|
[#1]
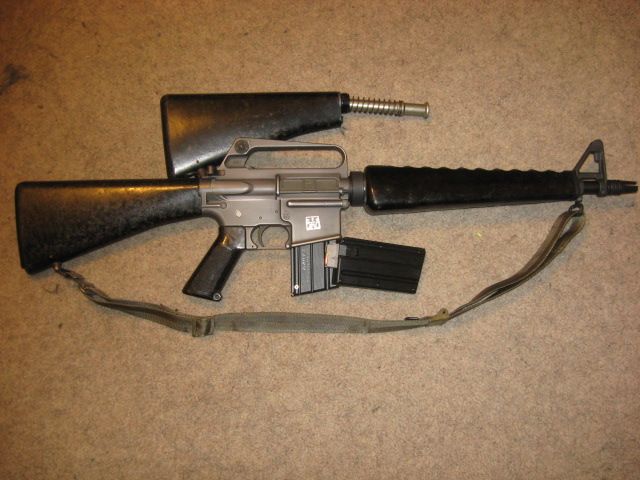
Yep, just finished one.


The hardest thing is taking the plunge. , after that it's knowing when to stop, I used a heavy file on the receiver and small parts, beat up the lip Of the Magwel with a hammer, and whacked the rest With a nail set. |
|
|
|
[#2]
I also put the stocks , receivers and small parts in a tool box and started shaking.
You will get done good small dings and scratches this way . I found for anodizing scotch brite works great , For norrells it's way to abrasive and. 0000 steel wool works better. Lately I added a worn port door I got from billbo And sanded the carrier with scotch brite 
Anyway this was my first time doing one , but I had so much fun At it i want to do another , maybe a 727.... |
|
|
|
[#3]
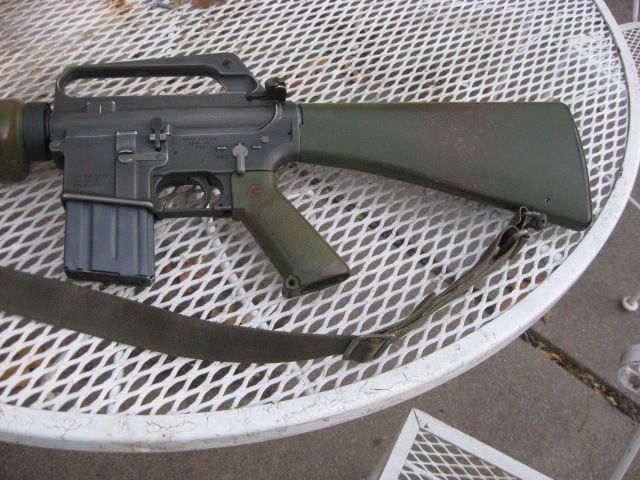
That looks great. Can I see the whole thing?
|
|
|
|
[#4]
Driveway.
Retro forum... RETRACTED |
|
|
|
[#5]
Kick it down the driveway a couple of times.
|
|
|
|
[#6]
Quoted:
That looks great. Can I see the whole thing? Sure, 


Mine is finished with norrells so it's a little more time consuming to distress . If you are starting with a anodized rifle, scotch brite is the way to go |
|
|
|
[#7]
I would love to see examples
|
|
|
|
[#8]
Sand paper, steel wool and a little bit of wire brush for this..........


|
|
|
|
[#9]
Is there a forum for how to do this? I am finding hard to pull the trigger on this.
|
|
|
|
[#10]
Quoted:
Is there a forum for how to do this? I am finding hard to pull the trigger on this. No forum. There's no science to it. Just do it. Seriously. It takes a lot more effort than you think. |
|
|
|
[#11]
I wonder what would happen if you put the receiver in a bag with some cut up scotch brite or sand paper pieces and ran it in the dryer for a little while with some cloths.
|
|
|
|
[#12]
Quoted:
I wonder what would happen if you put the receiver in a bag with some cut up scotch brite or sand paper pieces and ran it in the dryer for a little while with some cloths. i'd get yelled at by the SO. |
|
|
|
[#13]
Quoted:
i'd get yelled at by the SO. Quoted:
Quoted:
I wonder what would happen if you put the receiver in a bag with some cut up scotch brite or sand paper pieces and ran it in the dryer for a little while with some cloths. i'd get yelled at by the SO. Don't f' up your own dryer, that's what laundromats are for. |
|
|
|
[#14]
Quoted:
Don't f' up your own dryer, that's what laundromats are for. Quoted:
Quoted:
Quoted:
I wonder what would happen if you put the receiver in a bag with some cut up scotch brite or sand paper pieces and ran it in the dryer for a little while with some cloths. i'd get yelled at by the SO. Don't f' up your own dryer, that's what laundromats are for. lol, i can see it now. a print out from their surveillance camera of an arfcommer throwing lowers into dryers w/ a BANNED note across the top. |
|
|
|
[#15]
My plan is to buy an Aero precision lower, paint it grey and do this to match the upper. My only issue is trying to match the paint with the upper. I want it to look as close as possible.
|
|
|
|
[#16]
Quoted:
lol, i can see it now. a print out from their surveillance camera of an arfcommer throwing lowers into dryers w/ a BANNED note across the top. Quoted:
Quoted:
Quoted:
Quoted:
I wonder what would happen if you put the receiver in a bag with some cut up scotch brite or sand paper pieces and ran it in the dryer for a little while with some cloths. i'd get yelled at by the SO. Don't f' up your own dryer, that's what laundromats are for. lol, i can see it now. a print out from their surveillance camera of an arfcommer throwing lowers into dryers w/ a BANNED note across the top. LOL. Probably an even more grainy grey pic than the ones one the news asking, " Has anyone seen this suspect?" |
|
|
|
[#17]
When I purchased the 605 upper and XM lower from NDS a few years ago, I requested Mike apply a "used" or "battlefield pickup" look. This upper/lower is pictured on the NDS website offering this service. I applied the DOD acceptance stamp.
I originally built it using some nice black mottled furniture... 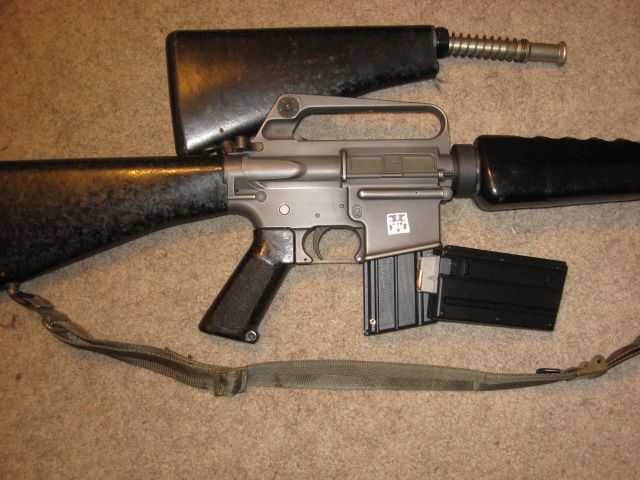
Currently with some of my repro distressed green over brown bakelite furniture... 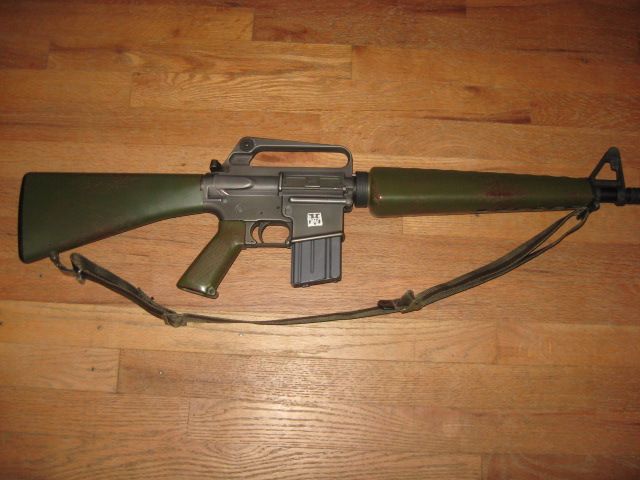

|
|
|
|
[#18]

Hows this? |
|
|
|
[#19]
BFPUing is fun. I used a myriad of various tools, rocks, abrasives to get the lower to match the upper on my GM.
|
|
|
|
[#20]
I hope JT posts his BFPU 601, that is one awesome rifle.
|
|
|
|
[#22]
Quoted:
Was this an 80% lower? Quoted:
Quoted:
Quoted:
That looks great. Can I see the whole thing? Sure, http://i1271.photobucket.com/albums/jj633/TRIMDAD/82DC9771-4E88-48E9-900B-6A855E6A9FE7.jpg http://i1271.photobucket.com/albums/jj633/TRIMDAD/951207DE-7041-4DD0-846F-EAA849197675.jpg http://i1271.photobucket.com/albums/jj633/TRIMDAD/4C85FB33-689B-4AED-8856-DB2D71F50091.jpg Mine is finished with norrells so it's a little more time consuming to distress . If you are starting with a anodized rifle, scotch brite is the way to go Yes sir. It's was a 80% from braceman |
|
|
|
[#23]
Quoted:
BFPUing is fun. I used a myriad of various tools, rocks, abrasives to get the lower to match the upper on my GM. http://i987.photobucket.com/albums/ae355/4mulaoneguy/Union%20Switch%20Slide/80d636a1-23b8-4d17-b7d0-c16cffc2e316_zpsfe4c89ea.jpg There are some awesome rifles in this thread, and the forum in general , But yours is one of my favorites. |
|
|
|
[#24]
The shiny new looking stocks and handguards don't look right with the stressed metal parts. I would think dragging it around would get a more natural look. Or take it camping/ hunting carry it around, drop it a few times throw it in and out of a pick up.
|
|
|
|
[#25]
Quoted:
The shiny new looking stocks and handguards don't look right with the stressed metal parts. I would think dragging it around would get a more natural look. Or take it camping/ hunting carry it around, drop it a few times throw it in and out of a pick up. I know you wandered in here, and don't want to discourage you, but shiny furniture belongs with BTDT finish. You need to do your homework on this. |
|
|
|
[#26]
Quoted:
I know you wandered in here, and don't want to discourage you, but shiny furniture belongs with BTDT finish. You need to do your homework on this. Quoted:
Quoted:
The shiny new looking stocks and handguards don't look right with the stressed metal parts. I would think dragging it around would get a more natural look. Or take it camping/ hunting carry it around, drop it a few times throw it in and out of a pick up. I know you wandered in here, and don't want to discourage you, but shiny furniture belongs with BTDT finish. You need to do your homework on this. You both have valid points, the furnature would look more authentic BFPU with scratches, nicks, gouges, taped up hand gaurds, etc. They do look a little too nice (blemish free) compared to the receivers. |
|
|
|
[#27]
Upper receiver is GI worn, the rest is my doing.
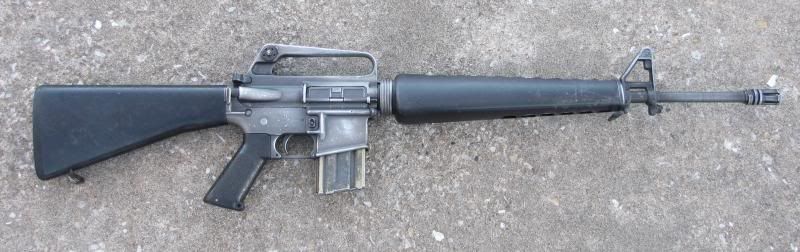
Started out as the rifle on top, except for the upper receiver & furniture. Those were switched with wore parts. 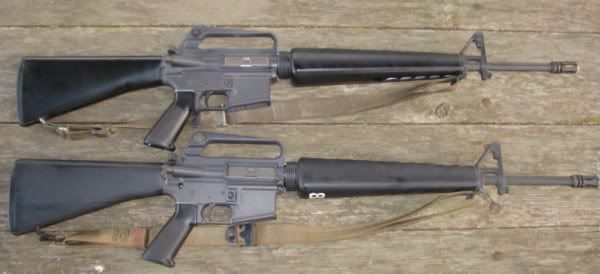
I used those green scotch brite pads, various grades of steel wool (with oil), & a lot of gumption to make the first mark. ETA: ...& some finer grade sandpaper with a little bit of oil |
|
|
|
[#28]
Now that looks excellent, would look really badass with some EB Green tape around the handguards but your furnature has just enough wear as it sits.
|
|
|
|
[#29]
Quoted:
You both have valid points, the furnature would look more authentic BFPU with scratches, nicks, gouges, taped up hand gaurds, etc. They do look a little too nice (blemish free) compared to the receivers. Quoted:
Quoted:
Quoted:
The shiny new looking stocks and handguards don't look right with the stressed metal parts. I would think dragging it around would get a more natural look. Or take it camping/ hunting carry it around, drop it a few times throw it in and out of a pick up. I know you wandered in here, and don't want to discourage you, but shiny furniture belongs with BTDT finish. You need to do your homework on this. You both have valid points, the furnature would look more authentic BFPU with scratches, nicks, gouges, taped up hand gaurds, etc. They do look a little too nice (blemish free) compared to the receivers. Agreed. I have since swapped the furniture out, now it matches better. Need a new pic of it, that one is pretty old. Still glossy tho. |
|
|
|
[#30]
Quoted:
You both have valid points, the furnature would look more authentic BFPU with scratches, nicks, gouges, taped up hand gaurds, etc. They do look a little too nice (blemish free) compared to the receivers. Quoted:
Quoted:
Quoted:
The shiny new looking stocks and handguards don't look right with the stressed metal parts. I would think dragging it around would get a more natural look. Or take it camping/ hunting carry it around, drop it a few times throw it in and out of a pick up. I know you wandered in here, and don't want to discourage you, but shiny furniture belongs with BTDT finish. You need to do your homework on this. You both have valid points, the furnature would look more authentic BFPU with scratches, nicks, gouges, taped up hand gaurds, etc. They do look a little too nice (blemish free) compared to the receivers. So all this milsurp, vintage, USED furniture people are using to build their rifles looks too new? The stuff that has the rack numbers on them from 40+ years of military use, is actually shiny from hard use and a billion harsh chemical cleanings, then bulk shipped across the world in giant crates, that stuff needs to be manually aged by us? 
|
|
|
|
[#31]
Love this thread. I wish there was a Battlefield pickup pic thread.
|
|
|
|
[#32]
Quoted:
BFPUing is fun. I used a myriad of various tools, rocks, abrasives to get the lower to match the upper on my GM. http://i987.photobucket.com/albums/ae355/4mulaoneguy/Union%20Switch%20Slide/80d636a1-23b8-4d17-b7d0-c16cffc2e316_zpsfe4c89ea.jpg That is great. Can you explain the process you used to get it like that? Was the lower the normal black color when it was new? Also, how weakened is the metal once you take off the finish? With the holes elongate? |
|
|
|
[#33]
Quoted:
That is great. Can you explain the process you used to get it like that? Was the lower the normal black color when it was new? Also, how weakened is the metal once you take off the finish? With the holes elongate? Quoted:
Quoted:
BFPUing is fun. I used a myriad of various tools, rocks, abrasives to get the lower to match the upper on my GM. http://i987.photobucket.com/albums/ae355/4mulaoneguy/Union%20Switch%20Slide/80d636a1-23b8-4d17-b7d0-c16cffc2e316_zpsfe4c89ea.jpg That is great. Can you explain the process you used to get it like that? Was the lower the normal black color when it was new? Also, how weakened is the metal once you take off the finish? With the holes elongate? I had my lower custom anodized by Victor @ USAnodizing. He basically does a 'flawed' die job, and the black dye wears easily down to the natural gold color of the anodizing. Finish is still there, so no worries on that, the finish is just worn. There were some runs of GM Hydramatics and early Colts that had finishes like this and wore down to gold/bronze. The upper on my GM is original finish. I am working on another GM that has original black finish, with a few wear spots that show gold. You can see all the details on my original GM parts in the "GM and H&R" sticky, HERE. You will also see an abundance of older USGI magazines that wear down from gray to gold colors, same deal. |
|
|
|
[#34]
Ok so if I have a new lower and I strip the finish off. Does this weaken the metal and the holes?
|
|
|
|
[#35]
Quoted:
I know you wandered in here, and don't want to discourage you, but shiny furniture belongs with BTDT finish. You need to do your homework on this. Quoted:
Quoted:
The shiny new looking stocks and handguards don't look right with the stressed metal parts. I would think dragging it around would get a more natural look. Or take it camping/ hunting carry it around, drop it a few times throw it in and out of a pick up. I know you wandered in here, and don't want to discourage you, but shiny furniture belongs with BTDT finish. You need to do your homework on this. Hello Morg, I have a question for you Sir in hopes you can help me with. I picked up a new set of original hand guards due to mine have more broken teeth/ribs than I wanted to deal with. They are actually a later style set and they have a flat chalk appearance. How would I go about getting them shined up like the ones pictured in the link? I do not want to paint as I feel the shine would be a fake look. While we are on furniture...... My stock over all is nice but has a small amount of molting, is it possible to get rid of the molting and match the shine of the hand guards? |
|
|
|
[#36]
Quoted:
Yep, just finished one. <a href="http://s1271.photobucket.com/user/TRIMDAD/media/8DCFE35C-85B8-4D4E-BADE-E7B2090FF9F9.jpg.html" target="_blank">http://i1271.photobucket.com/albums/jj633/TRIMDAD/8DCFE35C-85B8-4D4E-BADE-E7B2090FF9F9.jpg</a> <a href="http://s1271.photobucket.com/user/TRIMDAD/media/492A51FC-D697-44FC-99B5-448D26859588.jpg.html" target="_blank">http://i1271.photobucket.com/albums/jj633/TRIMDAD/492A51FC-D697-44FC-99B5-448D26859588.jpg</a> The hardest thing is taking the plunge. , after that it's knowing when to stop, I used a heavy file on the receiver and small parts, beat up the lip Of the Magwel with a hammer, and whacked the rest With a nail set. That engraving work is simply amazing!!! William |
|
|
|
[#37]
a little less artsy fartsy fake wear and a little more shooting.
|
|
|
|
[#38]
I've often wondered what would happen to a new lower if place in a vibratory cleaner [commonly called a "tumbler" for cleaning dirty cartridge cases] and let it run for a while.
But I've never had a reason to try for the battlefield pick-up look, so never tried it. |
|
|
|
[#39]
Quoted:
I've often wondered what would happen to a new lower if place in a vibratory cleaner [commonly called a "tumbler" for cleaning dirty cartridge cases] and let it run for a while. But I've never had a reason to try for the battlefield pick-up look, so never tried it. It wouldn't work. A tumbler would peel off finish evenly across the whole item, which is not how things wear in real life. ScrotchBrite is the ticket. It works amazingly well. Take your time and hit the high traffic areas. Google pics for inspiration. My part two was split the weapon in two, toss the pieces in a backpack with nothing else, and then take that thing everywhere, slinging it around, tossing in and out of the car, etc. That puts some real world scratches and dings on it as nature would intend. |
|
|
|
[#40]
Quoted:
Hello Morg, I have a question for you Sir in hopes you can help me with. I picked up a new set of original hand guards due to mine have more broken teeth/ribs than I wanted to deal with. They are actually a later style set and they have a flat chalk appearance. How would I go about getting them shined up like the ones pictured in the link? I do not want to paint as I feel the shine would be a fake look. While we are on furniture...... My stock over all is nice but has a small amount of molting, is it possible to get rid of the molting and match the shine of the hand guards? Quoted:
Quoted:
Quoted:
The shiny new looking stocks and handguards don't look right with the stressed metal parts. I would think dragging it around would get a more natural look. Or take it camping/ hunting carry it around, drop it a few times throw it in and out of a pick up. I know you wandered in here, and don't want to discourage you, but shiny furniture belongs with BTDT finish. You need to do your homework on this. Hello Morg, I have a question for you Sir in hopes you can help me with. I picked up a new set of original hand guards due to mine have more broken teeth/ribs than I wanted to deal with. They are actually a later style set and they have a flat chalk appearance. How would I go about getting them shined up like the ones pictured in the link? I do not want to paint as I feel the shine would be a fake look. While we are on furniture...... My stock over all is nice but has a small amount of molting, is it possible to get rid of the molting and match the shine of the hand guards? You could try Aluma-Hyde II in semi gloss black. I just did it on a test stock and it looks great |
|
|
|
[#41]
Quoted:
That engraving work is simply amazing!!! William Quoted:
Quoted:
Yep, just finished one. <a href="http://s1271.photobucket.com/user/TRIMDAD/media/8DCFE35C-85B8-4D4E-BADE-E7B2090FF9F9.jpg.html" target="_blank">http://i1271.photobucket.com/albums/jj633/TRIMDAD/8DCFE35C-85B8-4D4E-BADE-E7B2090FF9F9.jpg</a> <a href="http://s1271.photobucket.com/user/TRIMDAD/media/492A51FC-D697-44FC-99B5-448D26859588.jpg.html" target="_blank">http://i1271.photobucket.com/albums/jj633/TRIMDAD/492A51FC-D697-44FC-99B5-448D26859588.jpg</a> The hardest thing is taking the plunge. , after that it's knowing when to stop, I used a heavy file on the receiver and small parts, beat up the lip Of the Magwel with a hammer, and whacked the rest With a nail set. That engraving work is simply amazing!!! William Thank you sir , I can only take credit for writing tge check, The handiwork belongs to member Braceman. He is the goto for 80% lowers |
|
|
|
[#42]
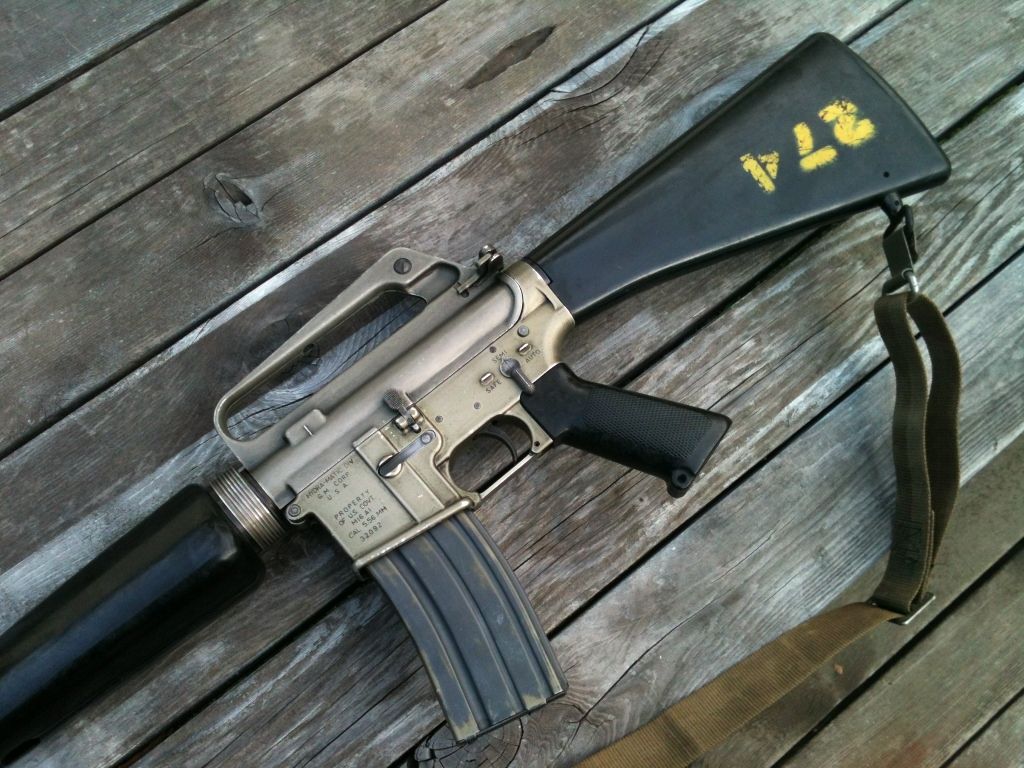
Some inspiration , I pulled these off the googles


|
|
|
|
[#43]
Quoted:
Some inspiration , I pulled these off the googles <a href="http://s1271.photobucket.com/user/TRIMDAD/media/4CC590B2-B747-424E-993D-DE1B374841E5.jpg.html" target="_blank">http://i1271.photobucket.com/albums/jj633/TRIMDAD/4CC590B2-B747-424E-993D-DE1B374841E5.jpg</a> <a href="http://s1271.photobucket.com/user/TRIMDAD/media/9DCF1FE7-703D-4778-996A-6EA3EF3B8DC8.jpg.html" target="_blank">http://i1271.photobucket.com/albums/jj633/TRIMDAD/9DCF1FE7-703D-4778-996A-6EA3EF3B8DC8.jpg</a> <a href="http://s1271.photobucket.com/user/TRIMDAD/media/92FC6522-86C2-48A0-93D8-0F0B0814747F.jpg.html" target="_blank">http://i1271.photobucket.com/albums/jj633/TRIMDAD/92FC6522-86C2-48A0-93D8-0F0B0814747F.jpg</a> Man that bottom receiver was rode hard and definetly put away wet, wonder how many rifles are still laying around Vietnam jungles with safeties off and a round in the chamber. |
|
|
|
[#44]
Getchasum,
How would I go about getting them shined up like the ones pictured in the link? Apologies Morg but I was bored. Most buff with polishing complound, rubbing compound then polishing compound if real dull and then wax with favorite car wax usually brings to a nice shine. The super cheap Scratch Out at Walmart works fine but requires a little more elbow grease. On the mottling / patina gonna have to re-finish to correct as sanding / buffing is only going to increase the mottling effect. Many do this to get the mottling effect. On a retro build many like the mottling patina as it adds a little character to an otherwise kinda plain finish. I've never used black dye but I believe the military used some type of dye probably toxic or have personally purchased surplus furniture that was obviously re-dyed at some point. Also seen a lot of JB weld or similar repairs on type D an earlier stocks without trap butt plate. Problem with dye is it could bleed on to you in right environment. Tan in a can! I've also had very good results painting with Fusion for plastic but from experience it doesn't strip back off worth a darn so if painting that stuff plan on it staying put. Matte worked good as it shined up nicely but not too shiney after cured. |
|
|
|
[#45]
I don't know much by the finish on lowers. Does the metal weaken if the finish is stripped?
|
|
|
|
[#46]
Hey guys I have a question too in addition to the above one. I was wondering if anybody has spray painted their receiver(s) with rustoleum dark grey primer (or anything of the sort) directly over the original black anodizing and then tried getting the BFPU look? I'm worried that the black will show through under the dark grey and look out of place.
To give a little extra background about my case is that I have a nice worn A1 upper from the LG outdoors kit and a PSA stealth lower that I had engraved but is black but I want to do something to get it to match the worn grey finish on the upper. I thought about doing sniper grey cerakote, moly resin, or this rustoleum dark grey primer. Just looking for some input since this seems like a good thread to ask. thanks guys! |
|
|
|
[#47]
3m makes a scotch brite on a roll lock wheel that would work
|
|
|
|
[#48]
Quoted:
Hey guys I have a question too in addition to the above one. I was wondering if anybody has spray painted their receiver(s) with rustoleum dark grey primer (or anything of the sort) directly over the original black anodizing and then tried getting the BFPU look? I'm worried that the black will show through under the dark grey and look out of place. To give a little extra background about my case is that I have a nice worn A1 upper from the LG outdoors kit and a PSA stealth lower that I had engraved but is black but I want to do something to get it to match the worn grey finish on the upper. I thought about doing sniper grey cerakote, moly resin, or this rustoleum dark grey primer. Just looking for some input since this seems like a good thread to ask. thanks guys! I shot norrels over black anodizing on my BFPU upper . Mainly because I didn't have the means to blast Of the anodizing , the problem came when I was sanding through the norrells to get the worn look,,, The black would show up . You will likely have this problem with anything you use. So I would have to sand the anodizing off in the spots that I planned to Sand the norrells, them re shoot the norrells and start over again. Otherwise you will sand through the primer, through the anodizing and you will see The " layers " . Best to blast the finish to the aluminum . |
|
|
|
[#49]
Quoted:
It wouldn't work. A tumbler would peel off finish evenly across the whole item, which is not how things wear in real life. ScrotchBrite is the ticket. It works amazingly well. Take your time and hit the high traffic areas. Google pics for inspiration. My part two was split the weapon in two, toss the pieces in a backpack with nothing else, and then take that thing everywhere, slinging it around, tossing in and out of the car, etc. That puts some real world scratches and dings on it as nature would intend. Quoted:
Quoted:
I've often wondered what would happen to a new lower if place in a vibratory cleaner [commonly called a "tumbler" for cleaning dirty cartridge cases] and let it run for a while. But I've never had a reason to try for the battlefield pick-up look, so never tried it. It wouldn't work. A tumbler would peel off finish evenly across the whole item, which is not how things wear in real life. ScrotchBrite is the ticket. It works amazingly well. Take your time and hit the high traffic areas. Google pics for inspiration. My part two was split the weapon in two, toss the pieces in a backpack with nothing else, and then take that thing everywhere, slinging it around, tossing in and out of the car, etc. That puts some real world scratches and dings on it as nature would intend. All right. Fair enough. But, have you TRIED it? |
|
|
|
[#50]
Quoted:
I shot norrels over black anodizing on my BFPU upper . Mainly because I didn't have the means to blast Of the anodizing , the problem came when I was sanding through the norrells to get the worn look,,, The black would show up . You will likely have this problem with anything you use. So I would have to sand the anodizing off in the spots that I planned to Sand the norrells, them re shoot the norrells and start over again. Otherwise you will sand through the primer, through the anodizing and you will see The " layers " . Best to blast the finish to the aluminum . Quoted:
Quoted:
Hey guys I have a question too in addition to the above one. I was wondering if anybody has spray painted their receiver(s) with rustoleum dark grey primer (or anything of the sort) directly over the original black anodizing and then tried getting the BFPU look? I'm worried that the black will show through under the dark grey and look out of place. To give a little extra background about my case is that I have a nice worn A1 upper from the LG outdoors kit and a PSA stealth lower that I had engraved but is black but I want to do something to get it to match the worn grey finish on the upper. I thought about doing sniper grey cerakote, moly resin, or this rustoleum dark grey primer. Just looking for some input since this seems like a good thread to ask. thanks guys! I shot norrels over black anodizing on my BFPU upper . Mainly because I didn't have the means to blast Of the anodizing , the problem came when I was sanding through the norrells to get the worn look,,, The black would show up . You will likely have this problem with anything you use. So I would have to sand the anodizing off in the spots that I planned to Sand the norrells, them re shoot the norrells and start over again. Otherwise you will sand through the primer, through the anodizing and you will see The " layers " . Best to blast the finish to the aluminum . Damn that sucks. Does anybody know if that guy victor at US Anodizing is still doing his thing? And if so does anybody know the cost of doing a lower? |
|
|
 Win a FREE Membership!
Sign up for the ARFCOM weekly newsletter and be entered to win a free ARFCOM membership. One new winner* is announced every week!
You will receive an email every Friday morning featuring the latest chatter from the hottest topics, breaking news surrounding legislation, as well as exclusive deals only available to ARFCOM email subscribers.

AR15.COM is the world's largest firearm community and is a gathering place for firearm enthusiasts of all types.
From hunters and military members, to competition shooters and general firearm enthusiasts, we welcome anyone who values and respects the way of the firearm.

Subscribe to our monthly Newsletter to receive firearm news, product discounts from your favorite Industry Partners, and more.
Copyright © 1996-2024 AR15.COM LLC. All Rights Reserved.
Any use of this content without express written consent is prohibited.
AR15.Com reserves the right to overwrite or replace any affiliate, commercial, or monetizable links, posted by users, with our own.


