CA, USA
|
[Last Edit: teerg22]
[#1]
Need a little help with my build.
How does the upper dust cover get installed? Are there pics? Does the c clip get installed between the dust cover and mounting holes? Thanks. |
|
|
MD, USA
|
[#2]
Is it just me, or is there a problem in the assembly order of the lower receiver? I tried your directions yesterday when replacing the fire control group (FCG) on my Bushmaster lower, and found that if you install the trigger/disconnector before installing the safety, then you can't slide the safety into the lower receiver. That caused me to have to remove the trigger/disconnector and hammer assemblies, and then reinstall them after installing the safety. That was no easy matter since my FCG pins fit very tightly.
I believe the correct procedure is to slide in the safety first, then install the trigger and disconnector by slipping the tail end of the trigger under the safety and then sliding the rest of the trigger assembly down into position and pinning it. The next step is to install the hammer group, followed by installing the safety detent, spring and pistol grip. If I am correct, I suggest you revise your post to reflect the correct procedure. If I am wrong, please tell me how you managed to get the safety to slide in once the trigger/disconnector is installed. |
|
|
|
[#3]
Originally Posted By jmorrell:
Is it just me, or is there a problem in the assembly order of the lower receiver? I tried your directions yesterday when replacing the fire control group (FCG) on my Bushmaster lower, and found that if you install the trigger/disconnector before installing the safety, then you can't slide the safety into the lower receiver. That caused me to have to remove the trigger/disconnector and hammer assemblies, and then reinstall them after installing the safety. That was no easy matter since my FCG pins fit very tightly. I believe the correct procedure is to slide in the safety first, then install the trigger and disconnector by slipping the tail end of the trigger under the safety and then sliding the rest of the trigger assembly down into position and pinning it. The next step is to install the hammer group, followed by installing the safety detent, spring and pistol grip. If I am correct, I suggest you revise your post to reflect the correct procedure. If I am wrong, please tell me how you managed to get the safety to slide in once the trigger/disconnector is installed. You are correct sir! |
|
|
|
|
[#4]
Originally Posted By teerg22:
Need a little help with my build. How does the upper dust cover get installed? Are there pics? Does the c clip get installed between the dust cover and mounting holes? Thanks. Install the C-Clip/E-Clip on the rod as far forward as possible; this keeps the rod from slipping out to the rear via the C/E-clip, and the barrel nut/slip-rings keep it from slipping out forward. |
|
|
|
|
[#5]
Originally Posted By silverstate55:
Originally Posted By jmorrell:
Is it just me, or is there a problem in the assembly order of the lower receiver? I tried your directions yesterday when replacing the fire control group (FCG) on my Bushmaster lower, and found that if you install the trigger/disconnector before installing the safety, then you can't slide the safety into the lower receiver. That caused me to have to remove the trigger/disconnector and hammer assemblies, and then reinstall them after installing the safety. That was no easy matter since my FCG pins fit very tightly. I believe the correct procedure is to slide in the safety first, then install the trigger and disconnector by slipping the tail end of the trigger under the safety and then sliding the rest of the trigger assembly down into position and pinning it. The next step is to install the hammer group, followed by installing the safety detent, spring and pistol grip. If I am correct, I suggest you revise your post to reflect the correct procedure. If I am wrong, please tell me how you managed to get the safety to slide in once the trigger/disconnector is installed. You are correct sir! No, not really. The instructions are correct... but you can also install it in the order mentioned above. It doesnt really matter. I suggest you watch the video. Simply cocking the hammer allows you to install the safety/selector. You dont have to remove anything. |
|
|
|
|
[Last Edit: Aufevermike]
[#6]
sorry internet connection acting up
|
|
|
|
|
[#7]
Hello......... My name is Mike and I'm an IDIOT.......... I have installed the triggerguard roll pin in the wrong side. I realized this after it wouldn't recess. now...... anyone have any ideas on how to remove it??????????
Thanx, you newbie AR15 idiot, Mike |
|
|
|
|
[#8]
Use the punch but be sure to support the ears of the lower; they break off easily if not supported. Use a piece of oak with the small hole to feed the roll pin in it
|
|
|
|
|
[#9]
Originally Posted By Aufevermike:
Hello......... My name is Mike and I'm an IDIOT.......... I have installed the triggerguard roll pin in the wrong side. I realized this after it wouldn't recess. now...... anyone have any ideas on how to remove it?????????? Thanx, you newbie AR15 idiot, Mike I am thinking you are going to have to dremel out carefully, the trigger guard and roll pin... then punch the remainder of the roll pin through, once the guard is out of the way. Going to have to be really steady on this. You could also use a hacksaw if you are careful. |
|
|
|
|
[#10]
I went through this section and have used it many times and would like to add something myself now!
I put together a Midwest Industries Free Float Mctar 20 (carbine rail) on my Stag upper today! This involves cutting off the delta ring. I questioned myself on doing this but with a dremel and a few minutes it is extremely easy! Here you go: here is the rifle with the old rail 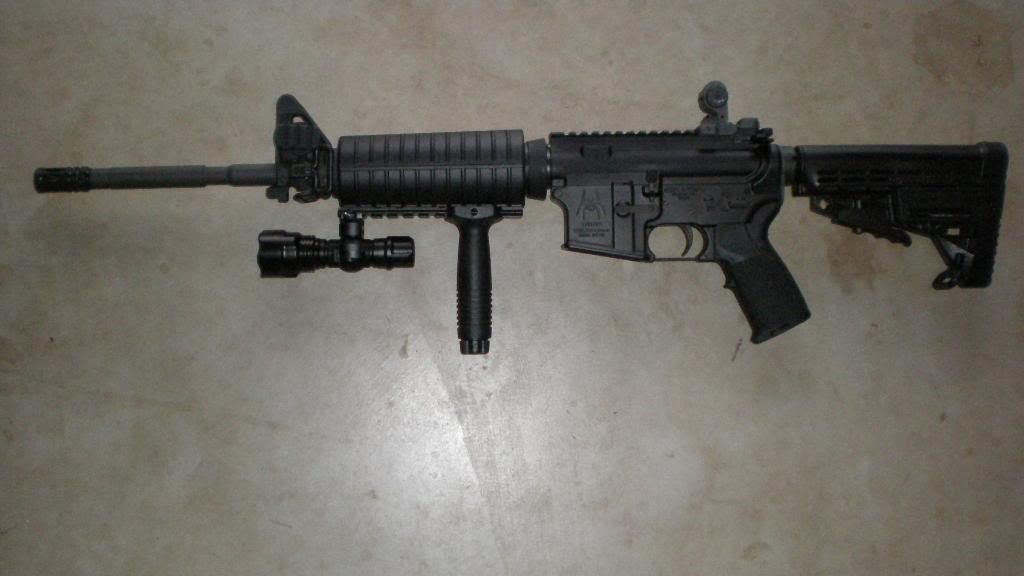 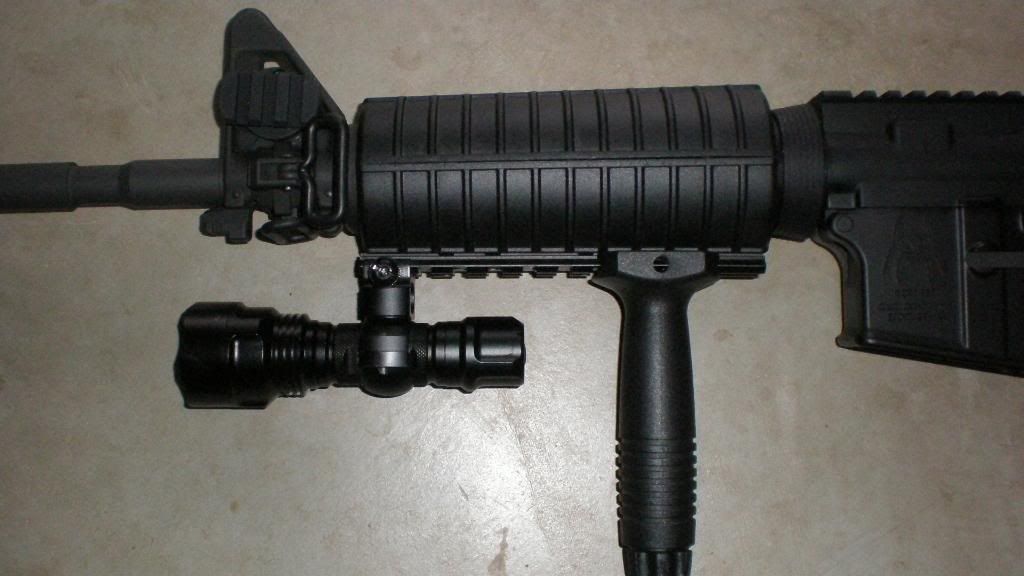 Here is the handguard parts laid out. 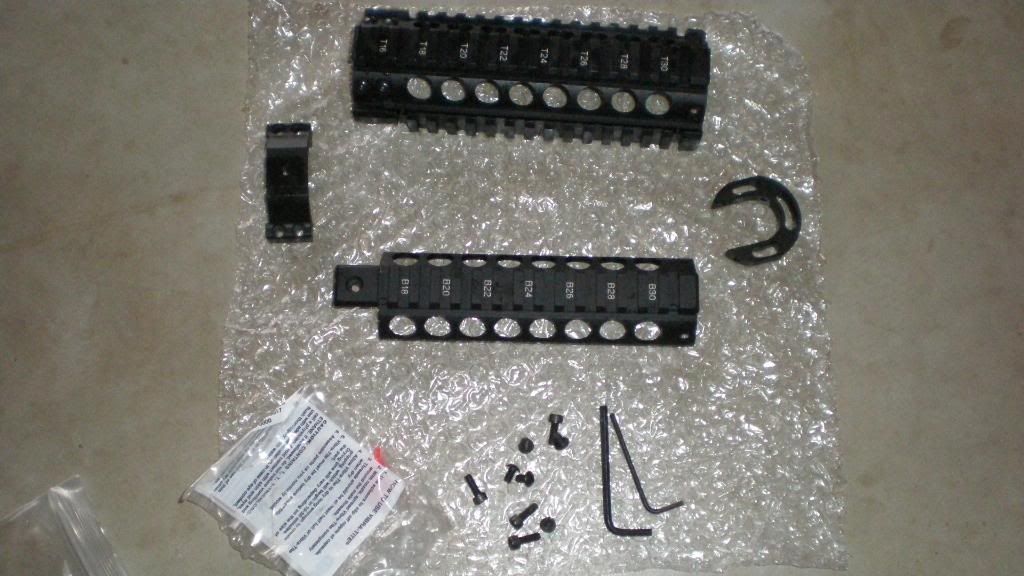 First, take off the old hanguards. 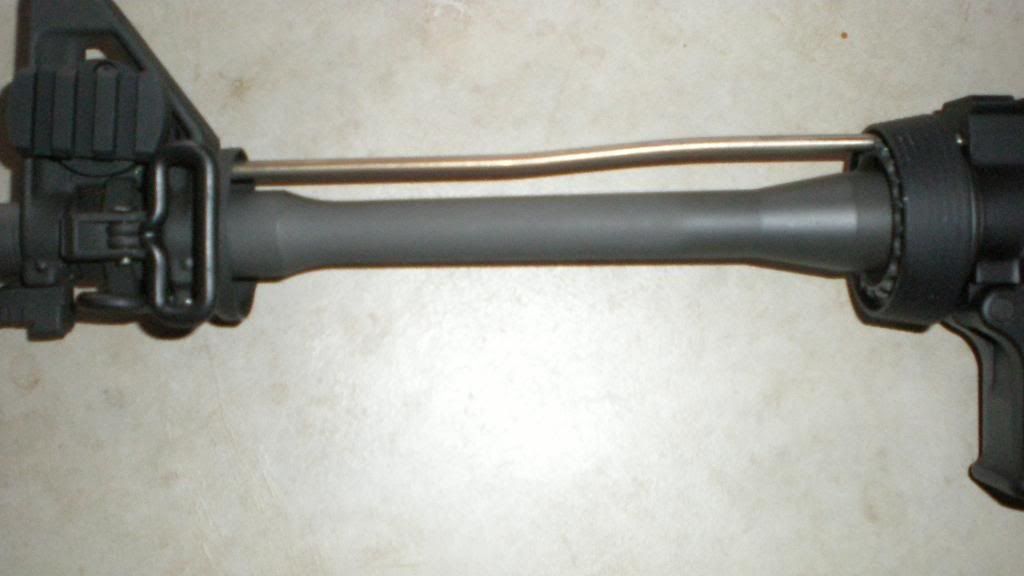 Next, tape up the areas around the delta ring. I also wrapped the gun with old shirts. you can use towels, or whatever works. this keeps most of the aluminum dust off the gun and saves you some cleaning time: 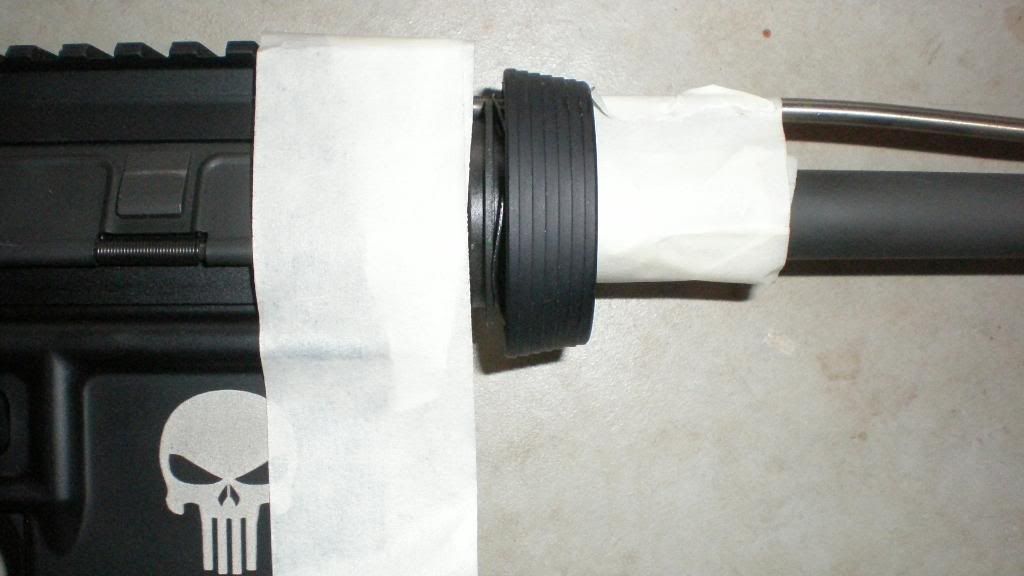 Now, with your dremel or other small cutting tool, cut the delta ring on both sides. The back and front both have some extra thickness to them. Go slow and take your time so you dont hit the barrel or anything else. Wear eye protection as you will have tiny bits of aluminum flying at you and will hurt your eyes!: 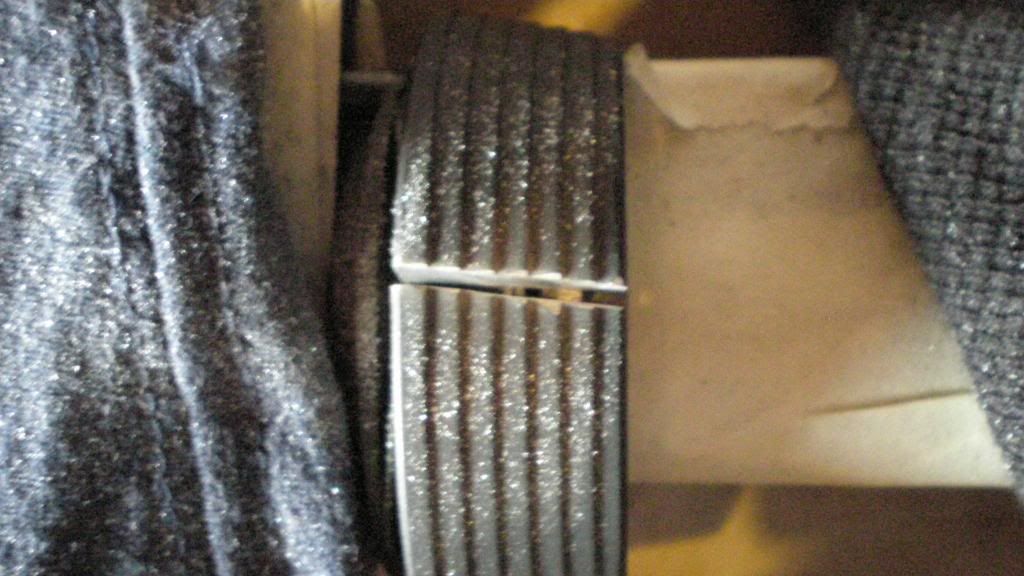 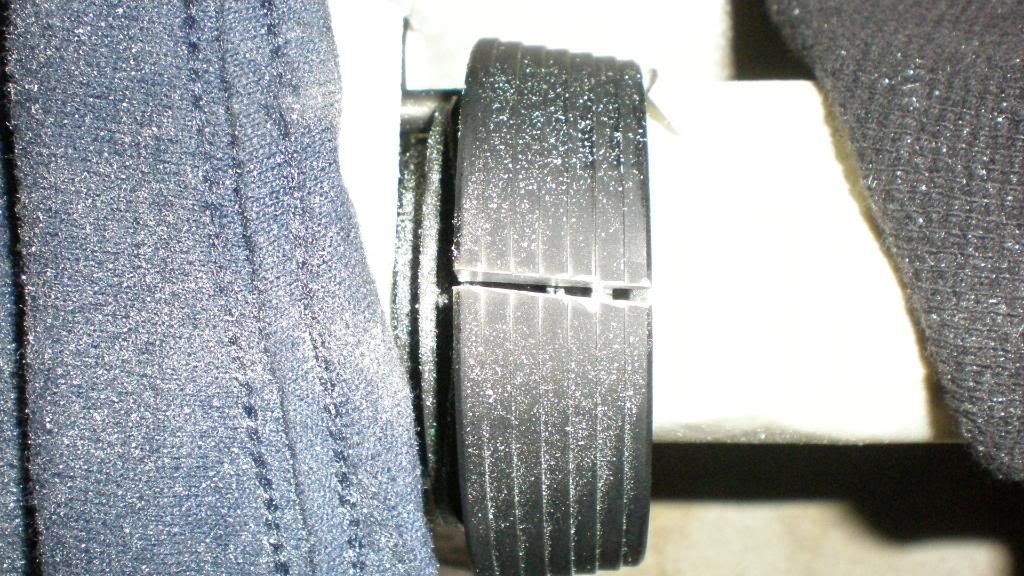 I didn't want to get too close to the barrel or the barrel nut with the dremel. The back (closest to the receiver) is easy to cut off but the front is very close to the barrel nut so I left just a touch of material remaining. Once I got both sides cut, I stuck a standard screwdriver into the cut and pulled down breaking the delta ring easily. I felt this was a bit safer! I used pliers to grab the weld spring and barrel snap ring. I ended up destroying the weld spring but the barrel snap spring was easy to get off...not that you would re use it, but if you wanted to you could: 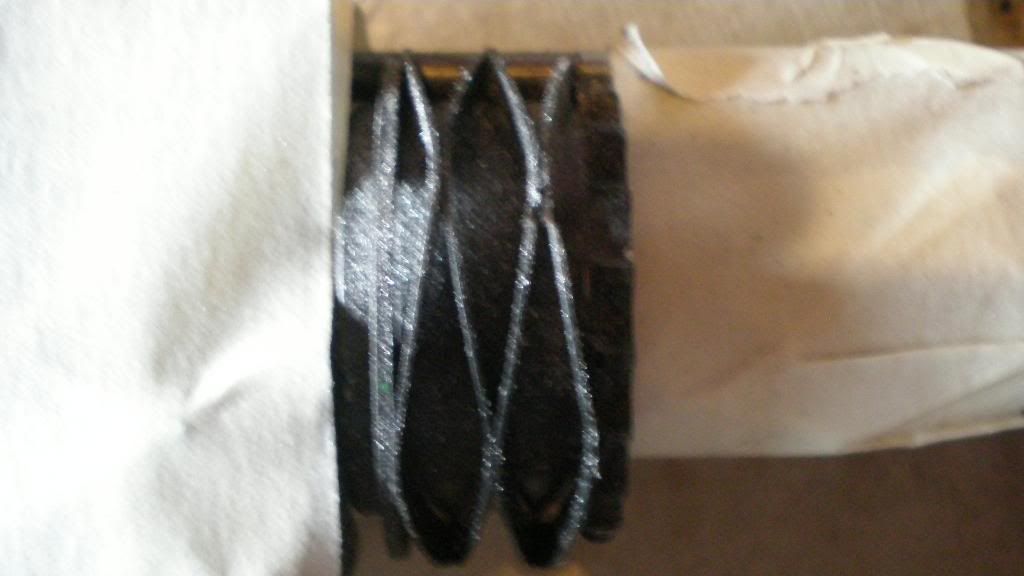 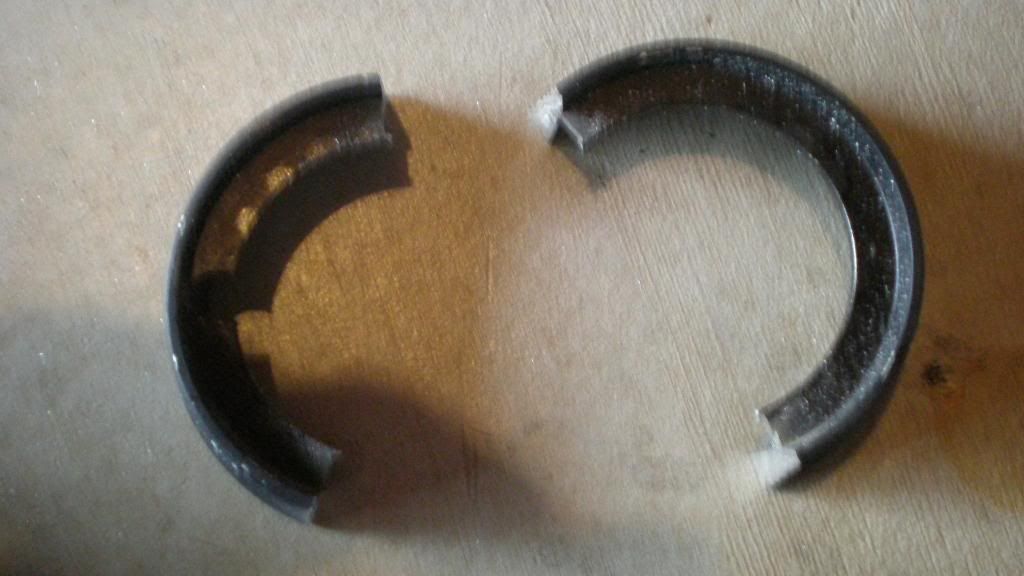 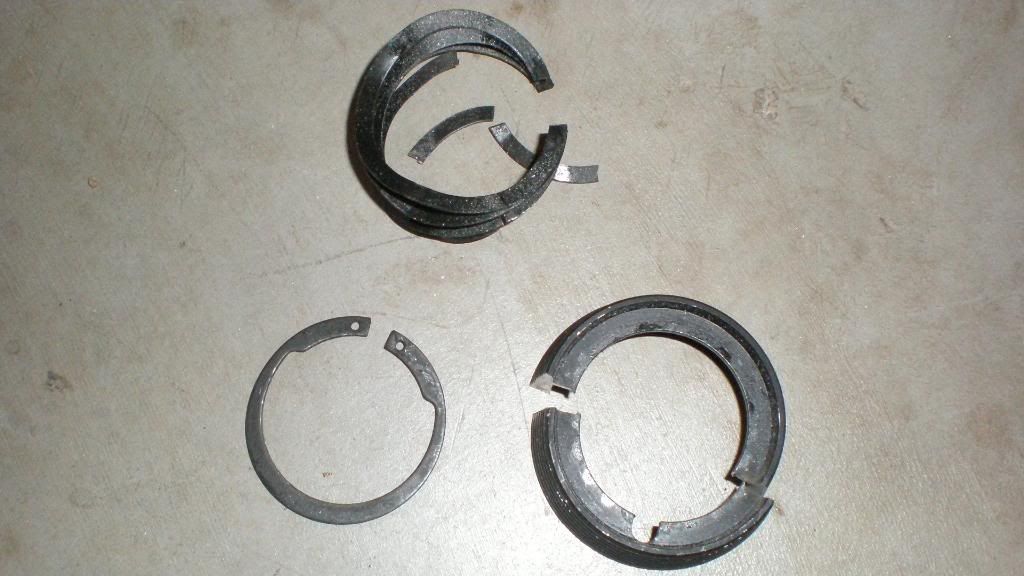 Your upper should now look like this: 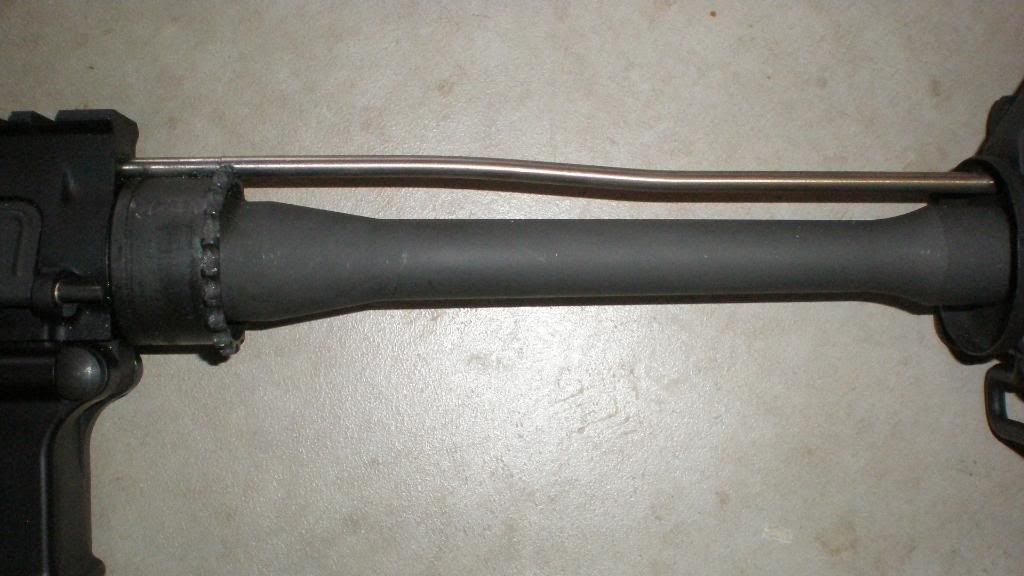 Now take the top half of the hanguard assembly and set it onto the barrel nut. there is a groove that in the rail that the barrel nut fits into. Then attach the bottom band and use the 4 supplied screws to attach it to the upper half. This piece also has a slot of the barrel nut and only fits one way. I suggest using a drop of locktite on each screw (locktite is included in the handguard assembly): 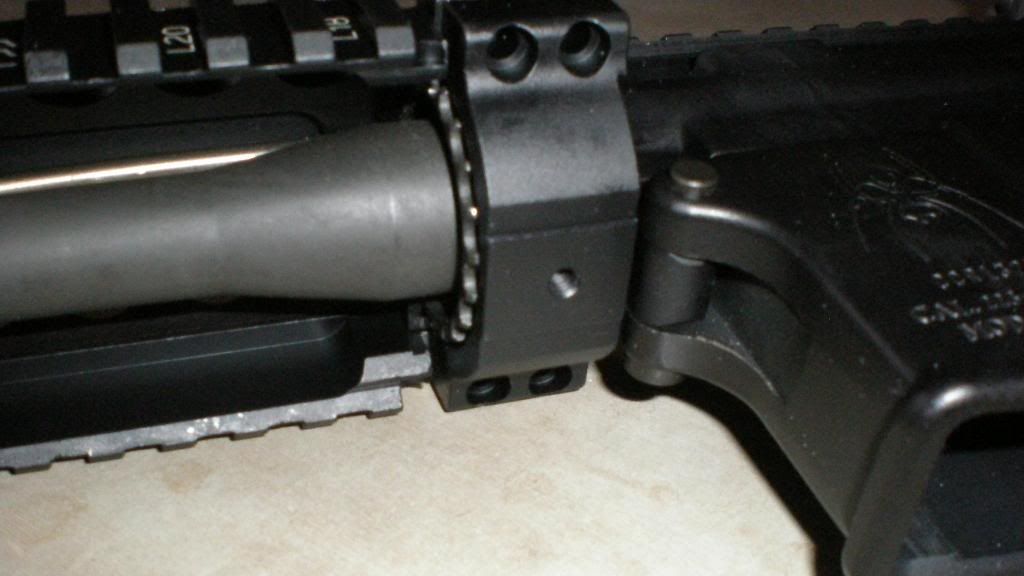 Now install the front ring piece of the rail. This piece just needs to line up. the open end should be facing up and surround the barrel. 2 of the smaller screws are required at this point and don't forget the locktite: 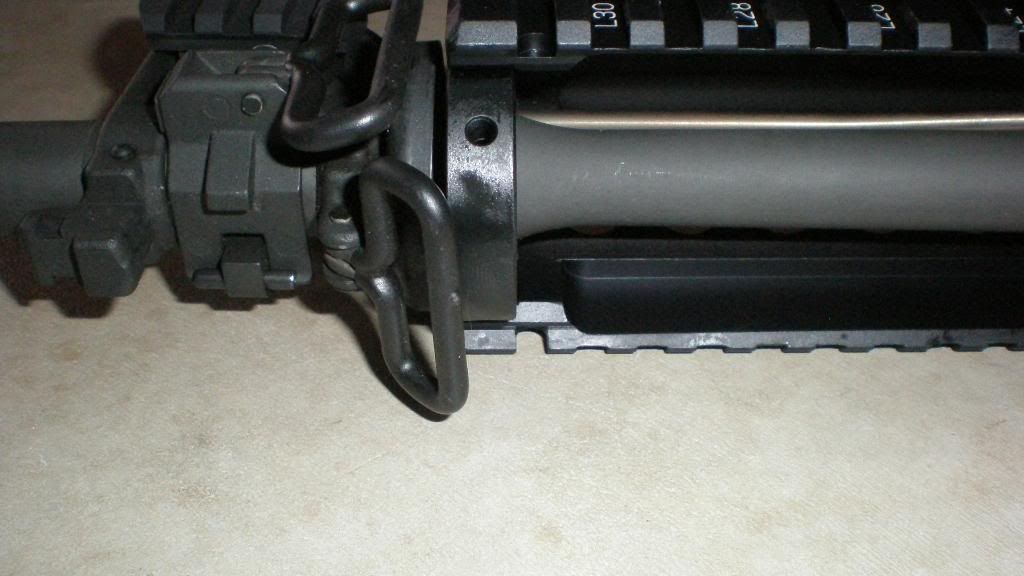 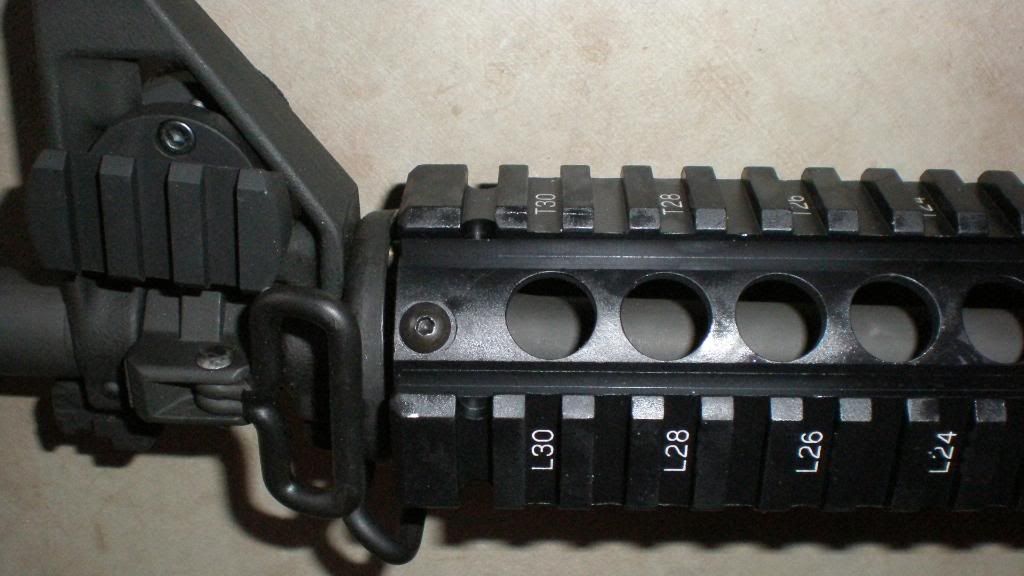 Take the bottom piece of the rail and install it to the front ring piece and the bottom band. Three small screws are required here (don't forget the locktite). Once you get those in place, you are all done!!! here is the finished product: 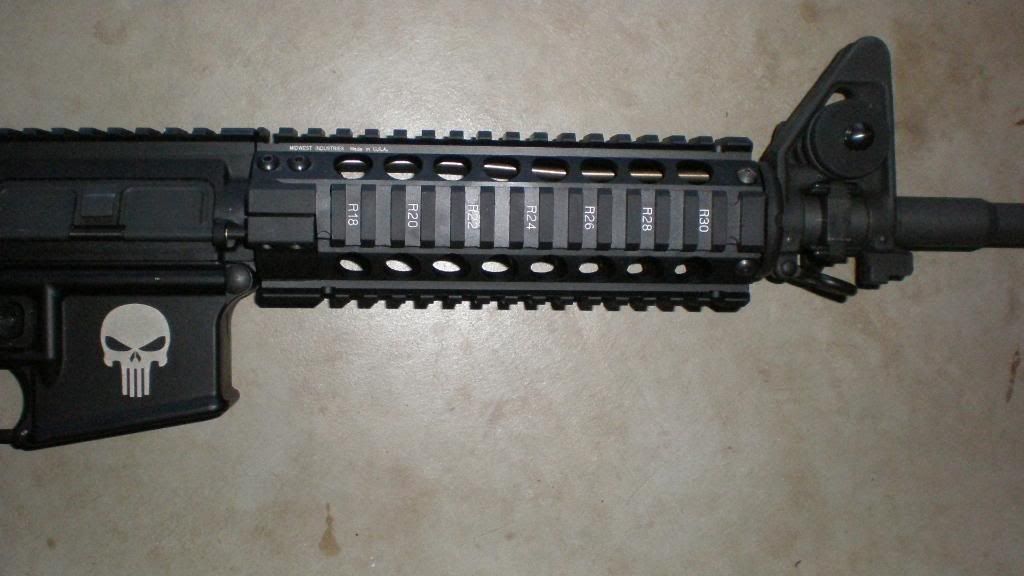 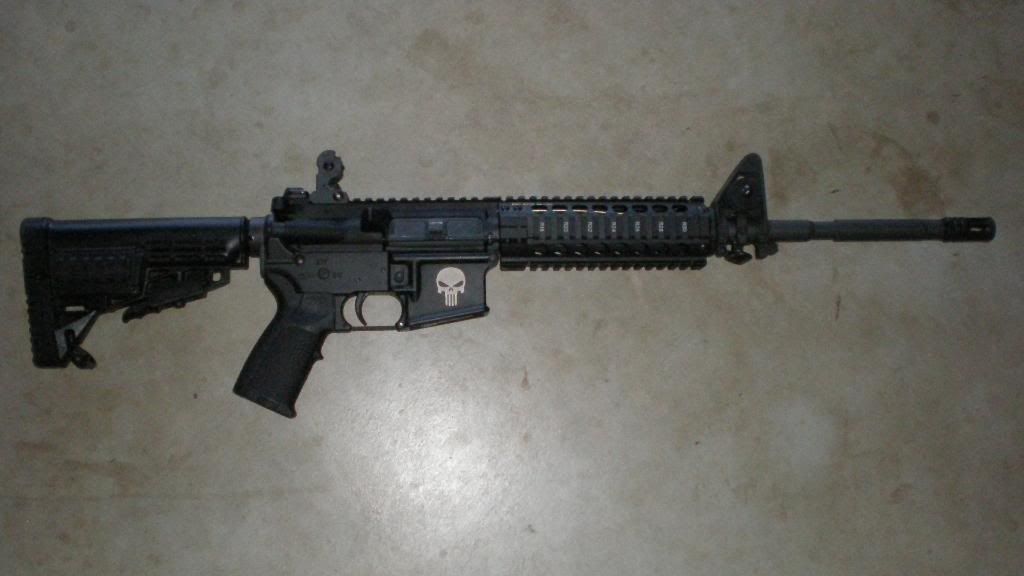 Hope this is helpful and saves some people some money. if you feel it saves you over $25, consider joining the site as it will save you a lot of money over time! If you felt this saved you more than that, consider joining both ar15.com and the NRA or other good pro-gun organization! Enjoy your new rail! |
|
|
|
CHE
|
[#11]
Thank you for this thread !
just build my 1st lower ! fingers in the nose ! |
|
|
OK, USA
|
[#12]
Thanks for the guide. I was able to put together my first lower!
|
|
|
|
[#13]
Thanks for the instructions and pics, I just put together my first lower receiver.
|
|
|
|
VA, USA
|
[#14]
Originally Posted By FALARAK:
Originally Posted By silverstate55:
Originally Posted By jmorrell:
Is it just me, or is there a problem in the assembly order of the lower receiver? I tried your directions yesterday when replacing the fire control group (FCG) on my Bushmaster lower, and found that if you install the trigger/disconnector before installing the safety, then you can't slide the safety into the lower receiver. That caused me to have to remove the trigger/disconnector and hammer assemblies, and then reinstall them after installing the safety. That was no easy matter since my FCG pins fit very tightly. I believe the correct procedure is to slide in the safety first, then install the trigger and disconnector by slipping the tail end of the trigger under the safety and then sliding the rest of the trigger assembly down into position and pinning it. The next step is to install the hammer group, followed by installing the safety detent, spring and pistol grip. If I am correct, I suggest you revise your post to reflect the correct procedure. If I am wrong, please tell me how you managed to get the safety to slide in once the trigger/disconnector is installed. You are correct sir! No, not really. The instructions are correct... but you can also install it in the order mentioned above. It doesnt really matter. I suggest you watch the video. Simply cocking the hammer allows you to install the safety/selector. You dont have to remove anything. I am with the OP on this as my safety selector is encountering the resistance if the tail end of the trigger. The selector cannot go straight through. |
|
|
OR, USA
|
[#15]
My first Lower.
Started at 11:18am ................ finished at 12:20am (didn't use the vise grips at all) Thanks for this great thread !! http://i150.photobucket.com/albums/s102/qwertyuioplkj_2007/AR%20Stuff/lowerstart2-20-09.jpg http://i150.photobucket.com/albums/s102/qwertyuioplkj_2007/AR%20Stuff/lowercomplete2-20-09.jpg |
|
|
|
[#16]
Phil |
|
|
|
|
[#17]
Originally Posted By FALARAK:
Assemble your own AR15 rifle from parts.... for dummies. FALARAK, Dude, you realize this thread is approaching 1,000,000 views? (Yep, one million) Not that is what I call making a contribution to the site. Nice job. [tips cap] |
|
|
|
OR, USA
|
[#18]
Awesome
|
|
|
TN, USA
|
[#19]
Thanks to everyone who created this thread. This is the best how-to thread I have ever seen on ANY website.

|
|
|
CO, USA
|
[#20]
I put a new LaRue Tactical forend on my Bushmaster over the weekend. Driving the pins out of the gas block was EXTREMELY difficult. After bending my brass drift, I moved on to a steel punch. This did aboslutely no good, so I moved on to a 15-ton press. This worked great, but was very difficult as I had to rig up a jig to support the gas block and keep it from rotating as pressure was applied. The OP stated he had to cut off a the gas block of a particularly tough Bushmaster because he couldn't get the pins out. I didn't have to go that far, but it was close! Fair warning, apparently Bushmaster does a fantastic job of inserting those pins. If you are going to remove them, be prepared for a challenge!
|
|
|
CA, USA
|
[#21]
THANKS TO THIS THREAD I JUST FINISHED MY FRIST LPK. I WAS VERY EASY, I
THINK THIS THREAD IS ONE OF THE MOST HELPFUL FOR A NEW GUY LIKE MYSELF. NOW I JUST NEED MY UPPER 
|
|
|
|
[#22]
Originally Posted By bowtie454: ... Driving the pins out of the gas block was EXTREMELY difficult. After bending my brass drift, I moved on to a steel punch. This did aboslutely no good, so I moved on to a 15-ton press... What side were you tapping them out from? Jeezle-Peezle! A 15 ton press? Were they welded? |
|
|
|
|
[Last Edit: FALARAK]
[#23]
Originally Posted By EarlBypass:
Originally Posted By bowtie454:
... Driving the pins out of the gas block was EXTREMELY difficult. After bending my brass drift, I moved on to a steel punch. This did aboslutely no good, so I moved on to a 15-ton press... What side were you tapping them out from? Jeezle-Peezle! A 15 ton press? Were they welded? Some of the bushies are rough. Stags are worse. None take a 15 ton press... Randall at AR15barrels made a cool simple jig that used a vice - he popped them out like nobody's business. I use a 3LB sledge, and a steel punch, and a Brownells polymer jig, and I still often have to hit them 30 times. It is my LEAST favorite part of working on an upper. I LOVE working on RRA's with their straight pins... that's for sure. |
|
|
|
AL, USA
|
[#24]
For my first post I'd like to start off by thanking you guys for the wealth of information in this thread. I put my first lower together last week in a little over an hour (hungover as hell too haha). Used the vise grip method even though I had punches on standby I wanted to try the grips as I assumed I'd have less of a chance of marring the receiver. got her all put together and it looks and functions flawlessly. I can't wait to get the rest of it together and hit the range. Thanks again!
|
|
|
USA
|
[#25]
I just received my LMT DI last week. I want to free float my barrel with either a Larue 7" or 9" rail system. I'm debating whether or not to cut off my front sight post and purchase a flip-up sight or just leave it on there and install the 7" rail. Do you guys know if there is much accuracy gained from cutting off the front sight post?
|
|
|
|
[#26]
There is no accuracy gained from removing a front sight base.
(The front sight "post" is actually the small screw-in sight, that threads into the FSB. It simply is a matter of choice.... leave the FSB in place, use a 7" rail, or remove it, use a gas block, and a longer rail that covers it. If anything, there is an accuracy potential loss, when using a flip-up sight mounted on the rail. Rail mounted front sights are general backup sights, because there is more potential for barrel shift in relation to the rail mounted sight, than the barrel mounted sight. Either will be fairly negligible. The quality and accuracy potential of the barrel will have the most significant impact. |
|
|
|
USA
|
[#27]
Originally Posted By sniper7:
I went through this section and have used it many times and would like to add something myself now! I put together a Midwest Industries Free Float Mctar 20 (carbine rail) on my Stag upper today! This involves cutting off the delta ring. I questioned myself on doing this but with a dremel and a few minutes it is extremely easy! Here you go: here is the rifle with the old rail http://i148.photobucket.com/albums/s10/jdean23_photos/My%20Guns/MIMctar20FFrailinstall1.jpg http://i148.photobucket.com/albums/s10/jdean23_photos/My%20Guns/MIMctar20FFrailinstall2.jpg Here is the handguard parts laid out. http://i148.photobucket.com/albums/s10/jdean23_photos/My%20Guns/MIMctar20FFrailinstall3.jpg First, take off the old hanguards. http://i148.photobucket.com/albums/s10/jdean23_photos/My%20Guns/MIMctar20FFrailinstall4.jpg Next, tape up the areas around the delta ring. I also wrapped the gun with old shirts. you can use towels, or whatever works. this keeps most of the aluminum dust off the gun and saves you some cleaning time: http://i148.photobucket.com/albums/s10/jdean23_photos/My%20Guns/MIMctar20FFrailinstall5.jpg Now, with your dremel or other small cutting tool, cut the delta ring on both sides. The back and front both have some extra thickness to them. Go slow and take your time so you dont hit the barrel or anything else. Wear eye protection as you will have tiny bits of aluminum flying at you and will hurt your eyes!: http://i148.photobucket.com/albums/s10/jdean23_photos/My%20Guns/MIMctar20FFrailinstall7.jpg http://i148.photobucket.com/albums/s10/jdean23_photos/My%20Guns/MIMctar20FFrailinstall6.jpg I didn't want to get too close to the barrel or the barrel nut with the dremel. The back (closest to the receiver) is easy to cut off but the front is very close to the barrel nut so I left just a touch of material remaining. Once I got both sides cut, I stuck a standard screwdriver into the cut and pulled down breaking the delta ring easily. I felt this was a bit safer! I used pliers to grab the weld spring and barrel snap ring. I ended up destroying the weld spring but the barrel snap spring was easy to get off...not that you would re use it, but if you wanted to you could: http://i148.photobucket.com/albums/s10/jdean23_photos/My%20Guns/MIMctar20FFrailinstall8.jpg http://i148.photobucket.com/albums/s10/jdean23_photos/My%20Guns/MIMctar20FFrailinstall9.jpg http://i148.photobucket.com/albums/s10/jdean23_photos/My%20Guns/MIMctar20FFrailinstall11.jpg Your upper should now look like this: http://i148.photobucket.com/albums/s10/jdean23_photos/My%20Guns/MIMctar20FFrailinstall10.jpg Now take the top half of the hanguard assembly and set it onto the barrel nut. there is a groove that in the rail that the barrel nut fits into. Then attach the bottom band and use the 4 supplied screws to attach it to the upper half. This piece also has a slot of the barrel nut and only fits one way. I suggest using a drop of locktite on each screw (locktite is included in the handguard assembly): http://i148.photobucket.com/albums/s10/jdean23_photos/My%20Guns/MIMctar20FFrailinstall14.jpg Now install the front ring piece of the rail. This piece just needs to line up. the open end should be facing up and surround the barrel. 2 of the smaller screws are required at this point and don't forget the locktite: http://i148.photobucket.com/albums/s10/jdean23_photos/My%20Guns/MIMctar20FFrailinstall12.jpg http://i148.photobucket.com/albums/s10/jdean23_photos/My%20Guns/MIMctar20FFrailinstall13.jpg Take the bottom piece of the rail and install it to the front ring piece and the bottom band. Three small screws are required here (don't forget the locktite). Once you get those in place, you are all done!!! here is the finished product: http://i148.photobucket.com/albums/s10/jdean23_photos/My%20Guns/MIMctar20FFrailinstall16.jpg http://i148.photobucket.com/albums/s10/jdean23_photos/My%20Guns/MIMctar20FFrailinstall15.jpg Hope this is helpful and saves some people some money. if you feel it saves you over $25, consider joining the site as it will save you a lot of money over time! If you felt this saved you more than that, consider joining both ar15.com and the NRA or other good pro-gun organization! Enjoy your new rail! Masking tape and paper, brilliant! I just went at it with a dremel and got shaving all over the place and it took a long time to make sure it was all cleaned out. |
|
|
NY, USA
|
[#28]
I laid a piece of thin cardboard over the pivot hole with, lined up the detent and rode it in with the pivot pin. Took about 30 seconds.
|
|
|
TX, USA
|
[#29]
I am soon going to pick up a Magpul CTR kit I am not seeing a castle nut listed with the kit, do I just Loktite the reciever tube in place where it captures the buffer retainer?, also on my other lower I will install a PRS stock does the rifle length receiver tube need loktite ?
|
|
|
|
[#30]
just did my first lower build....pretty damn simple, but I was so freakn excited and rushed it. Got a few nicks here and there, oh well.
|
|
|
|
NJ, USA
|
[#31]
Thanks for the step by step instructions. They made everything crystal clear. Just finished my first build and hope to build a few more. Thanks again.
|
|
|
|
[#32]
Originally Posted By rick458:
I am soon going to pick up a Magpul CTR kit I am not seeing a castle nut listed with the kit, do I just Loktite the reciever tube in place where it captures the buffer retainer?, also on my other lower I will install a PRS stock does the rifle length receiver tube need loktite ? I just followed these instructions with a Magpul CTR kit... It includes the castle nut for locking everything down. The step-by-step helped a lot, I just had to back track on one step to swap the safety spring for the rear take-down pin spring. They are the same length but different diameters. |
|
|
|
LA, USA
|
[#33]
I have a few AR's but this is the first time I hade to roll my own. I had the lower together in about 45 min. I used the vise grips instead of the punches. It worked great, no marks on my lower at all. By the way it is an EA lower with DPMS LPK.
|
|
|
FL, USA
|
[#34]
thanks guys this thread helped alot. I just got done building my first lower in about 45 minutes. just put some tape on the end of a set of channel locks and didnt get any nicks really. Was easier than I thought
|
|
|
AZ, USA
|
[#35]
What happened to all the pictures in this thread? Anyone have more current links?
Thanks, Sean |
|
|
|
[#36]
Originally Posted By SeanK1ng:
What happened to all the pictures in this thread? Anyone have more current links? Thanks, Sean They're all working for me. Are you surfing from work? |
|
|
|
GA, USA
|
[#37]
Anyone know where I can find info on assembling the upper receiver - in particular I am looking for info on how to install the fwd assist and dust cover.
Thanks! |
|
|
PA, USA
|
[#38]
Just built a Spikes lower with RRA and 2 stage trigger and everything went together great. Put it together while watching Rescue Me.
|
|
|
MT, USA
|
[#39]
Somebody PLEASE, PLEASE do a instructional on putting together an upper from a stripped upper receiver.
I'm wanting to do an SPR build. Planning on a barrel from CLE with matching bolt. I have questions about how the barrel goes on. Yes, I've looked through the part about CHANGING a barrel, but there's nothing about building one from scratch. Does the barrel from CLE, or any manufacturer for that matter come with a barrel extension, or do you have to buy one separately? Any work that needs to be done on the feed-ramps? I seem to recall a thread about this somewhere on here but haven't been able to find it again. I assume headspace won't be an issue with a fitted/matched bolt, but then again I could be wrong. It really would be nice to see a pictorial of a build from the ground up using custom parts instead of just buying a complete upper from a particular vendor. Thanks. |
|
|
|
[Last Edit: FALARAK]
[#40]
Originally Posted By FAB-10_Guy:
Somebody PLEASE, PLEASE do a instructional on putting together an upper from a stripped upper receiver. I will be happy to if someone will send me a stripped upper and a parts kit. I'm wanting to do an SPR build. Planning on a barrel from CLE with matching bolt. I have questions about how the barrel goes on. Yes, I've looked through the part about CHANGING a barrel, but there's nothing about building one from scratch. Does the barrel from CLE, or any manufacturer for that matter come with a barrel extension, or do you have to buy one separately?
Barrel extensions are ALWAYS installed by the manufacturer. Only gunsmiths would order a barrel blank without the extension. The final manufacturing stages are installing the barrel extension to spec, installing the alignment pin, drilling the gas port in line with the alignment pin, finish reaming for the chamber, and coating the barrel. All you need to know on installing a barrel is covered in the barrel change instructions. Any work that needs to be done on the feed-ramps?
No. I seem to recall a thread about this somewhere on here but haven't been able to find it again. I assume headspace won't be an issue with a fitted/matched bolt, but then again I could be wrong. It really would be nice to see a pictorial of a build from the ground up using custom parts instead of just buying a complete upper from a particular vendor. Thanks.
Many complete rifles were assembled from parts in this thread. The stripped upper recevier is basiucally the only thing that isnt covered here - because it is essentially self explanatory. You should be able to find instructions for assembly in the tech manual. |
|
|
|
MT, USA
|
[#41]
Thanks, FALARAK. This is very helpful. And thanks for putting up with all the noob questions.
|
|
|
TX, USA
|
[#42]
I assembled My Spikes lower with A RRA LPK no issues at all save for the fact my Carbine length action spring was NOT in my Magpul CTR kit.
I used red wheel bearing grease on the roll pins some painters tape and a pair of 430 channel locks Function checks A OK and everything. now on to the upper |
|
|
|
[Last Edit: USMC88-93]
[#43]
If you remove the pistol grip and the safety selector detent and spring does the safety selector just push out the side?
|
|
|
|
|
[Last Edit: FALARAK]
[#44]
Originally Posted By USMC88-93:
If you remove the pistol grip ans d the safety selector detent and spring does the safety selector just push out the side? As long as the hammer is cocked, in every build I have ever done - Yes. Some have reported trouble - and had to remove the hammer and trigger first... apparently. I never have..... as long as you cock the hammer first, the selector comes right out. See the video in the lower assembly post... and you can see him inserting the selector as one of the last steps. |
|
|
|
WV, USA
|
[#45]
Had a quick question i was wondering if i could get some help with...am working on converting an A2 style to a flat top...was an armorer in the army, but that was a few years ago and i am not spun up on the manufacturers and their quality...i know that Cerro Forge has a key hole on their upper receivers and that is it...i am looking at getting on off of gunbroker....but before i came across that i was planning on ordering a white oak armament...the white oak is cheaper and everyone seems to love their stuff...but i would have to wait 14-22 weeks for it....the Cerro Forge is mil spec and i can have it within a week or two, but its about 25 more...i am not in a great hurry becasue i have one functional m4 and this is for an oly arms i picked up lately at a gun show...i guess my question is (since i am not in a hurry) is the cerro forge upper comparable to the white oak armament? if so then its time to go shopping...thanks for your time
|
|
|
|
[#46]
Thank you arfcom for this thread. Helped me put together my first lower build without a hitch. Then it helped me again to tear down an upper barrel assembly to fix a canted fsb...I am not worthy.
|
|
|
|
|
[#47]
Originally Posted By fmfcorpsman: Originally Posted By sniper7: I went through this section and have used it many times and would like to add something myself now! I put together a Midwest Industries Free Float Mctar 20 (carbine rail) on my Stag upper today! This involves cutting off the delta ring. I questioned myself on doing this but with a dremel and a few minutes it is extremely easy! Here you go: here is the rifle with the old rail http://i148.photobucket.com/albums/s10/jdean23_photos/My%20Guns/MIMctar20FFrailinstall1.jpg http://i148.photobucket.com/albums/s10/jdean23_photos/My%20Guns/MIMctar20FFrailinstall2.jpg Here is the handguard parts laid out. http://i148.photobucket.com/albums/s10/jdean23_photos/My%20Guns/MIMctar20FFrailinstall3.jpg First, take off the old hanguards. http://i148.photobucket.com/albums/s10/jdean23_photos/My%20Guns/MIMctar20FFrailinstall4.jpg Next, tape up the areas around the delta ring. I also wrapped the gun with old shirts. you can use towels, or whatever works. this keeps most of the aluminum dust off the gun and saves you some cleaning time: http://i148.photobucket.com/albums/s10/jdean23_photos/My%20Guns/MIMctar20FFrailinstall5.jpg Now, with your dremel or other small cutting tool, cut the delta ring on both sides. The back and front both have some extra thickness to them. Go slow and take your time so you dont hit the barrel or anything else. Wear eye protection as you will have tiny bits of aluminum flying at you and will hurt your eyes!: http://i148.photobucket.com/albums/s10/jdean23_photos/My%20Guns/MIMctar20FFrailinstall7.jpg http://i148.photobucket.com/albums/s10/jdean23_photos/My%20Guns/MIMctar20FFrailinstall6.jpg I didn't want to get too close to the barrel or the barrel nut with the dremel. The back (closest to the receiver) is easy to cut off but the front is very close to the barrel nut so I left just a touch of material remaining. Once I got both sides cut, I stuck a standard screwdriver into the cut and pulled down breaking the delta ring easily. I felt this was a bit safer! I used pliers to grab the weld spring and barrel snap ring. I ended up destroying the weld spring but the barrel snap spring was easy to get off...not that you would re use it, but if you wanted to you could: http://i148.photobucket.com/albums/s10/jdean23_photos/My%20Guns/MIMctar20FFrailinstall8.jpg http://i148.photobucket.com/albums/s10/jdean23_photos/My%20Guns/MIMctar20FFrailinstall9.jpg http://i148.photobucket.com/albums/s10/jdean23_photos/My%20Guns/MIMctar20FFrailinstall11.jpg Your upper should now look like this: http://i148.photobucket.com/albums/s10/jdean23_photos/My%20Guns/MIMctar20FFrailinstall10.jpg Now take the top half of the hanguard assembly and set it onto the barrel nut. there is a groove that in the rail that the barrel nut fits into. Then attach the bottom band and use the 4 supplied screws to attach it to the upper half. This piece also has a slot of the barrel nut and only fits one way. I suggest using a drop of locktite on each screw (locktite is included in the handguard assembly): http://i148.photobucket.com/albums/s10/jdean23_photos/My%20Guns/MIMctar20FFrailinstall14.jpg Now install the front ring piece of the rail. This piece just needs to line up. the open end should be facing up and surround the barrel. 2 of the smaller screws are required at this point and don't forget the locktite: http://i148.photobucket.com/albums/s10/jdean23_photos/My%20Guns/MIMctar20FFrailinstall12.jpg http://i148.photobucket.com/albums/s10/jdean23_photos/My%20Guns/MIMctar20FFrailinstall13.jpg Take the bottom piece of the rail and install it to the front ring piece and the bottom band. Three small screws are required here (don't forget the locktite). Once you get those in place, you are all done!!! here is the finished product: http://i148.photobucket.com/albums/s10/jdean23_photos/My%20Guns/MIMctar20FFrailinstall16.jpg http://i148.photobucket.com/albums/s10/jdean23_photos/My%20Guns/MIMctar20FFrailinstall15.jpg Hope this is helpful and saves some people some money. if you feel it saves you over $25, consider joining the site as it will save you a lot of money over time! If you felt this saved you more than that, consider joining both ar15.com and the NRA or other good pro-gun organization! Enjoy your new rail! Masking tape and paper, brilliant! I just went at it with a dremel and got shaving all over the place and it took a long time to make sure it was all cleaned out. I am a OCD clean freak with my guns  |
|
|
|
MT, USA
|
[#48]
Anyone know why the front pin of the trigger guard doesn't go all the way through. There is no pin hole on the left side in front of the trigger guard. It looks almost like the trigger guard has a pin in it already for the front, but only is seen protruding from the right side. Why is this?
|
|
|
|
[#49]
Originally Posted By FAB-10_Guy: Anyone know why the front pin of the trigger guard doesn't go all the way through. There is no pin hole on the left side in front of the trigger guard. It looks almost like the trigger guard has a pin in it already for the front, but only is seen protruding from the right side. Why is this? The pin is spring-loaded so the trigger guard can swing down and out of the way for gloved (cold weather) usage. |
|
|
|
|
[#50]
What about a M4 stock wrench that accepts a torque wrench? Is there any other one besides the $50+ Brownell's?
|
|
|
|

AR15.COM is the world's largest firearm community and is a gathering place for firearm enthusiasts of all types.
From hunters and military members, to competition shooters and general firearm enthusiasts, we welcome anyone who values and respects the way of the firearm.

Subscribe to our monthly Newsletter to receive firearm news, product discounts from your favorite Industry Partners, and more.
Copyright © 1996-2024 AR15.COM LLC. All Rights Reserved.
Any use of this content without express written consent is prohibited.
AR15.Com reserves the right to overwrite or replace any affiliate, commercial, or monetizable links, posted by users, with our own.


