|
[#1]
Ok - I welcome comments or suggestions to make this post better! Trying to keep it real simple for those who have never done this.
|
|
|
|
[#2]
Nice Job! Great quality pictures!
I'm gonna save this as a good reference. |
|
|
|
[#3]
awesome ... thanks.
I'll have a copy of this, a copy of the full guide, and an Army LT by my side when my first one goes together in a couple weeks. My friend claims he can put one of these together blindfolded. I figure he'd be good to have around. |
|
|
|
[#4]
or you could by the bushy DVD and watch them build the whole thing step by step
|
|
|
|
[#5]
Good refrence
But the lower can be assembled with a hammer and a spare firing pin, plus masking tape |
|
|
|
[#6]
This is excellent! Good Job!
By having clear step by step instructions with pics, it makes it so people who are on the fence about building one come over to the Black Rifle side! Maybe you could describe the trigger safety check step in text after the last pic? That's the only thing I see missing.... |
|
|
|
[#7]
Great reference.
Thanks, 556man |
|
|
|
[#8]
Great post FALARAK! This needs to be tacked along with your upper build post!
|
|
|
|
[#9]
+1 |
|
|
|
|
[#10]
What about installing the buffer and spring?
|
|
|
|
[#11]
Added. I am trying to keep it simple... I kinda went with the assumption that anyone attempting to build their own rifle already has a handle on basic cleaning... which requires removal and reinstall of the buffer and spring. 
|
|
|
|
|
[#12]
Thanks for the info FALARAK
Tagged. |
|
|
|
[#13]
Great post!
|
|
|
|
[#14]
Pardon me, first time to join a discussion/forum. I’ve been surfing/reading here a lot lately since the AWBan was coming to a closure. Building or putting together my own weapon from parts sounds great. I think and read a person with some good common mechanical since, that loves to hobby and fiddle or fix things can work up his own custom/personal weapon. I’ve seen what appears to be some very nice weapons posted around/in this forum. Not unlike building one’s own “Harley”, you “get to have it your way” with parts & accessories ya choose. No “take offs” laying around or parts to sell to recoup. And like I said, I’ve seen what appear to be very nice weapons built from parts. However I’ve heard some people give opinions on so called “partz gunz”. They were not flattering comments. Additionally & worse, I was at a gun show and saw this one AR type rifle, a “partz gun” and it looked like hell. The colors/finish was not bad, not perfect, but reasonable. But the thing was so loose, and the curved section at the area where the lower meets the upper was terrible. Huge gap! I understand some home smithing is required, but I don’t think a little work around the pins and an accue wedge thingy would have made me happy . I need opinions on or about getting parts matched. Is this common? Do ya have to buy at the same time and hand match to get a good set? I was thinking about buying a stripped lower, building and fitting parts and using different brand upper. Just looking to for opinions and /or discussion. Sorry to be so long winded, Newbie at the forum……NRA member, Long time shooter. Is this posted in correct place. Hope I’m doing this right.
Addicted to this site!!! I would also welcome Email at [email protected] |
|
|
|
[#15]
Jny5: Welcome to the board!
Yes this is the right forum, and I can respond without hijacking the thread with this: Falarak: Excellent post. Well said, and better than the Mil. manual I first used. Jny5: Parts rifles, or "Franken-ar's" may not have as high of resale value as factory complete guns, but the quality can be easily as high for less money (no FET) for the doityerselfer. You probably see all sorts of posts asking about "color match between [brand x] lower and [brand y] upper?", but even some factory guns have color variations. Many will recall the purple Bushmasters. Color match can be fixed with a proper bake-on coating like Norrells ($22 pint will cover over 4 complete rifles and is chip-proof and hard as anything available -- I love it!). Some parts a re cheap imports, but decent parts are readily and cheaply available. Most parts have a mil-spec standard, and decent parts kits follow them, with exceptions. Of course, there are specialty parts as well. some are nicer looking and/or more expensive, but whether they work better than the mil-spec parts for the average shooter is debatable. You'll always find gear snobs and parts snobs at gun shows, and it sounds like you didn't need to be a snob to recognize junk when you see it at that gun show you mentioned, but I'd put my Franken Ars up against anyone's comparable factory rifle. And I have the pride of ownership, knowing that I built them. Agreed, worn-out, BTS, thrown-together, out-of-spec, hacked, obvious junk is junk. However, it won't take long to find on this board some so-called "factory" rifles that may look nice, but are equally junk. Some sellers resort to periodic name changes to try to lose their bad reputation for a while and sell more junk. IMHO, a kit rifle from a reputable seller properly built (in your own livingroom, even) on a decent stripped lower, again from a reputable seller, will fit, function, provide all the fun, and probably all the accuracy as a more expensive factory rifle. Cheers, Otto |
|
|
|
[#16]
Thanks for the positive feedback. Guess I’ll give it a shot. I’ve been studying the board just checking out what people think. Loads of good advice & ideas on this board
Thanks again. P.S. Remember to vote. |
|
|
|
[#17]
|
|
|
|
[#19]
This is exactly what I was looking for. I may have to buy a stripped lower and get to work. That will lead to another upper.... Im glad I keep my AR's black. That way my wife wont know when I pick up a new one.
A friend told me to assemble the small parts in the shower with the curtain closed and the drain covered. Easier to find those damn springs when they fly away. One of the more uselful posts I have read. Great job! |
|
|
|
[#20]
Great job!!!
|
|
|
|
[#21]
WOW that was nice... Im surprised no one has made one of these till now, as there have been many posts asking how to put the lower parts together. This should stay at the top or somewhere for refrence. Nice job.
|
|
|
|
[#22]
I am working to convert this to PDF for the ARFCOM reference section and I caught one thing I do differently... When I screw on the rear stock with the receiver lock plate in place I never have the rear takedown pin spring in place... When the buffer is where I want it I thread the buffer to the side a quarter turn and insert the spring... much easier then fighting with that spring with every rotation!
Here is this info converted to PDF so that it is easier to save and I would hope we can get this added to the Information section of ARFCOM... quarterbore.com/library/pdf_files/assemblealower.pdf |
|
|
|
[#23]
do any of the lower receiver parts need to lubed?
|
|
|
|
[#24]
Like everything in life... it is all relative. Some people built crappy rifles.... some built rifles that put ABC (Armalite, Bushmaster, Colt for you newbies out there) to shame. With optics, mounts, free float tubes, after market stocks, etc... you can put $3000 into a rifle easy and I mean easy. This This can make your rifle much more expensive and if done right more valuable than your standard off the self AR. Again... it is all relative. Some builds turn out better than others..... I wish you luck with yours. GREAT POST FALARAK.... Thank you for the reminder with pics |
|
|
|
|
[#25]
Great question. CLP is all you *need* for any part on the AR15/M16 rifle.... and at a minum should wipe down the FCG, safety, and pins, with CLP That being said, on initial assembly, I like to use a little moly-grease on the sear engagement surfaces on the trigger and hammer, and inside the trigger and hammer pin holes. I place a dab of grease on the new pins, and work them in and out to lube the inside of the new fire control group. I also add a dab of grease to the safety selector, and takedown/pivot pins. |
|
|
|
|
[#26]
Very nice - good job. P.S. You may want to make mention that an easy and safe way to get the roll pins in is by tapping them in with any small, thin object such as a punch or writing pen with the plastic handle of a screwdriver. |
|
|
|
[#27]
I followed the instructions in this post and they worked great. The lower went together just fine. Two questions though. In the photo of all the parts laid out, is the spring on the hammer assembly on backwards? Also, I installed the front pivot pin, but now I have to take it off to install the upper? This seems like it might not be that easy to do. Is there a trick to removing the pivot pin? Thanks for all your help.
|
|
|
|
[#28]
No... it is just spun around. If you took the spring in the picture and spun it around until the "hoop" caught on the back side of the hammer, it would be oriented properly for installation.
The pivot pin does not have to be removed to remove the upper. You just have to push it back out, until it snaps into the open position. The detent/spring holds it in place in fully open, and fully closed positions. Sometimes, when new, they are really tight and require you to work it back and forth a lot to get it to loosen up. The pic below shows a fully installed pivot pin... in the open position.... and the upper can be removed/installed when in this position: 
|
||
|
|
|
[#29]
Jny5 said However I’ve heard some people give opinions on so called “partz gunz”. They were not flattering comments. Additionally & worse, I was at a gun show and saw this one AR type rifle, a “partz gun” and it looked like hell. The colors/finish was not bad, not perfect, but reasonable. But the thing was so loose, and the curved section at the area where the lower meets the upper was terrible. Huge gap! I understand some home smithing is required, but I don’t think a little work around the pins and an accue wedge thingy would have made me happy . I need opinions on or about getting parts matched. Is this common? Do ya have to buy at the same time and hand match to get a good set? I was thinking about buying a stripped lower, building and fitting parts and using different brand upper. Just looking to for opinions and /or discussion. Sorry to be so long winded, Newbie at the forum……
Like others here, I would put my "parts guns" up against any factory guns. All of mine, but one, are "parts guns". And actually, as far as AR-15's, FACTORY guns are parts guns, too. You can have a mismatch in color, such as buying an Essential Arms lower, which come in the old original gray color, and teaming it with a black upper. On the other hand, I have three recently built rifles with DPMS lower. Two were assembled with J&T kits, and the fit and color is as good as one could possibly expect. A third was assembled with a DPMS lower and an LAR upper, and again, perfect match. I have seen few upper/lower combinations that would not mate up well. I have one older lower, a late 80's SGW (Olympic Arms) that the black finish is more of an eggshell, not quite semigloss. But if the upper and lower are wiped down with a slightly oily rag, you can't see a difference. More a difference in texture, not in color. Fit is good. I build my rifles for me, not to sell, so resale value is not a factor. The thing I like about building rather than buying is that I can configure the rifle exactly as I want it. |
|
|
|
[#30]
an easy and safe way to get the roll pins in is by tapping them in with any small, thin object such as a punch or writing pen with the plastic handle of a screwdriver.
That is difficult, and easy to slip and scratch the surrounding area. For the most part, I PRESS in pins using large ViseGrip pliers, with the jaws wrapped with several layers of electrical tape. This is done by holding the roll pin in position with needle nose pliers, and adjusting the ViseGrips open enough so that when the handles are closed, it just barely starts the roll pin in. Then open the pliers, turn the knob one half turn tighter, and repeat. Using the pliers like this you have a very great mechanical advantage, and good control of the operation. Just continue, half turn, press, half turn press. When the pin is almost flush, THEN use a punch or even an ordinary carpenter's nail set to tap the pin flush. |
|
|
|
[#31]
would a lower receiver block from like bushmaster help in putting on and removing a collaspable stock. or can this be done easily without one.
|
|
|
|
[#32]
No need.... sure, it makes it simpler... but installing a buttstock doesnt really require anything special. |
|
|
|
|
[#33]
tag
|
|
|
|
[#34]
Here are pictures, how to press in the roll pins in the lower (works also for the roll pin for the FWD asst on the upper, too):
Hold the roll pin in position with needle nost pliers, a little oil or grease in the hole helps:  Use large Vise Grip pliers, jaws taped to protect the receiver from scratches. Adjusting the pliers so that they just barely press the pin in with the handles all the way together gives maximum mechanical advantage: 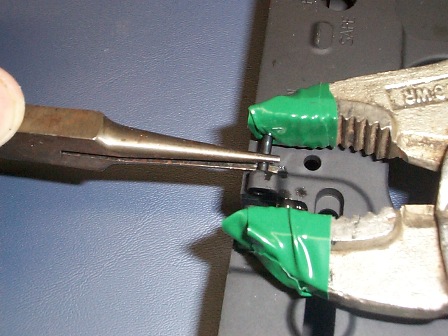 Get the pin started in, and put in the spring, detent, and position the bolt catch:  Continue pressing in the pin by opening the pliers, turning the knob 1/2 turn at a time, and pressing the pin in little by little:  Now the pin is almost all the way in, it can be tapped in flush with a few light taps on a punch or an ordinary carpenters nail set:  |
|
|
|
[#35]
Now let's do the trigger guard:
Hook the trigger guard in the front, by the mag well, and swing into position. If you don't have the trigger guard in position when you try to start the pin, it will break off the tab of your expensive lower:  Press in as in previous post, turning the knob of the Vise Grip 1/2 turn at a time:  Almost there:  Now that you have it this far, finish by tapping in flush using punch or nail set: 
|
|
|
|
[#36]
Thanks for the pics. When I installed my trigger guard, I almost did it backwards. Also, do you ever find the trigger and hammer pin move, or are they held in place fairly well? Ive seen some locking pins, are they necessary?
|
|
|
|
[#37]
If the FCG is installed correctly.... there will be no movement of the pins. There is a "j" hook installed in the hammer that firmly holds the hammer pin in place..... so that cannot move. Then, when the hammer is installed, one of the legs of the spring rest in the groove on the trigger pin, so that one cannot move. I dont see the real use of "anti-walk" pins unless you are running some sort of custom trigger that does not have these designs in place. |
|
|
|
|
[#38]
See, a lot of people (like me) would scratch their lower by using vise grips like that to install the roll pins. You have to put a fair amount of pressure to get them in (if they're good roll pins), and one mistake in exertion of pressure could drag the exposed metal of vice grips or the like across the lower and leave a nasty mark. That's why I recommend a small, thin object such as a writing pen, tapping on it to get the roll pin in with the (plastic) blunt end of a screw driver. That way, you're using all plastic objects to get the pin in, so a slip can't hurt it as bad. |
|
|
|
[#39]
The pliers jaws are taped.
The jaws only move a very small amount each time. This is not done with one big squeeze. The pliers are adjusted so that when the handles are fully together, it just barely moves the pin. In this position, the pliers have a great amount of mechanical advantage, and you have good control over the pin movement. Even if it slips, the tape on the jaws protects it from scratching. |
|
|
|
[#40]
|
|
|
|
[#41]
Thank you- I have a factory lower, but just used your pics to put on my telestock! Eat my shorts, Di Fi!! Couple of questions-
1) Any grease necessary on the buffer spring? I didn't put any, but it seems like some lube there would help against wear. 2) My rear takedown pin feels looser than it was before I started messing with it. The spring is in, it doesn't come out, it just feels looser. |
|
|
|
[#42]
1. No grease on the buffer spring. You aint gonna wear it out even if you never lubed it, ever. Just a little CLP wiped on the spring when you clean the tube, spring, and buffer, every 1000 rounds or so (more if you are anal) 2. The rear takedown pin is held in place by a detent, then a spring, with pressure applied by the telestock plate. There should be a noticeable "click" when fully opened, or fully closed. At the very least, if you took the upper off the lower, then closed the rear takedown pin, no amount of shaking or tapping on the receiver should allow the rear pin to move. If you think something is wrong, remove the stock, and spring, and then the takedown pin. then, re-insert the spring, it should push the detent into the takedown pin hole. If it does not, figure out why, fix, and re-assemble. |
|
|
|
|
[#43]
I just wanted to say thanks for creating this topic. I put my first lower together in about 15 minutes using just this topic, some masking tape, and a pair of pliers. Thanks!
|
|
|
|
[#44]
as for no special tools necessary, I would call the CAR wrench a special tool, otherwise, thanks for the guide!
|
|
|
|
[#45]
Ahhh but even that is not required! You can wrap it in electrical tape, and install it with pliers! Or use a punch and tap it to tighten. |
|
|
|
|
[#46]
.
|
|
|
|
[#47]
This post needs to be pinned.
|
|
|
|
[#48]
It is..... in a mega post that contains all my BIY posts: www.ar15.com/forums/topic.html?b=3&f=4&t=202467 |
|
|
|
|
[#49]
|
|
|
|
[#50]
Actually, a thin layer of grease applied to the buffer spring will reduce or eliminate the "sproing" noise as the action cycles... if you dislike this noise, then I offer this fix for your consideration. Not totally sure I'd do it to a SHTF rifle though. |
|
|
|
 Win a FREE Membership!
Sign up for the ARFCOM weekly newsletter and be entered to win a free ARFCOM membership. One new winner* is announced every week!
You will receive an email every Friday morning featuring the latest chatter from the hottest topics, breaking news surrounding legislation, as well as exclusive deals only available to ARFCOM email subscribers.

AR15.COM is the world's largest firearm community and is a gathering place for firearm enthusiasts of all types.
From hunters and military members, to competition shooters and general firearm enthusiasts, we welcome anyone who values and respects the way of the firearm.

Subscribe to our monthly Newsletter to receive firearm news, product discounts from your favorite Industry Partners, and more.
Copyright © 1996-2024 AR15.COM LLC. All Rights Reserved.
Any use of this content without express written consent is prohibited.
AR15.Com reserves the right to overwrite or replace any affiliate, commercial, or monetizable links, posted by users, with our own.


