|
[#1]
Originally Posted By dryflash3: I believe that the issue is that wet tumbling requires the axis of rotation to be horizontal, and the drum to have sides mostly parallel to the axis.Originally Posted By NCUrk: Hey guys, Newb question on wet tumbling, Has anyone used a concrete mixer to do this? Just curious. This idea comes up often. Works ok for dry tumbling, doesn't work for wet tumbling. People who have tried it have reported the drum design is wrong for wet tumbling. They didn't elaborate. Otherwise - the heavier media settles to the lowest area and the brass floats on top. Cement or mortar mixers generally don't have a seal-able lid and are designed to spin around an axis that is tilted up. That keeps the splashing and contents contained in the lower area of the drum, but leads to the settling problem above. |
|
|
|
|
[Last Edit: NCUrk]
[#2]
Finally got home from work and able to get on online via cable modem vs my phone. Read through all the pages and have seen all the pretty brass... Damn you all.... I may have to build me one and stop using walnut media.....
|
|
|
|
|
[#3]
Originally Posted By kaos: Thanks for clearing that up.Originally Posted By dryflash3: I believe that the issue is that wet tumbling requires the axis of rotation to be horizontal, and the drum to have sides mostly parallel to the axis.Originally Posted By NCUrk: Hey guys, Newb question on wet tumbling, Has anyone used a concrete mixer to do this? Just curious. This idea comes up often. Works ok for dry tumbling, doesn't work for wet tumbling. People who have tried it have reported the drum design is wrong for wet tumbling. They didn't elaborate. Otherwise - the heavier media settles to the lowest area and the brass floats on top. Cement or mortar mixers generally don't have a seal-able lid and are designed to spin around an axis that is tilted up. That keeps the splashing and contents contained in the lower area of the drum, but leads to the settling problem above. |
|
|
|
|
[#4]
Originally Posted By dryflash3:
Originally Posted By kaos:
Thanks for clearing that up.
Originally Posted By dryflash3:
I believe that the issue is that wet tumbling requires the axis of rotation to be horizontal, and the drum to have sides mostly parallel to the axis.
Originally Posted By NCUrk:
Hey guys, Newb question on wet tumbling, Has anyone used a concrete mixer to do this? Just curious. This idea comes up often. Works ok for dry tumbling, doesn't work for wet tumbling. People who have tried it have reported the drum design is wrong for wet tumbling. They didn't elaborate. Otherwise - the heavier media settles to the lowest area and the brass floats on top. Cement or mortar mixers generally don't have a seal-able lid and are designed to spin around an axis that is tilted up. That keeps the splashing and contents contained in the lower area of the drum, but leads to the settling problem above. Yes, Thank You for giving a very good answer. I have been lurking in GD to much and expect a "differant" style of approach most the time. |
|
|
|
|
[#5]
Originally Posted By NCUrk: Originally Posted By dryflash3: Originally Posted By kaos: Thanks for clearing that up.Originally Posted By dryflash3: I believe that the issue is that wet tumbling requires the axis of rotation to be horizontal, and the drum to have sides mostly parallel to the axis.Originally Posted By NCUrk: Hey guys, Newb question on wet tumbling, Has anyone used a concrete mixer to do this? Just curious. This idea comes up often. Works ok for dry tumbling, doesn't work for wet tumbling. People who have tried it have reported the drum design is wrong for wet tumbling. They didn't elaborate. Otherwise - the heavier media settles to the lowest area and the brass floats on top. Cement or mortar mixers generally don't have a seal-able lid and are designed to spin around an axis that is tilted up. That keeps the splashing and contents contained in the lower area of the drum, but leads to the settling problem above. Yes, Thank You for giving a very good answer. I have been lurking in GD to much and expect a "differant" style of approach most the time. We try to help here, not make fun of people. Stick around, we have a good group here.
|
|
|
|
CAN
|
[#6]
Holy smokes.... It works.
Gonna get my media in the a.m., but man... my tumbler actualy... tumbles. Filled my cannister with water for weight and ran it... Ta-daaaa...! Exactly 70RPM I'll pretty it up a bit and re-do the wiring, but man... Can't wait to try with the real stuff I have about 3k of .223 alone that needs cleaning not to mention all the pistol brass I need to get Loadin. Thanks BIGGDAWG for the great ideas |
|
|
AZ, USA
|
[#7]
Awesome. Post up your details, pulley sizes, and pics when you get a chance.
Thanks! |
|
|
|
[#8]
your welcome guys glad i could help
nothing like building something and having it work. 
|
|
|
|
CAN
|
[#9]
Originally Posted By CSCameron:
Awesome. Post up your details, pulley sizes, and pics when you get a chance. Thanks! Well, 'took a trip to Pellets LLC this morning... They're located about an hour from my place so no big deal... Grab my passport and make a run for the border. My set up is still a little rough, but it seems to work. Later when time permits I think I might have someone local weld me up a frame, but for now my wooden base seems to suffice. 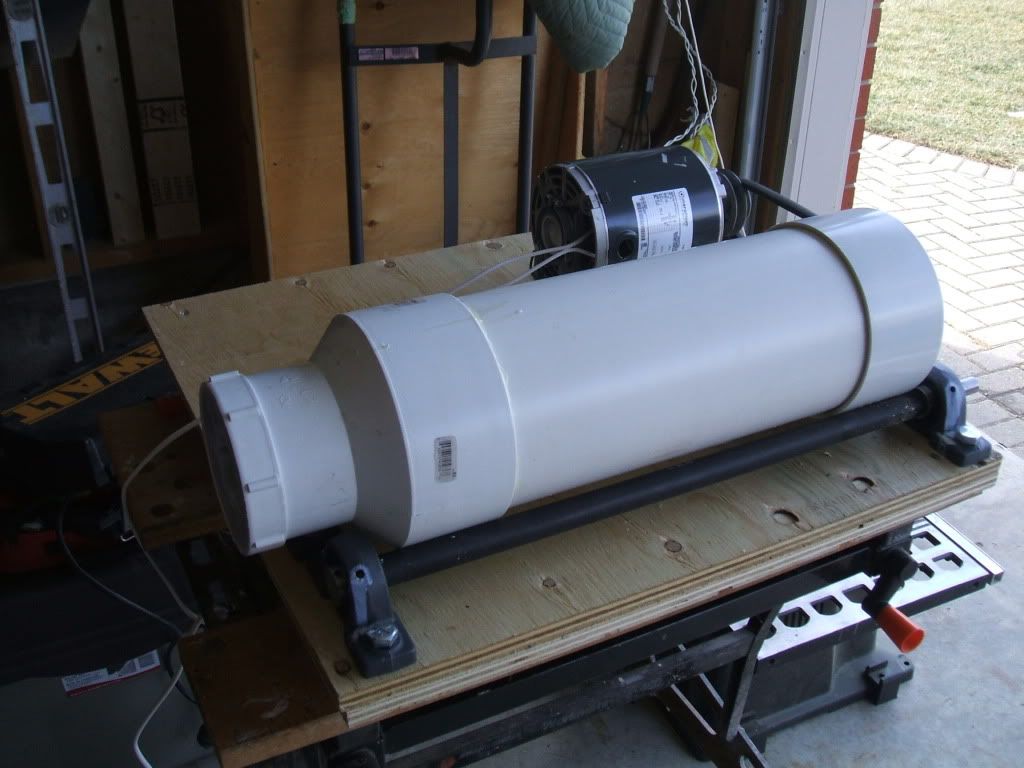
Cuttin' to the chase: 500 fired cases... Not extremly dirty or tarnished, but definately in need of a bath. 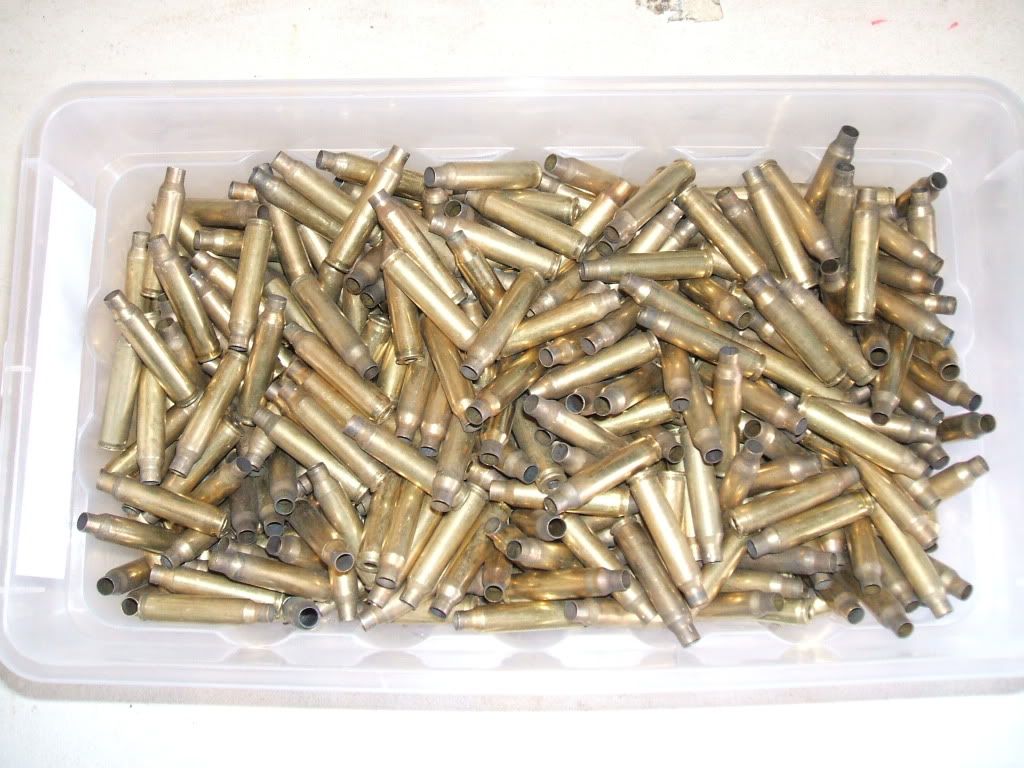
Dirty case mouth for the record... 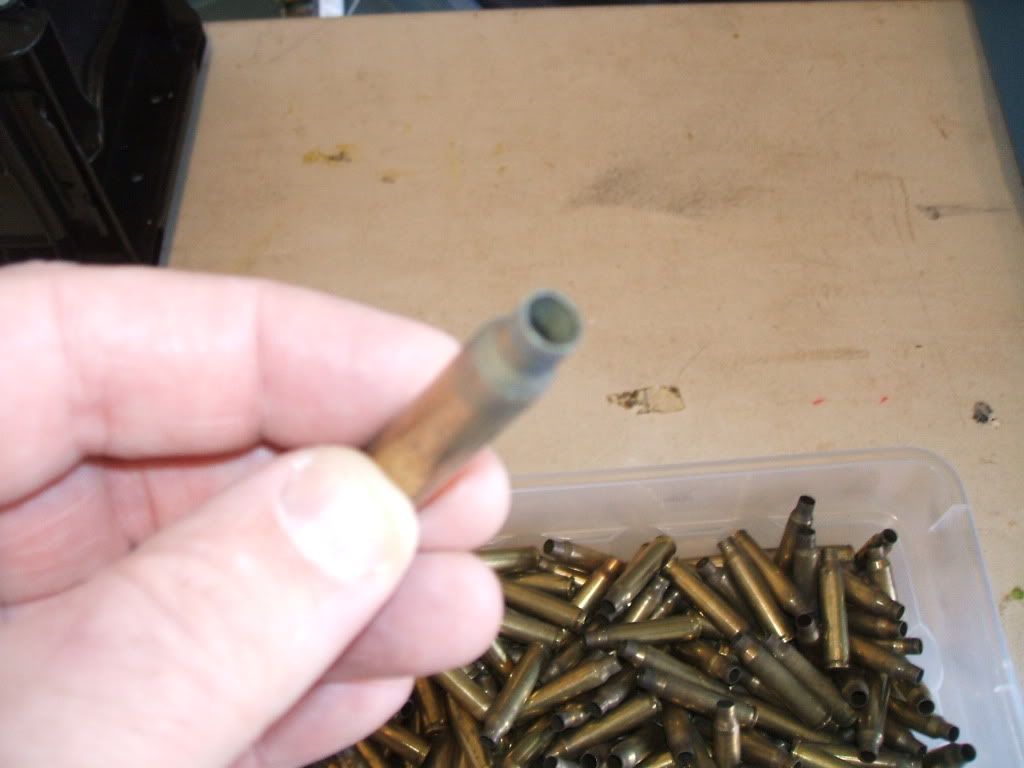
25lbs of pins Rather have too much than not enough. 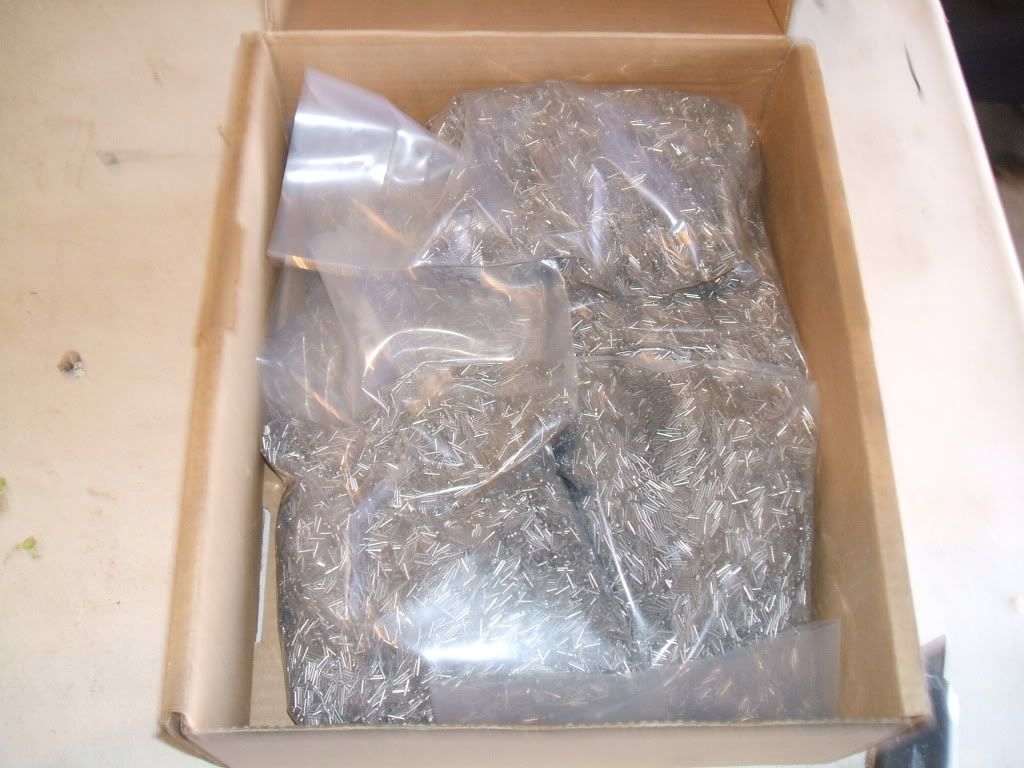
I initially am trying 15lbs of media and exactly 500 .223 cases. I esitmate the weight of the brass at just under 7lbs. 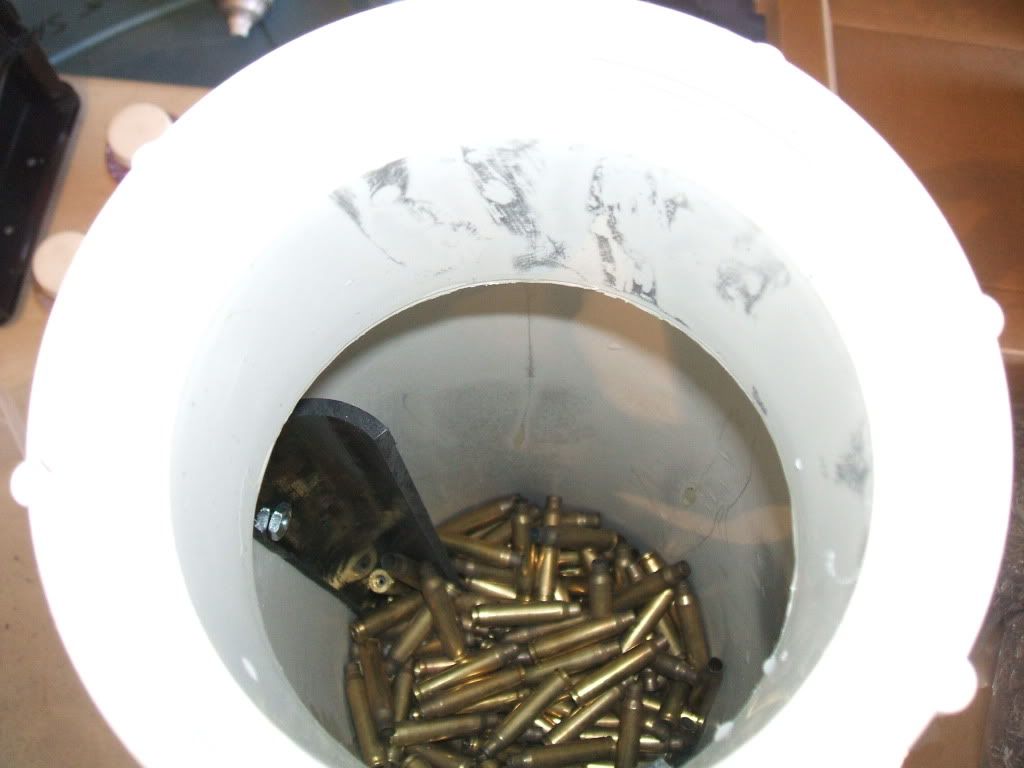
Water added...Squirt of Dawn dish soap.. and a little LemiShine 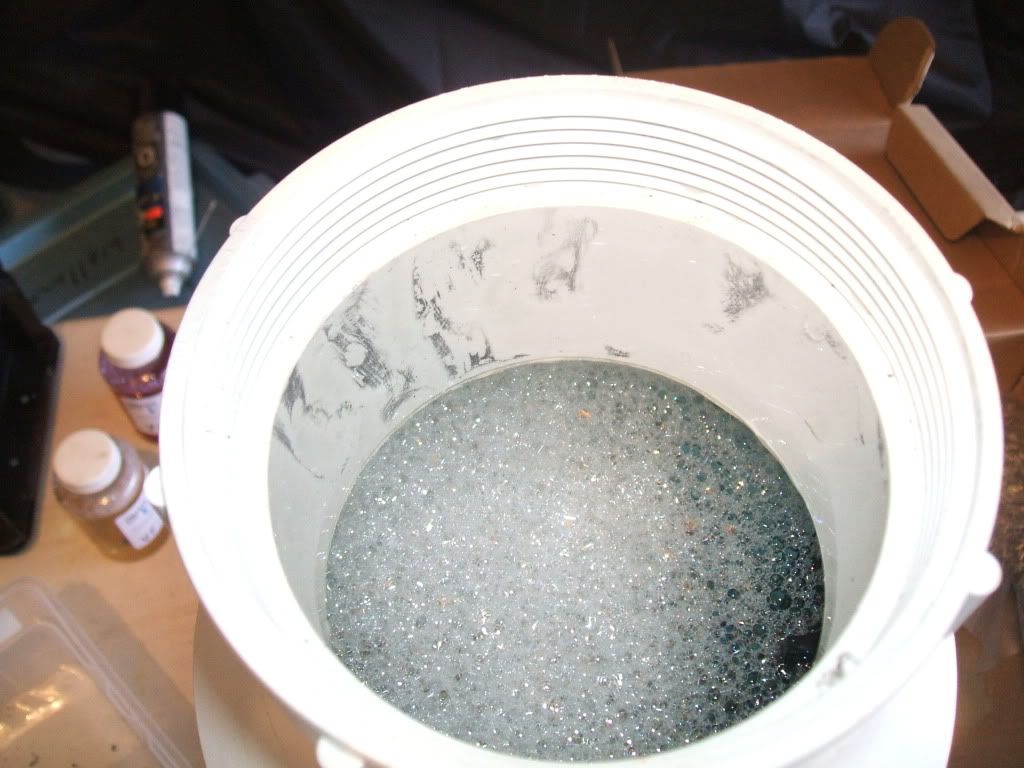
After 15 minutes... cases already starting to look clean 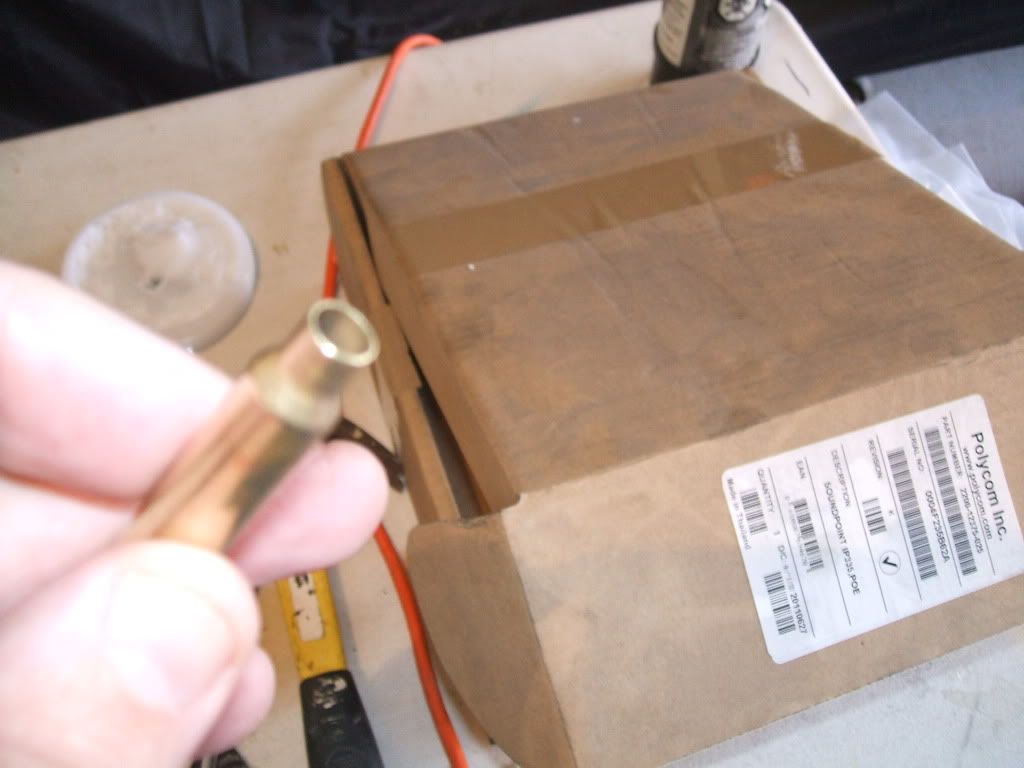
After 15 minutes... Primer pocket looks pretty good. 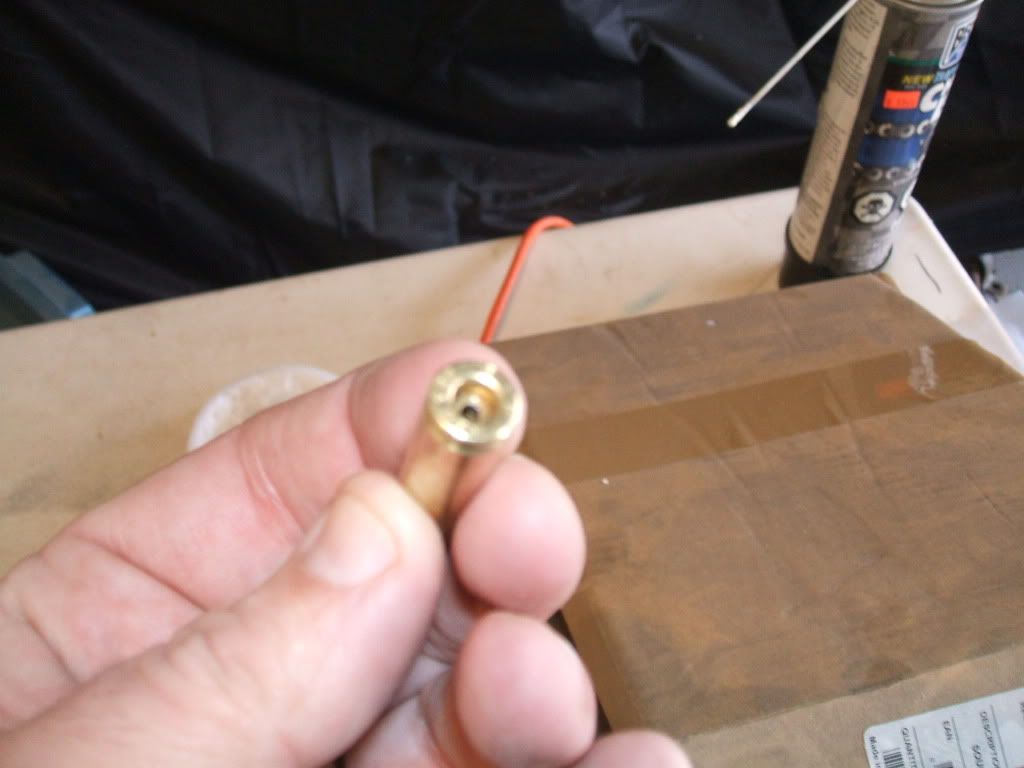
Short video of the machine running... http://youtu.be/YmTjfo4H4cA 'Going to let it run for two hours and see the rusults... |
|
|
AZ, USA
|
[Last Edit: CSCameron]
[#10]
Looks great! Did you use 24" shafts and a 6" drum pulley? What fitting did you use on the drum? Last, how long is the pipe for your drum? Sorry for all the questions, just cobbling together all my components for the build and haven't decided on the drum fittings yet.
Thanks for the info and updates! |
|
|
CAN
|
[#11]
Originally Posted By CSCameron:
Looks great! Did you use 24" shafts and a 6" drum pulley? What fitting did you use on the drum? Sorry for all the questions, just cobbling together all my components for the build and haven't decided on the drum fittings yet. Thanks for the info and updates! The shafts are 5/8" x 24" The drum pully is 6" The drive pully is 1" (maybe 1.5") I count 70-72 rpm on the drum. I don't know what the cap fitting is called, but it's basically a reducer from 6" to 4".. the cap isn't the best for the job though. It seats flush and is a bitch to tighten/loosen (unless there's a special tool avail?) I have another type of fitting/cap with the same threads... It uses an O-ring which at the momment has gone missing. |
|
|
TX, USA
|
[Last Edit: dryflash3]
[#12]
<removed> buying and selling are not allowed in threads. Use the IM button and reread the COC. dryflash3 I might be able to make the tumbler, but the container looks like a real pain to make. If I use a 1725 rpm motor what size pulleys do you recommend? Love your posts and pictures. Thanks
|
|
|
TX, USA
|
[#13]
I apologize for my error in posting something not allowed. Lesson learned.
|
|
|
|
[#14]
Originally Posted By Medic433: I apologize for my error in posting something not allowed. Lesson learned. Well you got an edit on your first post, but it's all down hill from here. Welcome aboard.
|
|
|
|
|
[#15]
ARFCOM inspires again.
This is a very informative thread. I have shafts, pillow blocks and a motor at work that will soon be turned into a tumbler. Since the items are "free", my shafts will be one inch with some nice SKF bearings and blocks. I will try and get some pictures when I get started. THANKS GUYS!!!!!!
|
|
|
|
|
[#16]
Originally Posted By Girlieman: Originally Posted By CSCameron: Looks great! Did you use 24" shafts and a 6" drum pulley? What fitting did you use on the drum? Sorry for all the questions, just cobbling together all my components for the build and haven't decided on the drum fittings yet. Thanks for the info and updates! The shafts are 5/8" x 24" The drum pully is 6" The drive pully is 1" (maybe 1.5") I count 70-72 rpm on the drum. I don't know what the cap fitting is called, but it's basically a reducer from 6" to 4".. the cap isn't the best for the job though. It seats flush and is a bitch to tighten/loosen (unless there's a special tool avail?) I have another type of fitting/cap with the same threads... It uses an O-ring which at the momment has gone missing. Try a strap wrench? |
|
|
|
AZ, USA
|
[#17]
OK, how are you guys sealing the agitator bars to the inside of the drum? I know you are using nuts, bolts & washers but, is the PVC cement enough or are you using some kind of caulk to get it water tight?
|
|
|
|
[#18]
Originally Posted By CSCameron:
OK, how are you guys sealing the agitator bars to the inside of the drum? I know you are using nuts, bolts & washers but, is the PVC cement enough or are you using some kind of caulk to get it water tight? they way i build mine the glue seals the bolts when i glue the caps/fittings on. the fins hold just fine with just the 2 bolts on each fin. i was putting silicone in the holes before i put the screws in and they didn't leak either then i thought about it and quit using the silicone and i haven't had a drum leak yet. |
|
|
|
|
[#19]
Originally Posted By CSCameron:
OK, how are you guys sealing the agitator bars to the inside of the drum? I know you are using nuts, bolts & washers but, is the PVC cement enough or are you using some kind of caulk to get it water tight? I used 1 Stainless steal screw at each end of the tube counter sunk under the cap that way it dont leak. |
|
|
|
|
[#20]
Originally Posted By CSCameron: I used a 5-gallon orange bucket from The Orange Borg.OK, how are you guys sealing the agitator bars to the inside of the drum? I know you are using nuts, bolts & washers but, is the PVC cement enough or are you using some kind of caulk to get it water tight? And a few 3 and 4.5 gallon buckets to do smaller loads or dry tumble. Nothing sticks to the plastic buckets except for a specific cement/glue which I did not use. I mention all of the above to set up the premise: In addition to the stainless steel nuts/bolts/washers, I squirted a bunch of silicone caulk around each drilled hole (I applied the caulk to the paddle itself at the location) to make a watertight gasket at the location of each hole. Screw it all together, give it about 6 hours to cure, 12 is better. No leaks from the plastic buckets containing water. To me that means the gasket is watertight, as opposed to acting as an actual 'glue'. The silicone material can be easily peeled off the bucket if I wanted to. |
|
|
|
MI, USA
|
[Last Edit: Jailer]
[#21]
OK, how are you guys sealing the agitator bars to the inside of the drum? I know you are using nuts, bolts & washers but, is the PVC cement enough or are you using some kind of caulk to get it water tight?
Seal all on the exterior of the drum as well as PVC cement on the interior. Seal all is some amazing stuff. http://www.eclecticproducts.com/sealall.htm |
|
|
AZ, USA
|
[#22]
Thanks for the replies. I put my first drum together today, what a mess! lol. Don't know if it will be water tight, but it needs to cure overnight. Will test it tomorrow and report back.
|
|
|
AZ, USA
|
[#23]
Any problem with leaving the screw lengths long like in this picture?
|
|
|
|
[#24]
Originally Posted By CSCameron:
Any problem with leaving the screw lengths long like in this picture? http://i4.photobucket.com/albums/y124/BIGGDAWG800/IMG_3514.jpg probably not but i did cut those down when i was done, i now use shorter screws. 3/4 inch those were and inch. |
|
|
|
AZ, USA
|
[#25]
By the way, is the process any different for nickel cases? I have about 500 .40 nickel cases I plan to run soon.
|
|
|
|
[#26]
Originally Posted By CSCameron:
By the way, is the process any different for nickel cases? I have about 500 .40 nickel cases I plan to run soon. not for me i do the same as i do for regular brass. |
|
|
|
AZ, USA
|
[#27]
Thanks!
My first batch of .38 cases is about done. 10 minutes to go (2hr run time). I'll post pics soon. |
|
|
AZ, USA
|
[Last Edit: CSCameron]
[#28]
OK, here is a couple of pics of the two runs I have made so far. First run, 1012 .38special (~10lbs), 10lbs of media, 2hrs, 4 squirts of dawn, 2 tablespoons of Lemishine.

Then a load of .40cal (11lbs), same recipe. 

I'm pleased. Now have about 4 more loads of .40 and 10,000+ .223 to do Special thanks to BIGGDAWG for showing the way on this project... Oh, and I only had one case (.38) that had pins stuck in the primer pocket, none of the .40. |
|
|
|
[#29]
those look great, and thank you glad i could help.
|
|
|
|
|
[#30]
I have heard not to leave primers in after tumbling. I have a 5 gal bucket of 40 cal I would like to clean oven dry and put back into storage. The question is will the primers freezes up in the pocket and not come out. Or will it just require a little more pressure to get out. At a later date I would more than likely clean again after resizing. Dose any one have experience with this.
|
|
|
|
|
[#31]
Originally Posted By jah141:
I have heard not to leave primers in after tumbling. I have a 5 gal bucket of 40 cal I would like to clean oven dry and put back into storage. The question is will the primers freezes up in the pocket and not come out. Or will it just require a little more pressure to get out. At a later date I would more than likely clean again after resizing. Dose any one have experience with this. my first 2 batches i didn't deprime and did as you want to do. a few weeks later i got my universal decapper and ran them through it. there was noticable corrosion in the pockets already and they were still damp. i may not have kept them in the oven long enuff but now i don't tumble till after they are deprimed. |
|
|
|
|
[#32]
Well I just ran a batch of 40s their in the oven now. I will experiment after they dry I'll pop a few out see they are all the way dried. Also check how much press to pop out, then let sit for a month and try again and so on. I have 2 more buckets of 30.06 I would like run also but will have to wait to see what happens with the 40s.
|
|
|
|
|
[#33]
Originally Posted By jah141: I'm not trying to nit-pick. I'm not so good that I can take the scrutiny. Well I just ran a batch of 40s their in the oven now. I will experiment after they dry I'll pop a few out see they are all the way dried. Also check how much press to pop out, then let sit for a month and try again and so on. I have 2 more buckets of 30.06 I would like run also but will have to wait to see what happens with the 40s. I don't understand why you'd want to go through the time and trouble to tumble and dry them once with the primers in so you can tumble and dry them at a later date after you deprime and size them? I deprime a bucket at a time as I have the time, and then tumble and dry them as a batch. After that it's just a resize and 5 minutes tumble in walnut to clean the lube off and I'm done. No wondering about how long to dry them to get the water out of the primers, and then retumbling to clean the primer pockets. Again, I'm not criticizing, just discussing technique. It seems to me there's less wasted motion and effort to tumble them once, than to dry them with the primers in. |
|
|
|
|
[#34]
Originally Posted By kaos:
Originally Posted By jah141:
I'm not trying to nit-pick. I'm not so good that I can take the scrutiny. Well I just ran a batch of 40s their in the oven now. I will experiment after they dry I'll pop a few out see they are all the way dried. Also check how much press to pop out, then let sit for a month and try again and so on. I have 2 more buckets of 30.06 I would like run also but will have to wait to see what happens with the 40s.
I don't understand why you'd want to go through the time and trouble to tumble and dry them once with the primers in so you can tumble and dry them at a later date after you deprime and size them? I deprime a bucket at a time as I have the time, and then tumble and dry them as a batch. After that it's just a resize and 5 minutes tumble in walnut to clean the lube off and I'm done. No wondering about how long to dry them to get the water out of the primers, and then retumbling to clean the primer pockets. Again, I'm not criticizing, just discussing technique. It seems to me there's less wasted motion and effort to tumble them once, than to dry them with the primers in. i agree with you. with my case feeder it is simple to just put the decapper in and deprime everything then i tumble and dry them and store for loading when ever i want. 95% of my brass is cleaned and stored waiting to be loaded. |
|
|
|
|
[#35]
Originally Posted By kaos:
Originally Posted By jah141:
I'm not trying to nit-pick. I'm not so good that I can take the scrutiny. Well I just ran a batch of 40s their in the oven now. I will experiment after they dry I'll pop a few out see they are all the way dried. Also check how much press to pop out, then let sit for a month and try again and so on. I have 2 more buckets of 30.06 I would like run also but will have to wait to see what happens with the 40s.
I don't understand why you'd want to go through the time and trouble to tumble and dry them once with the primers in so you can tumble and dry them at a later date after you deprime and size them? I deprime a bucket at a time as I have the time, and then tumble and dry them as a batch. After that it's just a resize and 5 minutes tumble in walnut to clean the lube off and I'm done. No wondering about how long to dry them to get the water out of the primers, and then retumbling to clean the primer pockets. Again, I'm not criticizing, just discussing technique. It seems to me there's less wasted motion and effort to tumble them once, than to dry them with the primers in. Dont worry about me Like I say at work I only have one feeling and I didn't bring it with me. That being said I have always cleaned my brass more than once. I like clean brass going threw my dies. My guess is there is about 10,000 40 cases in that bucket and I'm just using a lee loadmaster and dam that would make my arm sore. I would just like to clean my brass stock pile for later use. |
|
|
|
NC, USA
|
[#36]
Hey Guys,
I've rounded up an electric motor 1/3 hp 1750 rpm for free I'm having a hard time finding the drum parts locally though. I do however need it to be able to handle 50 bmg cases which are 4" long so I'm not sure that the 6" drums you guys are using will do the job. Jason |
|
|
MI, USA
|
[#37]
PM BIGDAWG, he can help you out.
|
|
|
|
[#38]
Originally Posted By SCRAMBLD:
Hey Guys, I've rounded up an electric motor 1/3 hp 1750 rpm for free I'm having a hard time finding the drum parts locally though. I do however need it to be able to handle 50 bmg cases which are 4" long so I'm not sure that the 6" drums you guys are using will do the job. Jason you may want to try a real plumbing supply house and look for an 8 in pvc pipe. |
|
|
|
CT, USA
|
[#39]
Where are u guys getting ur bearings from? looked at home depot and ace today and no luck. Any particular place or website?
|
|
|
|
[Last Edit: jah141]
[#40]
Originally Posted By Pabs311:
Where are u guys getting ur bearings from? looked at home depot and ace today and no luck. Any particular place or website? www.bearingson.com is where I got mine thier called pillow block and shaft rod from grainger |
|
|
|
|
[#41]
Originally Posted By Pabs311:
Where are u guys getting ur bearings from? looked at home depot and ace today and no luck. Any particular place or website? i get my bearings here http://www.usabearingsandbelts.com/m7/UCP201-8%20Bulk––1-2-pillow-block-bearings-bulk-sales-ucp201-8-shipping-included.html |
|
|
|
NC, USA
|
[#42]
currently discussing drum options with Biggdawg via Email. so hopefully I'll be tumbling in a week or 2
Jason |
|
|
|
[#43]
Random information:
2,000 rounds of decapped 5.56 brass is about 8 inches high in a 3.5 gallon bucket and displaces 1 inch of water when poured into a 5 gallon bucket containing enough water to cover the brass. |
|
|
|
NC, USA
|
[#44]
well we came to the decision that since I need it to handle 50 bmg that he'd build me a 3.5 gallon drum using 8" pipe. damn its going to be heavy when full of 5.56 or pistol brass but oh well.
Originally Posted By SCRAMBLD:
currently discussing drum options with Biggdawg via Email. so hopefully I'll be tumbling in a week or 2 Jason |
|
|
CT, USA
|
[Last Edit: Pabs311]
[#45]
For future reference, this is the best deal. The bulk buy with free shipping is the best deal i saw. ordered em up and waiting now.
EDIT: meant to quote BIGGDAWG http://www.usabearingsandbelts.com/m7/UCP201-8%20Bulk––1-2-pillow-block-bearings-bulk-sales-ucp201-8-shipping-included.html |
|
|
|
[Last Edit: kaos]
[#46]
Originally Posted By SCRAMBLD: Some stuff I dry tumble in bulk, for other reasons. I dry tumble for about a half hour just to clean the tarnish off enough to read the head stamps so I can separate the brass into big piles. well we came to the decision that since I need it to handle 50 bmg that he'd build me a 3.5 gallon drum using 8" pipe. damn its going to be heavy when full of 5.56 or pistol brass but oh well. Originally Posted By SCRAMBLD: currently discussing drum options with Biggdawg via Email. so hopefully I'll be tumbling in a week or 2 Jason Other stuff I wet tumble after I decap. Both methods use 5 gallon buckets like the ones from H.D. or Lowes, with screw on lids. Yes they get heavy to lug around. As I said above your post - 2000 rounds of 5.56 brass displaces an inch of water. That inch of water is a quart in the bucket. 2000 rounds weigh about 27 pounds. The water weighs about 2 pounds. You're increasing the tumbler barrel weight by 25 pounds by adding the brass. OTOH, I can get away with only 15 pounds of SS pins instead of the '5 pounds/gallon' rule. You can probably use 10 pounds. Add about 2.5 to 3 gallons of water and you've got another 22 to 25 pounds of water. 60 pounds approx with no handle, unless you can fab some handles on the tube that clear the axles while it's spinning. The only thing I can think of is 3 inch diameter wheels on the axles to get some clearance. The above is just my anecdotal experience. Your mileage WILL vary. |
|
|
|
NC, USA
|
[Last Edit: SCRAMBLD]
[#47]
Tumbler is done, need pins and the Large Drum from BIGGDAWG, Thanks for building it for me.
Time for pics. 
First off I cut all my angle and Deburred and cleaned the areas that would be welded. 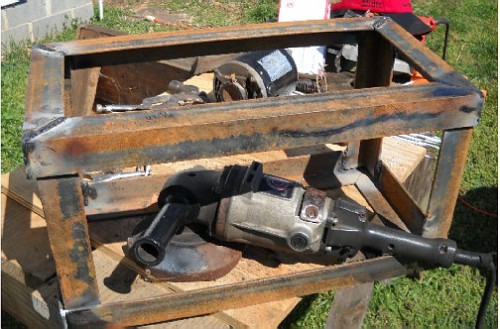
all welded up other than the motor mount and ready to grind down all the welds nice and smooth. 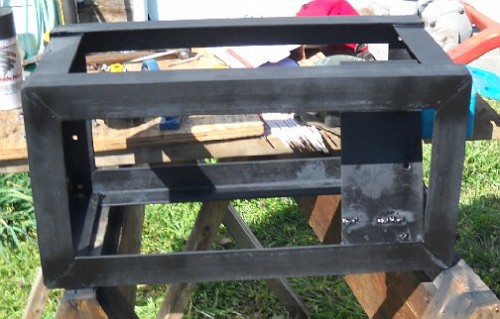
Motor mount installed and primered ready for the finish coat 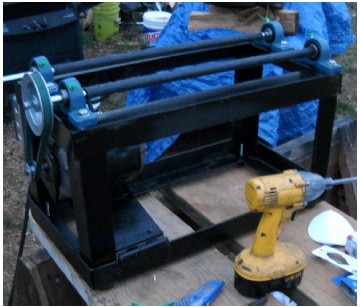
all finished up ready for a test run 
I used the 5 gal water bottle just to test it to make sure everything was working the way I wanted it too. 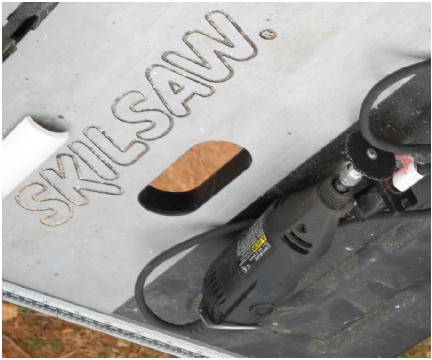
I got out my Table saw and dremel and dewalt cordless tools for making the drums. 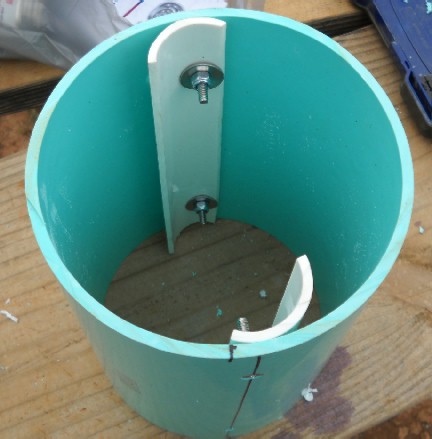
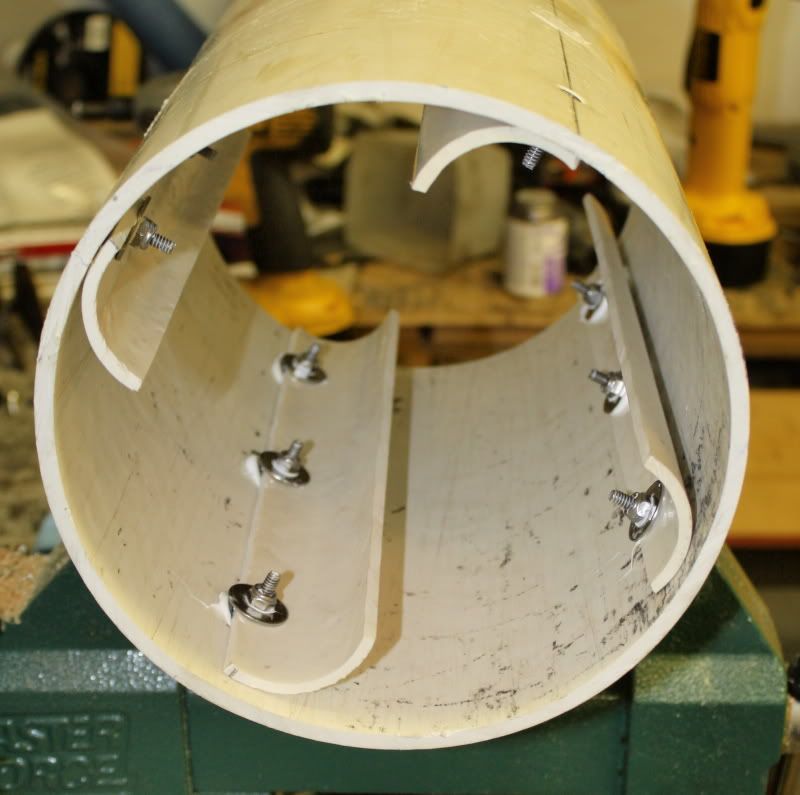
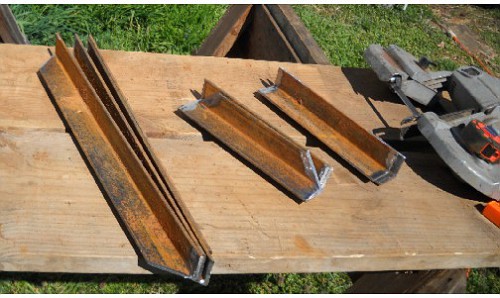
I cut the tubes to length and then I ripped the 1&1/2" pipe into 1/3rds to make the agitators and bolted them inside the tube so that the glued on fittings would conceal and seal the mounting hardware ( great idea Biggdawg) 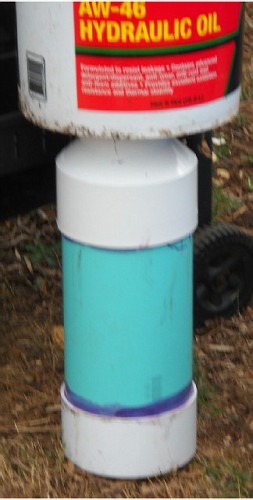
once I glued the fittings on, I weight the drum to keep the fitting from being pushed off by Hydraulic pressure between the pipe, glue and fitting, I'm a commercial electrician and I've seen it happen on PVC conduit especially the 3 in. and larger pipe. 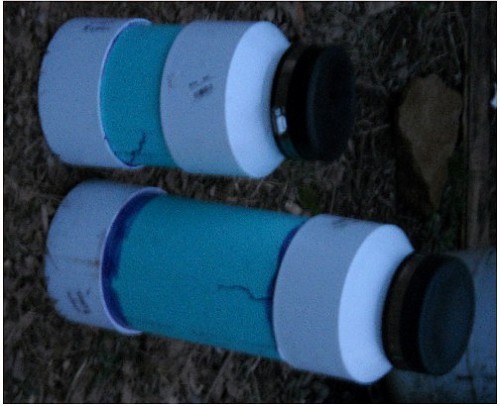
finished drums, the tallest one is 21" over all and the smaller is 13" overall. http://www.youtube.com/watch?v=On_cf3V5Qb0&feature=channel test run with water bottle http://www.youtube.com/watch?v=c6RQNd1KIbk&feature=youtu.be test run with small drum no leaks Thanks to BIGGDAWG for inspiring me to build this and all those that built thier own as well Jason edit for video links |
|
|
AZ, USA
|
[#48]
Nice! I need to learn how to weld.
|
|
|
|
[#49]
Originally Posted By SCRAMBLD:
Tumbler is done, need pins and the Large Drum from BIGGDAWG, Thanks for building it for me. Time for pics. http://images61.fotki.com/v380/photos/6/60416/1967545/wettumbler6-vi.jpg First off I cut all my angle and Deburred and cleaned the areas that would be welded. http://images15.fotki.com/v587/photos/6/60416/1967545/wettumbler4-vi.jpg all welded up other than the motor mount and ready to grind down all the welds nice and smooth. http://images60.fotki.com/v370/photos/6/60416/1967545/wettumbler2-vi.jpg Motor mount installed and primered ready for the finish coat http://images16.fotki.com/v382/photos/6/60416/1967545/wettumbler8-vi.jpg http://images15.fotki.com/v587/photos/6/60416/1967545/wettumbler7-vi.jpg all finished up ready for a test run http://images55.fotki.com/v648/photos/6/60416/1967545/Wettumbler1-vi.jpg I used the 5 gal water bottle just to test it to make sure everything was working the way I wanted it too. http://images16.fotki.com/v383/photos/6/60416/1967545/tools-vi.jpg I got out my Table saw and dremel and dewalt cordless tools for making the drums. http://images40.fotki.com/v775/photos/6/60416/1967545/insideofdrum-vi.jpg I cut the tubes to length and then I ripped the 1&1/2" pipe into 1/3rds to make the agitators and bolted them inside the tube so that the glued on fittings would conceal and seal the mounting hardware ( great idea Biggdawg) http://images61.fotki.com/v373/photos/6/60416/1967545/mediumdrum-vi.jpg once I glued the fittings on, I weight the drum to keep the fitting from being pushed off by Hydraulic pressure between the pipe, glue and fitting, I'm a commercial electrician and I've seen it happen on PVC conduit especially the 3 in. and larger pipe. http://images61.fotki.com/v219/photos/6/60416/1967545/tumblerdrums-vi.jpg finished drums, the tallest one is 21" over all and the smaller is 13" overall. http://www.youtube.com/watch?v=On_cf3V5Qb0&feature=channel test run with water bottle http://www.youtube.com/watch?v=c6RQNd1KIbk&feature=youtu.be test run with small drum no leaks Thanks to BIGGDAWG for inspiring me to build this and all those that built thier own as well Jason edit for video links Wow looks like it turned out great. glad i could help welcome to the """ BLING"" CLUB |
|
|
|
NC, USA
|
[#50]
Originally Posted By CSCameron:
Nice! I need to learn how to weld. CSCameron, Welding is not all that difficult, If you would like to learn see if you can find a friend or neighbor that has the equipment and is willing to spend a little time showing you the ropes. If you want an inexpensive welder that can handle up to 1/4 steel you can buy one of the small wire welder from lowes or home depot. Like these two which will allow you to grow with it by adding shielding gas when you get more proficient. Lincoln Wire Welder lincoln at home depot I've used these in the past and they do really well in the home owner setting and they should serve you well for many many years. Wire welding is pretty simple, once you get the amperage and wire speed set for the material that is being welded, and you can write you name, You can use a wire welder its just like any other skill it takes practice. The easiest way i can describe it is... while welding if it sounds a lot like Bacon frying you are probably doing it right. If you were closer I'd teach you myself, I have plenty of metal and lots of welding rods and welding wire. Jason |
|
|
 Win a FREE Membership!
Sign up for the ARFCOM weekly newsletter and be entered to win a free ARFCOM membership. One new winner* is announced every week!
You will receive an email every Friday morning featuring the latest chatter from the hottest topics, breaking news surrounding legislation, as well as exclusive deals only available to ARFCOM email subscribers.

AR15.COM is the world's largest firearm community and is a gathering place for firearm enthusiasts of all types.
From hunters and military members, to competition shooters and general firearm enthusiasts, we welcome anyone who values and respects the way of the firearm.

Subscribe to our monthly Newsletter to receive firearm news, product discounts from your favorite Industry Partners, and more.
Copyright © 1996-2024 AR15.COM LLC. All Rights Reserved.
Any use of this content without express written consent is prohibited.
AR15.Com reserves the right to overwrite or replace any affiliate, commercial, or monetizable links, posted by users, with our own.


