|
Posted: 5/6/2009 8:49:05 AM EDT
ONLY A TRAINED GUNSMITH SHOULD ATTEMPT ANYTHING IN THIS POST
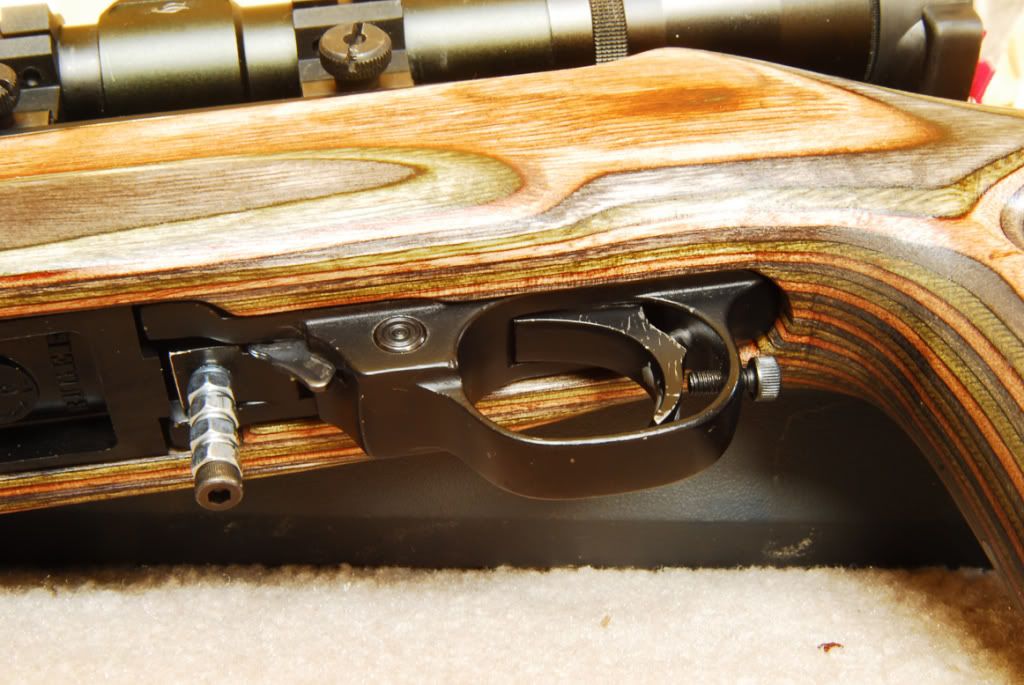
USE THIS INFORMATION @ YOUR OWN RISK!! well i've done the research, so i might as well share what i've learned: i'll start with some essential info, then lay things out in the order i plan to do them. exploded views for assembly/disassembly link how the trigger group parts interact link 1) "stoning the hammer" to reduce trigger pull to the desired weight link i made this the first point b/c it lightens the trigger pull and should probably be attempted before any of the stuff below. in this method u basically file down one side of the notch in your hammer (see link for pics). u file it down gradually to slowly decrease the amount of tension required to fire the gun. if u go too far, you'll make the gun inoperable and usafe. USE EXTREME CAUTION! if you're scared, you can buy an aftermarket hammer that's already got this done from manufacturers like Volquartsen or RT ( link to lots of goodies for the rich and/or lazy ) 2) the "jb weld trick" link this trick removes the excessive take up in the factory trigger without reducing trigger pull weight (it shortens the first part of your trigger pull). it costs about $5 and takes about 20 minutes of work and 1 day of cure time. another example of the jb weld trick to remove the take-up in the stock trigger this method can be done by purchasing a new sear with a set screw in it. if my memory serves these sears are available @ the link in point #1"stoning the hammer". or if you're brave you can drill and tap your factory sear with a set screw to accomplish the same result. i've also seen the take up on both ends of the trigger pull done with 2 different set screws drilled and tapped into the actual receiver that houses the trigger group. sorry no links available @ this time for these methods, but i did see them on that rimfirecentral.com forum somewhere 3) polishing the hammer, sear, disconnector, & trigger return plunger link this link shows excellent before and after pics of the surfaces to be polished. this mod will provide a smoother trigger pull, reduce the weight of the trigger pull, and will aide shooting subsonic ammo, especially if you've altered any springs in your trigger group. 4) the "set screw method" to remove trigger over-travel, aka takes out the slack not addressed by point #2 "the jb weld trick" link i'll provide more info & updates when i have time, feel free to post if u see errors or have anything to add from personal experience. i purposely did not copy and paste the info or pics so as not to leech bandwidth and to provide credit to the original posters. thanks and enjoy 
eta: update: Volquartsen makes an adjustable trigger i've been thinking of purchasing, or drill/tap my factory trigger in similar fashion also, Power Custom makes an adjustable sear i've been looking @, or i could drill/tap my factory sear as well. these parts have an adjustment screw in them. the Power Custom adj sear shortens trigger engagement (trigger take-up, the beginning of the trigger pull, aka creep). the adjustable sear would be an alternative to the "jb weld trick" the Volquartsen adj trigger takes care of the latter part of the trigger pull |
|
|
|
[#1]
|
|
|
|
[#2]
Thanks for posting. I did the stoning thing a while ago, but just polished the trigger guts today and it definitely made for a smoother pull. I also cut a link or two off of the hammer spring, which helped. Now onto the epoxy trick..

|
|
|
|
[#3]
Quoted:
glad the information is useful, i'd love to hear how things work out. post pics of the process & results if you have time.
Thanks for posting. I did the stoning thing a while ago, but just polished the trigger guts today and it definitely made for a smoother pull. I also cut a link or two off of the hammer spring, which helped. Now onto the epoxy trick.. |
|
|
|
[#4]
Quoted:
Quoted:
glad the information is useful, i'd love to hear how things work out. post pics of the process & results if you have time.
Thanks for posting. I did the stoning thing a while ago, but just polished the trigger guts today and it definitely made for a smoother pull. I also cut a link or two off of the hammer spring, which helped. Now onto the epoxy trick.. Pics would be pretty much the same as what's in the links above. The only extra thing was the hammer spring, and that's just the standard spring sans 2 links or so and ground to be flat on the end. Something else that I did, which I may take pictures of later was lapping the barrel/bolt face to mate up 100%, but that's not for the trigger. |
|
|
|
[#5]
update:
Volquartsen makes an adjustable trigger i've been thinking of purchasing, or drill/tap my factory trigger in similar fashion also, Power Custom makes an adjustable sear i've been looking @, or i could drill/tap my factory sear as well. these parts have an adjustment screw in them. the Power Custom adj sear shortens trigger engagement (trigger take-up, the beginning of the trigger pull, aka creep), and the Volquartsen adj trigger takes care of the latter part of the trigger pull and would be an alternative to the "jb weld trick" |
|
|
|
[#6]
no offense but a monkey coud do some of these things. anyone with common sense and basic firearm knowledge can safely and effectively do some of these things
|
|
|
|
[#7]
Quoted:
none taken.
no offense but a monkey coud do some of these things. anyone with common sense and basic firearm knowledge can safely and effectively do some of these things i put the disclaimer @ the top because these modifications, especially "stoning the hammer", can cause the safety to stop functiong if you remove too much material. not to mention the fact that adding or removing too much material in certain areas on certain parts could also cause the firearm owner to inadvertently violate federal law. also, many of the things listed above are not mere common sense nor would they be considered basic firearm knowledge you are correct when you say that anyone can safely and effectively do these things if they have the proper tools and the necessary time/patience |
|
|
|
[#8]
I just finished doing this to my 10/22. I got a three pound trigger with little creep and survives the drop test with no problem.
Hopefully I can take it to the range soon and try it out. |
|
|
|
[#9]
Quoted:
thanks for the report! glad to hear it worked out for you. let us know how it shoots
I just finished doing this to my 10/22. I got a three pound trigger with little creep and survives the drop test with no problem. Hopefully I can take it to the range soon and try it out. |
|
|
|
[#10]
I have done all of these to my 10/22 action as well as adding a radius the lower rear of the bolt to aid in cycling. I now have a 2.8 lb, crisp trigger pull with very little travel that cost me less than $10 in parts, sandpaper and jb weld. Took about 5 hours spread over a few days to do it all.
didn't take any pics of the process. |
|
|
|
[#11]
I have done this with parts and stoning a couple of times. Once it worked out well. Once, not so well. My ultimate answer is to replace the trigger group with a Kidd trigger. I feel it is the best trigger available.
|
|
|
|
[#12]
Quoted:
i would personally not spend more than i paid for the rifle on a trigger, but i'm glad you're happy with the Kidd
I have done this with parts and stoning a couple of times. Once it worked out well. Once, not so well. My ultimate answer is to replace the trigger group with a Kidd trigger. I feel it is the best trigger available. eta: Quoted:
nice rifle, i'd like to keep mine looking completely factory. but i like that custom mag release extension
I have done all of these to my 10/22 action as well as adding a radius the lower rear of the bolt to aid in cycling. I now have a 2.8 lb, crisp trigger pull with very little travel that cost me less than $10 in parts, sandpaper and jb weld. Took about 5 hours spread over a few days to do it all. http://i236.photobucket.com/albums/ff131/dupemaster007/Guns/CHI_0239.jpg didn't take any pics of the process. |
|
|
|
[#13]
|
|
|
|
[#14]
i kinda figured they had been, but i thought i'd consolidate everthing needed for a trigger job in one place. i mainly posted this so that i could refer to one place when i do my trigger job. i do appreciate your sarcasm though
|
|
|
 Win a FREE Membership!
Sign up for the ARFCOM weekly newsletter and be entered to win a free ARFCOM membership. One new winner* is announced every week!
You will receive an email every Friday morning featuring the latest chatter from the hottest topics, breaking news surrounding legislation, as well as exclusive deals only available to ARFCOM email subscribers.

AR15.COM is the world's largest firearm community and is a gathering place for firearm enthusiasts of all types.
From hunters and military members, to competition shooters and general firearm enthusiasts, we welcome anyone who values and respects the way of the firearm.

Subscribe to our monthly Newsletter to receive firearm news, product discounts from your favorite Industry Partners, and more.
Copyright © 1996-2024 AR15.COM LLC. All Rights Reserved.
Any use of this content without express written consent is prohibited.
AR15.Com reserves the right to overwrite or replace any affiliate, commercial, or monetizable links, posted by users, with our own.


