|
[#1]
You might try looking at the refinishing forum in the armory section.
I have painted a WASR. I used Duracoat, though. 
I just sanded a bit on the park finish, then cleaned, and used Duracoat. Blasting might work better, but then you might have to repark. The park makes a very good base for paint. I have painted one gun with high temp header paint. It turned out fairly well. I have painted a few magazines and such with the Duplicolor engine paints, and while it looked ok, some solvents could harm it. 
Sorry I can't help you very much with the auto style paints. I abandoned that approach after I started using Duracoat and Gunkote. |
|
|
|
[#2]
I've used high temperature ceramic break caliper spray can paint, bought it at Auto Zone or Advance auto parts store. Spray it on, cured in oven then reapply and cure again.
Low cost coating and easy to touch up and reapply. Full disclosure. |
|
|
|
[#3]
Are you wanting camo or black?
Camo - use krylon as it dries very fast and is durable for what it is. The beauty is that you can touch up as it wears should it bother you. Aervoe will have the best color choices but can be tacky for a while - best used in conjunction with an old oven for curing. The rustoleum stuff blows IMO. No prep other than a quick wipe down with dry cloth. Tape your rear sight and pull the safety and paint it seperate. I also pull the carrier out and stuff a paper towel in the gap. If you want black - the semi gloss engine enamel works great - used it on the draco. Only difference in prep was to wipe down with an alcohol swab to get surface grease off. Bake it or cure it under a heat lamp. |
|
|
|
[#4]
Just krylon the bastard.
Take elements from your AO and experiment. It's your canvas. |
|
|
|
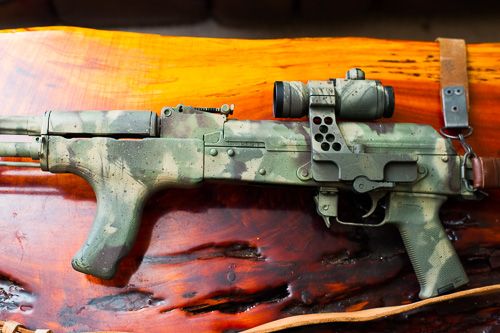
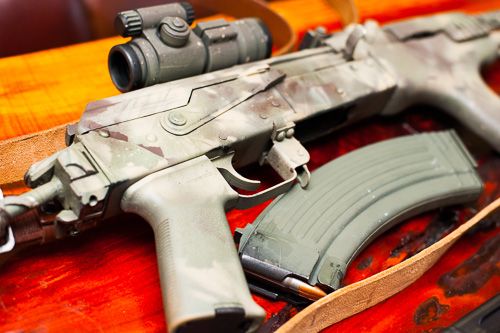
[#5]
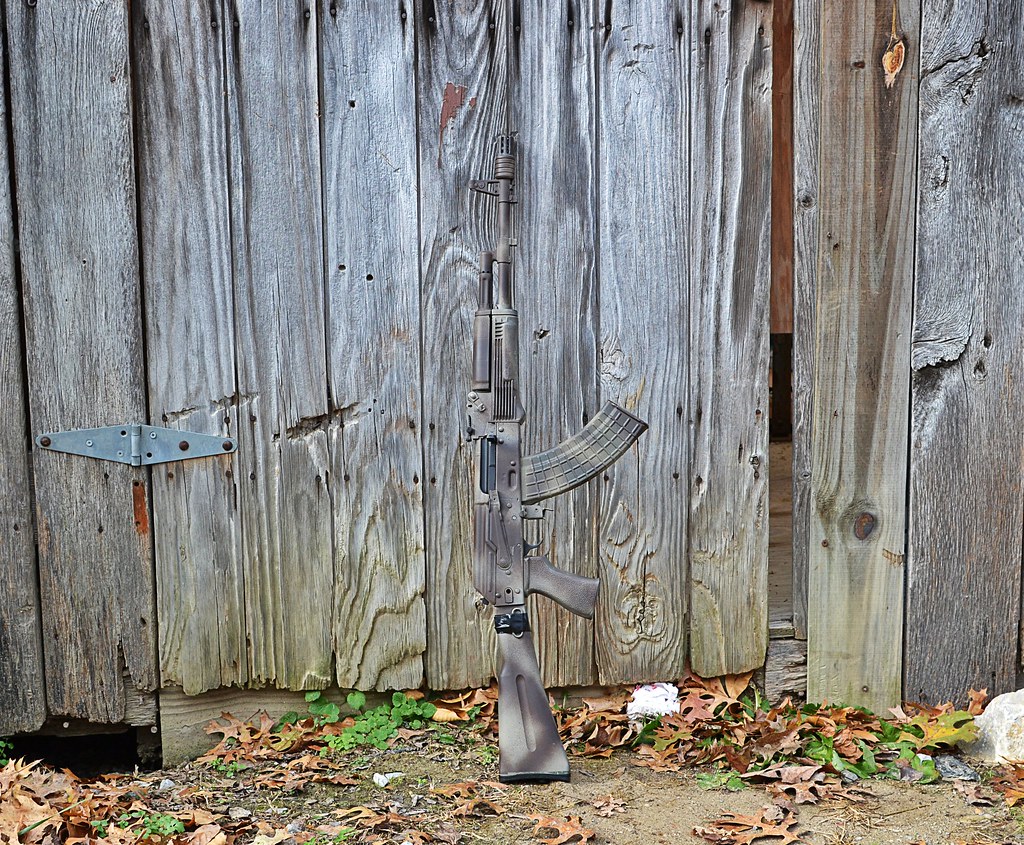
My wasr has been painted many times over it's life time. It has gone through many iterations of high temp engine paint, rattle can, Gun Kote, & moly paints. Each time, I thoroughly degrees the parts, sand blast with aluminum oxide, and then paint. Most of paints holds up reasonably, except for the rattle can.
This is my latest iteration: 
|
|
|
|
[#6]
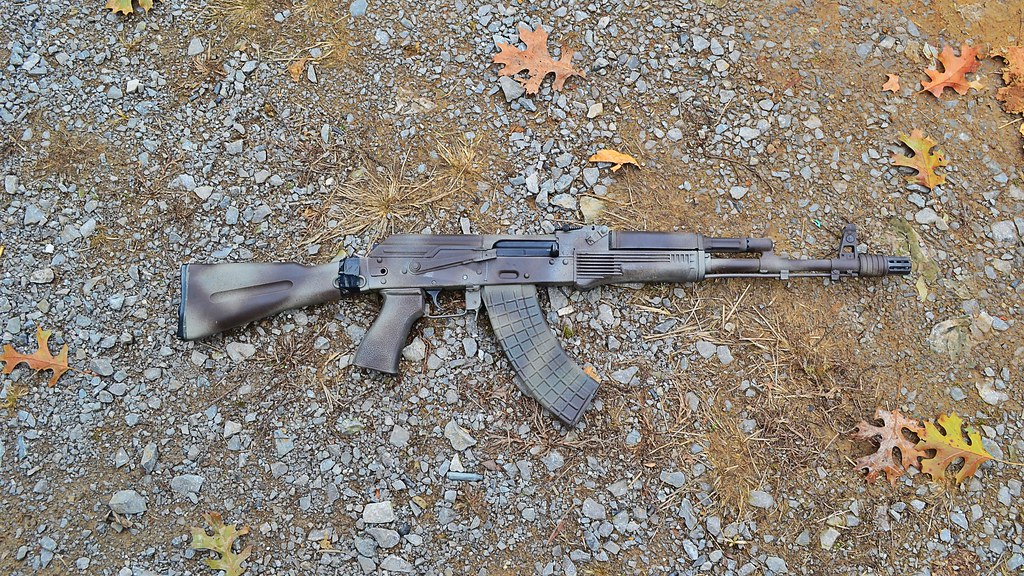
De-greased and painted.......no real special prep.

|
|
|
|
[#7]
|
|
|
|
[#8]
the degrease and prep are important. I degrease, then sweat the rifle in the oven for about 30 mins. That gets all the hidden grease in the pins and center support to come out. Then degrease again, dry and paint.
|
|
|
|
[#9]
Thanks for the replies guys!
Finslayer: I'm just going with black, and I thought I remembered you using the engine paint on the Draco, one of the big reasons I want use it here as I thought the Draco turned out really nice. It's gonna look a little wierd to some, as the Mrs. likes how chicom stocks fit her and leave her head in a better position for a proper cheek weld, but the wood should should look great with a fresh coat of black on the receiver I think. Oven is just barely large enough I can fit the receiver in. Didn't think about the park being a good base for paint, but that's been my experience too on small parts, thanks for pointing that out, now i'm thinking maybe just a brisk rub-down with 0000 steel wool and degreasing for prep. |
|
|
|
[#10]
Quoted:
No prep other than a quick wipe down with dry cloth. Tape your rear sight and pull the safety and paint it seperate. I also pull the carrier out and stuff a paper towel in the gap. Why's that? |
|
|
|
[#11]
Quoted:
Why's that? Quoted:
Quoted:
No prep other than a quick wipe down with dry cloth. Tape your rear sight and pull the safety and paint it seperate. I also pull the carrier out and stuff a paper towel in the gap. Why's that? Think about it. If you don't then you are going to have a big safety shaped spot that doesn't get painted. |
|
|
|
[#12]
Quoted:
Think about it. If you don't then you are going to have a big safety shaped spot that doesn't get painted. Quoted:
Quoted:
Quoted:
No prep other than a quick wipe down with dry cloth. Tape your rear sight and pull the safety and paint it seperate. I also pull the carrier out and stuff a paper towel in the gap. Why's that? Think about it. If you don't then you are going to have a big safety shaped spot that doesn't get painted. this. if the safety is up or down you won't get full paint coverage on the receiver. |
|
|
|
[#13]
I painted the rifle last night, I took the advice of sksmedic and went with appliance epoxy, and it turned out just stunningly well, I used the prep tips here too, and got the whole thing squeaky clean prior to painting, and heated the parts and paint before applying then baking, the rifle looks better than new. I also straightened the front sight block so it's dead-on now, going to do a custom winter/urban tiger strip job on the furniture, will post pics when done, thanks again guys!
|
|
|
|
[#14]
I'm in for the pics.
|
|
|
|
[#15]
Quoted:
De-greased and painted.......no real special prep. <a href="http://s48.photobucket.com/user/mvician/media/AK47/P1200711_zps7743c002.jpg.html" target="_blank">http://i48.photobucket.com/albums/f240/mvician/AK47/P1200711_zps7743c002.jpg</a> |
|
|
|
[#16]
degreese and krylon
any other paint is a waste imo |
|
|
|
[#17]
PICS!
|
|
|
|
[#18]
Degreased with carb cleaner and painted with auto chassis paint

|
|
|
|
[#19]
Quoted:
Degreased with carb cleaner and painted with auto chassis paint http://oi58.tinypic.com/153l1j7.jpg Looks like an anteater, but I like it. |
|
|
|
[#21]
Quoted:
Degreased and painted. <a href="https://flic.kr/p/pptsWH" target="_blank">https://farm8.staticflickr.com/7503/15361843733_71c3c0d595_c.jpg</a>Untitled by ostaF, on Flickr I like it! Nice job. |
|
|
|
[#22]
Quoted:
I like it! Nice job. Quoted:
Quoted:
Degreased and painted. <a href="https://flic.kr/p/pptsWH" target="_blank">https://farm8.staticflickr.com/7503/15361843733_71c3c0d595_c.jpg</a>Untitled by ostaF, on Flickr I like it! Nice job. +1 |
|
|
|
[#23]
 </a>" /> </a>" />
 </a>" /> </a>" />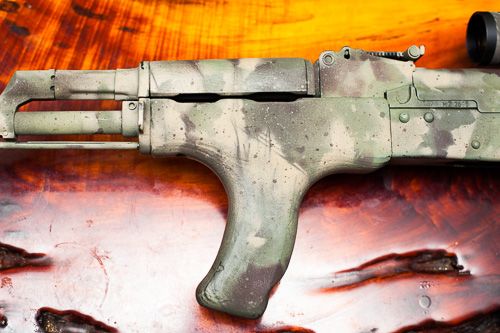 </a>" /> </a>" />
 </a>" /> </a>" />
Both were degreased and hit with High temp engine paint, the black one has it on a lot thicker where there aren't any moving parts, not pretty, but it should be a good moisture barrier. The camo one is a pretty even coat. The camo was done with a 2 green base coat, pretty much just like finslayer's, then covered with leaves for a stencil, and hit with the brown and tan. Its a bit darker in real life. The hardest part was painting the M3, that was just green with pine needles and a bit of brown. Then used the tan to "spatter" the tiny drops. |
|
|
|
[#24]
Quoted: Degreased and painted. https://farm8.staticflickr.com/7503/15361843733_71c3c0d595_c.jpgUntitled by ostaF, on Flickr |
|
|
|
[#25]
I tend to over do things, so I took mine down to bare metal with a wire wheel, degreased it with hot water and an auto parts degreaser, dried it thoroughly, applied high heat automotive paint, then baked it in the oven per the instructions on the can. It came out looking like a dark, flat gray so I rub oil into it occasionally to give it a dark, semi-gloss sheen similar to oiled park.
I should have sweated out the grease like an earlier post mentioned, I had some adhesion issues around the rivets caused by either leftover water during painting or old oil seeping out during the bake. Oil doesn't harm it at all, but I've had some come off the front face of the front sight tower, which I believe was caused by Hoppe's 9 being wrung out of patches as they're stuffed into the bore. I wrapped one layer of painters tape around a spent case and gently tapped it into the chamber to keep paint out of the barrel (I just stuffed a piece of paper towel in the muzzle end). |
|
|
|
[#26]
Quoted:
I should have sweated out the grease like an earlier post mentioned, I had some adhesion issues around the rivets caused by either leftover water during painting or old oil seeping out during the bake. Oil doesn't harm it at all, but I've had some come off the front face of the front sight tower, which I believe was caused by Hoppe's 9 being wrung out of patches as they're stuffed into the bore. That was one of the best tips i've seen, I did it and even after heating once and thoroughly degreasing and washing, on the second trip in the oven I still had oil or old cosmo that came out. And not just in riveted areas and seams, the gas tube had some come out from under where the spot-welded handguard retainer area is. Working on painting the wood is next project for me, but had almost a complete set of black plastic furniture, found a Tapco stock cheap and got it in, old rifle looks brand new and actually really good with the black furniture and new black paint job. And of course nothing goes together quite so well as Tapco and WASR's, lol, f**k yeah, 'Murica! |
|
|
|
[#27]
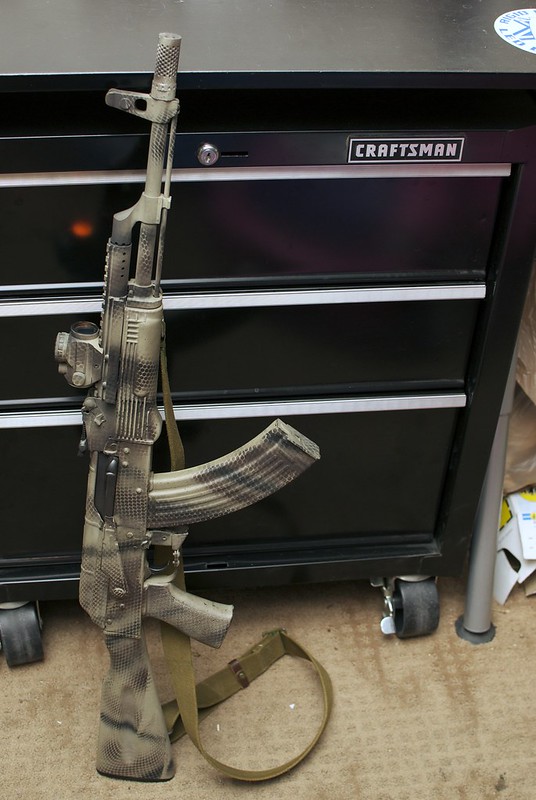
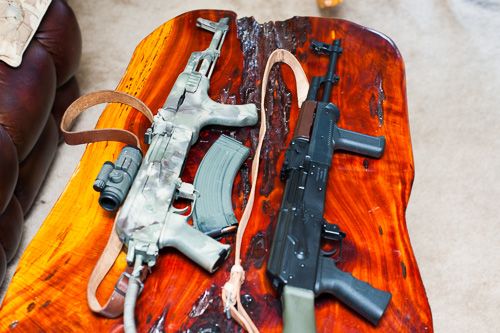
Was trying to wait until I got the other furniture done, or at least for a day with some good light to take pics, but apparently both are going to take a while. So here's some crappy pics, turned out nice, Mrs. Dragynn really warmed up to it after I got done with the refinishing. The Damage industries brake looks great, it actually has a little taper to it which is hard to see in the pics on their site, nice slim profile looks good with the slim barrel. I replaced the rear sight with a Vepr windage adjustable leaf and I corrected the tiny amount of front sight cant, now need to take it out and see how she shoots!


|
|
|
|
[#28]
Looks good, I like it!
|
|
|
|
[#29]
Looks great...it came out nicely.
|
|
|
|
[#30]
Quoted: Was trying to wait until I got the other furniture done, or at least for a day with some good light to take pics, but apparently both are going to take a while. So here's some crappy pics, turned out nice, Mrs. Dragynn really warmed up to it after I got done with the refinishing. The Damage industries brake looks great, it actually has a little taper to it which is hard to see in the pics on their site, nice slim profile looks good with the slim barrel. I replaced the rear sight with a Vepr windage adjustable leaf and I corrected the tiny amount of front sight cant, now need to take it out and see how she shoots! http://oi61.tinypic.com/29z654x.jpg http://oi60.tinypic.com/ivxopf.jpg http://oi58.tinypic.com/jqngcz.jpg |
|
|
|
[#31]
Painted mine today actually.
Used Rust-Oleum Camo spray paint and a sponge. I'm going to let it cure a few days then hit it with a matte clear coat enamel. 
image hosting gif 
how to take a screen shot |
|
|
|
[#32]
Quoted:
Painted mine today actually. Used Rust-Oleum Camo spray paint and a sponge. I'm going to let it cure a few days then hit it with a matte clear coat enamel. <a href="http://postimage.org/" target="_blank">http://s2.postimg.org/jnp3rft4p/10846080_10204017917701497_5323331395542371902_n.jpg</a> image hosting gif <a href="http://postimage.org/" target="_blank">http://s2.postimg.org/4qgmqffw9/10685604_10204017917741498_7294575772435015013_n.jpg</a> how to take a screen shot Looks great. Good job |
|
|
|
[#33]
Looks like I need to paint my AK and that we need a painted AK pic thread.
|
|
|
|
[#34]
Quoted:
Painted mine today actually. Used Rust-Oleum Camo spray paint and a sponge. I'm going to let it cure a few days then hit it with a matte clear coat enamel. <a href="http://postimage.org/" target="_blank">http://s2.postimg.org/jnp3rft4p/10846080_10204017917701497_5323331395542371902_n.jpg</a> image hosting gif <a href="http://postimage.org/" target="_blank">http://s2.postimg.org/4qgmqffw9/10685604_10204017917741498_7294575772435015013_n.jpg</a> how to take a screen shot Looks great! That matte clear coat will really make it pop, dang good way to prevent small scratches from digging into the color too, I usually always do that when I paint a stock. |
|
|
|
[#35]
Hey guys. What's the durability on all this? 2000 rounds? 3000? Also when you bake, is this oven bake in your oven?
And |
|
|
|
[#36]
Quoted:
Also when you bake, is this oven bake in your oven? And Yep. And actually Mrs. Dragynn doesn't mind it, she's uber cool though, lotta wives might get bent out of shape over it. |
|
|
|
[#37]
Tempted to give one of mine a once over. I love that kryptec looking one.
|
|
|
|
[#38]
Quoted: Yep. And actually Mrs. Dragynn doesn't mind it, she's uber cool though, lotta wives might get bent out of shape over it. Quoted: Quoted: Also when you bake, is this oven bake in your oven? And Yep. And actually Mrs. Dragynn doesn't mind it, she's uber cool though, lotta wives might get bent out of shape over it. |
|
|
|
[#39]
Quoted:
Was trying to wait until I got the other furniture done, or at least for a day with some good light to take pics, but apparently both are going to take a while. So here's some crappy pics, turned out nice, Mrs. Dragynn really warmed up to it after I got done with the refinishing. The Damage industries brake looks great, it actually has a little taper to it which is hard to see in the pics on their site, nice slim profile looks good with the slim barrel. I replaced the rear sight with a Vepr windage adjustable leaf and I corrected the tiny amount of front sight cant, now need to take it out and see how she shoots! http://oi61.tinypic.com/29z654x.jpg http://oi60.tinypic.com/ivxopf.jpg http://oi58.tinypic.com/jqngcz.jpg Good job. Looks great. Where did you get that sling? |
|
|
|
[#40]
Quoted:
Good job. Looks great. Where did you get that sling? Thanks! Got it right here on the EE a few months ago from another cool arfcommer, I have a couple of them, NOS Romy leather, I really like 'em, they look the best when paired with some nice wood furniture. And I really like to buy from fellow enthusiasts here when I can, lot of benefits to doing so. |
|
|
|
[#41]
Looks great!!!
|
|
|
|
[#42]
Installed some laminate furniture I just got done re-finishing, still working on the painted furniture, it's a long process due to multiple colors and having to wait out drying time on each one. Wife really likes the wood better, so this may be how it stays.


|
|
|
|
[#43]
Rifle looks GREAT !!! Have you had a chance to fire it with the DI brake on it yet ?? Was wondering how you liked it since I just ordered one tonight.
|
|
|
|
[#44]
Well done sir, well done.
|
|
|
|
[#45]
Dragynn,
All I can say is that is a fine looking AK. Awesome, actually. |
|
|
|
[#46]
Quoted:
Installed some laminate furniture I just got done re-finishing, still working on the painted furniture, it's a long process due to multiple colors and having to wait out drying time on each one. Wife really likes the wood better, so this may be how it stays. Nice job! I assume yours is one of the newer manufactured ones. The markings look pretty straight. Another tip for next time is use a phosphate prep available at the hardware store. It will clean and prep the metal for better paint adhesion. Let us know how the appliance epoxy holds up to solvents. |
|
|
|
[#47]
Thanks a lot guys! And much credit to all of y'all that not only replied to my questions in this thread, but in all the other threads in all the sections, i've really learned a lot here in the last couple of years, and been repeatedly inspired to try and be a better craftsman myself.
Merry Christmas to one and all, have a safe and happy holiday, I look forward to another great year in 2015 and my New Year's resolution is to try and not badmouth Arsenal products or aggravate their owners anymore. |
|
|
|
[#48]
Quoted: Thanks a lot guys! And much credit to all of y'all that not only replied to my questions in this thread, but in all the other threads in all the sections, i've really learned a lot here in the last couple of years, and been repeatedly inspired to try and be a better craftsman myself. Merry Christmas to one and all, have a safe and happy holiday, I look forward to another great year in 2015 and my New Year's resolution is to try and not badmouth Arsenal products or aggravate their owners anymore. Well said, and Merry Christmas to you also.
|
|
|
|
[#49]
Quoted: Thanks a lot guys! And much credit to all of y'all that not only replied to my questions in this thread, but in all the other threads in all the sections, i've really learned a lot here in the last couple of years, and been repeatedly inspired to try and be a better craftsman myself. Merry Christmas to one and all, have a safe and happy holiday, I look forward to another great year in 2015 and my New Year's resolution is to try and not badmouth Arsenal products or aggravate their owners anymore.  |
|
|
|
[#50]
I've heard good things about Brownell's Aluma-Hyde II and their TCE degreaser. Only issue with this is that you need to let it cure for 2 weeks before handling. Looks like the appliance epoxy turned out pretty smokin' though!
|
|
|
 Win a FREE Membership!
Sign up for the ARFCOM weekly newsletter and be entered to win a free ARFCOM membership. One new winner* is announced every week!
You will receive an email every Friday morning featuring the latest chatter from the hottest topics, breaking news surrounding legislation, as well as exclusive deals only available to ARFCOM email subscribers.

AR15.COM is the world's largest firearm community and is a gathering place for firearm enthusiasts of all types.
From hunters and military members, to competition shooters and general firearm enthusiasts, we welcome anyone who values and respects the way of the firearm.

Subscribe to our monthly Newsletter to receive firearm news, product discounts from your favorite Industry Partners, and more.
Copyright © 1996-2024 AR15.COM LLC. All Rights Reserved.
Any use of this content without express written consent is prohibited.
AR15.Com reserves the right to overwrite or replace any affiliate, commercial, or monetizable links, posted by users, with our own.