|
[#1]
Originally Posted By coctailer:
One of these days I'll get around to putting mine on.  +1 |
|
|
|
NM, USA
|
[#2]
Originally Posted By crackedcornish:
Originally Posted By coctailer:
One of these days I'll get around to putting mine on. +1 Me too. Did this get un-tacked? 
|
|
|
|
[#3]
Yeah, why is it untacked now?
|
|
|
|
|
[Last Edit: coctailer]
[#4]
Iwas making room in case we need some new tacked threads like we have been discussing.
I toggled the archive tab, so it will never drop into the archives though. |
|
|
|
NM, USA
|
[#5]
Awesome - thanks for keeping it around.
|
|
|
|
[#6]
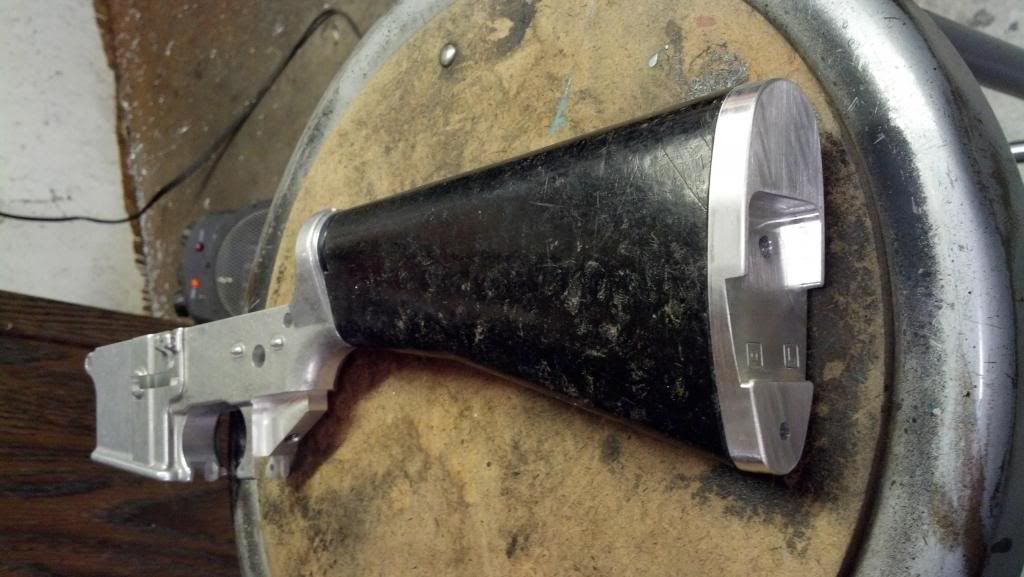
Just finished my 607 lower tonight. Now I need the flash hider, cut the barrel and a tax stamp.
GVS |
|
|
|
FL, USA
|
[#7]
Looks like a wave of 607's are coming.

|
|
|
|
[#8]
Going to start drilling today. Thanks for this guide!
|
|
|
|
|
[#9]
Originally Posted By OlSarge2K:
Going to start drilling today. Thanks for this guide! Good Luck with the project....and keep us updated |
|
|
|
|
[#10]
I tried to drill a test hole (rear lower hole) on an ArmaLite A2 lower.
I had modified a Model1 lower block by bolting a piece of metal on top of the block to hold the lower steady. Something happened to either the lower block or the clamp. End result was the endmill snagged the edge of the lower and milled a large hole in the takedown detent spring channel. I'm glad I toasted an ArmaLite A2 lower instead of my NoDak lower. I was able to "repair" the lower by tapping what was left of the channel and cutting the detent spring in half. A set screw now holds the "custom" spring in place. It looks nasty, but will be functional. I ordered a CNC jig to hold my NDS-601 lower steady while I drill the rear lower hole needed for pinning on a 607 buttstock. Hopefully I'll get it sometime next week. |
|
|
|
FL, USA
|
[Last Edit: Hal143]
[#11]
Originally Posted By TexSquirrel:
I tried to drill a test hole (rear lower hole) on an ArmaLite A2 lower. I had modified a Model1 lower block by bolting a piece of metal on top of the block to hold the lower steady. Something happened to either the lower block or the clamp. End result was the endmill snagged the edge of the lower and milled a large hole in the takedown detent spring channel. I'm glad I toasted an ArmaLite A2 lower instead of my NoDak lower. I was able to "repair" the lower by tapping what was left of the channel and cutting the detent spring in half. A set screw now holds the "custom" spring in place. It looks nasty, but will be functional. I ordered a CNC jig to hold my NDS-601 lower steady while I drill the rear lower hole needed for pinning on a 607 buttstock. Hopefully I'll get it sometime next week. ouch Our first attempt at drilling the rear takedown detent hole resulted in a little bit wandering. Not enough to do any damage thankfully. Then we used the punch to make an indent for the bit and it went smooth from there, varying the pressure to keep the bit straight. |
|
|
|
[#12]
My problem was trying to deepen the rear hole with the endmill.
I'll make sure I use a center punch for the small roll pin hole. |
|
|
|
|
[#13]
I used a center punch and drill a starter hole with a smaller bit. I drilled thur the outside of the take down spring hole. I then used the 1/8/ drill and had no problem drilling it.
GVS |
|
|
|
|
[#14]
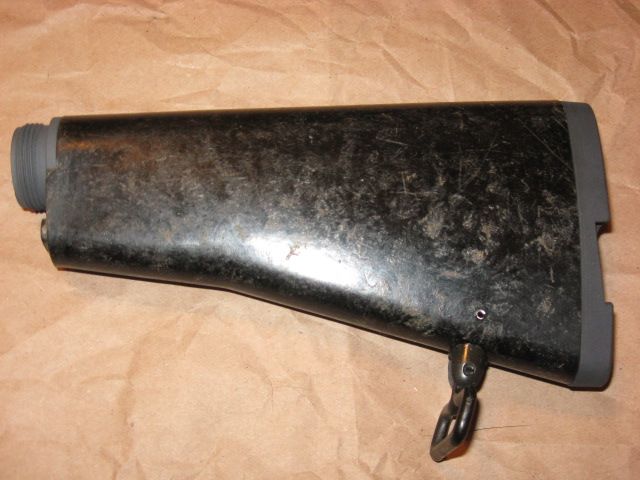
I am mentally and emotionally drained after mounting this bad boy. Even though my buddy did all the hard work.... ;)
This is such an amazing stock. The attention to detail and craftsmanship that went into it is incredible. Taking it apart and mounting it to a lower really made me appreciate the r+d, and hardwork that went into MY65SPAN's stock..... Anyway.... off to bed. |
|
|
|
|
[#15]
How are people choosing to finish the metal on MY65SPAN's stock?
Was considering park'ing the lower rod assy. but since I can't disassemble it, not sure how that would turn out. |
|
|
|
|
[#16]
Originally Posted By SgtRock2:
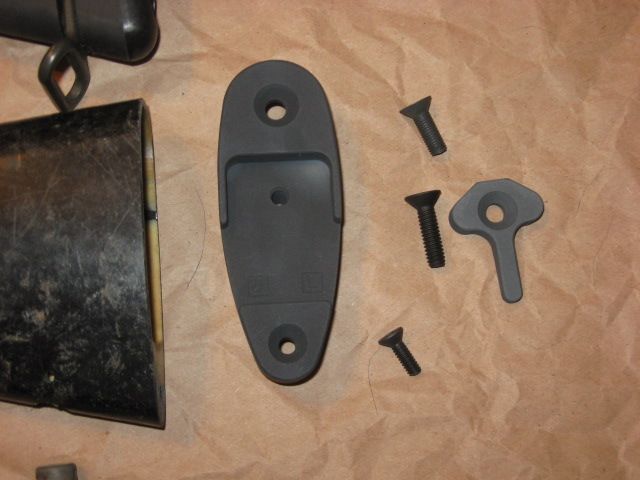
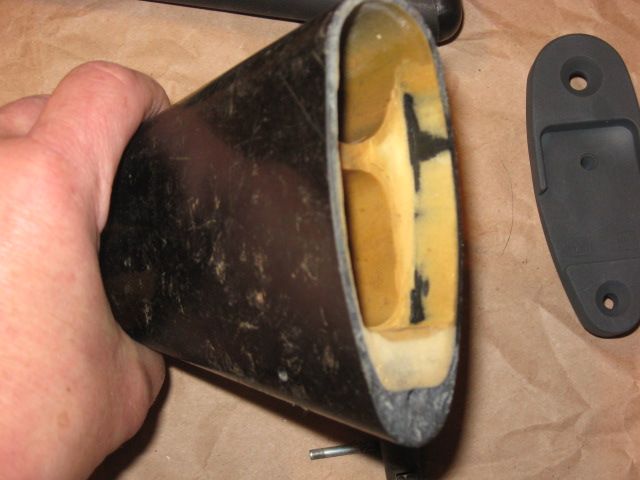
How are people choosing to finish the metal on MY65SPAN's stock? Was considering park'ing the lower rod assy. but since I can't disassemble it, not sure how that would turn out. Why can't you dis-assemble it? Just take the lever screw and buttplate screw out, pull off the lever and buttplate, and then pull the locking tube out the front of the stock body. At this point you can partially extend the locking tube to reach the set screw that secures the locking pin. The set screw is in the end of the inner locking rod. Once you loosen the set screw just pull out the pin and slide the rod out of the tube being careful not to lose the detent ball and spring. I hope this helps. |
|
|
|
IA, USA
|
[Last Edit: xlr8shn]
[#17]
AWESOME instructions!
I plan to put one on an AR10A2 and locate or make some midlength triangular handguards... |
|
|
|
[Last Edit: TexSquirrel]
[#18]
Well my CNC jig finally came in so I gave it another try.
(This time on my NDS-601 lower) I got the lower bolted into the jig, and put it in my drill press vise. I took the belt off my drill press and turned it by hand. It took about 15 minutes for me to get it to the depth I wanted. (.365) I've got a couple of new blisters on my right hand now. I cut off the aluminum rod with my bandsaw about 1/16 too long and used a file to get the rod to the exact length I wanted. The stock now fits perfectly. I decided I'd save the drilling of the hole that holds the rod for another day. I'm pretty tired from working overtime and want to make sure I do a good job.. Hopefully I'll get a chance tomorrow to drill it. If not it will be a couple of weeks before I get to complete it. This is an awesome stock. If I could keep my eyes open I'd head back outside and finish the job! |
|
|
|
|
[#19]
Originally Posted By my65pan:
Originally Posted By SgtRock2:
How are people choosing to finish the metal on MY65SPAN's stock? Was considering park'ing the lower rod assy. but since I can't disassemble it, not sure how that would turn out. Why can't you dis-assemble it? Just take the lever screw and buttplate screw out, pull off the lever and buttplate, and then pull the locking tube out the front of the stock body. At this point you can partially extend the locking tube to reach the set screw that secures the locking pin. The set screw is in the end of the inner locking rod. Once you loosen the set screw just pull out the pin and slide the rod out of the tube being careful not to lose the detent ball and spring. I hope this helps. Totally missed seeing the set screw, thanks...... |
|
|
|
|
[Last Edit: my65pan]
[#20]
Originally Posted By TexSquirrel:
Well my CNC jig finally came in so I gave it another try. (This time on my NDS-601 lower) I got the lower bolted into the jig, and put it in my drill press vise. I took the belt off my drill press and turned it by hand. It took about 15 minutes for me to get it to the depth I wanted. (.365) I've got a couple of new blisters on my right hand now. I cut off the aluminum rod with my bandsaw about 1/16 too long and used a file to get the rod to the exact length I wanted. The stock now fits perfectly. I decided I'd save the drilling of the hole that holds the rod for another day. I'm pretty tired from working overtime and want to make sure I do a good job.. Hopefully I'll get a chance tomorrow to drill it. If not it will be a couple of weeks before I get to complete it. This is an awesome stock. If I could keep my eyes open I'd head back outside and finish the job! Aluminum rod?
Glad the install is going well, keep us posted. Totally missed seeing the set screw, thanks...... No problem. |
|
|
|
|
[#21]
Originally Posted By my65pan:
Aluminum rod?
Glad the install is going well, keep us posted. Steel rod. |
|
|
|
NM, USA
|
[#22]
Originally Posted By TexSquirrel:
Originally Posted By my65pan:
Aluminum rod?
Glad the install is going well, keep us posted. Steel rod. I had to get a magnet & check - I thought my mind had gone the rest of the way down the drain! |
|
|
|
[#23]
Thanks for the info - I will see how I do this weekend
|
|
|
|
|
[Last Edit: my65pan]
[#24]
Originally Posted By JC_:
Thanks for the info - I will see how I do this weekend Just take your time and go slow. I don't recommend trying to do the locking rod hole like Hals gunsmith did though, he must have balls of steel. This method scares me for a lot of reasons. 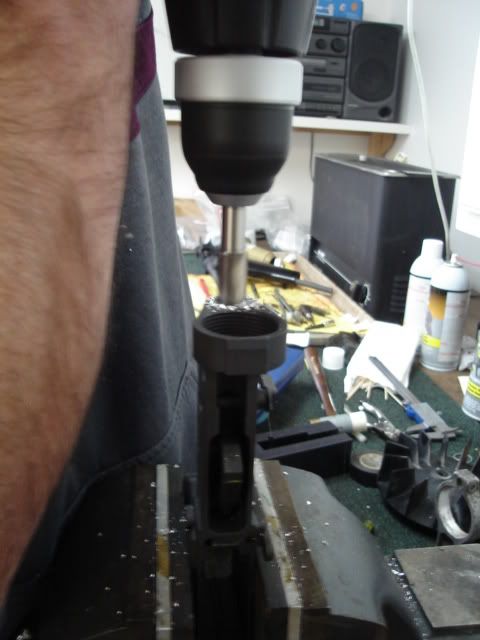
|
|
|
|
MI, USA
|
[#25]
I just got the loaner end mill in the mail, I think Friday or Saturday, and the above method os what I plan on doing.
Maybe.
|
|
|
FL, USA
|
[Last Edit: Hal143]
[#26]
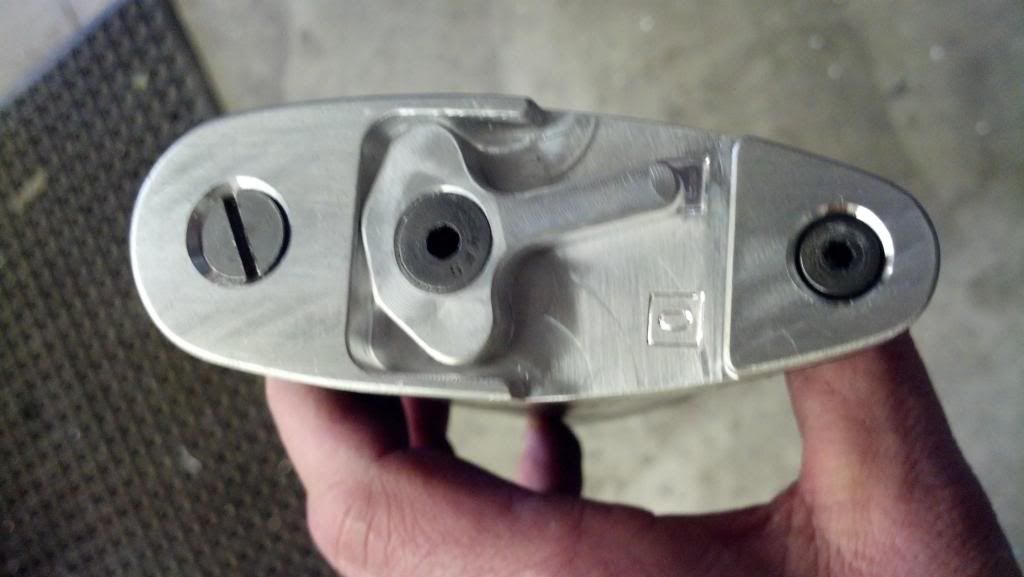
I left it up to my GS to decide how he wanted to do it.
I think the end result speaks for itself. Though I would have used a press, the hole was factory perfect. 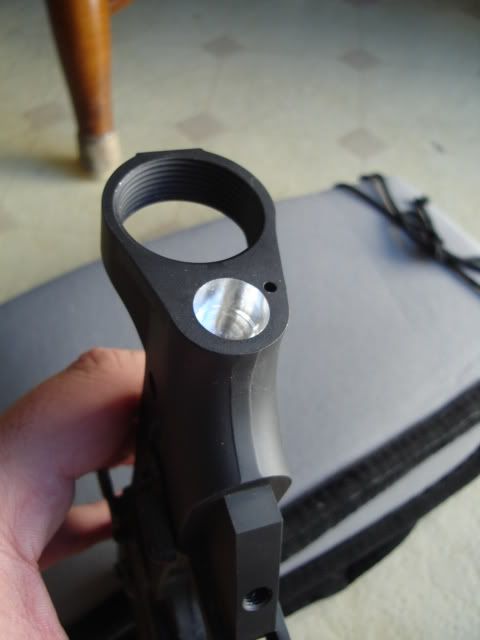
|
|
|
CA, USA
|
[#27]
This is to good to let archive . BTT
|
|
|
PA, USA
|
[#28]
bump
|
|
|
|
[#29]
Keeping it active...
|
|
|
|
|
[#30]
I think I remember seeing this thread, and was just mystified by the stock.
|
|
|
|
|
[#31]
Any sources for 607 stocks at this point?
|
|
|
|
TX, USA
|
[#32]
Originally Posted By Dawg180:
Any sources for 607 stocks at this point? i thought the guy that last made them was getting ready to start back up?? |
|
|
|
[Last Edit: ar15guy]
[#33]
Originally Posted By Dawg180:
Any sources for 607 stocks at this point? Can't provide any insight about the availability of working 607 versions. I was fortunate to be contacted by a member that was selling a "New In Wrap" bolt-on TSI 607 stock assembly when I was building my dedicated 22lr 607. A fellow retro member (braceman) made a fixed (closed) 607 style version for me. I sent the raw metal and RRA entry length buffer tube to John Thomas for anodizing. It turned out pretty darn nice. More info and detailed pictures here: Building a prototype "fixed" 607 style butttock assembly 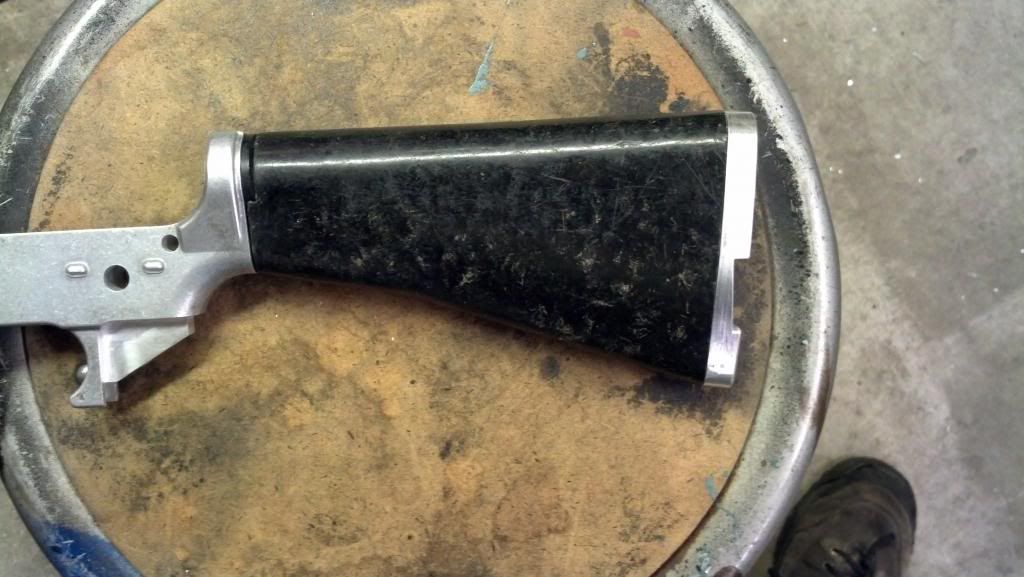


|
|
|
|
NC, USA
|
[#34]
Bumping this 607 stock's modification of receiver How To , so it doesn't get lost in the archives.
|
|
|
|
[#35]
Originally Posted By kudzunc:
Bumping this 607 stock's modification of receiver How To , so it doesn't get lost in the archives. I didn't know this was on the forum, I just thought it was on RBR. Im glad it is on here as I have a little to add to the subject. First, Thanks to Hal143 for taking the time to put this together. I actually used this method the first time I did an install. I have learned a few time consuming, (and at least one expensive) lesson in the 20 or so Ive installed. I would like to share a little of that here. If using this method (non-threaded) do not install the rod with the stock open. You run the risk of the tube not locking when closed. Always pin the rod in place from the closed and locked position. It is a good Idea to mount the receiver where the locking pin is held down by gravity. If your lever does slip out of time after instal, no problem, just remove the lever plug mark and re-pin it. I mentioned above threading... not to many folks knew about threading these early on. One of our members was able to come across a rear section of an original, and another was able to get pics of one in a museum. With this info, a few of us have done threaded installs. I myself, will never do it any other way, I believe it makes it easier to install. Here is a video explaining a threaded install. Not instructions but the jist of how it works, disregard everything after 9 min. -Matt 607 Stock Video |
|
|
|
|
[#36]
It's outstanding how you have taken the 607 stock to the next level.
|
|
|
|
|
[#37]
Originally Posted By Hal143:
It's outstanding how you have taken the 607 stock to the next level. Matt |
|
|
|
NC, USA
|
[#38]
Originally Posted By live4nov:
I think its tacked?, so we should be ok, but good looking out! I didn't know this was on the forum, I just thought it was on RBR. Im glad it is on here as I have a little to add to the subject. First, Thanks to Hal143 for taking the time to put this together. I actually used this method the first time I did an install. I have learned a few time consuming, (and at least one expensive) lesson in the 20 or so Ive installed. I would like to share a little of that here. If using this method (non-threaded) do not install the rod with the stock open. You run the risk of the tube not locking when closed. Always pin the rod in place from the closed and locked position. It is a good Idea to mount the receiver where the locking pin is held down by gravity. If your lever does slip out of time after instal, no problem, just remove the lever plug mark and re-pin it. I mentioned above threading... not to many folks knew about threading these early on. One of our members was able to come across a rear section of an original, and another was able to get pics of one in a museum. With this info, a few of us have done threaded installs. I myself, will never do it any other way, I believe it makes it easier to install. Here is a video explaining a threaded install. Not instructions but the jist of how it works, disregard everything after 9 min. -Matt 607 Stock Video https://www.AR15.Com/media/mediaFiles/356967/IMG-3969-216528.JPG When I found the post on the last page, ether as the last post or the second to last post, it didn't have a tacked symbol, nor appeared as a sticky. So I bumped out of fear. In rereading, I see on the second page coctailer had set the post's toggle to keep it from being archived by the system. I hope that survived through the new AR15.com design roll out. With other people watching out it has remained in the active section for 8 years, 4 months, and 9 days(as of 5/27/2017). A total of 3,052 days. days and counting How does that song from the musical "Rent go? .... 4,393,440 minutes so dear How do you measure - measure a year? In retro - in clones In P.I.F.s - in lots of cosmo In millimeter - in tig thickness feeder In modified receivers - with position locks How do you mill the 607 stocks.... |
|
|
 Win a FREE Membership!
Sign up for the ARFCOM weekly newsletter and be entered to win a free ARFCOM membership. One new winner* is announced every week!
You will receive an email every Friday morning featuring the latest chatter from the hottest topics, breaking news surrounding legislation, as well as exclusive deals only available to ARFCOM email subscribers.

AR15.COM is the world's largest firearm community and is a gathering place for firearm enthusiasts of all types.
From hunters and military members, to competition shooters and general firearm enthusiasts, we welcome anyone who values and respects the way of the firearm.

Subscribe to our monthly Newsletter to receive firearm news, product discounts from your favorite Industry Partners, and more.
Copyright © 1996-2024 AR15.COM LLC. All Rights Reserved.
Any use of this content without express written consent is prohibited.
AR15.Com reserves the right to overwrite or replace any affiliate, commercial, or monetizable links, posted by users, with our own.


