|
Posted: 1/10/2010 7:50:19 PM EDT
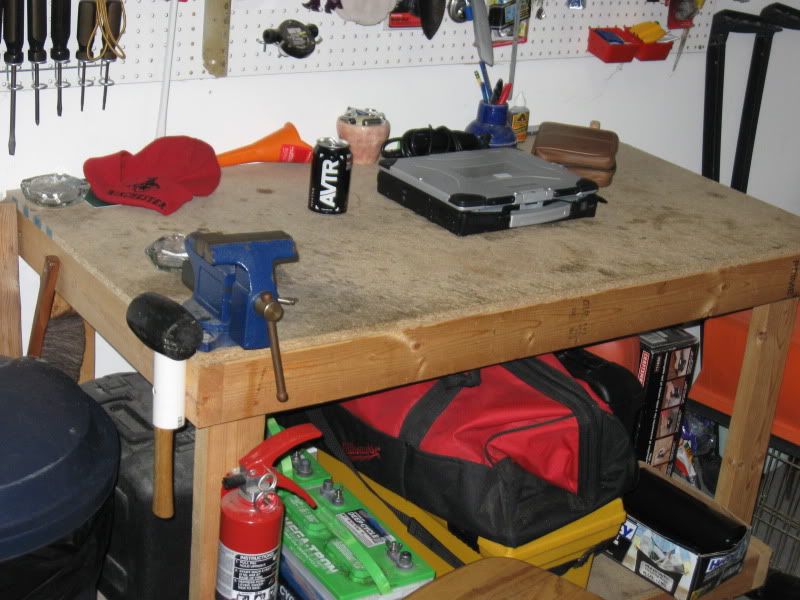
I recently moved across the country and into a small apartment. Didn't leave a lot of room for a "workshop" for various projects and stuff, and certainly no room in the car for one. I have a couple of flintlocks I want to rebuild so I needed something to work on, and I was sick of the $30 folding card tables wobbling everywhere. I also wanted something I could mount a gunsmithing vise and maybe a reloading press to. I only brought basic tools with –– a 14v screwgun was the only power tool I had –– so it had to be a simple design.
This bench is very basic but it's also very sturdy and would be easy to mod later or add a pegboard back or more shelves to. I found the plans online –– click here –– and changed only a few dimensions based on my working space. My pics will duplicate most of that site but they're a little bigger. Also, if you have to buy all the materials like I did (no scraps laying around) you can get it all done for $25. A bit more if you have to buy screws. The MDF is heavier and seems sturdier than plywood or the chipboard in the tutorial above... it was also cheaper and more square. It's not for outside use –– according to the Home Depot guy, water will ruin it. My bench is also a little higher than most, as I like to use a barstool-type seat or stand up rather than have it at desk height. Here's my materials list for my 37 1/2" high, 4' wide, 2' deep bench: Five 8' 2x4s –– get straight ones! $2/ea, $10 total One 4x2 3/4" sheet of MDF $10 (the Home Depot "handypanels" require no cutting for this –– very nice One 4x2 3/16" sheet of MDF $5 The frame uses the following pieces: 2x4 a is turned into four 24" pieces 2x4 b and c are turned into four 45" pieces, leaving two 3" scraps (minus sawblade allowance) 2x4 d and e are turned into four 37.5" pieces (legs) and two 21" pieces (supports for bottom shelf) For all the boards that are the same dimensions, obviously it's more important that they all be exactly the same rather than that they be exactly 24". For example, if you cut one 2x4 into four equal chunks, they'll be slightly less than 24" each because of the with of the three saw cuts. Here's the cut lumber in my laundry-room-turned-workshop (I have no washer/dryer  ): ):

Here is the first half of the frame partially assembled, with the parts for the other half ready to go. This is the part where keeping them square is very important. Predrilling your holes and using clamps will help a lot. If you have straight boards it's not all that, hard but error here will make the rest of the assembly harder. Also, I set the bottom shelf level 8" up from the floor –– just high enough to fit a standard ammo can under. 
Here's both halves, with the endpieces in place on one of them. 
Here's both halves, mirrored, ready to assemble (upside down to keep it the top flat). Here is where you'll suffer if your stuff isn't square. Mine was as perfect as I could measure it and I still struggled a bit getting these corners to line up: 
Now it's turned over ready for the top to be added: 
Here's a picture of the joints –– I measured and allowed for all the screws' positions so the ones coming in from one side wouldn't hit the ones already in place, but that was probably unnecessary. As the guy in the tutorial says, they're very strong. 
Here it is in place with the top on it, ready to be screwed down. Surprisingly, the bench is level! Well, at least as level as the floor! 
Here's where I deviated from the plans. After screwing the top down (be sure to predrill the MDF, it's hard stuff), I installed the 21" boards (left over from cutting the 37 1/2" legs, and the reason I decided on 37 1/2") to support the bottom shelf (probably unnecessary if you used another sheet of 3/4" MDF instead of the thin stuff, but I had enough 2x4s to do it this way and it saved me $5. 
I cut 3" by 5" out of the corners of the bottom shelf just as in the tutorial and it worked after a little fitting. 
Here it is, after sweep up –– very sturdy. I could easily climb on it and jump up and down if I wanted to. I don't think I'd use it as an anvil, but it would take a vice well and I think it will serve me just fine. 
And, just for you guys! Also, those three small chunks of 2x4 are all the scrap I had, other than the sawdust. 
I had fun –– took me two evenings, maybe 6 hours total work, using a hand saw and a screw gun. One of those small triangular squares is also invaluable. Any suggestions? Thoughts? I'm pretty happy with it, even after looking at the $200 benches for sale at HD and Lowe's. Mine will last longer and take more pounding. I can also replace the top with almost no effort should it get used up or damaged. |
|
|
|
[#1]
Not bad, but will it support a vise?
|
|
|
|
[#2]
Shoulda saved the money for a washer and dryer...
|
|
|
|
[#3]
Quoted: Looks great, I want one lol.I recently moved across the country and into a small apartment. Didn't leave a lot of room for a "workshop" for various projects and stuff, and certainly no room in the car for one. I have a couple of flintlocks I want to rebuild so I needed something to work on, and I was sick of the $30 folding card tables wobbling everywhere. I also wanted something I could mount a gunsmithing vise and maybe a reloading press to. I only brought basic tools with –– a 14v screwgun was the only power tool I had –– so it had to be a simple design. This bench is very basic but it's also very sturdy and would be easy to mod later or add a pegboard back or more shelves to. I found the plans online –– click here –– and changed only a few dimensions based on my working space. My pics will duplicate most of that site but they're a little bigger. Also, if you have to buy all the materials like I did (no scraps laying around) you can get it all done for $25. A bit more if you have to buy screws. The MDF is heavier and seems sturdier than plywood or the chipboard in the tutorial above... it was also cheaper and more square. It's not for outside use –– according to the Home Depot guy, water will ruin it. My bench is also a little higher than most, as I like to use a barstool-type seat or stand up rather than have it at desk height. Here's my materials list for my 37 1/2" high, 4' wide, 2' deep bench: Five 8' 2x4s –– get straight ones! $2/ea, $10 total One 4x2 3/4" sheet of MDF $10 (the Home Depot "handypanels" require no cutting for this –– very nice One 4x2 3/16" sheet of MDF $5 The frame uses the following pieces: 2x4 a is turned into four 24" pieces 2x4 b and c are turned into four 45" pieces, leaving two 3" scraps (minus sawblade allowance) 2x4 d and e are turned into four 37.5" pieces (legs) and two 21" pieces (supports for bottom shelf) For all the boards that are the same dimensions, obviously it's more important that they all be exactly the same rather than that they be exactly 24". For example, if you cut one 2x4 into four equal chunks, they'll be slightly less than 24" each because of the with of the three saw cuts. Here's the cut lumber in my laundry-room-turned-workshop (I have no washer/dryer ):http://img.photobucket.com/albums/v29/skywarp989/Everything%20Else/lumber.jpg Here is the first half of the frame partially assembled, with the parts for the other half ready to go. This is the part where keeping them square is very important. Predrilling your holes and using clamps will help a lot. If you have straight boards it's not all that, hard but error here will make the rest of the assembly harder. Also, I set the bottom shelf level 8" up from the floor –– just high enough to fit a standard ammo can under. http://img.photobucket.com/albums/v29/skywarp989/Everything%20Else/oneside.jpg Here's both halves, with the endpieces in place on one of them. http://img.photobucket.com/albums/v29/skywarp989/Everything%20Else/oneandahalfsides.jpg Here's both halves, mirrored, ready to assemble (upside down to keep it the top flat). Here is where you'll suffer if your stuff isn't square. Mine was as perfect as I could measure it and I still struggled a bit getting these corners to line up: http://img.photobucket.com/albums/v29/skywarp989/Everything%20Else/bothsides.jpg Now it's turned over ready for the top to be added: http://img.photobucket.com/albums/v29/skywarp989/Everything%20Else/frame.jpg Here's a picture of the joints –– I measured and allowed for all the screws' positions so the ones coming in from one side wouldn't hit the ones already in place, but that was probably unnecessary. As the guy in the tutorial says, they're very strong. http://img.photobucket.com/albums/v29/skywarp989/Everything%20Else/joint.jpg Here it is in place with the top on it, ready to be screwed down. Surprisingly, the bench is level! Well, at least as level as the floor! http://img.photobucket.com/albums/v29/skywarp989/Everything%20Else/withtop.jpg Here's where I deviated from the plans. After screwing the top down (be sure to predrill the MDF, it's hard stuff), I installed the 21" boards (left over from cutting the 37 1/2" legs, and the reason I decided on 37 1/2") to support the bottom shelf (probably unnecessary if you used another sheet of 3/4" MDF instead of the thin stuff, but I had enough 2x4s to do it this way and it saved me $5. http://img.photobucket.com/albums/v29/skywarp989/Everything%20Else/withbottomframe.jpg I cut 3" by 5" out of the corners of the bottom shelf just as in the tutorial and it worked after a little fitting. http://img.photobucket.com/albums/v29/skywarp989/Everything%20Else/bottomshelf.jpg Here it is, after sweep up –– very sturdy. I could easily climb on it and jump up and down if I wanted to. I don't think I'd use it as an anvil, but it would take a vice well and I think it will serve me just fine. http://img.photobucket.com/albums/v29/skywarp989/Everything%20Else/done.jpg And, just for you guys! Also, those three small chunks of 2x4 are all the scrap I had, other than the sawdust. http://img.photobucket.com/albums/v29/skywarp989/Everything%20Else/withgunflash.jpg I had fun –– took me two evenings, maybe 6 hours total work, using a hand saw and a screw gun. One of those small triangular squares is also invaluable. Any suggestions? Thoughts? I'm pretty happy with it, even after looking at the $200 benches for sale at HD and Lowe's. Mine will last longer and take more pounding. I can also replace the top with almost no effort should it get used up or damaged. |
|
|
|
[#4]
Not bad at all.
|
|
|
|
[#5]
Looks good.
|
|
|
|
[#6]
That looks really good! I was in the market for a small "rolling island" for my kitchen a few years back and the quality ones were in the $200+ realm. I built one for $50, I am very happy with it.
|
|
|
|
[#7]
MDF? Fucking fail.
Wait till the first time you get it wet. Next time, buy plywood. |
|
|
|
[#8]
looks good man. i may have to try this myself.
|
|
|
|
[#9]
I may have to make one of those as a gaming board.
|
|
|
|
[#10]
yea I hate to say it but the mdf could be a problem later. good job on the construct but maybe give a thought to covering the top with formica or something. I'm getting ready to do something very similar for a reloading bench, unless I find something else in the meantime.
|
|
|
|
[#11]
Quoted:
MDF? Fucking fail. Wait till the first time you get it wet. Next time, buy plywood. Easy, shooter, I don't plan on getting it wet. If it sucks that much after a while I'll replace it. It's only a few screws. |
|
|
|
[#12]
see also my medium duty bench here, uses prefab legs and 2x4's... http://www.ar15.com/archive/topic.html?b=1&f=139&t=949684 ar-jedi 

|
|
|
|
[#13]
Quoted: Quoted: MDF? Fucking fail. Wait till the first time you get it wet. Next time, buy plywood. Easy, shooter, I don't plan on getting it wet. If it sucks that much after a while I'll replace it. It's only a few screws. You never plan for these things to happen, but they always do. It's a shame though, as plywood would have been even cheaper. Good work though, and you're right, easily replaceable, which is a useful design feature. |
|
|
|
[#14]
Quoted:
MDF? Fucking fail. Wait till the first time you get it wet. Next time, buy plywood. But it doesnt look like a boat. |
|
|
|
[#15]
Quoted: Quoted: MDF? Fucking fail. Wait till the first time you get it wet. Next time, buy plywood. But it doesnt look like a boat. You want a nice flat surface? Don't set a soda can on it. MDF can swell 2-10% from contact with water. Even ambient humidity can effect it. One thing that can be done is to seal it, shellac is best. Could use a sanding sealer, epoxy based primer, etc etc... but then it becomes an eyesore with use unless maintained. It's in his apartment so I'm assuming he'd want it kept looking nice. Plywood is cheaper, and in my view better for this application. |
|
|
|
[#16]
Quoted: Quoted: Quoted: MDF? Fucking fail. Wait till the first time you get it wet. Next time, buy plywood. But it doesnt look like a boat. You want a nice flat surface? Don't set a soda can on it. MDF can swell 2-10% from contact with water. Even ambient humidity can effect it. One thing that can be done is to seal it, shellac is best. Could use a sanding sealer, epoxy based primer, etc etc... but then it becomes an eyesore with use unless maintained. It's in his apartment so I'm assuming he'd want it kept looking nice. Plywood is cheaper, and in my view better for this application. I was thinking this when I saw it too.... |
|
|
|
[#17]
Quoted: I was thinking this when I saw it too.... Yeah, I've had some hard work wrecked, before I learned my own lesson on this topic.  Of course, I realize OP was just following plans. But, at least now he knows to keep a towel handy and mop up any spills ASAP. |
|
|
|
[#18]
looks just like my reloading bench.
|
|
|
|
[#19]
If your worried about the water, you could always get a sheet of laminate and contact cement it to the top. I think it looks pretty good.
|
|
|
|
[#20]
cool project
|
|
|
|
[#21]
I used the exact same plans a few years ago. I think mines is a little smaller. It does support a vice and lee press. Very sturdy bench. I like it a lot.
eta - I used plywood for the top though. This is a must as I'm usually setting my beers down on this table while I watch movies. |
|
|
|
[#22]
Saving the plans for a weekend project.
|
|
|
|
[#23]
I'd rather just buy this $200 maple-topped one from Sam's Club

|
|
|
|
[#24]
Quoted: I'd rather just buy this $200 maple-topped one from Sam's Club http://graphics.samsclub.com/images/products/0001764120206_L4.jpg For those of us who'd rather spend 25 and an hour on a table, and spend the other 175 on ammo will get more out of this thread then, eh? Good job, OP.
|
|
|
|
[#25]
Looks fine. Basically, mine are the same except my stand-ups are 2 X 6, heres a unit I built for reloading and some ammo storage, Skeleton wise, the same as yours, just flushed out a bit more:

Heres it's baby brother. My cleaning/work bench on casters so the two can be joined up: 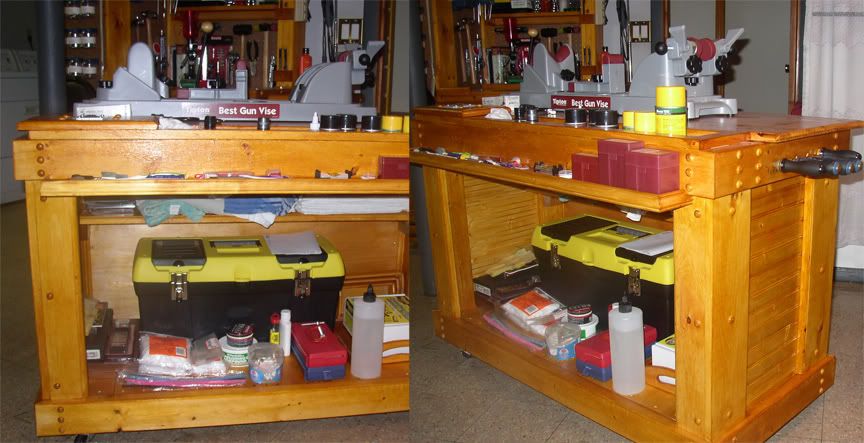
Between what I had lying around from prior projects and what I bought specifically for them, I may have shelled out about $250.00. I don't think I could have gotten close for one, never mind both store bought. |
|
|
|
[#26]
Just a couple of comments.
I would have used 4x4's for the legs. Additional strength and more "meat" for the fasteners to work with. This is important if you plan to place a vise on there as well. Speaking of fasteners. Perhaps predrilled holes and bolts instead of those screws for greater strength? |
|
|
|
[#27]
Quoted:
Looks fine. Basically, mine are the same except my stand-ups are 2 X 6, heres a unit I built for reloading and some ammo storage, Skeleton wise, the same as yours, just flushed out a bit more: http://i302.photobucket.com/albums/nn82/Taipan01/reloading.jpg Heres it's baby brother. My cleaning/work bench on casters so the two can be joined up: http://i302.photobucket.com/albums/nn82/Taipan01/Workbench.jpg Between what I had lying around from prior projects and what I bought specifically for them, I may have shelled out about $250.00. I don't think I could have gotten close for one, never mind both store bought. Damn fine looking work! |
|
|
|
[#28]
Nice job! I have built benches/tables using this same approach. Only I would have probably used a sealed plywood top. Like you said though, nothing to replace it.
|
|
|
|
[#29]
well done
How about a sheet of stainless for the top? |
|
|
|
[#30]
Another alternative to the MDF is to go to the back of Lowe's or Home Depot where the countertops are. They always have a stack of damaged pieces. I will but and 8' pieces with a corner broke off, cut it down to 7' and you are good to go. They are normally about $20, but a lot of the ones I have bought, they will knock the price way down just for asking. Especially if it is in a color or pattern that was special ordered or something that won't normally sell quickly.
|
|
|
|
[#31]
If to really want to make it sturdy put triangle
braces in the corners out f 1/4 inch plywood. I need to build a new bench for my milling machine |
|
|
|
[#32]
Those are real nice, Having built several functional workbenches myself, but nothing that the wife would like in MY Gun/reloading/computer room, which is now in the house. I am now building one that she won't complain about: starting with an old heavy oak dresser thats 5'L X 19"D X 33" H. and lots of drawers. ( old waterbed dresser from the 70's)
When done it will be taller, wider, strong enough for a vise and turret press, and most important..... Pretty enough to be in the house. I am going to use some of your design. |
|
|
|
[#33]
Quoted:
That's not a medium duty bench. It's heavy duty all the way. I used a kit to make a custom stand for a 110 gallon fish tank. That's 917 pounds of water alone.
see also my medium duty bench here, uses prefab legs and 2x4's... http://www.ar15.com/archive/topic.html?b=1&f=139&t=949684 ar-jedi http://losdos.dyndns.org:8080/public/coltsneck/workbench/DSCN4332_sm.jpg http://losdos.dyndns.org:8080/public/coltsneck/workbench/DSCN4321_sm.jpg http://wopr.losdos.dyndns.org:8081/gallery2/main.php?g2_view=core.DownloadItem&g2_itemId=3330 
|
|
|
|
[#34]
ost for the hubby...
|
|
|
|
[#35]
Quoted: I recently moved across the country and into a small apartment. Didn't leave a lot of room for a "workshop" for various projects and stuff, and certainly no room in the car for one. I have a couple of flintlocks I want to rebuild so I needed something to work on, and I was sick of the $30 folding card tables wobbling everywhere. I also wanted something I could mount a gunsmithing vise and maybe a reloading press to. I only brought basic tools with –– a 14v screwgun was the only power tool I had –– so it had to be a simple design. This bench is very basic but it's also very sturdy and would be easy to mod later or add a pegboard back or more shelves to. I found the plans online –– click here –– and changed only a few dimensions based on my working space. My pics will duplicate most of that site but they're a little bigger. Also, if you have to buy all the materials like I did (no scraps laying around) you can get it all done for $25. A bit more if you have to buy screws. The MDF is heavier and seems sturdier than plywood or the chipboard in the tutorial above... it was also cheaper and more square. It's not for outside use –– according to the Home Depot guy, water will ruin it. My bench is also a little higher than most, as I like to use a barstool-type seat or stand up rather than have it at desk height. Here's my materials list for my 37 1/2" high, 4' wide, 2' deep bench: Five 8' 2x4s –– get straight ones! $2/ea, $10 total One 4x2 3/4" sheet of MDF $10 (the Home Depot "handypanels" require no cutting for this –– very nice One 4x2 3/16" sheet of MDF $5 The frame uses the following pieces: 2x4 a is turned into four 24" pieces 2x4 b and c are turned into four 45" pieces, leaving two 3" scraps (minus sawblade allowance) 2x4 d and e are turned into four 37.5" pieces (legs) and two 21" pieces (supports for bottom shelf) For all the boards that are the same dimensions, obviously it's more important that they all be exactly the same rather than that they be exactly 24". For example, if you cut one 2x4 into four equal chunks, they'll be slightly less than 24" each because of the with of the three saw cuts. Here's the cut lumber in my laundry-room-turned-workshop (I have no washer/dryer ):http://img.photobucket.com/albums/v29/skywarp989/Everything%20Else/lumber.jpg Here is the first half of the frame partially assembled, with the parts for the other half ready to go. This is the part where keeping them square is very important. Predrilling your holes and using clamps will help a lot. If you have straight boards it's not all that, hard but error here will make the rest of the assembly harder. Also, I set the bottom shelf level 8" up from the floor –– just high enough to fit a standard ammo can under. http://img.photobucket.com/albums/v29/skywarp989/Everything%20Else/oneside.jpg Here's both halves, with the endpieces in place on one of them. http://img.photobucket.com/albums/v29/skywarp989/Everything%20Else/oneandahalfsides.jpg Here's both halves, mirrored, ready to assemble (upside down to keep it the top flat). Here is where you'll suffer if your stuff isn't square. Mine was as perfect as I could measure it and I still struggled a bit getting these corners to line up: http://img.photobucket.com/albums/v29/skywarp989/Everything%20Else/bothsides.jpg Now it's turned over ready for the top to be added: http://img.photobucket.com/albums/v29/skywarp989/Everything%20Else/frame.jpg Here's a picture of the joints –– I measured and allowed for all the screws' positions so the ones coming in from one side wouldn't hit the ones already in place, but that was probably unnecessary. As the guy in the tutorial says, they're very strong. http://img.photobucket.com/albums/v29/skywarp989/Everything%20Else/joint.jpg Here it is in place with the top on it, ready to be screwed down. Surprisingly, the bench is level! Well, at least as level as the floor! http://img.photobucket.com/albums/v29/skywarp989/Everything%20Else/withtop.jpg Here's where I deviated from the plans. After screwing the top down (be sure to predrill the MDF, it's hard stuff), I installed the 21" boards (left over from cutting the 37 1/2" legs, and the reason I decided on 37 1/2") to support the bottom shelf (probably unnecessary if you used another sheet of 3/4" MDF instead of the thin stuff, but I had enough 2x4s to do it this way and it saved me $5. http://img.photobucket.com/albums/v29/skywarp989/Everything%20Else/withbottomframe.jpg I cut 3" by 5" out of the corners of the bottom shelf just as in the tutorial and it worked after a little fitting. http://img.photobucket.com/albums/v29/skywarp989/Everything%20Else/bottomshelf.jpg Here it is, after sweep up –– very sturdy. I could easily climb on it and jump up and down if I wanted to. I don't think I'd use it as an anvil, but it would take a vice well and I think it will serve me just fine. http://img.photobucket.com/albums/v29/skywarp989/Everything%20Else/done.jpg And, just for you guys! Also, those three small chunks of 2x4 are all the scrap I had, other than the sawdust. http://img.photobucket.com/albums/v29/skywarp989/Everything%20Else/withgunflash.jpg I had fun –– took me two evenings, maybe 6 hours total work, using a hand saw and a screw gun. One of those small triangular squares is also invaluable. Any suggestions? Thoughts? I'm pretty happy with it, even after looking at the $200 benches for sale at HD and Lowe's. Mine will last longer and take more pounding. I can also replace the top with almost no effort should it get used up or damaged. Very nice work and good writeup and pics. Thank you!! Looks perfect for what you want. Here's a link with some solutions to protect the MDF if you're worried at all about the water. http://groups.google.com/group/rec.woodworking/browse_thread/thread/a71960138a7eea2d/c7fcbfb742ffae50?lnk=raot&pli=1 |
|
|
|
[#36]
That is some fine looking work OP. Simple, strong, exactly what you need.
I'm going to be doing something similar to make a rolling, indoor bunny pin for my daughter's pet rabbits. I'm planning on using fake tile board to cover the top and I need to get white chicken wire or similar to make the enclosure. |
|
|
|
[#37]
Hehehe...nice work. I love seeing other guys build stuff in the kitchen as well. I once bought my daughter an old Yamaha atv and tore it down to the bare frame in my kitchen because I was getting it ready for Christmas. When I was done, it looked brand new...and when Christmas rolled around, my wife was still pissed!

|
|
|
|
[#38]
Quoted:
MDF? Fucking fail. Wait till the first time you get it wet. Next time, buy plywood. No big deal. Just throw a piece of masonite like he used for the bottom shelf over it, shiny side up. Or a sheet of laminate. An application of contact cement and some screws and it'll last forever. |
|
|
|
[#39]
I have the same bench...from the same plans.
Been in my garage for about 5 years...been working great. I did a second bench a little taller and gave the original to my dad a while back. 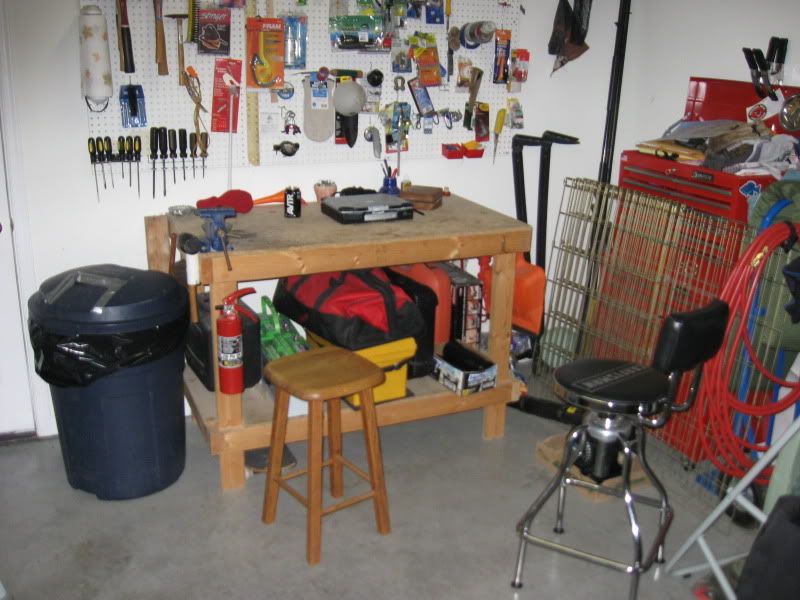
|
|
|
|
[#40]
Looks good to me.
HH |
|
|
|
[#41]
Quoted:
Looks fine. Basically, mine are the same except my stand-ups are 2 X 6, heres a unit I built for reloading and some ammo storage, Skeleton wise, the same as yours, just flushed out a bit more: http://i302.photobucket.com/albums/nn82/Taipan01/reloading.jpg Heres it's baby brother. My cleaning/work bench on casters so the two can be joined up: http://i302.photobucket.com/albums/nn82/Taipan01/Workbench.jpg Between what I had lying around from prior projects and what I bought specifically for them, I may have shelled out about $250.00. I don't think I could have gotten close for one, never mind both store bought. Very nice!! I think its time for you to add another bench to your shop...and while youre at it, make sure to provide step by step instructions please. |
|
|
|
[#42]
Quoted:
I have the same bench...from the same plans. Been in my garage for about 5 years...been working great. I did a second bench a little taller and gave the original to my dad a while back. http://img.photobucket.com/albums/v453/leadnbrass/IMG_0420.jpg http://img.photobucket.com/albums/v453/leadnbrass/IMG_0421.jpg Hmmm...that foldout cage in the right of pic wouldnt happen to be a drop-out pen would it? |
|
|
|
[#43]
Time to remodel the kitchen.
|
|
|
|
[#44]
Quoted:
Quoted:
That's not a medium duty bench. It's heavy duty all the way. I used a kit to make a custom stand for a 110 gallon fish tank. That's 917 pounds of water alone.
see also my medium duty bench here, uses prefab legs and 2x4's... http://www.ar15.com/archive/topic.html?b=1&f=139&t=949684 ar-jedi http://losdos.dyndns.org:8080/public/coltsneck/workbench/DSCN4332_sm.jpg http://losdos.dyndns.org:8080/public/coltsneck/workbench/DSCN4321_sm.jpg http://wopr.losdos.dyndns.org:8081/gallery2/main.php?g2_view=core.DownloadItem&g2_itemId=3330 http://i404.photobucket.com/albums/pp130/txgp17/IMG_0212.jpg Does Lowes have these? |
|
|
|
[#45]
Nice work OP! I built my reloading bench with no plans but it turned out just about the same as yours. I used two thicknesses of plain old 3/4" particle board for the top and coated it with about 3 coats of "Liquid Plastic" and used it for about 20 yrs. I mounted a regular 4" vise, Rockchucker press and a Uniflow. MDF is better than what I used and will last for years with a few coats of poly. I used the particle board because it's heavier than plywood and gave the bench a little more heft. It wasn't a bench you'd want to move around much.
|
|
|
|
[#46]
Quoted:
MDF? Fucking fail. Wait till the first time you get it wet. Next time, buy plywood. +1 Put a coat of spar urethane on it and it will last longer |
|
|
|
[#47]
Good job, OP! That bench will be sturdy as hell for years.
Buy a small can of poly urethane and coat the top and you won't have to worry about it at all. Make sure two get plenty of urethane in the end grain to stop swelling due to moisture over time. You also might want to unscrew the top to coat the bottom as well so the MDF doesn't warp because of the moisture difference between the top and bottom. Screw back down through the same holes once the top is coated. |
|
|
|
[#48]
Wow?
|
|
|
|
[#49]
Props to the OP hope it serves you well
|
|
|
|
[#50]
Similar to my bench. Main difference is I went fancy with the top and used a solid core wood door with a masonite top sheet for it.
|
|
|
 Win a FREE Membership!
Sign up for the ARFCOM weekly newsletter and be entered to win a free ARFCOM membership. One new winner* is announced every week!
You will receive an email every Friday morning featuring the latest chatter from the hottest topics, breaking news surrounding legislation, as well as exclusive deals only available to ARFCOM email subscribers.

AR15.COM is the world's largest firearm community and is a gathering place for firearm enthusiasts of all types.
From hunters and military members, to competition shooters and general firearm enthusiasts, we welcome anyone who values and respects the way of the firearm.

Subscribe to our monthly Newsletter to receive firearm news, product discounts from your favorite Industry Partners, and more.
Copyright © 1996-2024 AR15.COM LLC. All Rights Reserved.
Any use of this content without express written consent is prohibited.
AR15.Com reserves the right to overwrite or replace any affiliate, commercial, or monetizable links, posted by users, with our own.


