|
[#1]
Originally Posted By GunnyG:
King's 201A Originally Posted By GunnyG:
Originally Posted By NapeSticksToKids:
Originally Posted By hobbs5624:
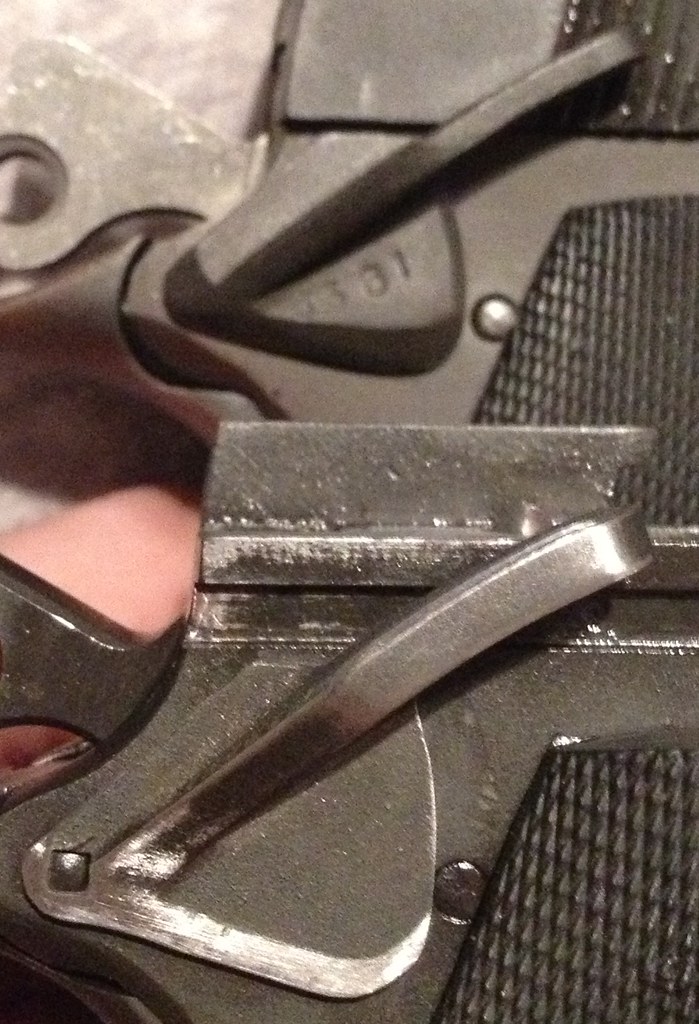
Today I bought the biggest POS 1911 I've ever purchased. It was a nasty looking custom Para Ordnance P12. I'd post a picture but it's just plain scary. The nice thing about it is the thumb safety I just took off: http://i420.photobucket.com/albums/pp284/hobbs5624/SAM_4207_zpsc95dc939.jpg what is it? King's 201A Is there a tell take mark on it or something? |
|
|
|
IN, USA
|
[#2]
Originally Posted By NapeSticksToKids:
Is there a tell take mark on it or something? Originally Posted By NapeSticksToKids:
Originally Posted By GunnyG:
Originally Posted By NapeSticksToKids:
Originally Posted By hobbs5624:
Today I bought the biggest POS 1911 I've ever purchased. It was a nasty looking custom Para Ordnance P12. I'd post a picture but it's just plain scary. The nice thing about it is the thumb safety I just took off: http://i420.photobucket.com/albums/pp284/hobbs5624/SAM_4207_zpsc95dc939.jpg what is it? King's 201A Is there a tell take mark on it or something? Hammer pin? |
|
|
|
[#3]
STAMPS>.....what size are the serial number stamps on all the parts, 1/16" ??? Is there anyone that has done this and has the stamps and willing to do it or recommend someone???
How hard do you have to whack it to make it sink good on the slide??? Thanks |
|
|
|
VA, USA
|
[#4]
They are 1/16" stamps. You can buy a set of number stamps for fairly cheap and do it yourself. It takes a good hard whack to mark the parts. Make sure the stamp is done with a single blow from your hammer, not several hits. If you do it yourself it is best to practice on a scrap piece of metal comparable to the parts that will be stamped. I hope this answers your question.
For anyone who is interested here is a list of the parts that are stamped and the location of the stamps Slide - right hand side, upper rear corner Mainspring housing - on the flat next to the loop that faces the frame Barrel - centered below the brand name Grip safety - on the small flat next to the tang Thumb safeties - inside next to the post. Use caution when stamping the safeties and ensure a solid backing surface is used. It is very easy to bend or skew the thumb safeties. Having someone help to hold the parts solid on an anvil, vise, or steel bench block is the best way to ensure a good stamp. Good luck! Ben |
|
|
AZ, USA
|
[#5]
As always Ben, your knowledge is appreciated. I know we already discussed how you all blacken the stainless steel, but for the other gunsmith types out there do you mind sharing? Also, I mean to ask you what you do the rest of the gun in. Is it Parkerized or matte blue?
|
|
|
AZ, USA
|
[#6]
Originally Posted By PWS2112:
They are 1/16" stamps. You can buy a set of number stamps for fairly cheap and do it yourself. It takes a good hard whack to mark the parts. Make sure the stamp is done with a single blow from your hammer, not several hits. If you do it yourself it is best to practice on a scrap piece of metal comparable to the parts that will be stamped. I hope this answers your question. For anyone who is interested here is a list of the parts that are stamped and the location of the stamps Slide - right hand side, upper rear corner Mainspring housing - on the flat next to the loop that faces the frame Barrel - centered below the brand name Grip safety - on the small flat next to the tang Thumb safeties - inside next to the post. Use caution when stamping the safeties and ensure a solid backing surface is used. It is very easy to bend or skew the thumb safeties. Having someone help to hold the parts solid on an anvil, vise, or steel bench block is the best way to ensure a good stamp. Good luck! Ben Sorry Ben, but can you clear these up for me? I'm a little confused, which doesn't take much. On the mainspring housing, are we talking the flat portion near the bottom? Or are we talking near the top by the mainspring tunnel? As for the grip safety, I can't even picture a surface large enough. Are you talking the side of the grip safety? If so, which side? Or, do you mean the block for the trigger bow? |
|
|
VA, USA
|
[Last Edit: PWS2112]
[#7]
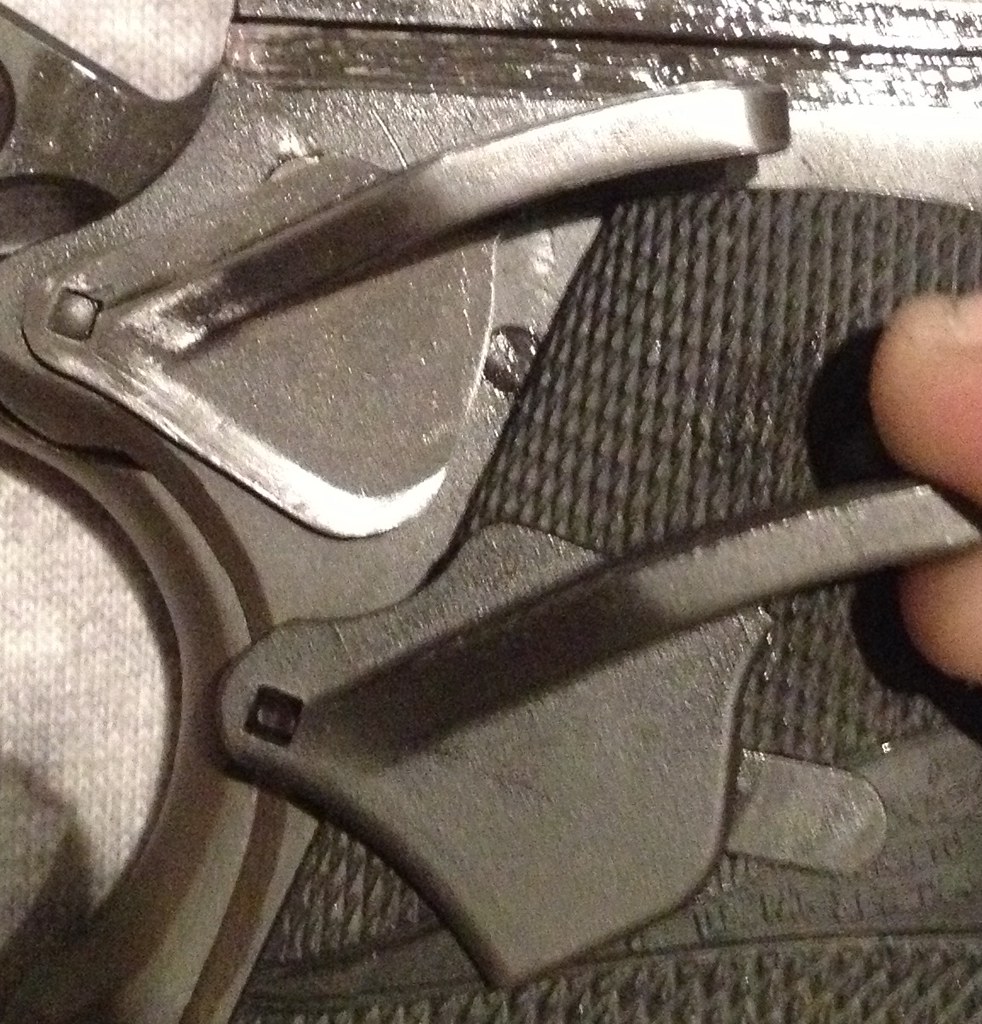
Here is a picture of parts from a pistol I am currently building. Hopefully this helps clear up any confusion about where to stamp.

|
|
|
VA, USA
|
[Last Edit: PWS2112]
[#8]
Hobbs,
As far as what PWS has done in the past for blackening the pistols, we have done a few different things. For the MEUSOC pistols, we parkerized almost everything and blackened the barrel using a stainless steel process. For the M45 pistols we would parkerize the parts first and then blue them. This gave a really dark, durable finish. Later on, we moved to just bluing the parts, which still gives a dark, durable finish without the extra step. There are many different ways, but for everyone who is interested here are the different processes that PWS has used or is currently using. Before any process the metal is prepped. Parts are all tested for what type of metal they are to determine the best process to use. The parts are wired in a way that they do not touch and the wire is tied off to create a loop. The parts are separated by metal type, generally this is either stainless steel or carbon steel. The parts are blasted with a silica bead media to give the metal a matte finish and to clean off any oils or residue. Once the parts are media blasted they are not touched again until after the entire blackening process is complete. The parts move into a heavy duty warm degreaser bath where they soak for 30 minutes. After this process the parts are rinsed in cool, clean water and moved to their respective processes. Parkerizing - The parts to be parkerized are placed in a bath with a manganese phosphate solution that is heated to 195 degrees and soak for 15 minutes. Bluing - Parts to be blued are placed in a bath with a black oxide salt solution that is heated to 285 degrees and soak for 30 minutes. For a darker finish parts are moved to a similar bath that is heated to 305 degrees and soak for another 30 minutes. Stainless blackening - Since stainless steel by its very nature resists coloring, a special process is used. Parts to be blackened are placed in an activator bath of 3-0 and soak for 20 minutes. They are then rinsed and moved to another bath of Aldak that is heated to 225 degrees to soak for another 30 minutes. Finishing - Regardless of the above process used all the parts are rinsed and moved to an oil bath to remove any water remaining on the parts and to seal the metal. If the parts are not going to be used immediately they are wrapped in a vapor barrier. If they are to be used the oil is cleaned off with a solvent and each part is lightly oiled before installation. I hope this gives valuable insight into what we do to blacken/blue metal at our shop. Thanks for asking! Ben |
|
|
|
[#9]
Originally Posted By PWS2112:
Here is a picture of parts from a pistol I am currently building. Hopefully this helps clear up any confusion about where to stamp. http://i970.photobucket.com/albums/ae185/pws2112/20140126_145915_zps85391ef0.jpg I always thought the stamp was on the outside of the safety. I guess that just is the clones where people want you to know they did it |
|
|
|
MD, USA
|
[#10]
|
|
|
FL, USA
|
[Last Edit: Parabellum226]
[#11]
Originally Posted By eternal24k:
I always thought the stamp was on the outside of the safety. I guess that just is the clones where people want you to know they did it Originally Posted By eternal24k:
Originally Posted By PWS2112:
Here is a picture of parts from a pistol I am currently building. Hopefully this helps clear up any confusion about where to stamp. http://i970.photobucket.com/albums/ae185/pws2112/20140126_145915_zps85391ef0.jpg I always thought the stamp was on the outside of the safety. I guess that just is the clones where people want you to know they did it There's some pictures of older actual MEU guns with King's safeties where the stamps are external on page 1. Perhaps the location was changed for the Ed Brown ambi? Given the notch on the inside of the King's there might have been less space inside, any idea how long this has been procedure PWS2112? Thanks. Originally Posted By DGI:
<a href="http://s302.photobucket.com/user/prez1967/media/Guns/MEUSOC%20BUILD/6B0D91C7-6B0A-45E0-A8C1-AFF8A3474EC5_zpstfb6sz0t.jpg.html" target="_blank">http://i302.photobucket.com/albums/nn89/prez1967/Guns/MEUSOC%20BUILD/6B0D91C7-6B0A-45E0-A8C1-AFF8A3474EC5_zpstfb6sz0t.jpg</a> A little motivation ;-) I take it yours is the one on Alchemy's facebook page? That's some super nice beavertail fitting. |
|
|
VA, USA
|
[#12]
PWS2112, you are definetly giving folks a great insight to how things are done there in the shop. Thanks for all the detailed information about the different types of finishing processes. I like that diagram of where to stamp the serial numbers. Sounds tricky, it would not be cool if someone ruined a Kings 201a trying to stamp it.
|
|
|
|
[#13]
I have always been unable to find good punches, mostly because i was trying to find something that could punch steel over hardness of RC40, which is not easy to find. Any brand recommendations?.
|
|
|
|
CA, USA
|
[Last Edit: mlin]
[#14]
Originally Posted By lear60pilot:
PWS2112, you are definetly giving folks a great insight to how things are done there in the shop. Thanks for all the detailed information about the different types of finishing processes. I like that diagram of where to stamp the serial numbers. Sounds tricky, it would not be cool if someone ruined a Kings 201a trying to stamp it. Springfield Custom shop stamped mine when they build the pistol. Turns out the stamping looks excellent on 201a safety. BTW, SACS parkerized finish is as very dark grey to almost black color for $80 when I have it done. Cannot beat that price either. 
|
|
|
MD, USA
|
[#15]
I take it yours is the one on Alchemy's facebook page? That's some super nice beavertail fitting. Yup! Rob is really doing a great job on it. |
|
|
VA, USA
|
[#16]
I have never seen procedures calling for stamping on the outside of the safeties. I asked around some of the older guys and they have also never done or seen it. It is possible that the stamps on the outside are done in that manner to keep from bending the safety when stamping. It takes a bit of creative thinking to hold the safeties in a way that allows you stamp the inside without bending anything. I use small tray that I filled with a fiberglass resin and pressed the different parts in the wet fiberglass. Once it hardened I removed the parts and that left me with a solid surface to stamp on. Different strokes for different folks, but PWS has never stamped on the outside.
Ben |
|
|
|
[#17]
Ben,
I appreciate all your input and glad to have you on the site. Do you know the brand of stamps used in the shop? There's a lot of soft looking Chinese crap out there. |
|
|
|
FL, USA
|
[#18]
My sons 1911 Mil Spec and My High Power with sights
 " /> " />
 " /> " />
|
|
|
VA, USA
|
[Last Edit: lear60pilot]
[#19]
I ask him the next time I talk to him if he doesn't respond to you.
Originally Posted By eternal24k:
Ben, I appreciate all your input and glad to have you on the site. Do you know the brand of stamps used in the shop? There's a lot of soft looking Chinese crap out there. |
|
|
CA, USA
|
[#20]
Personally I have a set of 1/16" Young Bros. hand stamps. Made in USA. Great quality.
http://www.youngbrosstampworks.com/about.html |
|
|
VA, USA
|
[#21]
Originally Posted By eternal24k:
Ben, I appreciate all your input and glad to have you on the site. Do you know the brand of stamps used in the shop? There's a lot of soft looking Chinese crap out there. We use Young Brothers at PWS; I have never had a problem with them. |
|
|
NC, USA
|
[#22]
Originally Posted By mlin:
Personally I have a set of 1/16" Young Bros. hand stamps. Made in USA. Great quality. http://www.youngbrosstampworks.com/about.html What set exactly do you have? I need some in 1/16 and 1/8. There are some real expensive ones on there. This question can also be answered by PWS2112 as well. I cant imagine that you guys use the real expensive stuff. |
|
|
CA, USA
|
[#23]
I have hand cut hand stamps with 9 digit figure set. I have no need for letter set that help minimize the cost.
http://stamps.youngbrosstampworks.com/item/hand-cut-hand-stamps/figure-sets-hand-cut-hand-stamps/01092? |
|
|
VA, USA
|
[#24]
We use 1/16" stamps. They are not cheap, but they are worth it. We don't stamp as much as we used to, but when we did the cheap stamps would wear out too quickly. It is more cost effective to buy longer lasting stamps, even if they are more expensive.
|
|
|
NC, USA
|
[#25]
Thanks for the help guys. I appreciate it. Im going to order a set of these.
|
|
|
TX, USA
|
[#26]
Originally Posted By mlin:
Springfield Custom shop stamped mine when they build the pistol. Turns out the stamping looks excellent on 201a safety. BTW, SACS parkerized finish is as very dark grey to almost black color for $80 when I have it done. Cannot beat that price either. http://i305.photobucket.com/albums/nn216/cxl17/DSC09599_zps548a9561.jpg Originally Posted By mlin:
Originally Posted By lear60pilot:
PWS2112, you are definetly giving folks a great insight to how things are done there in the shop. Thanks for all the detailed information about the different types of finishing processes. I like that diagram of where to stamp the serial numbers. Sounds tricky, it would not be cool if someone ruined a Kings 201a trying to stamp it. Springfield Custom shop stamped mine when they build the pistol. Turns out the stamping looks excellent on 201a safety. BTW, SACS parkerized finish is as very dark grey to almost black color for $80 when I have it done. Cannot beat that price either. http://i305.photobucket.com/albums/nn216/cxl17/DSC09599_zps548a9561.jpg Second best looking 1911 ever...right after mine 
|
|
|
AZ, USA
|
[#27]
lear60pilot, your inbox is full. Just wanted to say congratulations on your recent acquisition. I can't wait to see the finished product.
|
|
|
VA, USA
|
[#28]
Hobbs,
Thanks, yeah I was tired of waiting for a Kings. I finally broke down and did it. I just hope the Para is worth a damn after I salvage the safety off of it. It looks like there is also a Clark on it as we'll. I'll keep you guys updated. Ben has some work ahead of him :) Originally Posted By hobbs5624:
lear60pilot, your inbox is full. Just wanted to say congratulations on your recent acquisition. I can't wait to see the finished product. |
|
|
AZ, USA
|
[#29]
No Clark, it's an old Ed Brown. The gun is very nice though.
|
|
|
VA, USA
|
[#30]
Thanks to an amazing friend, below is a temporary place holder for an awesome work of art that I just received today. More pics and details to come in the future.
Semper Fi... 
|
|
|
USA
|
[#31]
So much bad assery in that picture.
|
|
|
SC, USA
|
[#32]
Originally Posted By lear60pilot:
Thanks to an amazing friend, below is a temporary place holder for an awesome work of art that I just received today. More pics and details to come in the future. Semper Fi... http://i1137.photobucket.com/albums/n516/lear60pilot/photo_zps6d8829af.jpg Thats awesome. I'm really jealous you have a Caspian frame with an MCXXX serial. I want a MEU SOC clone bad. |
|
|
NC, USA
|
[#33]
That's an awesome pistol. Cant wait to hear the details on this one.
|
|
|
FL, USA
|
[#34]
Not a perfect replacement, but I tried reprofiling a Caspian to look more like the Kings.
|
|
|
TX, USA
|
[#35]
Hey guys, came across this on gun broker... Not mine. Looks like a Clark grip saftey. Pistol would be a great retro build host in my opinion. Kind of pricey though for what you are getting, but there are some crazy folks on here that will canibalize a gun for the Clark grip safety... Don't get my wrong, I've considered it...
http://www.gunbroker.com/Auction/ViewItem.aspx?Item=391448790 |
|
|
NC, USA
|
[#36]
What do you guys do for the mainspring housing? I have a couple that are flat smooth with the lanyard loop and others that are flat serrated with no lanyard loop. Is it easier to put the lanyard loop on or mill out the serrations?
Also someone had brought up earlier about the Clark grip safety. Its expensive to buy a whole gun just for one part. Would it be possible to CNC this part? Im sure that there will be a lot of buyers for this one. I know I would be in for 2 or 3. Last thing is the front sight. What are people doing that have something other than the serrated? Is it also possible to have those CNC as well? Guys Im just throwing ideas out there. Wish I could be of more help here. Im still collecting pieces for my builds as well. |
|
|
AZ, USA
|
[#37]
With regards to mainspring housings, it's a matter of preference. I have a Les Baer flat serrated unit. I was going to drill and install a lanyard loop. I still may go that route. If you're going for attention to detail, you must remember there is a small relief cut between the lanyard loops. That's going to be hard to replicate, though you can with either a ball end mill (it won't be perfect) or a steady hand with the right dremel bit. THe other route, which I believe to be the easiest, is to take a WWI flat smooth mainspring housing that already has a lanyard loop and relief cut, and serrate it with a 20 line per inch checkering file. What I ended up doing, which was a pain in the ass, is to take a WWII arched lanyard loop, recontour to flat, and serrate it. I believe that to be the most authentic approach, but also the most time consuming.
As for grip safeties, I come across at least 20 of them a year. You just need to know where to look. They come up on eBay, GunBroker, Auction Arms, etc. I don't mind buying a whole gun to get the part, but it better be cheap enough that there is no doubt I can flip it for a profit. I wouldn't touch that gun Mr. Carmody posted only because it's overpriced to begin with, but to each his own. I think it may be different to take a loss on a gun for a King's 201A, but only because it and the MEU(SOC) rear sight are the rarest pieces. I actually came across an over priced custom in December that had a PWS rear on it. No idea where the guy got it. It was a DGFM with a Clark beavertail. The guy wanted $1600 for it, and the Clark and PWS were all that were done to it. Way too much, especially knowing that Ben was going to come through on the sights. I talked to a friend of mine who has a CNC mill. He programs, and the sight as well as the beavertail would be fairly simple. I don't pretend to know what's involved in programming a CNC, but he feels it's not cost effective to make either part if he'll only sell a few hundred a year. As for the front sight, look at my post a few pages back with regards to dual crimp solder installs vs. stake on. There are a lot of Millett sights on the market still, and tons more of them are dual crimp. You can get a dual crimp serrated or a dual crimp white dot .312" or above and still have something to work with. Getting any Millett above .225" and machining the serrations is also a way to go. Check eBay for the sights. |
|
|
AZ, USA
|
[#38]
Parabellum226, that is quite impressive. When you originally posted the comparison between the two safeties, I though about buying a Caspian, welding a new pin into the left paddle with enough to cover up the joint, make a traditional joint in the middle of the pins, and recontour. I now see this is a very viable option.
|
|
|
NC, USA
|
[#39]
Whats the best way to serrate a smooth mainspring housing? Are they done on a mill or can you use a 20 lpi file and get the same results. I might try it here but not too sure how to do it.
|
|
|
AZ, USA
|
[#40]
Even if you have access to a mill, you need to be able to set up in a fixture properly. You need to be able to serrate on the curve, and if you are not an experienced machinist with the proper measurements, it may not be the best approach. The original spacing is 20 lines per inch, so it's just easier to use a file. It's also easier to mess up with a file. There are a variety of ways to set up or guide your file cuts. Not as perfect as a mill, but here's how I do it, and it's at least as close to being centered as most factory mainspring housing.
I take a caliper and measure the width of the mainspring housing. I divide that in half to come up with a center mark. I place that mark top and bottom with a metal scribe, then I place masking tape on both sides, leaving a very thin space both sides of my scribe marks. Basically, the mainspring housing is covered by masking tape, except for a thin line about .030" wide. That's just an arbitrary number I'm comfortable with. I start a line from bottom to top of the mainspring housing between the tape using a single point checkering file. Once it gets deep enough, I pull the tape, make it deep enough that I know the edge row of my 20 line per inch file will catch, and start my serrations. I work both direction off that center line, deepening one side about 30 percent, then moving to the other side. I go one line at a time in both directions. By the time I get about 3 lines out the center is about 70 percent to depth. I have no idea if any of that makes sense. Everyone checkers a little different, and it's an art form. Maybe I'll do this on an old flat/smooth mainspring housing soon and document with photos. The biggest pitfall when doing this is making sure not to checker too wide. In other words, it's easy to over run the sides instead of leaving the last row of each side uncheckered. Again, it's an art form that takes practice. It's all a matter of knowing how to lean on the file/put sideways pressure when cutting. Tape your fingers or use gloves, and practice on a cheapy. Good luck. |
|
|
NC, USA
|
[#41]
Hobbs if you ever work on a mainspring to make it serrated please take plenty of pics. I look forward to learning how you do this process.
|
|
|
AZ, USA
|
[#42]
Here's some teasers from my current clone project. I've sought to be as close to accurate as possible, and that means there are certain cosmetic details I won't improve as the PWS guys wouldn't have bothered. For instance, I have a little fixture for my metal stamps to keep them lined up during stamping. Having studied a lot of photos, I wanted to freehand them and make them a little crooked.
I have a lot of things left to do, but at least the gun is starting to look like a real MEU(SOC) pistol now. One thing I found interesting is that the left side thumb safety was much harder than even the slide, and resisted my best efforts to stamp it. Fortunately the errors in stamping are so shallow that I can easily remove them and start over. I have a plan for that side though, so it should turn out fine. Things I have left to do are install a USGI MSH, fit the Barsto barrel, bevel the magwell, and redo the beavertail blending. The MSH will start from an arched one, which I will flatten and serrate. I went crooked on this one because I left some of the old grooves and my checkering file didn't quite match up to the old serrations, leading to crooked lines. While I'm pleased with the beavertail blending, I think it looks to be a little too blended, not keeping with photos of the actual guns I've studied. Right now the gun is in the white. It has one of Ben's hand made first run sights, though I have a later CNC sight. I prefer this one, as again it looks more authentic being machined manually. Hope you all enjoy the pics! 


|
|
|
VA, USA
|
[#43]
Hobbs,
Everything looks great so far! When you reblend your beavertail you should also blend the back of your frame and slide. The frame rails run flush with the back of the slide as well as the extractor. Hope this helps! Ben |
|
|
AZ, USA
|
[#44]
Thanks for the input Ben. I was talking with a couple of local 1911 smiths yesterday while working on this. The extractor was way oversized at the head, and one of the guys asked why I stopped blending it where I did, considering I usually take great pains to blend it flush. I showed him numerous photos I had of early PWS guns of this vintage with extractor heads sticking out. I'm aiming for period correct, and will likely leave it sticking out a little proud.
As for the frame rails, I have to fit the Bar-Sto still. They should line up a lot better with the slide once I fit the barrel feet. I'll clean up the back after the barrel work. I'll post up pictures once it's all done. You interested in blackening a barrel and bushing when this is all done? |
|
|
AZ, USA
|
[#45]
Hey MEU(SOC) enthusiasts. With slides becoming harder to find I thought I would post this up. Not my auction, but there is a slide that might work for some of you on GunBroker. I already asked this guy about the front sight, and I don't want to bother with welding it up. It's a dual crimp front, and it's orange bar. A serrated ramp dual crimp could easily be installed. If anyone wants it, you can always send me your slide and I'll install your dual crimp free of charge.
http://www.gunbroker.com/Auction/ViewItem.aspx?Item=392231703 |
|
|
FL, USA
|
[#46]
Hobbs5624, very nice progress!
I definitely agree that the beavertail looks a little too blended and perfect. When I bought an old springfield frame a while back I was quite bothered by the gap between the clark and frame as fitted. Upon perusing the old spec pics, I noticed that my "gap" was actually spot on or perhaps a bit tighter than on most of the GI guns :) I'm very excited to see the finished product. |
|
|
AZ, USA
|
[#47]
I've seen both large and next to no gap. When I fitted this one, I blended it the way I learned it 25 years ago, including blending the sides of the frame and keeping the lines of the frame visible in the grip safety. I notice that SACS did the same with mlin's pistol, and was impressed with how well they blended his gun, though they did his with a grip safety depressed fit. That's anal retentive gunsmith stuff though, and while it adds to pride of ownership, it's not what I'm looking for in this build. I'll likely go back and soften the bottom line of the grip safety contour.
When I toured the DET-1 armory at Pendleton, I got to talking with their armorer, and something stuck out for me. While showing me their pistols, he seemed sort of embarrassed about the fact that he installed Ed Brown grip safeties in place of the factory Kimber safeties without blending the frame tangs. He commented that he didn't have the time, nor the capability in his shop (it wasn't PWS after all, but a makeshift setup at a Pendleton armory), to refinish 103 frames. I could understand his embarrassment as he was obviously a professional and perfectionist, but I thought it was cool. When I set up my own DET-1 pistol, I promptly replaced the grip safety with an Ed Brown. To this day I want to blend it and sent it to Kimber for new KimPro. I won't though. It's not authentic. My gun looks just like all the other DET guns, with the exception of the higher serial number. So, as much as I want to do certain things, like clean up some of the lines on the frame, have a perfectly blended back end of the slide, do a dehorn, etc., I'm going to stick with my plan of having it look as authentic and true to my file pictures as possible. I'm hoping when it's done it could pass for the real deal, though it won't ever be for sale. I've got two boys, and one can have the DET-a pistol, the other the MEU(SOC) pistol. As a side note, any idea Ben what happened to all the DET guns? Did they happen to go back to you guys? |
|
|
FL, USA
|
[Last Edit: Parabellum226]
[#48]
Hobbs,
What are your opinions on the dual crimp? From what I have read, many do not like them because they prevent replacement with stake on sights, and require welding in order to add dovetails. Are they any less durable than the stake on ones though? From the link posted earlier in this thread, it sounds like they were used shortly on the original MEU(SOC) pistols, but benefitted from silver soldering ( http://m14forum.com/handguns/141421-colt-marine-pistol-3.html post #33). Originally Posted By hobbs5624:
Hey MEU(SOC) enthusiasts. With slides becoming harder to find I thought I would post this up. Not my auction, but there is a slide that might work for some of you on GunBroker. I already asked this guy about the front sight, and I don't want to bother with welding it up. It's a dual crimp front, and it's orange bar. A serrated ramp dual crimp could easily be installed. If anyone wants it, you can always send me your slide and I'll install your dual crimp free of charge. |
|
|
AZ, USA
|
[#49]
Dual crimp installs are good when done properly. Stake on is good when done properly. Cross dovetail is good when done properly. Forward to rear dovetail with either set screw or captive bushing is good when done properly. Trouble is, any of these can be done wrong.
The only reason I won't consider that slide for a MEU(SOC) clone is that it's not authentic. I can't access that post you listed, but I've never seen a dual crimp install documented, though a buddy of mine said that the very early guns had them. He was referring to guns prior to even Springfield slides. I don't know if any of the Springfield slides of that vintage ever had dual crimp sights, and I doubt there are any PWS guys around from that long ago. Maybe Ben can say whether he or any of the current PWS guys have seen a slide ever come through with an old dual crimp install. Regardless, the problem with dual crimp installs are many. Like you said, you won't be installing a stake in sight, and you won't use the slide for a dovetail install without welding first. The other issue is this. Dual crimp installs were the superior set up for strength when they were first made, and this was before dovetail fronts became popular. However, if the installer did not mill a flat for the sight to sit on, or if the flat was filed by hand and was too poorly done, the sight tended to wobbly and the thin walled crimped buttons wore out. If the installer drilled the holes with incorrect spacing by too much, again, the thin walls of the buttons wore out, and the sight would work it's way loose. The problem is that you usually can't see off space holes with the naked eye. That leaves silver soldering as the only method to secure one of these sights. The final issue is this. IF you go with this slide, and IF you have a serrated ramp front you want to use, you need to be able to find someone with a dual crimp tool for installation. Even the shops that did it are rarely around today. I have a tool for it and don't mind doing it for people. |
|
|
VA, USA
|
[#50]
In response to the mentions of PWS I will say I have never seen a dual crimp on a MEUSOC. Nor have I hears of anyone using a dual crimp on any military 1911. That being said we have a dual crimp tool at work that appears to have been used before. I know there are guys who have used dual crimps on personal builds so it may have been a donation from someone who didn't need them or possibly they were bought with the stake on fixture as a set. I am not sure, they probably have more time at PWS than I do in the Corps. I guess my general thought for most things MEUSOC related is this: when money and supplies are tight you do what you have to do to keep production moving. It is very possible that at some point in the past the only sights that were available were dual crimp. Just a mystery of the universe at this point though.
Ben |
|
|
 Win a FREE Membership!
Sign up for the ARFCOM weekly newsletter and be entered to win a free ARFCOM membership. One new winner* is announced every week!
You will receive an email every Friday morning featuring the latest chatter from the hottest topics, breaking news surrounding legislation, as well as exclusive deals only available to ARFCOM email subscribers.

AR15.COM is the world's largest firearm community and is a gathering place for firearm enthusiasts of all types.
From hunters and military members, to competition shooters and general firearm enthusiasts, we welcome anyone who values and respects the way of the firearm.

Subscribe to our monthly Newsletter to receive firearm news, product discounts from your favorite Industry Partners, and more.
Copyright © 1996-2024 AR15.COM LLC. All Rights Reserved.
Any use of this content without express written consent is prohibited.
AR15.Com reserves the right to overwrite or replace any affiliate, commercial, or monetizable links, posted by users, with our own.


