|
[#1]
Originally Posted By SERVED_USMC: Here's the updated progress as of today. Drywall will be finished Thursday so paint will come next week followed by flooring. All the wires hanging out of the wall are for the security cameras, internet,cable, etc.. http://i89.photobucket.com/albums/k215/THROTTLEJUNKIES/IMG_3068_zps2muyncmm.jpg http://i89.photobucket.com/albums/k215/THROTTLEJUNKIES/IMG_3069_zpsztqiwlc9.jpg You going to put in recessed lighting? I find recessed lighting makes rooms more bright and causes less strain on the eyes vs hang-down/ceiling fan type lights. At least for me anyway. |
|
|
|
|
[Last Edit: SERVED_USMC]
[#2]
Originally Posted By dangerdan:
You going to put in recessed lighting? I find recessed lighting makes rooms more bright and causes less strain on the eyes vs hang-down/ceiling fan type lights. At least for me anyway. Originally Posted By dangerdan:
Originally Posted By SERVED_USMC:
Here's the updated progress as of today. Drywall will be finished Thursday so paint will come next week followed by flooring. All the wires hanging out of the wall are for the security cameras, internet,cable, etc.. http://i89.photobucket.com/albums/k215/THROTTLEJUNKIES/IMG_3068_zps2muyncmm.jpg http://i89.photobucket.com/albums/k215/THROTTLEJUNKIES/IMG_3069_zpsztqiwlc9.jpg I find recessed lighting makes rooms more bright and causes less strain on the eyes vs hang-down/ceiling fan type lights. At least for me anyway. No. Ive got 8 4 foot high output fluorescent ballasts that are going in. I had 4 in there originally and decided to double it. 4 towards the middle of the room, 2 over the reloading bench and 2 along the other short wall. ETA: I did wire the switches to turn off the ones over the benches independently. |
|
|
|
OK, USA
|
[#3]
where is the cheapest place to get decent fluorescent tube light fixtures?
|
|
|
|
[#4]
Originally Posted By fury413rb:
where is the cheapest place to get decent fluorescent tube light fixtures? I found mine on sale at Menards for around $23 each |
|
|
|
|
[#5]
Originally Posted By fury413rb: where is the cheapest place to get decent fluorescent tube light fixtures? Please return thread to posting pics of reloading benches. |
|
|
|
OK, USA
|
[#6]
Originally Posted By SERVED_USMC:
I found mine on sale at Menards for around $23 each Originally Posted By SERVED_USMC:
Originally Posted By fury413rb:
where is the cheapest place to get decent fluorescent tube light fixtures? I found mine on sale at Menards for around $23 each Originally Posted By dryflash3:
Originally Posted By fury413rb:
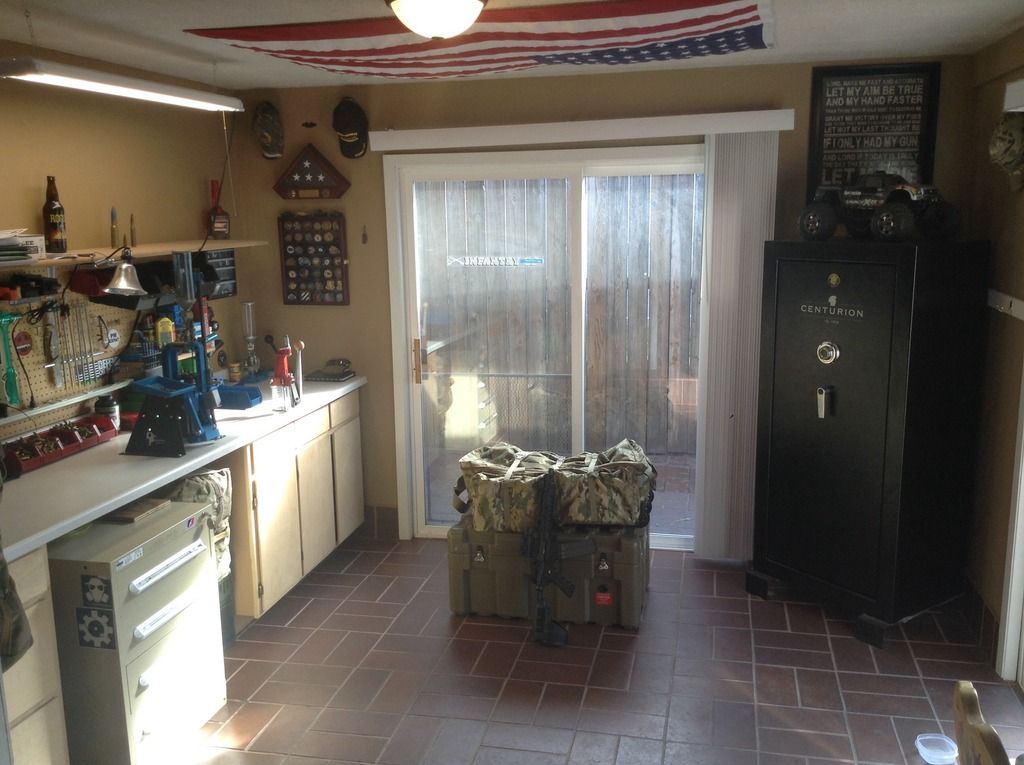
where is the cheapest place to get decent fluorescent tube light fixtures? Please return thread to posting pics of reloading benches. Sorry was referring to the lights in all the kickass pictures of reloading areas. Just moved into my house which was previously abandoned/foreclosed. The garage is a giant disaster with who knows what (free zeroturn) Reloading area will be in the right of the garage! Attached pictures for future reloading area to show the horrible current state. Dumper showed up yesterday! 
|
|
|
TX, USA
|
[#7]
 " /> " />
|
|
|
|
[#8]
Added some shelving to mine
Right side will eventually fill up with more dies Don't mind the mess 
|
|
|
|
OH, USA
|
[#9]
My humble submission. This was before I cleaned it up yesterday after the weather finally broke and it was bearable to be out in the garage. I need to replace the top with something heavier. Right now I've 3 sheets of high density particle board screwed together. Been looking at butcher block from Menards.

|
|
|
|
[#10]
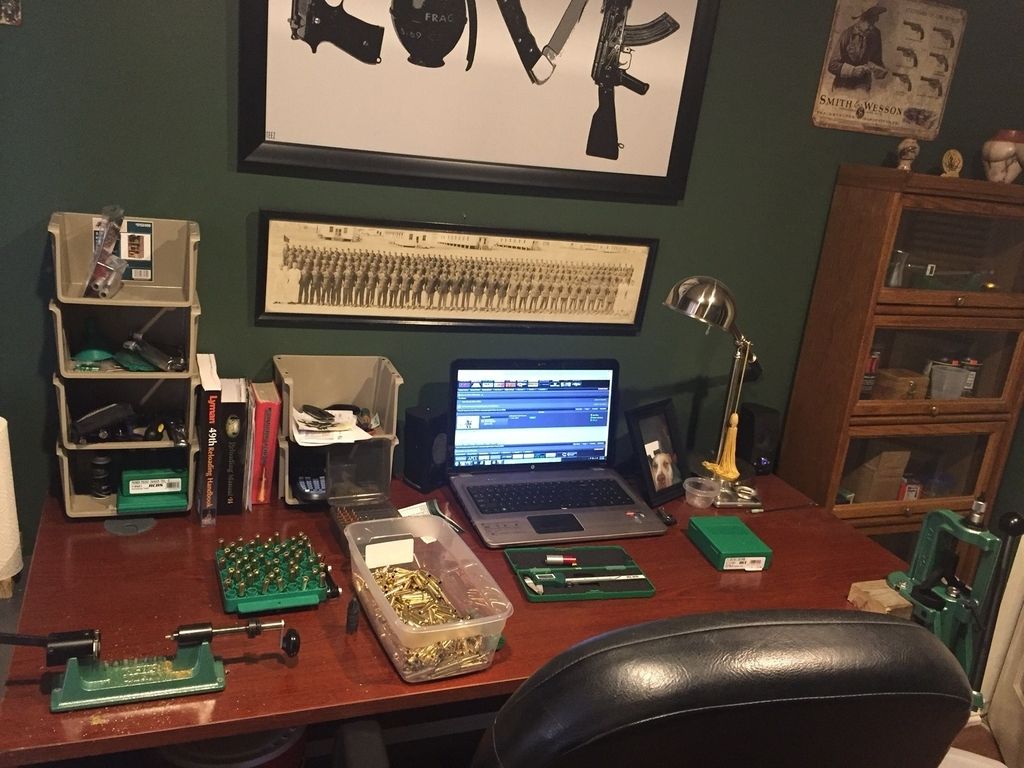
Figured I would show you guys what I am working with.
First had to remodel entire room- new insulation, drywall, floors, trim, paint. I wanted more of a multipurpose office/ reloading area. so I picked up the desk shell used from an office supply surplus store for $100. Already had the office chair.. Other side of room isn't ready for pictures, temporary gun cleaning table at the moment. 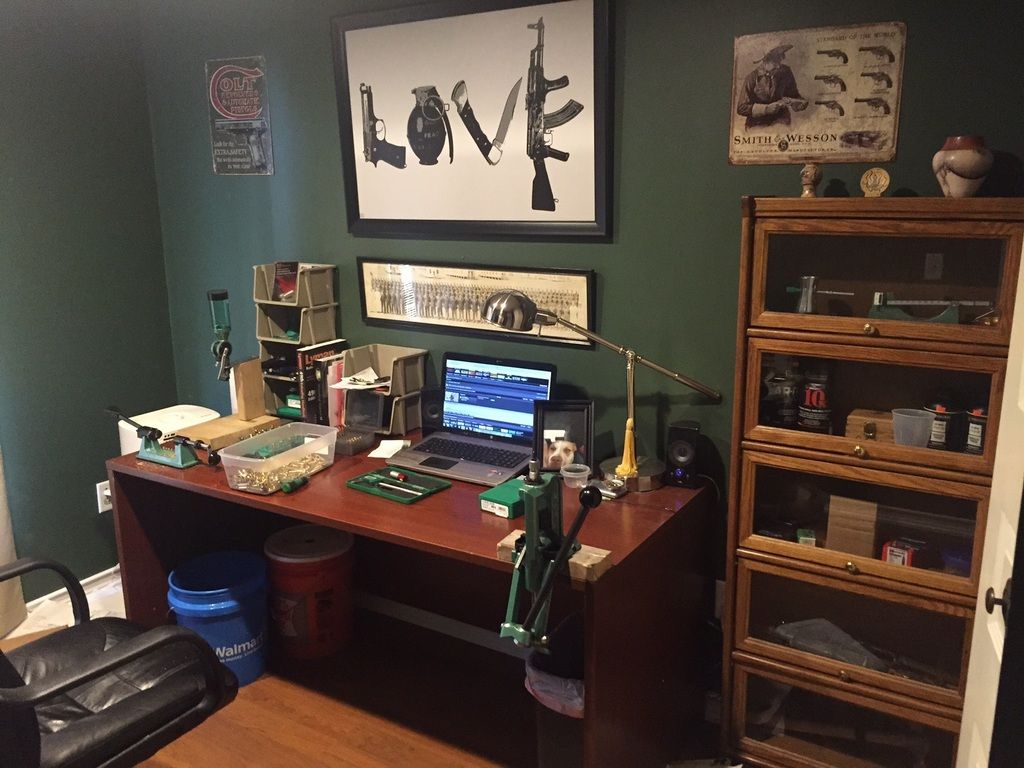 " /> " />
 " /> " />
Thanks for the inspiration fellows! |
|
|
|
|
[#11]
Originally Posted By Constant_Impingement:
For the surface, we wanted something that we could reload ammo, clean & work on rifles. He had an idea of 1/2" rubber...works perfect! Its sturdy enough to balance anything level with the perfect amount of give to not ding the rifles or vice versa...he then trimmed the rubber insert with a flush boarder. So the rubber mat can be removed and hosed down if needed. <a href="http://s1136.photobucket.com/user/jraymond614/media/Guns/IMG_0250_zps4efpk3tk.jpg.html" target="_blank">http://i1136.photobucket.com/albums/n499/jraymond614/Guns/IMG_0250_zps4efpk3tk.jpg</a> </a> Where did you pick up the rubber mat, and has it held up the way you thought it would? Very nice setup! |
|
|
|
|
[#12]
Originally Posted By medicman5000:
Inline actually makes storage plates that you mount to something sturdy to store your spare press/plate. However, given my space requirements and the need for some beefy backing for the storage plate it just wasn't going to work for my setup. What I needed was a way to keep my spare press stored on the bench but tucked out of the way. And it needed to be sturdy!!!! So YES, I ordered a second sub plate and used longer bolts and 1"x1/4ID nylon spacers. Mounted this all up and it is now my storage rack for switching out presses. https://lh6.googleusercontent.com/XtwqMNYnfItWpbDVG3zxaBdZb9bcEZzoHaP_2xv1wLw=w1236-h695-no https://lh6.googleusercontent.com/-u4_DsipHN2U/U-vWdZpItcI/AAAAAAAALng/es1wLmlJWRw/w1236-h695-no/IMG_20140813_141938854_HDR.jpg https://lh4.googleusercontent.com/-Xyv5APIbZ9A/U-vW8itAbGI/AAAAAAAALns/UdR-QZTnYU8/w391-h695-no/IMG_20140813_142148296.jpg Here is a view with my LNL stowed to the side: https://lh3.googleusercontent.com/-gJir_kqHU14/U_FkQUmncMI/AAAAAAAALrs/-nXwrvvQyYw/w1236-h695-no/IMG_20140817_192605561.jpg This also may explain the system a bit better to: https://www.youtube.com/watch?v=z4F93tWTC7Q Originally Posted By medicman5000:
Originally Posted By Corporal_Chaos:
Originally Posted By medicman5000:
Originally Posted By ThePontificator:
Is that bench of lockable casters? I'm assuming it is as otherwise it'd be kind of hard to use the Lyman turret press, wouldn't it? The mini-leg lamp is a nice touch. Im using Inline Fabrications quick mount system. In that picture the Lyman press is sitting in the spare press storage location. I can switch presses on the fly. It's really a great system! How are you mounting the turret to the bench? Did you just bolt down the quick change plate? Inline actually makes storage plates that you mount to something sturdy to store your spare press/plate. However, given my space requirements and the need for some beefy backing for the storage plate it just wasn't going to work for my setup. What I needed was a way to keep my spare press stored on the bench but tucked out of the way. And it needed to be sturdy!!!! So YES, I ordered a second sub plate and used longer bolts and 1"x1/4ID nylon spacers. Mounted this all up and it is now my storage rack for switching out presses. https://lh6.googleusercontent.com/XtwqMNYnfItWpbDVG3zxaBdZb9bcEZzoHaP_2xv1wLw=w1236-h695-no https://lh6.googleusercontent.com/-u4_DsipHN2U/U-vWdZpItcI/AAAAAAAALng/es1wLmlJWRw/w1236-h695-no/IMG_20140813_141938854_HDR.jpg https://lh4.googleusercontent.com/-Xyv5APIbZ9A/U-vW8itAbGI/AAAAAAAALns/UdR-QZTnYU8/w391-h695-no/IMG_20140813_142148296.jpg Here is a view with my LNL stowed to the side: https://lh3.googleusercontent.com/-gJir_kqHU14/U_FkQUmncMI/AAAAAAAALrs/-nXwrvvQyYw/w1236-h695-no/IMG_20140817_192605561.jpg This also may explain the system a bit better to: https://www.youtube.com/watch?v=z4F93tWTC7Q Great idea on the storage plate location for those of us with little bench space. |
|
|
|
PA, USA
|
[#13]
Here are a few pictures of my Work In Progress New Reloading Bench. I have a 2"x4" wall, double plated on the bottom and top. The bottom plate is preasure treated. I put in blocking for the shelf hangers and also in the middle of the 2"x4" studded wall. I attached the Shelf Hanging System with 1 1/2" Joist Hanger Screws into the blocking. My shelfs will be wood. I ran two dedicated 20 amp circuits and a video grade coax cable. The T1-11 is 3/8s glued and nailed to the 2"x4" studs and painted with Sherman Williams Exterior Paint. I used 4.5" Headlocks to attach my 2"x6" and 2"x4" ledger boards to the 2"x4" studs. I will put 3 preasure treated 4"x4"s on the two front corners and in the middle of the front of the bench framing. I am using joist hangers for the top 2"x4" studs but will screw in 2"x4" studs for my bottom shelf. I may put 2 layers of 3/4" plywood on top of the bench with one layer on my bottom shelf.
I also had my sons put drywall above my bench area to cut down on dust. I will attach some sort of lighting system above the bench area. The finish size will be 30" x 120". I drew up plans and had all of the wood cut off site. This has been a year long project for me due to my health issues. My wife and sons are helping me and I hope to have this reloading bench finished in a month. Dane 

|
|
|
|
[#14]
Thought I'd throw mine into the ring as well. Been piecing everything together for about a year and the current final product!

|
|
|
|
SC, USA
|
[#15]
Originally Posted By Roentgun:
Thought I'd throw mine into the ring as well. Been piecing everything together for about a year and the current final product! http://i1030.photobucket.com/albums/y365/Roentgun/Mobile%20Uploads/64FF06A3-311D-4AC6-A994-955413582412_zpsof6qqft6.jpg tell us about that brown powder scale. Looks similar to an RCBS 10-10 |
|
|
|
[Last Edit: Roentgun]
[#16]
Originally Posted By ThePontificator:
tell us about that brown powder scale. Looks similar to an RCBS 10-10 Originally Posted By ThePontificator:
Originally Posted By Roentgun:
Thought I'd throw mine into the ring as well. Been piecing everything together for about a year and the current final product! http://i1030.photobucket.com/albums/y365/Roentgun/Mobile%20Uploads/64FF06A3-311D-4AC6-A994-955413582412_zpsof6qqft6.jpg tell us about that brown powder scale. Looks similar to an RCBS 10-10 Old school Lyman/Ohaus M5 tuned by a guy out in California by the name of Scott Parker. The thing is dead nuts! I dip slightly under my charge weight and trickle the last few tenths. I keep checking with my check weights throughout my powder charging process, but I'm not sure why any longer. Probably because I've only had it a couple of months, but my trust factor is just about to go through the roof with the thing. ETA: Oh, and the corner of the box sticking out from behind the laptop. That is the original box from back in the mid 60's when it was manufactured! From some of my research it seems that it was actually the predecessor to the 10-10 as they were both made by Ohaus originally. Most seem to think that it was a bit more precise than the RCBS version, and the man that tuned it for me recommended it over the 10-10 as well. |
|
|
|
CA, USA
|
[#17]
Originally Posted By Roentgun:
Thought I'd throw mine into the ring as well. Been piecing everything together for about a year and the current final product! http://i1030.photobucket.com/albums/y365/Roentgun/Mobile%20Uploads/64FF06A3-311D-4AC6-A994-955413582412_zpsof6qqft6.jpg Did you buy or build that bench? |
|
|
|
[Last Edit: Roentgun]
[#18]
J
Originally Posted By zerodameaon:
Did you buy or build that bench? Originally Posted By zerodameaon:
Originally Posted By Roentgun:
Thought I'd throw mine into the ring as well. Been piecing everything together for about a year and the current final product! http://i1030.photobucket.com/albums/y365/Roentgun/Mobile%20Uploads/64FF06A3-311D-4AC6-A994-955413582412_zpsof6qqft6.jpg Did you buy or build that bench? Built. Originally built it as a laundry folding table with a Formica top. Repurposed it as a food prep table with a butcher block top, then claimed it as my own and put the Sears workbench/butcher block top on it as a reloading table. The table itself is about 20 yrs old and still going strong! ETA: before it became a reloading bench. 
|
|
|
|
|
[#19]


|
|
|
|
|
[#20]
|
|
|
|
NC, USA
|
[#21]
Finally finished mine.

I have waited many years to have a gun room. 
|
|
|
KS, USA
|
[#22]
Here is my humble submission to the picture thread. I feel like I made my little space work really well!

|
|
|
KS, USA
|
[#23]
Limited Space at the moment, but this thread has inspired me to take the plunge anyways!
Soon I will be making match quality .308 
Free lumber sure is nice, this project has only cost me a box of screws so far! I think I'm going to try and make a "countertop" out of some 2x12's. I'll update it when they are done. Planning on reinforcing the front where the press will be mounted as well. 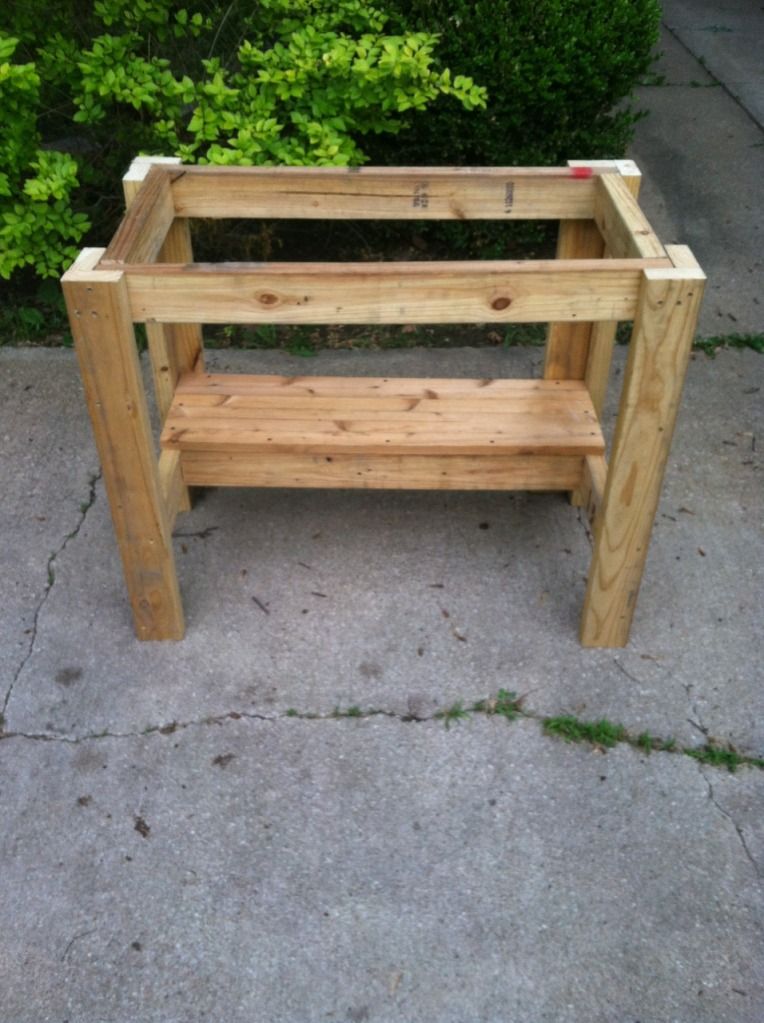
|
|
|
|
[#24]
Originally Posted By FreedomFighterKS: Limited Space at the moment, but this thread has inspired me to take the plunge anyways! Soon I will be making match quality .308 https://dl.dropboxusercontent.com/u/1209837/arfcom/happyreloader.gif Free lumber sure is nice, this project has only cost me a box of screws so far! I think I'm going to try and make a "countertop" out of some 2x12's. I'll update it when they are done. Planning on reinforcing the front where the press will be mounted as well. http://i1081.photobucket.com/albums/j347/TheHighRoadDude/Mobile%20Uploads/IMG_0687_zpsd8bf4e86.jpg I would add 2 cross braces to your top before adding the top surface. |
|
|
|
|
[#25]
Originally Posted By dryflash3:
I would add 2 cross braces to your top before adding the top surface. Originally Posted By dryflash3:
Originally Posted By FreedomFighterKS:
Limited Space at the moment, but this thread has inspired me to take the plunge anyways! Soon I will be making match quality .308 https://dl.dropboxusercontent.com/u/1209837/arfcom/happyreloader.gif Free lumber sure is nice, this project has only cost me a box of screws so far! I think I'm going to try and make a "countertop" out of some 2x12's. I'll update it when they are done. Planning on reinforcing the front where the press will be mounted as well. http://i1081.photobucket.com/albums/j347/TheHighRoadDude/Mobile%20Uploads/IMG_0687_zpsd8bf4e86.jpg I would add 2 cross braces to your top before adding the top surface. That's the start of a really solid bench there! |
|
|
|
KS, USA
|
[#26]
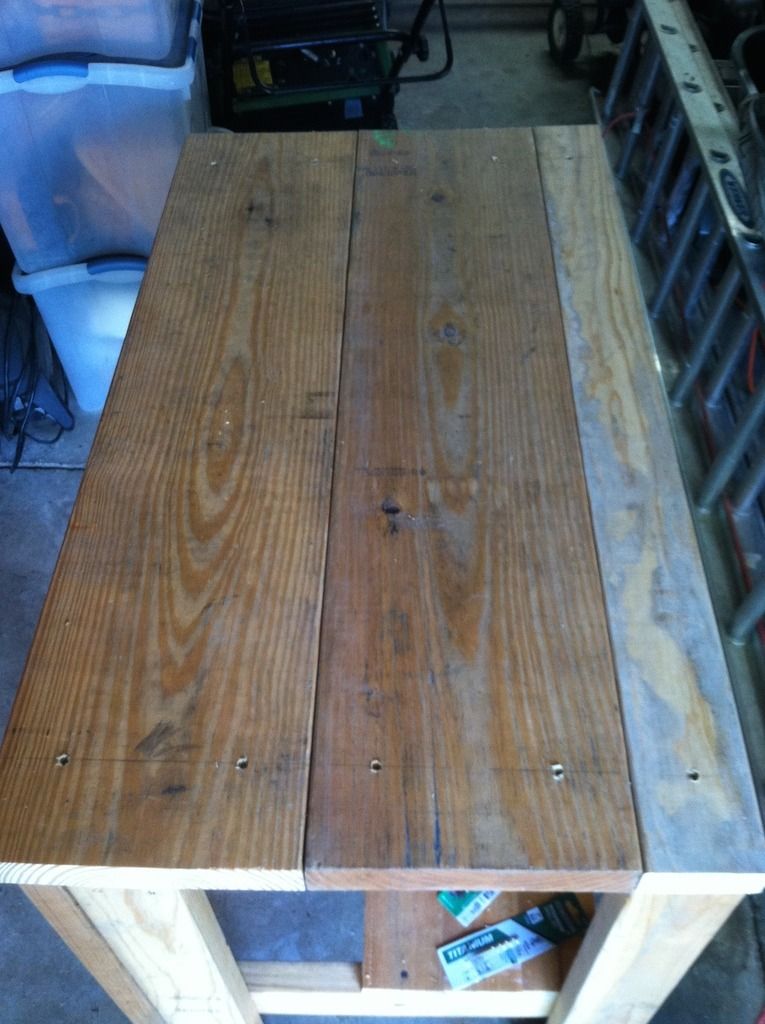
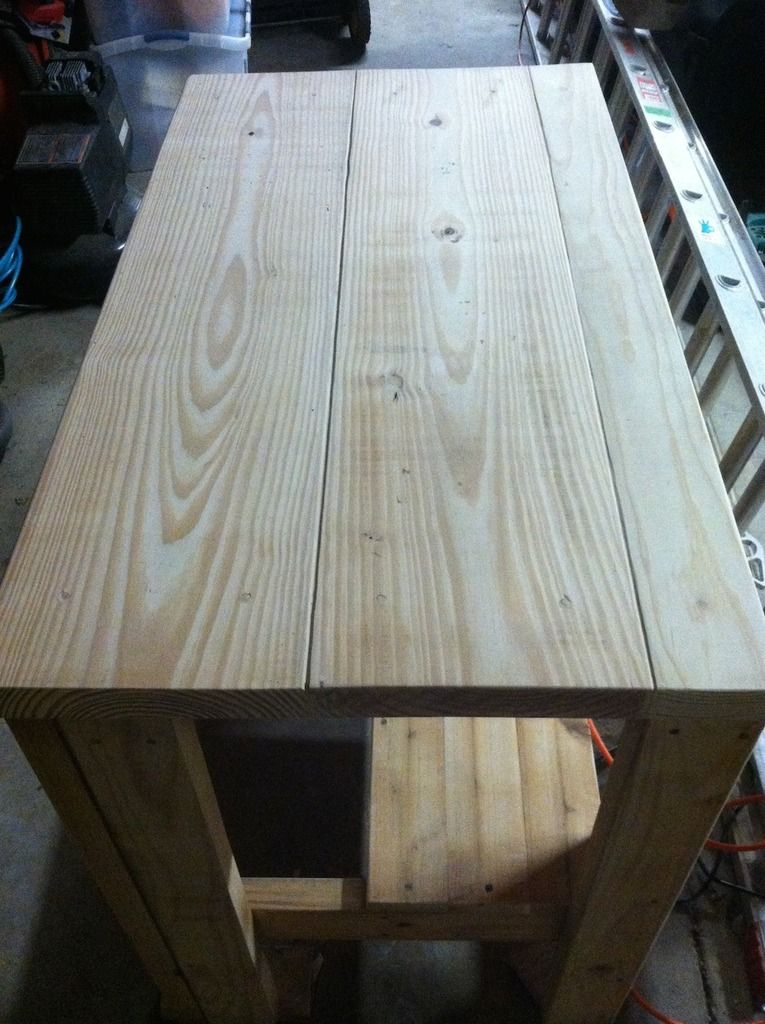
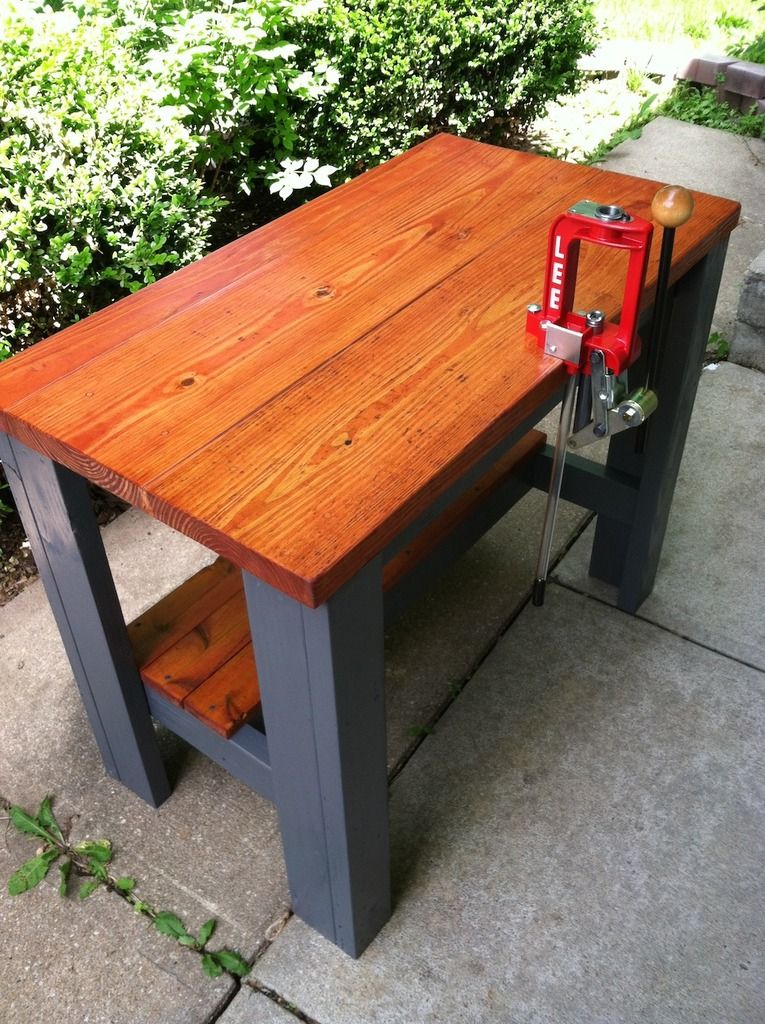
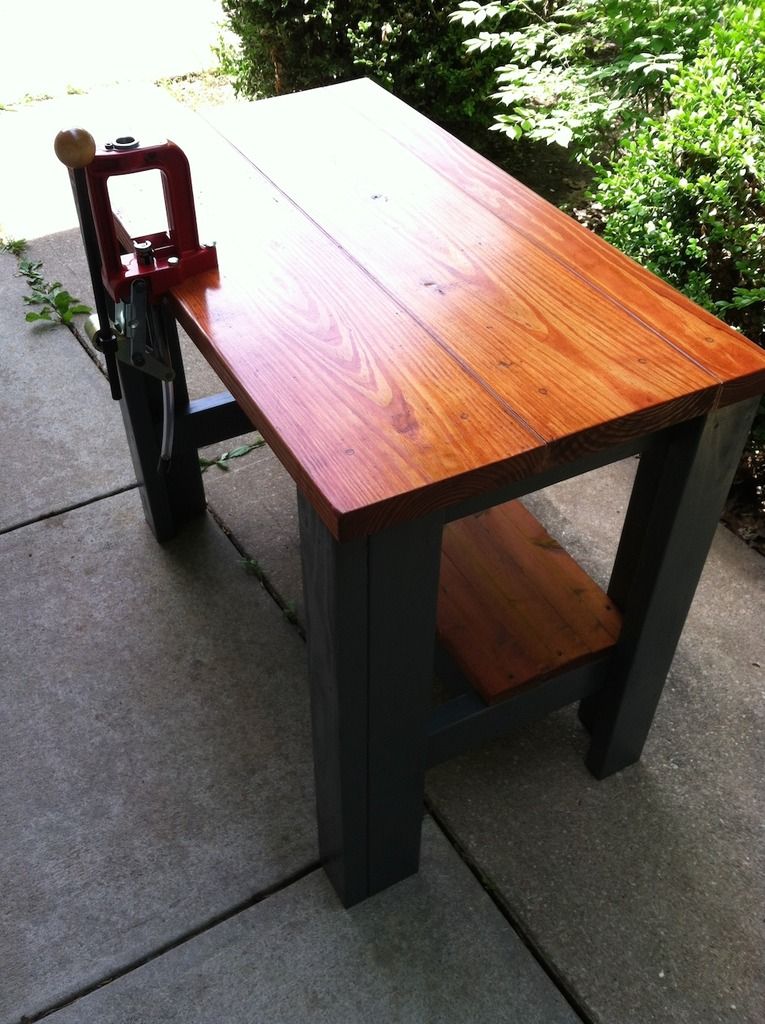
Thanks for the reinforcing advice, I added them and my bench is rock solid! It is now finished and I have made my first reloads ever!
Screws, paint, stain, and a little sweat. But I think it turned out alright, and the significant other approved it to go inside the house 
Progression pictures. 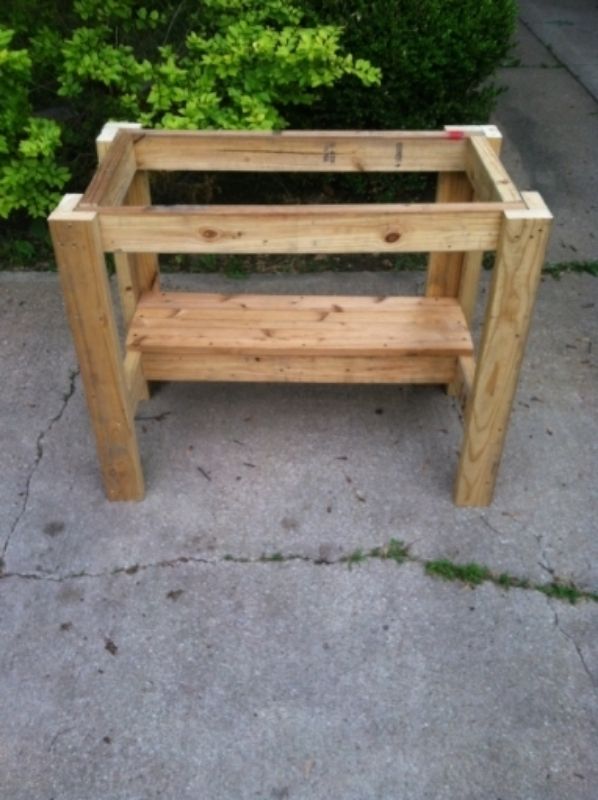
|
|
|
|
[#27]
Your bench turned out nice.
Thanks for the update. |
|
|
|
|
[Last Edit: Detn8r-Red2]
[#28]
Reloading newb here, finally made it all the way through this thread, and thought I would post a pic of my humble setup. Hopefully I will have better pics of an improved setup soon, I'm still acquiring some stuff.

|
|
|
|
|
[#29]
Originally Posted By Detn8r-Red2:
Reloading newb here, finally made it all the way through this thread, and thought I would post a pic of my humble setup. Hopefully I will have better pics of an improved setup soon, I'm still acquiring some stuff. http://i145.photobucket.com/albums/r210/ryan_jarvis3/Reloading/IMG_0762_zps6bdqa0ps.jpg That setup looks great. The Rock Chucker press can handle almost anything you can give it, even mounted on a repurposed office desk. I'd put a layer of 3/4" plywood on the desk top though, since desk tops tend to be MDF without much real firmness. My first bench was a 2-layer plywood top on a frame built from the metal parts of a motorcycle shipping crate. I miss that bench, but it couldn't follow where I had to go... |
|
|
|
|
[Last Edit: MonkTx]
[#30]
Here's a panoramic of the benches in my backyard shop.
 I installed my mini-split this weekend and it is sweet. |
|
|
|
PA, USA
|
[#31]
I added two new pictures. I nailed 1"x10" boards on the bottom shelf framing and painted them with some Barn Board Red Deck Paint that I had. I hopefully will be putting 3/4" plywood on the top framing this weekend. I will also paint the bench top with the deck paint. Then mount my two 650s and my Lee Cast Iron Breech Lock Press.
I can't wait to get this project done so I can start cleaning and re-organizing my area of the basement. Dane 

<a href="http://s1305.photobucket.com/user/md66948/media/IMG_5405_zpslgdpz2sh.jpg.html" target="_blank">http://i1305.photobucket.com/albums/s541/md66948/IMG_5405_zpslgdpz2sh.jpg</a> <a href="http://s1305.photobucket.com/user/md66948/media/IMG_5406_zps9oyakbyb.jpg.html" target="_blank">http://i1305.photobucket.com/albums/s541/md66948/IMG_5406_zps9oyakbyb.jpg</a> Originally Posted By lmlandlord:
Here are a few pictures of my Work In Progress New Reloading Bench. I have a 2"x4" wall, double plated on the bottom and top. The bottom plate is preasure treated. I put in blocking for the shelf hangers and also in the middle of the 2"x4" studded wall. I attached the Shelf Hanging System with 1 1/2" Joist Hanger Screws into the blocking. My shelfs will be wood. I ran two dedicated 20 amp circuits and a video grade coax cable. The T1-11 is 3/8s glued and nailed to the 2"x4" studs and painted with Sherman Williams Exterior Paint. I used 4.5" Headlocks to attach my 2"x6" and 2"x4" ledger boards to the 2"x4" studs. I will put 3 preasure treated 4"x4"s on the two front corners and in the middle of the front of the bench framing. I am using joist hangers for the top 2"x4" studs but will screw in 2"x4" studs for my bottom shelf. I may put 2 layers of 3/4" plywood on top of the bench with one layer on my bottom shelf. I also had my sons put drywall above my bench area to cut down on dust. I will attach some sort of lighting system above the bench area. The finish size will be 30" x 120". I drew up plans and had all of the wood cut off site. This has been a year long project for me due to my health issues. My wife and sons are helping me and I hope to have this reloading bench finished in a month. Dane <a href="http://s1305.photobucket.com/user/md66948/media/IMG_5405_zpslgdpz2sh.jpg.html" target="_blank">http://i1305.photobucket.com/albums/s541/md66948/IMG_5405_zpslgdpz2sh.jpg</a> <a href="http://s1305.photobucket.com/user/md66948/media/IMG_5406_zps9oyakbyb.jpg.html" target="_blank">http://i1305.photobucket.com/albums/s541/md66948/IMG_5406_zps9oyakbyb.jpg</a> |
|
|
|
[#32]
Hope that's 2 layers of 3/4 plywood for 1 1/2 inch thick top.
|
|
|
|
|
[#33]
Originally Posted By GHPorter:
That setup looks great. The Rock Chucker press can handle almost anything you can give it, even mounted on a repurposed office desk. I'd put a layer of 3/4" plywood on the desk top though, since desk tops tend to be MDF without much real firmness. My first bench was a 2-layer plywood top on a frame built from the metal parts of a motorcycle shipping crate. I miss that bench, but it couldn't follow where I had to go... Originally Posted By GHPorter:
Originally Posted By Detn8r-Red2:
Reloading newb here, finally made it all the way through this thread, and thought I would post a pic of my humble setup. Hopefully I will have better pics of an improved setup soon, I'm still acquiring some stuff. http://i145.photobucket.com/albums/r210/ryan_jarvis3/Reloading/IMG_0762_zps6bdqa0ps.jpg That setup looks great. The Rock Chucker press can handle almost anything you can give it, even mounted on a repurposed office desk. I'd put a layer of 3/4" plywood on the desk top though, since desk tops tend to be MDF without much real firmness. My first bench was a 2-layer plywood top on a frame built from the metal parts of a motorcycle shipping crate. I miss that bench, but it couldn't follow where I had to go... Thanks. I did just pick up a sheet of 3/4" plywood to put on the top. Hopefully today I can get it stained and screwed to the top of the desk. I'm still figuring out the process, so Iwant to make sure everything will be where I want it before I put the plywood on top and start drilling holes in it. I will post new pics as soon as I can. |
|
|
|
|
[Last Edit: edgephoto]
[#34]
Well I finally got my LnL working and my newest addition, the Co-Ax mounted.
Here is my bench setup that I built this spring. The cabinets are my design too. I still have to make the doors for them. I will be doing that in the next few weeks. Still have some organizing to do as well. My bench is used for all my hobbies and projects. I have dedicated 1/2 to reloading but can remove the presses if I need to. The bench is made from 2x4s. The top is 2x4 framed 16" on center glued and Tapcon screwed into the foundation. For the top I have 2 layers of 3/4" plywood with 3/4" oak flooring glued and nailed on top. Very sturdy. 


|
|
|
|
|
[#35]
Originally Posted By edgephoto:
Well I finally got my LnL working and my newest addition, the Co-Ax mounted. Here is my bench setup that I built this spring. The cabinets are my design too. I still have to make the doors for them. I will be doing that in the next few weeks. Still have some organizing to do as well. My bench is used for all my hobbies and projects. I have dedicated 1/2 to reloading but can remove the presses if I need to. The bench is made from 2x4s. The top is 2x4 framed 16" on center glued and Tapcon screwed into the foundation. For the top I have 2 layers of 3/4" plywood with 3/4" oak flooring glued and nailed on top. Very sturdy. http://i61.tinypic.com/28lvuav.jpg http://i60.tinypic.com/33lfpxj.jpg http://i59.tinypic.com/4jatd5.jpg Awesome setup |
|
|
|
|
[#36]
Originally Posted By ozzie839:
Awesome setup Originally Posted By ozzie839:
Originally Posted By edgephoto:
Well I finally got my LnL working and my newest addition, the Co-Ax mounted. Here is my bench setup that I built this spring. The cabinets are my design too. I still have to make the doors for them. I will be doing that in the next few weeks. Still have some organizing to do as well. My bench is used for all my hobbies and projects. I have dedicated 1/2 to reloading but can remove the presses if I need to. The bench is made from 2x4s. The top is 2x4 framed 16" on center glued and Tapcon screwed into the foundation. For the top I have 2 layers of 3/4" plywood with 3/4" oak flooring glued and nailed on top. Very sturdy. http://i61.tinypic.com/28lvuav.jpg http://i60.tinypic.com/33lfpxj.jpg http://i59.tinypic.com/4jatd5.jpg Awesome setup Thanks. I am still working on it. Have cabinet doors to make, some racks and accessories to buy or make. A work in progress. |
|
|
|
|
[#37]
Originally Posted By edgephoto: Thanks. I am still working on it. Have cabinet doors to make, some racks and accessories to buy or make. A work in progress. Very nice bench you built. Red press theme noted. I have a variety of colors, as I normally buy used. |
|
|
|
|
[#38]
Originally Posted By dryflash3:
Very nice bench you built. Red press theme noted. I have a variety of colors, as I normally buy used. Originally Posted By dryflash3:
Originally Posted By edgephoto:
Thanks. I am still working on it. Have cabinet doors to make, some racks and accessories to buy or make. A work in progress. Very nice bench you built. Red press theme noted. I have a variety of colors, as I normally buy used. The red theme is purely by accident. I was tossed up between a co-ax, Redding Big Boss II and Redding T7. |
|
|
|
|
[#39]
Originally Posted By edgephoto: The red theme is purely by accident. I was tossed up between a co-ax, Redding Big Boss II and Redding T7. Originally Posted By edgephoto: Originally Posted By dryflash3: Originally Posted By edgephoto: Thanks. I am still working on it. Have cabinet doors to make, some racks and accessories to buy or make. A work in progress. Very nice bench you built. Red press theme noted. I have a variety of colors, as I normally buy used. The red theme is purely by accident. I was tossed up between a co-ax, Redding Big Boss II and Redding T7. I read that thread, just my attempt at a witty comment. |
|
|
|
|
[#40]
Originally Posted By dryflash3:
I read that thread, just my attempt at a witty comment. Originally Posted By dryflash3:
Originally Posted By edgephoto:
Originally Posted By dryflash3:
Originally Posted By edgephoto:
Thanks. I am still working on it. Have cabinet doors to make, some racks and accessories to buy or make. A work in progress. Very nice bench you built. Red press theme noted. I have a variety of colors, as I normally buy used. The red theme is purely by accident. I was tossed up between a co-ax, Redding Big Boss II and Redding T7. I read that thread, just my attempt at a witty comment. I know. Although I briefly considered the Hormady single stage for just that reason. Practicality always wins out. |
|
|
|
VA, USA
|
[#41]

100% Ash wood bench we built last winter. Weighs a lot but super sturdy. |
|
|
|
[#42]
Originally Posted By Brosome: http://i.imgur.com/IklsS9y.jpg 100% Ash wood bench we built last winter. Weighs a lot but super sturdy. That's a beauty. Very solid and substantial looking. |
|
|
|
VA, USA
|
[#43]
Thanks, took about all winter to finish up but its built like a tank. Lots of bracing on the frame and under the vice and press. Glad we used wood screws instead of nails, had to take it down to the frame to get it inside, all assembled its gotta tip the scales around 350-400 lbs.

|
|
|
USA
|
[#44]
Originally Posted By edgephoto:
Well I finally got my LnL working and my newest addition, the Co-Ax mounted. Here is my bench setup that I built this spring. The cabinets are my design too. I still have to make the doors for them. I will be doing that in the next few weeks. Still have some organizing to do as well. My bench is used for all my hobbies and projects. I have dedicated 1/2 to reloading but can remove the presses if I need to. The bench is made from 2x4s. The top is 2x4 framed 16" on center glued and Tapcon screwed into the foundation. For the top I have 2 layers of 3/4" plywood with 3/4" oak flooring glued and nailed on top. Very sturdy. where did you get your stools? Those are exactly what I'm looking for one with and one wirhout a back |
|
|
|
[#45]
The one with a back is a Craftsman stool. It has adjustable height but I would not buy it again. The piston for the height does not hold well. I weigh 240 so I thought it was me but my son is 165 and it sinks on him too. When all the way down it is just a hair too low. I have not had time but I plan to just permanently fix the height.
I use the other stool 99% of the time. The height is perfect. My wife found it at Goodwill. They had 2 and I told her only to buy one. I regret now not buying both. I have friends who have bought the swivel stools from Snap on, Matco, harbor freight and they are all junk. The swivel plate wears out fairly quick. The upholstery rips and cracks after not much use. Basic Chinese junk. I am tempted to buy this. |
|
|
|
|
[#46]
bump
|
|
|
|
|
[#47]
Originally Posted By trackstarpre: bump No need to bump this thread it is one of many that has the archive toggle set, which will keep it out of the archives. It's too bad only mods can see the toggle icon next to the thread name. |
|
|
|
|
[Last Edit: Johnson184]
[#48]
Lots of inspirational and kickass reloading benches in all these pages. Hoping to start building my first reloading setup this week.
What do you guys think of wall mounted benches? Sort of like this? Good to go? Or not sturdy enough to support big 100 pound presses? |
|
|
|
SC, USA
|
[#49]
Originally Posted By Johnson184: Lots of inspirational and kickass reloading benches in all these pages. Hoping to start building my first reloading setup this week. What do you guys think of wall mounted benches? Sort of like this? Good to go? Or not sturdy enough to support big 100 pound presses? A couple of layers of 3/4" plywood for covering should be plenty. If you are worried about strength you could double the thickness of the front and back rail, use metal hangers to connect front rail to the back rail, and add stringer supports between each one shown under the top. Just remember the back rail needs to be just as securely fastened to the studs in the wall. |
|
|
|
[#50]
Originally Posted By Johnson184: Lots of inspirational and kickass reloading benches in all these pages. Hoping to start building my first reloading setup this week. What do you guys think of wall mounted benches? Sort of like this? Good to go? Or not sturdy enough to support big 100 pound presses? Every reloading bench I have scratch built (6) had supports at the front of the bench. Press should be mounted very close to this support. Support = 2x4 or 4x4 for overkill. My current bench (page 6) has 2x4 supports on each side of the Rockchucker. So IMHO, I would advise not building a bench like in your pic. Also wood screw and wood glue all joints and do indeed lag bolt bench to the wall. Also don't forget the toe kick on the front of the bench. |
|
|
|
 Win a FREE Membership!
Sign up for the ARFCOM weekly newsletter and be entered to win a free ARFCOM membership. One new winner* is announced every week!
You will receive an email every Friday morning featuring the latest chatter from the hottest topics, breaking news surrounding legislation, as well as exclusive deals only available to ARFCOM email subscribers.

AR15.COM is the world's largest firearm community and is a gathering place for firearm enthusiasts of all types.
From hunters and military members, to competition shooters and general firearm enthusiasts, we welcome anyone who values and respects the way of the firearm.

Subscribe to our monthly Newsletter to receive firearm news, product discounts from your favorite Industry Partners, and more.
Copyright © 1996-2024 AR15.COM LLC. All Rights Reserved.
Any use of this content without express written consent is prohibited.
AR15.Com reserves the right to overwrite or replace any affiliate, commercial, or monetizable links, posted by users, with our own.


