NC, USA
|
[#1]
Originally Posted By dryflash3:T-nuts are made to pound into the wood bottom of a bench. Not laminate. I have an IAC Industries work table that's been converted into a reloading bench. It has a laminate work top and has T-nuts in it from the factory to hold the top onto the base. |
|
|
|
[#2]
Built some shelving. Now I need more shelving!
Untitled by zweitakt250, on Flickr 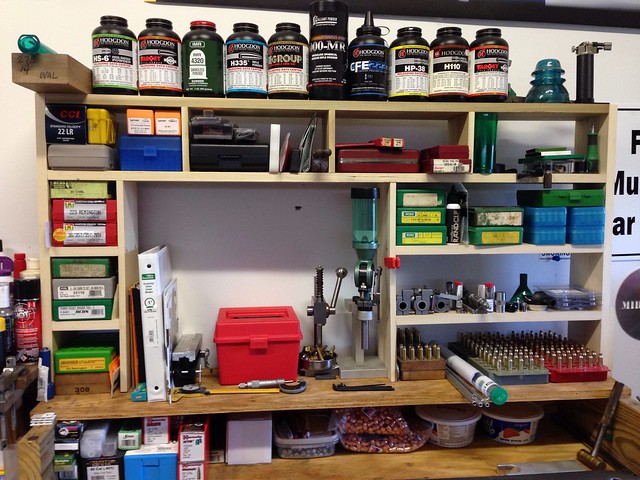
Untitled by zweitakt250, on Flickr |
|
|
|
|
[#3]
Originally Posted By -Un4GivN-:
I have an IAC Industries work table that's been converted into a reloading bench. It has a laminate work top and has T-nuts in it from the factory to hold the top onto the base. Originally Posted By -Un4GivN-:
Originally Posted By dryflash3:T-nuts are made to pound into the wood bottom of a bench. Not laminate. I have an IAC Industries work table that's been converted into a reloading bench. It has a laminate work top and has T-nuts in it from the factory to hold the top onto the base. Probably laminated after the T-nuts were installed. Applying laminate ain't too challenging. Dryflash's comment is aimed at installing T-nuts in existing, already laminated surfaces. It doesn't work. However, you CAN install T-nuts to the BOTTOM of a panel that has laminate on the top side - as long as you drill the hole carefully enough not to bugger up the laminate. |
|
|
|
|
[#4]
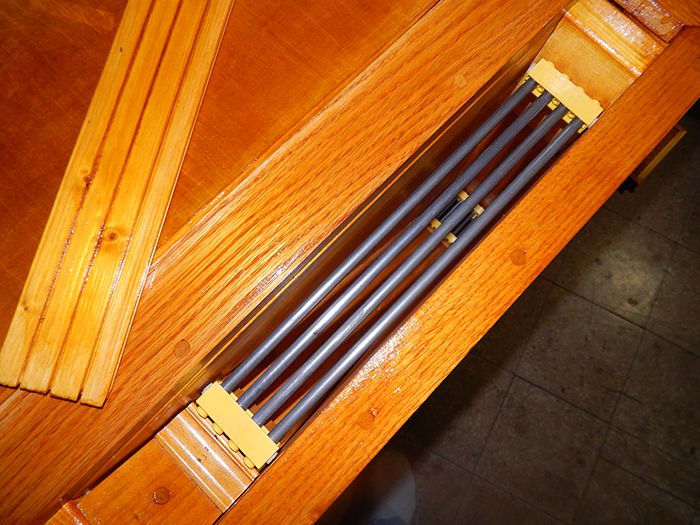
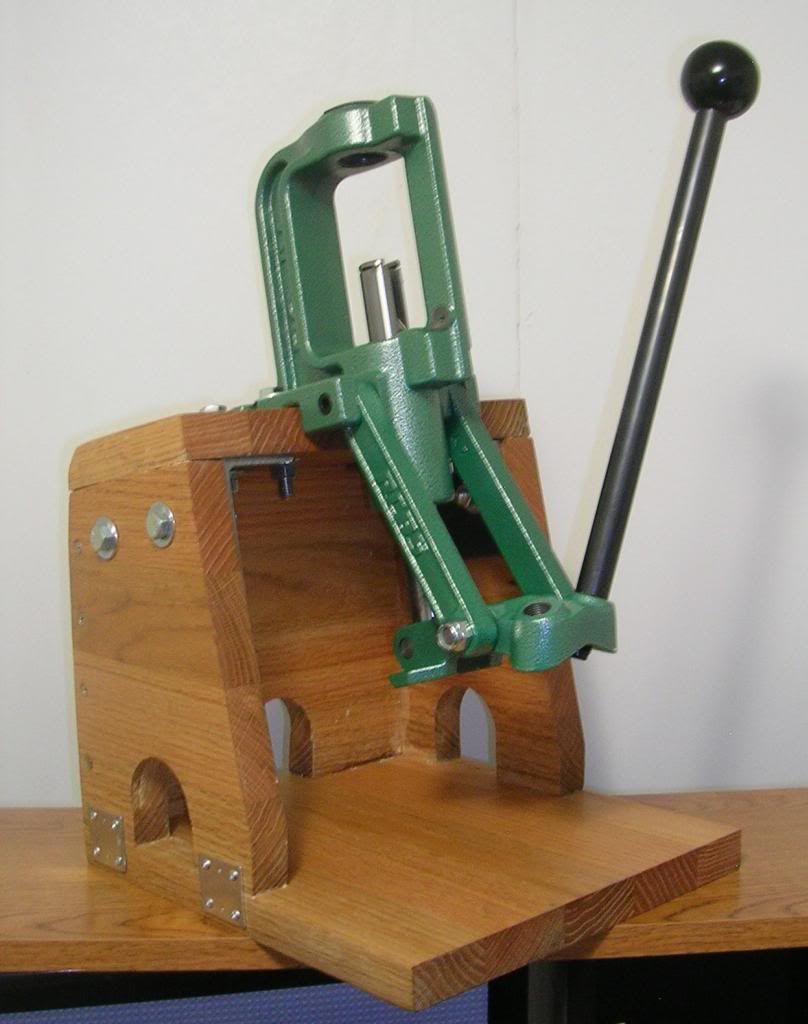
Originally Posted By Taipan01:
Thought I throw an updated image in for the super mini I posted a few pages ago (59). I finally got some free time to start on her again. The main body is done but I need to start on the attachments. Dryflash, to answer your question on the top. I went with a section of 3/4 birch plywood I had from another project for the main part and put an edging on it. For the front part around the trough, I used 3/4 oak, again, from some left overs. It will still be a while before I'm done. As a P.S., I'm opting out of a raised letter, latin expression for her. Instead, I'll use a single word, Somnio. Front & left sides: <a href="http://s302.photobucket.com/user/Taipan01/media/new%20mini/front_zps221905f4.jpg.html" target="_blank">http://i302.photobucket.com/albums/nn82/Taipan01/new%20mini/front_zps221905f4.jpg</a> Back and right sides: <a href="http://s302.photobucket.com/user/Taipan01/media/new%20mini/back_zpsbda44821.jpg.html" target="_blank">http://i302.photobucket.com/albums/nn82/Taipan01/new%20mini/back_zpsbda44821.jpg</a> I finally figured out what that round "trash receptacle" is: it's a bamboo kitchen utensil holder from Wal-Mart. |
|
|
|
|
[Last Edit: andrewz71]
[#6]
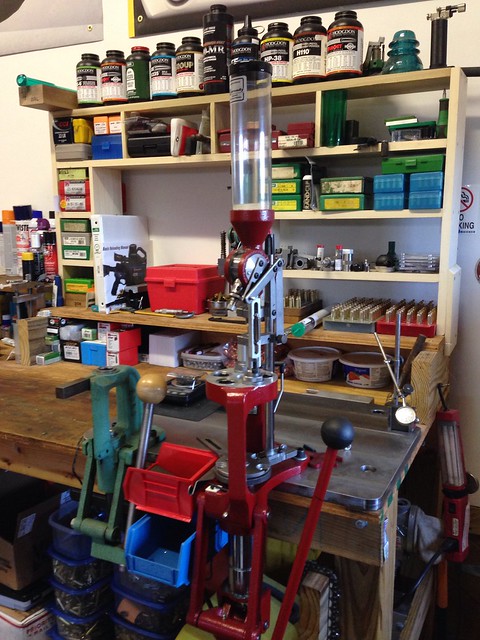
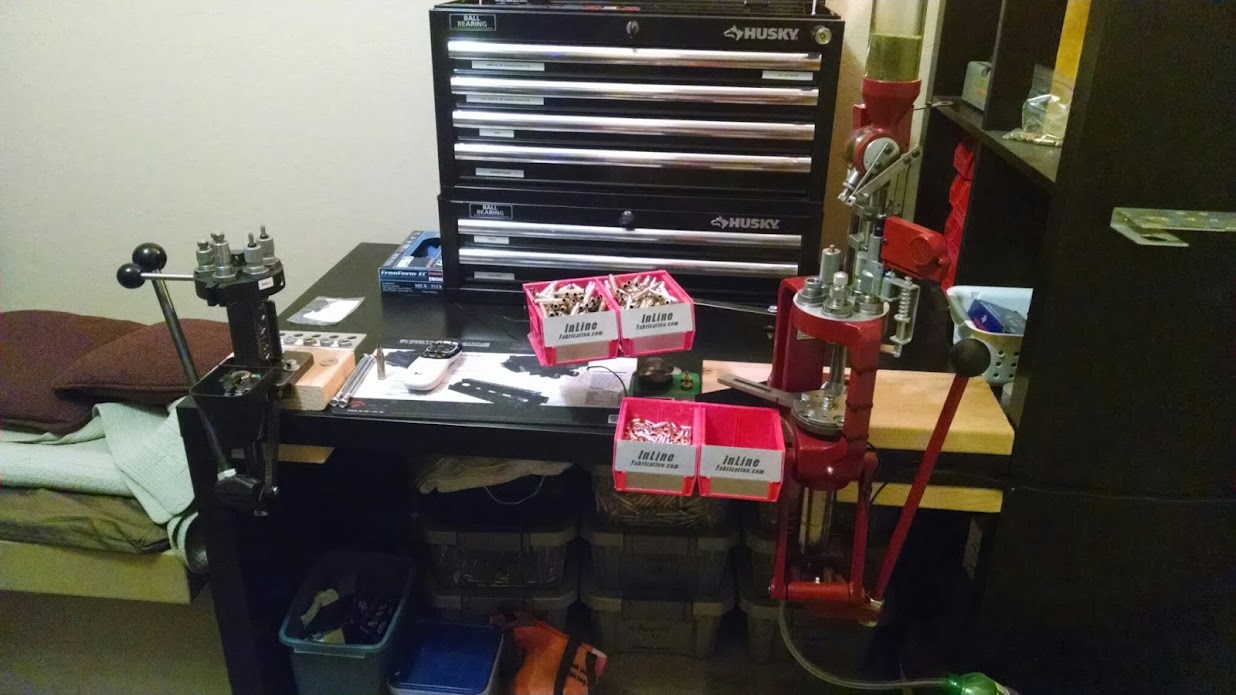
I'm pretty proud of how my little setup works.


|
|
|
|
|
[#7]
Originally Posted By andrewz71:
I'm pretty proud of how my little setup works. http://i.imgur.com/k1BiB27.jpg http://i.imgur.com/jHnW6fq.jpg Where did you get these tables? I've been looking for something just like this. |
|
|
|
|
[Last Edit: andrewz71]
[#8]
Sams club I think they were $199 each
But I did build the shelves inside the legs, using maple veneer mdf. |
|
|
|
|
[#9]
Originally Posted By andrewz71:
Sams club I think they were $199 each But I did build the shelves inside the legs, using maple veneer mdf. They look pretty sturdy...are they? |
|
|
|
|
[Last Edit: andrewz71]
[#10]
Originally Posted By coregon:
They look pretty sturdy...are they? Originally Posted By coregon:
Originally Posted By andrewz71:
Sams club I think they were $199 each But I did build the shelves inside the legs, using maple veneer mdf. They look pretty sturdy...are they? Yes, the feet are adjustable and have a anti slip hard rubber pad on bottom, using the presses they can wobble just a little, but I have them against the wall and might put a couple screws thru into a stud, but haven't thought it was worth it yet. |
|
|
|
|
[#11]
Originally Posted By OldmanFCSA:
A little note about my Reloading past. You all have seen my pictures posted above and I will add more. I started reloading in my dorm room at SDSU in Brookings, SD in 1972. I had a press mount that fit on edge of my desk, first cartridge was 7.62X54R. In 1976, I bought a mobile home, 14 X 70, in one of the three bedrooms I setup a reloading table and started loading 270, 7mmRM, 222Rem, and 44Mag. That worked well for 4 years. Jefferson, Huxley, & Cedar Falls, Iowa. (MOBILE home.) Then bought a house with basement, moved and expanded my reloading to tables 12 feet long, which competed with my dirtbike repair area. I lost that house 2 years later when laid-off with 19,000 other on same day. Moved to Kentucky, lived in really small mobile home. Assembled one of those 8'X8' tin sheds and reloaded in there. Moved to Chicago area. Reloading stayed in boxes. Moved to Iowa, reloading stayed in boxes. Moved to Minneapolis. Reloading stayed in boxes. Moved to Drummond, WI. Reloaded some in basement. Moved back to Minneapolis after divorce. Setup reloading in living room and kitchen. Re-married 7 years later, lived in wife's townhouse, kept my house for storage, it was paid off, reloaded there and repaired dirtbikes in house, mine in kitchen, daughters in bathroom, son's in living room. Bought and converted a 5' X 10' enclosed trailer with raised ceiling to a reloading trailer while living at townhouse. My daughter called it the "50CAL Trailer" = the name stuck, as that was how it was used, and I was a FCSA Match Director at Alliance, Nebraska. Trailer held all match supplies, computer, printer, flatscreen tv (also connected to computer, 3 reloading presses, electronic powder measures, KTM, shooting Bench and chair, other tables for signup registration, basically every thing required to run a match or reload at the range. I had a 2000watt generator mounted on the hitch hardwired into trailer at multiple points. And I reloaded in Winter in there using electric heater. After retiring on disability, we moved to our present location. Wife's things in house, my STUFF in 34' X 48' heated garage. I had to totally re-wire garage since somebody took an ax to all wiring and other stuff. House had paint on carpet, tile, walls, cabinets, doors kicked-in whether locked or not, garage doors gone with openers, heating systems gone also. A foreclosure house. I moved all my stuff in from wife's house, my house, a storage shed, everything, then kids went to college and grad school, so I got their STUFF too, including 2 dirtbikes, gear, and all their trophies. Initially I worked with others repairing the house, limited to what I could do from a wheelchair or sitting on floor. I could walk but very limited distances (4 later surgeries improved my legs). Many friends helped with the move and initial repairs..Two special friends helped move the gun safes into location. My shop is my playground now - my reloading area - my machining area - my woodworking area - my sanity area. I will take more pictures of special projects related to reloading, and add here. Anyone in the area is welcome to stop in and talk reloading. Thank you for putting up with me. Some days my meds cause irrational statements, those days I stay in bed and LURK the Forums. I am glad I am not the only one who prefers to do this inside the house I once built a small block chevy in my brothers bedroom, while he was living there reloading inside with AC/Heat makes it so much better |
|
|
|
|
[#12]
Originally Posted By Miser201:
thanks...i went through 30 pages before i gave up and just asked. Anyone use these on a laminate countertop on the top and bottom? Trying to get ideas for a clean and removable install. Originally Posted By Miser201:
Originally Posted By BCM45:
Originally Posted By Miser201:
Does anyone know where I can find the threaded inserts you put into the countertop that let you just screw in press from the top? They are called t-nuts and you should be able to find them at Home Depot or Lowes. thanks...i went through 30 pages before i gave up and just asked. Anyone use these on a laminate countertop on the top and bottom? Trying to get ideas for a clean and removable install. installing laminate is pretty easy you can get any color from Lowes or HD and use contact cement to apply it to whatever shape and layout you can fabricate. just get a cheap trim router to finish off the edge and put on a trim piece if you desire that way you can use better materials for the bench top as opposed to the particle board that is used for kitchen counter tops I generally use doubled up 3/4" plywood for the tops, glued and screwed together |
|
|
|
|
[#13]
Originally Posted By andrewz71:
I'm pretty proud of how my little setup works. http://i.imgur.com/k1BiB27.jpg http://i.imgur.com/jHnW6fq.jpg Very nice set up. I sent a PM with some dimensions questions. Looks good! |
|
|
|
SC, USA
|
[#14]
Originally Posted By andrewz71:
I'm pretty proud of how my little setup works. http://i.imgur.com/k1BiB27.jpg http://i.imgur.com/jHnW6fq.jpg I have the SAMs bench as well....but I don't have 3 of them 
nice set up...wish I had the cash and a room inside the house to have my own space like that. nice work! |
|
|
AZ, USA
|
[#15]
Indoors! In AZ!
|
|
|
|
[#16]
Originally Posted By medicman5000:
Indoors! In AZ! https://lh5.googleusercontent.com/-lLEVtgyVDo0/U0S9-MHV0mI/AAAAAAAAJ0c/5M9e7A0xxN4/w1236-h695-no/IMG_20140408_202631615.jpg Another T-Mag press. 
|
|
|
|
TX, USA
|
[#17]
Finally got some shelves made for the main bench this morning and started organizing. Pay no attention to the powder, it's only an illusion lol.

|
|
|
TX, USA
|
[#18]
Originally Posted By andrewz71:
I'm pretty proud of how my little setup works. http://i.imgur.com/k1BiB27.jpg http://i.imgur.com/jHnW6fq.jpg Wow. Very nice setup. What all do you load for? |
|
|
|
[#19]
Originally Posted By lte82:
Wow. Very nice setup. What all do you load for? Originally Posted By lte82:
Originally Posted By andrewz71:
I'm pretty proud of how my little setup works. http://i.imgur.com/k1BiB27.jpg http://i.imgur.com/jHnW6fq.jpg Wow. Very nice setup. What all do you load for? Process/size/or trim all my brass on the LNL ap press, except for process/size/trimming 300 blk on super 1050. I do all my reloading on the super 1050 so that all brass gets swaged, and I use a lee universal decapping die in each of my other 1050 tool heads, so I am only reloading clean brass. I reload 9mm, .45 acp, .223/5.56, and 300 blackout. |
|
|
|
TX, USA
|
[#20]
Originally Posted By andrewz71:
Process/size/or trim all my brass on the LNL ap press, except for process/size/trimming 300 blk on super 1050. I do all my reloading on the super 1050 so that all brass gets swaged, and I use a lee universal decapping die in each of my other 1050 tool heads, so I am only reloading clean brass. I reload 9mm, .45 acp, .223/5.56, and 300 blackout. Originally Posted By andrewz71:
Originally Posted By lte82:
Originally Posted By andrewz71:
I'm pretty proud of how my little setup works. http://i.imgur.com/k1BiB27.jpg http://i.imgur.com/jHnW6fq.jpg Wow. Very nice setup. What all do you load for? Process/size/or trim all my brass on the LNL ap press, except for process/size/trimming 300 blk on super 1050. I do all my reloading on the super 1050 so that all brass gets swaged, and I use a lee universal decapping die in each of my other 1050 tool heads, so I am only reloading clean brass. I reload 9mm, .45 acp, .223/5.56, and 300 blackout. Very cool. |
|
|
|
[#21]
Originally Posted By lte82:
Pay no attention to the powder, it's only an illusion lol. holy shit, over two grand in powder! just how many rounds can that make? |
|
|
|
|
[#22]
Originally Posted By lte82: Finally got some shelves made for the main bench this morning and started organizing. Pay no attention to the powder, it's only an illusion lol. http://imagizer.imageshack.us/v2/xq90/89/rr45.jpg |
|
|
|
PA, USA
|
[#23]
 " /> " />
My little oasis nothing like some of others but works for me |
|
|
|
[#24]
My take on a bench design I found at a custom builder. This was built for 1/3 of their price.

|
|
|
|
MT, USA
|
[Last Edit: EB_311]
[#25]
I already posted my bench a few pages back, but this is my "away" bench at the family Ranch in Montana. Powder, primers, and bullets are upstairs since the basement is full of moisture. Last year my dies started rusting after three days of sitting down there.
I do love this bench though. Papa(grandpa) did a lot of reloading when he was younger and knew he wanted something that would never budge. He gave me the badass 10-10 Ohaus scale too.  DSC02628 by yalikedags, on Flickr DSC02628 by yalikedags, on Flickr
 DSC02632 by yalikedags, on Flickr DSC02632 by yalikedags, on Flickr
 DSC02634 by yalikedags, on Flickr DSC02634 by yalikedags, on Flickr
|
|
|
USA
|
[Last Edit: feffrey]
[#26]
I moved my setup, I think it turned out allright.
  |
|
|
WA, USA
|
[#27]
I wish I had room to build a dedicated area but for now I'll be starting out with this, just finished it earlier this evening:
|
|
|
|
[#28]
Originally Posted By TheRedBaron:
My take on a bench design I found at a custom builder. This was built for 1/3 of their price. http://i810.photobucket.com/albums/zz21/jgunter001/20140419_104404_zpsa10fe28d.jpg Awesome looking bench no, functional furniture! |
|
|
|
|
[#29]
Originally Posted By HawkCreek:
I wish I had room to build a dedicated area but for now I'll be starting out with this, just finished it earlier this evening: http://i252.photobucket.com/albums/hh29/HawkCreek_photos/Guns/d923d930-5aab-4395-a98e-dad666fd3e8f_zpsa00ee95c.jpg Hey, nothing wrong with that and certainly an alternative to mounting to a board and attempting to clamp it to a piece of furniture not suited to being stressed (don't ask me how I know this Was this made from a stair tread? |
|
|
|
WA, USA
|
[#30]
Yes indeed, oak stair tread. Thanks!
|
|
|
WA, USA
|
[#31]
Originally Posted By TheRedBaron:
My take on a bench design I found at a custom builder. This was built for 1/3 of their price. http://i810.photobucket.com/albums/zz21/jgunter001/20140419_104404_zpsa10fe28d.jpg Nice bench, looks nice and sturdy. What is used for the top of the bench there? |
|
|
|
[#32]
Originally Posted By TheRedBaron:
My take on a bench design I found at a custom builder. This was built for 1/3 of their price. http://i810.photobucket.com/albums/zz21/jgunter001/20140419_104404_zpsa10fe28d.jpg That is one of the best home made benches I have seen.. I sent you a PM |
|
|
|
|
[#33]
Originally Posted By MrTinkels:
That is one of the best home made benches I have seen.. I sent you a PM Originally Posted By MrTinkels:
Originally Posted By TheRedBaron:
My take on a bench design I found at a custom builder. This was built for 1/3 of their price. http://i810.photobucket.com/albums/zz21/jgunter001/20140419_104404_zpsa10fe28d.jpg That is one of the best home made benches I have seen.. I sent you a PM Sent him a PM last week with no reply. C'mon, buddy....give it up (the info/plans/more pics, that is). |
|
|
|
|
[Last Edit: TheRedBaron]
[#34]
Originally Posted By ThePontificator:
Sent him a PM last week with no reply. C'mon, buddy....give it up (the info/plans/more pics, that is). Originally Posted By ThePontificator:
Originally Posted By MrTinkels:
Originally Posted By TheRedBaron:
My take on a bench design I found at a custom builder. This was built for 1/3 of their price. http://i810.photobucket.com/albums/zz21/jgunter001/20140419_104404_zpsa10fe28d.jpg That is one of the best home made benches I have seen.. I sent you a PM Sent him a PM last week with no reply. C'mon, buddy....give it up (the info/plans/more pics, that is). Sorry for the slow reply. Here are the details you seek. The top is 3/4" hard maple, 30ishx60ish. It's basically a homemade butcher block top, but not food grade. The legs are fir, the supports and top shelves are poplar, and the bottom shelving is bare cedar. All stain matched with Gunstock and polyed. And yes, it's hard as hell stain matching three different types of wood on the same piece. The top is attached with lag bolts, to the legs, and is removable. I found the design here: American Workbench and modified it for my tastes. I didn't like their top shelves, so I went a little different. |
|
|
|
FL, USA
|
[#35]
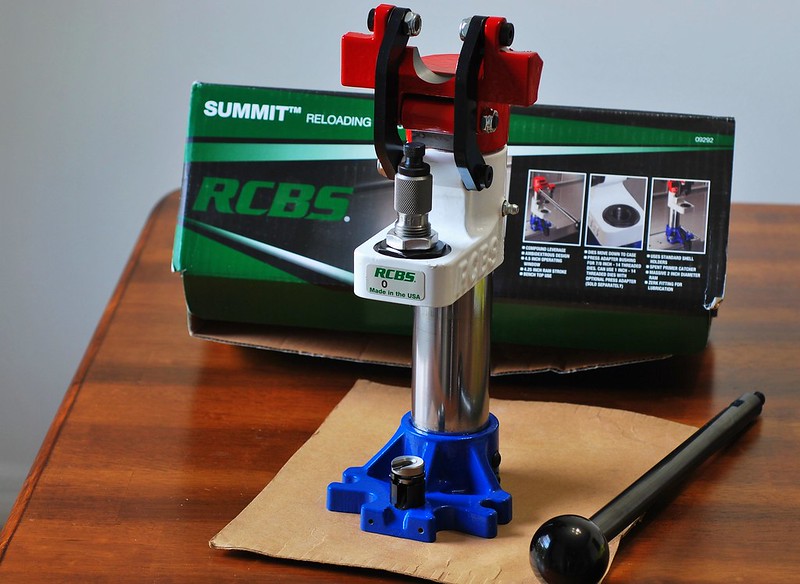
New arrival.
|
|
|
|
[#36]
red/white/blue version is pretty sweet looking!
|
|
|
|
FL, USA
|
[#37]
Originally Posted By Northerner:
red/white/blue version is pretty sweet looking! I think so too. And how can I resist a good deal. $115.69 shipped. |
|
|
|
[#38]
Originally Posted By bug22:
I think so too. And how can I resist a good deal. $115.69 shipped. Originally Posted By bug22:
Originally Posted By Northerner:
red/white/blue version is pretty sweet looking! I think so too. And how can I resist a good deal. $115.69 shipped. where did you find a Summit press for that price?? im so ready to get rid of my piece of shit RC4 because of the stupid ass primer tray which has to be the dumbest freakin POS design on the planet Earth! |
|
|
|
FL, USA
|
[#39]
Originally Posted By Northerner:
where did you find a Summit press for that price?? im so ready to get rid of my piece of shit RC4 because of the stupid ass primer tray which has to be the dumbest freakin POS design on the planet Earth! Originally Posted By Northerner:
Originally Posted By bug22:
Originally Posted By Northerner:
red/white/blue version is pretty sweet looking! I think so too. And how can I resist a good deal. $115.69 shipped. where did you find a Summit press for that price?? im so ready to get rid of my piece of shit RC4 because of the stupid ass primer tray which has to be the dumbest freakin POS design on the planet Earth! Got it from Tiger Outfitters. I just saw their banner in one of the gun forums ( I think it was the 1911 forum), offering a 30% discount. Clicked the banner and there it was on the homepage with a price of $165.27 with free shipping. Placed it in the cart and the price was down to $115.69. First time I heard of this outfit, so I did a quick Google and it seems like a good outfit. Fast shipping too. I think mine was the last one. |
|
|
|
[#40]
Originally Posted By bug22:
New arrival. <a href="https://flic.kr/p/nsyqxK" target="_blank">https://farm8.staticflickr.com/7037/14084047185_0cc0f3e265_c.jpg</a> $115? Man, I am drooling! |
|
|
|
|
[#41]
yeah, they dont even list the press now? :-(
|
|
|
|
|
[#42]
Please get back on topic.
This is the reloading bench thread.
|
|
|
|
|
[#43]
Took an old bench I had in the basement and replaced the particle board top and shelf with 3/4" MDF. Later learned that MDF might not be the best thing to make it out of, so I doubled up the top and added a sheet of aluminum to it for easy clean up. This was my "studying" bench for a while.
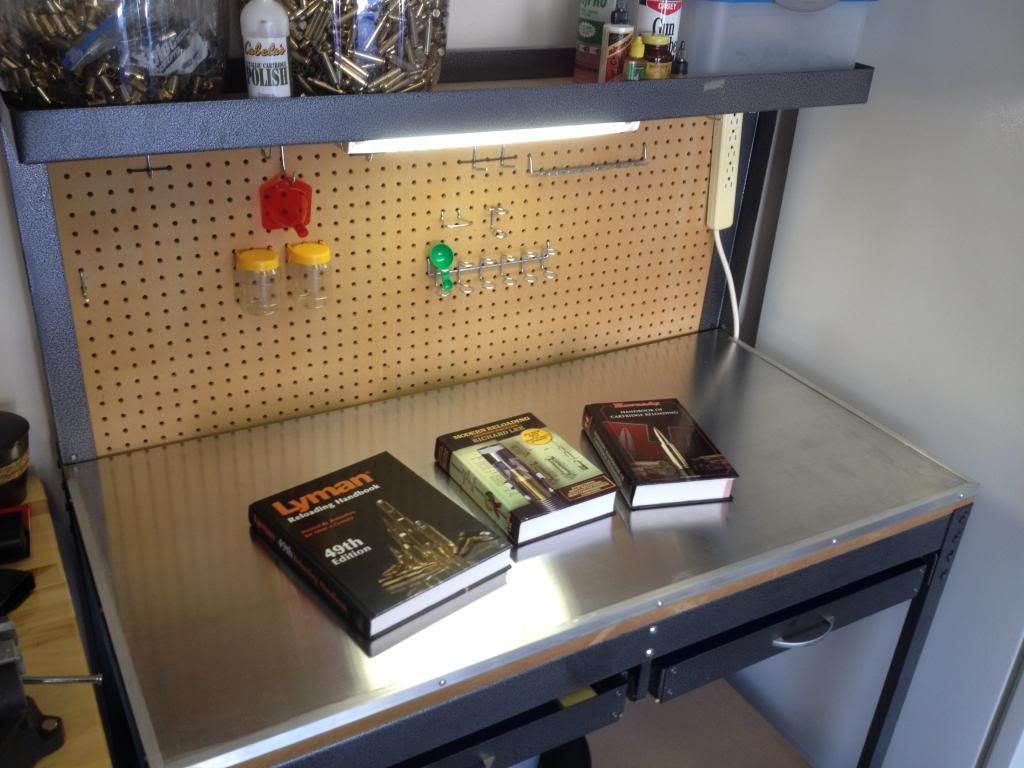 I added a couple of small shelves in the back which are filling up quickly. (Also learned from you all that pegboard isn't the best thing for a reloading bench, I'm going to keep that middle section I think.) If this bench wasn't sturdy enough I was going to move everything to the Sam's table next to it, but it is actually rock solid. Very very little movement while loading. 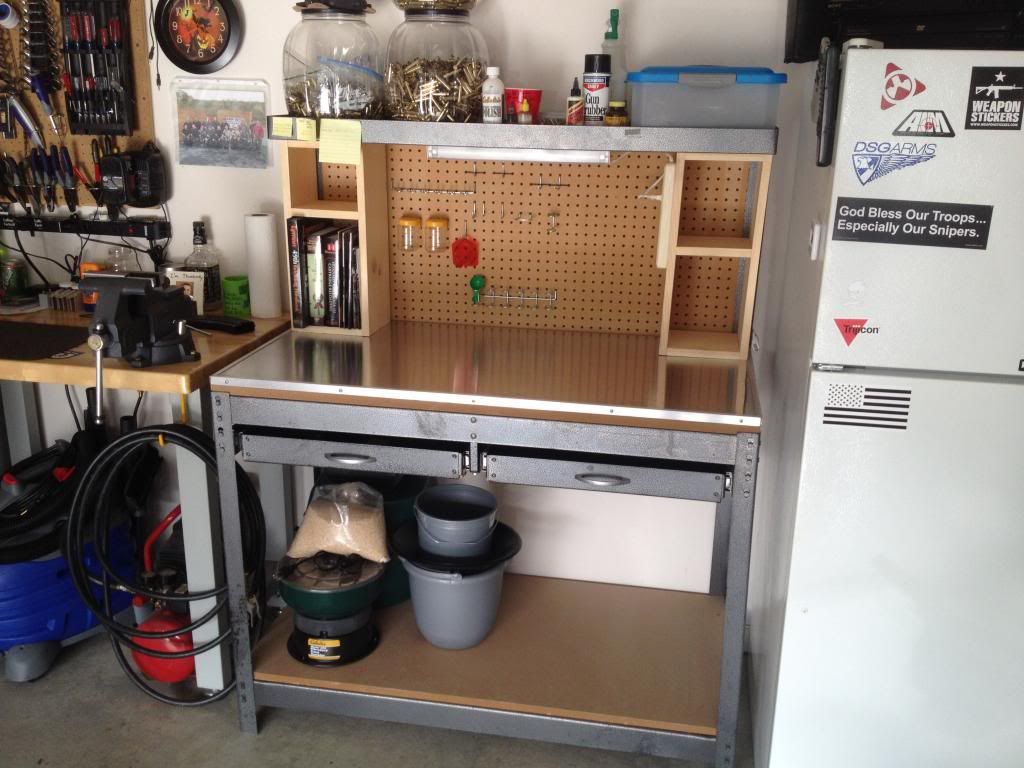 Dillon 650 arrived, and added to the bench. 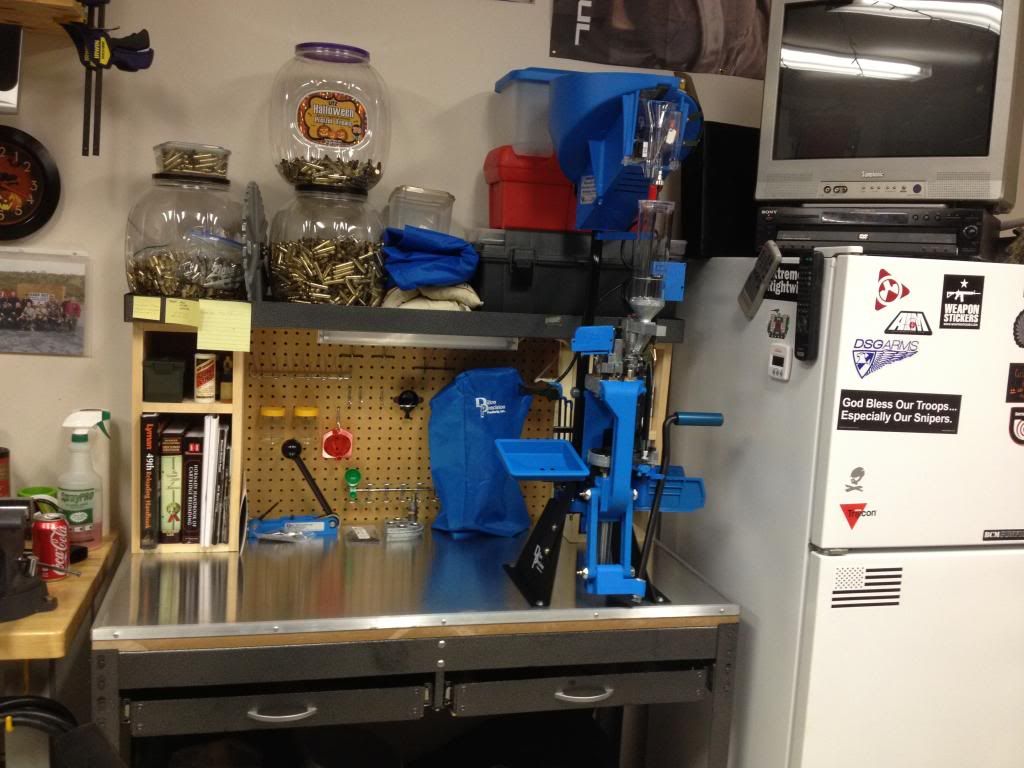 Future plans include adding more shelves above the bench, making something for the swager to go on, and a small shelf along the bottom between the other shelves.
|
|
|
|
|
[#44]
Originally Posted By grimhollow: Took an old bench I had in the basement and replaced the particle board top and shelf with 3/4" MDF. Later learned that MDF might not be the best thing to make it out of, so I doubled up the top and added a sheet of aluminum to it for easy clean up. This was my "studying" bench for a while. I added a couple of small shelves in the back which are filling up quickly. (Also learned from you all that pegboard isn't the best thing for a reloading bench, I'm going to keep that middle section I think.) If this bench wasn't sturdy enough I was going to move everything to the Sam's table next to it, but it is actually rock solid. Very very little movement while loading. Dillon 650 arrived, and added to the bench. Future plans include adding more shelves above the bench, making something for the swager to go on, and a small shelf along the bottom between the other shelves. That's a sweet bench top. If that were my bench, I would build shelf's for the pegboard part. But that's me. Nice bench.
|
|
|
|
|
[#45]
Originally Posted By dryflash3: Mount swager to a 1x4 and clamp in your vice. Put on shelf when not in use. What I do. Originally Posted By dryflash3: Originally Posted By grimhollow: Took an old bench I had in the basement.... That's a sweet bench top. If that were my bench, I would build shelf's for the pegboard part. But that's me. Nice bench. That's what I love about posting here... I never even thought about using the vise for the swager, and it's right there under my nose! Thanks, dryflash! I probably am going to put more shelves in front of that pegboard, too. The more I think about it the more sense it makes. |
|
|
|
|
[#46]
Originally Posted By grimhollow: That's a sweet bench top. Originally Posted By grimhollow: Originally Posted By dryflash3: Originally Posted By grimhollow: Took an old bench I had in the basement.... That's a sweet bench top. If that were my bench, I would build shelf's for the pegboard part. But that's me. Nice bench. That's what I love about posting here... I never even thought about using the vise for the swager, and it's right there under my nose! Thanks, dryflash! I probably am going to put more shelves in front of that pegboard, too. The more I think about it the more sense it makes.  Dug out the swager pic.  What the center of my bench looks like. I'm old school, PM and beam scale. |
|
|
|
USA
|
[#47]
After using Lee for 10 years I drank the blue koolaide in January.


|
|
|
CO, USA
|
[#48]
Just finished my basement and got my gun room set up:


|
|
|
|
[#49]
slightly upgraded my ghetto bench
from this 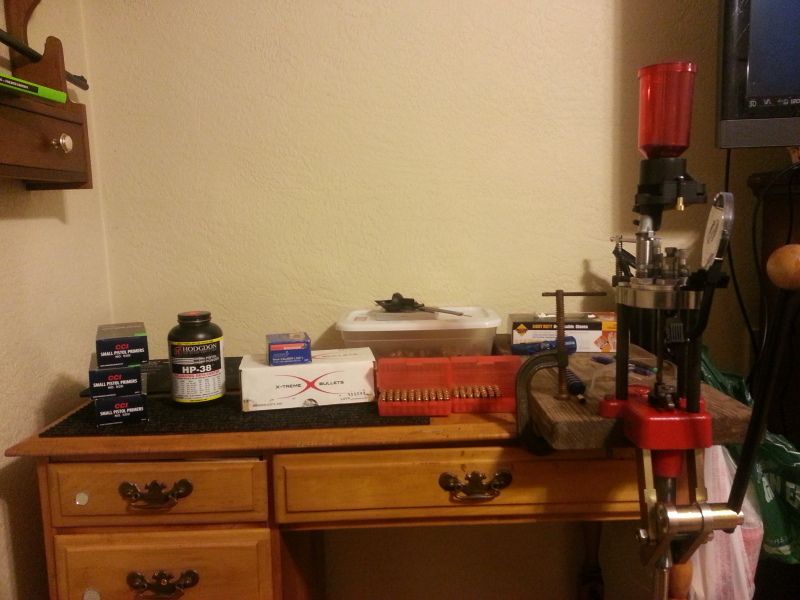
to this 
|
|
|
|
KY, USA
|
[#50]
Added some shelving to my bench area. I will apologize in advance for the Iphone pic.

Moved most of my RCBS stuff under my gun smith bench which was pretty messy.  
Im still in pretty good shape for powder.
  
|
|
|
 Win a FREE Membership!
Sign up for the ARFCOM weekly newsletter and be entered to win a free ARFCOM membership. One new winner* is announced every week!
You will receive an email every Friday morning featuring the latest chatter from the hottest topics, breaking news surrounding legislation, as well as exclusive deals only available to ARFCOM email subscribers.

AR15.COM is the world's largest firearm community and is a gathering place for firearm enthusiasts of all types.
From hunters and military members, to competition shooters and general firearm enthusiasts, we welcome anyone who values and respects the way of the firearm.

Subscribe to our monthly Newsletter to receive firearm news, product discounts from your favorite Industry Partners, and more.
Copyright © 1996-2024 AR15.COM LLC. All Rights Reserved.
Any use of this content without express written consent is prohibited.
AR15.Com reserves the right to overwrite or replace any affiliate, commercial, or monetizable links, posted by users, with our own.


.jpg)