GA, USA
|
[#1]
Originally Posted By slipjett:
I put an AR together for my brother and he built this for me... http://i680.photobucket.com/albums/vv165/slipjett/IMG_5404.jpg The single stage slides out and I can use other tools(case prep, vise, etc.) attached to slideouts or have more work space. Haven't reloaded a single round yet! Hey slipjett, I would like to see some close ups of the slide outs Great looking bench and setup though. |
|
|
TX, USA
|
[#2]
Originally Posted By rekles75:
Originally Posted By slipjett:
I put an AR together for my brother and he built this for me... http://i680.photobucket.com/albums/vv165/slipjett/IMG_5404.jpg The single stage slides out and I can use other tools(case prep, vise, etc.) attached to slideouts or have more work space. Haven't reloaded a single round yet! Hey slipjett, I would like to see some close ups of the slide outs Great looking bench and setup though. Thanks... 


|
|
|
GA, USA
|
[#3]
Originally Posted By slipjett:
Originally Posted By rekles75:
Originally Posted By slipjett:
I put an AR together for my brother and he built this for me... http://i680.photobucket.com/albums/vv165/slipjett/IMG_5404.jpg The single stage slides out and I can use other tools(case prep, vise, etc.) attached to slideouts or have more work space. Haven't reloaded a single round yet! Hey slipjett, I would like to see some close ups of the slide outs Great looking bench and setup though. Thanks... http://i680.photobucket.com/albums/vv165/slipjett/IMG_5425.jpg http://i680.photobucket.com/albums/vv165/slipjett/IMG_5427.jpg http://i680.photobucket.com/albums/vv165/slipjett/IMG_5428.jpg http://i680.photobucket.com/albums/vv165/slipjett/IMG_5429.jpg http://i680.photobucket.com/albums/vv165/slipjett/IMG_5430.jpg Well even if you never use it, at least it looks great! Haha! |
|
|
|
[#4]
Originally Posted By slipjett:
I put an AR together for my brother and he built this for me... http://i680.photobucket.com/albums/vv165/slipjett/IMG_5404.jpg The single stage slides out and I can use other tools(case prep, vise, etc.) attached to slideouts or have more work space. Haven't reloaded a single round yet! As a wood-butcher I must say that is a beautiful job of woodworking. You need to build your brother a few more rifles and get an entertainment center and a few matching bookcases. |
|
|
|
|
[Last Edit: bluegrass_uk]
[#5]
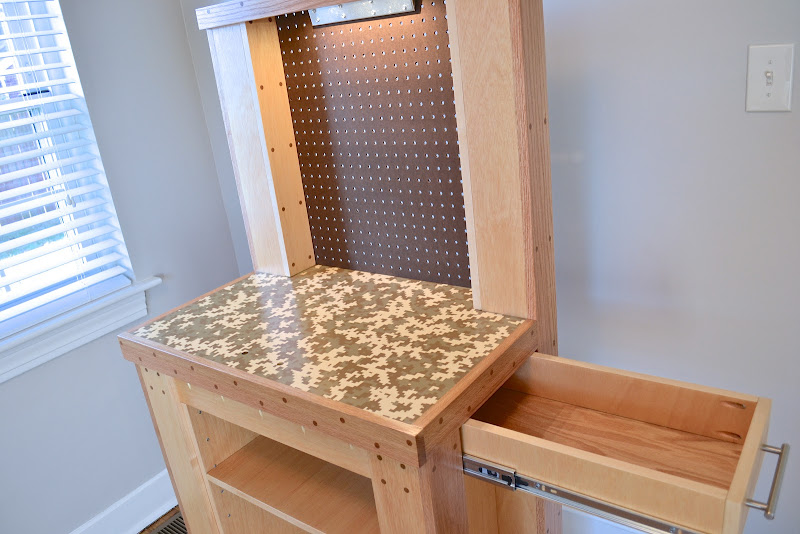
Okay, the "wall-mounted press" from earlier just isn't going to work over the winter months so I planned out a piece for inside the house reloading. This is loosely based on Cecil Braeden's idea from Fine Woodworking (plywood workbench) but adapted to be 5 feet tall x 30" wide x 20" deep so that it can be stored in a typical closet if needed and nice looking enough to be in the house.
This was built with 2 sheets of plywood and some solid oak with 2 coats of satin poly. The most expensive part was the 200 Lumen LED light fixture (doesn't look like much in the pictures but it is actually very bright). First I laminated the legs and stretchers from the sheet stock into something resembling mortise and tenon joinery. 

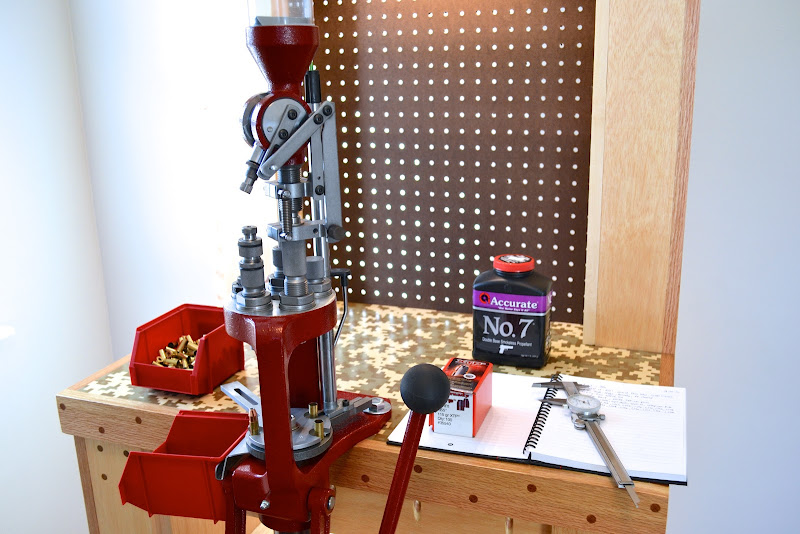
Then I trimmed it out with solid oak and covered the screws with walnut dowels. I also "edge band veneered" any exposed plywood edges. The top is 3 sheets of plywood which later gets nuts "JB Welded" inside of it to secure the reloading press. To protect the top I used epoxy covered with a digicam paint design and several extra coats of poly. I also added a drawer, LED light fixture, a sheet metal reflector, pegboard. Next I will fill with reloading hardware! 
|
|
|
|
|
[#6]
Nice bench I wish I had wood working skills like you
|
|
|
|
|
[#7]
Very nice Bluegrass_uk!
|
|
|
|
|
[#8]
converted an unused bedroom into a hobby/reloading room. I like to work with wood, so it'll get updated and changed after a while I'm sure.


any suggestions or ideas are always welcome. |
|
|
|
|
[#9]
Both the "slide-out" and oak-trimmed benches are beautiful. I have found that it doesn't take a lot of fancy classes to make wood working doable, nor does it require a lot of fancy tools. Just some time and attention to detail. When I retired from the Air Force, I took a couple of months and built some CD/DVD bookcases out of oak veneer plywood with solid oak trim. Since I like Mission furniture, there wasn't any fancy trim to do, but there were some technical issues involving how to drill consistent holes for shelf support pins, etc. It was also a lot of fun finishing the finished products; I used a reddish stain (more Mission style flavor) and a semi-gloss urethane varnish. These bookcases are in very much everyday use and they go with everything else in the living room, and I learned a whole lot just by doing what needed doing.
I mention all of that because at first, I was hesitant to try to build a bench. I was concerned that I might have difficulty getting things square, level, smooth, etc., and I spent a lot of time studying other people's work and wishing I could do something like that. Finally, I just said the heck with it and gave it a try. That was before I retired, and I have finally outgrown my 4' wide, 2' deep bench, so now I'm planning a 6' bench with some bells and whistles based on lessons learned. First, I have decided to go with "T track" for mounting my presses and some other tools; this will give me flexibility to move things around without going through major revisions of the bench, and particularly will let me remove my rather involved progressive setup to use the whole bench for 'smithing. I am also going to build in electrical outlets; in 2003 when I built my current bench, I had a single swing arm lamp as my only electrical need while loading. Now, I have a powered case feeder, lights on and in the press, a powered bullet feeder, and I'm adding more lights too. One more thing: I'm glad to see that I'm not the only one around who likes the way plain old plywood looks with a nice finish on it. There are some very high end furniture makers who simply use architectural plywood for their pieces, and all they do is seal and varnish it. While I'm not going to use architectural plywood for my next bench (at least not a lot of it), a good interior-grade plywood with some simple sanding and sealing can look great with just a little bit of varnish and attention to detail. |
|
|
|
NV, USA
|
[#10]
Howdy,
Still organizing the bench after doing some re-arranging. There are 13 litter buckets under there full of brass(and a few more that don't fit under there). Semper Fi, Luis R. 
|
|
|
|
[#11]
Originally Posted By bluegrass_uk:
Okay, the "wall-mounted press" from earlier just isn't going to work over the winter months so I planned out a piece for inside the house reloading. This is loosely based on Cecil Braeden's idea from Fine Woodworking (plywood workbench) but adapted to be 5 feet tall x 30" wide x 20" deep so that it can be stored in a typical closet if needed and nice looking enough to be in the house. This was built with 2 sheets of plywood and some solid oak with 2 coats of satin poly. The most expensive part was the 200 Lumen LED light fixture (doesn't look like much in the pictures but it is actually very bright). First I laminated the legs and stretchers from the sheet stock into something resembling mortise and tenon joinery. https://lh5.googleusercontent.com/-pLg_DVnZlyY/UKgT0PGo0mI/AAAAAAAAAMA/jwOz94eHMMw/s800/IMG_0257.jpg https://lh3.googleusercontent.com/-8_KIZWe_5_g/UKgTxj4IXII/AAAAAAAAALw/NIr_p_ENjV4/s800/IMG_0264.jpg Then I trimmed it out with solid oak and covered the screws with walnut dowels. I also veneered any exposed plywood edges. The top is 3 sheets of plywood which later gets nuts "JB Welded" inside of it to secure the reloading press. To protect the top I used epoxy covered with a digicam paint design and several extra coats of policy. I also added a drawer, LED light fixture, a sheet metal reflector, pegboard. Next I will fill with reloading hardware! https://lh5.googleusercontent.com/-dFguJ-P9J78/UKgTl_btUWI/AAAAAAAAALc/J9fNPVlge4k/s800/DSC_3623.JPG https://lh6.googleusercontent.com/-nh4wQlpy9WE/UKgTmqFTzvI/AAAAAAAAALo/TXtgZrf9Kxs/s800/DSC_3625.JPG https://lh6.googleusercontent.com/-K7c8hz1h5Ik/UKgTlMz9SVI/AAAAAAAAALY/q_rZqFxxBU4/s800/DSC_3629.JPG Some incredible work, very well done! |
|
|
|
MO, USA
|
[Last Edit: STLWaffles]
[#12]
My setup is very humble compared to some here, but here it is, just a Lees classic turret press.

I am in the process of building a new house, once it is done I will expand my setup. This is a tiny place with no basement. |
|
|
|
[Last Edit: sburggsx]
[#13]
Originally Posted By bluegrass_uk:
Okay, the "wall-mounted press" from earlier just isn't going to work over the winter months so I planned out a piece for inside the house reloading. This is loosely based on Cecil Braeden's idea from Fine Woodworking (plywood workbench) but adapted to be 5 feet tall x 30" wide x 20" deep so that it can be stored in a typical closet if needed and nice looking enough to be in the house. This was built with 2 sheets of plywood and some solid oak with 2 coats of satin poly. The most expensive part was the 200 Lumen LED light fixture (doesn't look like much in the pictures but it is actually very bright). First I laminated the legs and stretchers from the sheet stock into something resembling mortise and tenon joinery. https://lh5.googleusercontent.com/-pLg_DVnZlyY/UKgT0PGo0mI/AAAAAAAAAMA/jwOz94eHMMw/s800/IMG_0257.jpg https://lh3.googleusercontent.com/-8_KIZWe_5_g/UKgTxj4IXII/AAAAAAAAALw/NIr_p_ENjV4/s800/IMG_0264.jpg Then I trimmed it out with solid oak and covered the screws with walnut dowels. I also "edge band veneered" any exposed plywood edges. The top is 3 sheets of plywood which later gets nuts "JB Welded" inside of it to secure the reloading press. To protect the top I used epoxy covered with a digicam paint design and several extra coats of policy. I also added a drawer, LED light fixture, a sheet metal reflector, pegboard. Next I will fill with reloading hardware! https://lh5.googleusercontent.com/-dFguJ-P9J78/UKgTl_btUWI/AAAAAAAAALc/J9fNPVlge4k/s800/DSC_3623.JPG https://lh6.googleusercontent.com/-nh4wQlpy9WE/UKgTmqFTzvI/AAAAAAAAALo/TXtgZrf9Kxs/s800/DSC_3625.JPG https://lh6.googleusercontent.com/-K7c8hz1h5Ik/UKgTlMz9SVI/AAAAAAAAALY/q_rZqFxxBU4/s800/DSC_3629.JPG Dear god I can't even follow where those pieces of wood went, but it sure turned out beautiful! |
|
|
|
|
[#14]
My reloading/storage/workshop shed


|
|
|
|
MN, USA
|
[#15]
The garage work bench is also my reloading bench.
http://home.comcast.net/~blackgtx/guns/reloadbench.jpg |
|
|
|
[#16]
Originally Posted By bluegrass_uk:
Okay, the "wall-mounted press" from earlier just isn't going to work over the winter months so I planned out a piece for inside the house reloading. This is loosely based on Cecil Braeden's idea from Fine Woodworking (plywood workbench) but adapted to be 5 feet tall x 30" wide x 20" deep so that it can be stored in a typical closet if needed and nice looking enough to be in the house. This was built with 2 sheets of plywood and some solid oak with 2 coats of satin poly. The most expensive part was the 200 Lumen LED light fixture (doesn't look like much in the pictures but it is actually very bright). First I laminated the legs and stretchers from the sheet stock into something resembling mortise and tenon joinery. https://lh5.googleusercontent.com/-pLg_DVnZlyY/UKgT0PGo0mI/AAAAAAAAAMA/jwOz94eHMMw/s800/IMG_0257.jpg https://lh3.googleusercontent.com/-8_KIZWe_5_g/UKgTxj4IXII/AAAAAAAAALw/NIr_p_ENjV4/s800/IMG_0264.jpg Then I trimmed it out with solid oak and covered the screws with walnut dowels. I also "edge band veneered" any exposed plywood edges. The top is 3 sheets of plywood which later gets nuts "JB Welded" inside of it to secure the reloading press. To protect the top I used epoxy covered with a digicam paint design and several extra coats of policy. I also added a drawer, LED light fixture, a sheet metal reflector, pegboard. Next I will fill with reloading hardware! https://lh5.googleusercontent.com/-dFguJ-P9J78/UKgTl_btUWI/AAAAAAAAALc/J9fNPVlge4k/s800/DSC_3623.JPG https://lh6.googleusercontent.com/-nh4wQlpy9WE/UKgTmqFTzvI/AAAAAAAAALo/TXtgZrf9Kxs/s800/DSC_3625.JPG https://lh6.googleusercontent.com/-K7c8hz1h5Ik/UKgTlMz9SVI/AAAAAAAAALY/q_rZqFxxBU4/s800/DSC_3629.JPG WOW! I like it! |
|
|
|
MS, USA
|
[#17]

|
|
|
|
[#18]
This is what I'm working with. I found the drawing stand the night I went to my parents house to borrow c-clamps. It was my neighbors and they were throwing it out...
So I drilled some holes and voila! Its perfect because I can unbolt the press, put it on top of my safe and put the stand in a closet. Townhouse living sucks for room but you learn to work with what you have... 
|
|
|
|
|
[#19]
Back bedroom; Wife Approved. This is all she'll let me bring indoors

The bench is 2 2"x4" saw horses with a 12' 2"x12" cut in half for the bench top. Works great, good and sturdy, and more than enough for this type of work. |
|
|
|
|
[#20]
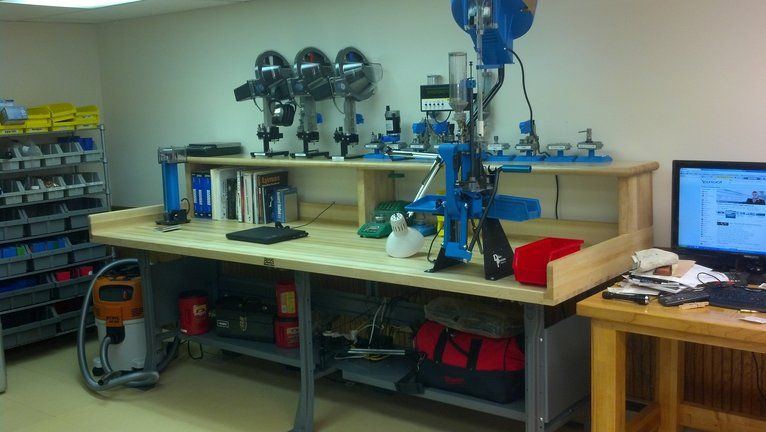
Recent pictures of my bench. It's hard to believe that I started with my 550B producing 40s&w and now with my 650, I'm up to 10 calibers in just 10 short years:
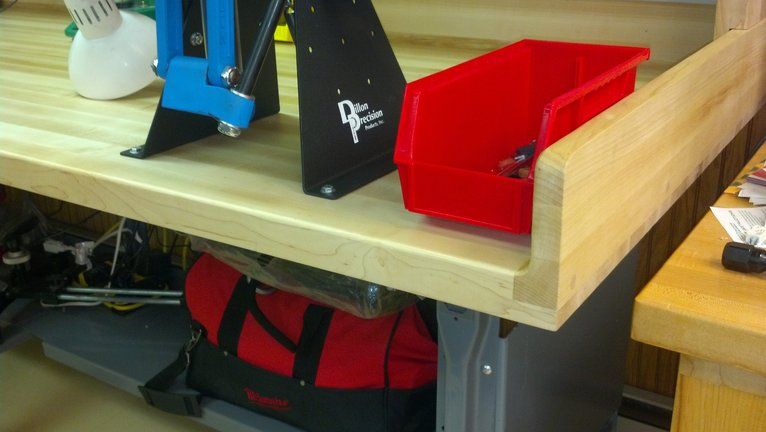
 Detail of home built bullet bin that's simply an Akro bin on a 550 finished bullet bracket that I bolted to the left strongmount leg. It holds a lot of bullets and slips off if in the way:  Details of bracket for cheap bullet bin as well as home made tool holder for my ball end allen wrench and open end box wrench sets (I got both from Harbor Freight) that sit behind my bullet bin (Akro bin removed). This cheap bullet bin allows one to position the home made toolholder in a more convenient place than Dillon's toolholder behind the press and better still, it's easy to make and free. It's simply a piece of 2x4 cut at a angle and then lag bolted to the leg from the inside with holes drilled in the top for the allen wrenches and small finishing nails for the open end box and Dillon bench wrenches:   Another benefit of my toolholder placement is that there is a space for the Casefeeder switch mounted behind press using rear two press mounting bolts:  My home made tray to hold unswaged and swaged brass while processing. The tray also serves to stabilize the Super Swage without having to mount it:  You can see all my Tips and Tricks for the 550B and XL650 in this tacked thread http://www.ar15.com/forums/topic.html?b=6&f=42&t=338019 |
|
|
|
|
[#21]
Originally Posted By bluegrass_uk:
Okay, the "wall-mounted press" from earlier just isn't going to work over the winter months so I planned out a piece for inside the house reloading. This is loosely based on Cecil Braeden's idea from Fine Woodworking (plywood workbench) but adapted to be 5 feet tall x 30" wide x 20" deep so that it can be stored in a typical closet if needed and nice looking enough to be in the house. This was built with 2 sheets of plywood and some solid oak with 2 coats of satin poly. The most expensive part was the 200 Lumen LED light fixture (doesn't look like much in the pictures but it is actually very bright). First I laminated the legs and stretchers from the sheet stock into something resembling mortise and tenon joinery. https://lh5.googleusercontent.com/-pLg_DVnZlyY/UKgT0PGo0mI/AAAAAAAAAMA/jwOz94eHMMw/s800/IMG_0257.jpg https://lh3.googleusercontent.com/-8_KIZWe_5_g/UKgTxj4IXII/AAAAAAAAALw/NIr_p_ENjV4/s800/IMG_0264.jpg Then I trimmed it out with solid oak and covered the screws with walnut dowels. I also "edge band veneered" any exposed plywood edges. The top is 3 sheets of plywood which later gets nuts "JB Welded" inside of it to secure the reloading press. To protect the top I used epoxy covered with a digicam paint design and several extra coats of policy. I also added a drawer, LED light fixture, a sheet metal reflector, pegboard. Next I will fill with reloading hardware! https://lh5.googleusercontent.com/-dFguJ-P9J78/UKgTl_btUWI/AAAAAAAAALc/J9fNPVlge4k/s800/DSC_3623.JPG https://lh6.googleusercontent.com/-nh4wQlpy9WE/UKgTmqFTzvI/AAAAAAAAALo/TXtgZrf9Kxs/s800/DSC_3625.JPG https://lh6.googleusercontent.com/-K7c8hz1h5Ik/UKgTlMz9SVI/AAAAAAAAALY/q_rZqFxxBU4/s800/DSC_3629.JPG nice work I especially like the exposed pocket screw holes. I have never seen anyone do that before. very unique. |
|
|
|
TX, USA
|
[Last Edit: bryonbush]
[#22]
were closing on a new house on the 17th which is cool but the best part is, it has a brick building that wired and has plumbing to it thats going to be my dedicated reloading room. its kinda small but it will be insulated, have AC/Heat, air lines and a 220V line when its finished. wish i had a better picture but here is a side shot. ill post with further updates.

|
|
|
AZ, USA
|
[#23]
[My home made tray to hold unswaged and swaged brass while processing. The tray also serves to stabilize the Super Swage without having to mount it:
http://img.photobucket.com/albums/v726/Coloradoglocker/100_2992.jpg You can see all my Tips and Tricks for the 550B and XL650 in this tacked thread http://www.ar15.com/forums/topic.html?b=6&f=42&t=338019 That's a great idea. I like it! |
|
|
AL, USA
|
[#24]
Originally Posted By bryonbush:
were closing on a new house on the 17th which is cool but the best part is, it has a brick building that wired and has plumbing to it thats going to be my dedicated reloading room. its kinda small but it will be insulated, have AC/Heat, air lines and a 220V line when its finished. wish i had a better picture but here is a side shot. ill post with further updates. http://i850.photobucket.com/albums/ab70/bbbry3/IMG_0067.jpg That would be excellent for my marriage. |
|
|
|
[#25]
Reloading/work bench has three outlets on one circuit above the bench and a single outlet under the bench on a separate circuit for the air compressor. Will take another picture later with the press mounted. Water heater is electric so no open flame near powder and primers.

Wife using the press to deprime 45 ACP for her SA 1911 loaded, first time using the press. 
|
|
|
|
TX, USA
|
[#26]
Originally Posted By Vegitan:
Reloading/work bench has three outlets on one circuit above the bench and a single outlet under the bench on a separate circuit for the air compressor. Will take another picture later with the press mounted. Water heater is electric so no open flame near powder and primers. http://i1099.photobucket.com/albums/g399/cpt_comeback/utf-8BSU1BRzAxMjQuanBn.jpg Wife using the press to deprime 45 ACP for her SA 1911 loaded, first time using the press. http://i1099.photobucket.com/albums/g399/cpt_comeback/utf-8BSU1BRzAxMjguanBn.jpg What did you have to bribe your wife with to get her to help you out?! |
|
|
|
[#27]
Originally Posted By bryonbush:
Originally Posted By Vegitan:
Reloading/work bench has three outlets on one circuit above the bench and a single outlet under the bench on a separate circuit for the air compressor. Will take another picture later with the press mounted. Water heater is electric so no open flame near powder and primers. http://i1099.photobucket.com/albums/g399/cpt_comeback/utf-8BSU1BRzAxMjQuanBn.jpg Wife using the press to deprime 45 ACP for her SA 1911 loaded, first time using the press. http://i1099.photobucket.com/albums/g399/cpt_comeback/utf-8BSU1BRzAxMjguanBn.jpg What did you have to bribe your wife with to get her to help you out?! Ammo of course. Told her since she likes to empty the brass she should help me reload it, she thought that was fair. She doesn't find loading it anywhere as awesome as unloading it though so I don't ask her to help all that much, just when I have big batches of brass prep to do from our shooting. Side note on the bench, being in the Army moving is a fact of life, so I designed the bench to break down into three major pieces. The top and the bottom shelf are built like a stud wall and bolts through the legs and frame are what ties it all together. To break the bench down I just undo the top bolts, pull the top off, flip the bench on its side and undo the bottom bolts and pull the legs out. The bench is rock solid without it being anchored to the wall, some of that is due its weight. |
|
|
|
|
[#28]
Side note on the bench, being in the Army moving is a fact of life, so I designed the bench to break down into three major pieces. The top and the bottom shelf are built like a stud wall and bolts through the legs and frame are what ties it all together. To break the bench down I just undo the top bolts, pull the top off, flip the bench on its side and undo the bottom bolts and pull the legs out. The bench is rock solid without it being anchored to the wall, some of that is due its weight.
So two stud walls with 4x4s in between them holding them together? |
|
|
|
|
[Last Edit: joemusso]
[#29]
here is my reloading room.
almost done just a few more benches to stain. what do you think. 

|
|
|
|
|
[#30]
Originally Posted By joemusso: here is my reloading room. almost done just a few more benches to stain. what do you think. Looks ideal! Plenty of solid bench space, good lighting and some elbow room!
|
|
|
|
|
[#31]
Joemusso: That is a nice looking room. Lots of space and I like the lighting around the perimeter where it is needed. Any above the bench cabinets in the plan?
|
|
|
|
|
[#32]
Originally Posted By sburggsx:
Side note on the bench, being in the Army moving is a fact of life, so I designed the bench to break down into three major pieces. The top and the bottom shelf are built like a stud wall and bolts through the legs and frame are what ties it all together. To break the bench down I just undo the top bolts, pull the top off, flip the bench on its side and undo the bottom bolts and pull the legs out. The bench is rock solid without it being anchored to the wall, some of that is due its weight.
So two stud walls with 4x4s in between them holding them together? Essentially, yes. I added some cross pieces between the "studs" to eliminate any lateral shift and there is a screwed in 2x4 behind each leg that sandwiches the leg in place. During the build I put the leg in first than added the 2x4, the fit was tight enough that I had to wiggle the leg to get it in and out. I drilled the bolt holes with an auger bit free hand; so I will have to mark the legs before I take it down or I am going to have a hell of time trying to line up all the holes perfectly again when I put it back together. I have added some peg board and scrap plywood to the back legs for function, bracing and to keep stuff from falling off the back of the bench. It is screwed in with 1.5 inch wood screws so that will just take a few minutes to get back off. Think I spent $100 to build it but that doesn't include the electrician to come put in the extra power and add another light above the bench. |
|
|
|
|
[Last Edit: joemusso]
[#33]
yes cabinets are in the plans just don't know what i want or how many.
joe Originally Posted By RLR350:
Joemusso: That is a nice looking room. Lots of space and I like the lighting around the perimeter where it is needed. Any above the bench cabinets in the plan? |
|
|
|
|
[#34]
Originally Posted By joemusso: here is my reloading room. almost done just a few more benches to stain. what do you think. Lots of room, but you missed the shade of green for RCBS or Redding. So I can only give you a 9 out of 10.
|
|
|
|
|
[#35]
It is pretty close to the rcbs green i think.
But i will take the 9 out of 10. thank you joe Originally Posted By dryflash3:
Originally Posted By joemusso:
here is my reloading room. almost done just a few more benches to stain. what do you think. Lots of room, but you missed the shade of green for RCBS or Redding. So I can only give you a 9 out of 10. |
|
|
|
UT, USA
|
[#36]
Originally Posted By joemusso:
here is my reloading room. almost done just a few more benches to stain. what do you think. http://i701.photobucket.com/albums/ww20/mussojoe/reloading%20room/IMG_2347.jpg http://i701.photobucket.com/albums/ww20/mussojoe/reloading%20room/IMG_2346.jpg http://i701.photobucket.com/albums/ww20/mussojoe/reloading%20room/IMG_2345.jpg http://i701.photobucket.com/albums/ww20/mussojoe/reloading%20room/IMG_2348.jpg Nice snap on hammer 
|
|
|
|
[#37]
Originally Posted By Lohe:
Originally Posted By joemusso:
here is my reloading room. almost done just a few more benches to stain. what do you think. http://i701.photobucket.com/albums/ww20/mussojoe/reloading%20room/IMG_2347.jpg http://i701.photobucket.com/albums/ww20/mussojoe/reloading%20room/IMG_2346.jpg http://i701.photobucket.com/albums/ww20/mussojoe/reloading%20room/IMG_2345.jpg http://i701.photobucket.com/albums/ww20/mussojoe/reloading%20room/IMG_2348.jpg Nice snap on hammer
Thought i was the only one that noticed that. 
|
|
|
|
TN, USA
|
[#38]
Originally Posted By joemusso:
here is my reloading room. almost done just a few more benches to stain. what do you think. http://i701.photobucket.com/albums/ww20/mussojoe/reloading%20room/IMG_2347.jpg http://i701.photobucket.com/albums/ww20/mussojoe/reloading%20room/IMG_2346.jpg http://i701.photobucket.com/albums/ww20/mussojoe/reloading%20room/IMG_2345.jpg http://i701.photobucket.com/albums/ww20/mussojoe/reloading%20room/IMG_2348.jpg its beautiful! any updates? |
|
|
OR, USA
|
[#39]
Just finished the bench tonight, which was a fun but exhausting project. I live in an apartment, so it's a bit small, and I got permission from my wife to let me keep it in the office
Just got the RCBS kit, so everything is still being setup. Hope to start loading soon, just need a couple more things. Excited though... I've been wanting to do this since I was a kid hearing about my Grandpa reloading for his .38 Special. 
|
|
|
|
[#40]
Ill try to get new pics tonight.
i just finished the other benches stained them last night. Originally Posted By sid_79:
Originally Posted By joemusso:
here is my reloading room. almost done just a few more benches to stain. what do you think. http://i701.photobucket.com/albums/ww20/mussojoe/reloading%20room/IMG_2347.jpg http://i701.photobucket.com/albums/ww20/mussojoe/reloading%20room/IMG_2346.jpg http://i701.photobucket.com/albums/ww20/mussojoe/reloading%20room/IMG_2345.jpg http://i701.photobucket.com/albums/ww20/mussojoe/reloading%20room/IMG_2348.jpg its beautiful! any updates? |
|
|
|
|
[#41]
Originally Posted By JE3146: Just finished the bench tonight, which was a fun but exhausting project. I live in an apartment, so it's a bit small, and I got permission from my wife to let me keep it in the office Just got the RCBS kit, so everything is still being setup. Hope to start loading soon, just need a couple more things. Excited though... I've been wanting to do this since I was a kid hearing about my Grandpa reloading for his .38 Special. http://i1299.photobucket.com/albums/ag61/Jordan_Edgar/2012-12-17_00-30-19_630_zpseb2840fe.jpg Nice looking bench. Hope you plan on some shelf's for the back. |
|
|
|
OR, USA
|
[#42]
Originally Posted By dryflash3:
Originally Posted By JE3146:
Just finished the bench tonight, which was a fun but exhausting project. I live in an apartment, so it's a bit small, and I got permission from my wife to let me keep it in the office Just got the RCBS kit, so everything is still being setup. Hope to start loading soon, just need a couple more things. Excited though... I've been wanting to do this since I was a kid hearing about my Grandpa reloading for his .38 Special. http://i1299.photobucket.com/albums/ag61/Jordan_Edgar/2012-12-17_00-30-19_630_zpseb2840fe.jpg Nice looking bench. Hope you plan on some shelf's for the back. Thank you. 2x4's extend up to hold the backsplash in place, and conveniently I left a gap running the full width of the back to allow for vertical 2x4's and shelving/pegboard/louvered mounted of sorts. The problem was it was inside, and while I got wife approval for the bench, she did not approve the shelves. So we'll see if I can budge her on it after a series of complaints for nowhere to put anything. For now I'm just happy to have a bench Started loading workup loads for my 308 tonight. |
|
|
IL, USA
|
[#43]
I replaced the table top with this new one. Beautiful piece and a great find. Made the new riser. All hard maple. The top is a "Baker's table". I had never heard that term before. It is for pastries and bread making and the edges are so that flour does not spill.

Bob |
|
|
IL, USA
|
[#44]
Spectacular! Well done.
Bob |
|
|
|
[#45]
Originally Posted By rleonard: I replaced the table top with this new one. Beautiful piece and a great find. Made the new riser. All hard maple. The top is a "Baker's table". I had never heard that term before. It is for pastries and bread making and the edges are so that flour does not spill. Wow! That is a nice top! Nice set up too! |
|
|
|
|
[#46]
Originally Posted By JE3146: Originally Posted By dryflash3: Originally Posted By JE3146: Just finished the bench tonight, which was a fun but exhausting project. I live in an apartment, so it's a bit small, and I got permission from my wife to let me keep it in the office Just got the RCBS kit, so everything is still being setup. Hope to start loading soon, just need a couple more things. Excited though... I've been wanting to do this since I was a kid hearing about my Grandpa reloading for his .38 Special. http://i1299.photobucket.com/albums/ag61/Jordan_Edgar/2012-12-17_00-30-19_630_zpseb2840fe.jpg Nice looking bench. Hope you plan on some shelf's for the back. Thank you. 2x4's extend up to hold the backsplash in place, and conveniently I left a gap running the full width of the back to allow for vertical 2x4's and shelving/pegboard/louvered mounted of sorts. The problem was it was inside, and while I got wife approval for the bench, she did not approve the shelves. So we'll see if I can budge her on it after a series of complaints for nowhere to put anything. For now I'm just happy to have a bench Started loading workup loads for my 308 tonight. Try a little trim around the exposed plywood/particle board edge. Then some stain and Polyurethane to finish.  Something like this. Trim hiding particle board edge. |
|
|
|
|
[#47]
dry, would you suggest framing up the top, then securing the plywood to the top of the frame, or building the plywood into the top, flush with the outer 2x6?
|
|
|
|
|
[#48]
Look at the bench in JE3146's post. Classic 2x4 frame, covered with Melamine top. Plywood will work well also for top.
Notice how bottom 2x4 braces are placed. Up about 2 inches off the floor. This is called a toe kick. Which is space for your toes when you are close to the bench. Also use screws not nails to fasten bench together. Glue all the joints also. If you want, frame around the plywood top, then extend legs down. Build braces and bottom shelf last. Good luck.
|
|
|
|
|
[#49]
Originally Posted By joemusso:
here is my reloading room. almost done just a few more benches to stain. what do you think. http://i701.photobucket.com/albums/ww20/mussojoe/reloading%20room/IMG_2347.jpg http://i701.photobucket.com/albums/ww20/mussojoe/reloading%20room/IMG_2346.jpg http://i701.photobucket.com/albums/ww20/mussojoe/reloading%20room/IMG_2345.jpg http://i701.photobucket.com/albums/ww20/mussojoe/reloading%20room/IMG_2348.jpg Curious to see your progress. |
|
|
|
WI, USA
|
[#50]
Just starting reloading. I have plans to modify this to have more storage shelves instead or the mirror, not that I don't enjoy staring at myself for hours on end.

Because outside. 

|
|
|
 Win a FREE Membership!
Sign up for the ARFCOM weekly newsletter and be entered to win a free ARFCOM membership. One new winner* is announced every week!
You will receive an email every Friday morning featuring the latest chatter from the hottest topics, breaking news surrounding legislation, as well as exclusive deals only available to ARFCOM email subscribers.

AR15.COM is the world's largest firearm community and is a gathering place for firearm enthusiasts of all types.
From hunters and military members, to competition shooters and general firearm enthusiasts, we welcome anyone who values and respects the way of the firearm.

Subscribe to our monthly Newsletter to receive firearm news, product discounts from your favorite Industry Partners, and more.
Copyright © 1996-2024 AR15.COM LLC. All Rights Reserved.
Any use of this content without express written consent is prohibited.
AR15.Com reserves the right to overwrite or replace any affiliate, commercial, or monetizable links, posted by users, with our own.


