MA, USA
|
[#3]
by the way, is there a video for putting together an upper similar the the great video of assembling a stripped lower and a LPK?...If so where can I find it?....<><....:)
|
|
|
IL, USA
|
[#4]
just finished installing my DPMS LPK into my MEGA lower....took 10 minutes my first time...super easy.
i think i can do it in under 2 minutes next time. thanks ar15.com for the great info. |
|
|
NY, USA
|
[#5]
This was a great help for my first built. total cost was $560.00
|
|
|
OR, USA
|
[#6]
I had plans to install a Compass Lake,Frank White trigger in my Colt AR. Seems to be a block in the way..Colt makes the block of very hard material and as the Compass Lake assembly has pins in the safety I have a problem. Is there a relatively simple way to remove this block?.......LLC
|
|
|
NY, USA
|
[#7]
Hey guys, I live in NY and was wondering if anyone knew where i could get a preban lower (stripped preferably)
Jim |
|
|
AZ, USA
|
[#8]
thanks for the great info. i just put together a 16" mid length rifle kit from del-ton on a spikes tactical. $600 well spent.
tomorrow is the range test. |
|
|
|
[#9]
AGH! Where's the post on how to do the the take-down pin retention mod???!!!
|
|
|
|
AZ, USA
|
[#10]
Great thread! Very good resource for those of us who only wrench once-in-a-while.
I've read all 13 pages & have seen no mention of a hitch I have previously encountered. Has anyone ever found the need to trim a coil or two from the pivot detent spring? 20+ years ago, I recall a couple of armorers w/the PD (both had military backgrounds) mentioning the occasional necessity for this mod. Seems sometimes there simply IS NOT enough clearance to get the pivot pin into place. Probably 10+ years ago, I was assembling an AR, & encountered the same issue. About two years ago, during another build the problem was NOT encountered. Now, I'm working on a new build on a DPMS lower, & DOGGONE if it hasn't returned! I've fished in the spring hole for any foreign crud, & found nothing. I've checked the springs & detents against parts from other kits, & nothing appears to be out of spec. The spring is obviously at coil bind, & the detent protrudes nearly 1/16" into the path of the pivot pin bore. Anyone ever seen this? Best, Matt |
|
|
|
[#11]
This thread is fuggin' awesome.
Thanks! |
|
|
|
|
[Last Edit: FALARAK]
[#12]
I do this all the time. I cut the coil just a hair under flush with the lower receiver. Really makes it easier to install. Sometimes the springs are a tad too long, sometimes there is crud in the lower, and sometimes they just dont drill the damned things right. I don't include every possible nuance or tip on the first pages.... simply because my goal was to "trick" people into how easy it is to build one yourself.... and then go into the deeper details in the forums if they ran into trouble. |
||
|
|
AZ, USA
|
[#13]
Thanks Kevin,
Just wanted to make sure I wasn't missing an "insider" trick. Much obliged, Matt |
|
|
TX, USA
|
[#14]
First time posting on this AWESOME site, don't know if my 2 cents is too late, but, I also own a Rock River, if the ff came stock, it may have red loctite, and require some heating up, I had the same problem removing the stock/buffer tube. I'd condtact RRA just to be sure.
|
|
|
|
[#15]
 Welcome Welcome
|
|
|
|
USA
|
[#16]
Do you need barrel vise blocks to change flashhiders or is the action block good enough ? It wasn't clear to me. I was afraid of tweaking something with my action block .
|
|
|
WY, USA
|
[#17]
First post, Just put together my first lower, I used a Mega lower, DPMS LPK, CAA 6 posistion stock and new grip, went together flawlessly, now I just have to wait to get the pieces complete the upper. I have found a use for the cheap grips that come in the LPK, we attached it to the barrel of a tater gun worked out pretty slick.
Thanks for the great page. |
|
|
|
[#18]
The correct tool is to use barrel vise blocks. You can torque the upper receiver, and barrel extension pin if the muzzle device is tight. I dont own barrel vise blocks, however, I just vise on the pinned FSB, or wrap the barrel in an old leather belt and vise on that to remove stubborn ones. |
||
|
|
|
[#19]
Thanks for all of the great info! Even if I never got any other good info (which I have) this would be well worth the price of membership. Thanks!
Just an FYI. Brownell's sells a very good pivot pin installation tool. It's patterned exactly like the tool you see in the Army and Marine Corps TM. The link is here: Brownell's--go down to #27 . Scroll down the page to #27. It's $14.95--and only around $10 if you have a C&R or FFL. I would definitely recommend it if you are planning to build more than one lower; but it's a really good buy even if you're only doing one. (I've read many posts about people having problems with the pivot pin installation. Springs and detents flying everywhere! Thanks again for the great resource! |
|
|
|
USA
|
[Last Edit: thebeekeeper1]
[#20]
Thanks ARF.com, You sure are swell. Assembled my first stripped lower, no problems!!!!
<Image removed. Please read the rules: *Posts with images of violence or photos of scantly clad men or women should contain a warning in the title. These types of images will not be tolerated if inserted at random in other discussions. --tbk1> |
|
|
TX, USA
|
[Last Edit: Tufiremn]
[#21]
I just put together my first lower a CMMG with DPMS LPK. I used a punch that was the same size as the pivot pin inserted from the left side. It held the detent in place as I slid the pivot pin in. Course this was after launching the detent once while trying to do as the instructions said. Everything else went smooth as glass thanks to the instructions. Even did the whole job at my desk in front of the computer. |
||
|
|
TX, USA
|
[#22]
So is anyone going to do a HOW TO ASSEMBLE A UPPER RECEIVER? I am currently buying parts and I want to assemble my own upper receiver.
|
|
|
NM, USA
|
[#23]
I am thinking about trying to move the front sight back to serve as the gas block on a dissapator barrel and replace current hand gaurds with shorter gaurds (like the patrolman) to achieve the same look of the patrolman rifle. Is this possible, will the hand gaurds fit and should i place the current gas block where the current front sight is to cover the holes in the barrel at the front sight location. It's probably obvious that I'm trying to save $$. I am new to this so please be patient with me.
|
|
|
OK, USA
|
[Last Edit: Wormydog1724]
[#24]
I have a bushmaster m4a3 patrolman's ar15 and i purchased the RRA Flip Front Sight Gas Block assembly. I have a UTG quad rail. is there anything special i need to do or anything i should know before attempting to install the new flip front sight/gas block?
I was just going to go off the front page and use the how-to. Just a noob here in love with ar's. trying to build mine the way i want it. going slow with minimimal experience. any suggestions will help. thanks. |
|
|
MS, USA
|
[Last Edit: Erevis]
[#25]
Hiya....
I wanted to thank you guys for this thread. I used it to build my Del-ton kit and was able to put it together in less than an hour AT my computer desk. I also wanted to ask a question.... Can anyone give me a guide to: 1.) Changing out a DPMS upper Receiver for an A3 upper on an LR-308? 2.) Removing a DPMS Free Float tube and installing a DPMS SASS forearm on an LR-308? I believe I know and can do it, but I have learned long ago to check with the experts. Thanks! -- Erevis (John) |
|
|
|
[#26]
Your least expensive option will be to buy a new barrel in the configuration you want. |
||
|
|
OK, USA
|
[#27]
I have a bushmaster m4a3 patrolman's ar15 and i purchased the RRA Flip Front Sight Gas Block assembly. I have a UTG quad rail. is there anything special i need to do or anything i should know before attempting to install the new flip front sight/gas block? I was just going to go off the front page and use the how-to on the gas block installation but wasn't sure if everything would correlate. Just a noob here in love with ar's. trying to build mine the way i want it. going slow with minimimal experience. any suggestions will help. thanks. |
|
|
|
[#28]
I've finally split the lower receiver video into two and uploaded it to YouTube.
Part 1: www.youtube.com/watch?v=iA_Vkb2UB1w Part 2: www.youtube.com/watch?v=jq4KfUaVp8M |
|
|
|
|
[#29]
Nice work! 
|
||
|
|
NC, USA
|
[#30]
Just want to say "Thank You" to FALARAK for the sticky on assembling a lower...my Mega lower came in today and I bought a RRA lower kit at the same shop and after I cleaned all the parts, it took about 20 minutes to put it together using the instructions here..(I tinker a little so I had some tools and "stuff" on hand)
Not certain if I will build or buy an upper but if I build, I know that the instuction here will make it successful... Thanks again, Hank |
|
|
FL, USA
|
[#32]
Originally Posted By FALARAK:
Assemble your own AR15 rifle from parts.... for dummies. How to install a free float tube to your upper: Brownells has a video on this available here: Brownells Free Float Tube Installation Video. |
|
|
CA, USA
|
[#33]
Many years ago I learned to build my own ARs from the original arfcom. I am truly impressed by the progress of the instructional material on this site.
|
|
|
NC, USA
|
[#34]
I'm building my first AR 15. I just put the Lower Parts Kit in the Receiver using this guide. It took about 30 minutes and I managed to do it without monkeying up the finish. +1 on the vise grips covered in electricians tape. It worked perfectly.
|
|
|
NM, USA
|
[#35]
AR PISTOL??? This is my first time hearing of this..., I like a challenge. Can anyone PM me some information on this. Or even better if anyone would like to go through a pistol build together with me, it can be fun!!!! If anyone is interested let me know. send me a PM!!!
|
|
|
MO, USA
|
[#36]
Wow! GREAT instructions! I just finished my first lower build, thanks to these well-done instructions... photos to follow soon!
|
|
|
CA, USA
|
[#37]
|
|
|
|
[Last Edit: Desert_AIP]
[#38]
How to install the front pivot pin using a $1 clevis pin:
(Page 14 of the thread) Since my original post went to the Archive, I'll repost it here to the sticky thread: –––––––––––––––––––––––––––––––––––––––––––––––––––––––––––––––––––––––––– There have been several questions in threads recently asking about the need for buying the $15 front pivot pin install tool to install the Pivot Pin. If you are only doing one build, it's hard to justify spending money on a single use tool, if you're building 100 the technique below works equally well. Many here have talked about using a 1/4" clevis pin to install the Pivot Pin but there are always follow up questions as to the technique. Below is a step by step procedure to install the Pivot Pin using a clevis pin, this takes 10 times longer to describe than to actually perform and costs nearly nothing. Got to your local hardware store and buy a 1/4" clevis pin. Get the kind with at least one hole through it not the kind with a captured ball bearing on the end. You should find them in the specialty hardware area with the setscrews, thread inserts and the like. I use a 2" long pin which reaches completely across the front of the lower. Get one at least this long. I paid 65¢ for mine. 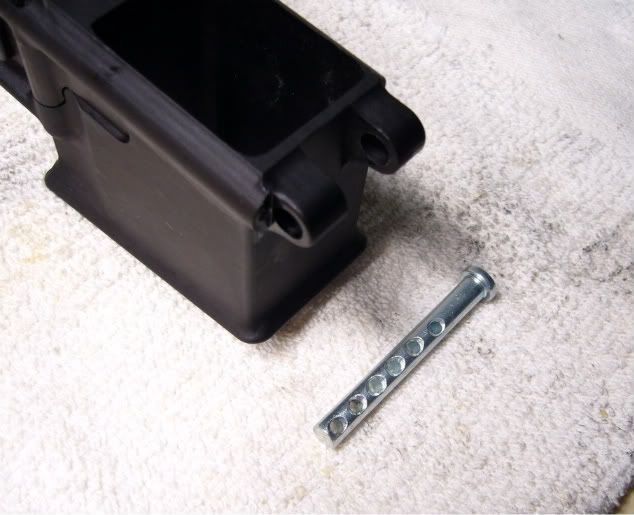
Insert the clevis pin through the pivot pin holes in the front of the lower from the left side. Align the hole (or one of the holes) in the clevis pin with the pivot pin detent channel in the lower. 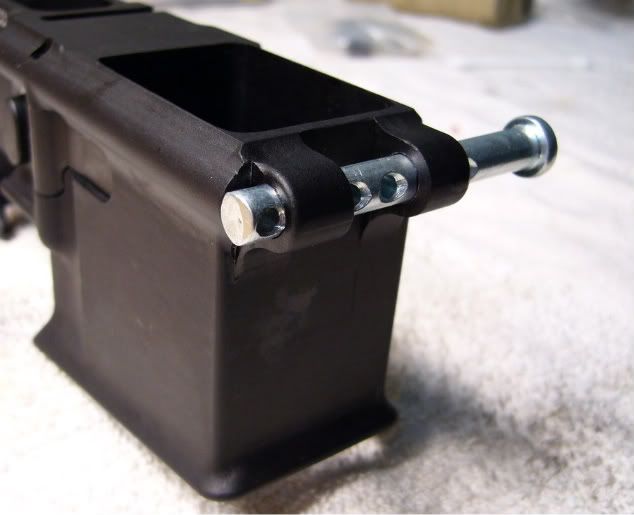
Insert the pivot pin detent spring through the hole and into the channel in the lower. 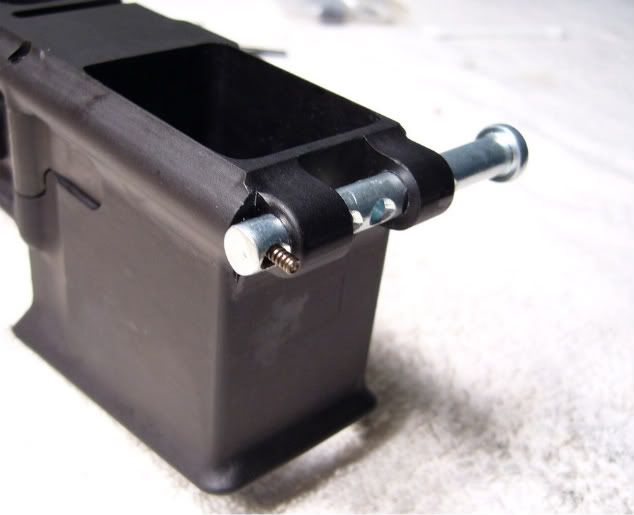
Insert the pivot pin detent through the hole. The spring will not let it go in very far without pressure. 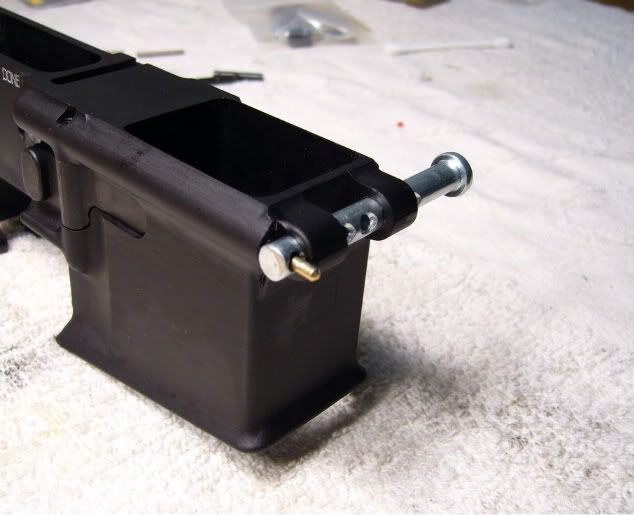
I perform the next three steps inside a 2 gallon zip-loc bag so I don't lose the detent or spring in case it gets away from me. With a punch or other suitable tool (like an allen wrench) push the detent through the hole in the clevis pin and into the lower while compressing the spring. The detent and spring are now inside the lower and clear of the clevis pin. The only thing holding them in place is pressure on the punch. 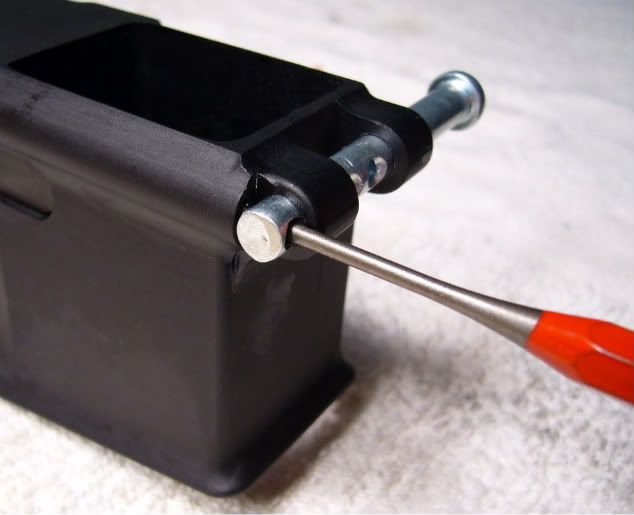
Turn the punch or allen wrench 90 degrees counter-clockwise so the hole is now at the top of the clevis pin. This will capture the detent and spring along the side of the clevis pin. 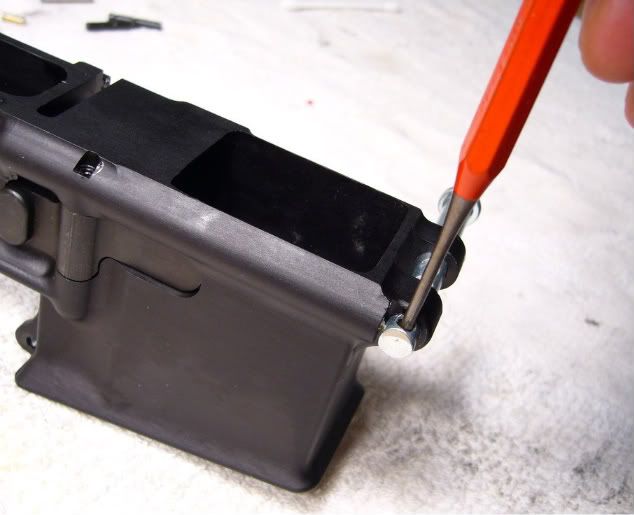
Remove the punch. You can see the detent poking out of the hole. 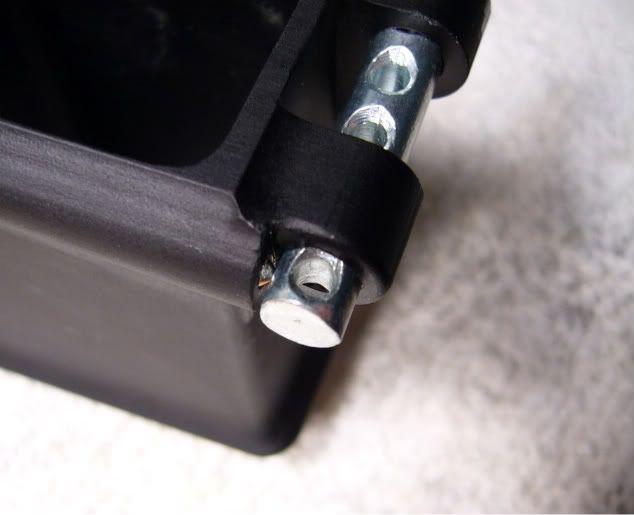
Start the pivot pin into the lower from the right side. Make sure the groove in the pivot pin is at the top. 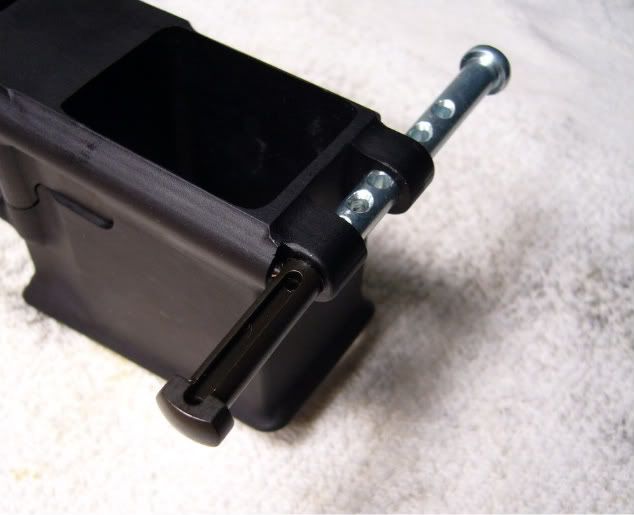
As you push the clevis pin out of the hole, keep sideways pressure on the detent until it is captured by the pivot pin. 
Keep pushing the pivot pin though the right side pivot hole. Once it is in the hole and won't fly out under spring pressure, remove the clevis pin. 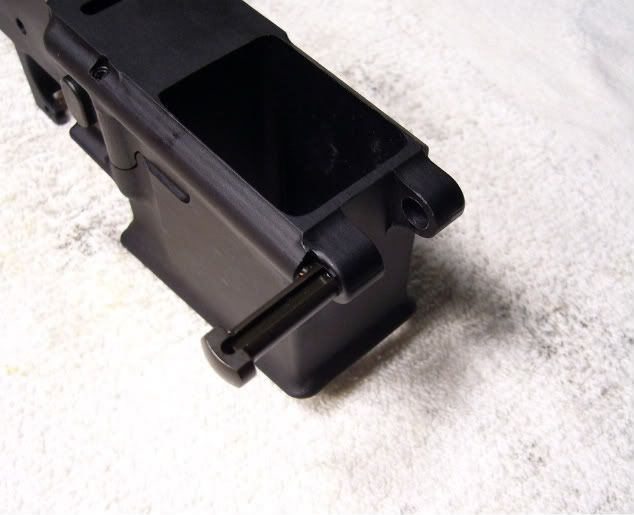
Rotate the pivot pin 90 degrees counter-clockwise until the groove in the pivot pin captures the detent. 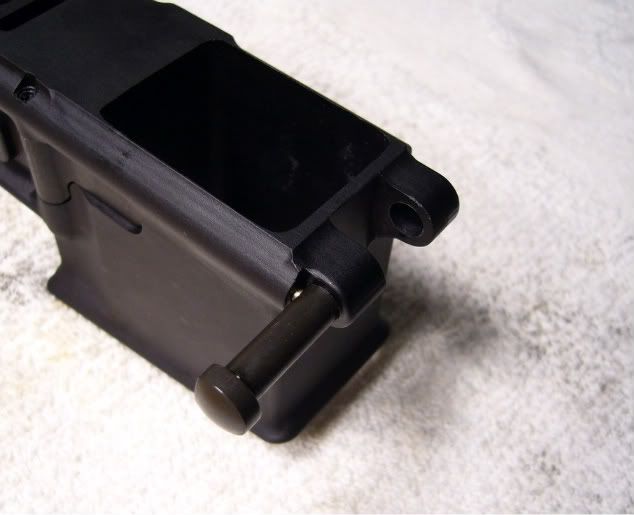
You are finished! 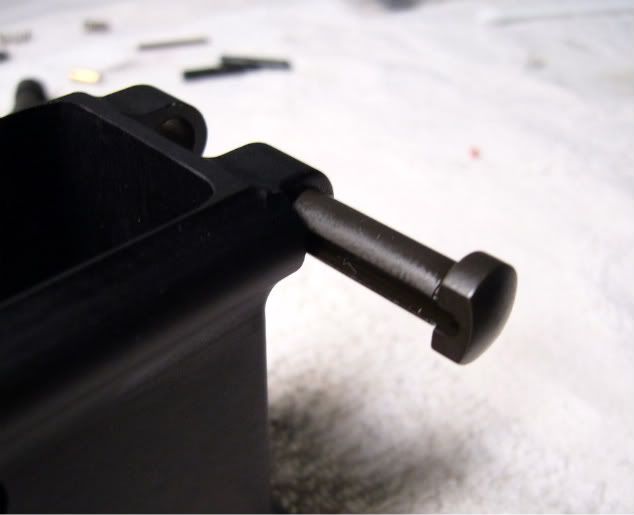
|
|
|
|
|
[#39]
|
|
|
|
|
[#40]
Awsome! just what I needed...

|
|
|
|
MA, USA
|
[Last Edit: MSPRet]
[#41]
how about a quick tutorial about installing an ejection port door and a FA? I have recieved the parts needed to complete my 3 uppers and now want to check on how to do it.
If it is in an online manual simewhere perhaps just direct me to that but your directions here seem so much better I thought I would ask. Also how about installing a complete A1 and A2 sight assemblies in stripped A1 and A2 recievers?...Thanks....<><....:) I got the ejection port doors all installed as well as the FA's. The 2 round FA's I put on new A3 upprs are fine. I put a teardrop on an old A1 upper and it seems the "teardtop" can move around it's axis (rotate) about 20 degrees, otherwise it seems to work fine, it that OK? It looks as if the hole in the reciever for the roll pin that holds in FA in is a bit to far from the shaft of the FA. This A1 has been used for a few years in competitive long range shooting with no ill effects so I am hoping it will be OK...any ideas? I could always swap it out and put in a round FA so the rotating teardrop won't be noticable... |
|
|
TX, USA
|
[#42]
I wish I had read this far down . I would have run down to the tractor supply and I would be able to type without pain in my fingers today The 9th and 10 th time with my friends help we lost the spring and detent I was using a pin punch to push the spring and detent and a pin punch through the pivot pin holes. I hate to say this but I cut one sixteenth off of the spring and then it was a bitch. My friend said lets do the second one . so more wild turkey and more stevie ray vaughn and I had it all together two stage trigger and all except the pivot pin. I told him now comes the bitch and just like advertised It just snaped bam in WTF? The second one just popped in no problem on cutting on bs WTF? The first one with the cut spring was much tighter even cut .? Are some parts kits different ? They look the same. One was dpms and one was a no name. Both were dpms lowers could one hole have trash in it or not be drilled deep enough. we thought about the razor blade trick but with all the pressure we exerted on the first one were afraid to use it . The punches worked fine on the second one. I will have a clevis pin on the next one. Another friend asked if I had a diagram to buld the lower and I pulled up this thread. He had never seen ar15 .com and was very impressed . Thank you all. |
|
|
|
|
[Last Edit: FALARAK]
[#43]
Some parts kits are different - and some lowers are not drilled to the same depth.
I cut the spring to be just short of the hole in the lower. Makes installing this MUCH simpler. |
|
|
|
TX, USA
|
[#44]
So I'm not crazy. I don't know why they call putting parts in a lower "a build". as I bought the complete uppers but even so it is addictive. You buy the parts alittle at a time . First thing you know you have guns. They look good no channel lock marks. Hope they shoot
|
|
|
|
[#45]
Just completed my first build. Needless to say I read your posting many times as I waited for the parts to arrive. Afterward receiving the parts I re-read the post, especially the one detailing the use of visegrips instead of a hammer.
Your instructions are TOP NOTCH! My lower came out great! I especially enjoyed your post on installing a RRA 2 stage trigger. I haven't had a chance to take photos yet as I am waiting for the optics to arrive. Once I do, I will post the evidence My build, an AR that I will use for deer hunting, consisted of: Spike's Tactical Lower RRA 2 Stage trigger lower parts kit by PK Firearms Magpul MAID with winter trigger guard Magpul CTR stock - milspec tube RRA 6.8 SPC 16" carbine upper with low profile gas block, RRA mid length free float tube, with swivel stud for bipod. Bushnell 3200 3x10 compact scope with Warne QR extra high rings Harris bipod |
|
|
|
AZ, USA
|
[#46]
Great Thread! Has helped me tons.
|
|
|
|
[#47]
This thread rocks. I would change the order, though, just a bit. I do everything inside the receiver first, then the buffer tube and buffer retainer, then the grip/selector. It's less cumbersome to move around, and having the buffer tube or CTR helps me hold it in various positions when I install the grip/selector. The clevis-pin method is stupid-good, although you must keep a fair amount of pressure on both pins as that stupid little detent needs only one red hair to fly.
Also, what this thread needs is a hi-def picture and description of the parts. I have a kit on the way, and I will happily post pics in a few days. The springs and detents, for sure, need good pics. Anyway, like FAL said, if you are on the fence, you can do it with this thread. |
|
|
|
VA, USA
|
[#48]
Excellent information.
I'm planning my first build and this is helping greatly. |
|
|
TX, USA
|
[#49]
going to try this tomorrow. I got owned badly by the detents and hopefully I can fund this! |
|
|
|
PA, USA
|
[Last Edit: friendlysniper]
[#50]
I've found a neat little way to install the front takedown pin without that tool you can buy to do it, or a clevis pin. All you need is a guitar pick. Simply put the spring, then detent in, press down with the guitar pick (it should be a thick rigid one, not a flimsy one) and then apply pressure to keep it down. Get your take down pin, put it over it, and press down with enough pressure that you can pull the guitar pick out. Begin pressing the take down pin in while pulling the guitar pick out and it should slide in and lock in place. Definitely a bonus to being a guitar player.
|
|
|
 Win a FREE Membership!
Sign up for the ARFCOM weekly newsletter and be entered to win a free ARFCOM membership. One new winner* is announced every week!
You will receive an email every Friday morning featuring the latest chatter from the hottest topics, breaking news surrounding legislation, as well as exclusive deals only available to ARFCOM email subscribers.

AR15.COM is the world's largest firearm community and is a gathering place for firearm enthusiasts of all types.
From hunters and military members, to competition shooters and general firearm enthusiasts, we welcome anyone who values and respects the way of the firearm.

Subscribe to our monthly Newsletter to receive firearm news, product discounts from your favorite Industry Partners, and more.
Copyright © 1996-2024 AR15.COM LLC. All Rights Reserved.
Any use of this content without express written consent is prohibited.
AR15.Com reserves the right to overwrite or replace any affiliate, commercial, or monetizable links, posted by users, with our own.


