|
Posted: 1/25/2015 3:55:58 PM EDT
thought I'd post a couple pics of some parts I've collected for an E2 build. Trying to make it all Colt with the exception of the lower, which is an 80%er. Still need to work on some engraving and a few small parts, plus the faux moderator. Parts include square forged upper, Colt 11.5 inch barrel, pretty nice Colt stock, no drain hole frt sight.........and some other junk.


|
|
|
|
[#1]
Looking sweet stoner! Keep us up to date with pics
|
|
|
|
[#2]
Quoted:
Looking sweet stoner! Keep us up to date with pics This. |
|
|
|
[#3]
|
|
|
|
[#4]
|
|
|
|
[#5]
Who's doing the rollmarks?
|
|
|
|
[#6]
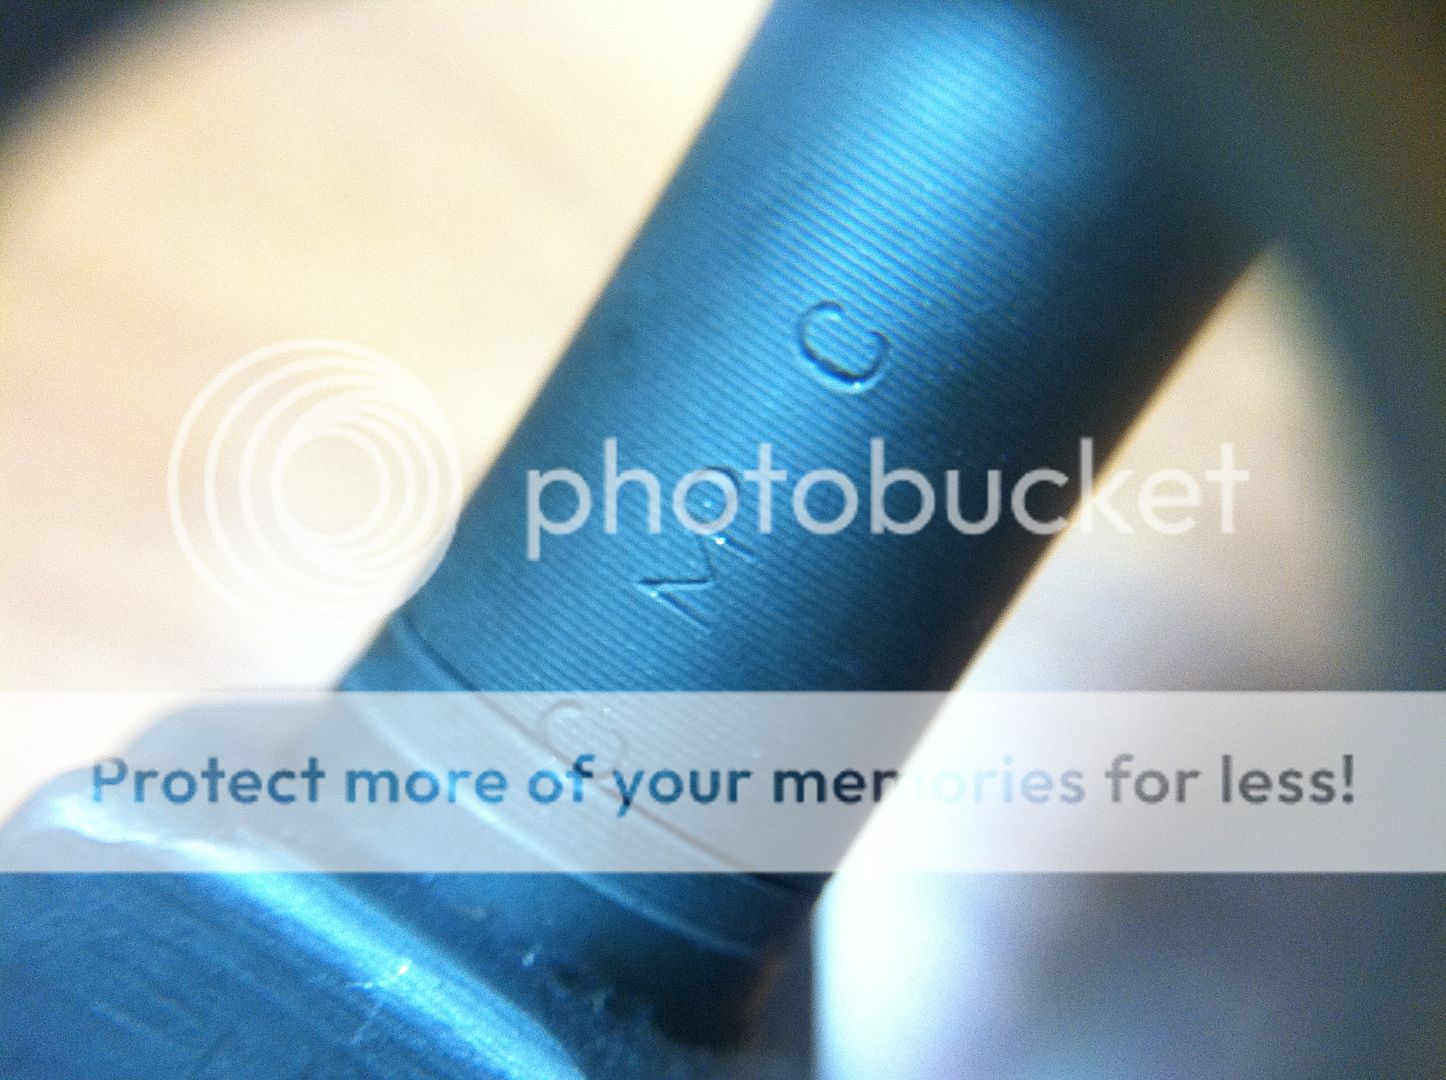
Quoted:
Who's doing the rollmarks? criio, I'm working on the rollmark and other engraving. I didn't have time to finish it and had to pull it off the mill to run another job, so I'll have to finish it later. I need to come up with a serial number that falls into the 900,000 range (I think that's where e2's fell)........that is a date of some significance in my life. My 607 is my son's birthday, and my M4A1 is my birthday, but I'm having trouble coming up with something for this one. This one also needs the Colt's Patent Firearms Mfg Co and the SAFE SEMI AUTO engraved, along with my trust info. Edit: my process of programming for engraving is extremely slow compared to what Braceman and other must use. I guess it is true........you can't teach an old dog new tricks, lol.......so I still do it the slooooooooooow way. Manual data input. I don't know how to use CAM software. This rollmark is a blend of 2 different programs I have. The 177E2 uses some of the old rollmark, along with some of the new......it uses the newer pony/globe, but the old Colts Patent Firearms Mfg Co wording, which meant I had to write a whole new program. Probably a half hour or less work for someone that knows what they're doing, but quite a few hours for me. |
|
|
|
[#7]
Coming together nicely. Looking forward to final pic's.
|
|
|
|
[#8]
Looking good. I had Braceman engrave a couple of lowers for me. One is a Nodak 80% engraved M16A1, and another 80% A2 lower engraved as M16A2. Very nice work, and your engraving is coming along nicely as well.
Edit: What do you plan on for a coating? |
|
|
|
[#9]
Quoted:
Looking good. I had Braceman engrave a couple of lowers for me. One is a Nodak 80% engraved M16A1, and another 80% A2 lower engraved as M16A2. Very nice work, and your engraving is coming along nicely as well. Edit: What do you plan on for a coating? Type III anodizing. I figure there is too much time/money involved for a stamped lower to not have it hard coated. I want it to be as resistant to dents/dings as I can make it. |
|
|
|
[#10]
That is SOOOO funny!
I took a crappy cell phone pic of my mocked up XM177E2-1/2 today but the picture sucked so I didn't post it. Might as well now. 
You can get the gist of it. Unfinished 80% lower and a bubba'd aluminum stock I stripped and sanded the major grinder marks out of. Yours looks better Stoner! |
|
|
|
[#11]
Quoted:
Type III anodizing. I figure there is too much time/money involved for a stamped lower to not have it hard coated. I want it to be as resistant to dents/dings as I can make it. Quoted:
Quoted:
Looking good. I had Braceman engrave a couple of lowers for me. One is a Nodak 80% engraved M16A1, and another 80% A2 lower engraved as M16A2. Very nice work, and your engraving is coming along nicely as well. Edit: What do you plan on for a coating? Type III anodizing. I figure there is too much time/money involved for a stamped lower to not have it hard coated. I want it to be as resistant to dents/dings as I can make it. Very true. I am considering sending my Nodak to US Anodize after I am done with it. I still need to machine it, and the weather is a bit cold for me to go out in my little piddly ass shop, lol. Takes a while for the heaters to warm it up. I |
|
|
|
[#12]
I've got another repro manual that I can send your way that will compliment this and the manual you've already got. Just need to have it spiral bound for authenticity.

|
|
|
|
[#13]
Quoted:
That is SOOOO funny! I took a crappy cell phone pic of my mocked up XM177E2-1/2 today but the picture sucked so I didn't post it. Might as well now. <a href="http://s39.photobucket.com/user/Cal30M1/media/20150125_173952.jpg.html" target="_blank">http://i39.photobucket.com/albums/e160/Cal30M1/20150125_173952.jpg</a> You can get the gist of it. Unfinished 80% lower and a bubba'd aluminum stock I stripped and sanded the major grinder marks out of. Yours looks better Stoner! It looks like a good start, but I want your alum butt stock. |
|
|
|
[#14]
Quoted:
It looks like a good start, but I want your alum butt stock. Quoted:
Quoted:
That is SOOOO funny! I took a crappy cell phone pic of my mocked up XM177E2-1/2 today but the picture sucked so I didn't post it. Might as well now. <a href="http://s39.photobucket.com/user/Cal30M1/media/20150125_173952.jpg.html" target="_blank">http://i39.photobucket.com/albums/e160/Cal30M1/20150125_173952.jpg</a> You can get the gist of it. Unfinished 80% lower and a bubba'd aluminum stock I stripped and sanded the major grinder marks out of. Yours looks better Stoner! It looks like a good start, but I want your alum butt stock. You wouldn't if you could see it better! 
It's a little chewed on. It'll be alright after some more sand paper and a few coats of Rustoleum gloss black! The inside is rough as a cob. Someone trying to hog it out I guess. Fits OK on my colt tube but it's already rubbing the anodizing off. |
|
|
|
[#15]
Looking good! I hope you enjoy yours as much as I do mine
|
|
|
|
[#16]
|
|
|
|
[#17]
Quoted:
Correct me if I'm wrong but both original XM177E2 uppers I have owned had round forge uppers. Were the earliest ones square forge? <a href="http://s576.photobucket.com/user/BigRix/media/null_zpsebb2595f.jpg.html" target="_blank">http://i576.photobucket.com/albums/ss208/BigRix/null_zpsebb2595f.jpg</a> <a href="http://s576.photobucket.com/user/BigRix/media/Colt%20XM177E2/889DCF77-3861-4641-AA42-C9EFB90603A0_zpskhbquwnj.jpg.html" target="_blank">http://i576.photobucket.com/albums/ss208/BigRix/Colt%20XM177E2/889DCF77-3861-4641-AA42-C9EFB90603A0_zpskhbquwnj.jpg</a> I guess you could call my first one square ish. Black lugs with recess. Later one is more round with gray lugs with no recess. BigRix......I don't know. I should do some more research. I'd be better off if I did not have to use the sq forge.......I've got a half dozen round forge FA uppers I could pick from.......some just barely rounded and some more pronounced. I could save the sq one for an earlier project. |
|
|
|
[#18]
I put a lot of research into my first one and I can say without a doubt it was an authentic, factory assembled XM177E2 made sometime between 67 and 70.
Upper was just like those from Enki's carbine guide. No forge codes, black lugs with counter bore. Bolt carrier was transitional with a parked carrier and chrome key like those used in late XM16E1's. 
I have pictures of some of the details but it has gone on to be matched up with a registered XM177E2 lower and I was happy to do so. My current one would have had to have been made in 1970 as it has gray lugs with no counter bore. |
|
|
|
[#19]
Looks great I could only hope mine would turn out that nice
Tom |
|
|
|
[#20]
BRix, so you think this would make a better upper receiver? I didn't know if late 66, which I think is when E2's came out, would have the sq forge or not......but if not then this one?

|
|
|
|
[#21]
That looks about like mine.
Does it have a counter bored front lug? |
|
|
|
[#22]
Quoted:
That looks about like mine. Does it have a counter bored front lug? It does. My crappy photography doesn't show it, but the lugs are black too. That upper was recoated with some kind of finish that was damned near impossible to remove. I spent a lot of time and stripper to remove whatever it was. It had some kind of metallic specs in it, not sure what. What you see is the original finish that's in pretty good shape. The black lugs aren't as black as others I've seen, but there's enough there to tell that it's original. edit: you also can't see in that photo that the proof marks are there. The "C" in a square is a good stamp, the Vp was struck at an angle, so only one "corner" of it is visible. |
|
|
|
[#23]
|
|
|
|
[#24]
well hail............all of a sudden I can't upload to Photobucket. About the drainhole........hmmmmm.........seems I have seen pics of an E2 that was a no drain hole. Hmmmmm. I have early onset of "can't remember chit", also known as CRS, but I think drain holes are believed to have started appearing in 67 and E2's first appeared in, I think, Nov of 66.......so maybe there were a few no drain hole E2's???? I have several of each type front sight, so either way I'm good on that. I'd assume that any round forged upper would probably have a drain hole in the sight.......so I;ll figure on going that route.
EDIT: darn, I knew I had a transitional carrier, and I do but it's a slick. |
|
|
|
[#25]
Quoted:
That is SOOOO funny! I took a crappy cell phone pic of my mocked up XM177E2-1/2 today but the picture sucked so I didn't post it. Might as well now. <a href="http://s39.photobucket.com/user/Cal30M1/media/20150125_173952.jpg.html" target="_blank">http://i39.photobucket.com/albums/e160/Cal30M1/20150125_173952.jpg</a> You can get the gist of it. Unfinished 80% lower and a bubba'd aluminum stock I stripped and sanded the major grinder marks out of. Yours looks better Stoner! Looks great but get yourself a skinny set of handguards. |
|
|
|
[#26]
Quoted:
Looks great but get yourself a skinny set of handguards. Quoted:
Quoted:
That is SOOOO funny! I took a crappy cell phone pic of my mocked up XM177E2-1/2 today but the picture sucked so I didn't post it. Might as well now. <a href="http://s39.photobucket.com/user/Cal30M1/media/20150125_173952.jpg.html" target="_blank">http://i39.photobucket.com/albums/e160/Cal30M1/20150125_173952.jpg</a> You can get the gist of it. Unfinished 80% lower and a bubba'd aluminum stock I stripped and sanded the major grinder marks out of. Yours looks better Stoner! Looks great but get yourself a skinny set of handguards. Those are the skinniest mid length guards I could find! Know where any skinnier and shinier are? |
|
|
|
[#27]
Rumor is RRA has the thinnest round mid-length. Is that true?
http://www.rockriverarms.com/index.cfm?fuseaction=category.display&category_id=306 Anyone? Anyone? Bueller? Need to write this down in case I'm tempted to do a retro 6.8. At the moment I'm planning an eventual M4ish 6.8. |
|
|
|
[#28]
Quoted:
Very true. I am considering sending my Nodak to US Anodize after I am done with it. I still need to machine it, and the weather is a bit cold for me to go out in my little piddly ass shop, lol. Takes a while for the heaters to warm it up. I Quoted:
Quoted:
Quoted:
Looking good. I had Braceman engrave a couple of lowers for me. One is a Nodak 80% engraved M16A1, and another 80% A2 lower engraved as M16A2. Very nice work, and your engraving is coming along nicely as well. Edit: What do you plan on for a coating? Type III anodizing. I figure there is too much time/money involved for a stamped lower to not have it hard coated. I want it to be as resistant to dents/dings as I can make it. Very true. I am considering sending my Nodak to US Anodize after I am done with it. I still need to machine it, and the weather is a bit cold for me to go out in my little piddly ass shop, lol. Takes a while for the heaters to warm it up. I I thought us anodizing quit doing finished 80s are they doing them again? |
|
|
|
[#29]
got a little time to finish the engraving. Fire control pocket and then off to anodizing.

|
|
|
|
[#30]
Excellent job Stoner. I like it!
|
|
|
|
[#31]
My engraving always looks skewed or something. The "S" in "SAFE" looks like it's messed up.......which it is.........but that's the way the roll mark was on the example that I "lifted". It would be easier, I suppose, to just type in the letters/numbers in AutoCAD, which would make them perfect but that isn't the way the originals look. The skews aren't so obvious after anodizing. Hopefully.
|
|
|
|
[#32]
Seeing that makes me wish I had followed my dads interests and his love of metal working instead of going the other route and working with wood.
Nice work and I love the 'flaws" Dad always said "leave one that they can find, and they won't seach for the ones you want to remain hidden"
|
|
|
|
[#33]
Quoted:
BigRix......I don't know. I should do some more research. I'd be better off if I did not have to use the sq forge.......I've got a half dozen round forge FA uppers I could pick from.......some just barely rounded and some more pronounced. I could save the sq one for an earlier project. Quoted:
Quoted:
Correct me if I'm wrong but both original XM177E2 uppers I have owned had round forge uppers. Were the earliest ones square forge? <a href="http://s576.photobucket.com/user/BigRix/media/null_zpsebb2595f.jpg.html" target="_blank">http://i576.photobucket.com/albums/ss208/BigRix/null_zpsebb2595f.jpg</a> <a href="http://s576.photobucket.com/user/BigRix/media/Colt%20XM177E2/889DCF77-3861-4641-AA42-C9EFB90603A0_zpskhbquwnj.jpg.html" target="_blank">http://i576.photobucket.com/albums/ss208/BigRix/Colt%20XM177E2/889DCF77-3861-4641-AA42-C9EFB90603A0_zpskhbquwnj.jpg</a> I guess you could call my first one square ish. Black lugs with recess. Later one is more round with gray lugs with no recess. BigRix......I don't know. I should do some more research. I'd be better off if I did not have to use the sq forge.......I've got a half dozen round forge FA uppers I could pick from.......some just barely rounded and some more pronounced. I could save the sq one for an earlier project. Lou, go with the red ^^^^. My original MP marked XM177E2 barrel does not have a drain hole in the FSB. |
|
|
|
[#34]
very nice looking work on the rollmark
|
|
|
|
[#35]
Very nice work. So you are not engraving a fake sear pin hole?
|
|
|
|
[#36]
Quoted:
Very nice work. So you are not engraving a fake sear pin hole? Mike, what I'll do is put two blind holes, about .040 or so deep.......one each side of the receiver, slightly off location of where a sear pin hole would be. After anodizing I'll insert pin nubs that are about .045-.050 long into the holes. They look more like a real pin than the engraved circles. Here's a pic of how they look on my Mk18. 
|
|
|
|
[#37]
Quoted:
Lou, go with the red ^^^^. My original MP marked XM177E2 barrel does not have a drain hole in the FSB. Quoted:
Quoted:
Quoted:
Correct me if I'm wrong but both original XM177E2 uppers I have owned had round forge uppers. Were the earliest ones square forge? <a href="http://s576.photobucket.com/user/BigRix/media/null_zpsebb2595f.jpg.html" target="_blank">http://i576.photobucket.com/albums/ss208/BigRix/null_zpsebb2595f.jpg</a> <a href="http://s576.photobucket.com/user/BigRix/media/Colt%20XM177E2/889DCF77-3861-4641-AA42-C9EFB90603A0_zpskhbquwnj.jpg.html" target="_blank">http://i576.photobucket.com/albums/ss208/BigRix/Colt%20XM177E2/889DCF77-3861-4641-AA42-C9EFB90603A0_zpskhbquwnj.jpg</a> I guess you could call my first one square ish. Black lugs with recess. Later one is more round with gray lugs with no recess. BigRix......I don't know. I should do some more research. I'd be better off if I did not have to use the sq forge.......I've got a half dozen round forge FA uppers I could pick from.......some just barely rounded and some more pronounced. I could save the sq one for an earlier project. Lou, go with the red ^^^^. My original MP marked XM177E2 barrel does not have a drain hole in the FSB. .Thanks Rob. I have one original no-hole front sight, and several that I've made by welding up the hole and reprofiling/reparking. I'll put the original to use on this build. |
|
|
|
[#38]
Quoted:
Mike, what I'll do is put two blind holes, about .040 or so deep.......one each side of the receiver, slightly off location of where a sear pin hole would be. After anodizing I'll insert pin nubs that are about .045-.050 long into the holes. They look more like a real pin than the engraved circles. Here's a pic of how they look on my Mk18. http://i840.photobucket.com/albums/zz327/T00lmanii/P1206528_zps5f8ade8f.jpg Quoted:
Quoted:
Very nice work. So you are not engraving a fake sear pin hole? Mike, what I'll do is put two blind holes, about .040 or so deep.......one each side of the receiver, slightly off location of where a sear pin hole would be. After anodizing I'll insert pin nubs that are about .045-.050 long into the holes. They look more like a real pin than the engraved circles. Here's a pic of how they look on my Mk18. http://i840.photobucket.com/albums/zz327/T00lmanii/P1206528_zps5f8ade8f.jpg Awesome job on the XM lower thus far. Your M4A1 lower looks just like the real deal |
|
|
|
[#39]
Quoted:
Mike, what I'll do is put two blind holes, about .040 or so deep.......one each side of the receiver, slightly off location of where a sear pin hole would be. After anodizing I'll insert pin nubs that are about .045-.050 long into the holes. They look more like a real pin than the engraved circles. Here's a pic of how they look on my Mk18. http://i840.photobucket.com/albums/zz327/T00lmanii/P1206528_zps5f8ade8f.jpg Quoted:
Quoted:
Very nice work. So you are not engraving a fake sear pin hole? Mike, what I'll do is put two blind holes, about .040 or so deep.......one each side of the receiver, slightly off location of where a sear pin hole would be. After anodizing I'll insert pin nubs that are about .045-.050 long into the holes. They look more like a real pin than the engraved circles. Here's a pic of how they look on my Mk18. http://i840.photobucket.com/albums/zz327/T00lmanii/P1206528_zps5f8ade8f.jpg OK - got it. I have seen that before and it will look great based on your picture! |
|
|
|
[#40]
Stoner - engraving looks great IMO. Love the faux sear pins.
|
|
|
|
[#41]
That looks nice stoner . Has anyone been harassed for the faux sear pin holes?
|
|
|
|
[#42]
Quoted:
That looks nice stoner . Has anyone been harassed for the faux sear pin holes? Ricky. The "pin" that I have in mine is actually 2 pin "nubs". They are about .040 long, which to the unprecise, is less than a 1/16". They are not located in the correct position, so could not be used to locate a "happy pin". In essence, they are no different from a dent or ding that you might find on any receiver. A blind hole .030-.035 deep with a pin nub in it isn't any different from an engraved circle that many use to simulate a pin. That's just my opinion though. On another note.........I made a huge blunder when milling out the fire control pocket. The result of running several machines at the same time. DAMN. It doesn't affect the operation of the lower, but it's cosmetically "junk". I don't know if I'll send it off to be anodized or not. Probably relegate this lower to a "beater". The machine spindle tangled with the receiver tang? (the threaded hoop where the buffer tube screws into. You know how the flat on top of that tang has an angled surface on the rear of it?.......well this one now has a bevel/angle on the front side of it too. Grrrrrrrrrrrrr. I wouldn't mind so much if it were a 45 dollar lower, but this one started life as a NoDak A1 80%er. Did I say damn yet? damn. |
|
|
|
[#43]
Damn! Sorry to hear that. It was a beauty.
|
|
|
|
[#44]
Quoted:
Ricky. The "pin" that I have in mine is actually 2 pin "nubs". They are about .040 long, which to the unprecise, is less than a 1/16". They are not located in the correct position, so could not be used to locate a "happy pin". In essence, they are no different from a dent or ding that you might find on any receiver. A blind hole .030-.035 deep with a pin nub in it isn't any different from an engraved circle that many use to simulate a pin. That's just my opinion though. On another note.........I made a huge blunder when milling out the fire control pocket. The result of running several machines at the same time. DAMN. It doesn't affect the operation of the lower, but it's cosmetically "junk". I don't know if I'll send it off to be anodized or not. Probably relegate this lower to a "beater". The machine spindle tangled with the receiver tang? (the threaded hoop where the buffer tube screws into. You know how the flat on top of that tang has an angled surface on the rear of it?.......well this one now has a bevel/angle on the front side of it too. Grrrrrrrrrrrrr. I wouldn't mind so much if it were a 45 dollar lower, but this one started life as a NoDak A1 80%er. Did I say damn yet? damn. Quoted:
Quoted:
That looks nice stoner . Has anyone been harassed for the faux sear pin holes? Ricky. The "pin" that I have in mine is actually 2 pin "nubs". They are about .040 long, which to the unprecise, is less than a 1/16". They are not located in the correct position, so could not be used to locate a "happy pin". In essence, they are no different from a dent or ding that you might find on any receiver. A blind hole .030-.035 deep with a pin nub in it isn't any different from an engraved circle that many use to simulate a pin. That's just my opinion though. On another note.........I made a huge blunder when milling out the fire control pocket. The result of running several machines at the same time. DAMN. It doesn't affect the operation of the lower, but it's cosmetically "junk". I don't know if I'll send it off to be anodized or not. Probably relegate this lower to a "beater". The machine spindle tangled with the receiver tang? (the threaded hoop where the buffer tube screws into. You know how the flat on top of that tang has an angled surface on the rear of it?.......well this one now has a bevel/angle on the front side of it too. Grrrrrrrrrrrrr. I wouldn't mind so much if it were a 45 dollar lower, but this one started life as a NoDak A1 80%er. Did I say damn yet? damn. I'll trade ya two fresh 80%'ers for it! OR just pick it out of your garbage can! My drill press hog job is so friggin hideous it can't be shown on ARFcom because it would be considered obscene! Works just fine and as long as you don't break it down you can't see it! |
|
|
|
[#45]
well.........here it is. What do you guys think.......go ahead and anodize it and use it? Just paint it and use it as a beater? Should I see if it is true that you can't Tig 7075........got a guy at work (welder) that can work magic on stainless and aluminum. He really is the best Tig'er I've ever known. I thought about taking another 80%'er and let him "test" on the area that gets milled out for the fire control pocket.


|
|
|
|
[#46]
Quoted:
well.........here it is. What do you guys think.......go ahead and anodize it and use it? Just paint it and use it as a beater? Should I see if it is true that you can't Tig 7075........got a guy at work (welder) that can work magic on stainless and aluminum. He really is the best Tig'er I've ever known. I thought about taking another 80%'er and let him "test" on the area that gets milled out for the fire control pocket. http://i840.photobucket.com/albums/zz327/T00lmanii/P2100041_zpspgef3zkm.jpg http://i840.photobucket.com/albums/zz327/T00lmanii/P2100039_zpsrn0xbqg9.jpg Heck, I think it still looks great! If you find you can't live with it, I'd gladly buy it off you for the beater carbine I'm building. |
|
|
|
[#47]
Not even noticeable with charging handle in place. I would go ahead with it if it is perfect otherwise
|
|
|
|
[#48]
I'd vote to anodize & use. Can you mill a small dovetail & press-fit a piece in there to fill the chamfer? I'll bet it's barely noticeable as-is, especially after finishing.
|
|
|
|
[#49]
That's a nicely mottled counter top, btw!
|
|
|
|
[#50]
OMG! I just threw up in my mouth!
Anodize the dayum thing ya anal retentive OCD zealot! Ya can't even see it with the CH on it! JEEZ! Or just throw it away. |
|
|
 Win a FREE Membership!
Sign up for the ARFCOM weekly newsletter and be entered to win a free ARFCOM membership. One new winner* is announced every week!
You will receive an email every Friday morning featuring the latest chatter from the hottest topics, breaking news surrounding legislation, as well as exclusive deals only available to ARFCOM email subscribers.

AR15.COM is the world's largest firearm community and is a gathering place for firearm enthusiasts of all types.
From hunters and military members, to competition shooters and general firearm enthusiasts, we welcome anyone who values and respects the way of the firearm.

Subscribe to our monthly Newsletter to receive firearm news, product discounts from your favorite Industry Partners, and more.
Copyright © 1996-2024 AR15.COM LLC. All Rights Reserved.
Any use of this content without express written consent is prohibited.
AR15.Com reserves the right to overwrite or replace any affiliate, commercial, or monetizable links, posted by users, with our own.