|
[#1]
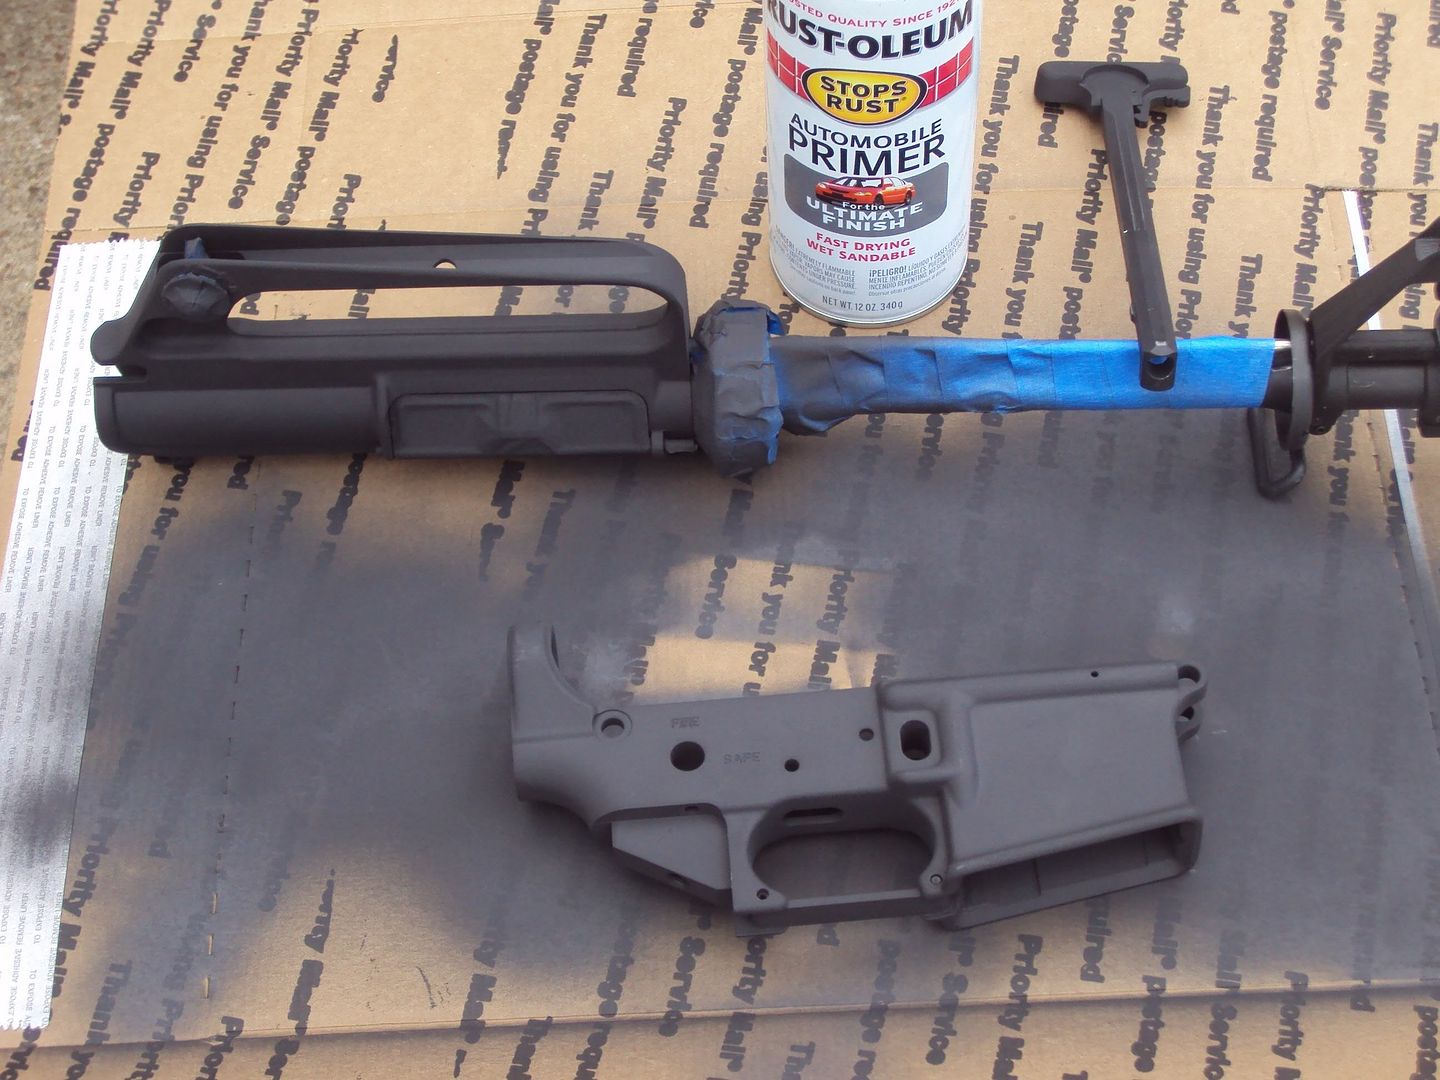
Norelles moly resin in grayish black flat is some very good stuff for this, you airbrush it on and then heat it to 300 degrees for about an hour. Theres also rustoleum dark gray primer if you are going on the cheap. Personally, go with the Norrelles, you won't be sorry.
Just let it cure for awhile before assembling it, like I didn't do |
|
|
|
[#2]
Quoted:
Hello Guys, I want to go ahead and put together my 603 clone with a commercial lower until NDS lower receiver supply becomes more ready available. Currently my lower is a standard PSA black anodized and the upper shows the normal grade 2 parts kit wear. Granted I don’t want to dump a lot of money in sending them off to have coated by a professional when the lower receiver will be change out in time to come. What type of DIY coating will give both the upper & lower receiver a nice, as close as I can get Colt XM gray finish? Like a said eventually I want to have this build on a NDS engraved & coated lower but until then I don't see dropping the extra money. The search function has yield me nothing..... Norrell's all the way !!! Norrell's Here's an SP1 with a commercial A2 lower - Before 
And After 
Here's a 603 From APEX gun parts 
All were done in Greyish Black Flat......they also have the lighter XM Grey |
|
|
|
[#3]
Edit Thanks for the pictures......
|
|
|
|
[#4]
Mr Cold please share the process that you used prior applying the coating.
|
|
|
|
[#5]
Norrells is the way to go, check out the site.
http://www.molyresin.com/ 
Here is a good how to http://www.weaponevolution.com/forum/showthread.php?176-Refinishing-AR15s-with-Norrells-Moly-Resin |
|
|
|
[#6]
If you don't have access to an air brush, I like Rustoleum grey auto primer. I have found it is pretty tough, and holds up to oil and wear. Best is to wash the parts in a dishwasher to totally degrease. It works well on black charging handles and black trigger guards, also.
|
|
|
|
[#7]
Quoted:
If you don't have access to an air brush, I like Rustoleum grey auto primer. I have found it is pretty tough, and holds up to oil and wear. Best is to wash the parts in a dishwasher to totally degrease. It works well on black charging handles and black trigger guards, also. http://i247.photobucket.com/albums/gg134/imarangemaster/Pstart.jpg Post some pictures of your gun once you have it back together..... |
|
|
|
[#8]
great post/info hear fellas. I've been wondering the same thing as I just ordered a black NDS A1 lower(as I am too impatient to wait for the XM grey finish version).
Only real question I have is will the norrels hurt/cover engraving? I was thinking of sending the lower out to get classic colt markings. should I do it before or after the finish job? I'll need to hit up my upper, lower, barrel and buffer tube. While on the topic of painting, anyone know if you could do a glossy black on a fiberlite CAR stock that would mimic the alluminum version? |
|
|
|
[#9]
Quoted:
great post/info hear fellas. I've been wondering the same thing as I just ordered a black NDS A1 lower(as I am too impatient to wait for the XM grey finish version). Only real question I have is will the norrels hurt/cover engraving? I was thinking of sending the lower out to get classic colt markings. should I do it before or after the finish job? I'll need to hit up my upper, lower, barrel and buffer tube. While on the topic of painting, anyone know if you could do a glossy black on a fiberlite CAR stock that would mimic the alluminum version? In my limited experience , norrells doesn't hurt the Engravings . I have a rifle I just shot with the norrells semi gloss black I'll take a pic of it next to my xm stock when I get home. ,,,, from the hell They call ... The circus !!! |
|
|
|
[#10]
If anyone viewing has a picture of the Norrell flat gray please post it up. Only reason I'd like to see it is because the Grayish black looks a tad dark.
And for sure to the above question.....Get it engraved before recoating. One last thing....I'm guessing an 8oz bottle should be plenty to take care of a one gun project??? |
|
|
|
[#11]
I've used DuraCoat on other, non AR projects and it has held up well. Color match to XM gray could be an issue though. No baking with DuraCoat, but I found letting it sit two weeks before touching makes a world of difference.
|
|
|
|
[#12]
Quoted:
I've used DuraCoat on other, non AR projects and it has held up well. Color match to XM gray could be an issue though. No baking with DuraCoat, but I found letting it sit two weeks before touching makes a world of difference. I just sprayed a TT-33 frame the other day for a two tone project with duracoat. I'm gunna let it sit a month before I re-assemble it. Happy so far, but duracoat's pics online and the actual colors are so far off I'm scared to try and pick one. I ll likely go with the Norrels. The TT frame. 
|
|
|
|
[#13]
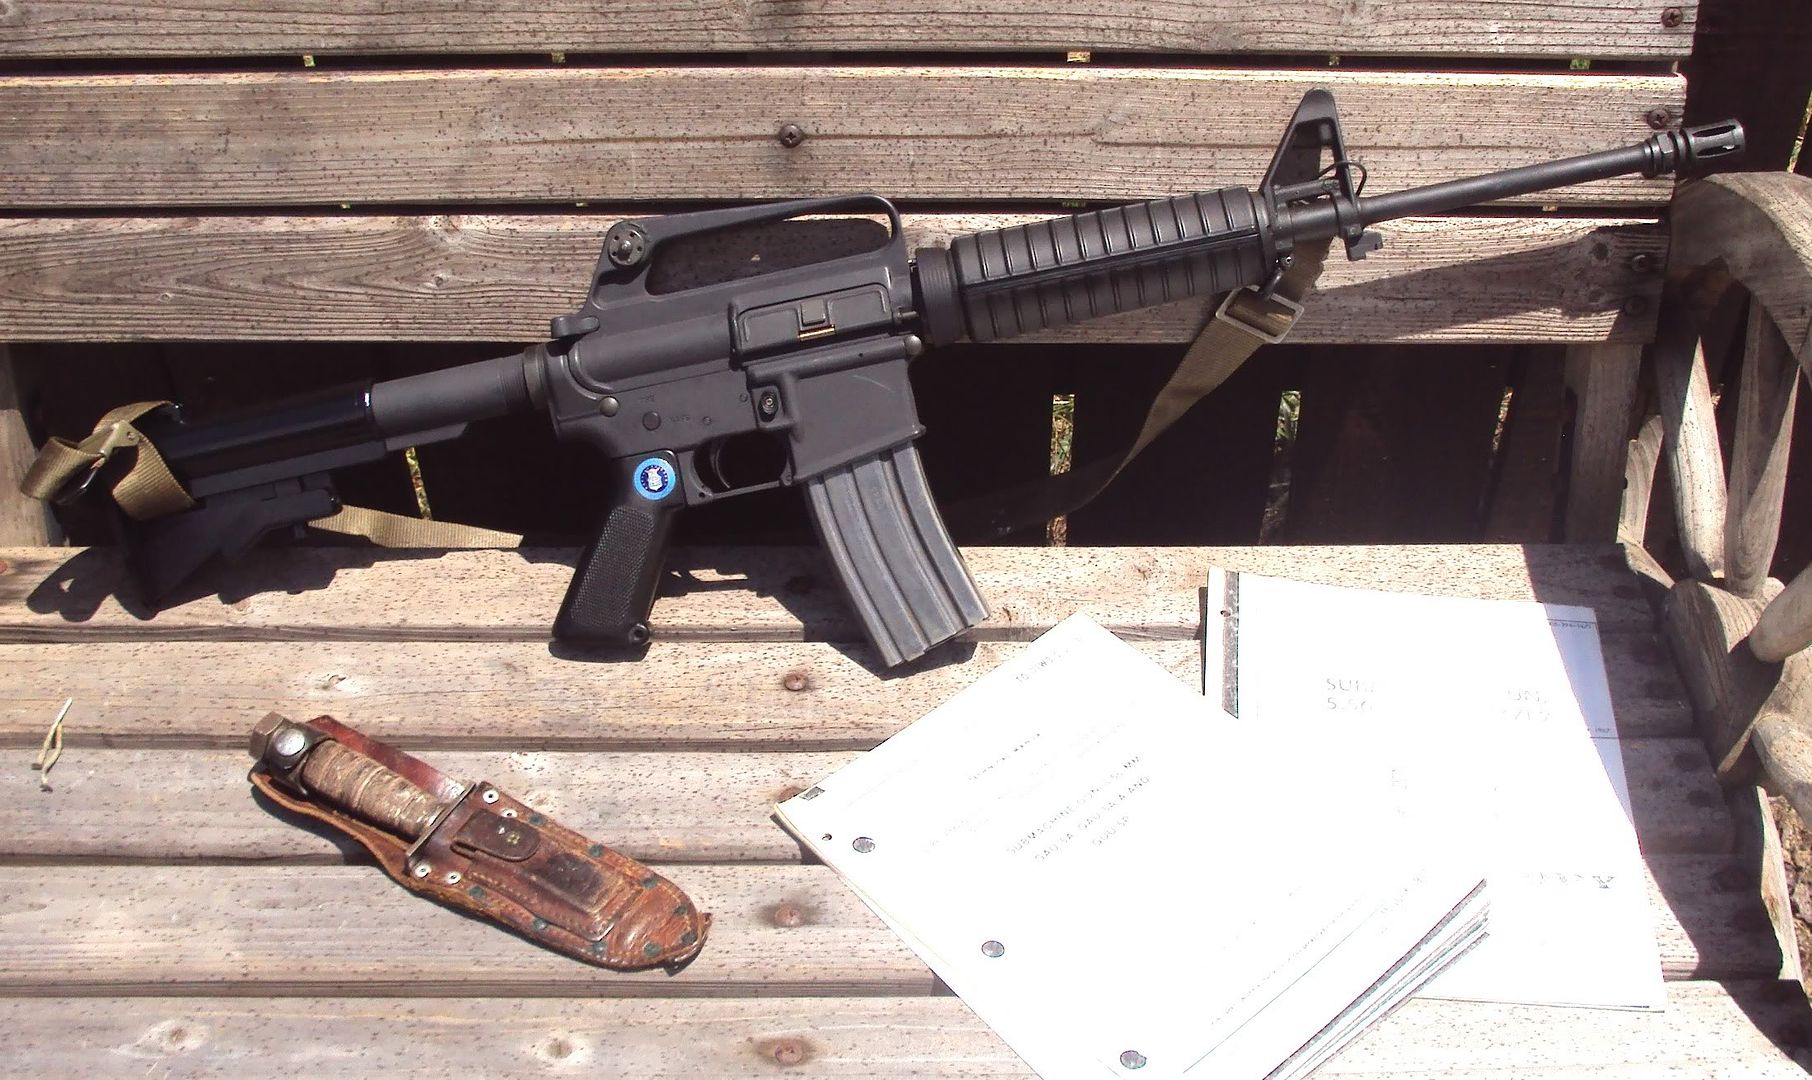
Here's the finished piece with rustoleum...
|
|
|
|
[#14]
Here is a pic of my beater rifle I finished in
Semi gloss black , and my aluminum xm stock. You can see the differance. . But my stock is not a colt And they seem to be more shiney than mine. 
And ya a 8 oz bottle will do one rifle , it should easily do two |
|
|
|
[#15]
Actually that looks very nice but I really don't think a sandable primmer will hold up, just basing that off of my auto body experience. Now if that was a non-sanding epoxy primmer it would be another story.
|
|
|
|
[#16]
I oiled the primer with CLR and it seems fairly tough. It has yet to wear or scratch. YMMV, but it has held up for me.. Not cerrokote, but easier to use!
|
|
|
|
[#17]
Quoted:
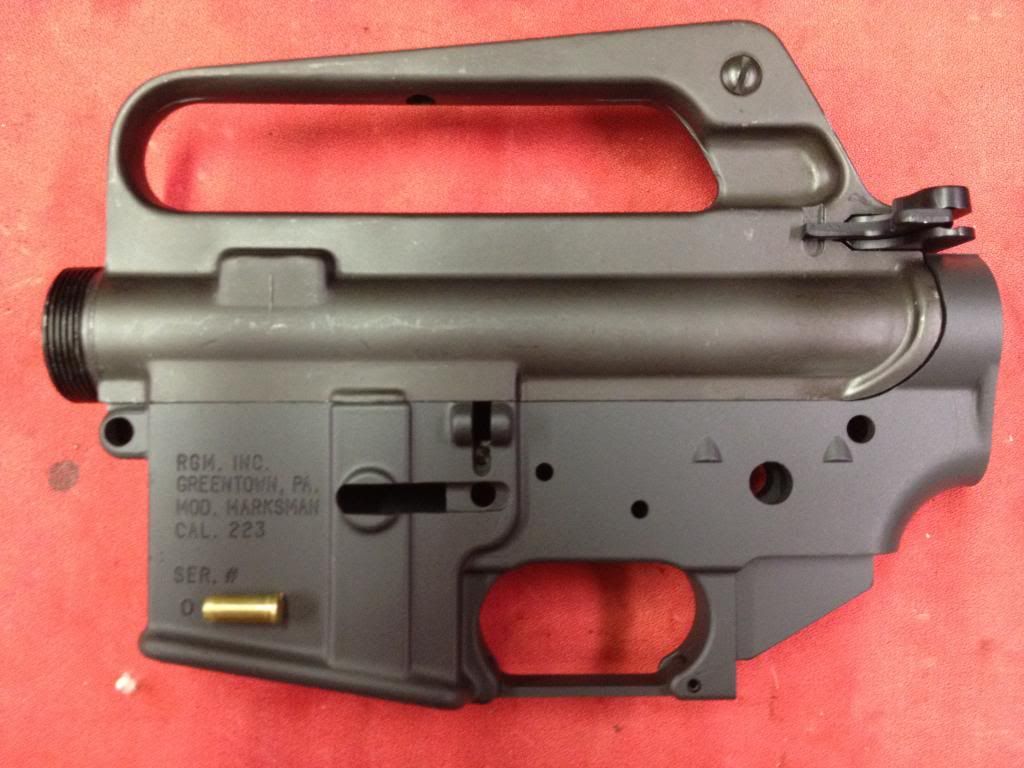
If anyone viewing has a picture of the Norrell flat gray please post it up. Only reason I'd like to see it is because the Grayish black looks a tad dark. And for sure to the above question.....Get it engraved before recoating. One last thing....I'm guessing an 8oz bottle should be plenty to take care of a one gun project??? Upper on left is Norrelles grayish flat black, upper on right is factory Colt anodizing. The Norelles actually came out a touch lighter, both are gray. 
A pic of the anodized upper in better lighting. This is the same upper, note the wear patterns. 
Black upper on a grayish black flat lower for comparison. 
|
|
|
|
[#18]
Quoted:
Mr Cold please share the process that you used prior applying the coating. Prep is key. Disassemble both receivers. Next, degrease. I use genuine imitation Simple Green from the dollar store. Let them soak and brush with a stiff bristle brush. You can also use an aerosol degreaser to get in hard to reach areas, like the dust cover latch. After degreasing thoroughly, put all parts in MEK ( $20.00 a gallon at Lowes ). You can blow the parts off with air to dry them faster. Next, I use a toaster oven to pre heat parts at about 200 degrees. Shake Norrell's thoroughly to mix moly resin. I put the bottle in hot water to warm it. Have a blow dryer handy to rewarm parts in between coats. Next to spray. I set my regulator to 35 lbs. I have a Badger air brush I bought from Amazon. Hook the air hose directly to the regulator on your compressor so as not to lose too much pressure in the line. Pour Norrell's in the air brush jar, and test spray. I'm right handed, so I wrap some masking tape around my left thumb and index finger, to remove hot parts from the toaster oven. Start spraying. Don't use very heavycoats. It's better to do 5-6 light coats. Remember to shake the air brush jar in between spraying, to keep everything mixed. NOTE: there is an air vent hole where the jar screws in, so you have to put your finger over the hole while shaking. When done with all the parts, hang and let dry. Pre heat your over to 300 degrees. Bake all parts for 1 hour. This stuff stinks, so do it when your significant other is not at home. When done, remove the parts and let cool. After they cool off, spray with Rem oil, or equivalent..........that's it !!! Oh yea, re-assemble rifle and have fun...... |
|
|
|
[#19]
Hey Guys,
Got the Norell's Grayish Black ordered. I was just wondering could I coat the upper with the forward assist in place? |
|
|
|
[#20]
Quoted:
Hey Guys, Got the Norell's Grayish Black ordered. I was just wondering could I coat the upper with the forward assist in place? I wouldn't, but if you have to...tape it off so it doesn't get paint on it. They look stupid painted....makes the paint job look sloppy IMHO. |
|
|
|
[#21]

Norrell's Gray Black Moly Resin on lower, original anodizing on the upper. The color match is so good, it's scary. Some uppers get a green tint from being stored in cosmoline. You can "tune" the Norrell's to match that color by baking at 350 instead of 300. Put it in for an hour...after that, take it out occasionally to check for color. When it's the right color, it's done. The directions are on the bottle and are almost foolproof. Don't let the dark color scare you...it dries the correct color. And, I'd remove the forward assist. Mine came with a round FA knob and I had to swap in an original style teardrop. It isn't a hard job. I drifted the roll pin out with a nail flattened on one end, and put it back in using a piece of brass rod as a punch. Used the same roll pin, too. Took about 10 minutes total. Need to remember, though, that the Moly Resin MUST go in the oven to cure. I pre-cleaned by boiling my lower in water and just a touch of soap. Rinsed well, wiped with a clean rag, straight in the oven to dry and preheat. Took it out and shot it with this: Preval One Time Use Sprayer Cheap and easy. Took me about two hours, including oven time. Easy to do and worth the extra effort. EDIT: A good trick is to use a long piece of allthread screwed into the handgrip threads to use as a handle by which you can hold the lower when painting. |
|
|
|
[#22]
Thanks for all the replies.....
I currently have the forward assist out but it is showing some signs of rust and I thought of adding a little color to it as well is why I asked. I'm not sure what the original finish of the forward assist was? So that seems to be the next question.......What color or finish should the tear drop FA be? |
|
|
|
[#23]
Mine is a dark gray/black color, but not quite the same shade as the upper. It seems to be a blued finish rather than parkerized, but mine is aftermarket, so yours may be different.

Hit that baby lightly with some steel wool and oil it up. Steel wool shouldn't strip the finish, but you might want to "test in an inconspicuous area". If the rust isn't too bad, it should be good to go. |
|
|
|
[#24]
I swear by the Rustoleum Sandable Dark Grey Primmer. All three are kits on Black A2 Lowers painted with rustoleum. They one on top has CLP on it after drying after about a week. I think it looks pretty good. Much better than black on grey! Works well till the NDS16A1s arrive. The top lower is a EA and the two bottom are Anderson MFG. I degreased em reaal good with engine degreaser and then blasted them with 3 coats. Great thing its cheap and if you scratch it you can spray over it.


|
|
|
|
[#25]
Quoted:
I oiled the primer with CLR and it seems fairly tough. It has yet to wear or scratch. YMMV, but it has held up for me.. Not cerrokote, but easier to use! What exactly is CLR? Do you mean CLP or this stuff? http://www.jelmar.com/CLRbasic.htm |
|
|
|
[#26]
Hey guys, I'm looking to spray my stripped lower with custom engraving from Ident Marking...I'm trying to figure out if anybody sprayed their lowers with the Norrell's Moly Resin or the Rustoleum Dark Grey Auto Primer and noticed that engravings got filled in. I'm hoping to use the Rustoleum and I'm worried that on my lower, the primer might fill in the relatively shallow Ident Marking engravings (which look sweet btw lol). If anybody thinks it would then how about with the Norrell's? Thanks guys!
|
|
|
|
[#27]
I sprayed my Mckay lower with the Rustoleum and the roll marks were not filled. I cannot comment on the moly resin though.
|
|
|
|
[#28]
The Molly resin didn't fill any of the markings on my lower and I ended up sanding the upper & lower down twice spraying them a total of 3 times before I got the finish I wanted. I have to say I did have a little learning curve on how to get the best results with the molly.
A light mist.... not coats and I think it's better to heat the parts more so that it dries as soon as the molly hits the part. (On my last spray I heated parts to 300* & reheat to 300* as needed to maintain temp of parts) Granted I'm very picky as my other hobby/passion is paint & body of show cars. |
|
|
|
[#29]
Thought I'd post up my DuraCoated lower for example. I wanted it to be off a little from my original 604 upper (black posts) to look a little more realistic. I mixed Colt gray with park green. 1/4 to 3/4 mix. It is freshly coated and un-oiled at this point, but I'm happy with this result at this point.
|
|
|
|
[#30]
Norrell's is on the way for my refinish job. Looking for an opinion on this sprayer. Badger Is this a good option for application or is there a better route?
|
|
|
|
[#31]
I wonder if cerakote has anything close or if they would make a XM gray.
|
|
|
|
[#32]
I used an automotive "touch-up" gun for excellent results.

This was finished with Dura Coat shot with the touch-up gun... 
|
|
|
|
[#33]
Ive used the automotive touch up gun also. It wastes a lot of paint. I highly recommend the airbrush,s (just have to thin the moly-resin 1st)
|
|
|
|
[#34]
With correct air-pressure, pattern size, and thinning there is not that much waste. 2oz of Dura Coat was more than enough to put several coats on a lower.
|
|
|
|
[#35]
How do you like the color match of the DuraCoat? I found it a little dark when using it with an older upper. I added a little park for that green tint, but may mix in a little white next time to lighten it up. I always use an airbrush wilth DuraCoat and fog the final coat.
|
|
|
 Win a FREE Membership!
Sign up for the ARFCOM weekly newsletter and be entered to win a free ARFCOM membership. One new winner* is announced every week!
You will receive an email every Friday morning featuring the latest chatter from the hottest topics, breaking news surrounding legislation, as well as exclusive deals only available to ARFCOM email subscribers.

AR15.COM is the world's largest firearm community and is a gathering place for firearm enthusiasts of all types.
From hunters and military members, to competition shooters and general firearm enthusiasts, we welcome anyone who values and respects the way of the firearm.

Subscribe to our monthly Newsletter to receive firearm news, product discounts from your favorite Industry Partners, and more.
Copyright © 1996-2024 AR15.COM LLC. All Rights Reserved.
Any use of this content without express written consent is prohibited.
AR15.Com reserves the right to overwrite or replace any affiliate, commercial, or monetizable links, posted by users, with our own.


