|
Posted: 6/5/2011 3:58:14 PM EDT
[Last Edit: BIGGDAWG]
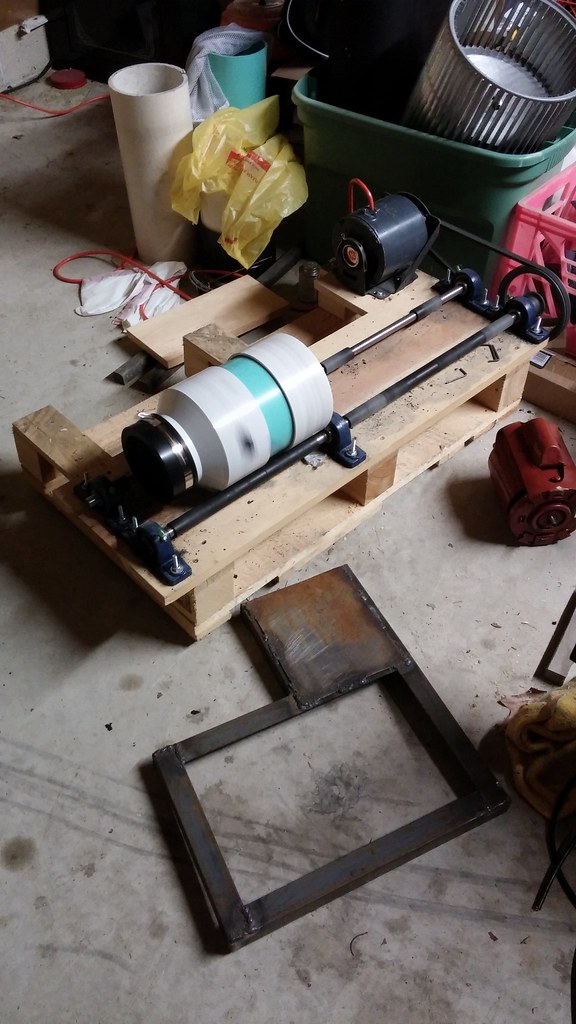
I thought i would post some pictures up of my build. After seeing all the shiny brass guys are posting I decided I wanted to
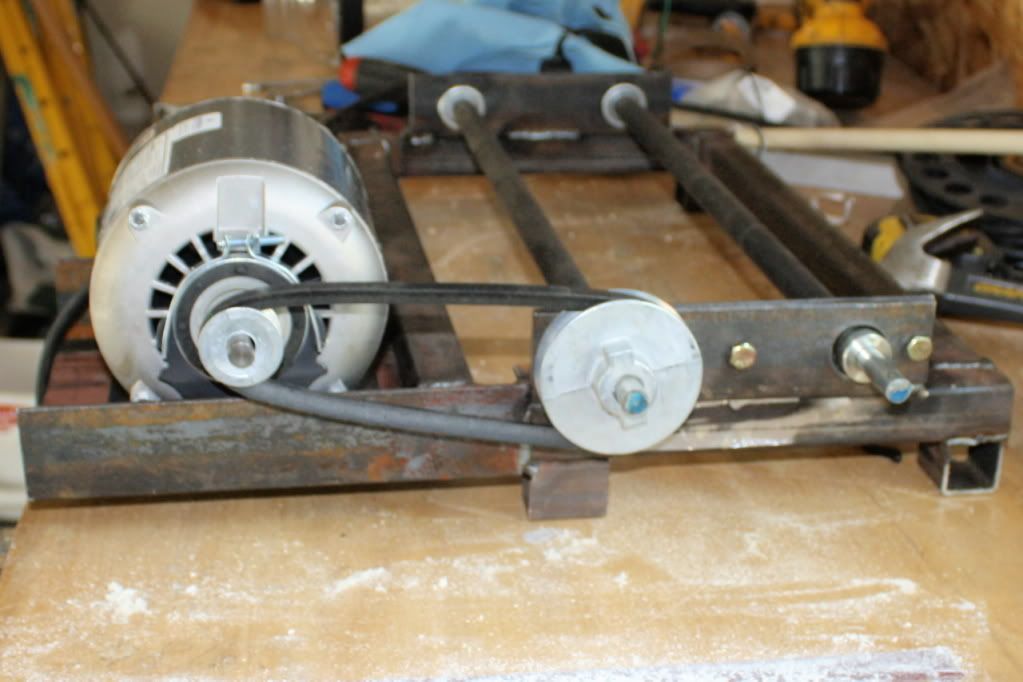
go to the wet tumbling method with stainless media but i didn't want to pay 180 for a tumbler and i wanted to be able to tumble more cases at one time than the thumler tumbler. So i decided to build my own. I did research and found some pictures of others that had build their own. I had some scrap metal laying around my shop so i drew up some plans and welded some 1 1/4" square tubing for my base. I used 2" angle iron for the bearing supports. I used a hole saw to cut the 1 3/8" holes for the bearings. on the one end i tack welded the bearings in. on the other end i made a piece of flat steel and cut 1 1/8" holes in it to hold the bearings in so you could remove and install the shafts after the rubber hose was put on the shafts. Speaking of that i used some 1/2" heater hose to cover the drive shafts and give some grip. this is the up dated parts list for newest design 

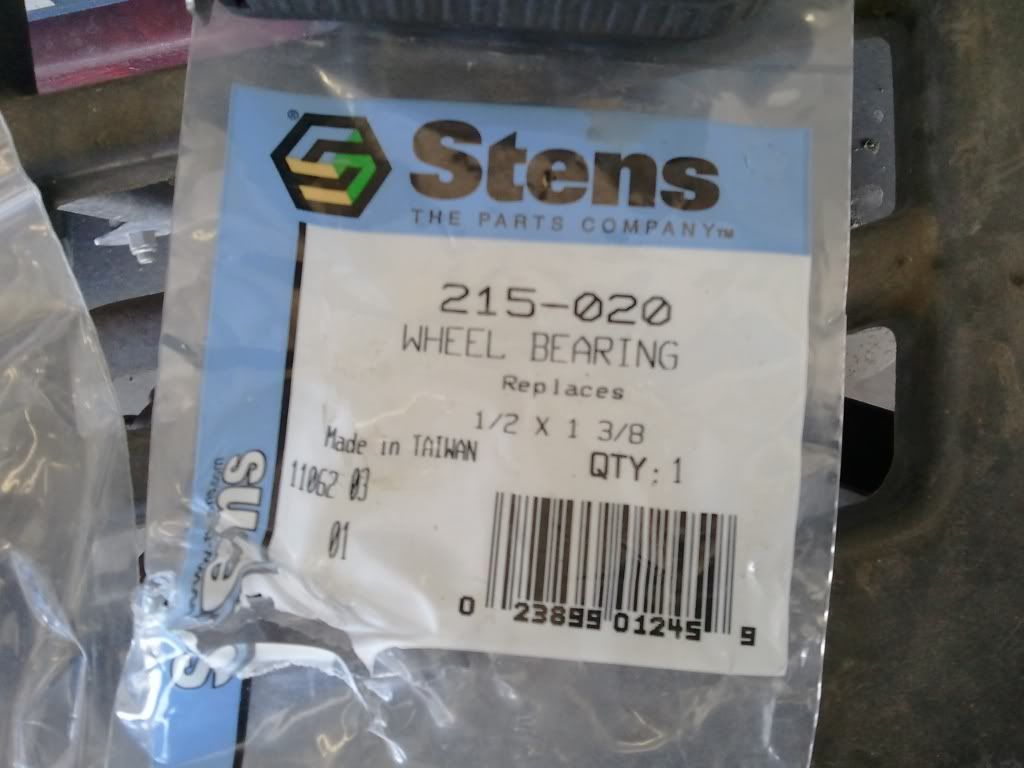
edit on 10-5-12 adding parts list for most up to date design This should be the list for the frame. if you want the 6" drum stuff i will have to dig that up but it is 6" sdr 35 sewer pipe with a 6" cap and a 6-4 inch reducer with 4" flex cap reducer at lowes http://www.lowes.com/pd_182570-676-6P07_4294765356__?productId=3609256&Ns=p_product_qty_sales_dollar|1&pl=1¤tURL=%3FNs%3Dp_product_qty_sales_dollar%7C1&facetInfo= cap at lowes http://www.lowes.com/pd_122863-676-6P06_4294765356__?productId=3575136&Ns=p_product_qty_sales_dollar|1&pl=1¤tURL=%3FNs%3Dp_product_qty_sales_dollar%7C1&facetInfo= 4" rubber cap is an american valve flexible cap part number RPC 100 1.7 foot 1 ¼” square tubing 2.1 ––1/8 to3/16 flat plate steel 6.5x7 inches 3.4 – half inch pillow block bearings http://www.ebay.com/itm/NEW-High-Quality-1-2-Set-Screw-Pillow-Block-Bearing-UCP201-08-/271046997616?pt=LH_DefaultDomain_0&hash=item3f1ba8f670 4.2—1/2 inc zinc plated rods –– I buy 36” and cut to size like this http://www.homedepot.com/h_d1/N-25ecodZ5yc1v/R-202183547/h_d2/ProductDisplay?catalogId=10053&langId=-1&keyword=zinc+rod&storeId=10051#.UG7Nypjqss0 5.40 “ of ½” heater hose 6.8—3/8x2 ½ bolts 7.2 – ¼”x3 ½ bolts 8.4—5/16x1 bolts 9.12 – 5/16 flange nuts 10.8 – 3/8 flange nuts 11. 4 – ¼ nuts 12.2 – 1/4x3/4 bearings like these http://www.ebay.com/itm/2-R4A-2RS-Premium-seal-bearing-1-4-x-3-4-x-9-32-ABEC3-C3-R4A-RS-bearings-/140687183130?pt=LH_DefaultDomain_0&hash=item20c19c0d1a 13.1 – 3k771 dayton ¼ hp electric motor 14.1 – A21 belt 15.1 – 4” pulley for ½” shaft http://www.amazon.com/gp/product/B00004RAOS/ref=oh_details_o04_s00_i01 16.1 – 1 ½” pulley for ½” shaft http://www.amazon.com/gp/product/B00004RAO2/ref=oh_details_o04_s00_i00 17.4 –– rubber feet http://www.ebay.com/itm/250847857418?ssPageName=STRK:MEWNX:IT&_trksid=p3984.m1497.l2649 here is the frame rough drawing 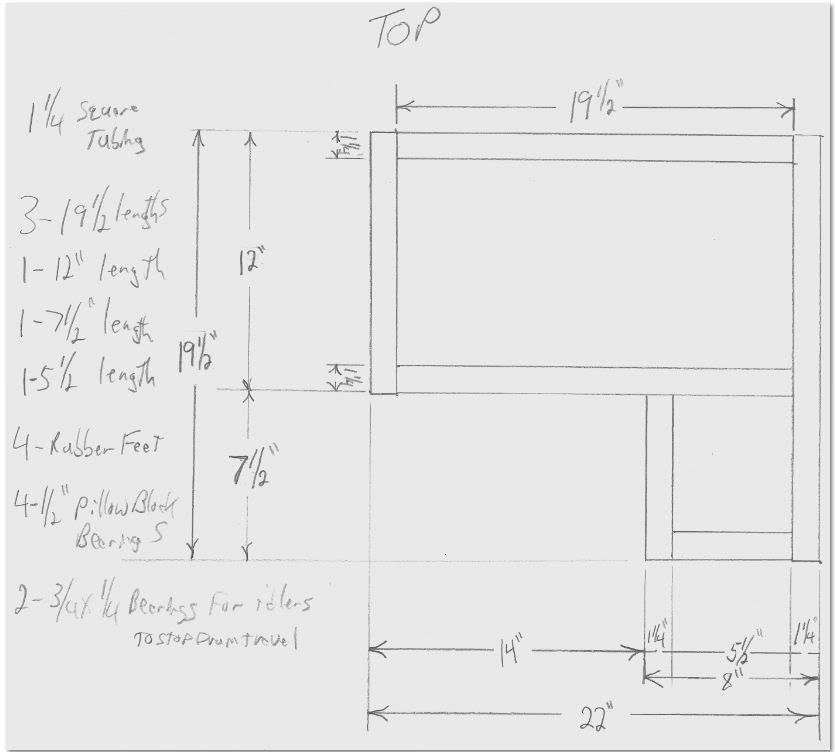
Rough bill of materials: Emerson 8000 1/4hp electric motor $78 A19 V-belt $3.25 4 –– 152-08005 nova set collars $2.00 each $8 total 4 –– 215-020 stens wheel bearings 1/2" x1 3/8" $2.50 each $10.00 total 2 –– 1/2" zinc plated steel shafts 36" long $5.00 each $10 total 1 –– 1 1/2" aluminum pulley $3.50 1 –– 3" aluminum pulley $4.25 4 foot 1/2" heater hose 2 inch angle iron as needed 1 1/4" square tubing 7"x7"x 1/8" piece of flat steel Edited to add –– With all the questions i have had. here is a link that i used to calculate my rpms. you can play with it and figure out what you need i shoot for 60-80 rpm the thumler is 30 rpm from what i remember. rpm calculator I started taking pictures late so here are the first pics from after i got the frame welded together. 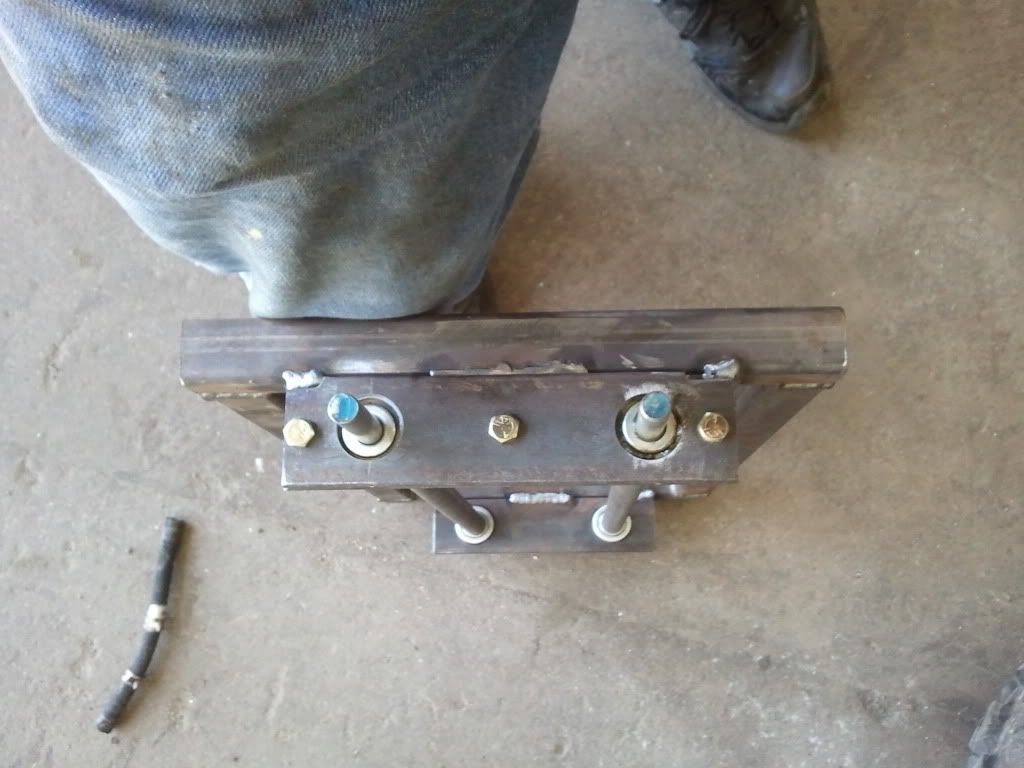
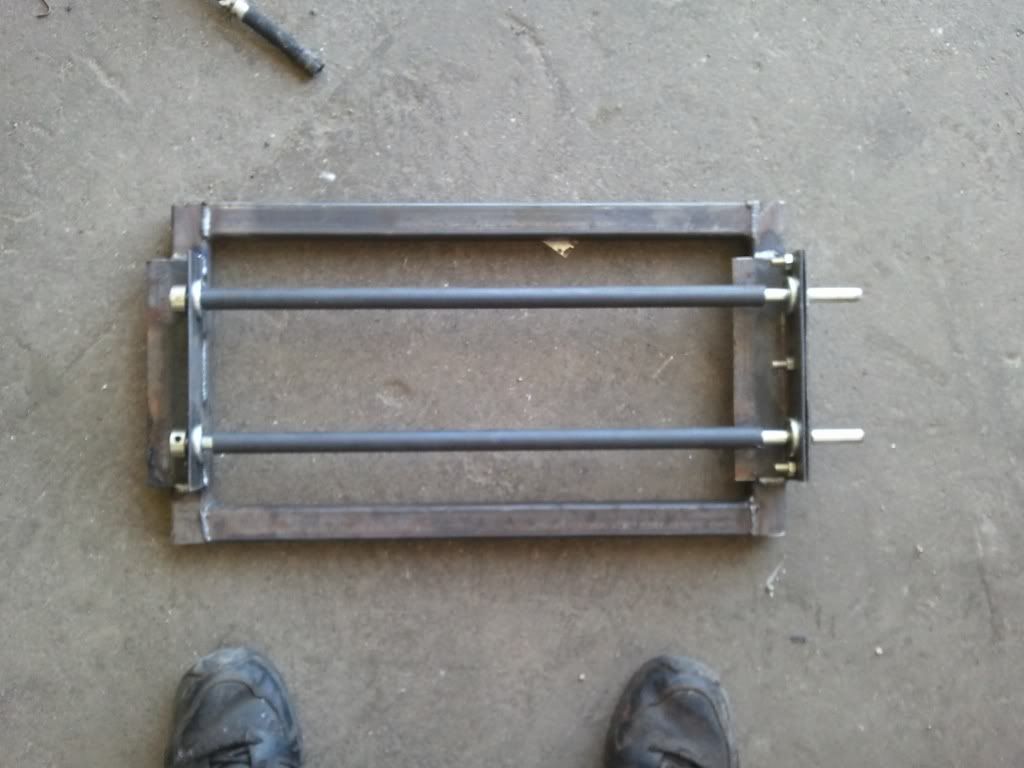
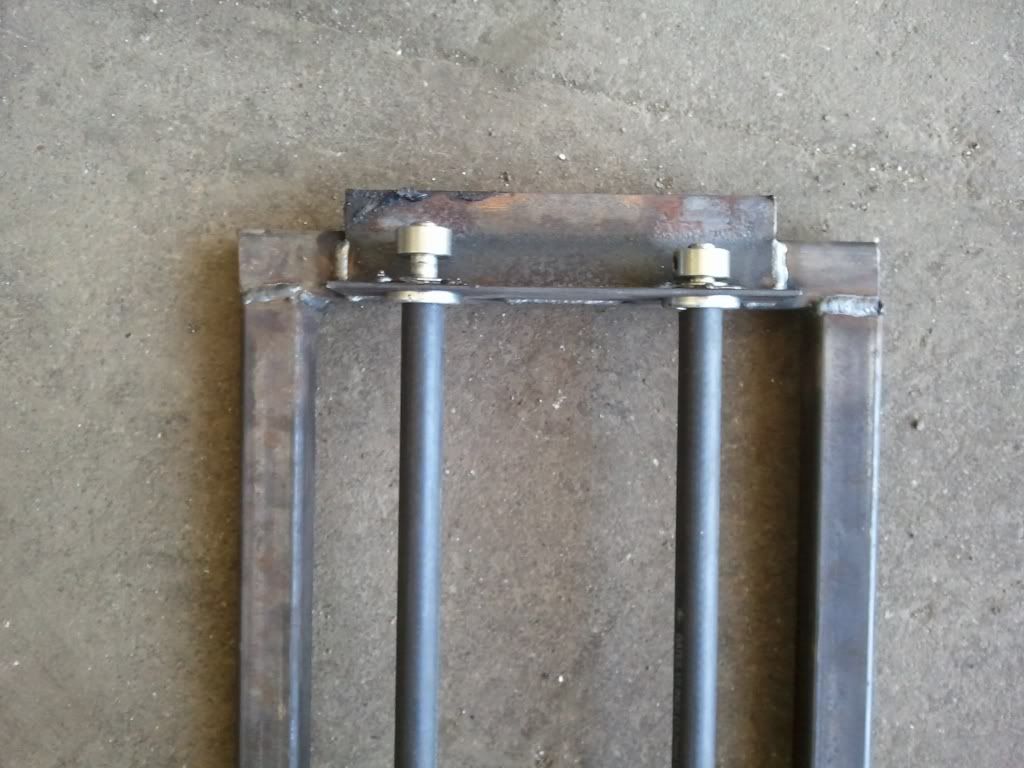
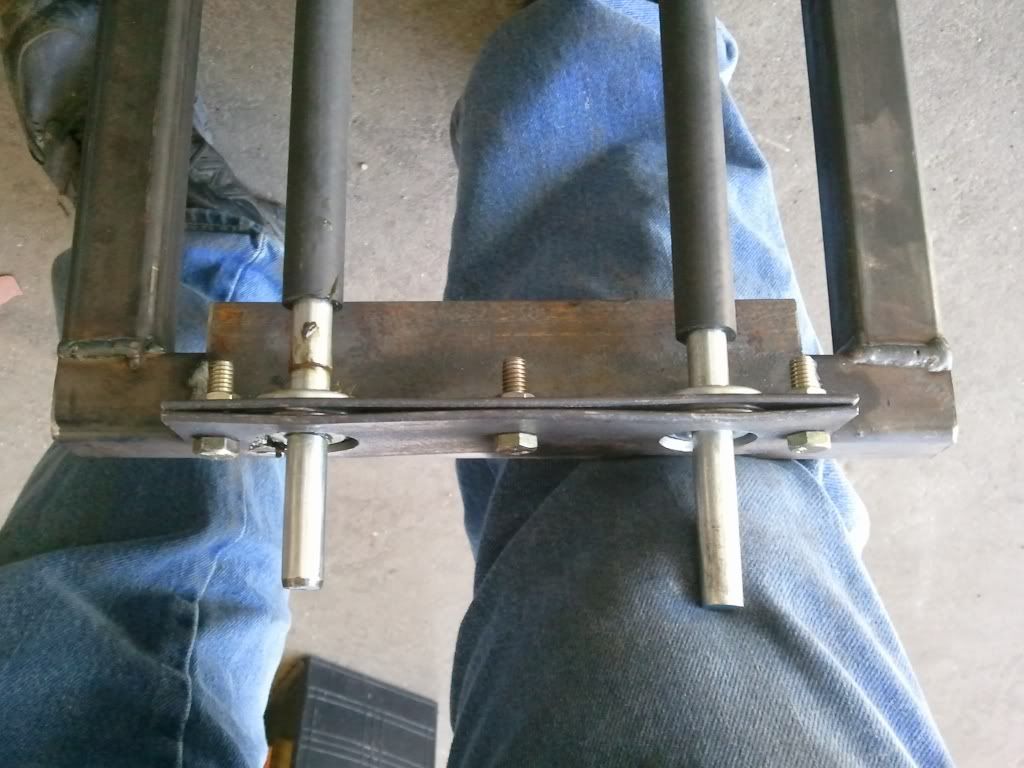
here are the bearings and collars I used. i also purchased 2 - 36" 1/2" zinc plated steel rods for the shafts 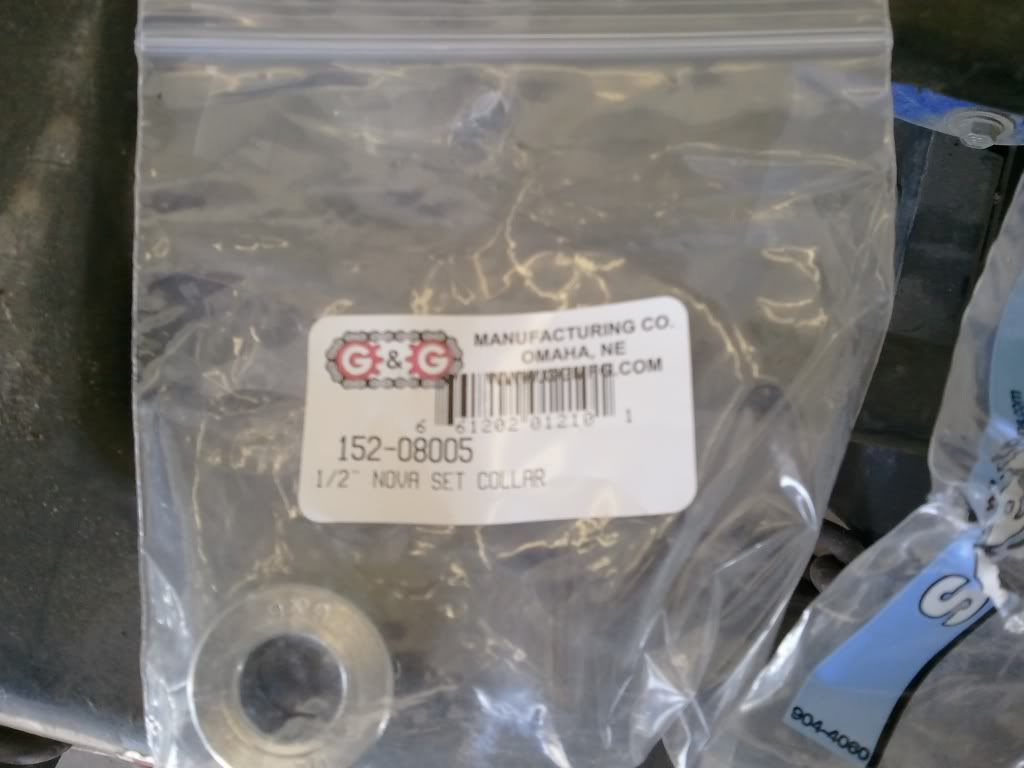
This is the electric motor i used. i picked it up on sale at my local blain's farm and fleet for 78 bucks Also pictured is the belt i used from my norby's farm fleet. the pulleys used are a 1 1/2" pulley for a 1/2" shaft and a 3" for a 1/2" shaft 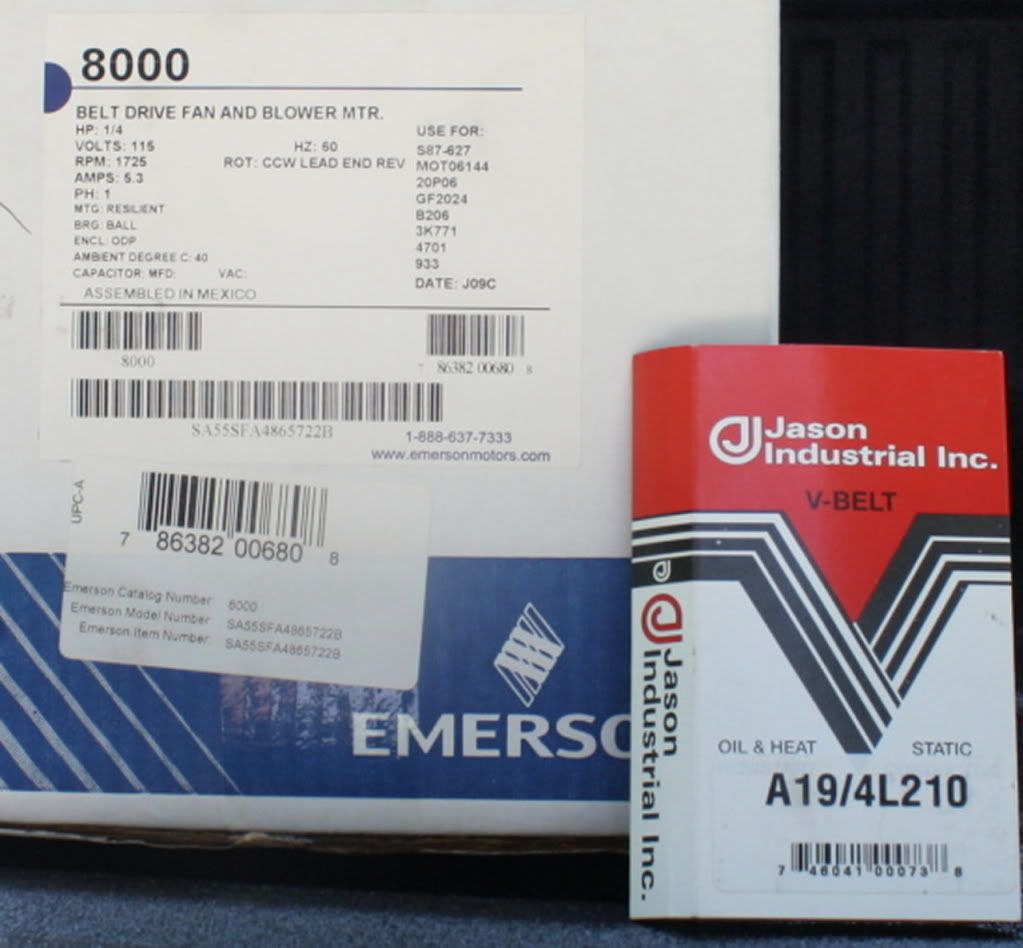
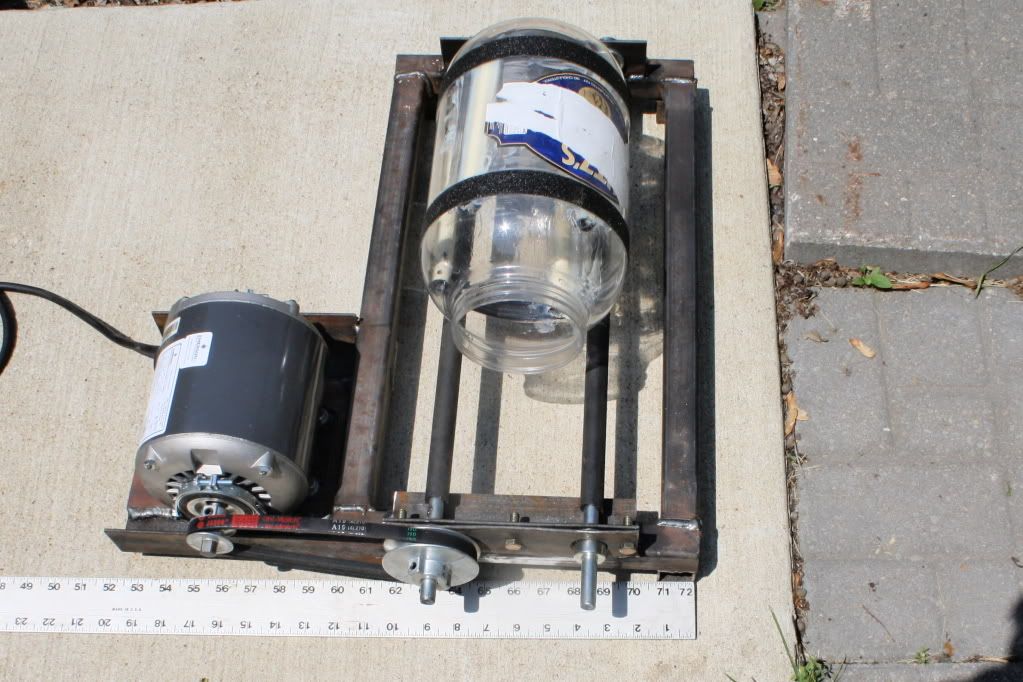
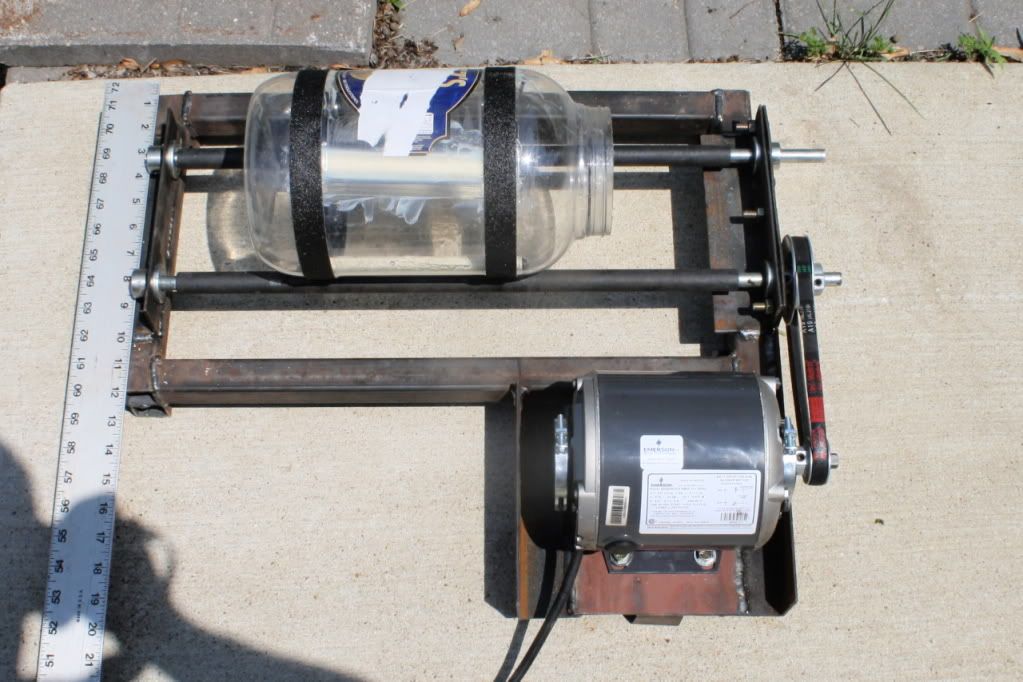
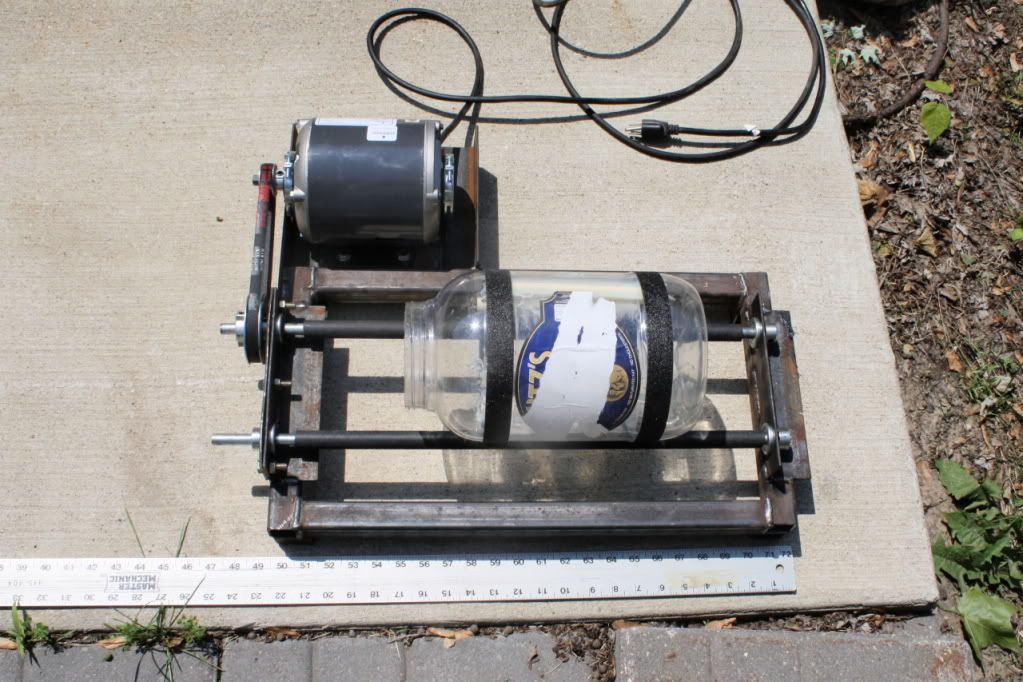
Here are the final pictures with a ruler in place to give an idea of demensions. 
|
|
|
|
TX, USA
|
[#1]
Originally Posted By fritz-er:
FWIW - I think this is reference to retro-fit of older commercial sewing machines. My dad's 1960 or earlier Singer has a fractional HP motor. When switched "on" that motor runs at full speed the entire time. The foot treadle operated a solid rod to a slip clutch arrangement on the motor shaft. The harder you pressed down - the more the clutch engaged for the sewing speed. The motor would hum all the time drawing power - sewing or not. Just some useless trivia..... Originally Posted By fritz-er:
Originally Posted By Vinny302:
No noise or vibration when machine is not running. Draws minimal electricity when machine not running. Duh...really Vince FWIW - I think this is reference to retro-fit of older commercial sewing machines. My dad's 1960 or earlier Singer has a fractional HP motor. When switched "on" that motor runs at full speed the entire time. The foot treadle operated a solid rod to a slip clutch arrangement on the motor shaft. The harder you pressed down - the more the clutch engaged for the sewing speed. The motor would hum all the time drawing power - sewing or not. Just some useless trivia..... That makes a little more sense. I remember my Mom's old sewing machine doing just that. Thanks Vince |
|
|
TX, USA
|
[#2]
Originally Posted By flybyjohn:
Nice fabricating work, gonna be a great machine. Vince |
|
|
MT, USA
|
[#3]
Project update: The chain drive was a bust. The motor speed seams just a little too fast for that narrow of a chain. It runs for a while and then throws the chain. I tried aligning everything several times and adjusting the tension to different tension levels and it still is not reliable enough for me to leave it alone. It also is noisy. I have gone to pulleys and as soon as I get the right size belt, I will be tumbling tonight. I had to make a pulley for the motor because I couldn't find a small enough one in a 5/8" shaft size to fit my motor. It cost me 1 hour of time and some scrap aluminum sitting around. I should have some pictures of the finished tumbler and brass tomorrow.
I had an idea from reading a previous post for those folks who want to slow down their drum a little more and don't want to change out pulleys. If you leave the rubber hose off your 1/2" rods and get an inner tube the right size to fit snug over your caps of your drum you would reduce your speed by quite a bit and still have a rubber connection from shaft to drum. Using my setup as an example, I would go from 80 drum rpm to 52 drum rpm by taking off the 1/8” thick rubber hose and putting a 1/16” thick inner tube on my drum. This obviously is for folks who are running too fast in the first place, which I am not, but I thought it might be a solution for those who need to drop some rpms. |
|
|
|
[#4]
Looking forward to the final tumbler.
Too bad the chain drive was a bust. |
|
|
|
MT, USA
|
[Last Edit: flybyjohn]
[#5]
I know I said I would have a picture the other day but I couldn't dare post a picture of the machine naked. The red paint took forever to dry on the pvc pipe. After two days and it still tacky, I had to set it in direct sunlight and rotate it every few hours to get it to dry. It finally dried this afternoon. Heres a few pictures of the finished product and a sample of brass that came out of it. I could not find a small enough pully for the motor so I turned one out of a scrap piece of aluminum. The media was GunTap brand, .047 x .255. The 6" drum is running right at 76 rpms. It holds 1.3 gallons of water. I ran some pistol brass with the 7mm mag brass and noticed that the 7mm looked like it was sandblasted. The pistol wasn't quite as noticeable but it was there. I read the media needs to be broken in. Is this my problem or is it something else. I had all my media (7.5lbs) in the tumbler but only about 2 lbs brass. I had to run the 7mm for 4 1/2 hours to get the primer pockets clean. The pistol brass was clean in 2 hours. Still a lot less time than in my walnut media. Well here is the pictures. Total cost of machine - about $60.00 ; Media - 55.00 shipped for 7.5lbs
 </a>" /> </a>" /> </a>" /> </a>" /> </a>" /> </a>" /> </a>" /> </a>" /> </a>" /> </a>" />
|
|
|
CA, USA
|
[#6]
Originally Posted By criio1:
How do you guys strain your pins from water? Meaning after its sperated from the brass. In thinking of a flour sifter or a fine mesh bag. I bought the FA release magnet to pickup the pins and keep them in a separate bucket. It should be here at the end of the week. 
|
|
|
CA, USA
|
[#7]
I made the 6" wide 16" long drum. How many 223 brass do you guys put in there? I use 10# of pins and my last batch was 1K brass. It seemed like a bit much. After 3 hours of tumbling about 1/2 the primer pockets were clean and the other 1/2 needed more tumbling.
|
|
|
|
[Last Edit: BIGGDAWG]
[#8]
Originally Posted By tbravo30:
I made the 6" wide 16" long drum. How many 223 brass do you guys put in there? I use 10# of pins and my last batch was 1K brass. It seemed like a bit much. After 3 hours of tumbling about 1/2 the primer pockets were clean and the other 1/2 needed more tumbling. 10lbs of pins no more than 8lbs of brass personally i wouldn' t run more than 7lbs of brass with 10lbs of pins - lately i try to stay at 1.5-1 to 2-1ratio of pins to brass they just clean faster if you don't overload them in my 2 gallon 8" drum i run 20lbs of pins and i run no more than 12lbs of brass most of the time i run 7-9lbs of brass and it is done in 1.5 hours if you fill it up to max it slows down to 3 hrs -3.5 hrs. |
|
|
|
TX, USA
|
[#9]
Originally Posted By tbravo30:
I bought the FA release magnet to pickup the pins and keep them in a separate bucket. It should be here at the end of the week. http://ecx.images-amazon.com/images/I/41rEcoyIfdL.jpg Originally Posted By tbravo30:
Originally Posted By criio1:
How do you guys strain your pins from water? Meaning after its sperated from the brass. In thinking of a flour sifter or a fine mesh bag. I bought the FA release magnet to pickup the pins and keep them in a separate bucket. It should be here at the end of the week. http://ecx.images-amazon.com/images/I/41rEcoyIfdL.jpg That magnet will work fine but be aware that you will also pick up some brass that has pins inside them. Also some brass is magnetic, I have found S&B brass to be able to be picked up with a magnet. I am finding that it is much easier to agitate the brass/pins in some sort of sifter before picking up the pins with a magnet. Vince |
|
|
MT, USA
|
[#10]
Ok, I have been going through my friends range brass bucket and picking out 30 06 brass (old brass, pretty brown) and am getting different results with different batches. I am starting to think there is not only a correlation between amount of media to brass but also the amount of media per container size. I am running 7.5 lbs media in a 12" long 6" tube (6" part is a full 12" long) using 2-45 acp full lemishine, and a squirt of dawn ( have really hard well water). I ran some scrap brass just previous to the 30-06 batch and it turned out great except it took 4.5 hours for the primer pockets to get clean on the 7mm mag. The most brass I have run at one time so far is 190 30-06 which should be just under 5 lbs. I am using the standard dawn, lemishine and water. So I ran the 30 - 06 brass for one hour, took a sample case out , for another hour, took another sample case out and at 4.5 hours stopped it and to my suprise, I had the black residue on the inside of my tumbler and the brass was really dull. I had plenty of suds and so I dumped out the water and cleaned the inside of the tumbler with paint thinner, reran the brass and it came out clean and shinny. I ran another batch but this time I ran the brass in my vibrator first to clean it up a bit so hopefully I wouldn't get the black residue again. This time after 4 hours, the brass came out very dull like it was sanded and almost white on the edges but nothing stuck to the sides of the tumbler. I changed the water and reran for just over an hour with the dawn and lemishine again and it turned out good this time except a little rougher then the first big batch and 35% of the primer pockets still had chunks of debree in them. The second batch was the same size as the first batch. As a side note let me say that the pistol brass had no problems getting completely cleaned in the first batch at 2 hours.
I don't know what the black residue is from because the cases were old once fired military 30-06 cases stamped in the 50's. They were pretty much oil free. Now thinking about the primmer pocket cleaning and going off the difference in the way the pistol brass cleaned compared to the rifle brass, I am starting to think, maybe I need a larger diameter, shorter container to tumble these longer cases and get the primer pockets clean like everybody else is getting. If the media and brass is in a shorter, taller area, the brass might swim in the media better and the primer pockets might have more contact with the media in stead of just rolling along with the container. So maybe for a certain size container, there needs to be a minimum of media to work efficiently and after that amount is reached, brass can be added until that efficiency curve is reached. I don't have any larger diameter than the 6" pipe so I am going to try and make a shorter container and see if the longer brass will be forced to tumbler end over end more and do a better job at cleaning the primer pockets. I am sorry for the long winded post and hope I am not getting off topic, just wanted to get this wet tumbler figured out. |
|
|
CA, USA
|
[#11]
Will the DAYTON 3K771 motor be enough to power a dual drum setup?
|
|
|
|
[#12]
Originally Posted By tbravo30:
Will the DAYTON 3K771 motor be enough to power a dual drum setup? it is the bare minimum. i would opt for the 1/3 hp version which is 6k778 |
|
|
|
|
[#13]
Originally Posted By flybyjohn:
Ok, I have been going through my friends range brass bucket and picking out 30 06 brass (old brass, pretty brown) and am getting different results with different batches. I am starting to think there is not only a correlation between amount of media to brass but also the amount of media per container size. I am running 7.5 lbs media in a 12" long 6" tube (6" part is a full 12" long) using 2-45 acp full lemishine, and a squirt of dawn ( have really hard well water). I ran some scrap brass just previous to the 30-06 batch and it turned out great except it took 4.5 hours for the primer pockets to get clean on the 7mm mag. The most brass I have run at one time so far is 190 30-06 which should be just under 5 lbs. I am using the standard dawn, lemishine and water. So I ran the 30 - 06 brass for one hour, took a sample case out , for another hour, took another sample case out and at 4.5 hours stopped it and to my suprise, I had the black residue on the inside of my tumbler and the brass was really dull. I had plenty of suds and so I dumped out the water and cleaned the inside of the tumbler with paint thinner, reran the brass and it came out clean and shinny. I ran another batch but this time I ran the brass in my vibrator first to clean it up a bit so hopefully I wouldn't get the black residue again. This time after 4 hours, the brass came out very dull like it was sanded and almost white on the edges but nothing stuck to the sides of the tumbler. I changed the water and reran for just over an hour with the dawn and lemishine again and it turned out good this time except a little rougher then the first big batch and 35% of the primer pockets still had chunks of debree in them. The second batch was the same size as the first batch. As a side note let me say that the pistol brass had no problems getting completely cleaned in the first batch at 2 hours. I don't know what the black residue is from because the cases were old once fired military 30-06 cases stamped in the 50's. They were pretty much oil free. Now thinking about the primmer pocket cleaning and going off the difference in the way the pistol brass cleaned compared to the rifle brass, I am starting to think, maybe I need a larger diameter, shorter container to tumble these longer cases and get the primer pockets clean like everybody else is getting. If the media and brass is in a shorter, taller area, the brass might swim in the media better and the primer pockets might have more contact with the media in stead of just rolling along with the container. So maybe for a certain size container, there needs to be a minimum of media to work efficiently and after that amount is reached, brass can be added until that efficiency curve is reached. I don't have any larger diameter than the 6" pipe so I am going to try and make a shorter container and see if the longer brass will be forced to tumbler end over end more and do a better job at cleaning the primer pockets. I am sorry for the long winded post and hope I am not getting off topic, just wanted to get this wet tumbler figured out. my question is how much soap are you using? you say "a squirt" and you still have suds well honestly that don't mean a thing. in that size container you should be using 5-7 tbs of dawn, the dawn is a surfactant it is what keeps the crud off of the brass once it is clean. I never have to tumble mine past 3 hours unless the brass was black and full of dirt then i change the water at 2 hours and put more soap and lemi shine in then they are done in another 2-2.5 hours. secondly you don't have enuff media in the drum should be 10lbs. if runing 7.5lbs i wouldn't run over 3.5-4lbs of brass. You get better results if you run less brass and more media i have tried it time and time again. for your drum i would run 10lbs of media and max of 6lbs of brass. my rule now is keep the pins at 1.5-1.75 -1 brass things turn out better and faster i rarely tumble over 1.5 hours with these ratios i use 8" drums which work a little bit better but the 6" wouldn't be over 2 hours. |
|
|
|
MT, USA
|
[Last Edit: flybyjohn]
[#14]
Ok I will try more soap. If I was to say how much dawn I am currently putting in, it would be about 2 table spoons. The volume of water my container holds below the slant on the reducer top is 1.3 gallons. Actual moveable space for media and brass is only 1.2 gallons of space since my 3 aggitators are a 1.5 pvc cut in a half circles facing the walls. (water can get behind it but media and brass cannot) I assumed that if 5 lbs media was enough for a gallon container, 7.5 lbs would be just right for 1.3 gallons. Guess I guessed wrong. 7.5 lbs media and 5 lbs brass is right at 1.5: 1 ratio which is the bottom end of your recomendation.
So is a 1 gallon size container the size I want for 7.5 lbs media? I can make one that size, I have all the materials. Thank you for your help. I looked at the thumbler rebel 17 dimensions and It measures out to a volume of 1.8 gallons, of which they call for 5 lbs media, 3-4 lbs brass, and 1 gallon water filled to 1" below the top. I have a much smaller area than the rebel 17 but have more media. Maybe I have too much media for the space. |
|
|
|
[Last Edit: BIGGDAWG]
[#15]
Originally Posted By flybyjohn:
Ok I will try more soap. If I was to say how much dawn I am currently putting in, it would be about 2 table spoons. The volume of water my container holds below the slant on the reducer top is 1.3 gallons. Actual moveable space for media and brass is only 1.2 gallons of space since my 3 aggitators are a 1.5 pvc cut in a half circles facing the walls. (water can get behind it but media and brass cannot) I assumed that if 5 lbs media was enough for a gallon container, 7.5 lbs would be just right for 1.3 gallons. Guess I guessed wrong. 7.5 lbs media and 5 lbs brass is right at 1.5: 1 ratio which is the bottom end of your recomendation. So is a 1 gallon size container the size I want for 7.5 lbs media? I can make one that size, I have all the materials. Thank you for your help. i run 7lbs of media in my 6" 1 gallon drums they have an 8" piece of pipe, i also fill with water to just up into the reducer. just remember you really can't have too much soap sure you will have suds but it keeps the dirt off the cases. |
|
|
|
MT, USA
|
[#16]
Thanks for the help BIGGDAWG. I used a bit more soap and the last two loads came out sparkling clean. Since it is really old, dirty brass, I have been leaving it in for a little over 4 hours and It looks great when it comes out.
|
|
|
CA, USA
|
[#17]
Where to buy the 8" cap and reducer? Can't seem to find one cheaper than $100.
|
|
|
MD, USA
|
[Last Edit: H48R]
[#18]
Today I just finished building a 8 inch drum. Then I filled it with water to leak test it. Water is seeping up and out from the top edge of the bottom cap. What is the best way to stop this leak? Will PVC glue around the edge of the cap seal it, or will epoxy be better?
I want to mention that this leak is where one of the agitators is mounted. I accidently drilled the hole too big by using a large drill bit to countersink the hole. I then drilled a new hole for mounting the agitator, so there is a half inch hole in the drum under the agitator on the bottom cap. Maybe the best fix would be to remove the agitator and fill the hole with epoxy? Anyone have a better solution? |
|
|
|
[Last Edit: m411b30]
[#19]
Doing some maintenance on my drum I figured out that the baffles inside it are the cause for recent poor performance in cleaning cases. They were made out of 1 1/2" PVC, and apparently they've worn out to the point that it took 3 - 4hrs. of cleaning.
Even after 4hrs., the primer pockets, and inside of the cases were still pretty dirty. So I put some 1 1/2" angle steel with holes in it that you can get from any TSC, and that made a huge difference. 4hrs. went to 1hr., and the cases were spotless. Any concern using the steel baffles versus the PVC, beside the obvious rust? I think I can prevent the rust, and SS angle, or even aluminum angle can be used. |
|
|
|
TX, USA
|
[#20]
Originally Posted By H48R:
Today I just finished building a 8 inch drum. Then I filled it with water to leak test it. Water is seeping up and out from the top edge of the bottom cap. What is the best way to stop this leak? Will PVC glue around the edge of the cap seal it, or will epoxy be better? I want to mention that this leak is where one of the agitators is mounted. I accidently drilled the hole too big by using a large drill bit to countersink the hole. I then drilled a new hole for mounting the agitator, so there is a half inch hole in the drum under the agitator on the bottom cap. Maybe the best fix would be to remove the agitator and fill the hole with epoxy? Anyone have a better solution? Short quick answer...JB Weld. Vince |
|
|
CA, USA
|
[#21]
Originally Posted By H48R:
Today I just finished building a 8 inch drum. Then I filled it with water to leak test it. Water is seeping up and out from the top edge of the bottom cap. What is the best way to stop this leak? Will PVC glue around the edge of the cap seal it, or will epoxy be better? I want to mention that this leak is where one of the agitators is mounted. I accidently drilled the hole too big by using a large drill bit to countersink the hole. I then drilled a new hole for mounting the agitator, so there is a half inch hole in the drum under the agitator on the bottom cap. Maybe the best fix would be to remove the agitator and fill the hole with epoxy? Anyone have a better solution? I had leaks in mine initially, then I just put silicone around it. No more leaks. |
|
|
|
[#22]
For leaks, I have used, and still do use Flex Seal with excellent results. I also use Flex Seal on the surfaces that make contact with the bars on the tumbler itself to create a much better contact so the drum doesn't slip, and lose rotation.
|
|
|
|
|
[#23]
Originally Posted By xtreme762:
. Any concern using the steel baffles versus the PVC, beside the obvious rust? I think I can prevent the rust, and SS angle, or even aluminum angle can be used. Do not use steel. It will turn your cases really dark or brownish. I used 1/2 in millable nylon square bar. |
|
|
|
|
[#24]
Originally Posted By criio1:
Do not use steel. It will turn your cases really dark or brownish. I used 1/2 in millable nylon square bar. Originally Posted By criio1:
Originally Posted By xtreme762:
. Any concern using the steel baffles versus the PVC, beside the obvious rust? I think I can prevent the rust, and SS angle, or even aluminum angle can be used. Do not use steel. It will turn your cases really dark or brownish. I used 1/2 in millable nylon square bar. Thanks for the info.. I picked up some 2" diameter nylon round stock that I'll cut in halves, and put 4 separate agitators in the drum. For those who don't know about this place. If I can't find something locally, which we all have something we need but can't get locally. I have use this site 100 times in the last decade to get raw materials, and tons of other fabrication parts. The place is called McMaster-Carr. If you can't get it locally, they WILL have it, and at a great price. Check it out, you won't be disappointed. |
|
|
|
TN, USA
|
[#25]
|
|
|
CA, USA
|
[#26]
I'm going to convert mine to a dual drum tumbler. I have a setup like in post #1 here with the 4" and 1 1/2" pulleys.
Can anyone tell me what size pulleys I need to power the other side? |
|
|
MI, USA
|
[#27]
Bucket List:
When searching the interwebs - I stumbled on this site: One of these might separate your media from the gunk - or allow you to pour off the water and save any pins that head for the drain. https://utahbiodieselsupply.com/filters5gallon.php And I thought these lids were nifty for a bucket based build: http://utahbiodieselsupply.com/sealpro.php Any recent examples for the bucket type wet tumbler designs? Cheers, Fritz. |
|
|
MT, USA
|
[Last Edit: flybyjohn]
[#28]
Originally Posted By tbravo30:
I'm going to convert mine to a dual drum tumbler. I have a setup like in post #1 here with the 4" and 1 1/2" pulleys. Can anyone tell me what size pulleys I need to power the other side? I haven't built a dual drum but you would just need two pulleys of the same diameter to hook the two sets of rollers together for the same drive speed. Use the driven axle from the first set of rollers to drive the second set of rollers. A couple 3"-4" pulleys will have more bite and less slip on the belt than two really small ones. Make sure you link the correct roller so that the drive rollers turn down into the drum. |
|
|
TX, USA
|
[#29]
Originally Posted By tbravo30:
I had leaks in mine initially, then I just put silicone around it. No more leaks. Just as a test I made a 6" drum from the PVC pipe I had left over. I used JB Weld to attach the agitators to the inside of the PVC pipe. To date it has held up perfectly. Vince |
|
|
CA, USA
|
[Last Edit: tbravo30]
[#30]
I had a issue with the Home Depot steel rods used for the shafts. None of the ones at my local stores were straight and would wobble making the drum hop a bit.
Got these off Ebay and they are excellent. Much higher quality steel and they are as true spinning as motor shafts. I run a dual drum setup with the Frankford Arsenal drums and they work perfect. Link to rods The 24" are $4.76 ea + shipping. Even after shipping, they are only a few bucks more than HD and way better quality. If you need them longer you can probably have them do it for you. 24" was perfect in my case though. |
|
|
|
[#31]
I'm in the process of building one now. Thanks for all the help so far! I figured I'd help out a little:
Lowes parts list for the hopper/drum: 110875: 6"x2' PVC sewer drain (green) 122863: 6" sewer cap 182570: 6" to 4" reducer 23493: 4" flexible pipe cap (rubber with hose clamp) 256098: 1.5" x 2' sch 40 PVC (to cut for inside agitators) Your choice of bearings. I'm using 1/2" pillow block bearings from USA Bearing and Belts. $32 shipped for 4. 1/2" steel rod from Home Depot (Lowes probably has this, but I stopped at HD first hoping they would have everything but the didn't carry anything over 4" for PVC) 1/2" id heater hose I had laying around. I'm using a 3450rpm 1/3hp motor from a dishwasher we took out of our house recently. I will source pulleys and a belt at a later date. |
|
|
|
|
[#32]
Originally Posted By Vinny302:
Just as a test I made a 6" drum from the PVC pipe I had left over. I used JB Weld to attach the agitators to the inside of the PVC pipe. To date it has held up perfectly. Vince Originally Posted By Vinny302:
Originally Posted By tbravo30:
I had leaks in mine initially, then I just put silicone around it. No more leaks. Just as a test I made a 6" drum from the PVC pipe I had left over. I used JB Weld to attach the agitators to the inside of the PVC pipe. To date it has held up perfectly. Vince I had jb weld turn my brass dark. It has metal in it and it'll act just like having a steel case in the load. |
|
|
|
MT, USA
|
[#33]
My last drum was a short one about 8" long with 6" pipe. Instead of building the normal agitators, I cut some of the extra 6" pipe I had into 8" strips and used pvc pipe glue to glue them on the inside of the pipe before putting on the ends. This creates more of a rolling action inside the drum instead of a water fall effect. The strips of pipe do not let the media slide on the drum but it is not picked up very high before the brass and media roll to the middle. The noise from the drum when tumbling went from a slush - slush - slush - slush sound with the conventional agitators to a constants river rappids sound with my new agitators. The rifle brass seems to clean quicker with the new setup, but haven't seen much of a difference with the pistol brass yet.
If you do it this way, make sure your spacing between the strips is small or big enough to not let the brass get wedged between two strips. I had two strips that were just the right size to catch 7mm 08 brass. I could have cut the strips with 45 degree edges so that the brass would have nothing to catch on if I was thinking ahead. |
|
|
|
[#34]
I started wet tumbling with a Frankford Arsenal tumbler with Lemi Shine with great results. The only problem was drying. I had an idea that a spare drum kept dry with the "vents" or "strainers" installed with a hair dryer blowing through would work great but FA will not sell a drum alone. So I have attempted to make one out of a 5 gallon bucked. This is really just a proof of concept but seams to work great..
It is loud... Ill need to get a dedicated hair dryer. Don't tell my wife I borrowed hers... 

|
|
|
|
|
[Last Edit: CoyoteGray]
[#35]
Removed - Duplicate post
|
|
|
|
|
[#36]
Try some glass beads or corn cob inside the drum. It will help distribute the heat.
|
|
|
|
CA, USA
|
[#37]
I got some work done on my tumbler, got all the square tubing cut up and most of the holes drilled still have to drill the holes for the motor. After i get those done im going to cut the heads off the Stainless steel bolts i bought and tig them to the tubing and sand down the frame so its smooth and showing no welds. after im going to sent it out to powder coat, im thinking about OD Green and Flat Black. Got the drum almost finished just need to add a couple more coats of krylon. i epoxied the baffels in the tube and let them dry for a week they seem very secure so hopefully well see how long they last. Ive mad some drawings that might help some people if they need them, ive modified the origional big dawg with a few minor improvements. Ive made the frame 24inches long instead of 22inches. I am also adding some 3/8 bar stock to the side of the tumbler to allow for my power cables to be wraped up when the machine is not in use. Ive got all the parts just need to assemble for the motor i wanted ball bearings so i opted for the 6k778k dayton motor its 1/3 hp and only a few dollars more than the 3k778 which uses sleeve bearings. im also going to run the power cable through the frame to a double switch box which i have with a regular switch and a digital timer.


|
|
|
MI, USA
|
[#38]
Anyone make a drum without agitators and have good results?
|
|
|
|
[#39]
Originally Posted By chaoticmachinery: Anyone make a drum without agitators and have good results? |
|
|
|
|
[#40]
Apparently the Frankford Arsenal Drum can be purchased separately. I asked one of the Vendors who sells the kits on the EE.
No connection to the seller, Frankford Arsenal, or anyone else. I am not sure if the $85.00 price is dealer cost or retail.
|
|
|
|
MI, USA
|
[#41]
I had a 6" drum I built out of PVC and after filling it with water the first time I noticed it was leaking.
Here is the fix for that: 1) Get your shop vac out 2) Duct tap the hose to the drum opening. Make sure you make it air tight as you want to create a vacuum inside the drum. 3) Turn on the vacuum. The duct tape should start sucking in on the drum. Make sure you have a good seal. If the seal is good continue on. 4) On the joints swab in some more primer. You should see it being sucked into the joint. Make sure to go around the whole joint. 5) Let it dry for a min or so. 6) Turn on the vacuum and swab the cement on the joints. You may have to keep going back to the same spot as the cement is sucked into the joint. Make sure to go around the whole joint. I kept putting cement until I had a slight build up at the joint. 7) Let it dry. I waited about 12 hours before I started using it. CM |
|
|
SC, USA
|
[#42]
|
|
|
NJ, USA
|
[#43]
Don't think I ever posted a pic of mine up, but here it is. I originaly made it with the intent of being a dual drum (small and large) but i don't think the motor is strong enough and the small drum alone is good enough for my purposes, hence the new frame on the bottom. Finaly got someone to show me how to weld... my welds look like crap but they should hold, still happy with it though, just needs some paint.
|
|
|
OK, USA
|
[#44]
What do the experts think of using a Dayton 6K011 motor? It is a variable speed (500-5000RPM) 1/2 HP motor... Found one available locally.
|
|
|
|
[#45]
Originally Posted By amcardon:
What do the experts think of using a Dayton 6K011 motor? It is a variable speed (500-5000RPM) 1/2 HP motor... Found one available locally. I wouldn't recommend it. It's not rated for continuous duty unless run at full speed. So then you've got a motor that's going to need a giant secondary pulley |
|
|
|
TX, USA
|
[#46]
Originally Posted By BMD:Finaly got someone to show me how to weld... my welds look like crap but they should hold, still happy with it though, just needs some paint.] LOL I am a much better grinder than a welder Vince |
|
|
WI, USA
|
[#47]
Heya gents
Ive looked thru this thread a couple of times but I cant find what Im looking for. How much 6" pipe would yield about the same size as a Thumler Tumbler B. Id like to build something that would hold a pair of drums roughly about that size so I can do different sizes of brass or one drum double sized for doing large lots. Thanks |
|
|
SC, USA
|
[#48]
Got an interesting idea yesterday. A person who sells brass online told me he wet tumbles his brass with as pins, lemishine and armor all wash & wax.
|
|
|
|
[#49]
Originally Posted By Velo555:
Got an interesting idea yesterday. A person who sells brass online told me he wet tumbles his brass with as pins, lemishine and armor all wash & wax. yes there are guys using the wash and wax, it helps the shine last longer from the feed back i have gotten. |
|
|
|
|
[#50]
Originally Posted By Kaldor:
Heya gents Ive looked thru this thread a couple of times but I cant find what Im looking for. How much 6" pipe would yield about the same size as a Thumler Tumbler B. Id like to build something that would hold a pair of drums roughly about that size so I can do different sizes of brass or one drum double sized for doing large lots. Thanks using an 8-9" section of 6" pipe and then your fittings will make a 1-1.2 gallon drum your total height of drum will be 11-12" they will do roughly what a thumbler will do. you could put 7 or so lbs of media and 3-4lbs of brass in each drum. |
|
|
|
 Win a FREE Membership!
Sign up for the ARFCOM weekly newsletter and be entered to win a free ARFCOM membership. One new winner* is announced every week!
You will receive an email every Friday morning featuring the latest chatter from the hottest topics, breaking news surrounding legislation, as well as exclusive deals only available to ARFCOM email subscribers.

AR15.COM is the world's largest firearm community and is a gathering place for firearm enthusiasts of all types.
From hunters and military members, to competition shooters and general firearm enthusiasts, we welcome anyone who values and respects the way of the firearm.

Subscribe to our monthly Newsletter to receive firearm news, product discounts from your favorite Industry Partners, and more.
Copyright © 1996-2024 AR15.COM LLC. All Rights Reserved.
Any use of this content without express written consent is prohibited.
AR15.Com reserves the right to overwrite or replace any affiliate, commercial, or monetizable links, posted by users, with our own.


