|
[#1]
After fitting the one on my Draco, I think your biggest bang for the buck is to lengthen the slot on the top piece, cutting the top rail portion back a little while you bevel the inside edge on the sides; Also cutting the knotch for the safety higher is a must. The rear is fine and just pops in if fitted at the front. I will try it on my 10/63 but have a Gen I on it right now. I like it even if I had to fit one every time. It is a nice well made piece.
I think if you made it shorter so it could be adjusted forward a little it would fit most, but the knotch for the safety needs to be located from the rear(button end) and get the measurment to set the curve and the height from the top of the rail down, Those measurments should be close to the same on all rifles. You are the expert and you are very close. DON"T stop It is a nice ITEM. Beta Tester Draco "C" loco Thanks for the chance to help. |
|
|
|
[#2]
Addendum to my original review found here"
Review by Chayfo Here is the modified push button to accommodate the stop plate for the bolt on the Saiga .308. I used a 3/8" titanium drill bit, and lined it up with the pre-existing button. I marked my starting point and drilled right through without issue. Fit like a glove and works even better than the original: http://omnivirtual.com/saiga/pushbutton_mod.jpg Here is the button catch issue I mentioned. The old dust cover doesn't have a lip on the inside of the cover, however the Gen2 rail does, I simply grinded this down to a smooth surface to allow for proper function and no catching: http://omnivirtual.com/saiga/buttoncatch.jpg Since the rail was slightly too long (roughly 1/32"), i had to grind the back down a little bit, this allowed the rail to pass the trunion and sync up smoothly with the rifle, it locks into place without any movement whatsoever: http://omnivirtual.com/saiga/back_mod.jpg As you can see from these images of the original dust cover, there is an outer-beveled edge to accommodate the bolt action/charging of the rifle. This meant I had to bend the TWS Gen 2 rail outward to mimic this design. Which worked great. http://omnivirtual.com/saiga/dustcover.jpg All done and attached, snug as a bug in a rug: http://omnivirtual.com/saiga/completed.jpg More pics and additional details to come... |
|
|
|
[#3]
I'm using a Romanian Draco, original (non-C) variant.
Some thoughts after a day at the range: I had to remove 1/2 to 2/3 of the rear of the cover to make it fit. My trunion is wedge-shaped, with the slope (of course) on the inside. Your proposed shortening of the overall length and adding a reciprocal wedge on the cover will fix that nicely. The space allowed for the charging handle is not quite wide enough. Although the rear of my dust cover sits higher than I'd like (I had to raise the front sight post quite a bit) the charging handle still catches and rubs on the way back. The bolt can still be cycled with metal on metal contact, so if changed it would only need to be made a very small amount wider. I had to move my front sight all the way to the left, and I am still shooting 3" left at 25 yards. The pistol tended left before the replaced rear sight, so it's possible the barrel or front sight are somehow torqued and the extended sight radius has exacerbated the problem. An adjustable rear sight would be great and (given the varying specs and loose tolerances of the AK generally) seems prudent to ensure firearms of a variety of origins and build qualities can be made functional. A vertical adjustment isn't as necessary as a horizontal, but would be nice. My eye tends to want to align the front sight's protective ring with the ghost ring, where instead I need to be aligning the front sight with the center of the ghost ring. Granted, I realize lowering the rear sight any further might not be possible. And on to the good! The dust cover held its zero exactly. I was very consistent with the AK (touching 20-round groups at 25y) using iron sights off a rest, which is unusual for me. Because of the nature of the rear sight I had a better view of my target than I had with the rear leaf. Want: a pen to touch up the finish after making necessary adjustments. If not included, one recommended that matches the color of the finish more exactly than my black sharpee. Because of the variable nature of AK manufacturing, no part you design will be drop-in for every model on the market. |
|
|
|
[#4]
chafo,
Am i understanding that you did not have to trim the area where the charging handle slides? Are others able to get by without trimming this slot area? I'm waiting for more range reports with iron sights as cover does sit a little taller in back as noted. |
|
|
|
[#5]
Quoted:
chafo, Am i understanding that you did not have to trim the area where the charging handle slides? Are others able to get by without trimming this slot area? I'm waiting for more range reports with iron sights as cover does sit a little taller in back as noted. Correct, I did not have to trim anything for the charging handle/bolt to slide back properly. I merely had to bend out the side of the cover to mimic my old dust cover as shown in my pictures above. You can see on the original dust cover, it was beveled outward to accommodate the charging handle/bolt. I modified the Gen 2 rail by clamping it to the edge of my workbench with a soft piece of cloth around it and a C clamp with padded grips. I then used a piece of hardwood pressed against the inside of the Gen 2 rail where I needed it to be bent and pounded it into shape. I didn't have to move it much, about 1/16" to 1/8". |
|
|
|
[#6]
Quoted:
Quoted:
chafo, Am i understanding that you did not have to trim the area where the charging handle slides? Are others able to get by without trimming this slot area? I'm waiting for more range reports with iron sights as cover does sit a little taller in back as noted. Correct, I did not have to trim anything for the charging handle/bolt to slide back properly. I merely had to bend out the side of the cover to mimic my old dust cover as shown in my pictures above. You can see on the original dust cover, it was beveled outward to accommodate the charging handle/bolt. I modified the Gen 2 rail by clamping it to the edge of my workbench with a soft piece of cloth around it and a C clamp with padded grips. I then used a piece of hardwood pressed against the inside of the Gen 2 rail where I needed it to be bent and pounded it into shape. I didn't have to move it much, about 1/16" to 1/8". And before bending the cover the charging handle itself would not fit in the intended slot? Or was it just an internal clearance problem with the bolt carrier? I'm still trying to decide if just by bending it out it will help it to clear the handle. I'm not having any inside clearance issue & I like the tight tolerance of the cover.(old cover clearance is like ten times worst tolerances) But I would pass on the tolerance part if by bending it out I wouldn't have to trim the cover. It's just hard to picture your charging handle being thinner. |
|
|
|
[#7]
I noted with interest Chayfo's need to bend his TWS to allow more room for his bolt carrier to move back and forth. I just wanted to report that I have no such issues with mine on a Saiga .308. I carefully examined my TWS after the range session this weekend and there are no indications of the bolt carrier or charging handle contacting any portion of it.
Just out of curiosity, how many Beta testers are out here? |
|
|
|
[#8]
To me it seems like it's raised up to allow the safety lever to slide under it. But I did get the impression he was getting some internal drag.
|
|
|
|
[#9]
Definitely internal drag, it would completely lock the thing up when fully pulled back. Here is a collage showing the charging handle and the bolt carriage where they were dragging, and the end result showing the chunks missing from the rail. At first when I tried to charge the rifle I felt some drag and noticed shiny aluminum shavings falling on my workbench, I then pulled it back one more time all the way and it just got stuck in place. I ended up smoothing off where it was dragging on the rail with my Dremel, then proceeded to bend it outward a little to accommodate my rifle better. This is a Saiga .308 16" IZ-137 Model 2 if you want to be exact. I bought it 2 months ago and have put roughly 250 rounds through it, she's still a virgin.
http://omnivirtual.com/saiga/charging_grind.jpg |
|
|
|
[#10]
Lots of good installation feedback so far. Here's what I see so far:
- A little more room for the safety lever and charging handle, maybe 1/16" (.062) -Shorten the overall length just a little, maybe 1/32" (.031) -Lengthen the slot on the front tab about 1/16" -Add a small 45 degree bevel to the lower rear edge -Some solution for the .308 Saiga carrier/trunnion spacer ( not sure what just yet). Maybe flatten one side of of the retaining pin that goes through the rear sight base. On my Arsenal there is a bevel edge that prevents the pin from going all the way through and seating flat against the rear sight base. This will prevent the e-clip from seating all the way on the other side. This is probably not an issue on most AK's but something to consider. I ground off some material off the rear sight base with a die grinder to get it to seat. Problem solved but in hind sight I should have ground the pin head. http://i198.photobucket.com/albums/aa169/35spline/Guns/DSCF5367.jpg I wish I would have known about the cam action release button before filing material off of the base of the button hole. I thought this was another clearance issue. I think it is still in the wedge. Does this look OK? http://i198.photobucket.com/albums/aa169/35spline/Guns/DSCF5371.jpg |
|
|
|
[#11]
Bear with me everyone. I know all these pics are from different perspectives, resolutions, and lighting conditions may be casting shadows. But there might be two versions of the beta test rail covers out there. Notice all rail covers that required mods for clearance of the safety/bolt handle seems to have a bigger "lip".
Thin Lip Rafaga's - original test subject 
Steve_in_Allentown - no mod 
dlxcupid - no mod 
Big Lip Rosebuddy - ground safety 
Chayfo - bent the lip 
drifter_r6 - cut the lip 
Are my old eyes playing tricks on me?? If this is the case, I would prefer to have the bigger lip cover and beable to create a tight fit to my AK's. I don't care much for the gaps left by the varying safety levers. |
|
|
|
[#12]
Hadn't noticed that. Its obvious when you see them side by side.
|
|
|
|
[#13]
I've been wondering about that. I think your right. rafaga?
Looks like your button may be bottoming. Any play? rafaga, why'd you give me a fat lip? LOL |
|
|
|
[#14]
Quoted:
Bear with me everyone. I know all these pics are from different perspectives, resolutions, and lighting conditions may be casting shadows. But there might be two versions of the beta test rail covers out there. Notice all rail covers that required mods for clearance of the safety/bolt handle seems to have a bigger "lip". Thin Lip Rafaga's - original test subject http://i904.photobucket.com/albums/ac248/drifter_r6/rafaga.jpg Steve_in_Allentown - no mod http://i904.photobucket.com/albums/ac248/drifter_r6/Steve_in_allentown.gif dlxcupid - no mod http://i904.photobucket.com/albums/ac248/drifter_r6/dlxcupid.jpg Big Lip Rosebuddy - ground safety http://i904.photobucket.com/albums/ac248/drifter_r6/rosebuddy.jpg Chayfo - bent the lip http://i904.photobucket.com/albums/ac248/drifter_r6/chayfo.jpg drifter_r6 - cut the lip http://i904.photobucket.com/albums/ac248/drifter_r6/drifter_r6.jpg Are my old eyes playing tricks on me?? If this is the case, I would prefer to have the bigger lip cover and beable to create a tight fit to my AK's. I don't care much for the gaps left by the varying safety levers. WOW!!!! Excellent catch. I've been so close to these for so long now I hadn't seen that. I went and reviewed parts that I have here and found something curious. The parts that received the custom engraving have a wide lip and the parts with no engraving have a narrow lip. When these were in production we did a copy/paste of the CNC code and generated two programs for the parts. One with the engraving and one without. It seems the engraving program was the older one and didn't receive that detail update. If anyone wants to have their opening enlarged just let me know and I'll re-cut it for you. At this point, however, I would recommend waiting just a little until we get all the details just right then we'll put your DL back into the CNC to clean it up and we'll also re-anodize it for you so it's nice and pretty. Again, good catch drifter_r6. |
|
|
|
[#15]
its great
|
|
|
|
[#16]
Glad you answered soon as I was just heading out the door to go trim my cover. Instead I'll order a new Safety Lever & pack up my GEN II.
And don't forget more relief on the Front Adjusting Tang. |
|
|
|
[#17]
Got my box! I have custom engraving and would have to trim some for the safety lever.
Rifle is a SLR-95. 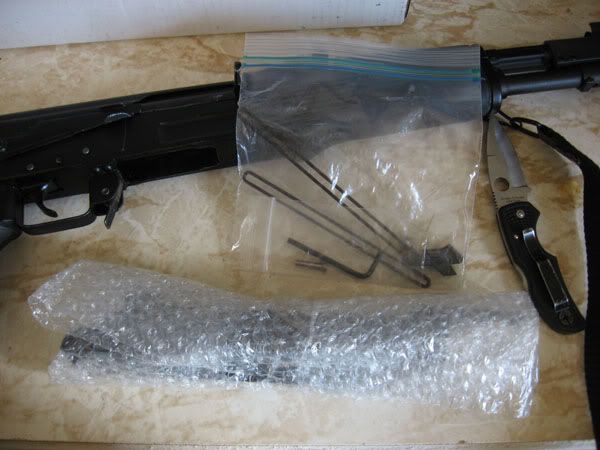
I had to dremel out this slot a little to get the cover to close. Now it pops in the slot on the back with a thump from your palm 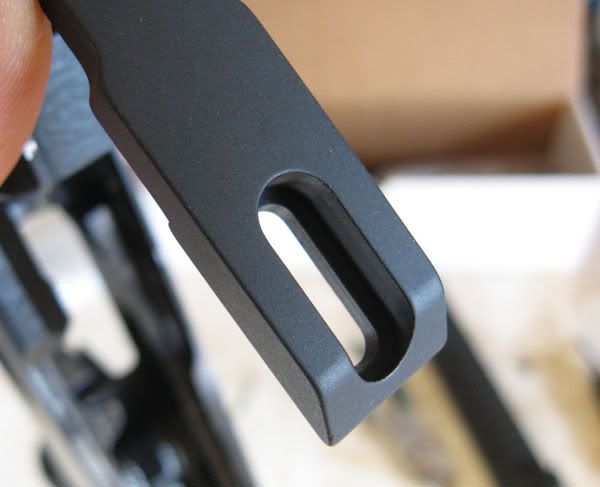
Also had to remove some material from either the front of the cover or here. It didn't take much. 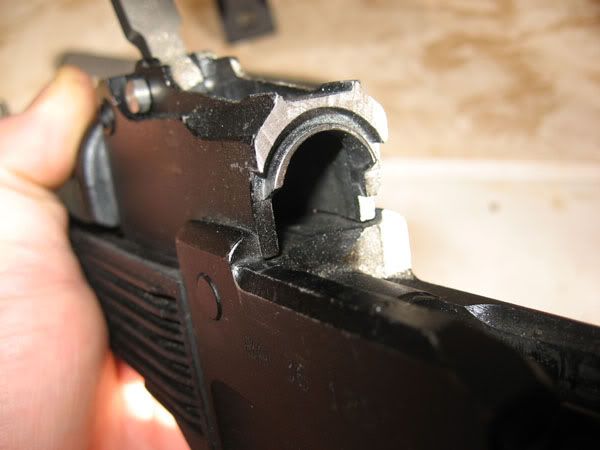
Safety lever. The charging handle also contacts the cover here. 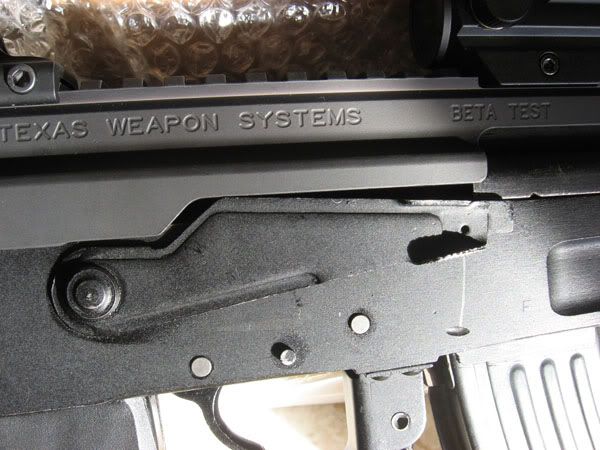
I use an ace clamp on front sight and a KNS front pin. The peep size is perfect for me. The glob of crap inside the TRS-25 is irritating. I moved the red dot back closer to the rear peep and it helps. 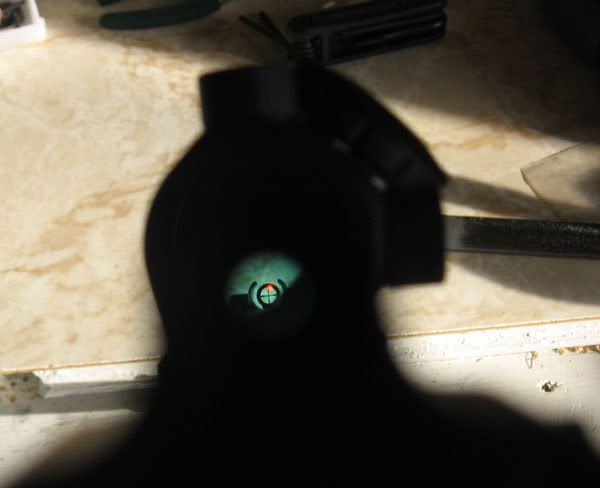
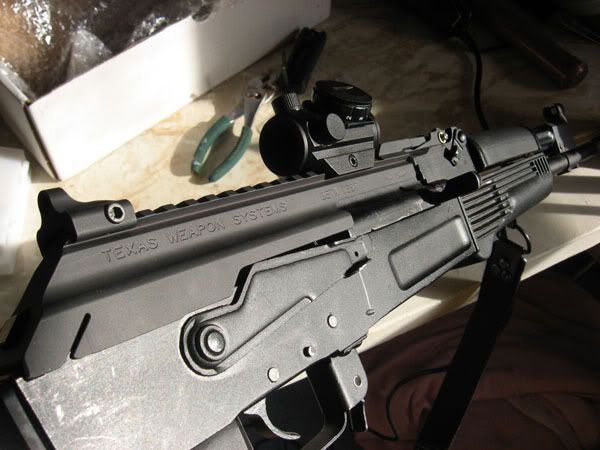
Overall very impressed. If the cover portion were about 1mm shorter and the slot the bolts go in were 1mm longer it would have been a perfect fit with no modification. And of course the safety lever issue. I was impressed with how light it was when i first took it out of the box. This sucker is also rock solid. Haven't had a chance to shoot it yet. What would the turnaround time be on sending it in to get the charging handle/safety slot cut? I may just do it myself since I don't care about the finish. The entire rifle is getting duracoat once everything is set and zeroed. |
|
|
|
[#18]
Quoted:
I wish I would have known about the cam action release button before filing material off of the base of the button hole. I thought this was another clearance issue. I think it is still in the wedge. Does this look OK? http://i198.photobucket.com/albums/aa169/35spline/Guns/DSCF5371.jpg It looks to still be ok. As long as it's not moving around you should be good to go. |
|
|
|
[#19]
Quoted:
The parts that received the custom engraving have a wide lip and the parts with no engraving have a narrow lip. When these were in production we did a copy/paste of the CNC code and generated two programs for the parts. One with the engraving and one without. It seems the engraving program was the older one and didn't receive that detail update. Mystery solved. I did not want the custom engraving so I must have gotten the narrow lip version which explains why my 16" Saiga .308 had no issues with the bolt carrier contacting the inside of the TWS. Until I read Nelson's explanantion I was going to suggest that either Chayfo's rifle or mine was a vodka special. Good stuff. Outstanding detective work, Drifter. |
|
|
|
[#20]
Quoted:
Got my box! I have custom engraving and would have to trim some for the safety lever. Rifle is a SLR-95. http://i557.photobucket.com/albums/ss15/philwhaz11/TWS/Picture002.jpg I had to dremel out this slot a little to get the cover to close. Now it pops in the slot on the back with a thump from your palm http://i557.photobucket.com/albums/ss15/philwhaz11/TWS/Picture003.jpg Also had to remove some material from either the front of the cover or here. It didn't take much. http://i557.photobucket.com/albums/ss15/philwhaz11/TWS/Picture007.jpg Safety lever. The charging handle also contacts the cover here. http://i557.photobucket.com/albums/ss15/philwhaz11/TWS/Picture011.jpg I use an ace clamp on front sight and a KNS front pin. The peep size is perfect for me. The glob of crap inside the TRS-25 is irritating. I moved the red dot back closer to the rear peep and it helps. http://i557.photobucket.com/albums/ss15/philwhaz11/TWS/Picture010.jpg http://i557.photobucket.com/albums/ss15/philwhaz11/TWS/Picture012.jpg Overall very impressed. If the cover portion were about 1mm shorter and the slot the bolts go in were 1mm longer it would have been a perfect fit with no modification. And of course the safety lever issue. I was impressed with how light it was when i first took it out of the box. This sucker is also rock solid. Haven't had a chance to shoot it yet. What would the turnaround time be on sending it in to get the charging handle/safety slot cut? I may just do it myself since I don't care about the finish. The entire rifle is getting duracoat once everything is set and zeroed. Today I created a small CNC program to make the necessary change on the engraved covers. At the same time we'll cut .030" off the front face scallop to provide additional clearance to the sight block and also increase the length of slot in the front tab. If you have a non-engraved cover and just want the front face and tab slot machined down we can do that too. In your case with no anodizing involved turnaround would be 1-2 days. If anodized then add a week on top of that. |
|
|
|
[#21]
My cover was one of the ones that were engraved. I did find it odd that all my AK variants had the same issue. Fyi: I can't get to the range till next weekend so I boresighted my H1. After getting everything tight, I proceeded to swing the pistol around by gripping the cover only in various ways. Completely unscientific I know but it seemed to hold zero.
Rafaga... is it possible to refine the elbow bend around the safety lever so there isn't that small gap? For catching this, do I get a lifetime discount for any future products I purchase? |
|
|
|
[#22]
Damn. Now I wish I hadn't done the hack job with a dremel. The CNC machine can't add aluminum back!

|
|
|
|
[#23]
Quoted:
Today I created a small CNC program to make the necessary change on the engraved covers. At the same time we'll cut .030" off the front face scallop to provide additional clearance to the sight block and also increase the length of slot in the front tab. If you have a non-engraved cover and just want the front face and tab slot machined down we can do that too. In your case with no anodizing involved turnaround would be 1-2 days. If anodized then add a week on top of that. Now that we know that you have to make necessary mods to all Engraved Covers & they're doing no good in our possession I see no reason to wait on sending them back.(for those electing to not trim Covers themselves) If you agree, is there any special instructions on shipping & or how to tag them? Just got your email from last night. But here's a caveat: I don't want any machining done to my cover face as I already elected to cut the rear of my sight block down a little which closed up the gap up front & made my cover the right length. I reiterate: I ONLY WANT THE SIDE LIP TRIMMED DOWN. |
|
|
|
[#24]
Quoted:
But here's a caveat: I don't want any machining done to my cover face as I already elected to cut the rear of my sight block down a little which closed up the gap up front & made my cover the right length. I reiterate: I ONLY WANT THE SIDE LIP TRIMMED DOWN. No Problem at all. Just include a note with your rail and a back up email so that we are double sure you get just what you need. When we confirm your email we'll update your requirements on the list of Beta Testers. Mail to: Texas Weapon Systems 4815 West Braker Lane #502-130 Austin, TX 78759 |
|
|
|
[#25]
Rafaga,
FYI- My mount has been siting at a sort facility since Friday of last week. USPS doesn't know why so I just put in a request for them to figure it out. It's obviously going to take longer than expected to share my results on the SA-93. Sorry about that and hopefully someone else with an SA-93 can get back to you sooner just in case the cnc program needs additional tweaking. I feel like I have a decent plan of action for when the mount does get here, thanks to everyone's input. Will probably test on a stamped Mak and the Bulgy before modifying any parts unless you feel like the Mak90 has been covered well enough.. |
|
|
|
[#26]
I put it on my Romy AK, and it fit pretty much perfect. I have the small lip version; there is no interference with the safety lever, and I didnt have to trim anything. It fits a bit snug and rubs at the front where the rear of the front trunnion is but no biggie (I might file a bit off it later). Its a little harder to strip the AK now but the top cover is rock solid with that new button.
The only change that I would suggest is to elongate the front tab slot. So everything else can be trimmed and filed to fit.. Overall, Im pretty happy with the TWS Gen 2 top cover rail and rear peep sight. Not too bad of a price once you consider that youre getting a low rail for optics, a rear sight, top cover and the recoil spring assembly button. Cant wait to try it out at the range and mount my red dot. Will post (cellphone) pics once I get to a computer. |
|
|
|
[#27]
Beta Tester here.... Long time lurker, first time poster....
I am currently testing the Gen II Beta on my “go-to” AK-47: A 1986 Romy-G Parts Kit on a Nodak Spud 3. It is currently outfitted with a Tapco G2 Semi-Auto Trigger, East German Sidefolder, Stock Adapter For Wire Side-Folder (Cheekpiece), Ultimak Gas Tube, Tapco M-16 Style Flash Suppresor, Krebs’ Mark VI Enhanced AK Selector Lever, Hogue Pistol Grip, Bulgarian Lower Hand Guard, and a Primary Arms Microdot. http://i121.photobucket.com/albums/o215/Blake74u/1.jpg I took off my Rear Sights using the “screwdriver method.” In order to attach the Gen II Beta, I utilized a Stanley 12 Fatmax Heavy Duty Trigger Clamp, Punch, and Mallet. Unfortunately, I hammered it so much, that one of the gun screws came off of the Gen II… -No problem, as I was going to Blue Loctite that anyways. I noticed immediately that it wasn’t going to line up with my Kreb’s Safety Lever and charge all the way to the rear in order to clear the chamber. I measured that .5cm off the side of the dust cover was going to have to come off. (See painted mark in Red). http://i121.photobucket.com/albums/o215/Blake74u/2.jpg http://i121.photobucket.com/albums/o215/Blake74u/3-1.jpg http://i121.photobucket.com/albums/o215/Blake74u/4-1.jpg |
|
|
|
[#28]
In order to do this I utilized a Dremel equipped with a Cut Off Reinforced Cutting Wheel. Once completed, I smoothed it out with a hand file and painted it flat black with a touch-up pen.
http://i121.photobucket.com/albums/o215/Blake74u/5.jpg The Button to the Receiver’s Dust Cover was flush prior to me grinding off .5cm off the side; however, after charging my Charging Handle a few times, it began to poke out. (Perhaps due to the force of the Recoil Spring Guide slamming itself due to the Bolt?) Wah-la! I solved two issues with one stone. http://i121.photobucket.com/albums/o215/Blake74u/6.jpg http://i121.photobucket.com/albums/o215/Blake74u/7.jpg Quick Observations: 1. After experiencing the process of having to custom fit my Gen II and reading everyone else’s reports, I have come to the conclusion that Gen IIs will have to have a particular AK in mind when it comes to measurements as a “base model.” I would recommend Romaks (WASRs in particular) because they are the most plentiful in the U.S.; however, enough material should be left on the Dustcover so that the proper fitting can be made… -With that in mind, I don’t imagine that everyone is going to be pleased about having to custom fit. (Proof of that? -Read the reviews on a site like CTD for AK Furniture…. There’s always a Yugo, or Mak owner out there with a complaint about something not fitting their weapon). But, I am sure that you ran into that issue with the manufacturing of the Gen I. 2. The finish everywhere on the Gen II isn’t going to hold up. My Red Dot marred it already after cinching it down with an Allen Wrench; however, I’m no stranger to using Flat Matte Krylon on gun parts, so it’s not really an issue with me…. I probably won’t get any range time until this weekend. I run an earlier generation of Primary Arms’ Red Dot, and I am not expecting it to co-witness; however, keeping it on the Ultimak while utilizing the Gen II’s Peep is intriguing…. As is the idea of utilizing Picatinny HK Sights and a thin Picatinny Riser to compensate for the Ultimak…. But alas, I am getting way ahead of myself. More to follow. |
|
|
|
[#29]
Why not just send the rails with a disclaimer that some gunsmithing may be required for a custom fit?
|
|
|
|
[#30]
I just got my Bushnell TRS-25. Belated Christmas present from a buddy. Now that I have the bolt running smoothly, the sight adjusted as well as it will go, and the optic (any evaluation of an optics rail would be silly without an optic) I'll give it a more thorough look with pics and such next Saturday when I can get to the range again.
|
|
|
|
[#31]
Quoted:
Why not just send the rails with a disclaimer that some gunsmithing may be required for a custom fit? I think he can get it to fit most any once he's done with the fix to the few areas he mentioned. Curious as to range reports. Particularly the iron sight so rafaga can make any adjustments in that area. |
|
|
|
[#32]
Quoted:
Quoted:
Why not just send the rails with a disclaimer that some gunsmithing may be required for a custom fit? I think he can get it to fit most any once he's done with the fix to the few areas he mentioned. I do plan to get a Gen II but now I will wait until they work out the few quirks. It is like when you buy a car: don't buy the 1st year since it tends to have the kinks and usually the next year will fix them. |
|
|
|
[#33]
Quoted:
Quoted:
Why not just send the rails with a disclaimer that some gunsmithing may be required for a custom fit? I think he can get it to fit most any once he's done with the fix to the few areas he mentioned. Curious as to range reports. Particularly the iron sight so rafaga can make any adjustments in that area. An adjustable rear sight is the biggest improvement I would want. Even if it was an upgrade option over the standard peep. Its just a matter of time before someone finds something else that will work though. |
|
|
|
[#34]
Something I would really like to see is a dual aperture rear sight, using an AR flip aperture for example. The peep on your sight seems somewhat small, which would work well for accurate shooting, but it would be nice to have the larger, almost ghost ring aperture for faster or closer shooting.
Keep up the good work. eta: 
|
|
|
|
[#35]
Hey everyone,
I've been watching this thread for a good long time now, and thougth I'd register to ask a couple questions. First off, though, I love the way everyone's AKs are looking with that rail. Damn sharp if you ask me. Now, questions: Has anyone tried mounting a 1-4x on the rail with the peep sight? How much clearance would be needed and what kind of rings/mounts are you using? Rafaga, I'm in the first round of pre-orders from JABTAC. Any idea what the ETA will be for them? |
|
|
|
[#36]
Hey Dcoil1,
I did the same thing. Hung around til this Rail Cover got close to completion & wanted to Beta Test. I got a feeling the Jabtac type orders will be there within 3 weeks..... just my prediction. I've got 4x for mine but my Beta rail is on it's way back for final fixes so I can't try it. I'm not in a see through mount/over under setup. Just Quick Disconnect. I know to co-witness.... the optic has to be really low like the TRS-25. I bought one for this too....so I don't know what I'll end up using. I usually like scopes the best but I just recently started getting into Red Dots. Mainly curious right now.... if the peep sight will zero with the front sight. I'm pretty sure it will & if not I'll drop my cover a hair. I think this thing is awseome.....looks.....function! |
|
|
|
[#37]
Thanks for the info, Rosebuddy. I've been eyeballing 1-4x's since I pre-ordered in Dec.
I'm thinking I'll go with the Leatherwood CMR with these see-thru rings, but I just didn't know if they were high enough. Barska see-thru rings |
|
|
|
[#38]
For what it's worth, I put a Weaver 4x38 scope on the TWS and it required a set of rings with a 3/4" saddle height. The 1" Weaver see through rings have an advertised saddle height and should work for less than $20. The high Burris Xtreme Tactical rings also have a 3/4" saddle height for $50.
|
|
|
|
[#39]
The mount finally arrived today so I took a long lunch and tried it on a milled Bulgy SA-93 and a stamped Mak-90.
I won't have time to make the rail fit properly until sometime this weekend but wanted to give some info for Rafaga. 1) The rail build quality looks very good. The cover is light but feels much stiffer than the factory covers. 2) All machined corners are crisp but smooth to the touch. 3) This looks like it is going to be one hell of a mount. This is a test fit of a TWS mount without the custom engraving; Removed the factory covers on both weapons, left the bolt carrier in and used the guide rod provided by TWS. A) As others noticed, I couldn't get the mount to seat at the rear of the receiver with the hinge and pin installed on the sight block. Overall length is approximately .031" too long. B) Proceeded to remove the hinge plate from the mount and again tried to install the mount. Started by inserting the rear of the mount into the slot at the rear of the receiver and then lowered the front portion of the mount into position. It wouldn't drop into place against the trunion without a good whack, too long. I think that the 1/32" shortening that Rafaga mentioned would work fine on both of these weapons. Others had mentioned 1/16" but when I looked at a caliper I thought that 1/16" might be heavier than needed. Does anyone else think 1/32" is enough? C) After getting the mount in place I checked the safety lever and the fit was perfect. Any reduction in overall length should come off forward of the safety lever cut out, at least for my weapons. Also cycled the bolt carrier about 20 times in each gun and didn't notice any wear marks on the underside of the mount cover or the charging slot. D) The release button fit and functioned perfectly. Can't wait to get this thing mounted on the bulgy and to the range. It looks like this mount will be exactly what my poor eyes need. Pics and range report in a few days. Thanks guys for sharing your results earlier, it was very helpful. Bill |
|
|
|
[#40]
Just finished mounting everything and updated the post above.
Also put on a micro dot a few minutes ago and though it's not zeroed yet the dot sits right on the front post when looking through the peep hole. Will try to take a pic after going to the range. |
|
|
|
[#41]
Nelson, Any update as to when mine is going to ship??
If you are doing the Mods to it, please let me know.. I left you a voice mail yesterday. Thanks, Eric |
|
|
|
[#42]
I put mine back on and went to the range and shoot 40 rds, with red dot and rear site. The rear site actually worked fine I could jump a can at 35 yrds no problem and I didn't adjust it just installed and shot. Red dot high left but constant. Will go to my gun club before long and do some real shooting. What I found was the button fully seated the bolt carrier was touch just below the spring on the spring assembly both sides. The button was hard to push but it pop open after a little force. The bolt carrier has two curved cuts in the rear top where the spring latch slides in? Not sure of what its call but it has hit several times? But it works nice. Loco
|
|
|
|
[#43]
I took mine out to the range this afternoon for a spin. I have one that needed a trim to fit. I removed a bit from the front and opened up the side so the charging handle could move to the rear, safety close, ect. Mine bolted on fine without doing anything to the front adjustment area. The rifle is a Bulgarian AK 74 built on a Armory USA receiver and I used a Bushnell TRS-25 as the optic. I shot it at 25, 50, and 100 yards. I had plenty of elevation left in the front sight once I got it zeroed, so that is an improvement over the Gen 1 rail. I had been running that rail on this rifle so my front sight was pretty close to the top of the sight ears, but with this rail it needed several turns down. The windage was dead on, so both rails were the same in that respect. I shot nice little 5 shot groups with the iron at all ranges. I ran the dot to the top of the front sight post as you would on an AR to get on paper, then banged away. A few adjustment clicks and I was again making nice little 5 shot groups. I took the top cover loose and put it back on a few times and still was shooting in the same spot. So, we finally have a rail with a good peep sight at the rear and the ability to co witness. It does need a bit of refinement so the end user doesn't have to alter it to fit, but that is a minor problem for Rafga to fix. If you are looking to mount a red dot to your AK this is your ticket.
I will be trying a non removable base Gen 1 Primary Arms micro as well as the current Gen 6 micro on the rail this weekend so see if they will co witness too and will post here when I am done. Here are the ways I see this mount as being superior to the Gen 1 mount. * No locking mechanism sticking out at the rear keeping you from shooting with your face where it normally is with irons ( I shoot with my nose pretty close to the top cover) so short stocks are not a problem * No stock tang needed for the locking mechanism so many other rifles can now use the mount * You can see your irons through the optic FINALLY * Is more rugged and looks a lot like a normal top cover at first glance Here are the ways I see this mount as being inferior to the Gen 1 *You have less area to mount a scope or a red dot and magnifier on the new rail. The old rail is longer because it sticks out farther at the rear and keeps the peep farther back allowing the scope more room while still retaining the peep. You can still mount a scope of course, but anything very long will require you to remove the peep. * You can't run a left hand charging handle unless cutting the cover open on the side will not affect performance. I have one for the rifle I used today, but I swapped out the carrier for testing. Well, Rafga answered this one, so that leaves me one negative. I think that is pretty good as most of us have a least two or three negatives. |
|
|
|
[#44]
Quoted:
Nelson, Any update as to when mine is going to ship?? If you are doing the Mods to it, please let me know.. I left you a voice mail yesterday. Thanks, Eric NavyChief, Yes, yours has the mods done and is at the finishers. Should have it back on Tuesday I hope. Soon as it ships I'll email the tracking #. |
|
|
|
[#45]
Quoted:
* You can't run a left hand charging handle unless cutting the cover open on the side will not affect performance. I have one for the rifle I used today, but I swapped out the carrier for testing. ACR1, Thanks for the right up. Regarding the left side handle, as long as you retain the rearmost 3/4" or so of the left side panel you're ok. The inside left rear corner area is what provides the reference surface controlling the repeatability of the mount. Raf |
|
|
|
[#46]
So, can I rest assure that when Ithe next batch will have the mods or will some modification always be the norm?
|
|
|
|
[#47]
NavyChief, Yes, yours has the mods done and is at the finishers. Should have it back on Tuesday I hope. Soon as it ships I'll email the tracking #. Nelson, Thank you very much. The waiting is rough. But, from what I've been reading and seeing here, it's worth the wait. Chief |
|
|
|
[#48]
Quoted:
So, can I rest assure that when Ithe next batch will have the mods or will some modification always be the norm? Moving forward all new parts will have the mods discussed here. As you all know AK's are all a little bit different but, having to tweak the mount should be the exception rather than the rule. |
|
|
|
[#49]
Anyone have an idea if the Vortex StrikeFire with the Low Mount will Co-Witness ???
Thanks, Chief |
|
|
|
[#50]
Quoted:
I did have one tester contact me with an issue you should all keep an eye on. In his case the wire guide rod came loose from the release button. Not sure yet if it is an isolated installation issue or a problem on my end. I'll be looking into it more closely on Monday when I get back to work. Quoted:
Moving forward all new parts will have the mods discussed here. As you all know AK's are all a little bit different but, having to tweak the mount should be the exception rather than the rule. Okay, so we've now had three failures of the wire guide rod coming loose from the release button. After investigating the problem it seems like it's just a simple problem of the wire not pressed deep enough into the button. The simple solution of course is to press the wire deeper. The wire is currently pressed into the button a distance equal to about 1.5-2X the wire diameter. That should increase to a minimum of about 3X wire diameter. This week I'll revise the pressing fixture to cure the problem and make up some new buttons to swap out everyone's old button for a new one. Cheers |
|
|
 Win a FREE Membership!
Sign up for the ARFCOM weekly newsletter and be entered to win a free ARFCOM membership. One new winner* is announced every week!
You will receive an email every Friday morning featuring the latest chatter from the hottest topics, breaking news surrounding legislation, as well as exclusive deals only available to ARFCOM email subscribers.

AR15.COM is the world's largest firearm community and is a gathering place for firearm enthusiasts of all types.
From hunters and military members, to competition shooters and general firearm enthusiasts, we welcome anyone who values and respects the way of the firearm.

Subscribe to our monthly Newsletter to receive firearm news, product discounts from your favorite Industry Partners, and more.
Copyright © 1996-2024 AR15.COM LLC. All Rights Reserved.
Any use of this content without express written consent is prohibited.
AR15.Com reserves the right to overwrite or replace any affiliate, commercial, or monetizable links, posted by users, with our own.


