|
Posted: 1/16/2016 8:39:17 PM EDT
And it is very well made. Considering they made the Syrac kit there are a lot of similarities as you will see. There are some key changes which I thought I would share. Unfortunately I didn't take pics of the Syrac kit to compare (I sold it to get this one). I ordered the Carbine kit for my SBR build.
Nice boxing in foam, not just flopping around in a tube. 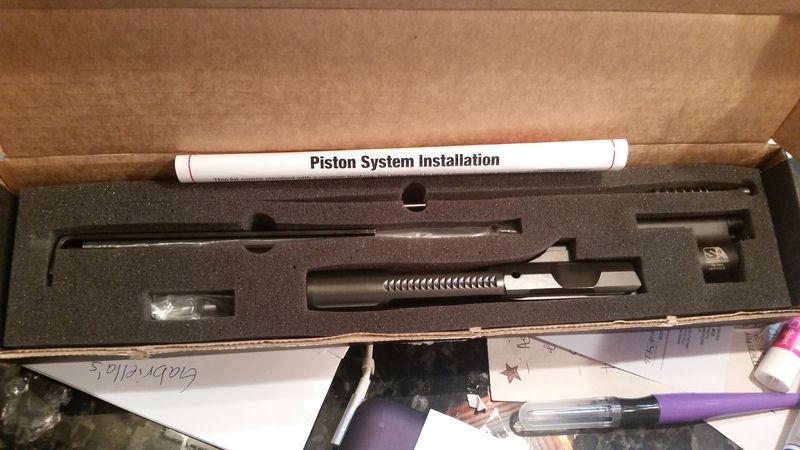
Here are all the parts which we all know what they are. They do include the bushing for the upper and installation tool if you choose to use it. After talking to the owner he said most people use the bushing when firing FA. Even then it's not needed but it's extra insurance. 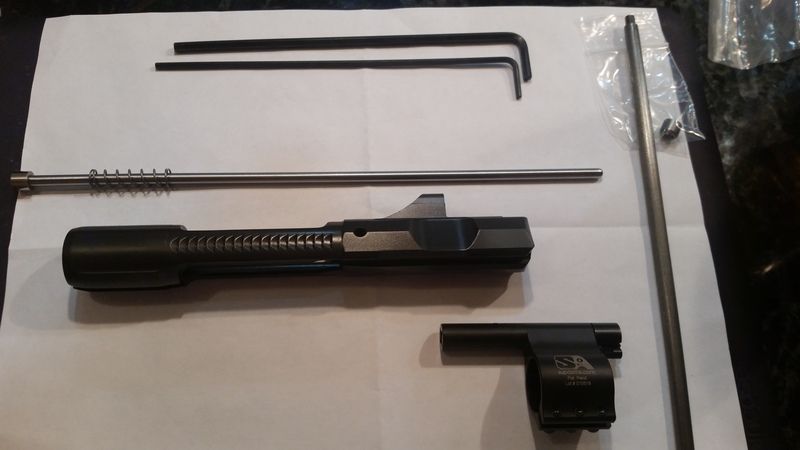
Here is the gas block with the bleed off port on the side of the adjustment screw (vents to the front). Once again the machining on this was outstanding. The plug and adjustment screw were very smooth (except the detent, but that's a given). The detent system is way better on the adjustment screw than the Syrac kit. 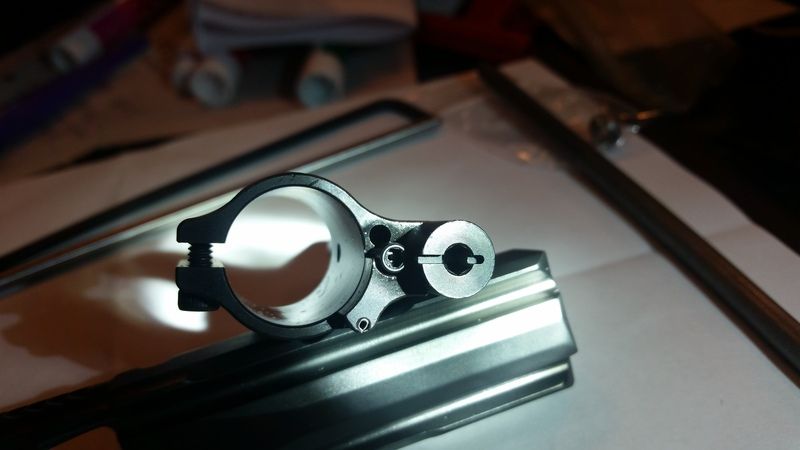
Here is the adjustment screw. This is where I wish I took pics of the Syrac version to compare. The part all the way on the left is where the main interaction with the gas happens. As you can see it is smooth and would build up minimal carbon. Also, the detent is not milled grooves which could easily build up carbon (on the right). It is now just flat spots (it's a square basically). It works. I have to purposely try to get it to the next adjustment setting. So I assume there is 4 adjustments per rotation. 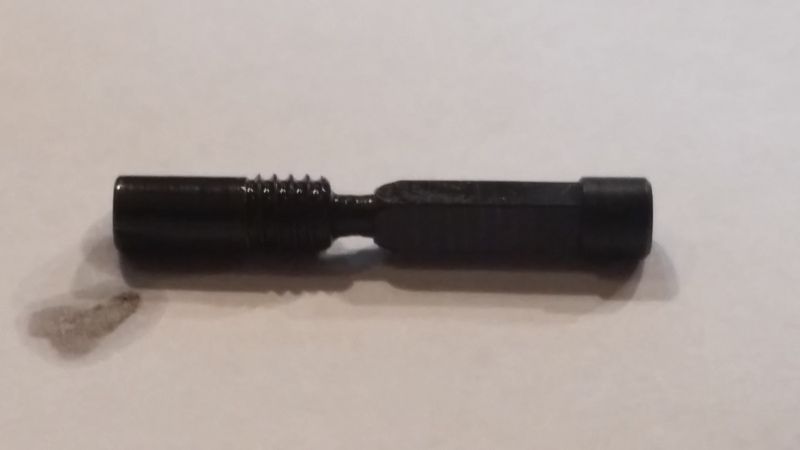
And lastly the bolt carrier. I finger fucked this thing all over the place and let me tell you it is smooth. I consider this a very crucial part and there was not one rough edge or burr anywhere. It slid into my upper super smooth. 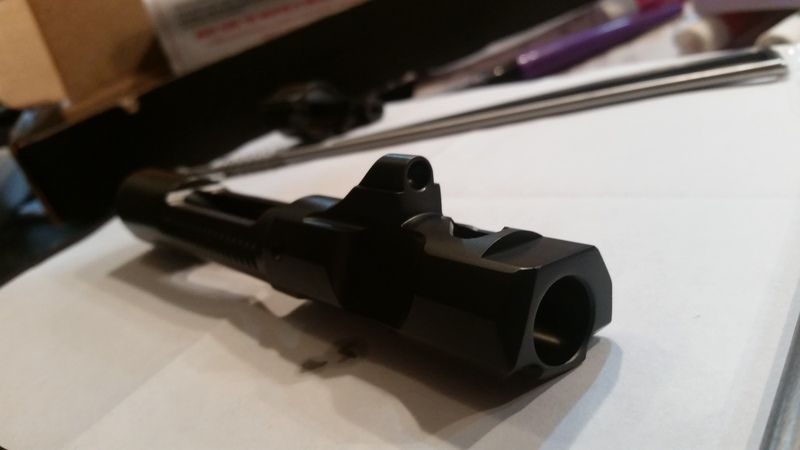
I was going to install it this weekend but I had to work. I just wanted to post my pics because a few of us have been talking about it. This kit is completely serviceable without taking your handguards off or anything else. Hopefully before the month finishes I will build it and give you guys a range report. I am still waiting on my stamp but my buddy has a registered lower which we will test it with. Oh, and I heard Rainier will be carrying this kit soon. UPDATE: So my stamp was approved last week and I finally shot it today. The system ran flawless. The first round ejected hard at 1 o'clock. After 2 or 3 rounds of tuning the brass was ejecting perfect at 3 o'clock. The bolt always locked back on an empty mag. I only ran about 200 rounds but it was perfect. Needless to say I am very happy with it!! My Comp M4s should be here tomorrow. ETA: To those concerned with the bleed-off making the hand guard dirty, it is no worse than my AA kit. I think it actually runs a little cleaner in that aspect since it directs the gas forward. I had just a tiny bit of carbon just under the front sight on the right side, and it wiped right off. Also, my KMR never got too hot to hold, just a little warm. 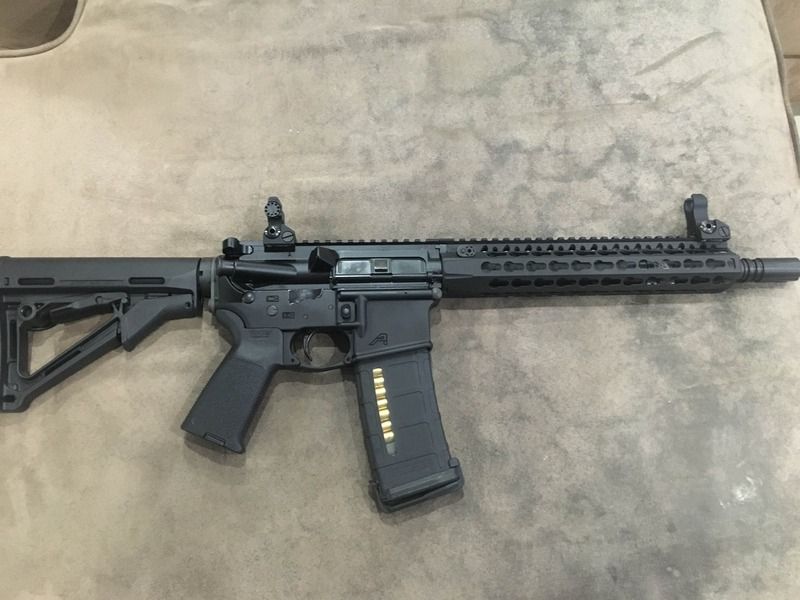
|
|
|
|
[#1]
Awesome thanks for the report. Do you think I could use my low mass carrier from my AA kit instead of theirs?
I'm actually holding off on the.750 kit until they come out with the.625. Going to make a lightweight piston AR sub 6 lbs. |
|
|
|
[#2]
I've been very interested in this kit since Syrac first posted about it. Then I read the thread on WEVO about the Superlative version and was practically sold. I think your pics and info may have just pushed me the rest of the way home. I'll be looking into this in a little while for my current build. Do you foresee any issues with the adjustments on this version? I kinda wish they made a non-adjustable model.
|
|
|
|
[#3]
Quoted:
Awesome thanks for the report. Do you think I could use my low mass carrier from my AA kit instead of theirs? I'm actually holding off on the.750 kit until they come out with the.625. Going to make a lightweight piston AR sub 6 lbs. I would say no to the AA carrier. But I hear there is a low mass carrier in the works. Email them with your requests/questions. The owner will get back to you or you can call him and he will explain things in full detail. Like I said I am using this kit in my SBR build and I have been bothering the shit out of him, but he always answers the phone, or calls me right back, or responds to my emails. Give him a call on Monday or email him now. |
|
|
|
[#4]
Quoted:
I've been very interested in this kit since Syrac first posted about it. Then I read the thread on WEVO about the Superlative version and was practically sold. I think your pics and info may have just pushed me the rest of the way home. I'll be looking into this in a little while for my current build. Do you foresee any issues with the adjustments on this version? I kinda wish they made a non-adjustable model. I don't foresee any issues with the adjustment at all. IMO it is an improvement. If you are worried about it you can take out the adjustment screw and clean the piss out of it after each range trip anyway. And why would you want a non adjustable model out of curiosity? |
|
|
|
[#5]
Just seems simpler. One less thing to worry about.
|
|
|
|
[#6]
Quoted:
Just seems simpler. One less thing to worry about. Well then you could set this kit to the max setting and never have to worry about it again. Kinda the same thing. Just change springs and buffers as you see fit. |
|
|
|
[#7]
That was actually one of the things I had in mind.
 I figure with a full auto carrier and a vltor A5 it should be fine. I was just concerned with something, no matter how unfounded, happening with the adjustment. Since I don't have a need for it, it had me wishing they offered a non-adjustable version of the block. I figure with a full auto carrier and a vltor A5 it should be fine. I was just concerned with something, no matter how unfounded, happening with the adjustment. Since I don't have a need for it, it had me wishing they offered a non-adjustable version of the block.
|
|
|
|
[#8]
Quoted:
That was actually one of the things I had in mind. I figure with a full auto carrier and a vltor A5 it should be fine. I was just concerned with something, no matter how unfounded, happening with the adjustment. Since I don't have a need for it, it had me wishing they offered a non-adjustable version of the block.Better to have and not need, than to need and not have. |
|
|
|
[#9]
I got mine yesterday and got it installed today. GREAT KIT. Gas Block and Carrier were very smooth and no hint of tooling, super easy to install and the directions provided were very efficient. Very happy with the purchase.
 </a>" /> </a>" /> </a>" /> </a>" /> </a>" /> </a>" />
|
|
|
|
[#10]
Quoted:
I've been very interested in this kit since Syrac first posted about it. Then I read the thread on WEVO about the Superlative version and was practically sold. I think your pics and info may have just pushed me the rest of the way home. I'll be looking into this in a little while for my current build. Do you foresee any issues with the adjustments on this version? I kinda wish they made a non-adjustable model. You will not be disappointed at all with this kit. I am VERY happy with my purchase and the customer service with Superlative Arms has been fantastic. |
|
|
|
[#11]
I was interested in the Syrac Kit, but I'm very interested in this since they have a set screw version of the retrofit block.
Did I see a coupon code posted somewhere in the last few days? EDIT: Found thread listing it. Favforum16 was it. |
|
|
|
[#12]
Quoted:
I got mine yesterday and got it installed today. GREAT KIT. Gas Block and Carrier were very smooth and no hint of tooling, super easy to install and the directions provided were very efficient. Very happy with the purchase. http://<a href=http://i1292.photobucket.com/albums/b566/Captainoverkill/DSC00812_zpsxffrkl0a.jpg</a>" />http://<a href=http://i1292.photobucket.com/albums/b566/Captainoverkill/DSC00813_zpsxkywuult.jpg</a>" />http://<a href=http://i1292.photobucket.com/albums/b566/Captainoverkill/DSC00814_zpsk3cbnrey.jpg</a>" /> Could you do me a favor and take pics of the gas block from the front with the rail on? Pics of the top, bottom, and sides would be appreciated. Thanks!! |
|
|
|
[#13]
Quoted:
Could you do me a favor and take pics of the gas block from the front with the rail on? Pics of the top, bottom, and sides would be appreciated. Thanks!! Quoted:
Quoted:
I got mine yesterday and got it installed today. GREAT KIT. Gas Block and Carrier were very smooth and no hint of tooling, super easy to install and the directions provided were very efficient. Very happy with the purchase. http://<a href=http://i1292.photobucket.com/albums/b566/Captainoverkill/DSC00812_zpsxffrkl0a.jpg</a>" />http://<a href=http://i1292.photobucket.com/albums/b566/Captainoverkill/DSC00813_zpsxkywuult.jpg</a>" />http://<a href=http://i1292.photobucket.com/albums/b566/Captainoverkill/DSC00814_zpsk3cbnrey.jpg</a>" /> Could you do me a favor and take pics of the gas block from the front with the rail on? Pics of the top, bottom, and sides would be appreciated. Thanks!! Sure, so you want one looking down inside the handguard (that I understand) but you want one with the handguard on or off form the top and bottom? |
|
|
|
[#14]
Quoted:
I was interested in the Syrac Kit, but I'm very interested in this since they have a set screw version of the retrofit block. Did I see a coupon code posted somewhere in the last few days? EDIT: Found thread listing it. Favforum16 was it. Share that code with everyone you know who's interested in a kit. I want people to know who this company is. |
|
|
|
[#15]
Quoted:
Sure, so you want one looking down inside the handguard (that I understand) but you want one with the handguard on or off form the top and bottom? Quoted:
Quoted:
Quoted:
I got mine yesterday and got it installed today. GREAT KIT. Gas Block and Carrier were very smooth and no hint of tooling, super easy to install and the directions provided were very efficient. Very happy with the purchase. http://<a href=http://i1292.photobucket.com/albums/b566/Captainoverkill/DSC00812_zpsxffrkl0a.jpg</a>" />http://<a href=http://i1292.photobucket.com/albums/b566/Captainoverkill/DSC00813_zpsxkywuult.jpg</a>" />http://<a href=http://i1292.photobucket.com/albums/b566/Captainoverkill/DSC00814_zpsk3cbnrey.jpg</a>" /> Could you do me a favor and take pics of the gas block from the front with the rail on? Pics of the top, bottom, and sides would be appreciated. Thanks!! Sure, so you want one looking down inside the handguard (that I understand) but you want one with the handguard on or off form the top and bottom? Hand guard on for all pics. Take all of them from the front. I just want to see the clearance from all angles. |
|
|
|
[#16]
Looks awesome! I just ordered one of the Sup Arms kits. I emailed them with a few questions and Tony got back to me within minutes. Pretty nice when companies respond on weekends. Will be installing on my 11.5 SBR to use with my Omega can.
|
|
|
|
[#17]
Quoted:
Hand guard on for all pics. Take all of them from the front. I just want to see the clearance from all angles. Quoted:
Quoted:
Quoted:
Quoted:
I got mine yesterday and got it installed today. GREAT KIT. Gas Block and Carrier were very smooth and no hint of tooling, super easy to install and the directions provided were very efficient. Very happy with the purchase. http://<a href=http://i1292.photobucket.com/albums/b566/Captainoverkill/DSC00812_zpsxffrkl0a.jpg</a>" />http://<a href=http://i1292.photobucket.com/albums/b566/Captainoverkill/DSC00813_zpsxkywuult.jpg</a>" />http://<a href=http://i1292.photobucket.com/albums/b566/Captainoverkill/DSC00814_zpsk3cbnrey.jpg</a>" /> Could you do me a favor and take pics of the gas block from the front with the rail on? Pics of the top, bottom, and sides would be appreciated. Thanks!! Sure, so you want one looking down inside the handguard (that I understand) but you want one with the handguard on or off form the top and bottom? Hand guard on for all pics. Take all of them from the front. I just want to see the clearance from all angles. Between a crappy camera and the Bi-Pod Stud getting in the way I was able to get a photo of the top and one that gives the side and bottom. There is plenty of clearance all the way around even on the bottom. Just for giggles I put a Keymod VFG directly below the gas block and there was still clearence. 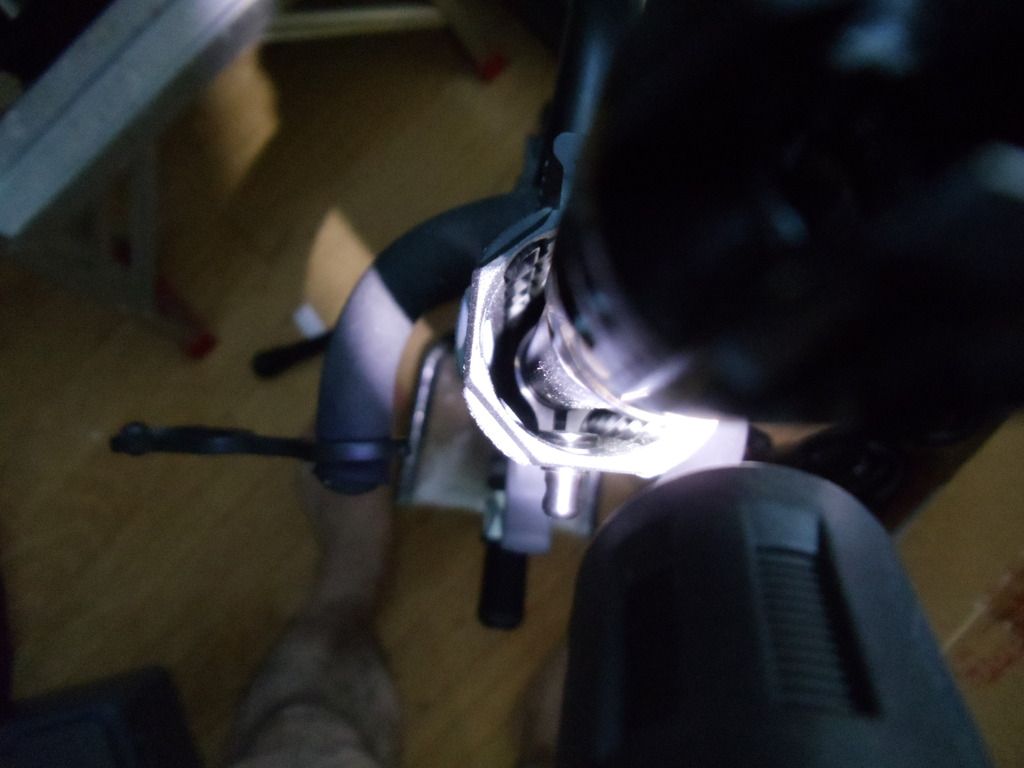 " /> " />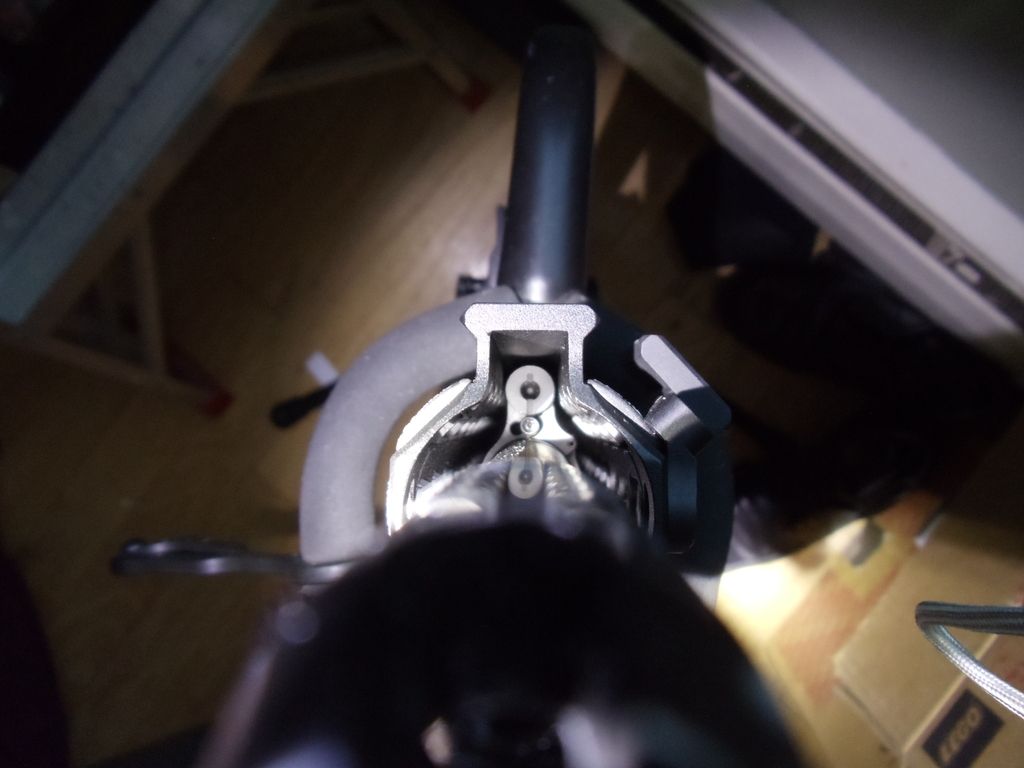 " /> " />
|
|
|
|
[#18]
Quoted:
Between a crappy camera and the Bi-Pod Stud getting in the way I was able to get a photo of the top and one that gives the side and bottom. There is plenty of clearance all the way around even on the bottom. Just for giggles I put a Keymod VFG directly below the gas block and there was still clearence.http://<a href=http://i1292.photobucket.com/albums/b566/Captainoverkill/DSC00825_zpsiiluczio.jpg</a>" />http://<a href=http://i1292.photobucket.com/albums/b566/Captainoverkill/DSC00824_zps38vaqvvn.jpg</a>" /> Quoted:
Quoted:
Quoted:
Quoted:
Quoted:
I got mine yesterday and got it installed today. GREAT KIT. Gas Block and Carrier were very smooth and no hint of tooling, super easy to install and the directions provided were very efficient. Very happy with the purchase. http://<a href=http://i1292.photobucket.com/albums/b566/Captainoverkill/DSC00812_zpsxffrkl0a.jpg</a>" />http://<a href=http://i1292.photobucket.com/albums/b566/Captainoverkill/DSC00813_zpsxkywuult.jpg</a>" />http://<a href=http://i1292.photobucket.com/albums/b566/Captainoverkill/DSC00814_zpsk3cbnrey.jpg</a>" /> Could you do me a favor and take pics of the gas block from the front with the rail on? Pics of the top, bottom, and sides would be appreciated. Thanks!! Sure, so you want one looking down inside the handguard (that I understand) but you want one with the handguard on or off form the top and bottom? Hand guard on for all pics. Take all of them from the front. I just want to see the clearance from all angles. Between a crappy camera and the Bi-Pod Stud getting in the way I was able to get a photo of the top and one that gives the side and bottom. There is plenty of clearance all the way around even on the bottom. Just for giggles I put a Keymod VFG directly below the gas block and there was still clearence.http://<a href=http://i1292.photobucket.com/albums/b566/Captainoverkill/DSC00825_zpsiiluczio.jpg</a>" />http://<a href=http://i1292.photobucket.com/albums/b566/Captainoverkill/DSC00824_zps38vaqvvn.jpg</a>" /> Thanks!! There's more room than I thought under there. |
|
|
|
[#19]
Yup, no worries about adding a Keymod VFG or Rail Covers. The only thing that might cause a clearence issue is the Stud for the bipod but on an SBR you wont be using one of those. Install was easy, just read the directions and it goes together easy.
|
|
|
|
[#20]
Quoted:
Yup, no worries about adding a Keymod VFG or Rail Covers. The only thing that might cause a clearence issue is the Stud for the bipod but on an SBR you wont be using one of those. Install was easy, just read the directions and it goes together easy. How did you get the gas block perfectly straight so it didn't touch? Just by eyeing it like the instructions say or did you have to put the hand guard on and test fit it a few times? |
|
|
|
[#21]
Quoted:
How did you get the gas block perfectly straight so it didn't touch? Just by eyeing it like the instructions say or did you have to put the hand guard on and test fit it a few times? Quoted:
Quoted:
Yup, no worries about adding a Keymod VFG or Rail Covers. The only thing that might cause a clearence issue is the Stud for the bipod but on an SBR you wont be using one of those. Install was easy, just read the directions and it goes together easy. How did you get the gas block perfectly straight so it didn't touch? Just by eyeing it like the instructions say or did you have to put the hand guard on and test fit it a few times? I used the bushing and spent a fair amount of time making sure the rod didnt bind. I aligned it by eyeball/close by eye and tighted the screws to 15in lb. Then I lightly tapped it into final positiin with a nylon jewelers hammer untill there was no binding no matter how I spun the rod. Also there is a small amount of play with the anti rotate tab untill you torque the cross bolts down.... What can I say I am an OCD perfectionist. |
|
|
|
[#22]
Quoted:
I used the bushing and spent a fair amount of time making sure the rod didnt bind. I aligned it by eyeball/close by eye and tighted the screws to 15in lb. Then I lightly tapped it into final positiin with a nylon jewelers hammer untill there was no binding no matter how I spun the rod. Also there is a small amount of play with the anti rotate tab untill you torque the cross bolts down.... What can I say I am an OCD perfectionist. Quoted:
Quoted:
Quoted:
Yup, no worries about adding a Keymod VFG or Rail Covers. The only thing that might cause a clearence issue is the Stud for the bipod but on an SBR you wont be using one of those. Install was easy, just read the directions and it goes together easy. How did you get the gas block perfectly straight so it didn't touch? Just by eyeing it like the instructions say or did you have to put the hand guard on and test fit it a few times? I used the bushing and spent a fair amount of time making sure the rod didnt bind. I aligned it by eyeball/close by eye and tighted the screws to 15in lb. Then I lightly tapped it into final positiin with a nylon jewelers hammer untill there was no binding no matter how I spun the rod. Also there is a small amount of play with the anti rotate tab untill you torque the cross bolts down.... What can I say I am an OCD perfectionist. So when can we expect a range report? |
|
|
|
[#23]
Quoted:
So when can we expect a range report? Quoted:
Quoted:
Quoted:
Quoted:
Yup, no worries about adding a Keymod VFG or Rail Covers. The only thing that might cause a clearence issue is the Stud for the bipod but on an SBR you wont be using one of those. Install was easy, just read the directions and it goes together easy. How did you get the gas block perfectly straight so it didn't touch? Just by eyeing it like the instructions say or did you have to put the hand guard on and test fit it a few times? I used the bushing and spent a fair amount of time making sure the rod didnt bind. I aligned it by eyeball/close by eye and tighted the screws to 15in lb. Then I lightly tapped it into final positiin with a nylon jewelers hammer untill there was no binding no matter how I spun the rod. Also there is a small amount of play with the anti rotate tab untill you torque the cross bolts down.... What can I say I am an OCD perfectionist. So when can we expect a range report? Depending on how my schedule/life play out either 26th, 30th or 31st this month are the next 3 days I am off and an indoor range is open. And yes I will let you know how it goes. |
|
|
|
[#24]
Got a chance to take it to the range today. Everything worked flawlessly! The interesting thing that I confirmed is how the bleed off system works. If you turn the adjustment screw all the way clockwise it's shut off like any other adjustable. Full open is 4.5 turns Counter Clock Wise from closed. Then you keep turning CCW past full open 1/2 turn to divert the gas out the bleed off until the bolt won't hold open. Then you turn it back 1/4 turn at a time Clockwise until it holds open again.
It took 7 rounds to dial it in, from there I didn't have a hick up. |
|
|
|
[#25]
Quoted:
Got a chance to take it to the range today. Everything worked flawlessly! The interesting thing that I confirmed is how the bleed off system works. If you turn the adjustment screw all the way clockwise it's shut off like any other adjustable. Full open is 4.5 turns Counter Clock Wise from closed. Then you keep turning CCW past full open 1/2 turn to divert the gas out the bleed off until the bolt won't hold open. Then you turn it back 1/4 turn at a time Clockwise until it holds open again. It took 7 rounds to dial it in, from there I didn't have a hick up. Nice. Did you see I got mine installed? |
|
|
|
[#26]
Quoted:
Nice. Did you see I got mine installed? Quoted:
Quoted:
Got a chance to take it to the range today. Everything worked flawlessly! The interesting thing that I confirmed is how the bleed off system works. If you turn the adjustment screw all the way clockwise it's shut off like any other adjustable. Full open is 4.5 turns Counter Clock Wise from closed. Then you keep turning CCW past full open 1/2 turn to divert the gas out the bleed off until the bolt won't hold open. Then you turn it back 1/4 turn at a time Clockwise until it holds open again. It took 7 rounds to dial it in, from there I didn't have a hick up. Nice. Did you see I got mine installed? No did you start another thread? BTW since it was an indoor range I could only do a 100ft (33.3yd) zero but here is a shot of my best 10 shot group standing unsupported. Now I just have to wait until spring to take it outdoor on a bipod. 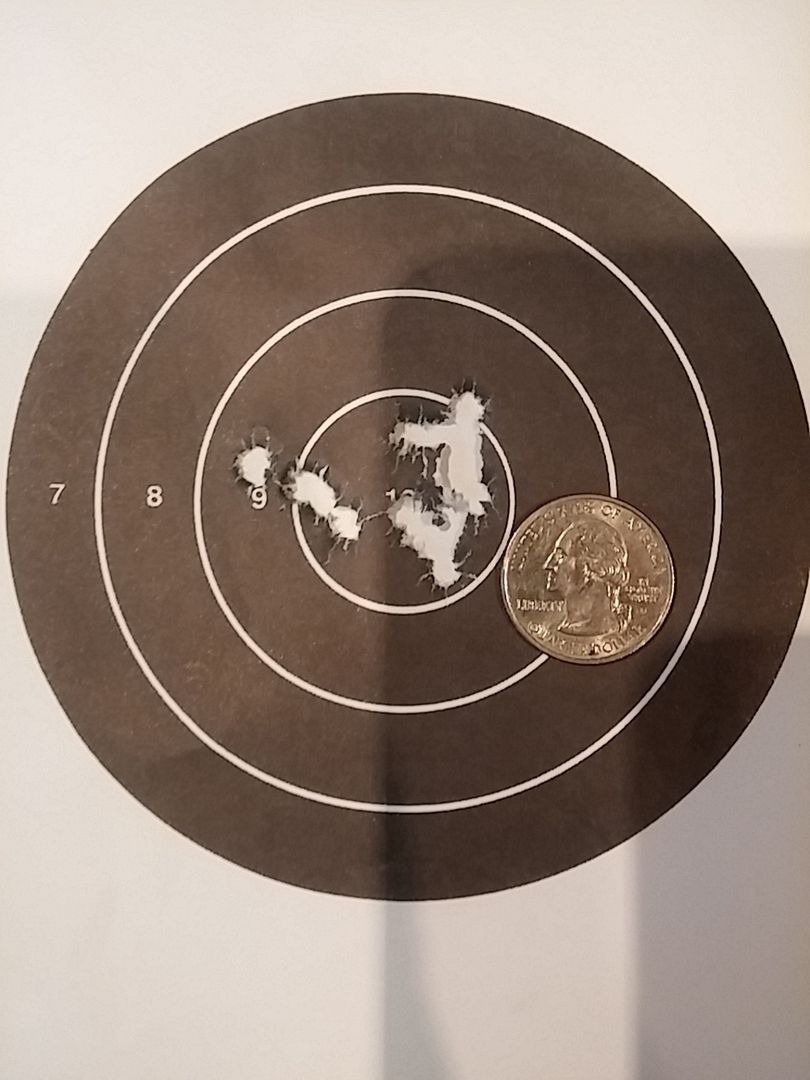 " /> " />
|
|
|
|
[#27]
Quoted:
No did you start another thread? BTW since it was an indoor range I could only do a 100ft (33.3yd) zero but here is a shot of my best 10 shot group standing unsupported. Now I just have to wait until spring to take it outdoor on a bipod. http://<a href=http://i1292.photobucket.com/albums/b566/Captainoverkill/20160131_171619_zpsr7wlb0ru.jpg</a>" /> Quoted:
Quoted:
Quoted:
Got a chance to take it to the range today. Everything worked flawlessly! The interesting thing that I confirmed is how the bleed off system works. If you turn the adjustment screw all the way clockwise it's shut off like any other adjustable. Full open is 4.5 turns Counter Clock Wise from closed. Then you keep turning CCW past full open 1/2 turn to divert the gas out the bleed off until the bolt won't hold open. Then you turn it back 1/4 turn at a time Clockwise until it holds open again. It took 7 rounds to dial it in, from there I didn't have a hick up. Nice. Did you see I got mine installed? No did you start another thread? BTW since it was an indoor range I could only do a 100ft (33.3yd) zero but here is a shot of my best 10 shot group standing unsupported. Now I just have to wait until spring to take it outdoor on a bipod. http://<a href=http://i1292.photobucket.com/albums/b566/Captainoverkill/20160131_171619_zpsr7wlb0ru.jpg</a>" /> Yea I started another thread. Here. |
|
|
|
[#28]
Quoted:
No did you start another thread? BTW since it was an indoor range I could only do a 100ft (33.3yd) zero but here is a shot of my best 10 shot group standing unsupported. Now I just have to wait until spring to take it outdoor on a bipod. http://<a href=http://i1292.photobucket.com/albums/b566/Captainoverkill/20160131_171619_zpsr7wlb0ru.jpg</a>" /> Quoted:
Quoted:
Quoted:
Got a chance to take it to the range today. Everything worked flawlessly! The interesting thing that I confirmed is how the bleed off system works. If you turn the adjustment screw all the way clockwise it's shut off like any other adjustable. Full open is 4.5 turns Counter Clock Wise from closed. Then you keep turning CCW past full open 1/2 turn to divert the gas out the bleed off until the bolt won't hold open. Then you turn it back 1/4 turn at a time Clockwise until it holds open again. It took 7 rounds to dial it in, from there I didn't have a hick up. Nice. Did you see I got mine installed? No did you start another thread? BTW since it was an indoor range I could only do a 100ft (33.3yd) zero but here is a shot of my best 10 shot group standing unsupported. Now I just have to wait until spring to take it outdoor on a bipod. http://<a href=http://i1292.photobucket.com/albums/b566/Captainoverkill/20160131_171619_zpsr7wlb0ru.jpg</a>" /> How noticeable is the gas bleed off? I emailed the company and haven't heard anything back but I was wondering as I am a lefty and shoot with a "C- Clamp" grip and wondered about the excess gas being a problem for my hand. Thanks! |
|
|
|
[#29]
Quoted:
How noticeable is the gas bleed off? I emailed the company and haven't heard anything back but I was wondering as I am a lefty and shoot with a "C- Clamp" grip and wondered about the excess gas being a problem for my hand. Thanks! Quoted:
Quoted:
Quoted:
Quoted:
Got a chance to take it to the range today. Everything worked flawlessly! The interesting thing that I confirmed is how the bleed off system works. If you turn the adjustment screw all the way clockwise it's shut off like any other adjustable. Full open is 4.5 turns Counter Clock Wise from closed. Then you keep turning CCW past full open 1/2 turn to divert the gas out the bleed off until the bolt won't hold open. Then you turn it back 1/4 turn at a time Clockwise until it holds open again. It took 7 rounds to dial it in, from there I didn't have a hick up. Nice. Did you see I got mine installed? No did you start another thread? BTW since it was an indoor range I could only do a 100ft (33.3yd) zero but here is a shot of my best 10 shot group standing unsupported. Now I just have to wait until spring to take it outdoor on a bipod. http://<a href=http://i1292.photobucket.com/albums/b566/Captainoverkill/20160131_171619_zpsr7wlb0ru.jpg</a>" /> How noticeable is the gas bleed off? I emailed the company and haven't heard anything back but I was wondering as I am a lefty and shoot with a "C- Clamp" grip and wondered about the excess gas being a problem for my hand. Thanks! It bleeds out the front. If you look at the small adjustment screw there is a hole to the side of it. I didnt have any problems but then again I have keymod covers on my rail. |
|
|
|
[#30]
Quoted:
How noticeable is the gas bleed off? I emailed the company and haven't heard anything back but I was wondering as I am a lefty and shoot with a "C- Clamp" grip and wondered about the excess gas being a problem for my hand. Thanks! Quoted:
Quoted:
Quoted:
Quoted:
Got a chance to take it to the range today. Everything worked flawlessly! The interesting thing that I confirmed is how the bleed off system works. If you turn the adjustment screw all the way clockwise it's shut off like any other adjustable. Full open is 4.5 turns Counter Clock Wise from closed. Then you keep turning CCW past full open 1/2 turn to divert the gas out the bleed off until the bolt won't hold open. Then you turn it back 1/4 turn at a time Clockwise until it holds open again. It took 7 rounds to dial it in, from there I didn't have a hick up. Nice. Did you see I got mine installed? No did you start another thread? BTW since it was an indoor range I could only do a 100ft (33.3yd) zero but here is a shot of my best 10 shot group standing unsupported. Now I just have to wait until spring to take it outdoor on a bipod. http://<a href=http://i1292.photobucket.com/albums/b566/Captainoverkill/20160131_171619_zpsr7wlb0ru.jpg</a>" /> How noticeable is the gas bleed off? I emailed the company and haven't heard anything back but I was wondering as I am a lefty and shoot with a "C- Clamp" grip and wondered about the excess gas being a problem for my hand. Thanks! Not bad at all. |
|
|
|
[#31]
I may have to give this a try. Shooting suppressed and left handed still sucks with my current adjustable gas block. The only thing making me hold off is having to send my upper back to ADCO to have the GB pinned.
How much gas would still be coming out using the piston kit, vs just the GB with bleed off? |
|
|
|
[#32]
Quoted:
I may have to give this a try. Shooting suppressed and left handed still sucks with my current adjustable gas block. The only thing making me hold off is having to send my upper back to ADCO to have the GB pinned. How much gas would still be coming out using the piston kit, vs just the GB with bleed off? I really couldn't tell you. But if I had to guess it would be less using the piston kit since there is no gas tube going back into the action. |
|
|
|
[#33]
Captain Overkill and ahrion,
Ten four! I sent the company another email yesterday and when it asked me to verify my message or whatever, I realized my first one I sent must not have went through. Anyways, Mr. Russo emailed me back and asked me to call him and when I did he was VERY open about the system and cleared up all my questions. From what you guys and Mr. Russo told me I think that I was figuring alot more gas bleeds off than what actually comes out of the port. He stated he has a LEA that uses them on full auto and their handguards don't get too hot and that's on full auto. So I don't think I have anything to worry about. Figured better safe than sorry! Thanks for the input guys! I'm pretty excited to try one of these out with the modifications they've made over the Syrac setup. |
|
|
|
[#34]
Quoted:
Captain Overkill and ahrion, Ten four! I sent the company another email yesterday and when it asked me to verify my message or whatever, I realized my first one I sent must not have went through. Anyways, Mr. Russo emailed me back and asked me to call him and when I did he was VERY open about the system and cleared up all my questions. From you guys and Mr. Russo told me I think that I was figuring alot more gas bleeds off than what actually comes out of the port. He stated he has a LEA that uses them on full auto and their handguards don't get too hot and that's on full auto. So I don't think I have anything to worry about. Figured better safe than sorry! Thanks for the input guys! I'm pretty excited to try one of these out with the modifications they've made over the Syrac setup. Good to hear! And quit posting so much.
|
|
|
|
[#35]
Quoted:
Good to hear! And quit posting so much. Quoted:
Quoted:
Captain Overkill and ahrion, Ten four! I sent the company another email yesterday and when it asked me to verify my message or whatever, I realized my first one I sent must not have went through. Anyways, Mr. Russo emailed me back and asked me to call him and when I did he was VERY open about the system and cleared up all my questions. From you guys and Mr. Russo told me I think that I was figuring alot more gas bleeds off than what actually comes out of the port. He stated he has a LEA that uses them on full auto and their handguards don't get too hot and that's on full auto. So I don't think I have anything to worry about. Figured better safe than sorry! Thanks for the input guys! I'm pretty excited to try one of these out with the modifications they've made over the Syrac setup. Good to hear! And quit posting so much. I have taken the "read more post less" quote to the furthest extreme. |
|
|
|
[#36]
WOW, this is a great looking setup, I am getting ready for my second build and would like to incorporate this system, didn't see any specs of the overall outer diameter of the gas block?? or I guess the "height" [radius since that is the clearance area that's critical]
is there a list of handguards that will fit?, I was thinking of using a SLR Solo m-lok handguard....it has a 1.3" I.D. thanks doug |
|
|
|
[#37]
Quoted:
WOW, this is a great looking setup, I am getting ready for my second build and would like to incorporate this system, didn't see any specs of the overall outer diameter of the gas block?? or I guess the "height" [radius since that is the clearance area that's critical] is there a list of handguards that will fit?, I was thinking of using a SLR Solo m-lok handguard....it has a 1.3" I.D. thanks doug Clamp on specs. 
Solid specs. 
|
|
|
|
[#38]
Thanks, I looked right over that pic on their page, but it looks like its almost 1.6" for that gas block......damn my luck
doug ***edit*** I just looked up the BCM KMR rail and it says 1.3 inside diameter as well, I might just be able to make it work....... thanks again |
|
|
|
[#39]
Quoted:
Thanks, I looked right over that pic on their page, but it looks like its almost 1.6" for that gas block......damn my luck doug ***edit*** I just looked up the BCM KMR rail and it says 1.3 inside diameter as well, I might just be able to make it work....... thanks again When they say 1.3" inside diameter they are not counting the distance right under the rail. That will add something to the ID. Just make sure that the part right under the rail is wider than the .410" where the piston goes through the block. |
|
|
|
[#40]
Quoted:
Thanks, I looked right over that pic on their page, but it looks like its almost 1.6" for that gas block......damn my luck doug ***edit*** I just looked up the BCM KMR rail and it says 1.3 inside diameter as well, I might just be able to make it work....... thanks again Doug, Hey I just found this on SLR's site. You are in luck fella! http://slrrifleworks.com/index.php?route=product/category&path=131 |
|
|
|
[#41]
Quoted:
Doug, Hey I just found this on SLR's site. You are in luck fella! http://slrrifleworks.com/index.php?route=product/category&path=131 Quoted:
Quoted:
Thanks, I looked right over that pic on their page, but it looks like its almost 1.6" for that gas block......damn my luck doug ***edit*** I just looked up the BCM KMR rail and it says 1.3 inside diameter as well, I might just be able to make it work....... thanks again Doug, Hey I just found this on SLR's site. You are in luck fella! http://slrrifleworks.com/index.php?route=product/category&path=131 hey Thanks for that.......I am in..... doug |
|
|
|
[#42]
ok, I probably should just email superlative, but you guys seem to have all the answers and others might have this question also so here goes:
reading the install instructions it says to push the carrier forward [sans bolt] to locate the gas block [it will move just a bit] so I am wondering how this affects the [one] usually pre dimple in the barrel, will it not sit in that dimple so you can then mark and drill the second dimple? I have done this on my two DI builds but since it indicates that the gasblock will move forward slightly before tightening I am just wondering if I will have to acquire a barrel that has no dimples and then after setting that dimension drill first one, then the second dimple? thanks and I hope I am not offending anyone with my incessant questions ;-) doug |
|
|
|
[#43]
Quoted:
When they say 1.3" inside diameter they are not counting the distance right under the rail. That will add something to the ID. Just make sure that the part right under the rail is wider than the .410" where the piston goes through the block. Quoted:
Quoted:
Thanks, I looked right over that pic on their page, but it looks like its almost 1.6" for that gas block......damn my luck doug ***edit*** I just looked up the BCM KMR rail and it says 1.3 inside diameter as well, I might just be able to make it work....... thanks again When they say 1.3" inside diameter they are not counting the distance right under the rail. That will add something to the ID. Just make sure that the part right under the rail is wider than the .410" where the piston goes through the block. ^Correct. You also have to make sure the upper channel of the rail is relieved enough to allow proper fitment of the gas block once it is installed on the barrel. Case in point, my ALG EMR V3 could fit the gas block inside the handguard when doing a test fit, but when I installed the gas block onto the barrel and tried to install the handguard over the barrel nut, it would not fit without taking a file to the upper channel of the ALG EMR. If you look closely at the handguards known to work with the SA/Syrac kits (BCM KMR, MI, etc...), you'll see that the upper channels of those handguards have been machined more than those that don't work without some modification (ie: ALG EMR). It's also worth noting that I tried both the clamp-on and the solid version of the gas blocks, but the issue was the gas block height above the barrel, causing my problems. I've since sold the EMR and looking at a CMMG RKM rail for my SA piston kit build. I'll update everyone as soon as parts come in. |
|
|
|
[#44]
So I have a question for y'all. What receiver extension are you guys using? PWS, POF, mil-spec, A5? I know the BCG has skids but I wondered if it still wore groves into mil-spec and A5 RE's. I prefer to run A5's and hope it won't be a problem.
|
|
|
|
[#45]
Quoted:
So I have a question for y'all. What receiver extension are you guys using? PWS, POF, mil-spec, A5? I know the BCG has skids but I wondered if it still wore groves into mil-spec and A5 RE's. I prefer to run A5's and hope it won't be a problem. I have the Vltor RE-10 (6 position version of RE-A5) and can say so far I have no noticible wear. Granted I only have about 200 rounds on it but am not worried. |
|
|
|
[#46]
Quoted:
I have the Vltor RE-10 (6 position version of RE-A5) and can say so far I have no noticible wear. Granted I only have about 200 rounds on it but am not worried. Quoted:
Quoted:
So I have a question for y'all. What receiver extension are you guys using? PWS, POF, mil-spec, A5? I know the BCG has skids but I wondered if it still wore groves into mil-spec and A5 RE's. I prefer to run A5's and hope it won't be a problem. I have the Vltor RE-10 (6 position version of RE-A5) and can say so far I have no noticible wear. Granted I only have about 200 rounds on it but am not worried. Awesome that's what I hoped to hear. I forgot to ask Tony that the other day. |
|
|
|
[#47]
I emailed these guys , never heard back.....prob just busy, just wondering if they are going to offer the BCG in NiB or hard chrome maybe?
thanks doug |
|
|
|
[#48]
Quoted:
I emailed these guys , never heard back.....prob just busy, just wondering if they are going to offer the BCG in NiB or hard chrome maybe? thanks doug I wonder how a coating would hold up to the piston rod. Where as it's currently a surface treatment that's not an issue. You might try to call him if you don't hear back from your email. |
|
|
|
[#49]
Quoted:
I wonder how a coating would hold up to the piston rod. Where as it's currently a surface treatment that's not an issue. You might try to call him if you don't hear back from your email. Quoted:
Quoted:
I emailed these guys , never heard back.....prob just busy, just wondering if they are going to offer the BCG in NiB or hard chrome maybe? thanks doug I wonder how a coating would hold up to the piston rod. Where as it's currently a surface treatment that's not an issue. You might try to call him if you don't hear back from your email. I talked to Tony yesterday because I received my kit. This thing is freaking light, probably half the weight of the Adams Arms. I originally thought the piston rod was 416-R stainless steel, however he said it was an expensive and very hard and corrosive resistant steel, which needs a different process to be melonited. He told me because I asked him why the rod wasn't melonited to begin with because stainless steel can be melonited. He said it is much stronger than 416-R. However I don't remember what kind of steel it is. I think he said it was HP something or other. I'm sure you could MADBlack coat these and it would be nice, perhaps enhance functionality. |
|
|
|
[#50]
Quoted:
I talked to Tony yesterday because I received my kit. This thing is freaking light, probably half the weight of the Adams Arms. I originally thought the piston rod was 416-R stainless steel, however he said it was an expensive and very hard and corrosive resistant steel, which needs a different process to be melonited. He told me because I asked him why the rod wasn't melonited to begin with because stainless steel can be melonited. He said it is much stronger than 416-R. However I don't remember what kind of steel it is. I think he said it was HP something or other. I'm sure you could MADBlack coat these and it would be nice, perhaps enhance functionality. Quoted:
Quoted:
Quoted:
I emailed these guys , never heard back.....prob just busy, just wondering if they are going to offer the BCG in NiB or hard chrome maybe? thanks doug I wonder how a coating would hold up to the piston rod. Where as it's currently a surface treatment that's not an issue. You might try to call him if you don't hear back from your email. I talked to Tony yesterday because I received my kit. This thing is freaking light, probably half the weight of the Adams Arms. I originally thought the piston rod was 416-R stainless steel, however he said it was an expensive and very hard and corrosive resistant steel, which needs a different process to be melonited. He told me because I asked him why the rod wasn't melonited to begin with because stainless steel can be melonited. He said it is much stronger than 416-R. However I don't remember what kind of steel it is. I think he said it was HP something or other. I'm sure you could MADBlack coat these and it would be nice, perhaps enhance functionality. I was more wondering about a different coating on the BCG than the rod itself. Where the rod appeared to be untreated or coated, I just wondered about a NiB or hard chrome on the BCG chipping. |
|
|
 Win a FREE Membership!
Sign up for the ARFCOM weekly newsletter and be entered to win a free ARFCOM membership. One new winner* is announced every week!
You will receive an email every Friday morning featuring the latest chatter from the hottest topics, breaking news surrounding legislation, as well as exclusive deals only available to ARFCOM email subscribers.

AR15.COM is the world's largest firearm community and is a gathering place for firearm enthusiasts of all types.
From hunters and military members, to competition shooters and general firearm enthusiasts, we welcome anyone who values and respects the way of the firearm.

Subscribe to our monthly Newsletter to receive firearm news, product discounts from your favorite Industry Partners, and more.
Copyright © 1996-2024 AR15.COM LLC. All Rights Reserved.
Any use of this content without express written consent is prohibited.
AR15.Com reserves the right to overwrite or replace any affiliate, commercial, or monetizable links, posted by users, with our own.


