|
Posted: 9/11/2009 10:48:33 AM EDT
First off, guys, I’d like to thank everyone in Retro section, it’s great to be able to discuss the historical minutiae of this weapon system that we all love, and a lot of great research has been done through this site. I remember when anything with triangle handguards was still considered “an A1,” and any carbine with a fixed carry handle was a “CAR-15.”
I’ve always been a bit of a history buff, it’s what I’ve studied, what I got my degree in. WWII aviation has always been a passion of mine as well, as has scale modeling, so I’ve come to this Retro Black Rifle disease and brought the obsessive and sometimes anal retentive love of tiny details with me. One of the most difficult things about WWII aviation is that most of the aircraft that I study are no longer in service, and surviving examples are very few, and there’s extremely limited access to them. Myself and other researchers have always wished that there were servicemen as anal retentive as we are while they were in service so that they could have been documented in real time, rather than scrambling around sixty years in the future trying to figure things out from grainy period photographs. With retro rifles, the situation is a little bit better, but not by much, but as we all well know, if you look hard enough, you can find little retro gems tucked away now and again, this was one of those opportunities, and I’ve tried my very best to document it as well as I could for all of you and for posterity, hopefully it’ll answer any questions there may be about the M231 Port Firing Weapon, though I’m sure you guys’ll be able to think of more! This story actually begins in the summer of 2007, when I learned that there were still M231s listed on my Brigade’s property books as a Mechanized Infantry Brigade. The firing ports have all long since been covered over on the Bradley’s the FPWs have remained in the supply line. Fast forward a couple of years and one deployment later, the brigade reorganized, and I found myself in a Combined Arms Battalion, two companies of Bradley’s, and two companies of Tanks. Long story short, during a combined exercise by the battalion, I managed to “acquire” an M231 for use on my tank, the “Tank Commander’s Trash Scraper,” I called it. Incidentally, a hard mounted version of the M231 was, for a short time considered for inclusion in the “TUSK,” Tank Urban Survival Kit, with a 90 round drum as the “Tank Commander’s Light Automatic Weapon.” As far as I know, the TUSK kits never ended up including it, and the idea was dropped, probably due to impracticality. I was only able to use the M231 for one day, so I did not have an opportunity to do any measurements, but it did have to be cleaned, and therefore fully disassembled. I did not have the opportunity to fire live rounds, either, only blanks. 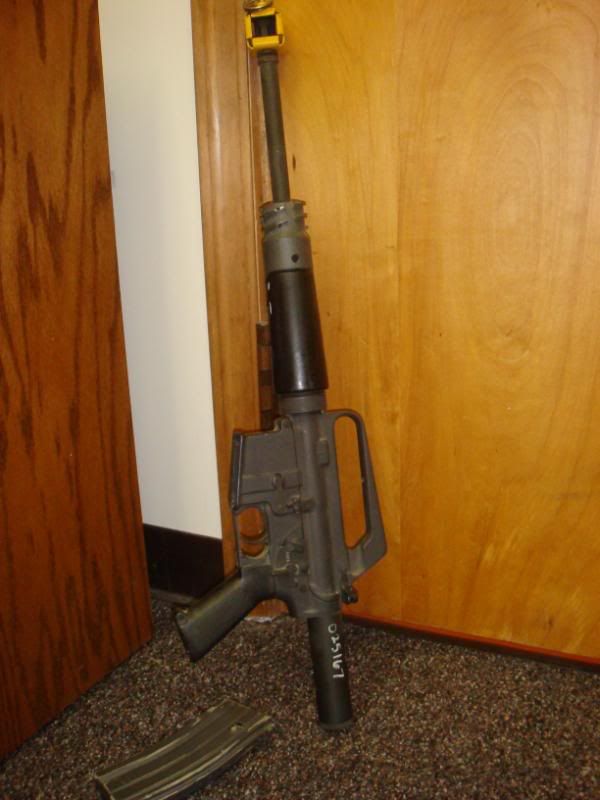
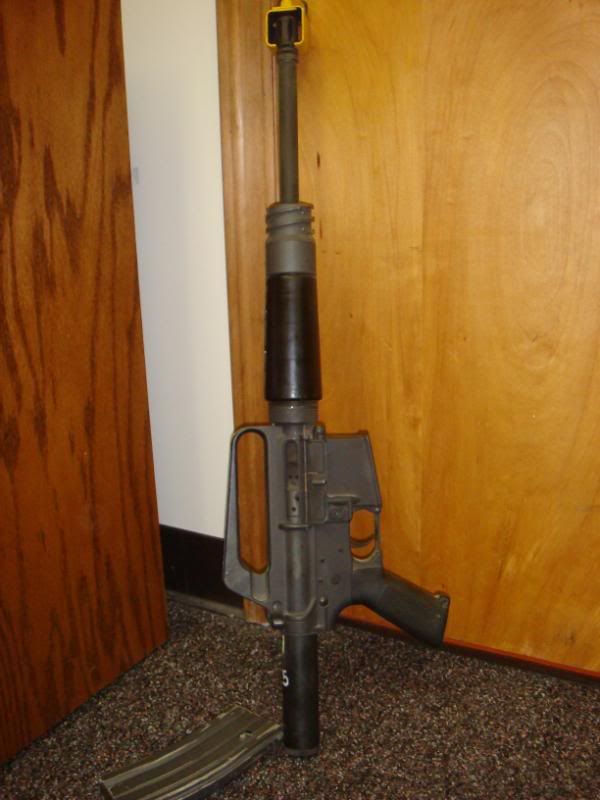
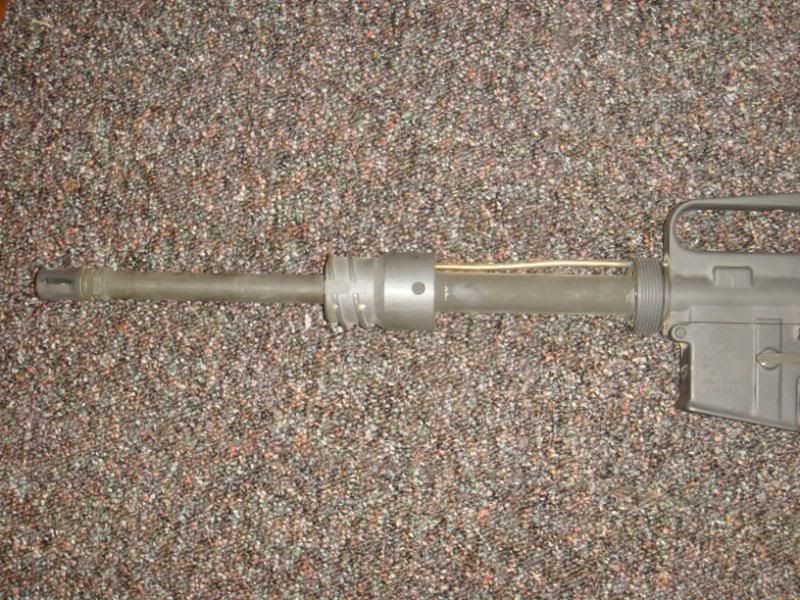
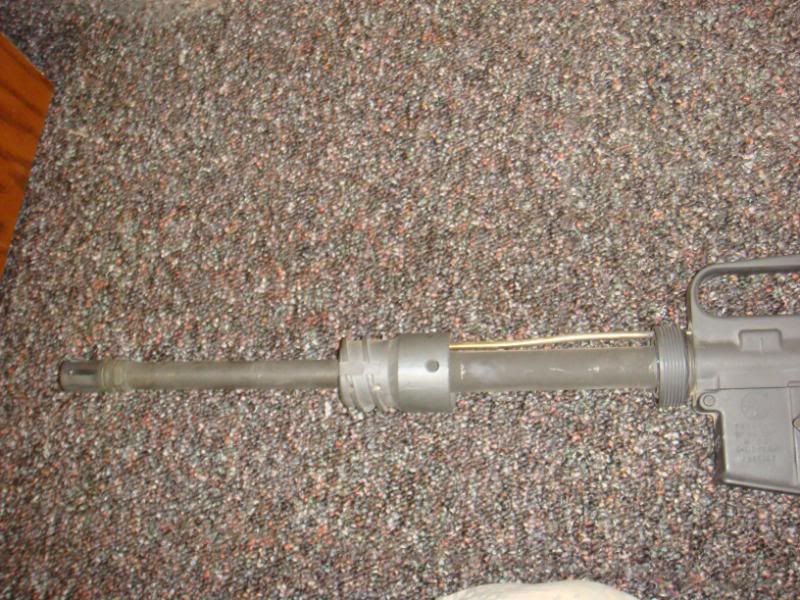
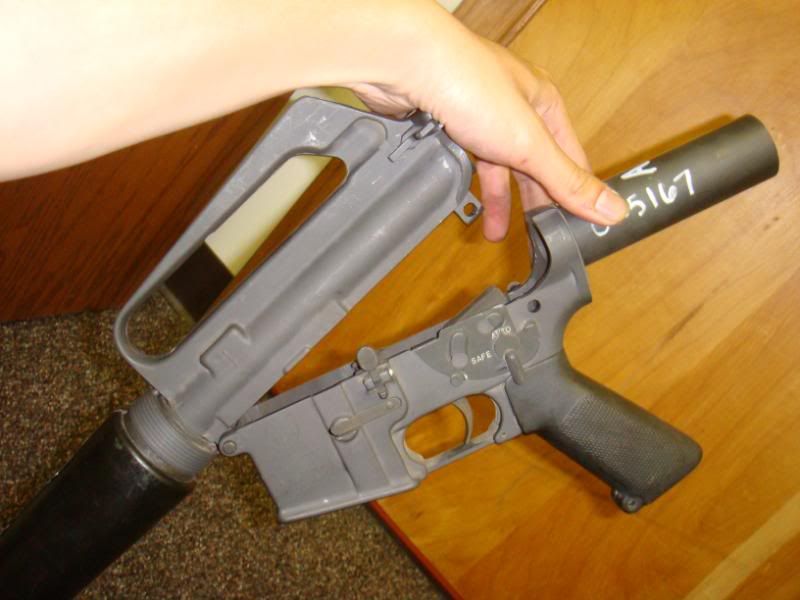
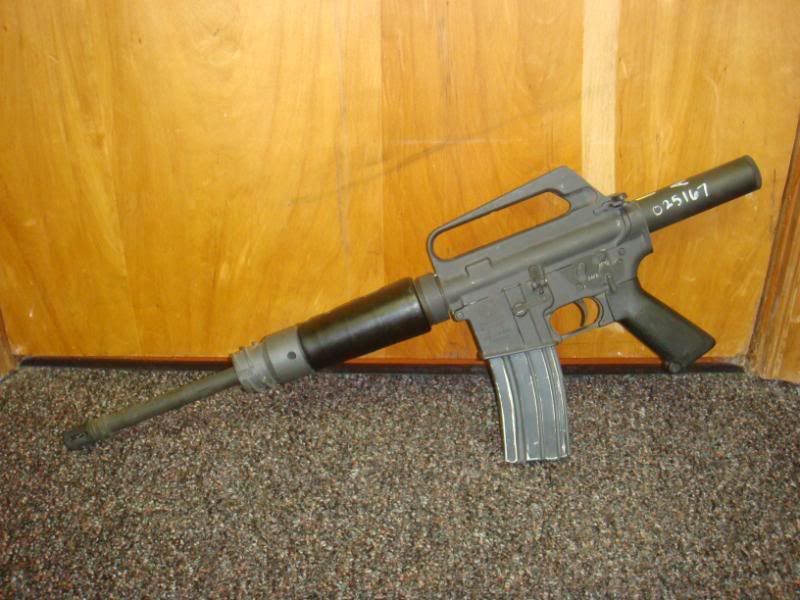
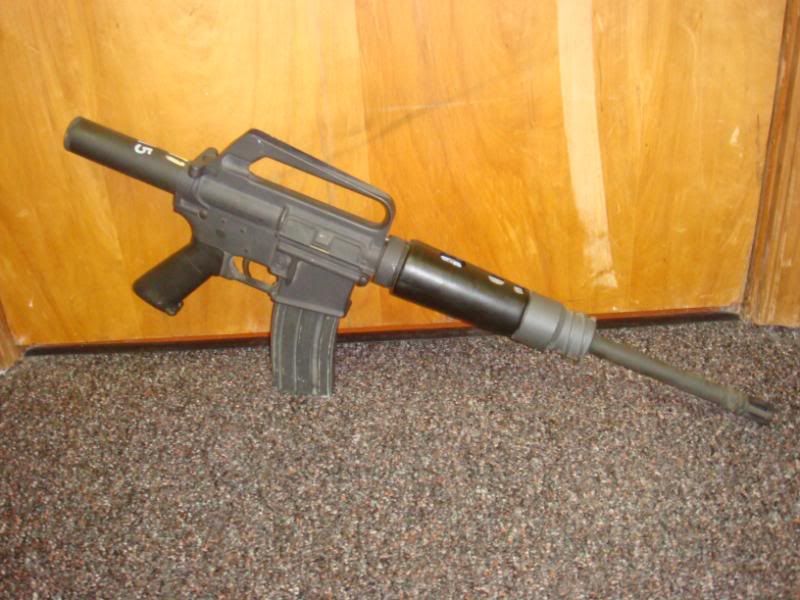
Just some basic layout pics, as you can see, the yellow M4 blank adapter is still attached. 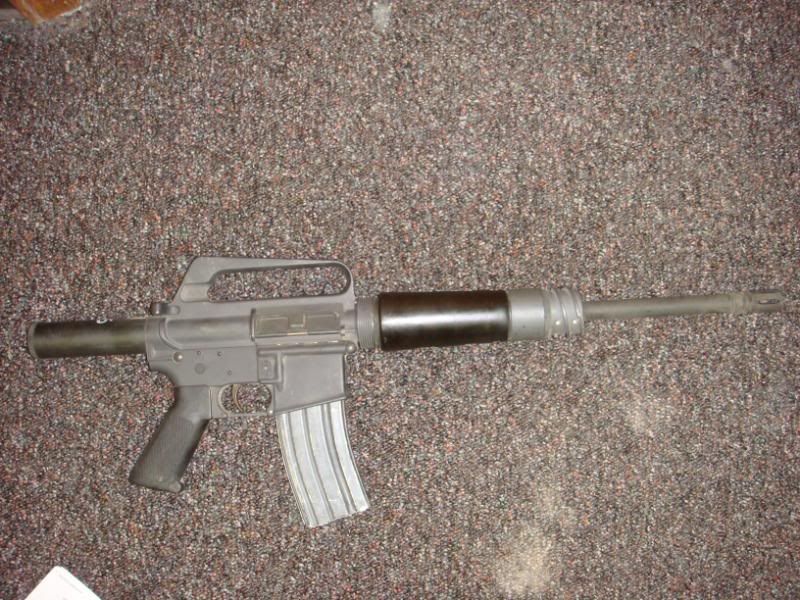
Despite not having the opportunity to fire live round, I did get to use it in a somewhat “tactical” situation. My impression was this: for starters, as has been well documented, it fires way too fast. While it was relatively controllable using blanks, full power live rounds would have muzzle flip from hell. If you imagine that a normal AR/M16 firing sounds like: pop…pop…pop on semi, pap-pap-pap-pap on auto, the M231 would sound like: pfffffffffffft-click. When I got it, it was already disgusting inside, it was obvious it had probably not been cleaned in a decade, as you will see, carbon was crusted on the interior parts. Nevertheless, even firing the notoriously filthy and unreliable blanks, it cycled continuously without a single hiccup throughout the exercise, which I did not expect at all. I have the utmost confidence in a well tuned carbine setup, but I had always figured the M231 to be something of an unstable system, I was not expecting it to run like a sewing machine, especially in the condition it was in. Instead, I got the distinct impression that it was firing so fast, it never even got the chance to malfunction. Firing was just like firing an AR pistol, holding the handguards, keeping the short buffer tube off my shoulder and sighting down the carry handle sight groove, obviously firing blanks, I can’t make any comment on accuracy, and there are no sights mounted, but it is definitely an area weapon for suppression and close in “trash scraping.” Starting from the front, the flash hider was an A1, secured with a lock ring. 


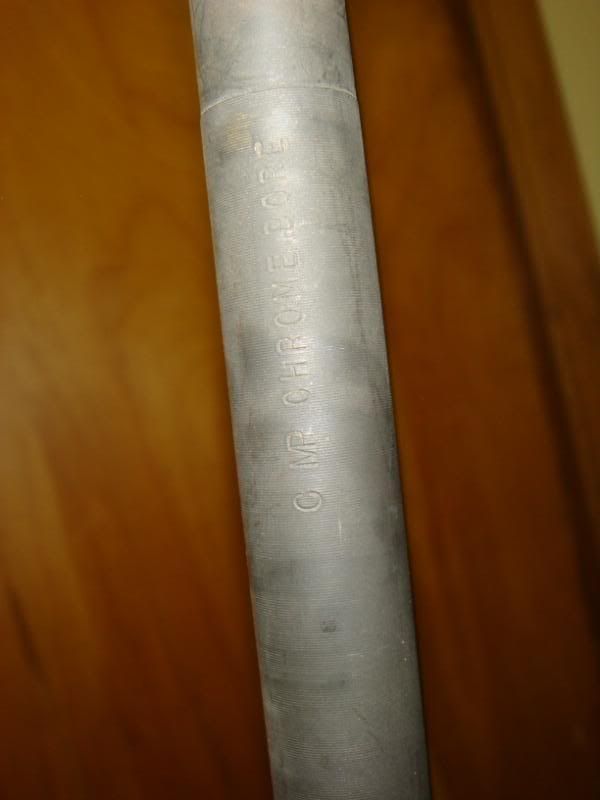
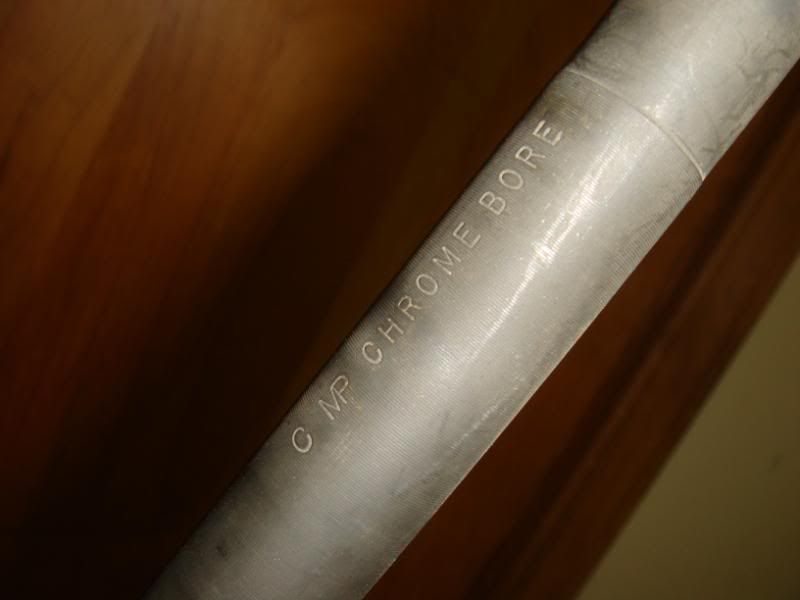
Barrel is marked: C MP CHROME BORE, implying a 1/12 twist, which means it’s probably got about a snowball’s chance in hell of stabilizing M865, though M855 should be fine well within the effective range of the sighting configuration. Obviously, the M193 and M196 it was originally designed for should offer no problems, but those loads are no longer readily in the supply system. 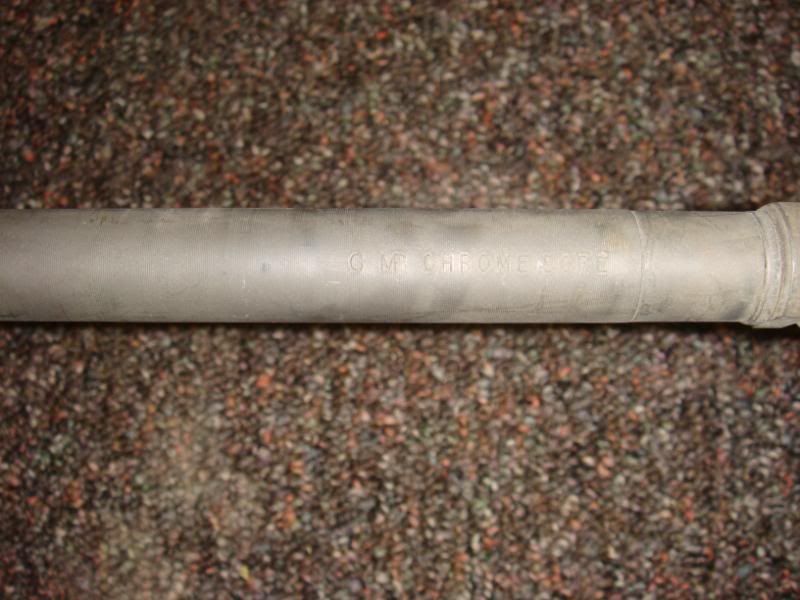

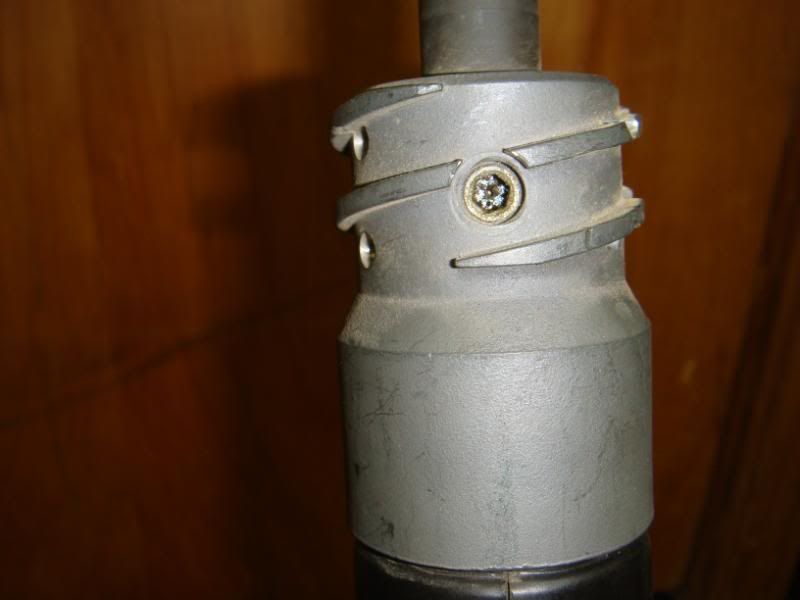
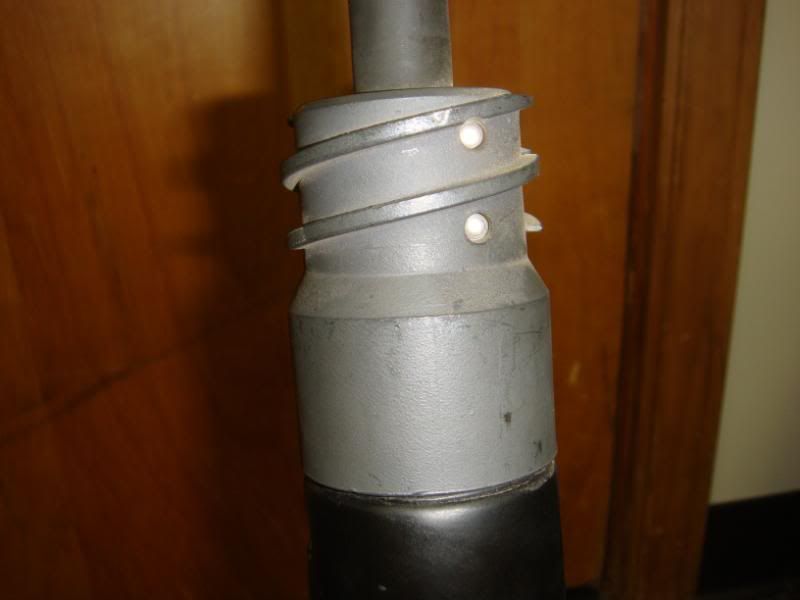
Gasblock details: 
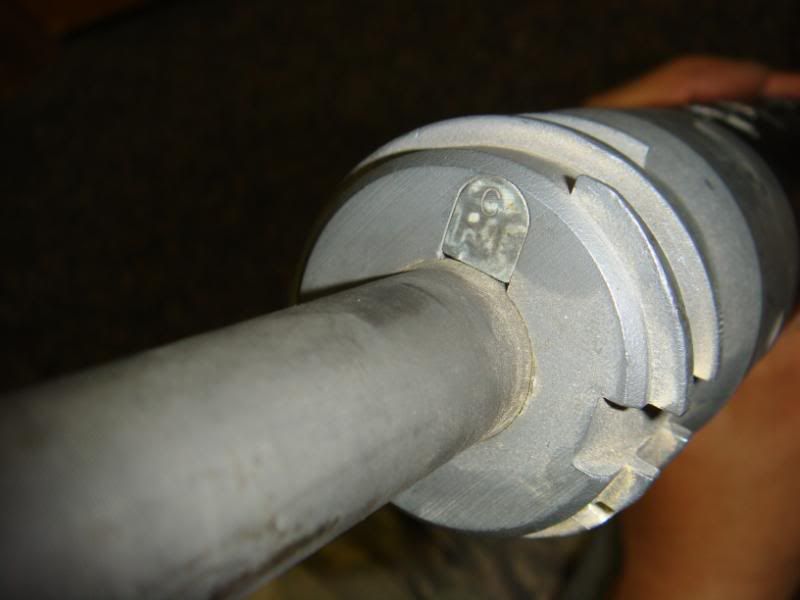
Above you can see the front of the gas tube block, marked “C” on the front and pressed into the gasblock. 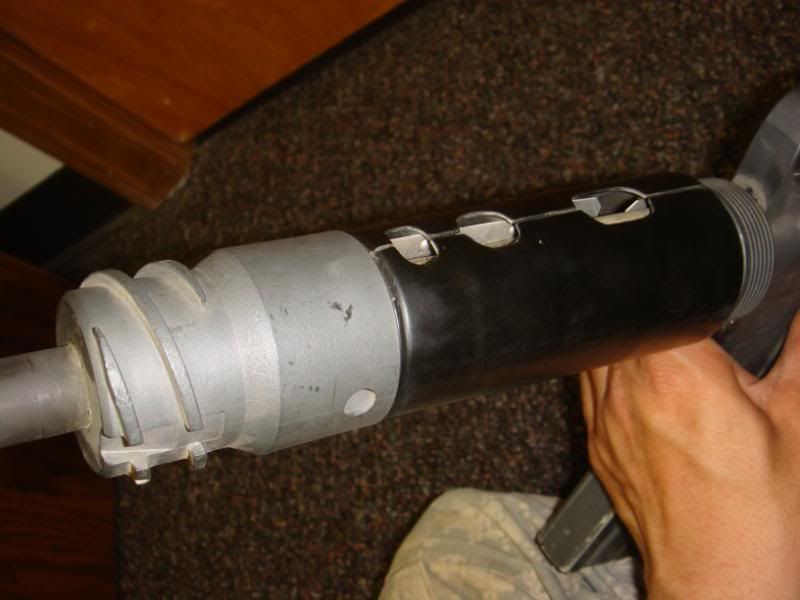


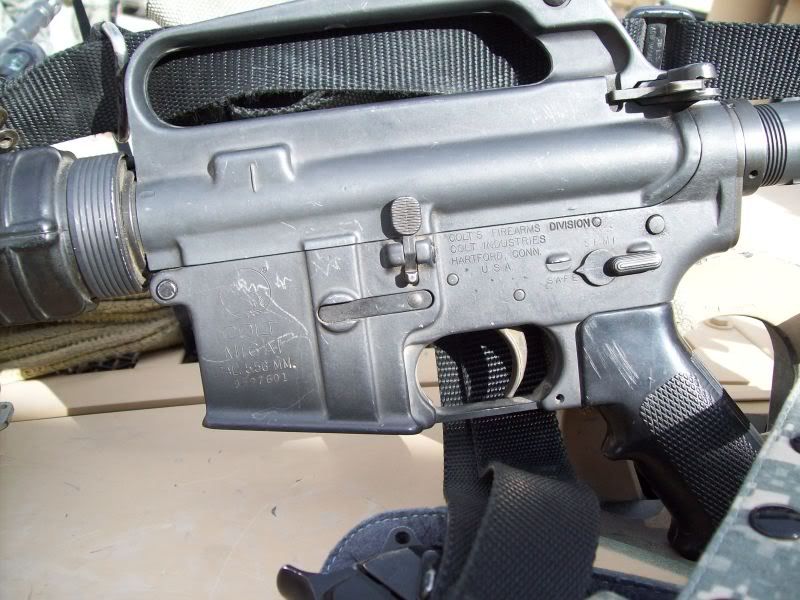
Here you can get a good view of the A1 contoured lower, the flat slipring, and the arsenal stamping. The forging flash on the front of the magwell has been finished very cleanly, and is difficult to detect. You can also see clearly the A2 style EPC. 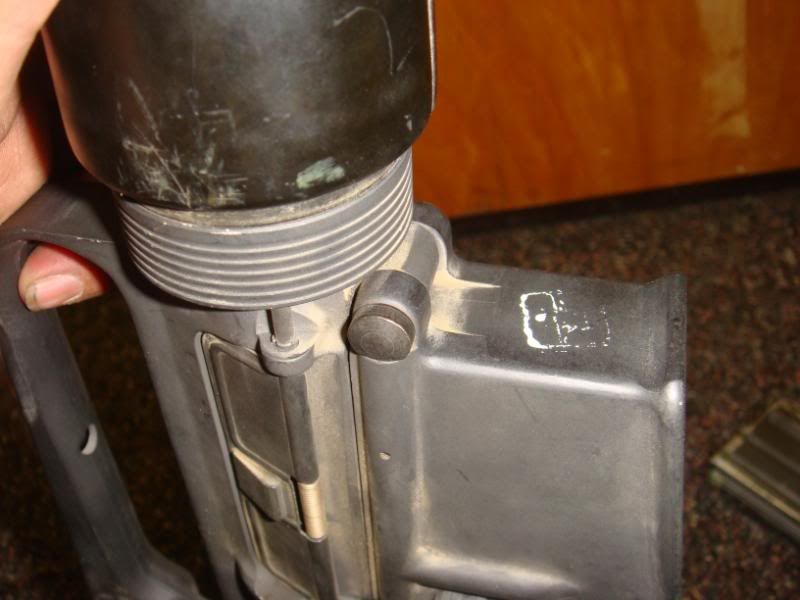
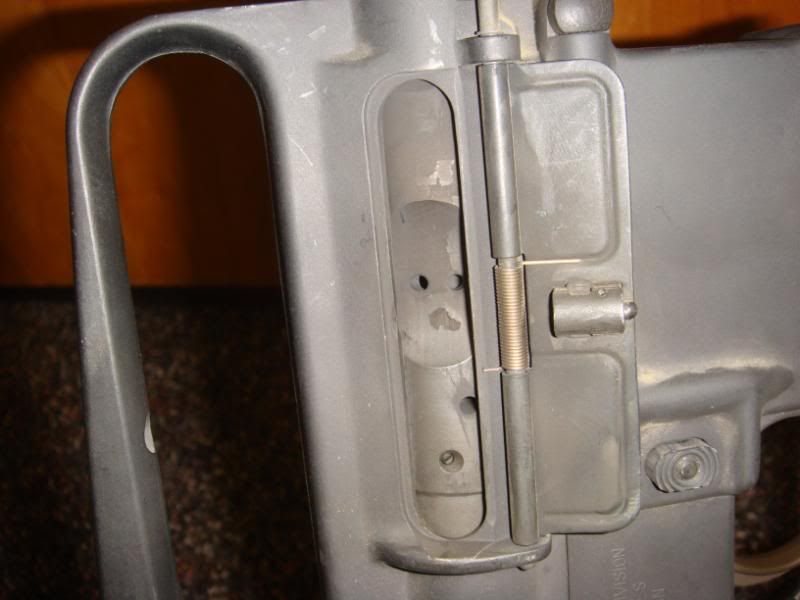
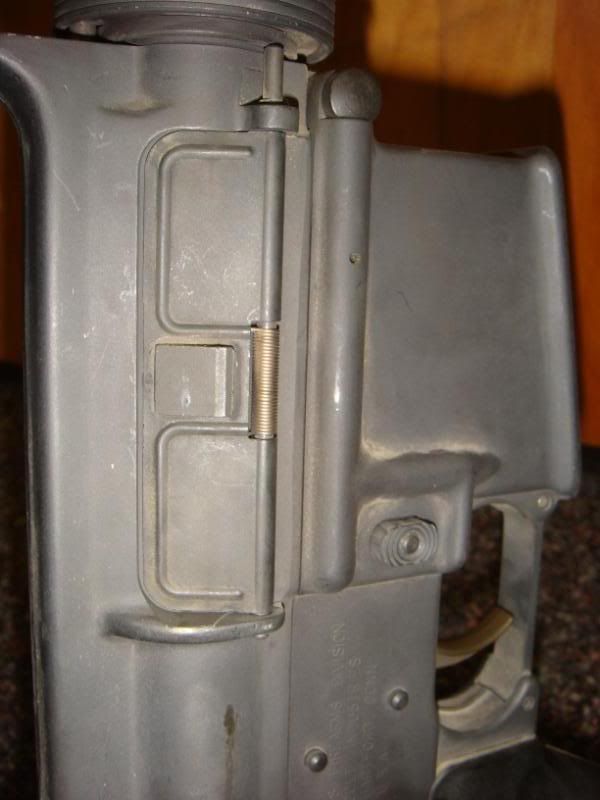
Here you can see the EPC open, and a view of the filthy bolt carrier. The upper seems to be the later “curved” style above the ejection port, however you can see in the third photograph with the EPC closed the “early style” milling of the upper under the case deflector rib to match the contours of the lower. 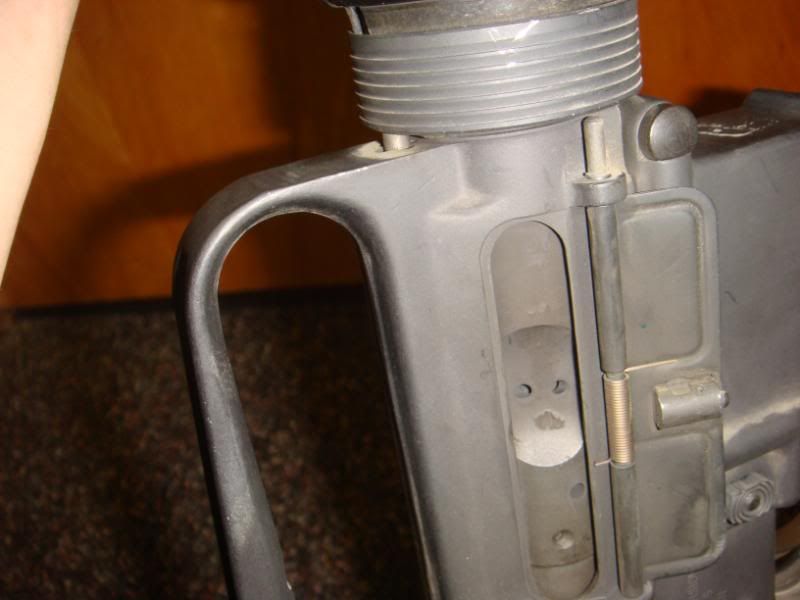
The forging flash inside the carry handle is pretty distinct, yet is has, like the lower, been machined off very cleanly on the outside of the carry handle. You can see the clean lines of the carry handle without the sight assembly, though the hole in the center of the carry handle is still present. 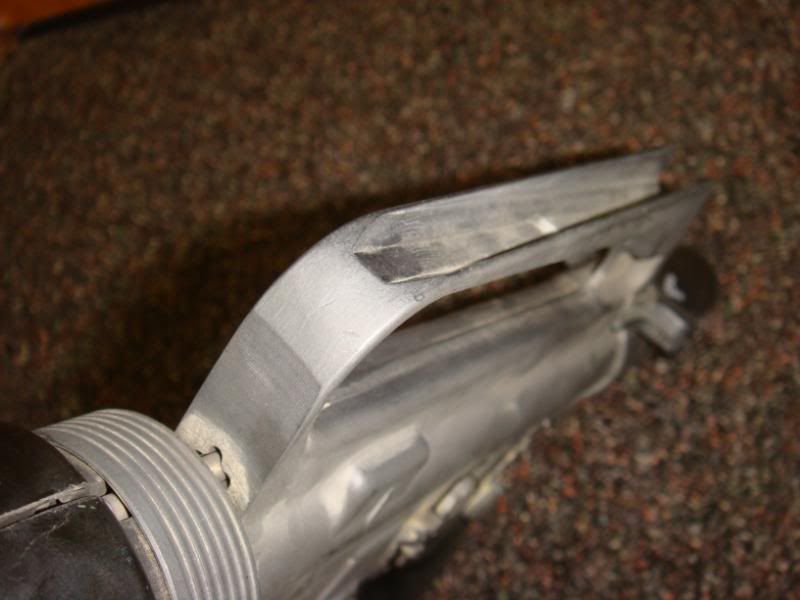

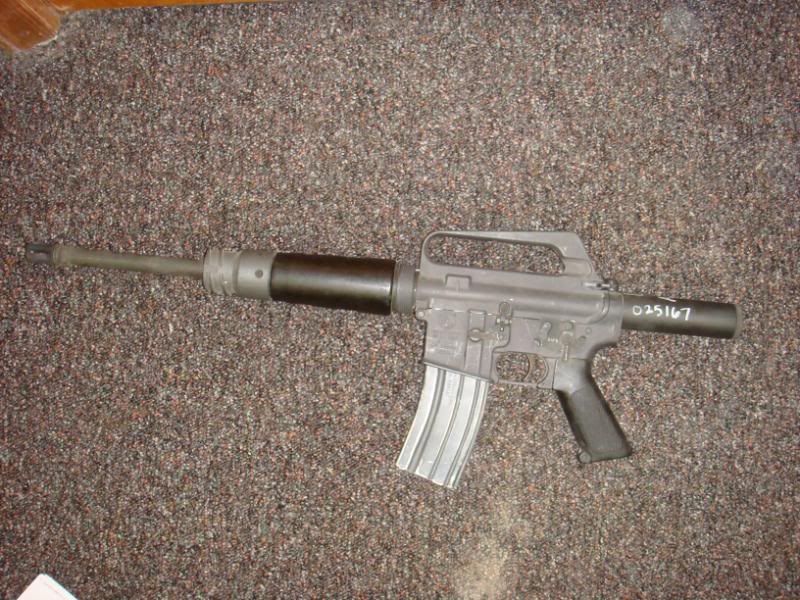
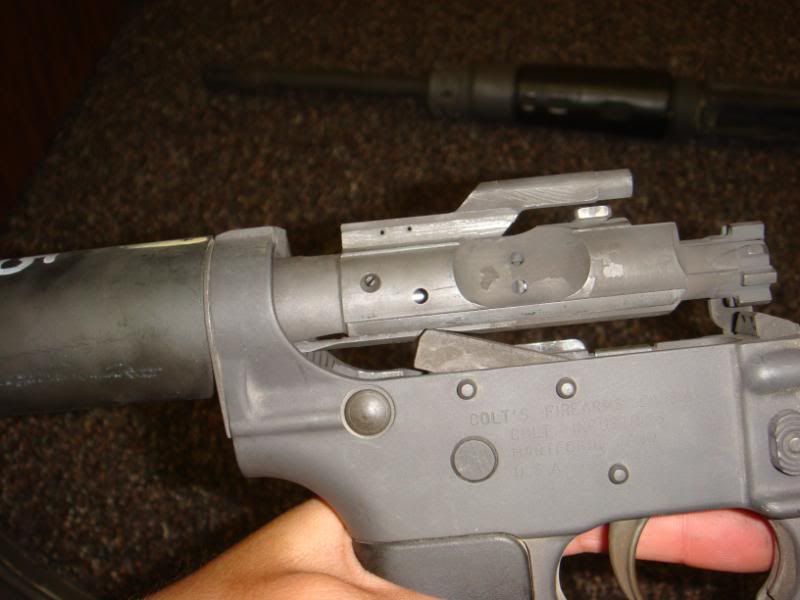
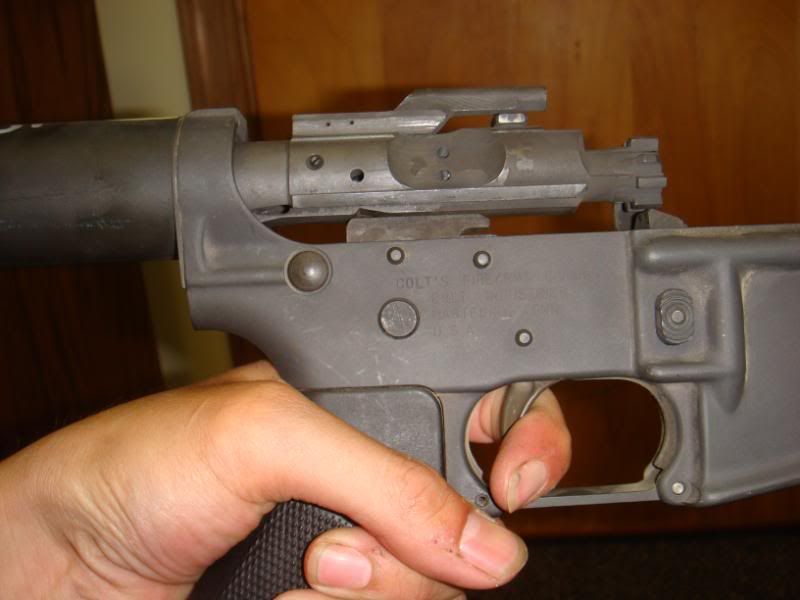
Next we go to lower receiver markings, the lower is marked more or less like a standard M16, with the Colt prancing pony logo, and underneath: PROPERTY OF U.S. GOVT M 231 CAL. 5.56 M.M. F025167 Bolt catch is the standard type, more on that later. 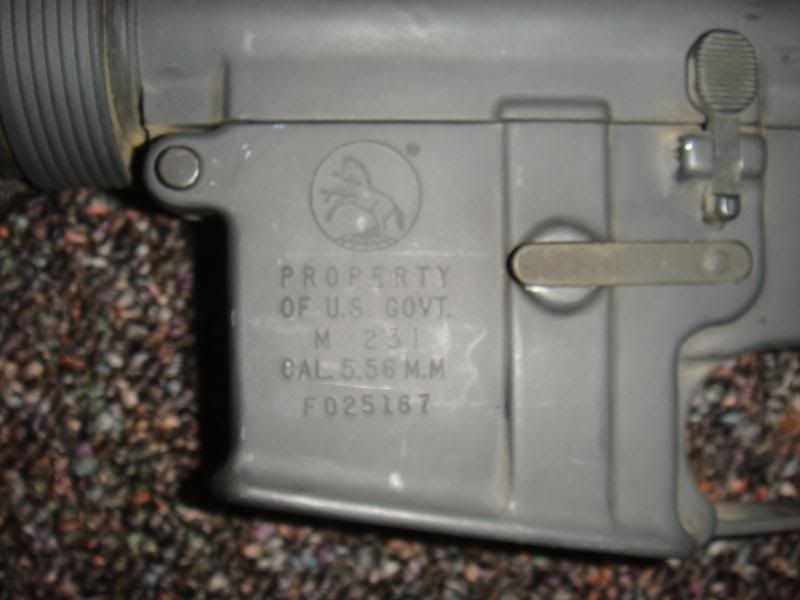
Here you see the first really big sign that this is not your everyday M16, the selector plate, the selector has a 90* throw, with “AUTO” being in the normal “SEMI” position. You can see that the massive pin heads are not in any position resembling where they are on a normal FCG, semi or select fire. 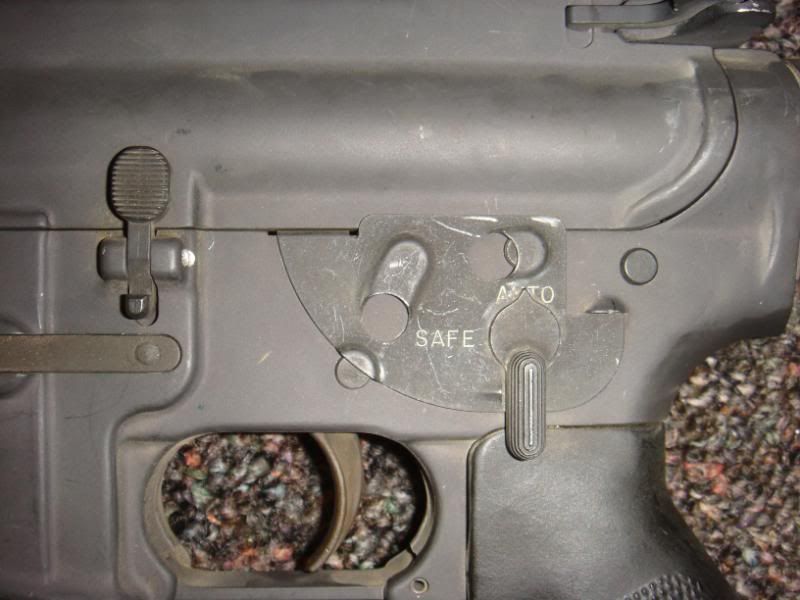
Again, forging flash is distinct inside the trigger guard, yet very clean on the exterior, Colt’s classic concession to “fit and finish,” I’m sure. 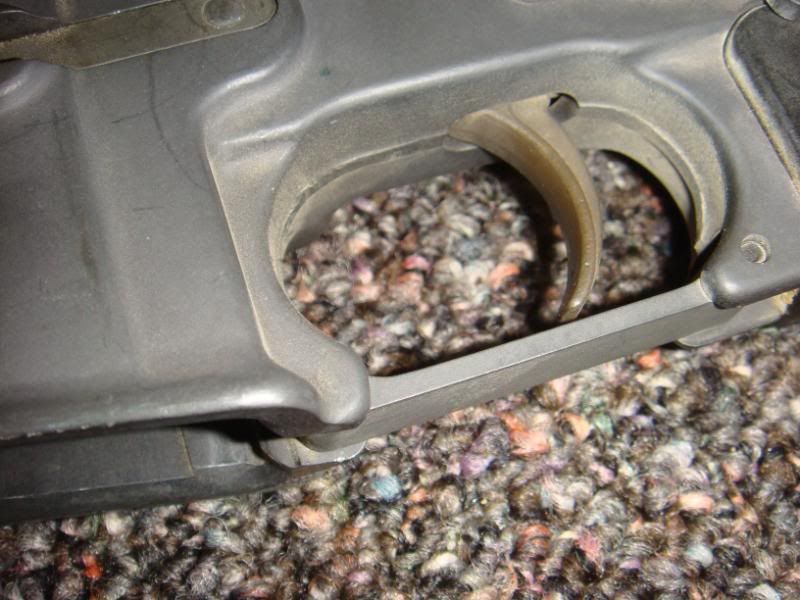
A good view of the A1 pistol grip, and the “no tick” selector lever. 
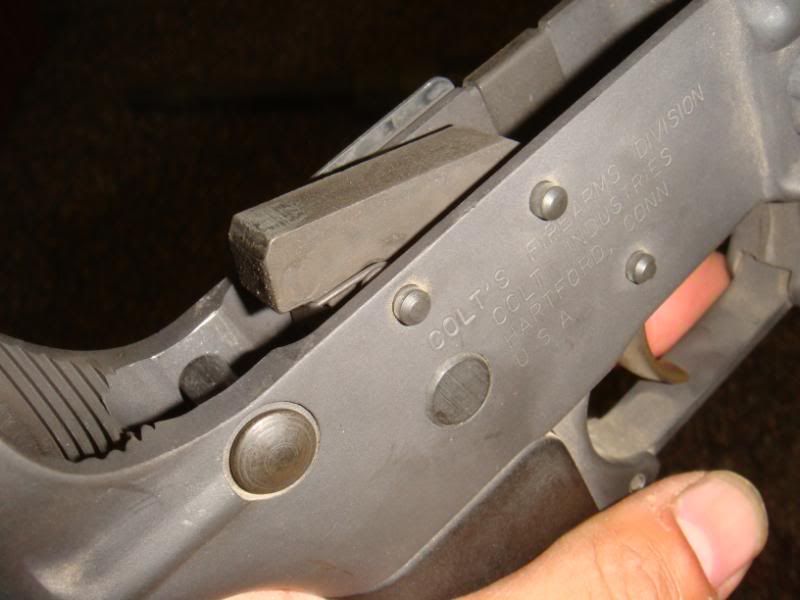
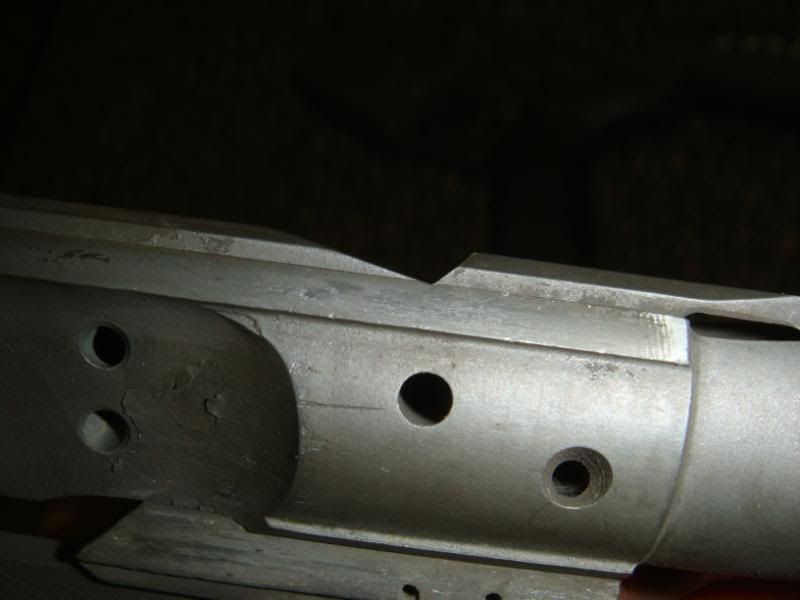
Here you can examine the right side of the lower receiver, observe again the massive size of the FCG pins and their location, however, note that they are much smaller on the right side than on the left. Mag catch appears to be standard, and another good view of the “early” milling of the upper. 
On the right side of the receiver is where Colt’s company information is stamped, reading: COLT’S FIREARMS DIVISION COLT INDUSTRIES HARTFORD, CONN USA Not the lack of periods after “CONN” and between the “USA,” and compare to the second photo of an M16A1 lower, also marked “COLT’S FIREARMS DIVISION” with full punctuation. Nothing major, but interesting. 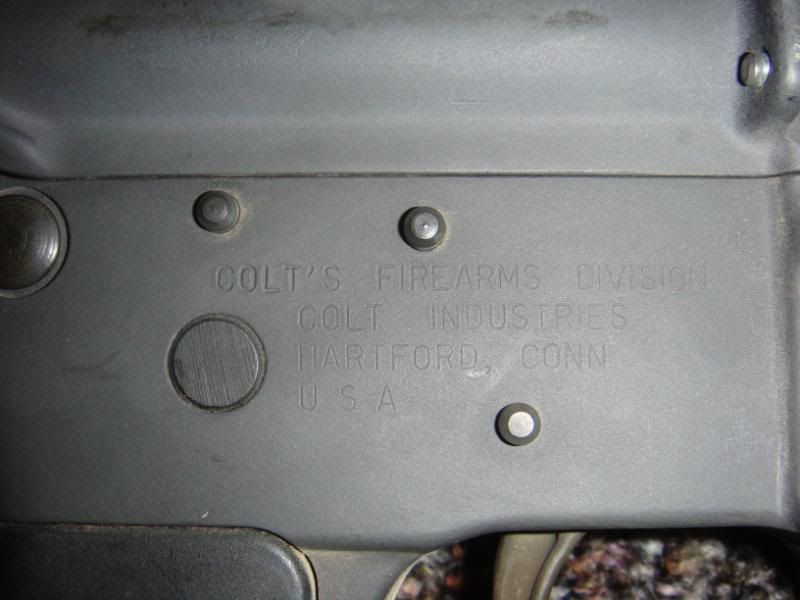
Here’s another good view of the carry handle, with directional arrows, but not drilled for sights. The forge code is “C H.” 
This is the weapon ready to fire, as it is an open bolt weapon, the bolt remains locked to the rear when ready to fire. 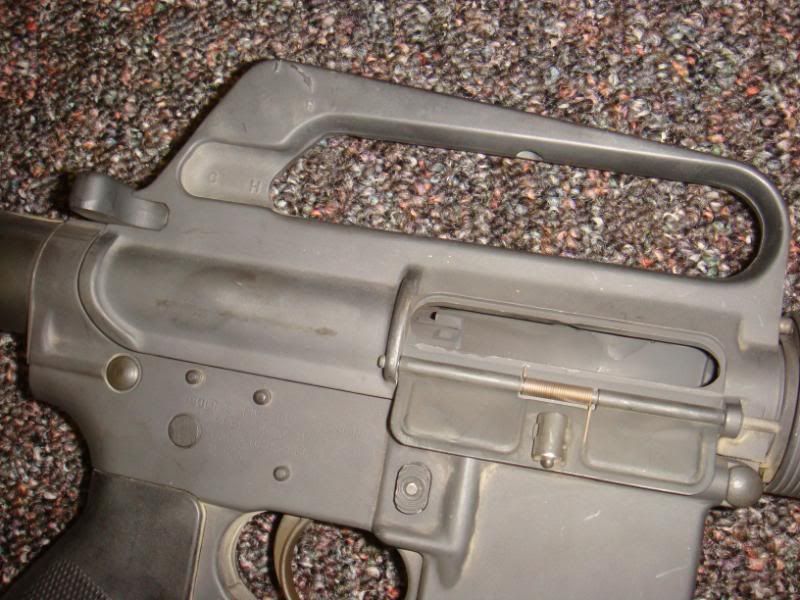
Another general view of the weapon “ready to fire,” you can see that the bolt catch is not engaged, and is not what is holding the bolt back. 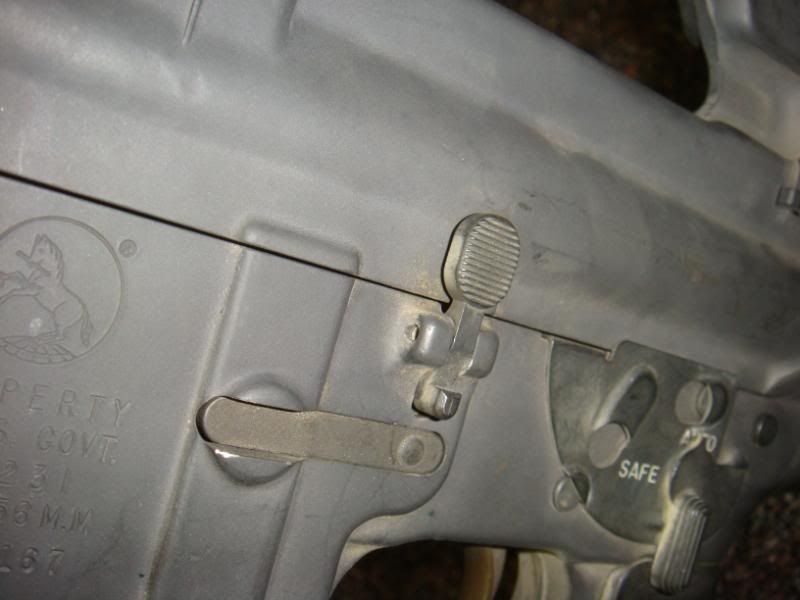
Once the weapon is charged, it can be placed on “SAFE,” IIRC, like many open bolt weapons, I do not believe that the M231 can be placed on “SAFE” when the bolt is closed. 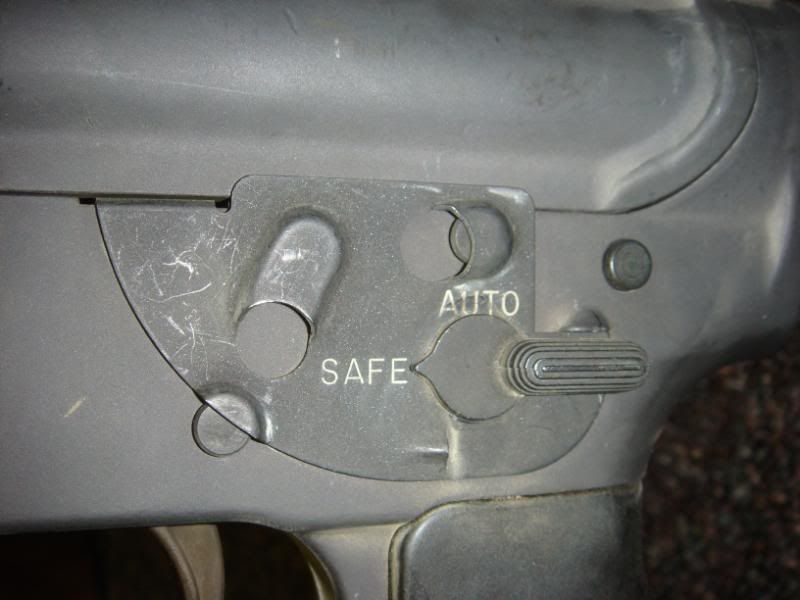
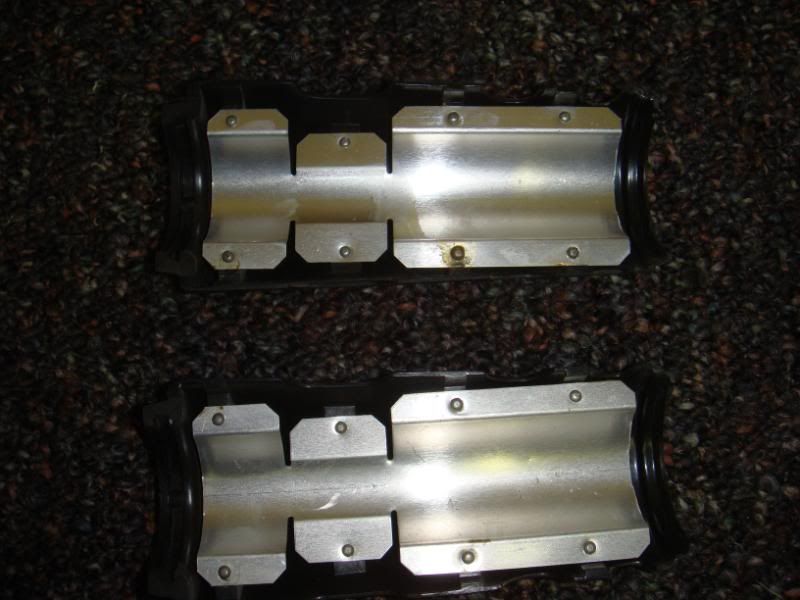
And now disassembly! First, the handguards are removed, they’re the standard DOE/M231 pattern that most everyone is familiar with, but I added a couple of quick pics for the sake of completeness. 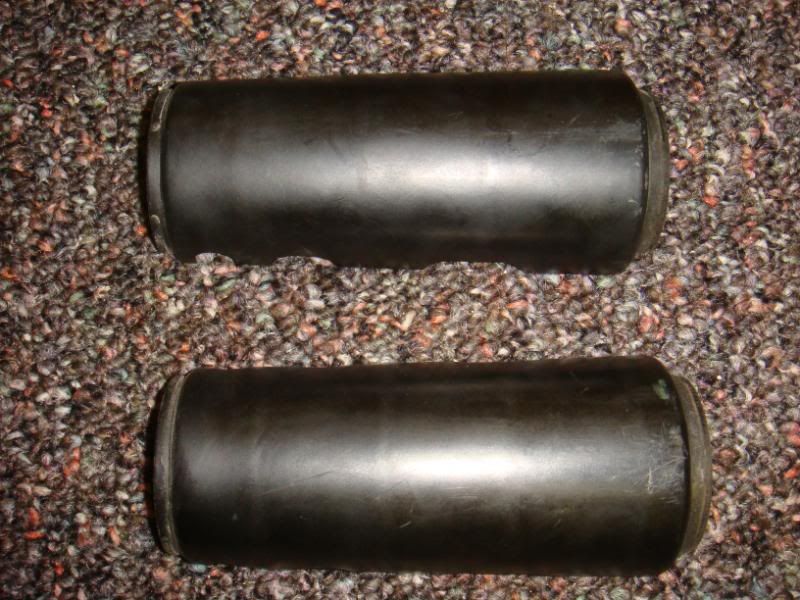
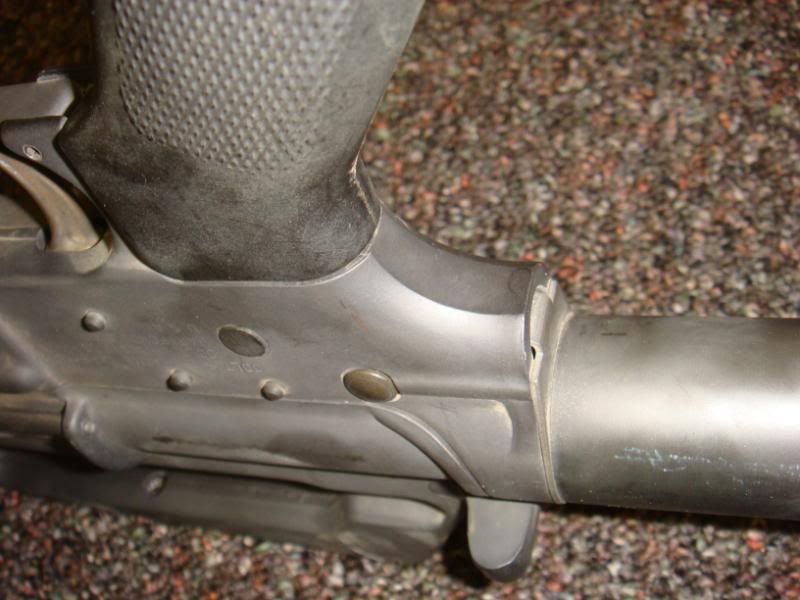
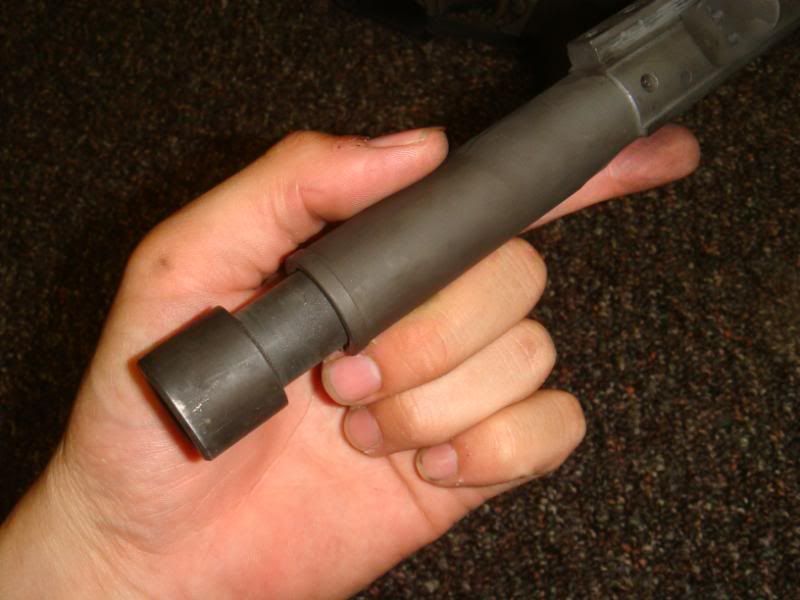
With the handguards removed, you can see the impressive HBAR profile of the barrel which combined with the extremely short buffer tube, and total lack of a reciprocating buffer assembly makes the weapon rather front heavy. In dismounted use, it could actually be an advantage, mitigating, even if by a little bit, the muzzle rise. Practically speaking, it’s necessary because of the volume of automatic fire the barrel was expected to endure, and the fact that it was intended to be used mounted to a Bradley firing port and would therefore be supported. 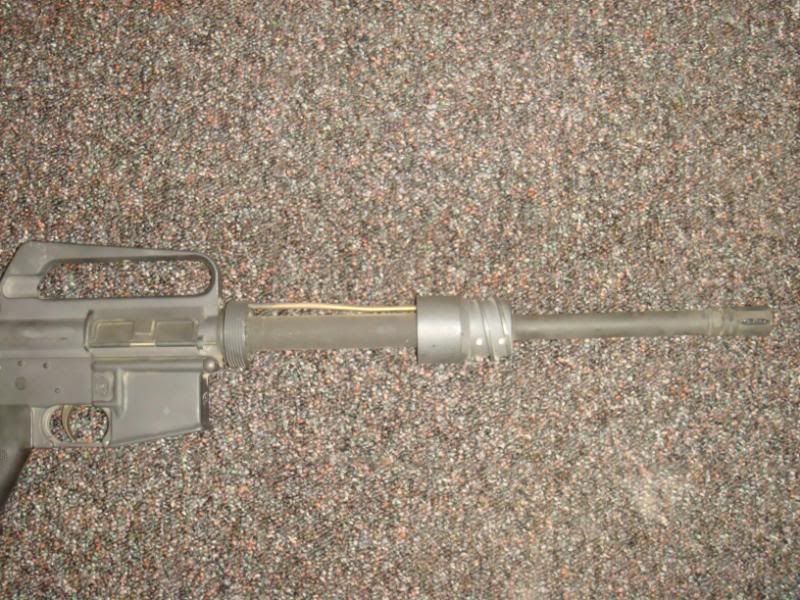

Here you can see the carbine gas tube disappearing into the massive gasblock and the gasblock/barrel interface. 
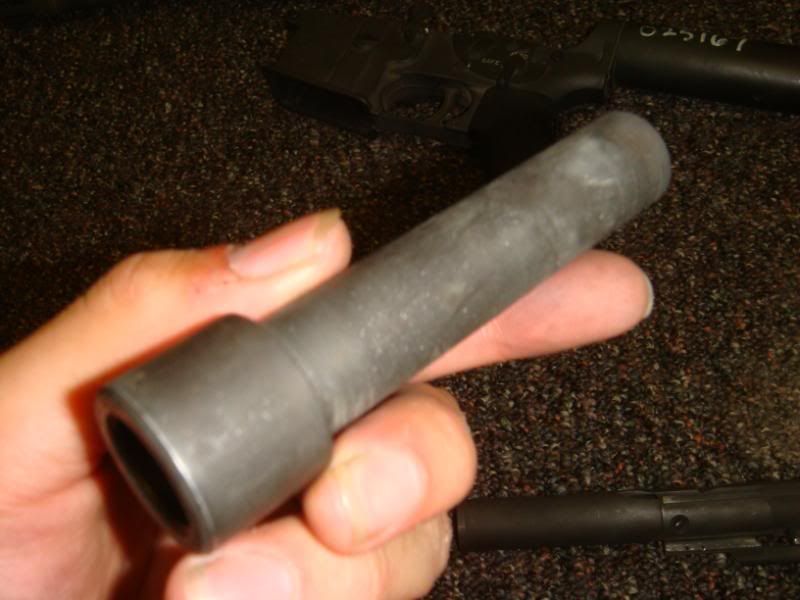
Here again you see the flat slip ring, and a slight machining step in the rear of the barrel before it goes in to the barrel nut. I do not recall there being any markings on the barrel under the handguards. The barrel nut and slip ring are standard M16 assemblies. 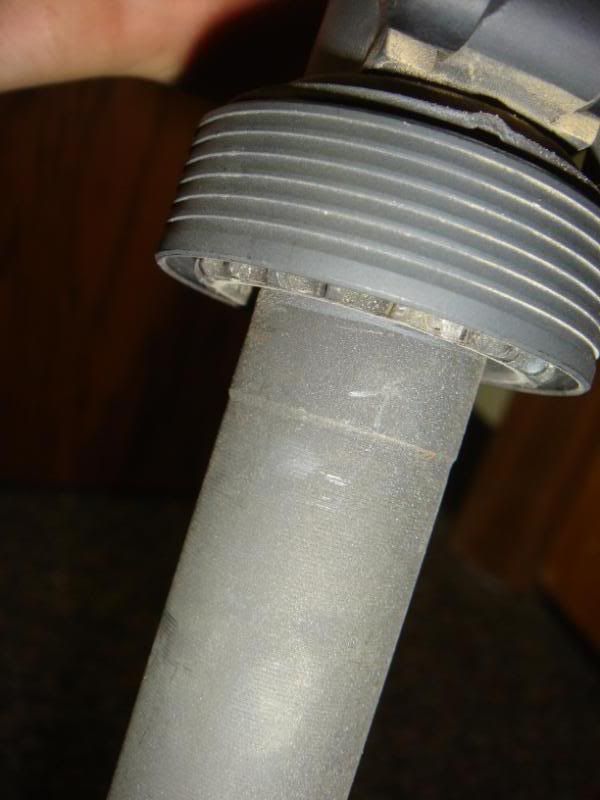

Here is a view with one half of the handguard installed so you can see the relationship of the barrel to the heatshields inside the handguard. 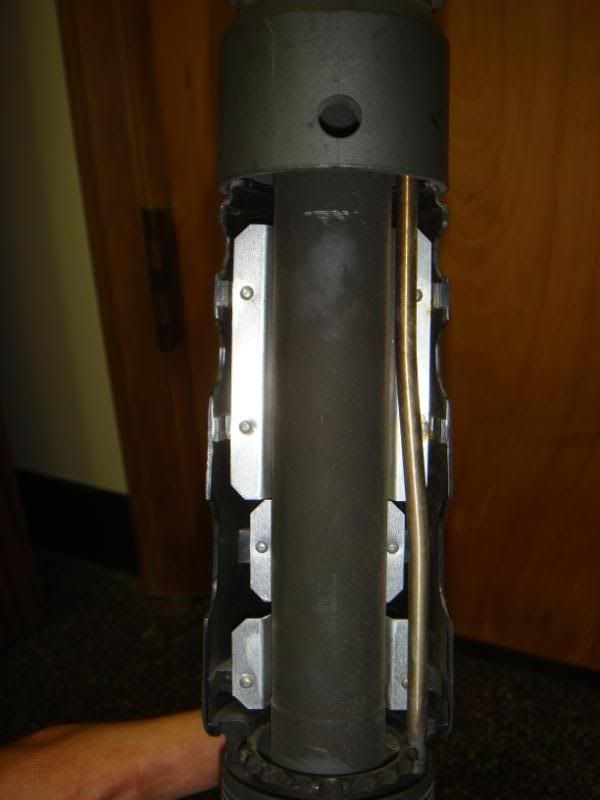
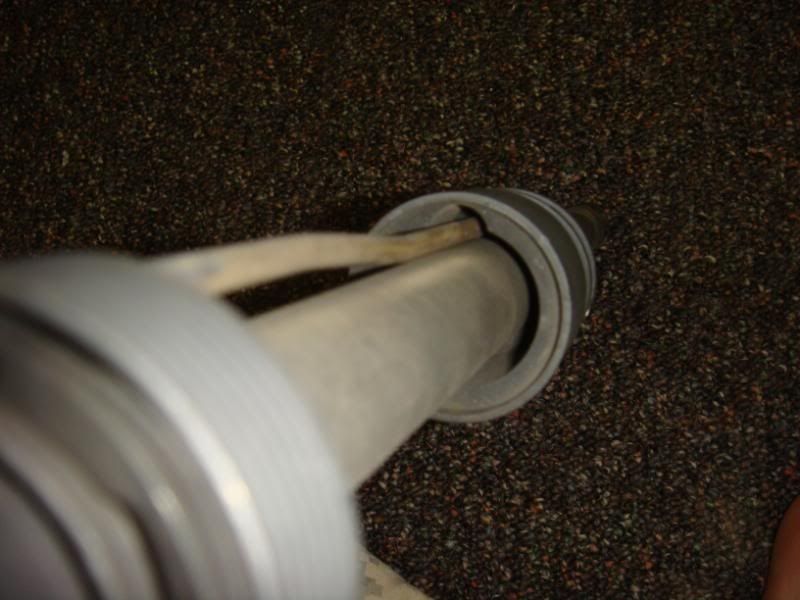
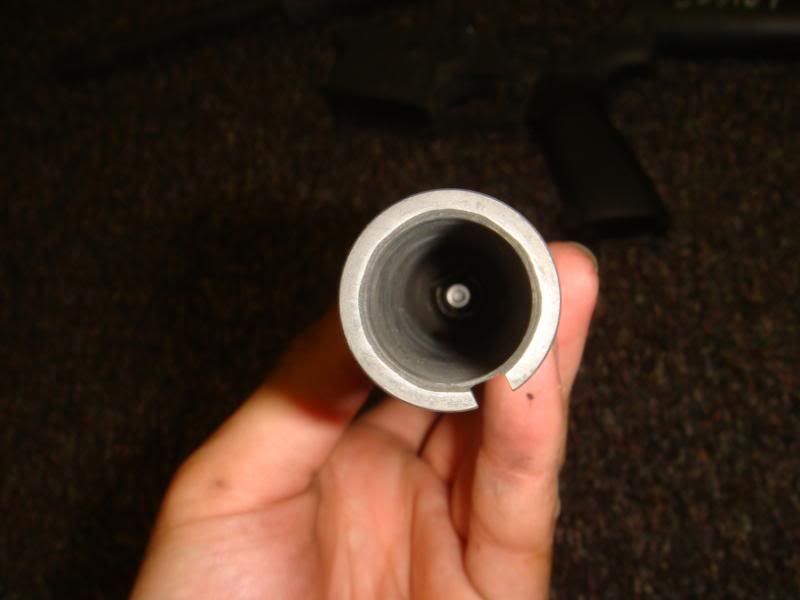
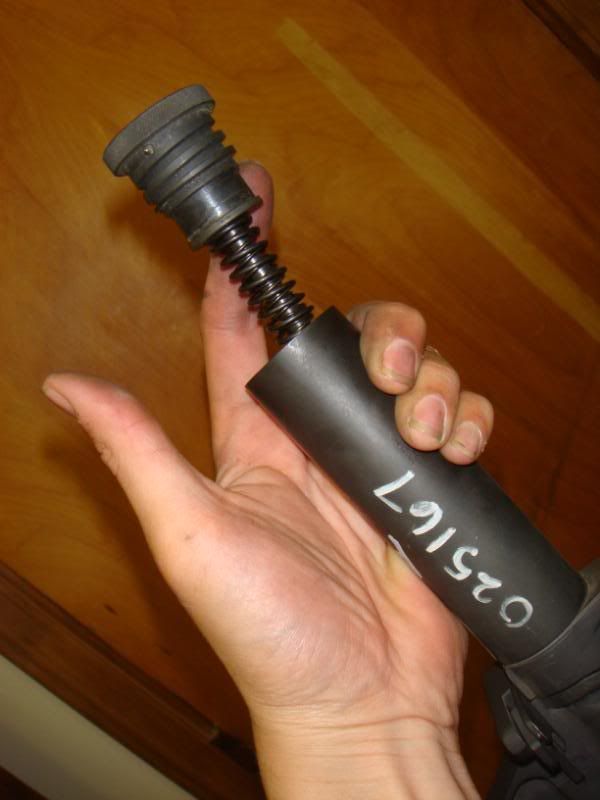
The buffer tube / receiver extension tube is extremely short, about the length of a pistol RET, but not constructed the same way. Note the serial number duplicated in white paint pen on the RET. 
The receiver end plate is not a standard CAR type, it seems to be little more than a shim that locks in to secure the takedown pin spring and detent, very simple solution to a simple problem. 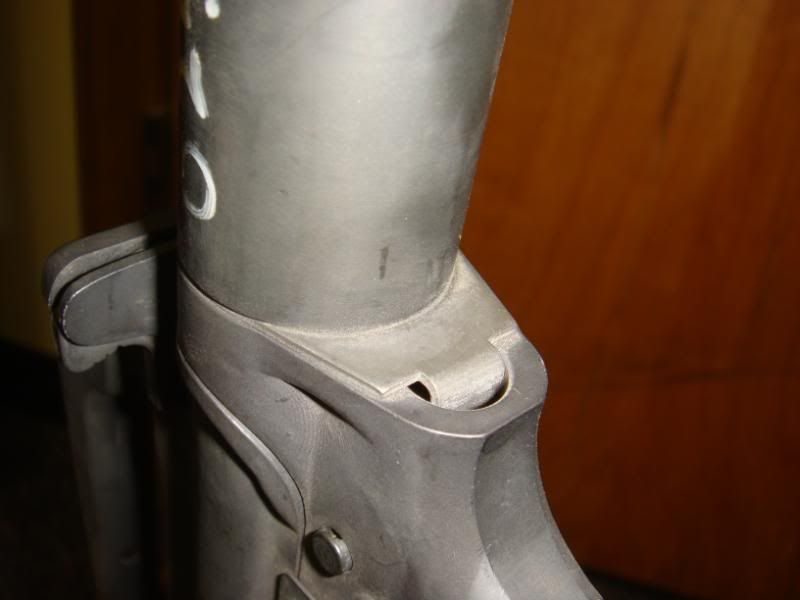
On the underside of the RET, just off center is what seems to be a drain hole. Also, above the RET is the rack number “11 – A5.” What the exact meaning of the two numbers is, I’m not sure, though I’m guessing that it probably came from A Co. 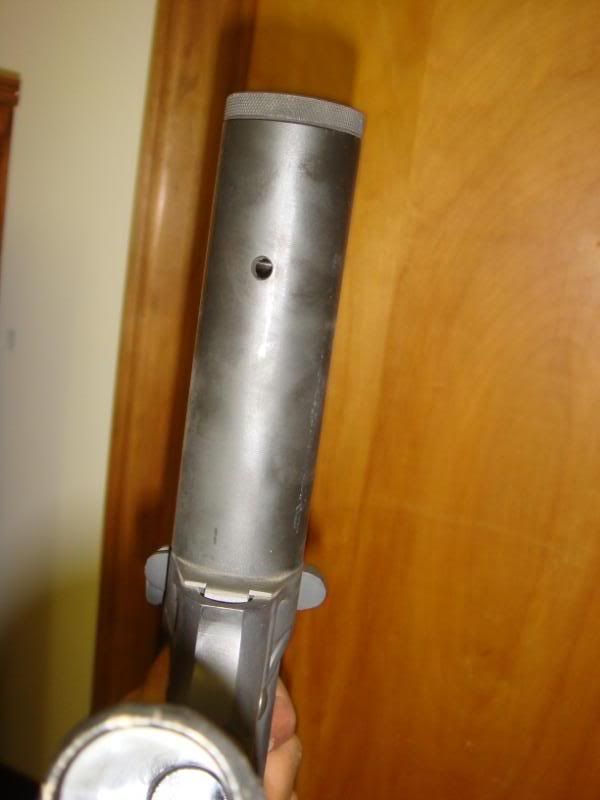


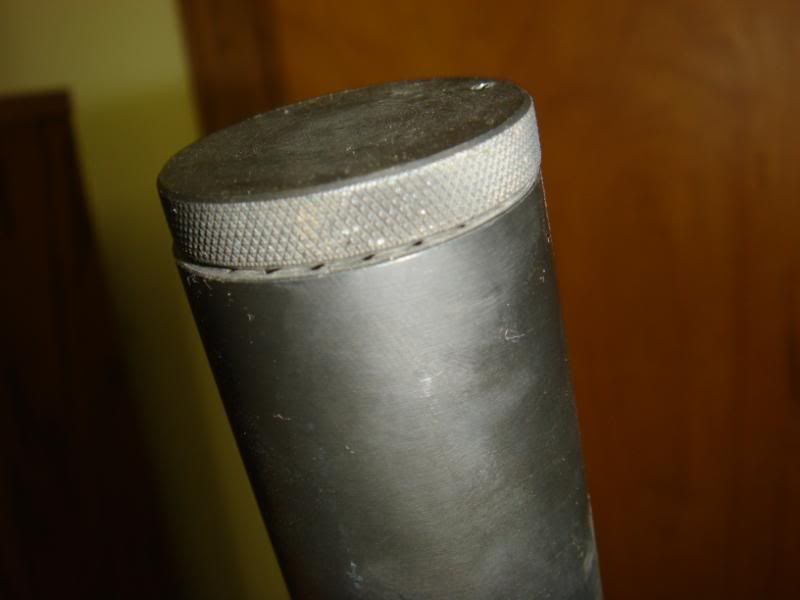
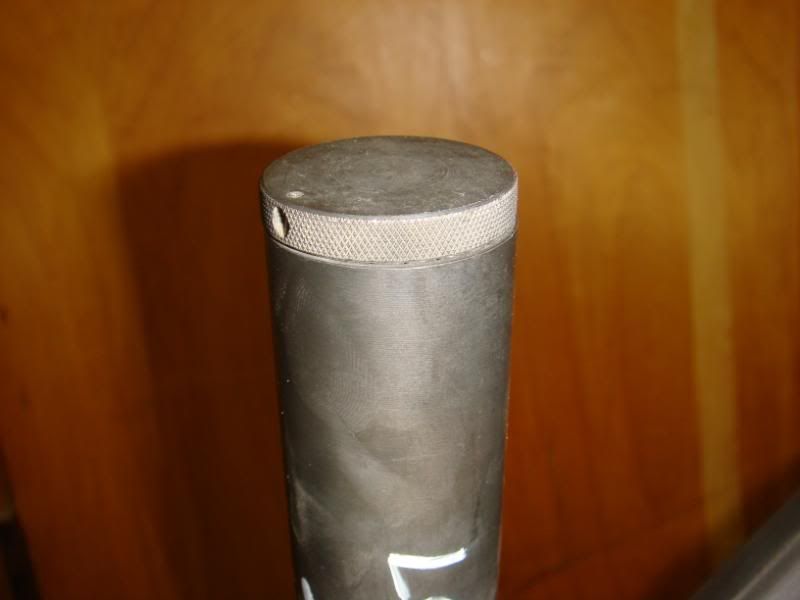
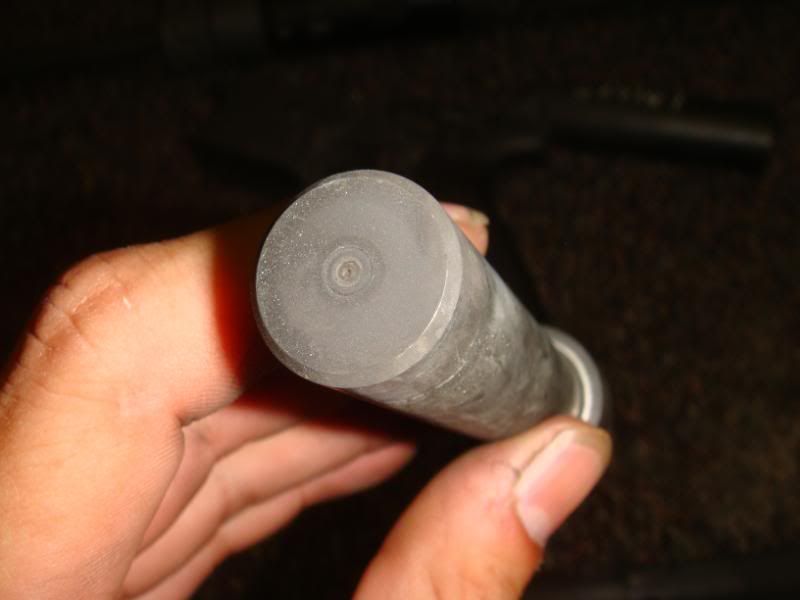
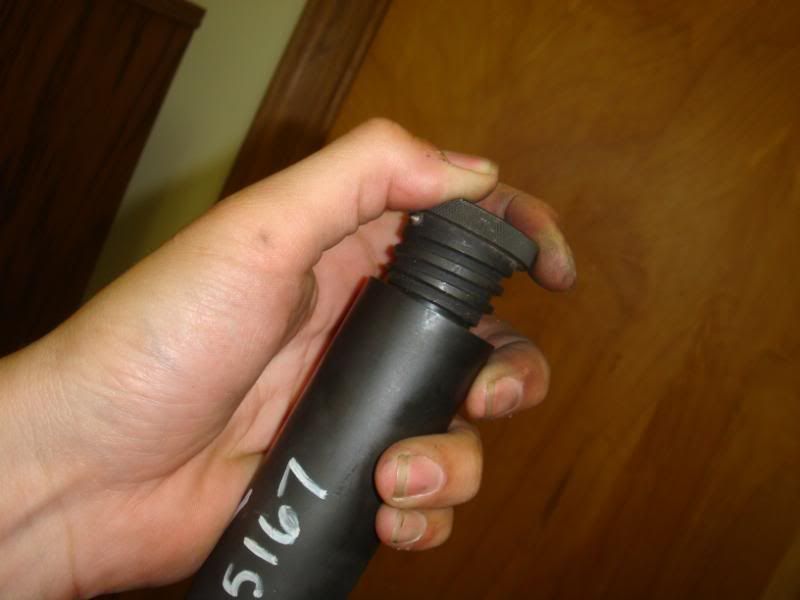
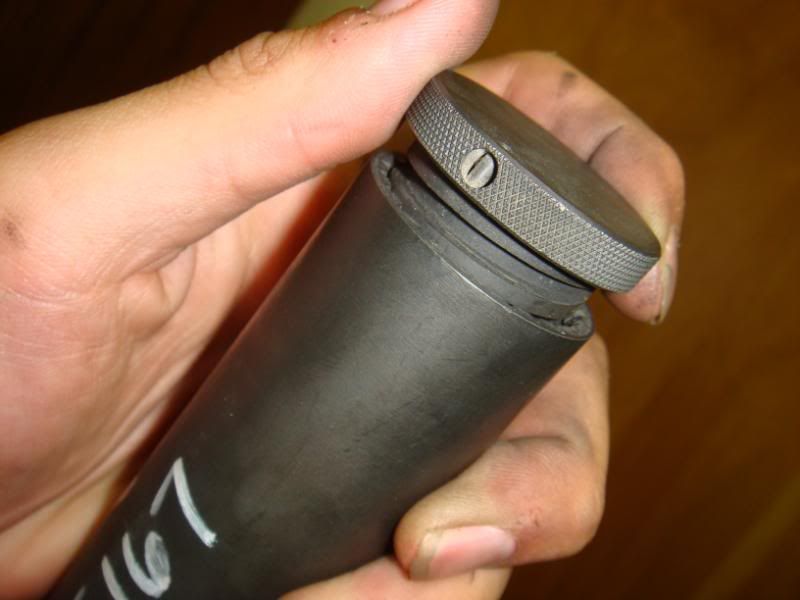
At the end of the RET is the knurled cap, you can see where the rollpin has been inserted to secure the detent in the cap. 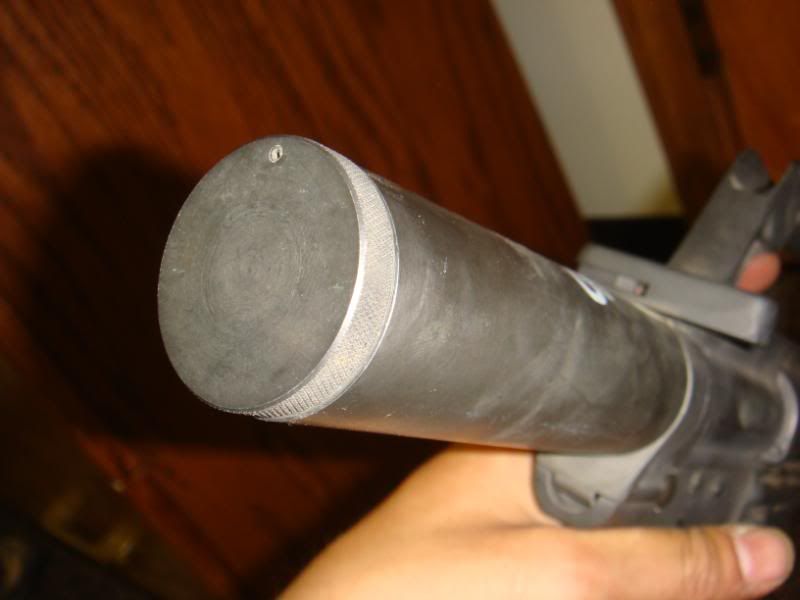
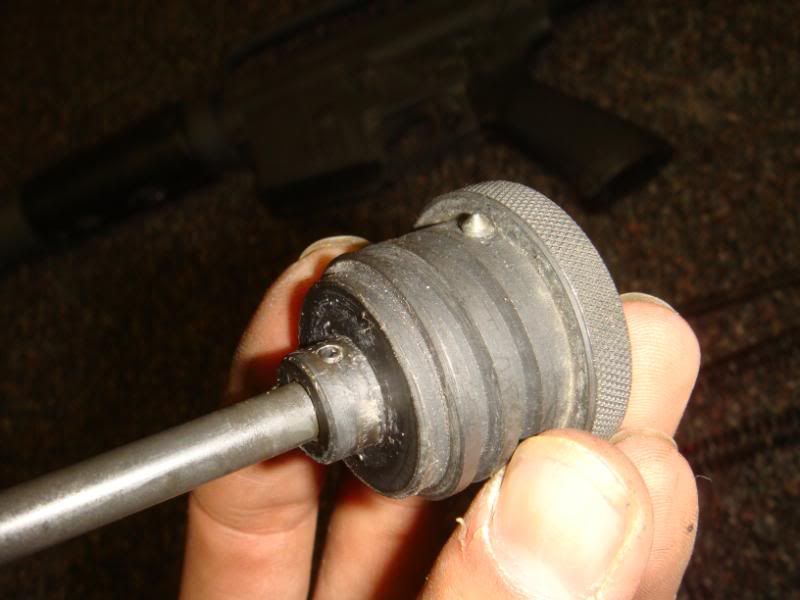
Because of the short action of the M231, the recoil system is actually longer than the RET, necessitating the removal of the recoil system from the rear of the RET. 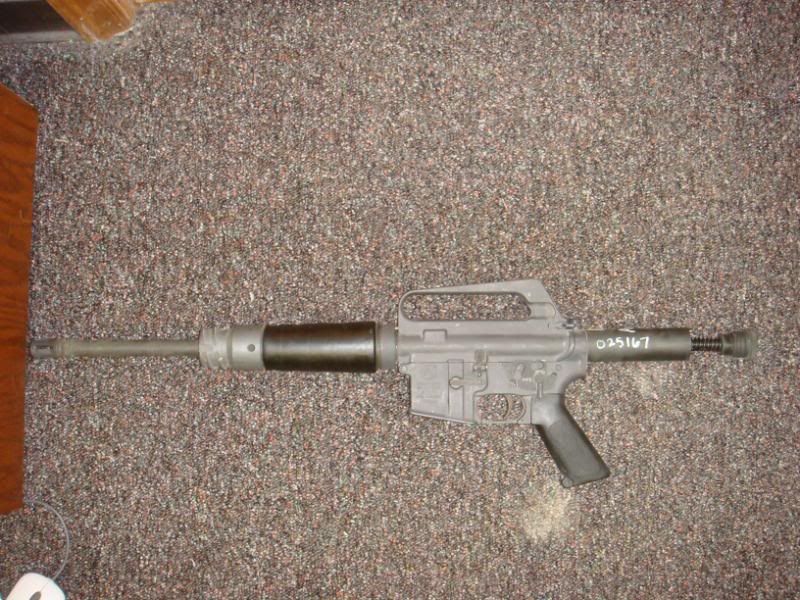
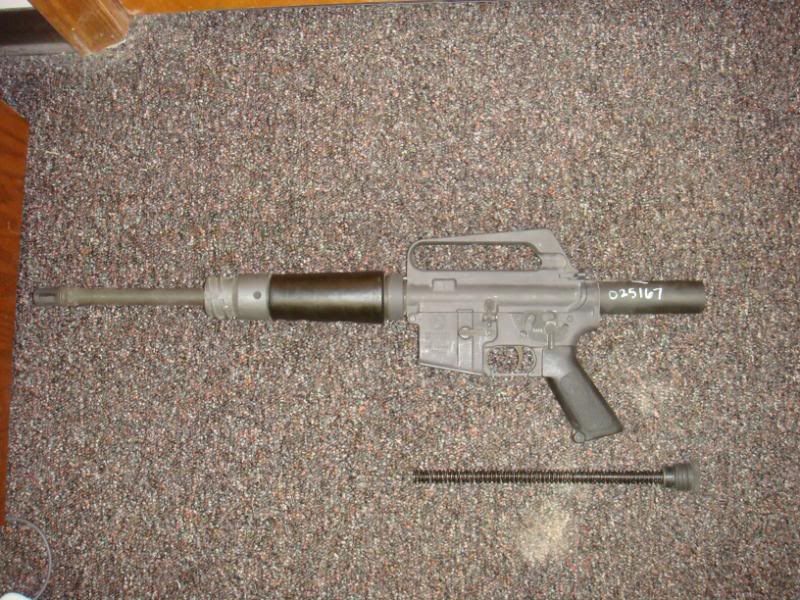

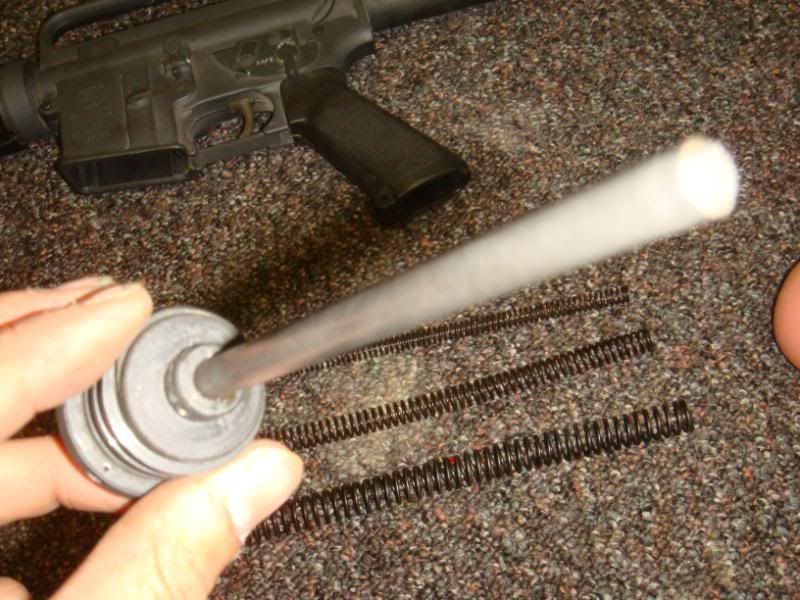
You can clearly see the three nestled springs as they come out of the RET with the buffer assembly. As I said, there’s no reciprocating buffer, only the springs for the recoil. The endcap, however, does have a buffer assembly, consisting of a washer and a rubber bumper between the endcap and the washer. In these photos you can also see the spring loaded detent that locks the end cap into the RET. The long mandrel/recoil spring guide keeps the springs from kinking and binding. 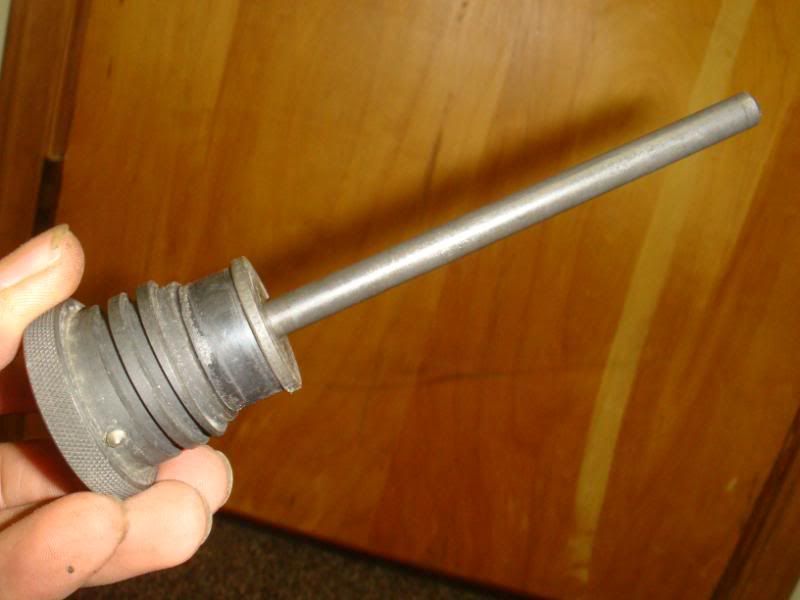
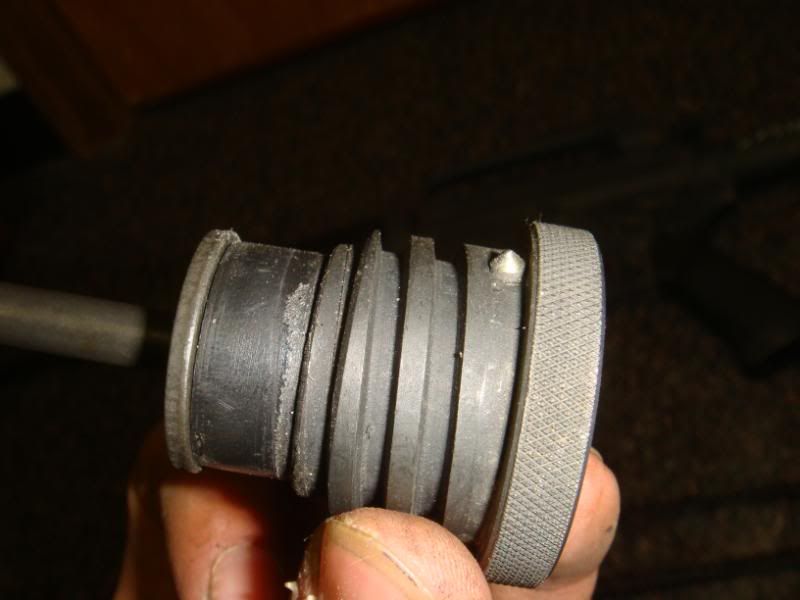
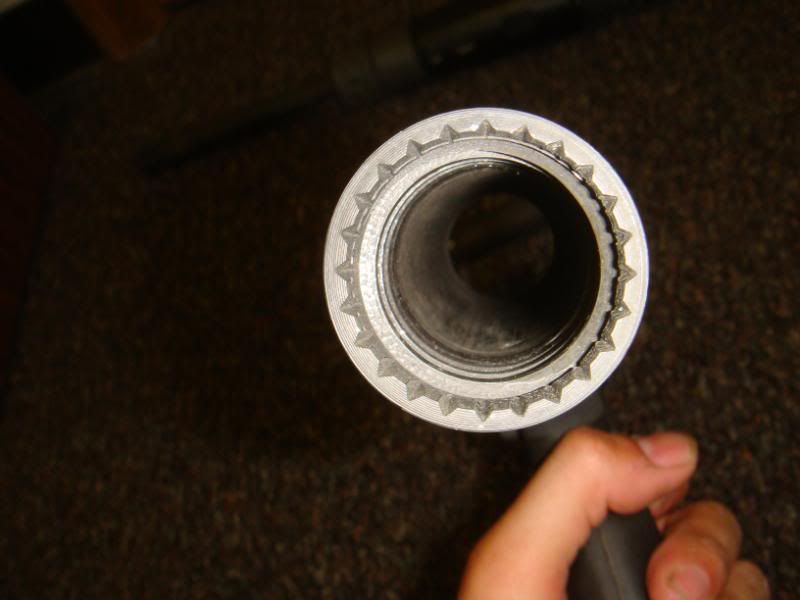
Here is the rear of the RET, where you can see where the endcap threads in, and the teeth that engage the detent on the endcap as you screw it in, and keeping the endcap from backing out during firing. 

Once the recoil assembly is removed from the RET, the upper and lower receivers can be separated. 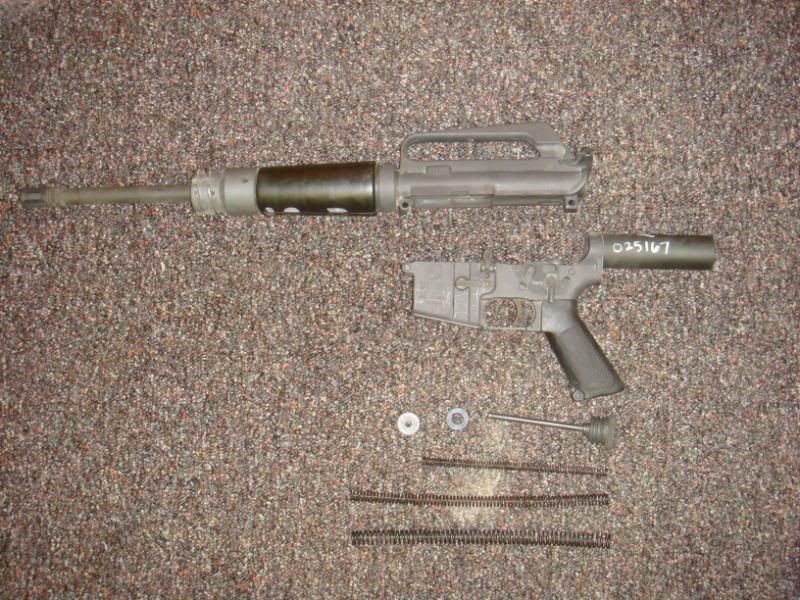
The upper is disassembled similarly to a standard M16/M4 with BCG and charging handle, however the BCG has an extra part (the striker), and is of very different design. 

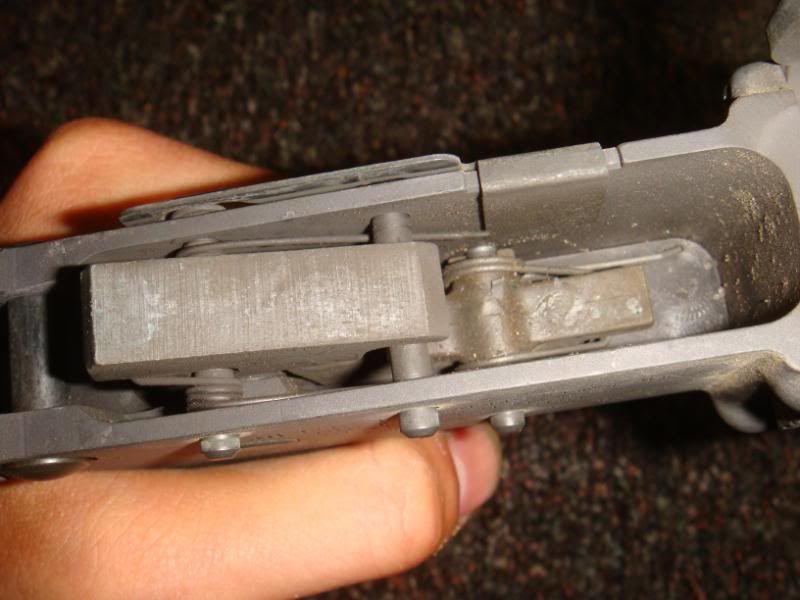
And here’s where things start to get interesting! Into the lower receiver. What appears to be a massive hammer… is really not. It’s probably best described as a bolt release. Examining the FCG, I was impressed by the simplicity of the FCG and the FCG function. 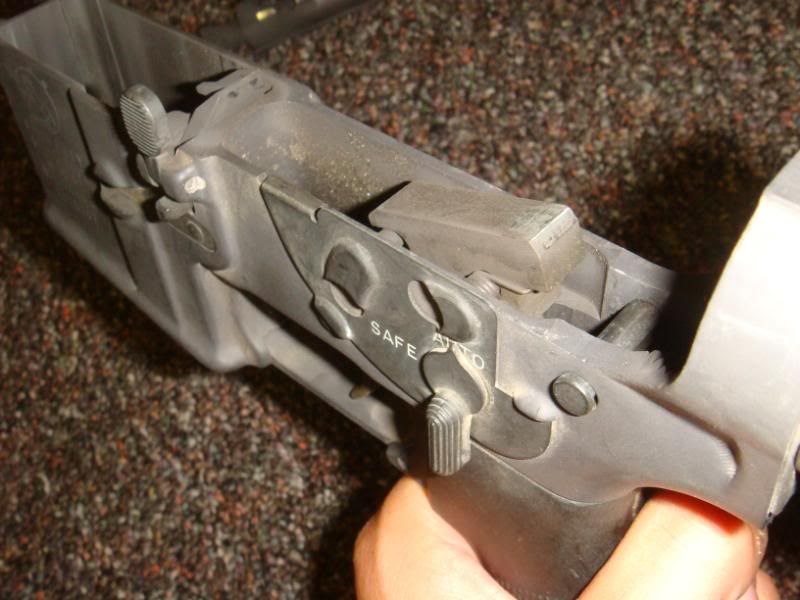
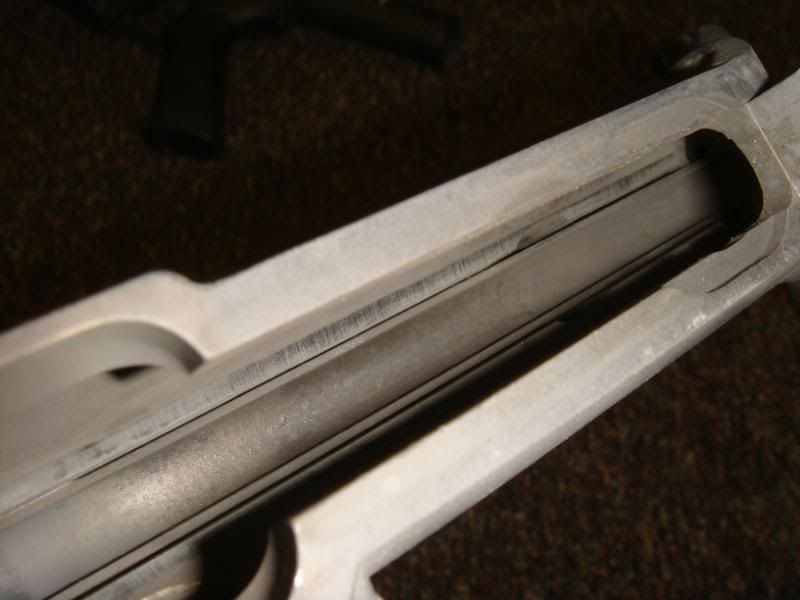
Here you can see where the RET screws in, and you can see that the lower has not been machined for a buffer detent. 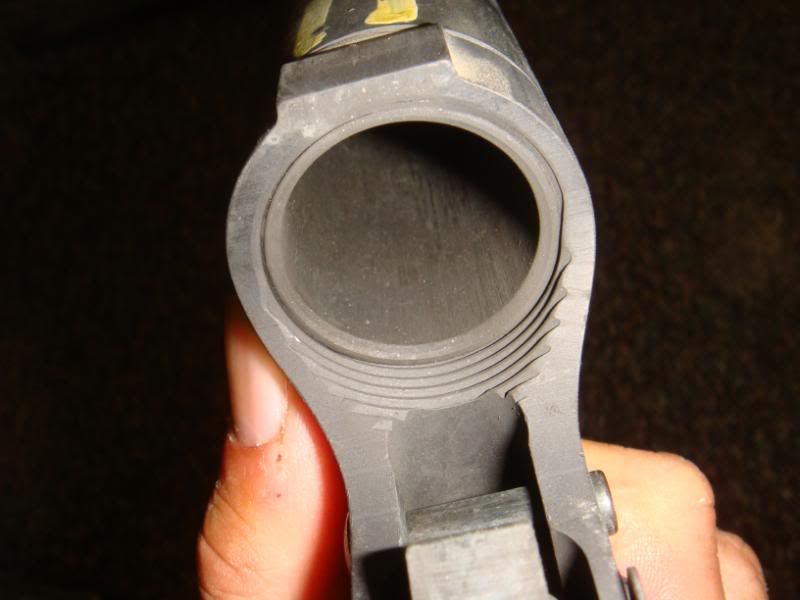


The selector plate seems to basically be an “anti-walk” plate, to prevent the FCG pins from backing out of the left side of the weapon, and would have been easily removed if I had taken the pistol grip off, and removed the selector. 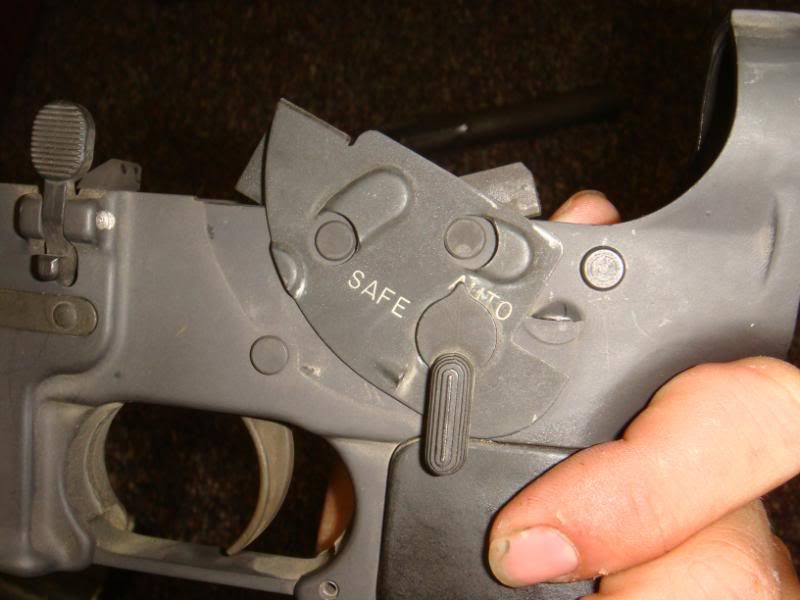
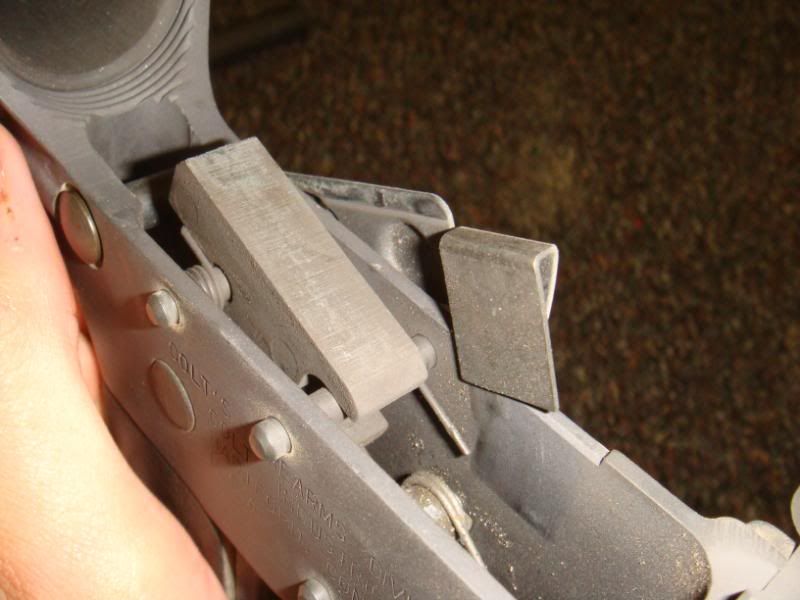


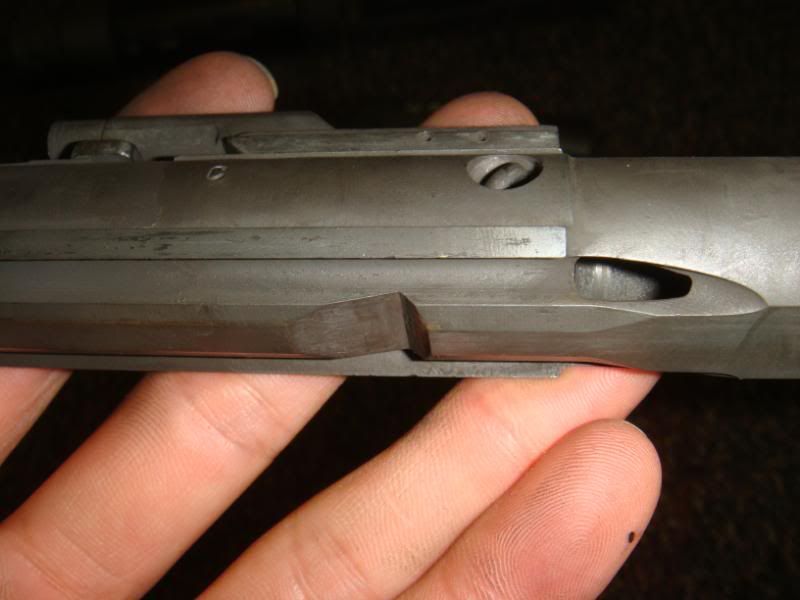
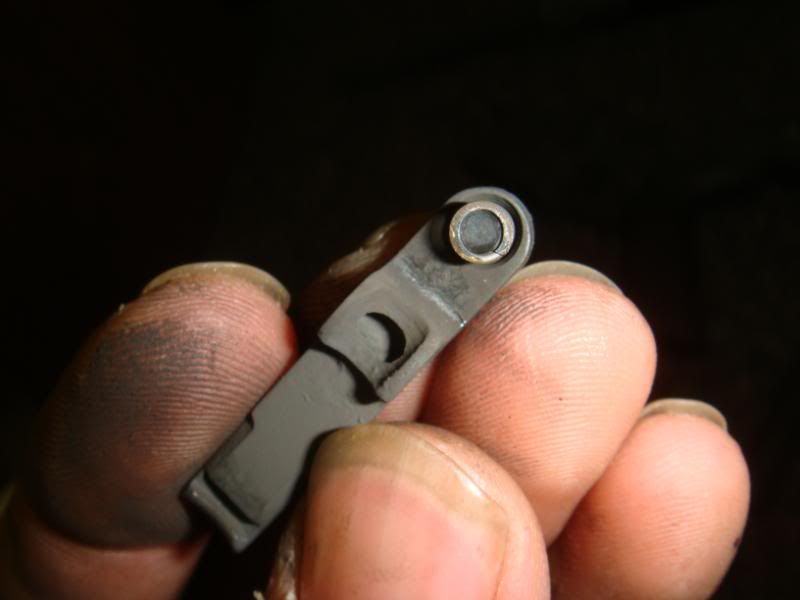
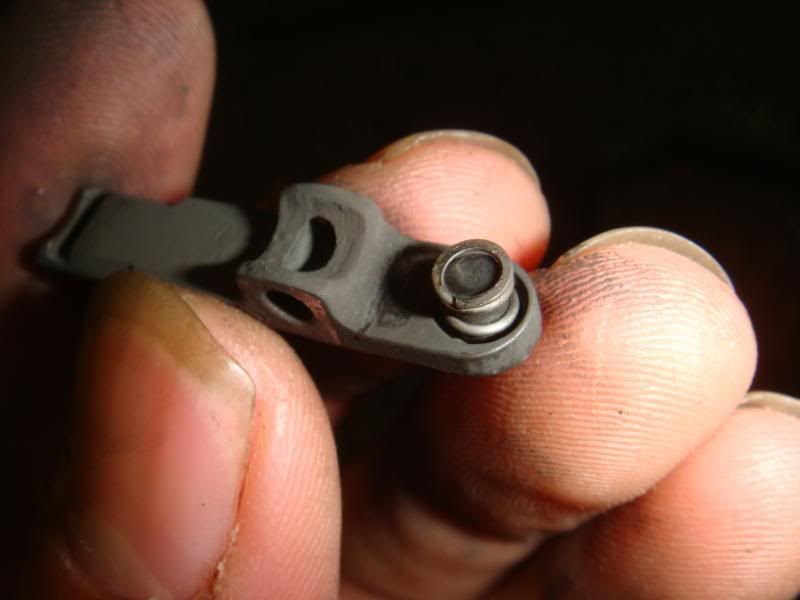
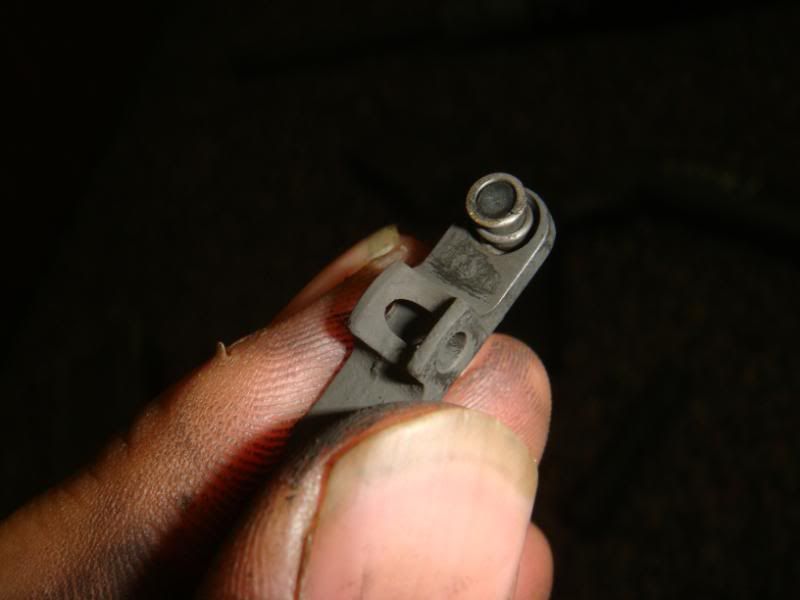
I will cover the BCG shortly with the stiker mechanism that allows the FPW to fire from an open bolt, here I’ve demonstrated how the FCG works in the M231. The bolt release mechanism is actually locked in the “down” position when fired, and squeezing the trigger pivots the bolt release around the rear pin, lifting the front end of the bolt release, and creating a flat surface across the top of the bolt release. You’ll notice that the BCG is very different looking from a standard M16 BCG, and has a notched underside. In practice, pulling the charging handle and therefore the BCG back causes the BCG to ride back against the spring tension of the recoil system, and the rear of the bolt release clicks into the notch in the BCG when the trigger is in the neutral position, locking the bolt back, under the pressure of the three nestled recoil springs. 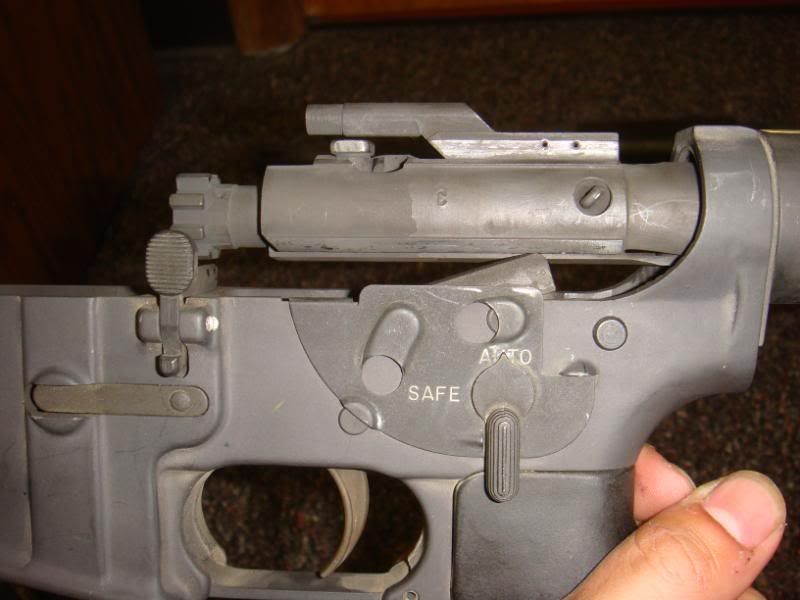
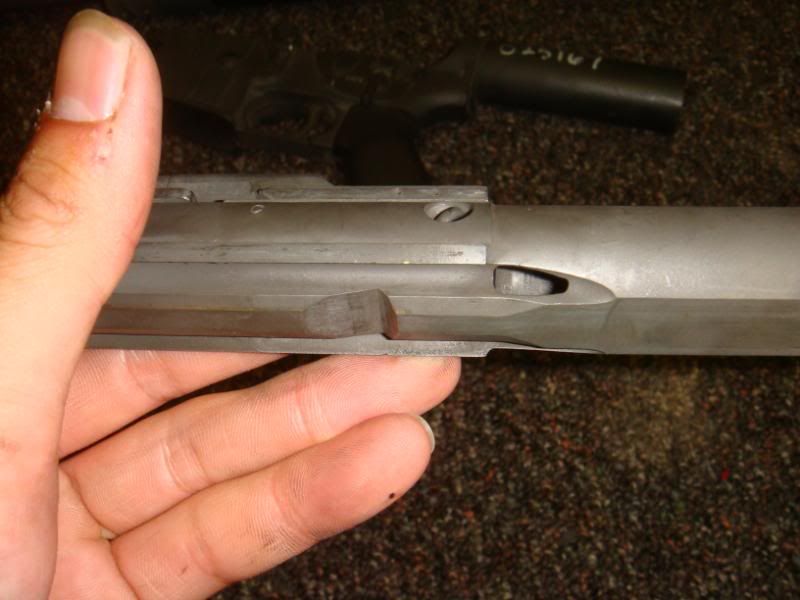
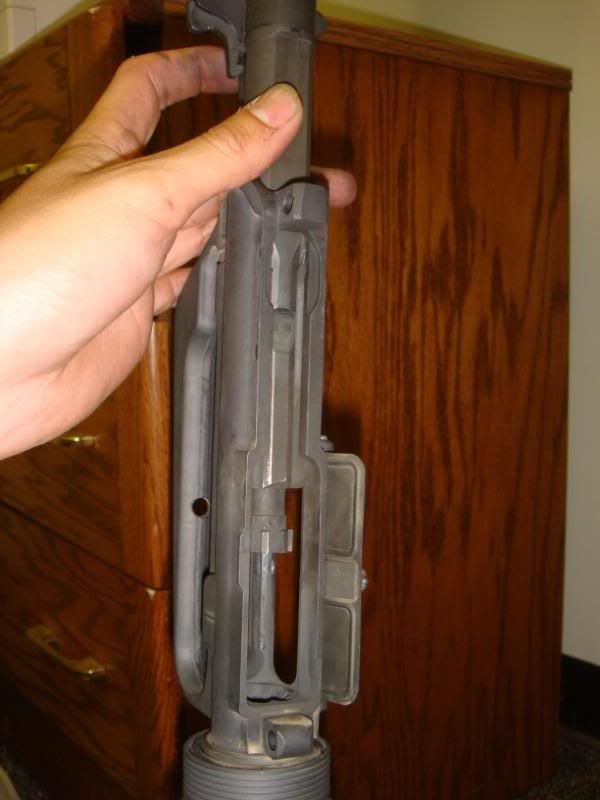
When the trigger is pulled, the bolt release pivots, and the rear of the bolt release disengages from the BCG notch, creating a flat surface, and allowing the BCG to travel forward.

The BCG then travels forward under spring tension, and fires a round as soon as the bolt cams and is locked into the chamber. The firing cycle then progresses much like a standard M16, and the bolt cycles back against the recoil spring assembly until it reaches the end of its travel and moves forward again, stripping another round, and firing it as soon as it reaches battery. To interrupt the firing cycle, the trigger is simply release to return to its neutral position and the rear lug of the bolt release again pivots up and catches the BCG before it can return to battery and fire another round. 
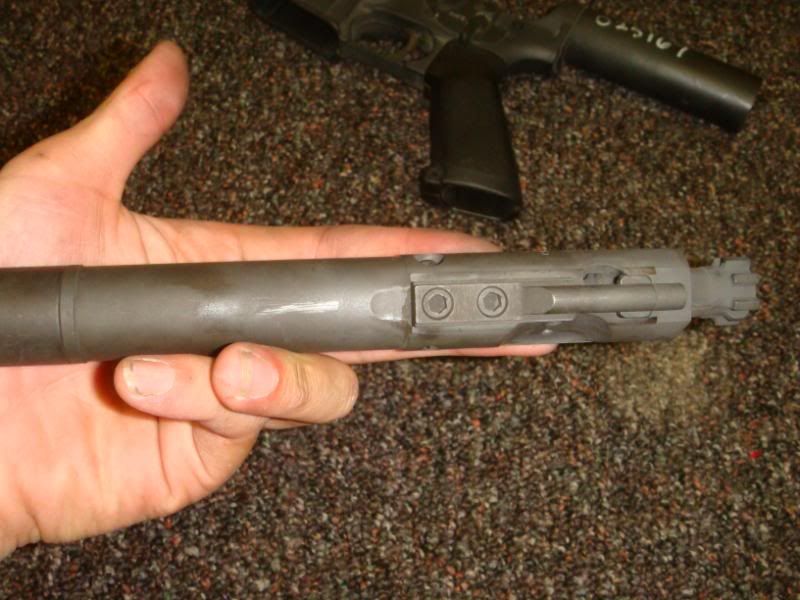
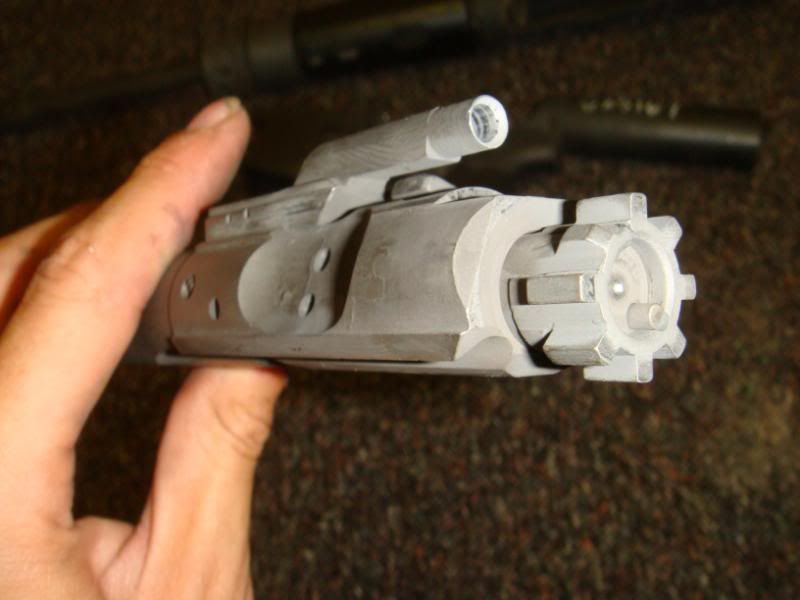
It’s an extremely simple system with very few moving parts, and quite effective (like most open bolt MGs and SMGs that don’t need to bother with the hassle of a semi selector function). The BCG is an interesting animal as well, here you can see the whole BCG and striker assembly, at a glance it looks similar to a slickside BCG, but closer examination reveals quite a few differences. 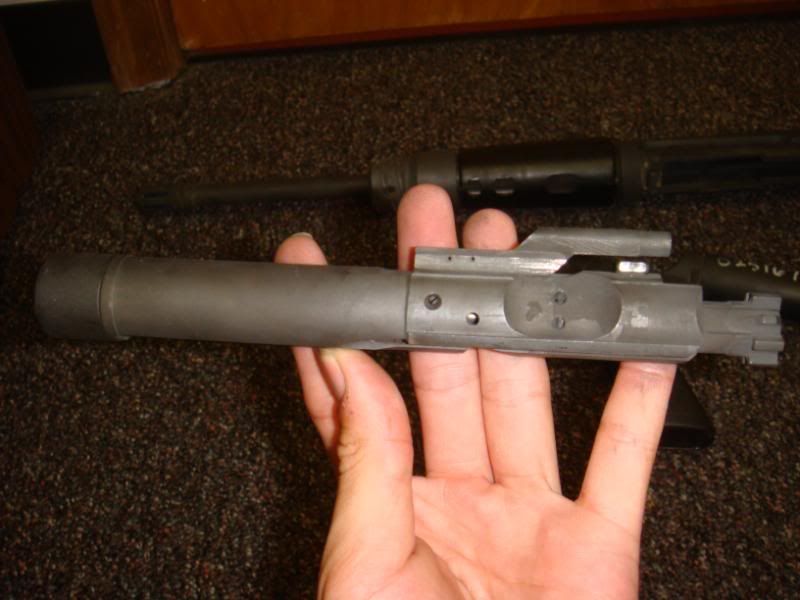
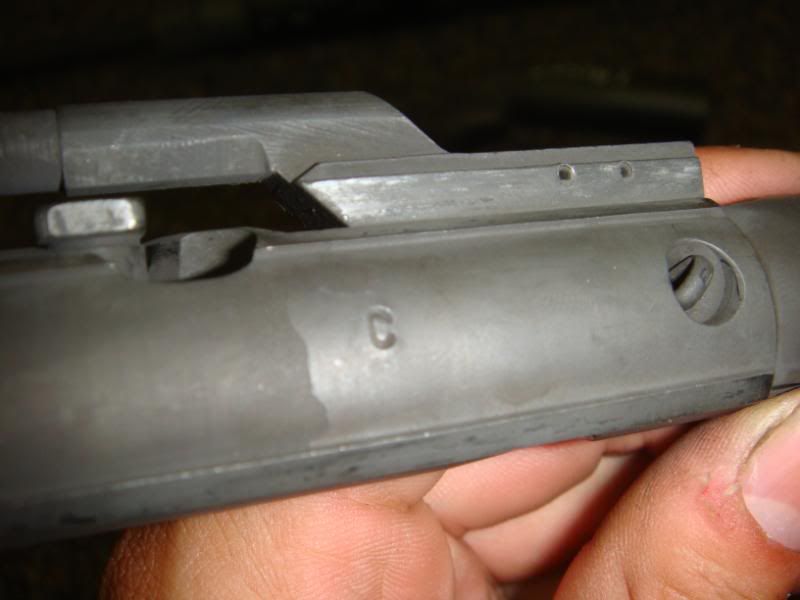
Like most Colt BCGs, the left side of the carrier is stamped with a “C.” 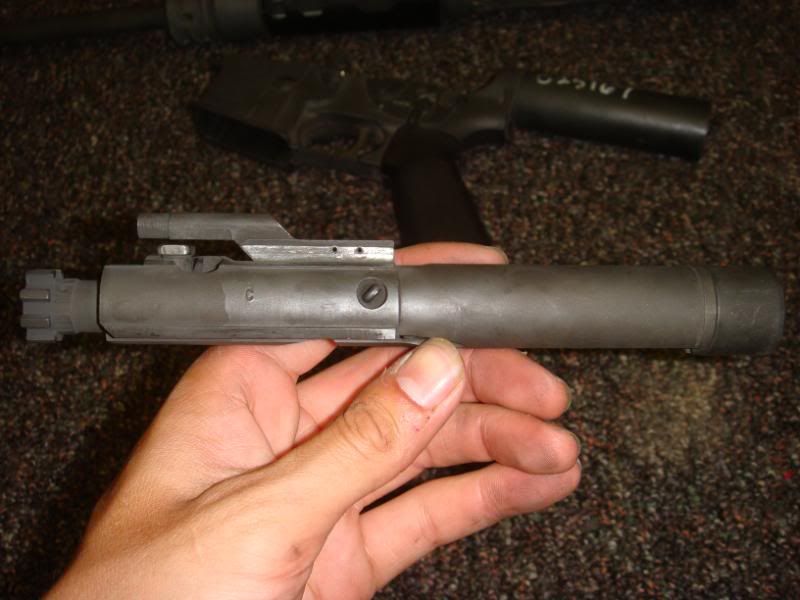

In these photographs, you can see the pins in the gas carrier key, note that the gas carrier key is in fact *not* staked to the BCG, but pinned in place, which would seem to imply that the engineers anticipated far more stress on the gas carrier key than in the standard M16 design, probably due to the extremely high rate of fire in automatic. 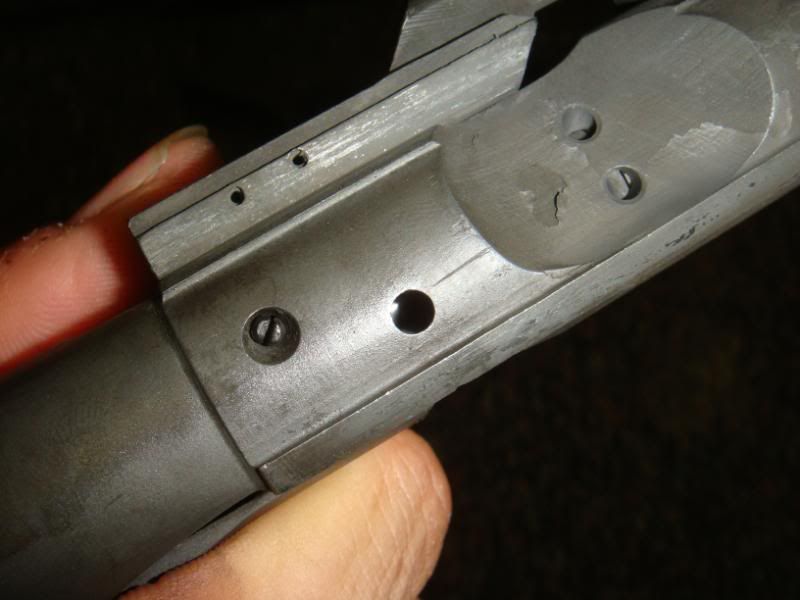
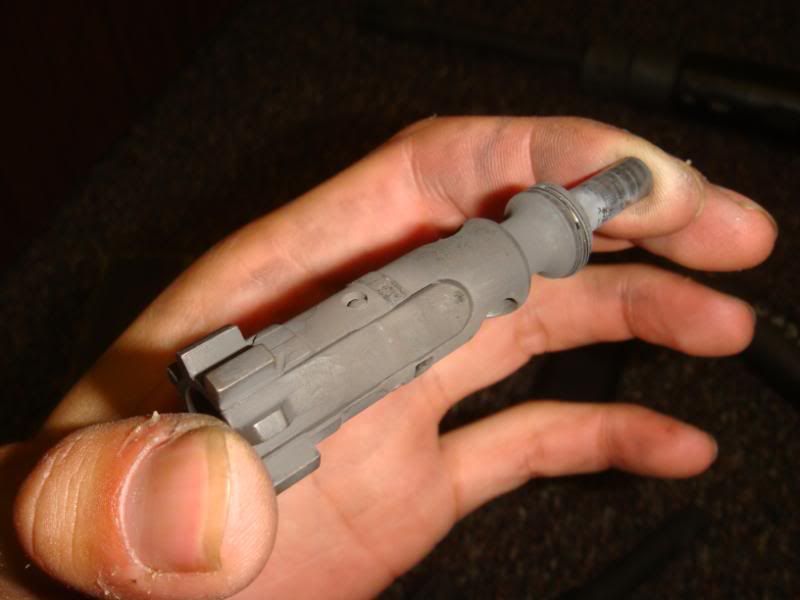
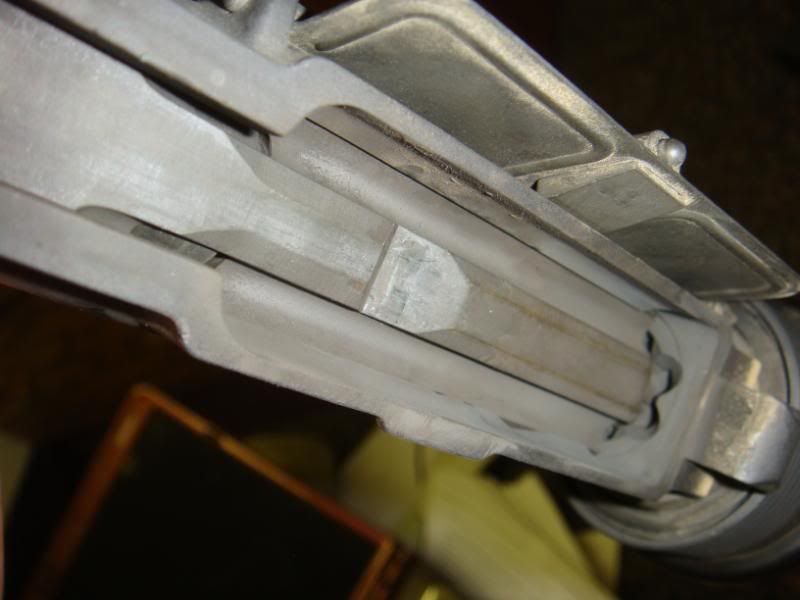
From the underside, you can see the notch cut in the BCG for the bolt release to catch, but you can also see two smaller cut outs on either side that are cut through the bolt carrier. You can see the striker through the notches, and when it’s backed out slightly, you can actually see the end of the firing pin. 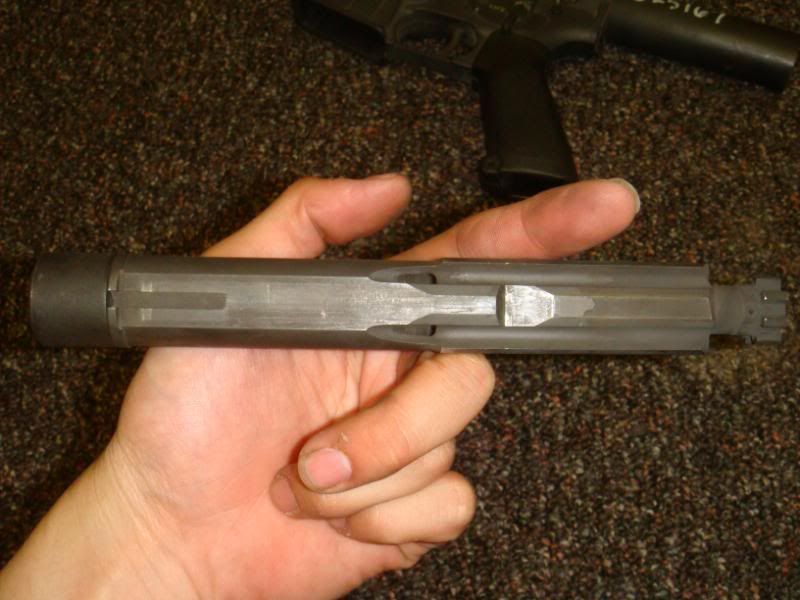


The striker is simply nestled into the rear of the bolt carrier and slides out easily. In a neutral position, it rests against the firing pin when the bolt is cammed and in battery. When the bolt is extended, it can be pushed all the way in to the lip. 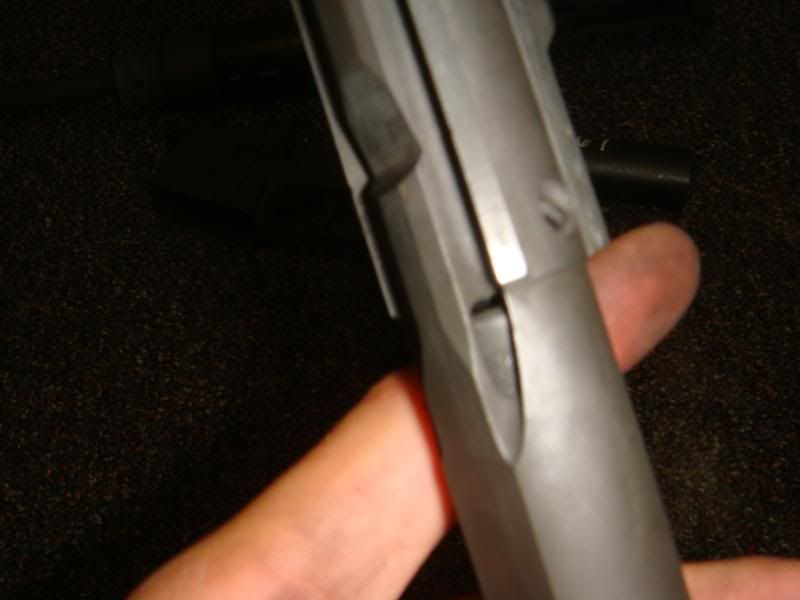
It’s really nothing more than a hollow tube that slides into the rear of the bolt carrier, on the face you can see where it impacts the firing pin. 
The lip on the striker essentially makes it a fixed length, it can only extend a certain distance in to the BCG. What the means is that when the bolt is extended (i.e. in travel, not in battery) the striker cannot reach the firing pin to ignite the primer of a loaded cartridge. Only when the bolt has traveled fully forward, and the cam pin rotates the bolt in the chamber, and locks it closed, and the weapon is in battery, the spring pressure on the striker immediately extends it as far as it will go, igniting the primer, and firing the cartridge. The result is that it is nearly impossible for the weapon to fire out of battery, yet the moment that bolt locks, the round is discharged which contributes to the absurdly fast rate of fire. Returning again to the BCG, with the striker removed, you can see the tail of the bolt and the end of the firing pin and better detail of the notches cut in the bolt carrier. If I were to guess, I’d say that they are to prevent debris from getting trapped between the bolt and the striker, as well as to allow air to escape, avoiding a “air buffer” situation from occurring if air got trapped in there and had no way to escape. 
The gas carrier key is the full round type, and the bolt is very (almost boringly) conventional. 
The firing pin and FP retaining pin are nothing special, standard M16 components. 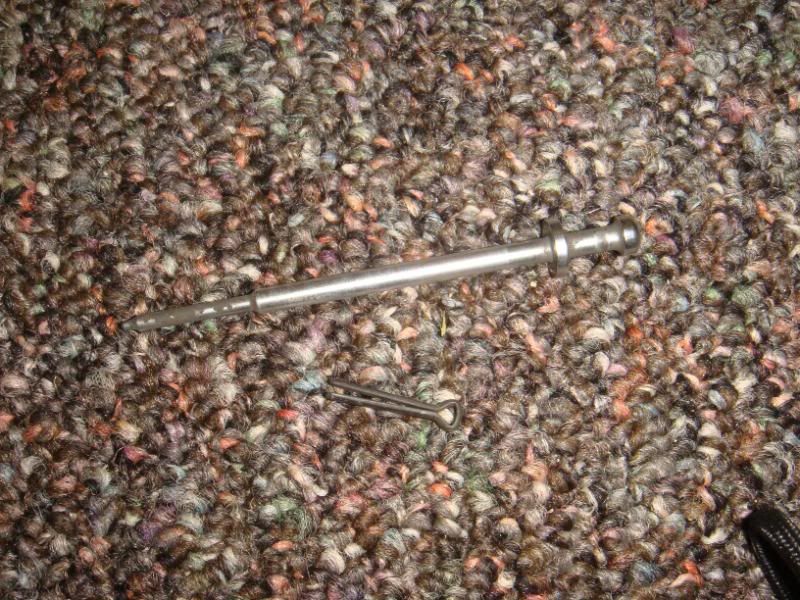
As is the bolt (albeit more filthy than any soldier should let his personal weapon get… I got it issued to me like this, by the way, and I did not have the chance to clean it before it was used so I only added to the years of crud.) 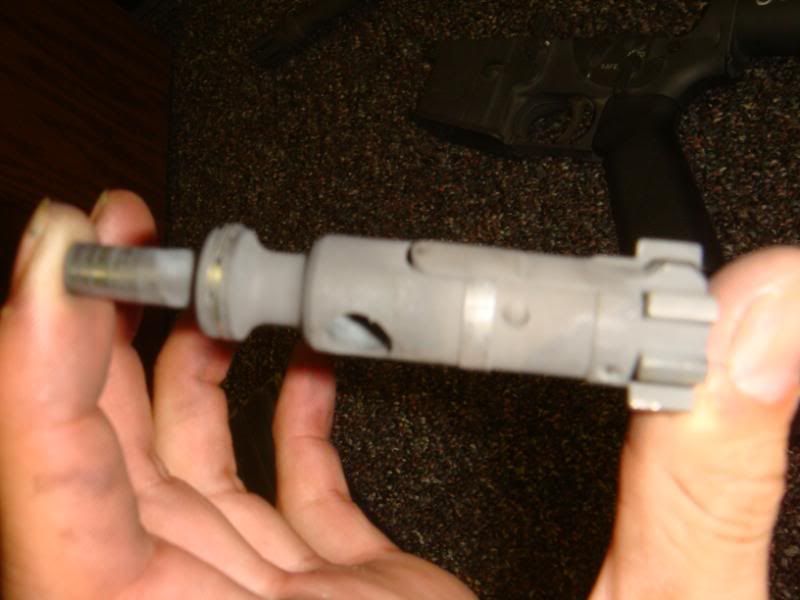
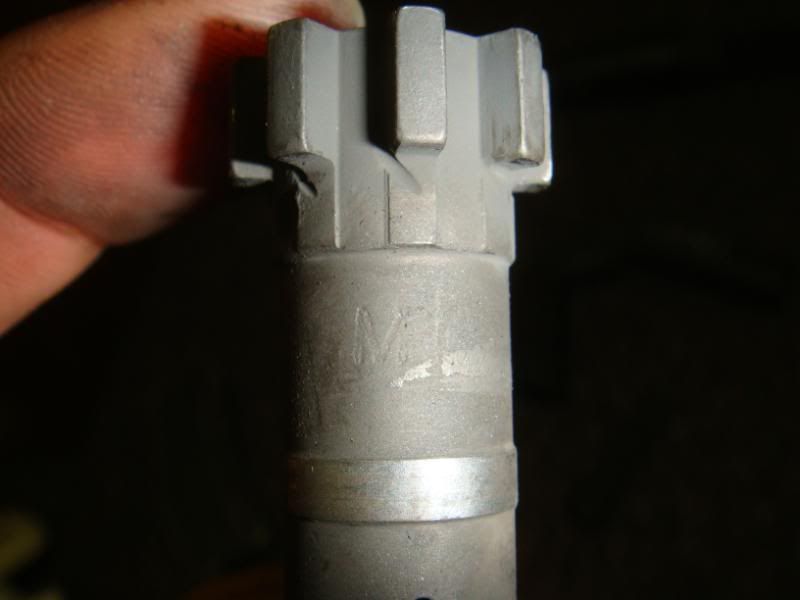
The bolt was marked, as expected, with the “MPC” marking, and the diagonal cuts along the locking lugs. 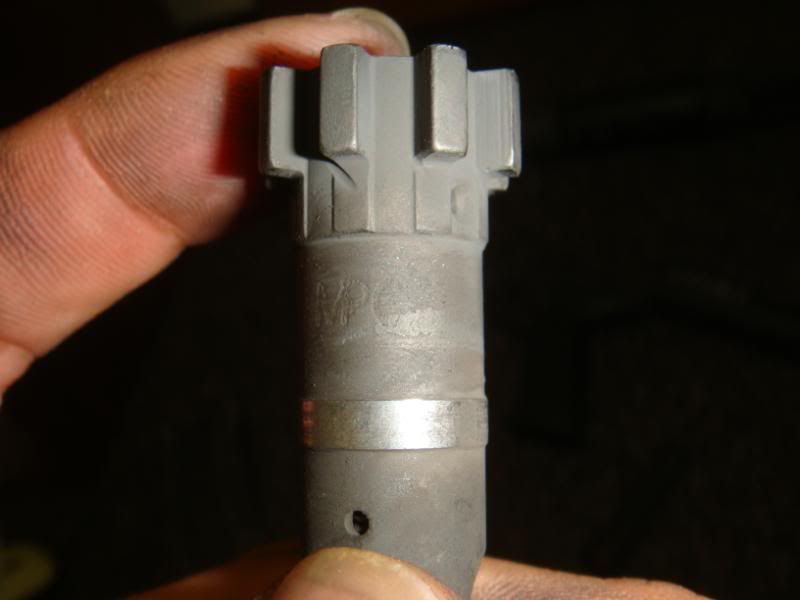
Extractor, also marked with a “C” inside, and what appears to be a standard rifle buffer and spring. Insert appeared to be black, but it was hard to tell underneath all that carbon. 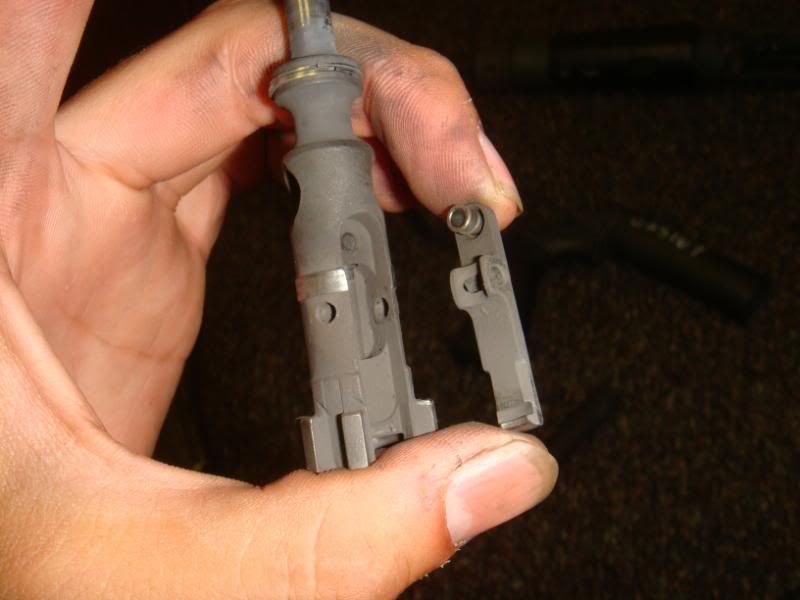

Some more photos of the stripped bolt carrier. 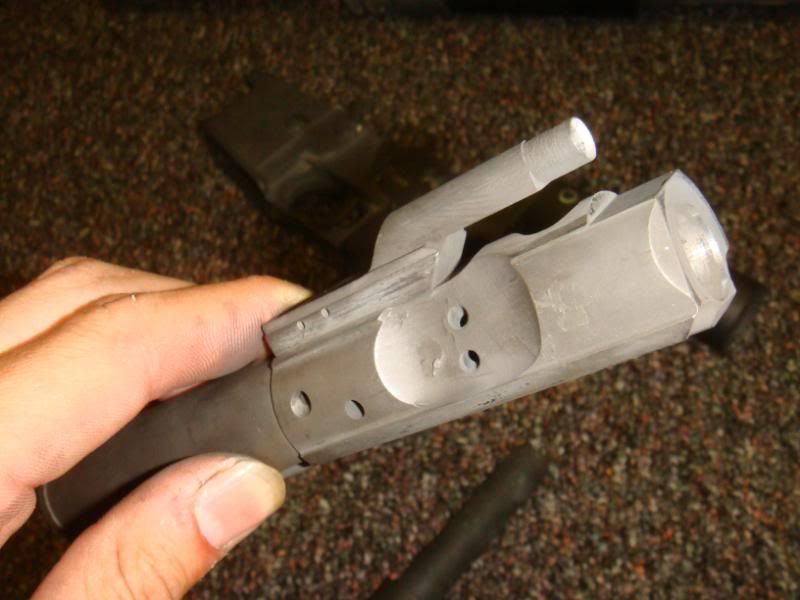
This inside of the upper receiver was cut like a standard 5.56mm M16, again, nothing surprising there, barrel extension and feedramps were rifle style, not extended. 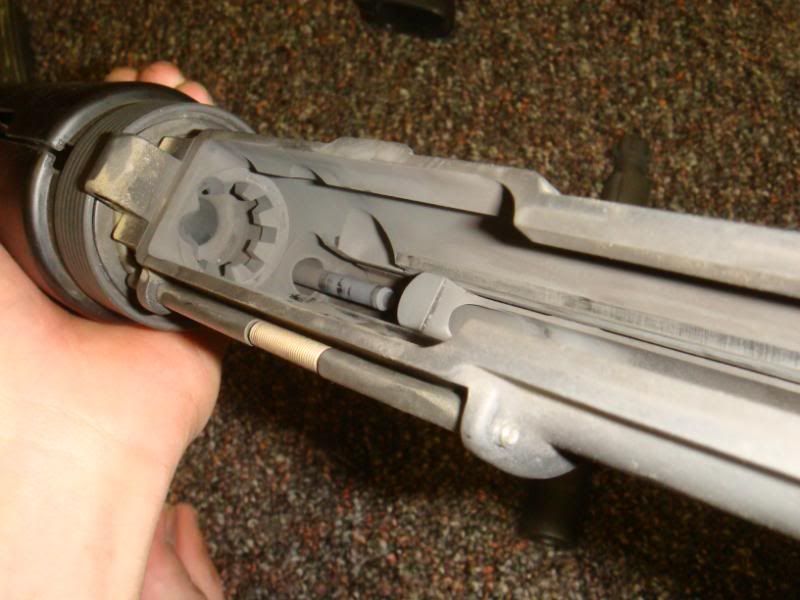


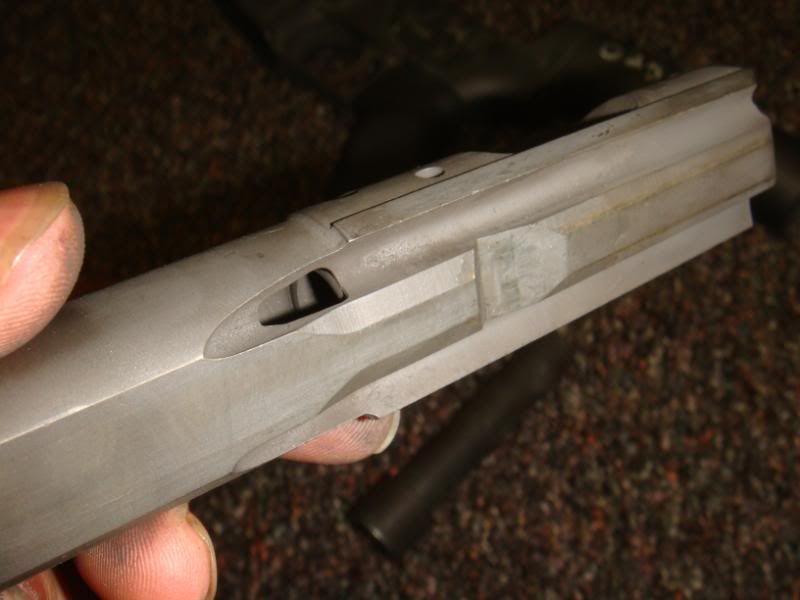
Reassembly was pretty similar to the standard reassembly procedures, again, minus the inserting of the recoil assembly. Here you can also see that the upper has been relieved for an auto sear, yet as far as I can tell, there’s no assembly within the lower that would require it. Given the economy with which the receivers were machined (no sight cuts or buffer detent cut, ect.) I wonder why they bothered cutting the auto sear relief. Or perhaps someone can see something in the photos that would make it necessary? 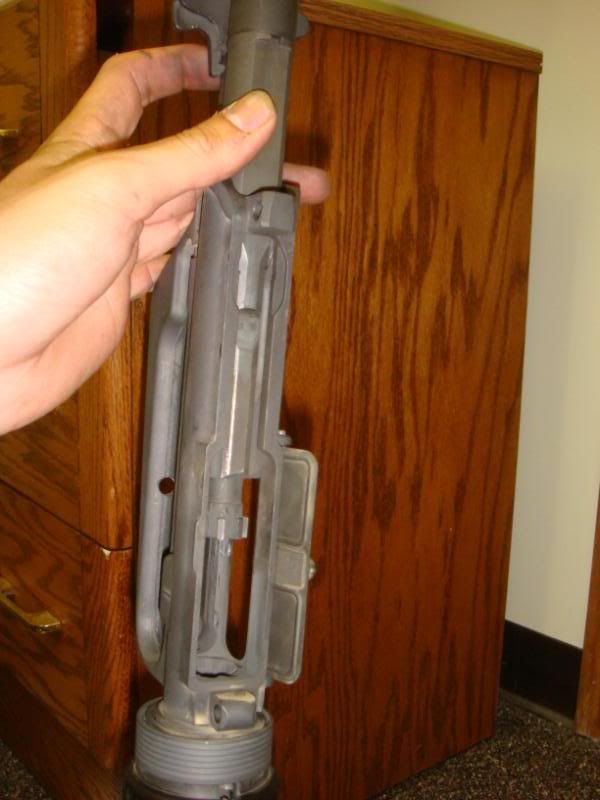
Now here’s an interesting tidbit, as I mentioned, the bolt catch is a standard M16 assembly. 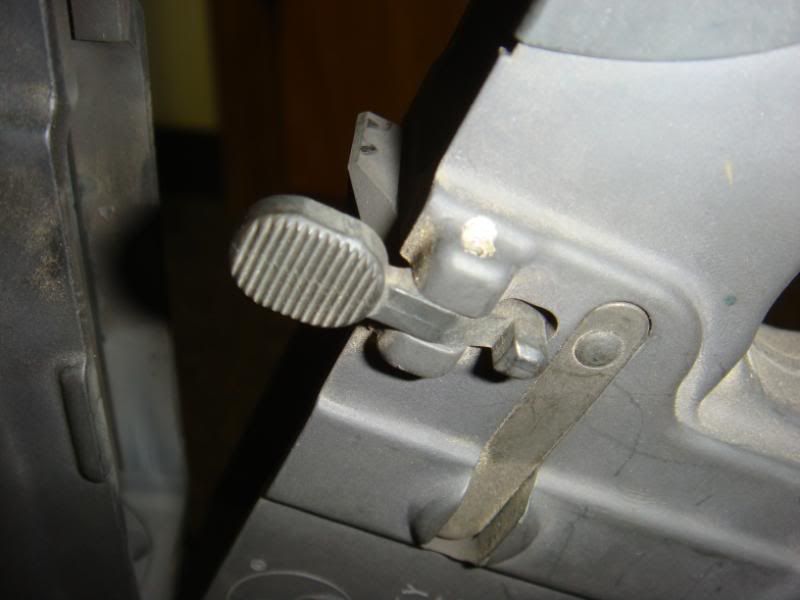
This actually caused a bit of a function problem, not mechanically, but in its user interface. The problem it created was that when the magazine would run dry (very very quickly), the magazine follower would engage the bolt catch, which would function as designed, and lock the bolt open. However, the bolt catch engaged the bolt further back in its travel than the FCG, and thus, the FCG was not engaging the BCG. I’ll admit, the first time I ran dry, I hadn’t even thought of it, I just slapped another magazine in, the bolt was locked to the rear, as it should be on an open bolt weapon, and I went to fire again… and nothing. Squeezing the trigger did nothing until the bolt catch was depressed, and the bolt was released forward about 1/3” to be caught by the FCG before it could be fired. Furthermore, the bolt was under so much spring pressure from the three nestled recoil springs, that simply slapping the side of the weapon with the support hand like one would do with a standard M16 would not be enough pressure to release the bolt (which is not to say that it cannot be done, but it takes noticeably more effort than with an M16A2 or M4 Carbine), and I found I was better off gripping the magwell and pressing the bolt catch with my thumb, a mush finer motor movement that simply slapping in the general area. In retrospect, I should have anticipated the problem, as it had already been addressed with Colt’s LMGs which also fired from an open bolt, and were fitted with a modified, extended bolt catch which had a leg that hung down over the mag catch, meaning that when the mag catch was depressed to release the spent magazine, or barring that, to insert a fresh one, the mag catch would automatically disengage the bolt catch and return the BCG to a “ready” position to begin firing. I’m surprised that no such extended magazine catch was fitted to the M231, given its purpose as a last ditch weapon, the way the bolt catch functioned was far less than desirable. 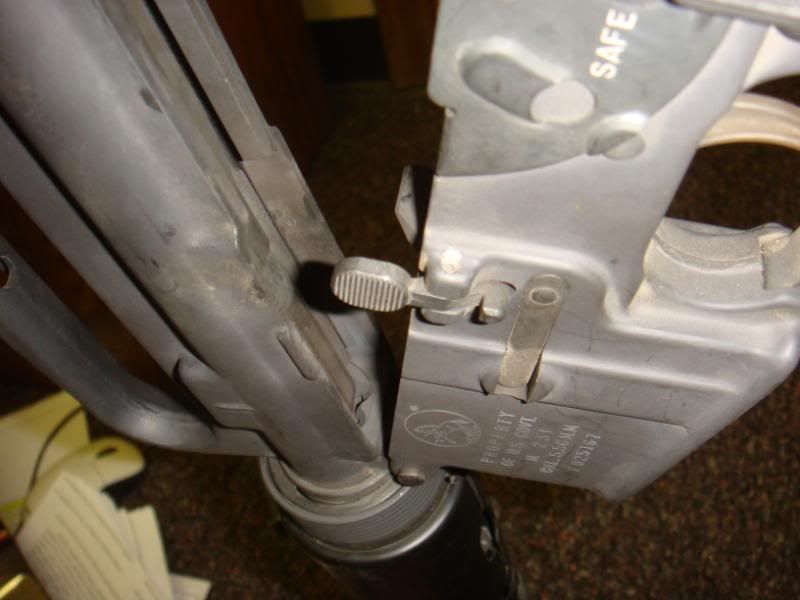
Once the upper and lower receivers are closed, the recoil buffer assembly is reassembled on the endcap, and the entire assembly is slipped into the back of the RET. 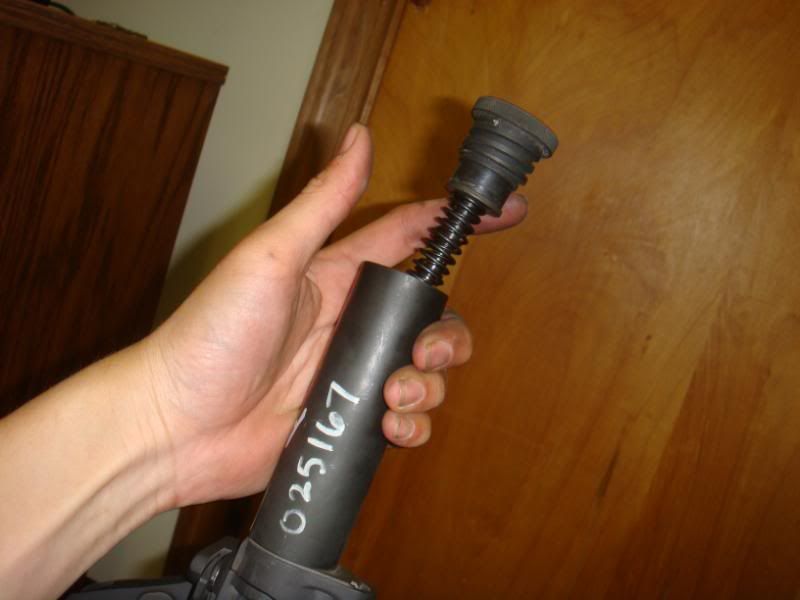
Pressure needs to be applied to the springs in order for them to compress far enough to allow the threads to engage, after which you screw the endcap in as far as you can, with the spring loaded detent ratcheting in the teeth until it is fully screwed in with the detent engaging the teeth. 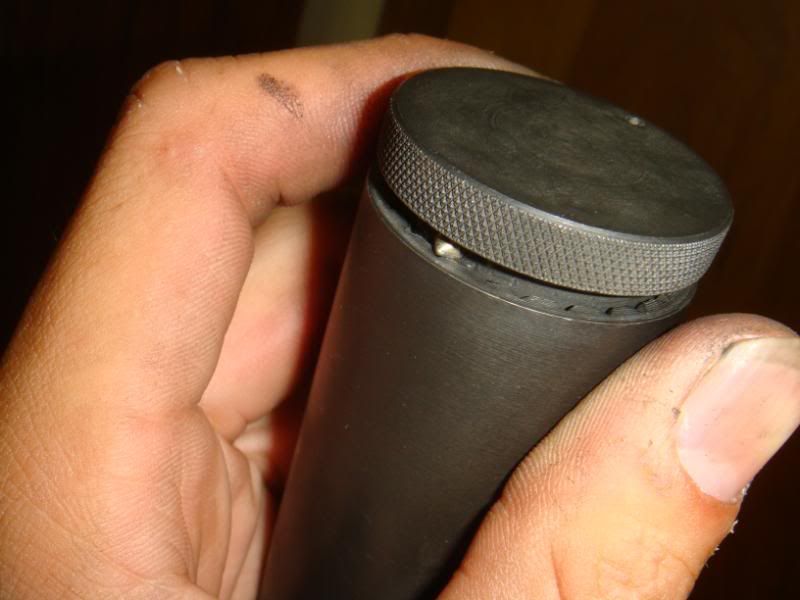
And she’s reassembled! 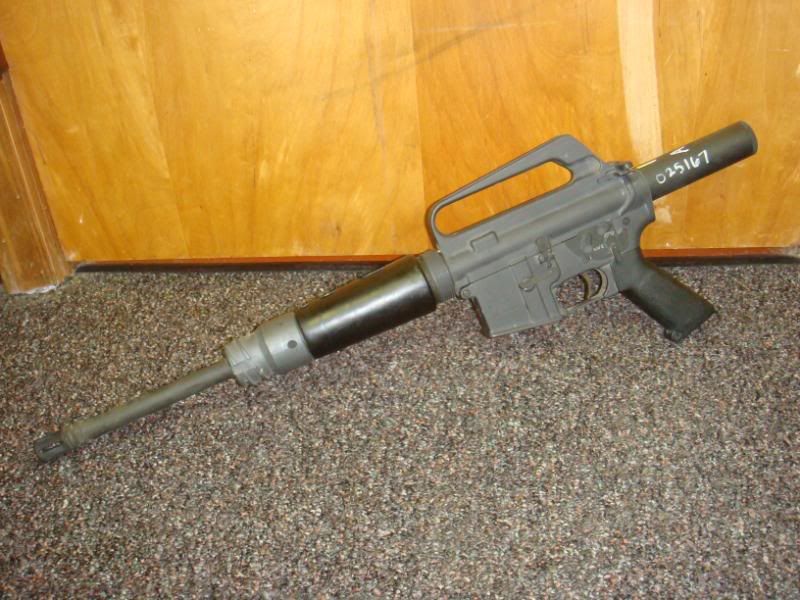
My overall thoughts: This is a fun as hell weapon system, fires ridiculously fast, and is pretty compact. It is not practical for… anything. There’s a reason that all the Bradley firing ports have been covered up, and that this weapon and its sisters were sitting in mothballs, where they probably would have stayed if I had not weaseled one out, until someone decides they’re just taking up too much space and demils them (a tragedy, but a completely different subject). On the Scout side, especially light, I carry my M4. Current operations, I want my M4. Sorry, I love retro ARs as much as the next guy, for their history, their technical features, and just as interesting pieces of equipment, but if I have to spend a significant amount of time on the ground, I feel that my M4 is exactly what it needs to be. 14.5” barrel is short and handy enough to mount and dismount vehicles easily, while giving you a pretty good engagement range if necessary, any further than my M4 can shoot, my crew served weapons should be shooting at, if not indirect fire of some sort. My ACOG, MRD, IR laser/illum, visible light, I would not give up. I don’t think any of it is “bolting 10 pounds of crap” to my rifle, so my “handy little carbine” may weigh as much as a Garand, but I’m confident in saying that I carry far more capability, pound for pound than someone carrying a Garand would be. Let’s face it, the soldier’s load never gets lighter, once you make one item lighter, it just means you can hump more useful shit of another variety. That being said, on the armor side, space is at a much higher premium, and I shouldn’t have much business engaging enemies with small arms. I would probably be much happier having an R723 type rifle, maybe with a small red dot, something like an IDF carbine, small, light and effective. IMHO, the M231 could be adapted to a very effective PDW with some modifications to the design, and could be made relevant in today’s operating environment, especially in built up urban environments, when vehicle crews might not have enough standoff to traverse their main weapon systems. If I had my way, I’d see what could be done to reduce the ROF on the M231, cut it at least in half, but maintain the simple firing system that it has, install LMG bolt catches, and a flattop upper of between 14.5” and 11.5” on to which is mounted an MRD. Reinstall the wire stocks, or develop a new stock that maintains the compactness of the short action, but provides better cheekweld, and issue these “M231A-1s” to armored vehicle crews, truck drivers, ect. Eh, but y’all don’t want to hear my pontifications on what should be done with the M231, you just want to look at the retro one! Gentleman, that concludes my review of the M231 Firing Port Weapon, what are your questions? ~Augee Oh, and yes, I've got a couple more pictures of that GUU-5P that is in there, too.  Nowhere near as many though! Nowhere near as many though!
|
|
|
|
[#1]
Awesome. Thanks!
Sadly I never took the time to take any detail pics of mine while I had it. |
|
|
|
[#2]
Interesting photos, the amount of crud in that rifle is FREAKY! Don't they still have usable firing ports on the M2/M3 rear ramps BTW?
Actually I think I agree with you about the M231 as a PDW... Perhaps pistol type sights on the carry handle (Fixed post up front, pin-punch-driftable V or U notch rear sights in a dovetail), wire stocks again, and maybe longer buffer systems to slow down the ROF? |
|
|
|
[#3]
Very unique weapon.
Definitely a spray and pray weapon. Thanks for sharing. |
|
|
|
[#4]
Thanks for all the pictures and info.
Nice to really see the open bolt design. It really is a simple design. That was tough even for my high bandwidth connection. |
|
|
|
[#5]
So basically, you pull the trigger, and that retracts the "bolt release" and it slamfires to beat all hell. Wow.
|
|
|
|
[#6]
Thank you! That was a fun read!!!!!!
Your pictures and description gave an excellent overview of how it works and how it was designed. The bolt catch is interesting. It works and didn't require any changes to the original design. So, if you held the trigger and released the bolt catch you'd be in for a full auto surprise? Great documentation - Thanks again. Did you ever get it cleaned? |
|
|
|
[#7]
Augee, or someone with better eyes then mine, can you tell me if the trigger spring and sear spring appear to be the same as use in the standard M16, or something different?
|
|
|
|
[#8]
Quoted:
There’s a reason that all the Bradley firing ports have been covered up... I was under the impression that the two in the rear doors were still there. I've seen at least one picture circa 2003-2004 with an M231 dangling from one, so they were at least until then. There's at least one other picture from the same time period of a Bradley TC with one too. |
|
|
|
[#9]
Shot a 231 in Florida a couple of years ago... It really was an awesome piece of kit!!
|
|
|
|
[#10]
Great Augee, just great!! Thank You. Thanks for all your efforts in sharing this here. Mods, could this info PLEASE be tacked.
|
|
|
|
[#11]
Wow! Thats way more info than I have seen on this weapon before. Thanks for the pics!
|
|
|
|
[#12]
Quoted:
Great Augee, just great!! Thank You. Thanks for all your efforts in sharing this here. Mods, could this info PLEASE be tacked. THIS!! Augee, How was the force required to pull the charging handle compared to a regular ar15/m16? I saw where you said that smacking the gun to disengage the bolt stop didn't work the same, I would assume the springs were stiffer at close to full compression. Your thoughts would be appreciated. Thank you for an OUTSTANDING write up and especially, THANK YOU AND ALL VETERANS FOR YOUR SERVICE!! shrikefan |
|
|
|
[#13]
Outstanding!!
Probably the best photo essay and write-up on any single weapon I've ever seen posted here. Thanks again. |
|
|
|
[#14]
Augee, Thanks for your time and effort in educating all of us here on a weapons system that most of us have never even had the chance to fondle. I'm sure that even those here who have had a chance to use one of these has learned a little about the function of this outrageous bullet hose.
I agree that this thread should be tacked. Doc |
|
|
|
[#15]
Tack, tack, tack, tack!
|
|
|
|
[#16]
Thanks for excellent post - perhaps the best yet - you may have set a new standard? CW
|
|
|
|
[#17]
BRAVO! outstanding writeup!
|
|
|
|
[#18]
I believe on the A3s, the rear firing ports are covered as well though some A2s have them. My Bradley knowledge is somewhat limited, especially for the M2 (IFV) series as what little time I've spent on Bradleys has been on the M3 variant (CFV).
The fire control group is totally different, so I would suspect the hammer and trigger springs are different as well, at least if they are the same, as the "hammer" operates much differently, they'd have to be installed differently. I don't recall the charging handle being any noticeably difficult to pull back, I would guess that the spring pressure must be a little heavier with the three nestled springs, but I only ever charged it "traditionally," and ripped back on it, so I didn't notice much difference. Glad everyone liked it the review, I'm just glad I could document this interesting weapon before the opportunity is lost! ~Augee |
|
|
|
[#19]
Great post! Great info, great pics, great amount of dirt! Nice job
|
|
|
|
[#20]
Outstanding presentation!
BTW, Thanks Alot! Now I have to have one of those too! |
|
|
|
[#21]
Great write-up and photos!
You've answered a couple questions I had about exactly how the trigger, sear, and bolt carrier work together. Thank you Augee! |
|
|
|
[#22]
When I was Mech. back in 2003-2005, our M2A2 and M2A3 bradleys had the two firing ports on the door still. They might have deleted them or covered them with armor since then.
If you or anyone gets a chance to take a vernier caliper to one of these, all of the external measurement of M231 specific parts would be much appreciated. I.E. length of receiver ext., width of receiver ext., thickness of rear takedown spring cover thingy, every single possible dim. on the gas block, etc.. Dustin |
|
|
|
[#23]
Outstanding! Hell yes it should be tacked! Great write-up an a rare variant Augee! - Thank you!
|
|
|
|
[#24]

I have a dream of a 1200 RPM MK18Mod0. Just gotta get that pesky MG ban out of the way first. |
|
|
|
[#25]
In case you have never seen one being fired before, I found this short video clip of a soldier firing one for our benefit. (Sounds a lot like an MG42)
http://vids.myspace.com/index.cfm?fuseaction=vids.individual&videoid=2029533788 |
|
|
|
[#26]
Thanks for the great write-up!
|
|
|
|
[#27]

|
|
|
 Win a FREE Membership!
Sign up for the ARFCOM weekly newsletter and be entered to win a free ARFCOM membership. One new winner* is announced every week!
You will receive an email every Friday morning featuring the latest chatter from the hottest topics, breaking news surrounding legislation, as well as exclusive deals only available to ARFCOM email subscribers.

AR15.COM is the world's largest firearm community and is a gathering place for firearm enthusiasts of all types.
From hunters and military members, to competition shooters and general firearm enthusiasts, we welcome anyone who values and respects the way of the firearm.

Subscribe to our monthly Newsletter to receive firearm news, product discounts from your favorite Industry Partners, and more.
Copyright © 1996-2024 AR15.COM LLC. All Rights Reserved.
Any use of this content without express written consent is prohibited.
AR15.Com reserves the right to overwrite or replace any affiliate, commercial, or monetizable links, posted by users, with our own.


