|
Posted: 12/16/2005 7:10:04 PM EDT
hey guys!
What kind of work and tooling did it take to do this project? How long did it take? I have been thinking of going this route to making a retro lower since the ASA project looks like it is dead. I know some of you guys have dones this, and I would greatly appreciate any info or step by step procedures reguarding this kind of modification to the lower. I know it takes forever, but I would love to have an A1 style lower, and this seems like the only way. Plus, it would make one heck of a project. Also, it would be great to see pics of your results. Thanks in advanced... Couch-Commando 
|
|
|
|
[#1]
tag for DIY info/pics
|
|
|
|
[#2]
there was a thread about it the other day.
|
|
|
|
[#3]
I tried a search but it didn't find anything. There was that thread with pics from vietnam that mentioned a little about the subject, but it didn't go into any detail. If there is another thread other than that, I would greatly appreciate a link. Thank you... Couch-Commando |
|
|
|
|
[#4]
tried looking for it as well but dont remember what the topic read.
tweak was the one to reply with a link to pis of lowers and what not, hopefully he will come along. |
|
|
|
[#5]
Yeah, I think I saw the pics, they were comparing an A2 to an A1, but I am interested in more of a step by step explination from those who have done such a conversion. The last thing I want to do is screw up a lower from making a stupid mistake... Couch-Commando
|
|
|
|
|
[#6]
dont think there was ever a how to just pictures to follow. there was a guy i think in the biy forum that actually did it but cant remember that thread either
|
|
|
|
[#7]
I know this is kind of hijacking my own thread, but I was also wondering what kind of lower reciever the XM177E1 would have, whether or not it was an XM16E1 or an M16A1.
 Here is a pic of it from the total silence web site, and as you can see, it shows up with an A1 lower, but all of them have the same lower in every pic, and i know the XM607 had an XM16E1 lower, so I am basically clueless... Here is a pic of it from the total silence web site, and as you can see, it shows up with an A1 lower, but all of them have the same lower in every pic, and i know the XM607 had an XM16E1 lower, so I am basically clueless... I would like to make a clone as authentic as possible... I would like to make a clone as authentic as possible...Thanks for any info... Couch-Commando |
|
|
|
[#8]
The XM177E1 has the same receiver as the XM16E1.
|
|
|
|
[#9]

|
|
|
|
[#10]
How odd that you should post this today, since I just finished doing a DPMS lower over to XM16E1 specs this morning. Haven't done the final color finish yet, but should get it done as soon as we get a warm spell down here First, to answer the question in the post above, so far as I can tell, the XM177s were built on the earlier lower, while the E2s were on M16A1 pattern lowers. Now, having posted that, I'm almost positive somebody will post that they saw an early type on an A1 lower, or vice versa Getting to the original question, so far as I can tell, I'm the only one who has posted about doing over a current type lower to early specs. I have no doubt that others have done it, but I don't recall ever seeing anyone else post on it. I finished doing a Rock River lower over to A1 configuration about 6 or 8 months ago, and started the early type on a DPMS piece 5 or 6 weeks ago. The A1 piece was such a chore that I originally cancelled plans for the early piece, and planned to wait for one of the ASA jobs; but after I saw what a poor copy the early type lower was, I withdrew my name from the list and started to do the lower myself. I have no machine tools, and did both conversions strictly w/hand files and abrasive paper. Since the A1 upper I have is finished in an oddball shade about halfway between the early shade and current types, I decided to mix my own paint shades, using Rustoleum off the shelf paint. After three tries, I finally got a close (if not perfect) match w/the A1s upper. I do have a batch made up which is a perfect dup of the early light shade, which I'll use on the early style lower. Why over the counter paint? One reason is that when I started, I had no idea whether I'd be able to do a good job on finishing, and I wanted something I could take off and try again. As it turned out, I needed it w/the A1 clone. Second; After thinking about it, I realized that what I was building were range rifles. I'm not going into the boonies w/either of these rifles. They'll go to the range in hard cases, sit on a bench or rack 'til it's time to shoot, and go home the same way. I don't own a digital camera, but I have made a committment that when the Air Force clone is finished in a few weeks; I'll beg, borrow, or steal something that will take pics I can post. 'Til then, all I can do is ask y'all to be patient. 
|
|
|
|
|
[#11]
cool! I look forward to the pics.
ETA: Also, how hard would it be to shave down the magazine fence? It does look alot harder than the reenforcements, but I would love a semi-accurate replica of an XM177/XM607 carbine. It is too bad that the ASA project looks dead, and I hope another company does something similar, but right now this looks like the best bet. It might be a good idea to practice on 0% forgings, so I don't screw up a good lower though... Couch-Commando
|
|
|
|
[#12]
|
|
|
|
[#13]
Click Here for the retro pic thread There should be something in there you might find useful. |
||
|
|
|
[#14]
Taking off the fence itself isn't all that hard. It's the reshaping of the reciever at the bottom of the wide area that's the bear. That, of course, is one of the reasons I backed out of the ASA deal. He didn't do that reshaping, or shortening of the spring housing at the top, which was precisely the reason I'd decided not to do the job myself  Well, I got it done, not w/o difficulty, It's a very close, but not absolutely perfect match for the profile on the left side. I'll live w/"very close" 
|
|
|
|
|
[#15]
[edited] Oooops. Wrong comment!
|
|
|
|
[#16]
did you reshape the front of the lower where the tabs for the pivot pin are? If I were to do this, I would probably just leave that alone, unless it isn't that hard. I can't wait to see pics of your lowers...
Couch-Commando
|
|
|
|
[#17]
If you're using a lower that is well finished on the front wall, like any Continental piece, it's really the easiest part of the job. And BTW, if you're going to buy a new lower for the project, by all means, get a Conti made lower. That'd be Rock River, Century, Stag, or any other brand in which the serial No. starts w/a CM. Doing the front wall on the Rock River piece I used for the A1 lower, was a snap. Just take a good quality mid sized triangular file and cut the bevel out . On the other hand, the DPMS lower I bought for the Air Force piece has been a real PITA from the start. DPMS leaves the front wall as raw as an uncooked steak. Forging remnent, unmachined surfaces and a bunch of other crap here and there around the piece make it more of a chore to do the ptoject. I knew it up front when I bought it, but it was the only lower I could find that was an almost perfect mactch for the wider than usual upper I have. Meanwhile, the day down here would have been a good one weather wise to start the paint job, but I got involved inside and just went out a few minutes ago. GRRR. Well, next weekend will be a no no w/the holiday; so I guess I'm looking at after the first of the year to do the finishing. |
|
|
|
|
[#18]
www.jobrelatedstuff.com/forums/topic.html?b=3&f=4&t=261291 Here is a thread about which lower is ideal for this conversion...
|
|
|
|
[#19]
I read in another thread that it is easier to do a modification like this if you have a number of photos of the A1 features. I made a pic that includes close up photos of A1 lowers, taken by ASA, AR15.com, Canonshot, and Stickman.
 I hope this helps... Edited to add more pictures |
|
|
|
[#20]
Stickman would probably know the answer, sorry I do not.
|
|
|
|
[#21]
Also, what brand and type of file would you recomend?
|
||
|
|
|
[#22]
Don't really pay much attention to the brands. I have found that the files made in the USA are generally better made, more durable, and cut more easily than any of the cheap imports. Any of the USA made pieces at your local Home Depot, Lowes, or whatever shoud do. The tricky things to find are good quality needle files and riffler (curved needle) files. The set I have I got at a gun show from a tool selling guy, 8 or 10 years ago. They are marked "SE" & "745RF", but I have no idea who made 'em or where. Brownell's certainly can supply anything you'd need, but their tools do tend to be expensive. |
|
|
|
|
[#23]
im thinking its time to whip out the dremel.
|
|
|
|
[#24]
shamayim, the natives are getting restless! they are screaming, "PICS, PICS PICS PICS...."
|
|
|
|
[#25]
Haven't gotten the Air Force clone painted yet, and probably won't for another 3-5 weeks, depending on North Georgia weather.. Don't worry; haven't forgotten my promise. Going to see if I can borrow my (anti gun) oldest son' s digital camera when the time comes. Interestingly. when he lived in a crime ridden part of downtown Atlanta as a college student, he asked me to lend him an M1 Carbine. Gave it back when he got middle class, and now won't let a gun in his house. Ah well, such is life sometimes 
|
|
|
|
|
[#26]
Bump
I was wondering if once you were done if you saw any metal missing from the converted A2 that should have been there on a real A1. I saw the ASA project had a tab like thing at the end of the reciever, and was wondering if yours had the same kind of thing. As for actually grinding the metal down, I have no experience with these kinds of tools, but i do have good hand-eye coordination for fine detailed things, and i am confident I could do this without messing it up too badly (I am thinking of trying this on a raw forging to make sure). I would also like to know each and every type of file you used, so I can replicate your project and get the best possible results. the A1 reenforcements on the right side is what scares me the most about this project, as most of the lowers i've seen are completely slanted ont his part, and no curved part at the bottom where the detend goes in. Before I am serious about this project, I would like to see how your lower turned out first, and I hope to see the pictures soon... Couch-Commando
|
|
|
|
[#27]
bump for anyone else who had knowledge of this subject
|
|
|
|
[#28]
just a thought... but if enough people were interested, I am sure you could find someone to at least do a small batch of these converted loweres?
|
|
|
|
[#29]
There was a whole thread about someone making A1 from A2, but I think it fell apart.
I was going to machine a RRA A2 to A1, but I ran across a Sendra A1 lower here from another member. All I have to do is molycoat the A1, and my Retro would be near completion (of course after SBR). The The most difficult part to machine would be the beffer tube area, as they are drastically different. You might even have to weld metal to get correct. |
|
|
|
[#30]
Hmmmmmnn?
|
|
|
|
[#31]
Maybe even mark them with the proper "retro" markings? |
|
|
|
|
[#32]
The best thing is that the A1 characteristics seem to all be based on less metal, so it is possible to just modify an A2 to the proper look. I don't have a mill, but I really want to get one of those $25 80% lower receiver forgings from DSA to practice on. That way, I wouldn't be scared going too far and have a cool retro-look paperweight.
I think cutting a clean, square mag well will be much harder than filing the walls off. |
|
|
|
[#33]
bump.
I was thinking, you know on the A2 lower, where it is thick and then there's a depression at the end where the stock begins? Is that depression lower than the material is on the A1 lower, or is the stuff forward of that higher? If the back is lower than on the A1 lower, wouldn't this pose a problem when filing down, since there is missing material? I don't have a photo off hand, so i don't know if I'm making any sense or not... As stated previously, PICS, PICS, PICS... |
|
|
|
[#34]
Oops, I didn't read this. This is exactly what I'm asking in my last post. |
|
|
|
|
[#35]
We needs pics, yo!
 Finished or not. |
|
|
|
[#36]
 A1 buffer area is lower than A2. Even at the very rear where the A1 has the vertical rib going up, it is no higher than the A2 in the same area. It's an optical illusion caused by the extra support added to the A2 just in front of that rib and going over the top to the other side. Still, it would (will be?) a PITA to do with just files with that triangular depression. Now where's my dremel...
|
|
|
|
|
[#37]
cool idea...taggity tag.
|
|
|
|
[#38]
Is it the same on the other side? On the photos of the ASA lowers, there was a depression at the back of the lower (where the one on the A2 is...) |
||
|
|
|
[#39]
On the right side, it is the same, except for the horizontal bump that contains the takedown detent and spring. Unlike the pivot detent housing, all lowers including slabsides have the takedown detent housing and it shouldn't be milled/filed off. Depending on which forge made your lower, and who then did the final milling on it, this spring housing ranges from a very definite line all the way across the A2 reinforcement, to just visible at the very rear.
|
|
|
|
[#40]
Okay, that's what I was thinking, but I wasn't entirely sure. Shamayim, we beg for pictures... |
|
|
|
|
[#41]
Okay, I was looking in my retro pic thread, and ekie posted some photos of his excellent retro collection, and this raises some questions about converting an A2 lower to A1/XM/A0 specs.
These photos are taken by Ekie, not me! Okay, in this first one is an SP1 lower. You can see the old style reinforcements.  In these second two pictures is the A2 lower, with beefed up reincorcements. 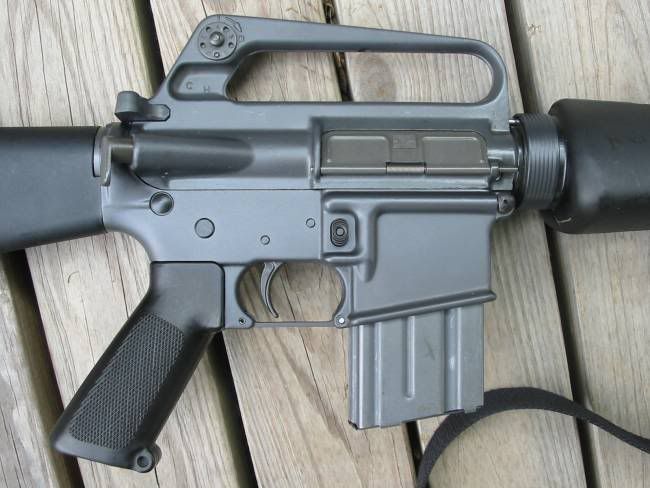  Okay, now that I have examples to show you guys, here's my question. as you can see, behind the beefed up area on the A2 is a depression. Is this lower than or the same height as the ridge on the end of the old fashioned lower? I remember on the photos of the ASA project that went down the crapper, there were signs of these depressions in the lowers that were re-machined to A1 specs. The reason I want to see the finished project so badly is because i want to see if there is enough metal there when it's all done. |
|
|
|
[#42]
oops, forgot to add, Ekie if you want me to take these pictures down, I will be more than happy to.
Couch-Commando
|
|
|
|
[#43]
Just looking at the pictures it seems to me that all the receivers match the contour of the buttstock. So should all be the same dimension there?
Hmm, maybe not, that last receiver looks like it dips, kinda figure 8 looking? |
|
|
|
[#44]
I am not an expert, but from what I learned.
You will need to add material (i.e. weld) to get that rib that is vertical right above the detent channel, but I believe you can just machine the rest of the material to match the rear part of the buffer tube threaded area. It will be pretty thin, hence the reason for the build up on A2s, but it would be sufficent for a Retro. I was going to machine on a RRA lower, but I found a Sendra A1 for sale and bought that instead. |
|
|
|
[#45]
That's kind of what I was afraid of. I've also noticed that area behind the beefed up section varies from company to company and from year to year. I would assume this is because of all the different forgings out there, but I'm not sure. |
|
|
|
|
[#46]
Here is my first practice attempt at removing the fence to replicate the XM177. I used a Dremel grinding bit but I put it in my drill press. I moved the lower around by hand which explains the crappy lines and mistake marks. I don't have pictures of the bit I used as I pushed too hard near the end and promptly destroyed the bit. I found the shaft but the rest is somewhere in my garage.
 I found the bit finally. It has 15 angled flutes. I didn't destroy it but some off the flutes are broken on the end. Here is a very crappy photo. My camera sucks as this is with macro on. 
|
|
|
|
[#47]
Thanks for the pics! If anyone else has photos of retro conversions, please post them here... |
|
|
|
|
[#48]
Quotes from another thread from buzgun
|
||
|
|
|
[#49]
I was wondering, if I wanted to do a Colt model 601 style rifle, and I ground out the entire magazine fence, are there any aftermarket set screws I could use as a pivot pin? thanks for any information.
PS Shamayim, I'm still interested in seeing how your lower turned out with basic hand files... |
|
|
|
[#50]
Hey , That Clown Buzgun does some nice work !!---- seriously -- the photo's above are of the first one i did , i have just bought a XM compete std. upper from the EE , and i am going to modify another DPMS to XM specs. -- if you want , i could take step by step photos of the process -- there is some TIG welding involved - if you want the back to turn out good - as the A2 reinforcement has a small "ring area" on each side that i had to weld build up - but IMO it is not a good idea to go to work on these with just hand files - especially on a Colt !
|
|
|
 Win a FREE Membership!
Sign up for the ARFCOM weekly newsletter and be entered to win a free ARFCOM membership. One new winner* is announced every week!
You will receive an email every Friday morning featuring the latest chatter from the hottest topics, breaking news surrounding legislation, as well as exclusive deals only available to ARFCOM email subscribers.

AR15.COM is the world's largest firearm community and is a gathering place for firearm enthusiasts of all types.
From hunters and military members, to competition shooters and general firearm enthusiasts, we welcome anyone who values and respects the way of the firearm.

Subscribe to our monthly Newsletter to receive firearm news, product discounts from your favorite Industry Partners, and more.
Copyright © 1996-2024 AR15.COM LLC. All Rights Reserved.
Any use of this content without express written consent is prohibited.
AR15.Com reserves the right to overwrite or replace any affiliate, commercial, or monetizable links, posted by users, with our own.


