|
[#1]
500 replies, 20 pages, and >30,000 page-views.
And I own page 21 of my own thread 
|
|
|
|
|
[#2]
Here's a Mobotix D22 camera, mounted to the ceiling. As you can see, it fits into practically any decor. You can even paint the outer trim ring to match the crown molding:

Here it is from another angle: 
|
|
|
|
|
[#3]
Here's the view through the above-linked Mobotix D22 dome:
That would be me doing some late-night CME, while my Rott sleeps on the rug. 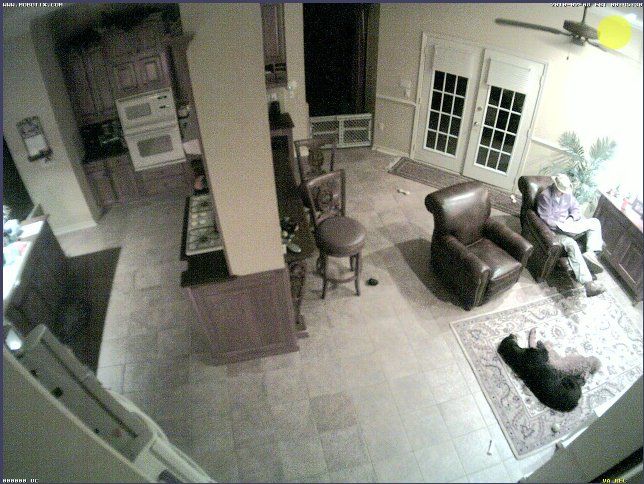
|
|
|
|
|
[#4]
So, Doc...how much do you have tied up in Camera equipment?
|
|
|
|
|
[#5]
Originally Posted By Pita_146:
So, Doc...how much do you have tied up in Camera equipment? A bit... but nowhere near what some posters here have tied up in their guns. You've asked a fair question, but I'm fairly reticent about discussing a handful of things... that list includes my work (in any patient-specific detail), my income, my wife/kids, and my possessions. This is why you won't see me posting up a picture of my gun collection. It's a little too much like bragging for my taste, and while I realize this is a gun board, and that doing that kind of thing is an accepted practice here, it skirts a bit too close to violating my personal philosophy of keeping a low profile. That's why I don't want to get into exact dollar amounts... but let me put it this way. If I had to pay for somebody to come out and do what I've done to my home (not including labor), it would probably cost roughly what you'd pay for a very nice TL-30 safe. That's serious money to most people, but realize that I went way overboard for what most people would consider in a residential application. You'd probably have to get up to a larger installation like an airport or civic center to find some of the same hardware I'm using. This isn't just about me playing with toys (though I do enjoy tinkering with these things), it's about something far more important than that. My system is designed to protect the most important possessions I have... my family. I'm reminded of the Gospel of Matthew, Chapter 6, Verse 21... where it states "for where your treasure is, there your heart will be also." That pretty much sums it up. |
|
|
|
USA
|
[Last Edit: EXPY37]
[#6]
G-M, Is that last pix from the dual hi res from eBay?
Also, I resolved the used glued broken cam issue totally. With prejudice. Getting ready to test another PTZ from another source. same model. With 20x or thereabouts optical zoom, they are incredible. I was able to experiment w/ the bkn one before sending it back. Trying to figure where to put it in the mtns. No dome on it. |
|
|
|
[#7]
Originally Posted By EXPY37:
G-M, Is that last pix from the dual hi res from eBay? Also, I resolved the used glued broken cam issue totally. With prejudice. Getting ready to test another PTZ from another source. same model. With 20x or thereabouts optical zoom, they are incredible. I was able to experiment w/ the bkn one before sending it back. Trying to figure where to put it in the mtns. No dome on it. The last pic is from a D22 dome, purchased from the same seller. The D22-SEC is a single-imager Mobotix camera. That image is 640x480, but the max resolution is up to 3MP; ARF automatically resizes any pictures to 800x600. I'll get some pics of the D12 up when I've had a chance to mount/test it. The D12 also looks like it has the capability to change out the imager modules... so you could replace a wide-angle color module for one with a narrower FOV, or exchange one for an IR-sensitive B&W imager with a different lens, and have both high-res color pics, and low-light IR-illuminated pics of the same scene. The latter might be a nice option, because not only does a 1/2" imager gather more light compared to a 1/3" or 1/4", but you virtually always get a better night-time picture with a dedicated B&W sensor. |
|
|
|
OK, USA
|
[#8]
I do this type of work too! I have been all over putting in GE Interlogic systems, but that was like 3-4 years ago. This is great info.
|
|
|
|
[#9]
Originally Posted By UNDERTOW4507:
I do this type of work too! I have been all over putting in GE Interlogic systems, but that was like 3-4 years ago. This is great info. 
Welcome aboard... and please, feel free to interject at any point. I'm merely an amateur/DIY type, and can't claim to be anything approaching a professional at this kind of work. I didn't go to school for it, don't have any certifications, and basically learned OJT. It would be a welcome addition to have the opinion/experience of a professional installer, particularly as it pertains to actually running the cables, doing 2-3 story structures, going behind brick walls, drop-ceilings, etc. I think most ARFCOMers would like to have some more install tips so that they can integrate this kind of thing into their own home security plans. It was the fact that his subject comes up so often that led me to start this thread almost a year ago. I know the video and networking side of it, but while the equipment I've been using is fairly elaborate, the installs themselves have been relatively simple... so any input is welcome. |
|
|
|
|
[Last Edit: TheGrayMan]
[#10]

Hell yeah, beeyotch. It's tough out there for a pimp geek. Actually, no. It's not... crimpin' is easy... dead easy. This question was asked by Clivus, in this thread, and it's apropos here as well... so I thought I'd throw it in: TGM's primer on crimping and butt-splicing wires. 
Start with the stuff you need... butt splices (the tubular-looking thingamajigs), and a set of crimpers. You don't need much else. Note that these are insulated splices... they make uninsulated butt splices, but those have to be covered in heat-shrink tubing after they're spliced, and IMO that's rarely necessary or worth the extra hassle. 
That's the end-on view. Butt splices come in different sizes for different wire gauges. If you look in the upper-right-hand corner of the "stuff" picture, you'll see a small box of splices with a color chart on the top. It's visibly intuitive, so you don't have to memorize it. If the wire you're splicing won't fit into the butt splice, get a bigger one... duh. 
As an aside, crimping tools are also useful for putting other connectors on wire as well. Here we have spade terminals, ring terminals, etc... and all can be crimped on a wire-end with the same tool. 
We'll start with some Siamese cable, and separate the video from the power with a simple utility knife/box-cutter. 
So we have this... 18gauge two-conductor wire inside an outer jacket. You can see the red/black wires peeking out of that left end. 
Use the strippers on the base of the tool to remove the outer jacket. I simply eyeballed it and used the 10ga notch to remove the outer wiring jacket. 
With the outer jacket removed, you see the individually insulated wires. Here we're measuring how much insulation to strip off. You want slightly less than half the butt splice length. 
Line the wire up with the appropriate notch on the stripping/crimping tool (it's helpfully marked... you can't get it wrong), clamp down, and pull. This will neatly strip the insulation off... and beats the hell out of doing it the old-fashioned way with a set of wire cutters. 
About like that... maybe even a little less (you can always trim a millimeter or two off the end of the wire). What you don't want is bare wire showing outside the splice... that's a good way to generate a short. 
Pop the butt splice on the end of the wire. You can see the length is about right (there's a little metal nubbin inside the butt splice that will prevent you from inserting the wire too far... you can see it in the end-on view a few pictures up). 
Get it in the crimping tool (again, use the notch with the appropriate wire gauge marked next to it... you can't get it wrong), and squeeze down on that sucker. I do it twice... once near the middle, and again right next to it, but towards the end (see next picture) 
And you can clearly see the before-and-after. Note the two spots where I crimped the butt splice. To complete the splice, you would do the same thing to the other wire-end. And isn't that neater than this? Not that there's anything wrong with wiring nuts... but they can come undone, they take up more room, and don't fit in a small space nearly as well. They're also more expensive. 
|
|
|
|
USA
|
[#11]
G-M, pick up one of these at HF or any auto store, and you can thank me later.

|
|
|
|
[Last Edit: TheGrayMan]
[#12]
Originally Posted By EXPY37:
G-M, pick up one of these at HF or any auto store, and you can thank me later. http://www.harborfreight.com/cpi/photos/97400-97499/97420.gif What is it? ETA: NVM... found it. Ratcheting crimping tool? Does it do the stripping for you, or what's the advantage? |
|
|
|
USA
|
[#13]
Originally Posted By TheGrayMan:
Originally Posted By EXPY37:
G-M, pick up one of these at HF or any auto store, and you can thank me later. http://www.harborfreight.com/cpi/photos/97400-97499/97420.gif What is it? ETA: NVM... found it. Ratcheting crimping tool? Does it do the stripping for you, or what's the advantage? Not a stripper. There is no comparison between that type of crimper and the yellow handled one. Much better crimp and ~$15. You'll love it, buy one tomorrow and if you don't agree I'll pay for it. |
|
|
|
[#14]
If I describe what I'm looking to do can someone recommend what I need to get and do? I looked at the thread and it overwhelmed me.
|
|
|
|
|
[Last Edit: TheGrayMan]
[#15]
Originally Posted By EXPY37:
Originally Posted By TheGrayMan:
Originally Posted By EXPY37:
G-M, pick up one of these at HF or any auto store, and you can thank me later. http://www.harborfreight.com/cpi/photos/97400-97499/97420.gif What is it? ETA: NVM... found it. Ratcheting crimping tool? Does it do the stripping for you, or what's the advantage? Not a stripper. There is no comparison between that type of crimper and the yellow handled one. Much better crimp and ~$15. You'll love it, buy one tomorrow and if you don't agree I'll pay for it. Hey... you sayin' my crimp doesn't look pimp? ETA: Rich219: I'm happy to attempt to help you... what kind of installation are you planning? |
|
|
|
|
[#16]
In case any of you wondered what is inside one of those "embedded" DVRs... here you go. If you're any kind of DIY PC guy, you'll recognize many of these components. The hard drives (2) are in the lower right (standard PATA drives), the PSU is in the upper left, and the CD burner is in the bottom center. It's simply a slim form-factor CD/DVD drive like you'd find in any laptop computer. The rest of the DVR case is either empty (there's a ridiculous amount of empty space in these things... they're not nearly as complicated as you might think), or contains the system/IO board. A lot of these things are embedded *nix, or other RTOSs. This one actually boots from an ATA disk-on-chip in almost the very center of the picture (it's green and purple, and mostly obscured by the ribbon cable for the hard drives).

I was called on this one because it was making a "grinding noise." The culprit was a dead fan... and when replacing fans, sometimes it pays to replace all of them at the same time. A fan that gradually wears out/seizes up is one of the main causes of premature PC death... and it could easily lead to the death of this system, its drives, or its PSU. Fans are one of the most failure-prone moving parts on any modern computing devices, so it pays to watch them. If you replace them, replace them with quality ball-bearing fans. You'll thank me. 
|
|
|
|
|
[#17]
bump
|
|
|
|
|
[#18]
I intended to mention this last night, but neglected to do so. Notice anything else about that system board? Yes... that's right. It's a weird-looking thing... certainly no ATX, Micro-ATX, e-ATX, or any other common form factor. In fact, your chances of picking up a replacement board for that DVR on NewEgg, TigerDirect, or any other common component website are precisely ZERO... and you'll find that's the case with a lot of embedded DVRs. We managed to fix this one because the problem was simply a fan. We simply lucked out... but think if this DVR was some no-name Chinese rebranded thing. This one is made by a major, big-name international company with offices all over the world, including in the US. They actually have tech support... but imagine if your DVR was made by some company out of Hunan, China that nobody had ever heard of before? Some of these systems (this is one of them) are a royal beeyotch to even replace a hard drive (I was actually quoted, by the manufacturer, almost a thousand dollars for putting two drives into this type of DVR). If it's something more involved than a fan, a drive, or a power supply, you're hosed (you could hack a small-form-factor PSU, or Shuttle-cube PSU into that case relatively easily, even if the holes didn't exactly match up). This is exactly the problem that led me to go PC-based. Why pay for somebody else's proprietary solution, overprice parts, mandatory you-must-ship-it-back-in-order-to-get-it-serviced policy... when you can fix it yourself with commonly-available commodity parts for cheap? |
|
|
|
|
[#19]
Originally Posted By TheGrayMan:
Originally Posted By EXPY37:
Originally Posted By TheGrayMan:
Originally Posted By EXPY37:
G-M, pick up one of these at HF or any auto store, and you can thank me later. http://www.harborfreight.com/cpi/photos/97400-97499/97420.gif What is it? ETA: NVM... found it. Ratcheting crimping tool? Does it do the stripping for you, or what's the advantage? Not a stripper. There is no comparison between that type of crimper and the yellow handled one. Much better crimp and ~$15. You'll love it, buy one tomorrow and if you don't agree I'll pay for it. Hey... you sayin' my crimp doesn't look pimp? ETA: Rich219: I'm happy to attempt to help you... what kind of installation are you planning? I would like to be able to install 2-3 camera in an outbuilding behind my house where I will be running my FFL from and then put another 3-4 cameras around the outside/inside of my house. How wireless can a system be? Will I have to dig a trench out to my outbuilding if I want cameras out there? |
|
|
|
|
[#20]
Originally Posted By Rich219:
I would like to be able to install 2-3 camera in an outbuilding behind my house where I will be running my FFL from and then put another 3-4 cameras around the outside/inside of my house. How wireless can a system be? Will I have to dig a trench out to my outbuilding if I want cameras out there? Let's start with your outbuilding. A few questions: How large is it? Are you shooting for Interior or exterior coverage with the cameras? Detailed images necessary? (eg. face shots and/or license-plate shots?) Will it be lit at night? Do you have power to the building? Any network connectivity available? How far from the main house? What kind of construction? How high are the eaves? (eg. are they out of reach from the ground?) Is there an alarm system in that building? |
|
|
|
|
[Last Edit: Rich219]
[#21]
Originally Posted By TheGrayMan:
Originally Posted By Rich219:
I would like to be able to install 2-3 camera in an outbuilding behind my house where I will be running my FFL from and then put another 3-4 cameras around the outside/inside of my house. How wireless can a system be? Will I have to dig a trench out to my outbuilding if I want cameras out there? Let's start with your outbuilding. A few questions: How large is it? 24x32' Are you shooting for Interior or exterior coverage with the cameras? Both, probably 2 inside and 2-3 outside Detailed images necessary? (eg. face shots and/or license-plate shots?) Preferably Will it be lit at night? No Do you have power to the building? Yes Any network connectivity available? No, only wireless internet access out there. How far from the main house? 30-40ft What kind of construction? Pole and beam How high are the eaves? (eg. are they out of reach from the ground?) Yes, they are about 8-10ft Is there an alarm system in that building?No |
|
|
|
|
[Last Edit: TheGrayMan]
[#22]
Originally Posted By Rich219:
Originally Posted By TheGrayMan:
Originally Posted By Rich219:
I would like to be able to install 2-3 camera in an outbuilding behind my house where I will be running my FFL from and then put another 3-4 cameras around the outside/inside of my house. How wireless can a system be? Will I have to dig a trench out to my outbuilding if I want cameras out there? Let's start with your outbuilding. A few questions: How large is it? 24x32' Are you shooting for Interior or exterior coverage with the cameras? Both, probably 2 inside and 2-3 outside Detailed images necessary? (eg. face shots and/or license-plate shots?) Preferably Will it be lit at night? No Do you have power to the building? Yes Any network connectivity available? No, only wireless internet access out there. How far from the main house? 30-40ft What kind of construction? Pole and beam How high are the eaves? (eg. are they out of reach from the ground?) Yes, they are about 8-10ft Is there an alarm system in that building?No The 24x32 interior should be easily covered with one or two cameras. Anyone coming inside is going to turn on the lights, so you don't necessarily need day/night cameras. This room, for instance, is roughly 20x20, and that's a single megapixel camera with a wide-angle (90-degrees horizontal) lens. That image is also only 640x480... that camera goes all the way up to 2048x1536 for the same scene (ARFCOM will not post a picture that size)::
Outside cameras are probably best geared towards area coverage... for instance, mounted at a corner, shooting down the side of the building. Light is your friend, not only as a visible deterrent (burglars and prowlers avoid well-lit areas), but to aid your cameras. Unless you're really bound-and-determined to use infrared, I'd simply add exterior motion-detection floodlights. My situation was a little different... I went to the expense, and use a lot of infrared, but that's because of some HOA rules in my neighborhood (they don't like floodlights). I don't recommend dropping the money on infrared just for the hell of it. If you have power to the building, you save yourself some trouble. You don't have to trench the yard and hardwire cat5 to the building... a good wireless link should provide enough bandwidth. You could even put big megapixel cameras out there, and use wireless... but you'd have to use wireless-N (about 370Mbps of bandwidth, compared to a theoretical 54Mbps for wireless-G). For the number of cameras we're talking, that's doable, and as for distance, 30-40 feet is nothing, and should make your wireless link rock-solid. Pole-and-beam construction should make penetrations to the outside fairly easy. The eaves are high enough that you really don't need super-armored cameras.... basic outdoor domes would be sufficient. The alarm thing is easily fixed... you could even get one of those cheap wireless deals like I reviewed here. That would provide you a bit of heads-up if you were at the main house, and somebody was jacking your stuff in the outbuilding. You could save yourself some extra wiring and gear by placing a DVR in your outbuilding, as well as the main house, but I wouldn't do that unless there's some kind of alarm system there. A shrieking alarm will usually run the bad guys off, and not allow them enough time to locate/steal your DVR. Even if you put it inside a DVR lockbox (page9 of this thread), a bad guy with enough time/privacy will simply break into it and steal your evidence. |
|
|
|
|
[#23]
Let me throw in a brief digression.
Anybody remember this illuminator? 
Producing this image? 
Weeeellll.... That illuminator is very powerful, and is covering a fairly sizable area. However... note the following series of images: 


Yep. Same camera, same scene, same illuminator. Those images were all shot under similar lighting conditions on sequential nights. LEDs tend to vary in brightness according to variations in voltage. That series of images is a bad sign: it's a big fat red flag for a power supply about to let out the magic blue smoke. Here's the troublemaker: 
So I ordered a replacement... check out the size of that toroid 
Unfortunately, I failed to note the dimensions of that power supply... it's friggin huge. It wouldn't even fit in the same area where the previous one was mounted. 
A quick change of plan... I went with this one instead (also weather-resistant... IP65): 
And here's the final image. I can even brighten it up a bit by adjusting the voltage: 
|
|
|
|
|
[#24]
So I've been playing with the Mobotix dual-dome a bit more. The first one had a problem with one of the sensors... but I contacted the seller, and he immediately replaced it with another one... even offered to pay shipping.
This one looks exactly like the other one, except it has one color sensor, and one B&W sensor. 
Some of you were probably looking at the previous pictures and wondering how that cover comes off, once you have the camera mounted on a flat surface, and that cover snapped into place. The answer can be found in a simple paper clip: 
That barely-visible hole has two siblings evenly-spaced around the outside of that cover, for a total of three holes. Inserting a paperclip into that hole and slightly pulling on the edge of that cover will allow it to separate from the body of the camera: 
Working your way around to the second hole and repeating the process allows the cover to lift a bit more: 
working your way around to the third hole allows the cover to be removed, and reveals the flange you were pressing on with the paperclip (sorry for the blurry pic): 
Now you can see another cover, held in place by two hex-head screws. A simple allen wrench will remove both of them (no security bits required): 
The cover is nicely gasketed for weather resistance, like most of the rest of the camera (it's IP-54 rated by itself, and IP-65 rated with the optional wall-mount), and removing it reveals several ports: Ethernet (currently connected), Serial I/O (for alarm contacts, etc), and ISDN). You can connect any one, or all three. 
There is also a flash memory slot. It takes up to 16GB SD cards: 
Here is an 8GB SD card being inserted into the camera for image storage: 
The camera software allows you designate places to store images (including off-site servers, flash, etc, etc). In the case of this camera, I'm planning on slaving the on-board image storage to some external sensors. This way, even if somebody steals the DVR that's constantly recording, there will still be images stored on the camera (I have several that do this). This ensures that anyone who wants to break in and steal anything will literally have to rip down and steal every camera in addition to stealing the DVR, in order to ensure that there are no images of them, or their vehicle. 
Redundant is good. |
|
|
|
|
[#25]
And here are some example images from the Dual-Dome:
Of this scene:
Same vantage point as the above camera... here is a side-by-side comparison of their relative sizes. The Dual-Dome is slightly larger in diameter (the polycarbonate dome is the same size, and is interchangeable with the D22 dome seen to the right). The larger base incorporates the necessary electronics for TWO cameras, and the microphone/speaker/PIR element: 
The lenses are both L22 wide-angle lenses... one color (3MP), and one B&W (1.3MP). They have a horizontal FOV of 90-degrees, and are perfect for corner mounting. The Dual-Dome also has the option of melding the images together into a complete 180-degree panoramic view. The lenses in the following images are looking in the same direction, and the in-camera software is displaying the images side-by-side. 
Here is the above scene in full light, similar to the original image: 
Here is the scene in low-light. The only light in the room is being provided by a small table lamp just out of view in the left side of the frame... and it's pretty minimal. Note the difference in light sensitivity between the color and the B&W imagers. Bear in mind that these pictures were taken at exactly the same moment: 
And here is no-light. Note again how much more sensitive the B&W imager is to ambient light. The light you do see in this image is actually infrared light coming from another source. 
And just to demonstrate the sensitivity of the B&W imager to infrared, I included an IR source in the same room, behind one of the chairs in the picture. The IR source is an Ebay special, but it runs cool, and throws out a very wide-angle, even pool of light: 
Note that the IR filter on the color camera isn't 100% effective. The IR source is just barely visible in that left-hand frame... whereas the IR sensitivity of the imager for the right-hand frame allows that low-wattage infrared source to light up the entire room. That room is still completely pitch-black to the naked eye: 
The B&W imager of the mobotix camera produces some really great night images. Part of it is the increased sensitivity of a dedicated B&W imager. The other part of it is the fact that the imager is 1/2", rather than 1/3" or 1/4" with cheaper cameras. The larger area allows the imager to gather more light, and will produce relatively greater night-time performance. |
|
|
|
|
[Last Edit: Mach]
[#26]
Grayman,
I don't mean to have you repeat yourself, but I still don't understand something. ( I have decided to upgrade my system , The Lorex 4 camera system I bought last May crapped out. the company is going to send a replacement , but I've decided to go with a PC dedicated system that I am going to put together, using ZoneMinder). I have a few questions. Pc running Linux ( I will most likely use Ubuntu) and Zone Minder Axis 240Q blade card for the computer to take the 4 analog cameras I already have. ( looks like that isn't made for a computer, just a rack mount Axis server , I knew that price was too good to be true) The question is this: How do I connect IP based cameras?. Can I just connect them to my network with a switch and then the software can pull in the video from the network? If that is so, then should I have a dedicated network just for the cameras due to bandwidth concerns? I'm sure you must have covered this, I just can't find it. Thanks ETA: Neve rmind, found the answers on page 4. Thanks |
|
|
|
|
[#27]
Originally Posted By Mach:
Grayman, I don't mean to have you repeat yourself, but I still don't understand something. ( I have decided to upgrade my system , The Lorex 4 camera system I bought last May crapped out. the company is going to send a replacement , but I've decided to go with a PC dedicated system that I am going to put together, using ZoneMinder). I have a few questions. Pc running Linux ( I will most likely use Ubuntu) and Zone Minder Axis 240Q blade card for the computer to take the 4 analog cameras I already have. ( looks like that isn't made for a computer, just a rack mount Axis server , I knew that price was too good to be true) The question is this: How do I connect IP based cameras?. Can I just connect them to my network with a switch and then the software can pull in the video from the network? If that is so, then should I have a dedicated network just for the cameras due to bandwidth concerns? I'm sure you must have covered this, I just can't find it. Thanks ETA: Neve rmind, found the answers on page 4. Thanks I see you already found the answer... but yes... you just plug them in. You may also need to plug in a local power source for some cameras. In the case of PoE cameras (power-over-ethernet... which are the only network cameras I'm using), you literally just plug them into a PoE switch, and use the included software to find them. In my case, I assign them an IP address from a specific IP range in my LAN. For instance, my camera servers are in a certain IP range (like 192.168.1.X, where X=130-140), while my individual IP cameras are in the next set of 10 IP addresses (192.168.1.X, where X=140-150). It helps me to keep track of what is where... because looking at this: 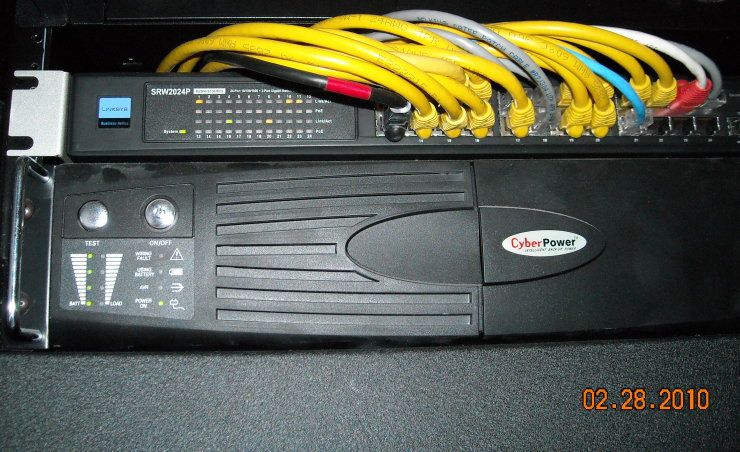
Is completely unrevealing. It's a lot harder keeping track of 24 ports than when you're looking at something like this (this one's in my garage, and used for testing): 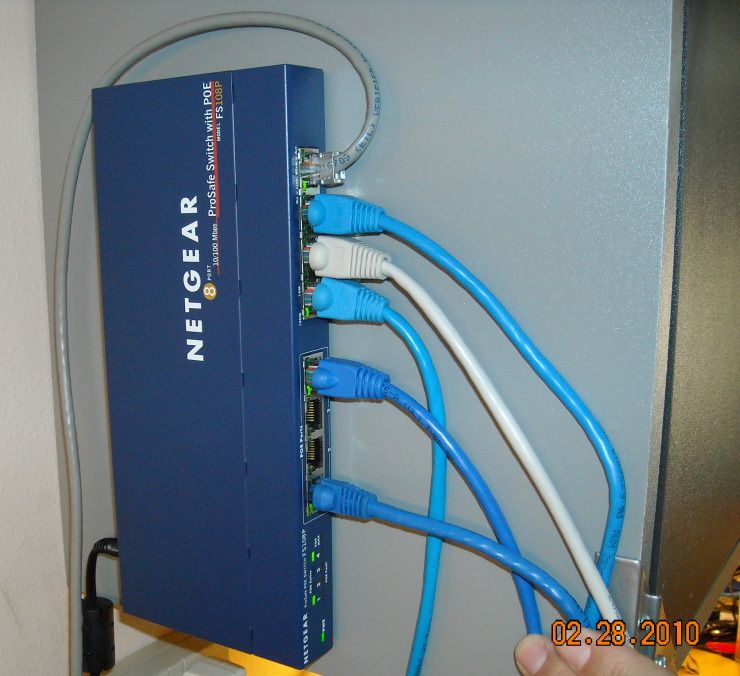
The upside of using a larger rack-mount switch is the ability to manage them via software. That Linksys/Cisco switch has its own web interface, and you can keep track of all sorts of parameters, including PoE wattage: 
And network utilization: 
Ports 5, 6, and 12 in those pictures are PoE megapixel IP cameras... and you can see that each one generates a steady 8-9Mbps of data. You can't hang too many of those off a regular 100-megabit backbone before you start running up against the practical limits of 100-megabit ethernet. That rackmount gigabit switch handles the whole thing nicely, however. |
|
|
|
|
[#28]
tag
|
|
|
|
|
[#29]
Wow this is some great info I have been lurking for awhile and have a stupid ?
I want to install a 6 cam system in my home 5 outside and 1 inside and want to do the work myself. I'm comfortable with any kind of wiring but after doing a lot of reading I don't know if I should go with a package deal or buy each piece separately. Any recommendations on brand and mod# would be appreciated as well. I want to be able keep it under 1k if possible for a decent system. Thanks |
|
|
|
|
[Last Edit: TheGrayMan]
[#30]
Originally Posted By Norecoil1:
Wow this is some great info I have been lurking for awhile and have a stupid ? I want to install a 6 cam system in my home 5 outside and 1 inside and want to do the work myself. I'm comfortable with any kind of wiring but after doing a lot of reading I don't know if I should go with a package deal or buy each piece separately. Any recommendations on brand and mod# would be appreciated as well. I want to be able keep it under 1k if possible for a decent system. Thanks There are no stupid questions. I've done almost every system piecemeal. Most are PC-based systems for maximum expandability, balanced against cost. PC-based systems benefit from cheap commodity parts, but provide a LOT of expandability... and you can fix them yourself if they go TU. Box systems usually provide you with 4-6 cheap identical cameras... but you'll also find that a single type of camera won't suffice to cover every area and lighting condition you'll want to cover. For instance, you'll want a different camera for a hallway compared to a corner-mounted camera in a brightly-lit room, compared to a camera focusing on an exterior doorway (nasty backlighting conditions usually make a WDR camera advisable for such a spot). Going piecemeal allows you to seek out individual cameras for specific spots, and not buy a box-o-stuff... perhaps half of which will be ill-suited for the location you had in mind. I've torn down/replaced a bunch of cameras because I didn't like the way they looked. Also, piecemeal allows you to shop Ebay and other places for deals on what you need. Always remember: a camera system takes pictures. That's what it does... so make sure the picture quality is adequate for your needs. Everything else follows from that. ETA: If you're prone to tinkering, beware! This stuff can really suck you in... my system has been in an almost-constant state of evolution since I first had it installed. |
|
|
|
|
[Last Edit: clivus]
[#31]
I need 7 Mobotix D12Di-Sec-D43N43. Too bad they are $1400 each.
Oh yeah, I just read all 22 pages of this for the third time. |
|
|
|
|
[#32]
Originally Posted By clivus:
I need 7 Mobotix D12Di-Sec-D43N43. Too bad they are $1400 each.
Oh yeah, I just read all 22 pages of this for the third time. Keep an eye on Ebay... within the next six months, Mobotix is coming out with the D14 as a replacement for the D12Di... so you may start seeing used D12s (mine are all used) on Ebay. The guy I bought my D12s from started out with 15-16 of them. It's one of those things where used is practically as good as new, especially since Mobotix cameras have no moving parts whatsoever (they design them that way on purpose to extend their service life). |
|
|
|
|
[#33]
I'll do that. I think I could cut down on the number of cameras, while possibly increasing my coverage by using the day/night dual lens Mobotix D12s. It would probably be worth it if I could find them for under $1000 each since I expect to pay at least $500 for a single day/night IP megapixel dome.
Would this gigabit switch power the cameras POE? It seems that maybe the "phantom power" is starting to come to market in some switches. Dlink Of course, it looks like that switch is nearly $1000, so it is probably cheaper to have multiple 10/100 POE switches hooked to a Gigabit switch. (if I'm understanding everything correctly.) |
|
|
|
|
[Last Edit: TheGrayMan]
[#34]
OK... so I was planning on installing one of my American Dynamics IR-emitter panels for an area over my driveway. But then I stumbled onto a panel illuminator by this company. The company is Senstar, and this Illuminator claims to reach out 200ft+ (datasheet can be found here).

Here's a size comparison. We'll start with an Extreme/Bosch IR cube illuminator: 
Then an American Dynamics panel: 
Then the Senstar StarLED 200: 
It's HUGE... and heavy (almost eight pounds). By comparison, the American Dynamics panel weighs maybe a pound. Most of that weight is heat sink. 
They recommend a mounting height of 4M (12-13ft), so that's roughly what we did. Here it is mounted, and hooked up to power (it takes a direct 120V feed through a weatherproof grommet on the bottom left of the panel. The unit is IP54 rated, so you can mount it outdoors without much fear. 
Do you notice that the LED pattern looks a bit asymmetric? Compare it to the energized American Dynamics panel: 
Here's a closer look: 
Now do you see? If you walk around underneath this illuminator, some of the LEDs are only visible at certain angles. That faceplate has integrated lenses for several different banks of LEDs (there are also side-sections of LEDs). The shorter top section focuses slightly down on the the area immediately in front of the illuminator. The bottom LEDs are the distant-focused LEDs, and are actually dimly visible even across the street. It's an interesting approach to directing the light output, and contrasts with the American Dynamics panel, which simply blasts all of its LEDs out at the same angle (making it more likely to give you a hot-spot in your field of view). The lens arrangement in that faceplate also means that you MUST mount it in the correct orientation (the top is marked). As for the range of this device, it's actually quite close to what they claim. The treeline visible across the street in this NVG view is about 70 yards away. 
A nice option if you happen to find one at a reasonable price... and since it has its own power supply built-in, you simply hook it into your house wiring. This makes it less usable on a vehicle (as a roll-bar-mounted night-driving light, for instance...), but more convenient for home use. Much more amenable to a mobile application are the American Dynamics panels, which are 12V, and might make a nice addition to your BOV. |
|
|
|
|
[Last Edit: TheGrayMan]
[#35]
Originally Posted By clivus:
I'll do that. I think I could cut down on the number of cameras, while possibly increasing my coverage by using the day/night dual lens Mobotix D12s. It would probably be worth it if I could find them for under $1000 each since I expect to pay at least $500 for a single day/night IP megapixel dome. Would this gigabit switch power the cameras POE? It seems that maybe the "phantom power" is starting to come to market in some switches. Dlink Of course, it looks like that switch is nearly $1000, so it is probably cheaper to have multiple 10/100 POE switches hooked to a Gigabit switch. (if I'm understanding everything correctly.) Yes. Any switch that is a PoE switch will deliver power to a PoE device. Most of them (my Linksys/Cisco switch does this) will auto-detect any PoE device, and deliver power if needed. Devices that are receiving power will connect at 100-megabit speed, but the other non-PoE ports are gigabit, and the backbone inside the switch is gigabit, so it won't choke down your network speed like a 100-megabit switch. Try ebay for used switches. The one I'm using retails for $700-900, but I bought it on Ebay for about $400. I promptly cracked it open and removed the noisy little 40mm fans it was using for cooling, and spliced in some nice quiet slot coolers. Now it moves more air, and is dead quiet. You can mod switches just like you mod anything else. ETA: The switch I'm using is an SRW2024P |
|
|
|
|
[Last Edit: TheGrayMan]
[#36]
Here's the SRW2016 switch I was using prior to the SRW2024P. The model numbers indicate number of ports (16 versus 24), and whether it's a PoE switch (no "P" versus a "P" designation). This one is also modded.

Front view: 
Here are the parts I used. The trick was finding an 80mm fan thin enough to fit inside the switch casing, clear the circuit board, and still provide enough room for air to flow (I think that fan is 80x80x15mm). 
It's a pretty blue... added an eerie blue light to my rack. It also draws air in the top of the switch, so you have to make sure there is at least 1U of empty space above the switch for airflow reasons. 
Close-up: 
It worked great... I only changed switches because I wanted an all-in-one PoE solution, and didn't have space in my rack for multiple switches. My current switch was modded with two "slot cooler" fans like these: 
The above fans are arranged differently. They exhaust hot air out the side of the switch rather than the top. This allows me the freedom to use the 1U space above the switch for something else. |
|
|
|
|
[Last Edit: TheGrayMan]
[#37]
I'm going to throw up some pictures to explain the "Modding" process. If you're not skeered of voiding your warranty, modding your equipment is sometimes a very useful thing to do... in the case of these Linksys switches, the OEM fans are 40mm, and run at a VERY high speed. These types of rack-mount switches are meant to be located in wiring closets and data centers... so they pay less attention to the acoustic properties of the switch.
This one was painful... like sitting next to a dustbuster. No way my wife was going to tolerate that racket. Getting the switch apart takes a few steps. You start by removing the rack-mount brackets (these are rotatable, as you'll see later. It allows you to wall-mount the switch) 
It easily rotates once the four screws are removed. 
Get the one on the other side too: 
You also have to remove two hex-head screws/bolts next to the console port. If you don't remove these, you can't get the front panel off. 
The back panel can be removed by working a screwdriver between the top/bottom panels, and the back plastic panel. Gently rotating the screwdriver will separate that plastic back plate (it's only held on by friction clips... no screw involved. 
Here it is off: 
The front panel is a little different. There are little plastic nubs that snap it into place over the top/bottom panels. Getting the front panel off requires that you get a screwdriver blade under the edge of the plastic, and pry up/out. Working your way along that edge will cause the entire thing to come off. 
And here you have it. 
The top panel hooks to the bottom panel via L-shaped tabs on the sides (these fit underneath matching tabs on the lower panel). You have to slide the top panel forward on the bottom panel in order to separate them. 
And here you see the top pane being removed. You can see the modded fan is attached to a matching fan header on the switch's motherboard. It's a standard 3-wire fan header. Note also the tiny/noisy 40mm fans. 
Here's the on/off top view. You can see where that modded fan sits... right in that empty space on the switch's motherboard. You could also put a slot-cooler fan in that open area in the back. Honestly, there's a surprising amount of empty space inside these things. 
To be continued... |
|
|
|
|
[#38]
Replacing the fans required careful selection. 80mm was chosen for the broad selection (most common fan size), and a nice thin 15mm thickness was chosen to maximize airflow for a low-profile application.

Remove the screws (the screws that hold the grille go all the way through the cover and also hold the fan in place) 
That hole was made with this hole saw (80mm). Note: when cutting/drilling anything near an electronic device, make sure you separate the panel and do it FAR AWAY from the motherboard. Metal shavings and electronics do NOT mix. 
Plug in the header... using one of the same headers that the 40mm fans were using. 
Getting the switch back together is basically a reverse of the earlier process. Here is a better view of the L-shaped tabs I referenced earlier: 
Here is the top in place. It just needs to be slid backwards so that the L-shaped tabs hook under the corresponding tabs on the lower panel: 
Here is the "after" view: 
Slide the back plastic panel back into place: 
Aaaaaaand... it works! 
Here is the front view. You can see there is enough clearance between the fan and the motherboard to ensure decent airflow... and that 80mm fan is completely silent. 
In addition to being rack-mountable, turning the rack-mount ears 90 degrees allows you to wall-mount the switch. Not that you'd ever need that, of course... I mean, you DO have a server rack in your house... right? 
If you used something like this as your main network switch, but you wanted to use PoE for cameras, access points, etc, you'd simply add your switch (like the one on the right), and uplink it to the gigabit switch (eg. just plug one of the non-PoE ports into the gigabit switch). This way you could have multiple PoE switches all connected to a gigabit backbone. This would avoid the congestion problems seen with a 100-megabit switch and too many high-res video sources. 
|
|
|
|
|
[#39]
Good thread.
|
|
|
|
|
[#40]
Originally Posted By Duggan:
Good thread. Hard to believe I started this thread almost a year ago. |
|
|
|
|
[#41]
Originally Posted By TheGrayMan:
Originally Posted By Duggan:
Good thread. Hard to believe I started this thread almost a year ago. I can hardly believe how fast the last 4 years have gone by. It truly sets me back sometimes when I look at dated files that I recall having made just recently, and their date is from 2 years ago. Fuck. |
|
|
|
|
[#42]
Everyone remember the Mobotix D12 dual dome?
I discovered something interesting about those cameras. The modules are field-replaceable, and supposedly by the end-user... so I bought one to see if that's true. It is... and it's dead easy. Here's what comes in the box... tiny little imager module in a static bag (imagers are about $225 from Mobotix... much cheaper than a replacement camera). This tiny little thing came ridiculously well-packaged... literally in a box big enough to hold two .50 caliber ammo cans. 
Taking the cover off the camera and unscrewing the dome allows you to simply unplug the camera module and take it out (make sure you've powered it off first). It's connected by nothing more than a little ribbon cable: 
Here they are, side-by-side: 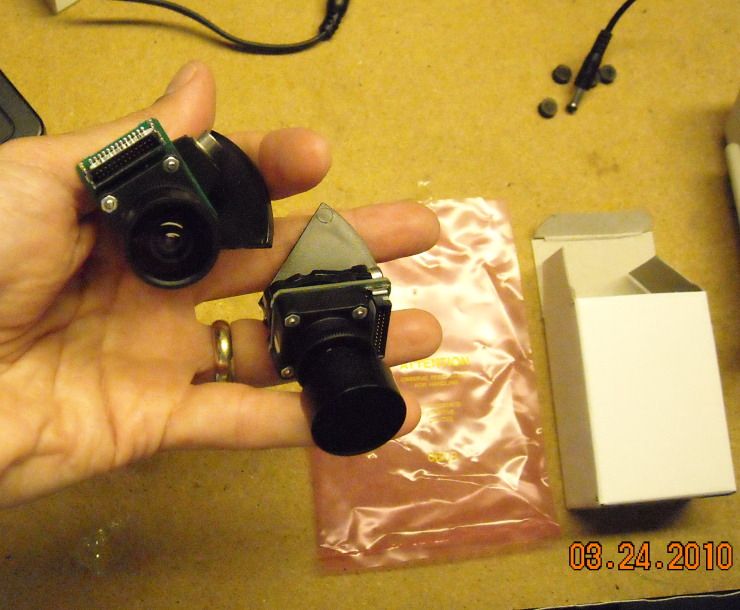
And again, side-by-side on the bench... you can see the tiny little jack. It's on the top of the left-handed one, 90 degrees from the one on the right, demonstrating that you can rotate that little module any way you want. 
Installation is as simple as snapping it into place, and plugging it in (naturally, you should have the power off while you're doing this). When you power the camera back up, it automatically detects which module you have, and displays the picture. 
Here it is with the included lens cap off... note the obvious visual difference betweem the lens on the left, and the lens on the right. The right-hand lens has the fish-eye appearance you'd expect from a wide-angle model, and the one on the left is the 65mm telephoto B&W imager/lens we just installed. The one we uninstalled was a wide-angle color imager. You'll see why we did this in a minute. 
Here's the one we took out. All mobotix D12 imagers are marked with either a tri-color sticker like this one, or a B&W circle (half white, half black) to denote a B&W imager. They are all totally interchangeable based on your application. Again... you'll see why we did this. 
And here's the kill shot... before-and-after views. The first view is a night-shot through the color imager. Remember... the color imager isn't IR sensitive, and isn't as light-sensitive as a B&W imager. The second shot is the B&W imager with the 65mm telephoto lens. 

Note that you get a FAR more useful image with the latter imager. The limitation is that it's B&W only... so you won't ever get color out of it, even during the day. It doesn't switch from B&W to color like some cameras do (I have other cameras that provide color area coverage for this scene). This camera also goes up to 3MP per imager (in software... you can tune it to the resolution you want), so that B&W image can be quite detailed and sharp... not to mention usable at night (I've resized it for ARF-posting purposes). It can also be augmented by IR. Mobotix also allows you to fine-tune the shutter speed for that camera, so you can really brighten that image up even more if you're willing to deal with a little blur of moving objects. I find that a 1/30 shutter speed is the most reasonable compromise (with my specific lighting conditions), as it gives me reasonable brightness, and cuts down on the blur. Now to the trade-offs. Note that the telephoto lens really tightens down the field of view... this is good and bad. It's bad if you're after area coverage (fortunately, I have that with another camera), but VERY good if you want more pixels-per-foot. I wanted to be able to see/identify people on that sidewalk... and I could ALMOST do it with the prior imager, but only during the day. This way, I've zoomed in the view to make better use of my pixels, and added night capability. Another thumbs-up for Mobotix. |
|
|
|
|
[#43]
Here's another D12. This one has even a different lens setup from the ones I've already shown.
These are either L32 or L43 wide-angle lenses (compared to the L22 and the L65 examples shown in the post above). There is a table here that shows the different lenses. 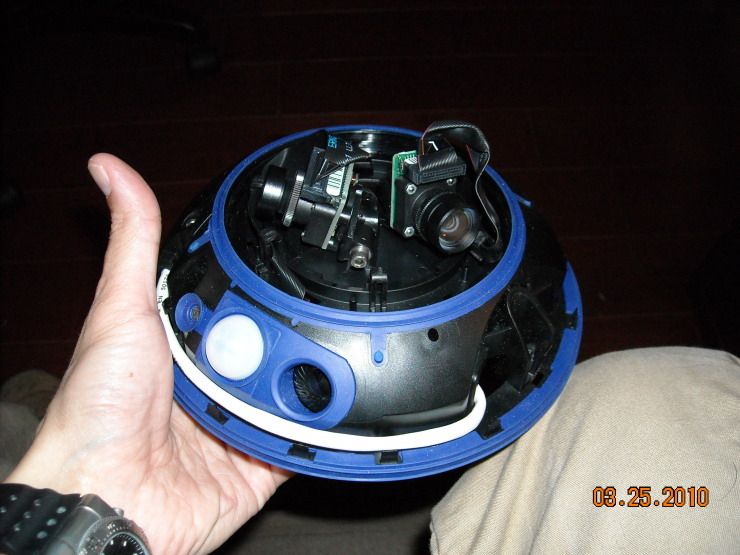
Incidentally, if you want to see what kind of view a specific lens configuration will have on your Mobotix camera, it's easy. If you have (or can borrow) a 35mm SLR camera, you can figure it out easily. Here's my old Nikon D50: 
To determine what kind of FOV you're going to have with the L65 lens, simply adjust your lens to 65mm (I sort of guessimated between 55 and 70 in this picture). Then look through your viewfinder, or take a picture and look at it: 
For an L135 telephoto lens (the longest zoom lens Mobotix makes), adjust your lens as shown below, and take a picture: 
Easy as that. |
|
|
|
IN, USA
|
[#44]
|
|
|
|
[Last Edit: TheGrayMan]
[#45]
Good find, AR50
That's exactly the model I have... and that price is less than half what they go for retail. ETA: and I can verify that it's a high-quality unit. You simply hook it up to 120VAC, and mount it. It has a built-in photocell, so you don't have to concern yourself with timers or anything like that. I can't speak to the longevity of it yet, but it runs significantly cooler than the American Dynamics illuminators. |
|
|
|
|
[#46]
Glad to see some serious techies here.
So tell me what you'll think abot this 'scope. It can be used for checking impacted colons or looking for gold nuggets in swallow streams? Thanks 
Really, I'm serious. |
|
|
|
|
[#47]
Originally Posted By SevenPaul7:
Glad to see some serious techies here. So tell me what you'll think abot this 'scope. It can be used for checking impacted colons or looking for gold nuggets in swallow streams? Thankshttp://buy1.snapon.com/catalog/OBJECTS/55800/55791.JPG Really, I'm serious. Is that simply a fiber-optic scope? Got a link to where we can check it out? And fiber-optic scopes are useful for all sorts of things. They can be extremely useful for fishing walls. |
|
|
|
|
[#48]
Yes, it's snap on - a tad higher than Harbor Fright
But for sniping gold around boulders could have possibilities. |
|
|
|
|
[#49]
Originally Posted By SevenPaul7:
Yes, it's snap on - a tad higher than Harbor Fright But for sniping gold around boulders could have possibilities. Looks useful. They have similar models at Northern Tool ;) |
|
|
|
|
[#50]
I've been through this post a half dozen times and I think I am more confused than before I started.
That being said, I am a systems administrator and have half a dozen old PC's laying around my office all the time. I know how to crimp Cat 5/6 and think I should be GTG with the addition of cameras and software, or am I wrong? I'd really love the cliff notes for this thread in bone head form; I know enough to be dangerous. Can I get cameras that will power over ethernet, plug into the server with an RJ45 and do the job. Thanks for the bone head answer, some times I make things harder that they should be. |
|
|
|
 Win a FREE Membership!
Sign up for the ARFCOM weekly newsletter and be entered to win a free ARFCOM membership. One new winner* is announced every week!
You will receive an email every Friday morning featuring the latest chatter from the hottest topics, breaking news surrounding legislation, as well as exclusive deals only available to ARFCOM email subscribers.

AR15.COM is the world's largest firearm community and is a gathering place for firearm enthusiasts of all types.
From hunters and military members, to competition shooters and general firearm enthusiasts, we welcome anyone who values and respects the way of the firearm.

Subscribe to our monthly Newsletter to receive firearm news, product discounts from your favorite Industry Partners, and more.
Copyright © 1996-2024 AR15.COM LLC. All Rights Reserved.
Any use of this content without express written consent is prohibited.
AR15.Com reserves the right to overwrite or replace any affiliate, commercial, or monetizable links, posted by users, with our own.


