|
Posted: 8/29/2008 1:28:22 AM EDT
Cross-post from GD:
Anyone with a digital camera can take great gun pics outdoors under natural lighting or even indoors with improvised equipment like shop lights and white board. However, being an apartment dweller, I can't just haul my black rifles around the complex taking picture, and I don't have the storage space for lights and other equipment. I also work night shift, so it's usually around 1:00AM on my off days whenever I get the itch to take pictures of guns. However, photography was a big hobby of mine when I was younger, so I am not satisfied with unsatisfactory pictures. This has led me to discover improvised ways of taking decent pictures using simple equipment. Being a former photography buff, I own a digital SLR with an exterior flash. Since I'm forced to shoot indoors, usually at night, I set up white shelving that I bought a Lowes for $10 on the floor of my bathroom and bounce the flash of the ceiling (and walls) to produce some very nice photos. However, most people don't have an SLR with external flash nor do they want to go buy backgrounds that they will have to store when not in use. Also, not everyone has a white, sterile, apartment type bathroom that works well at bouncing light. Most people do have a white bathtube though. After some photoshop tweaking, you can make decent images using any digital camera with a built in flash. Set the gun in your bathtub, stand over it, and take a picture using the flash. Yes, it's that simple. Sure, the picture in the camera looks like shit , but we'll fix that. Open up the picture in photshop, and follow these quick steps: Step 1: Crop the picture. You want the rifle to fill the frame and want just a small amount of white space around the edges. 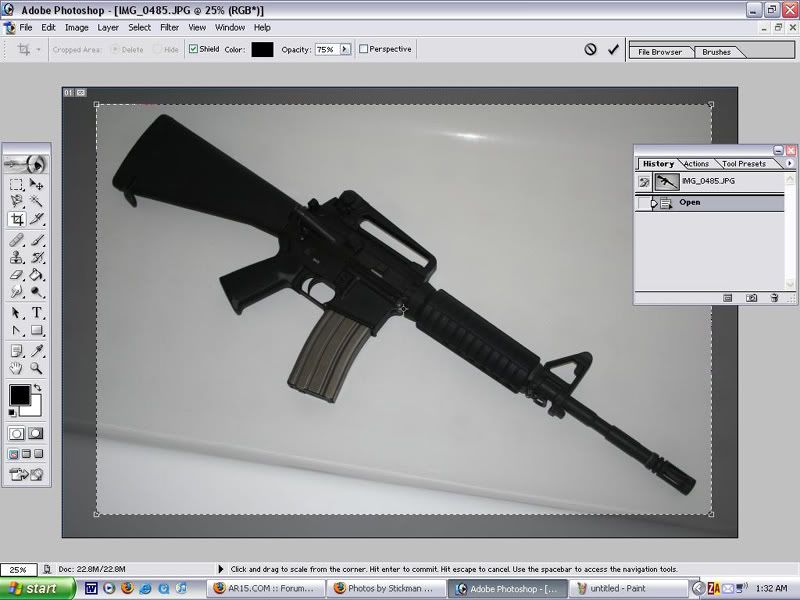 Step 2: Adjust the levels. This is the single biggest improvement that can be made to the picture. Click on Image -> Adjustments -> Levels... (NOT "Auto Levels"). In the levels menu, you can make the background a nice solid white by sliding the right arrow left until it's at the left base of the large right peak. Next, slide the left arrow right until it's at the left base of the left peak. Finally, slide the center arrow left until it's where the right slope of the left peak begins to move sharply upward. You can tweak the center arrow until the image is to your liking. 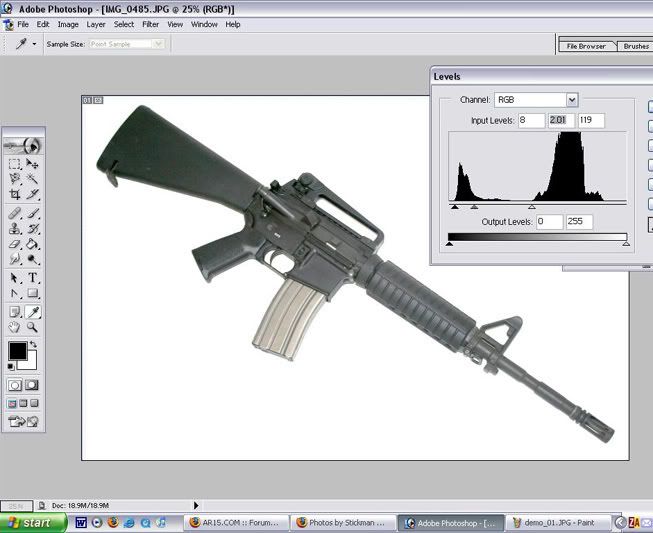 Step 3: Color correction. Click on Image -> Adjustments -> Auto color. That's it. If it darkened the rifle too much for your liking, then you can open up the levels menu and adjust the center arrow until you are happy. 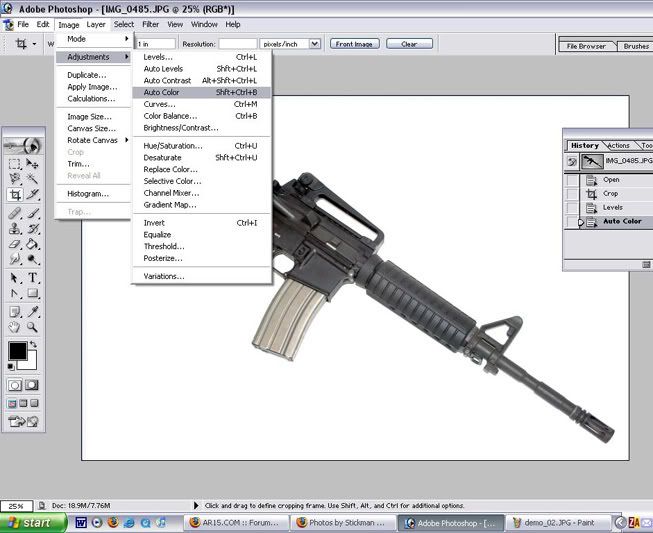 That's all of the correction the picture needs. I usually save the file here so I have a hi-res version. However, this file is much too big to share on the web, so we'll have to optimize the image for web sharing . . . Step 4: Image sizing. Click on Image -> Image Size... to resize the image. I usually make the width 800 pixels for posting on message boards. Be sure that "Constrain Proportions" box at the bottom is checked so the height automatically adjusts for the width. 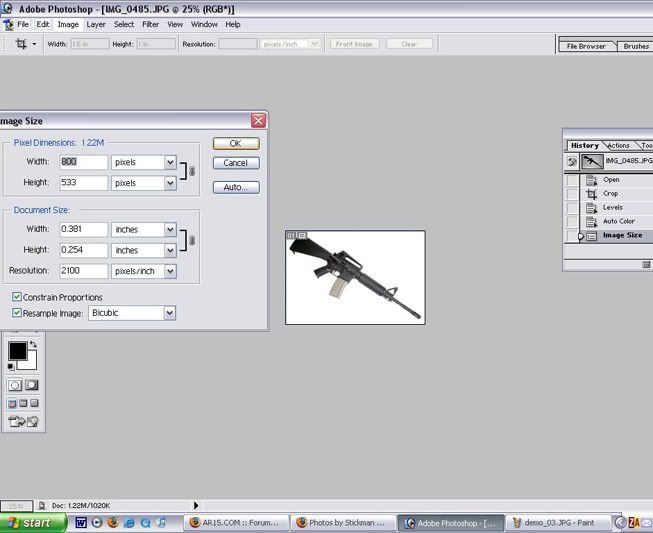 Use the magnifying glass to zoom in until the image is at 100%. That's the size that the image will display on the web. If you think that it's too big or too small, click "Undo" and try another size. Step 5: Adding a border. I border makes your image pop out on the web and generally looks more professional (Stickman uses a border right?). The easiest way to add a simple black border (which contrasts well with the white background) in Photoshop is to click on the Rectangular Marquee tool and select the whole image. Make sure black is selected as your color then right click on the image and click "Stroke...". In the Stroke menu, type in "10 px" as the width and check "Inside" under "Location" then click Okay. Click anywhere to deselect, and your done. 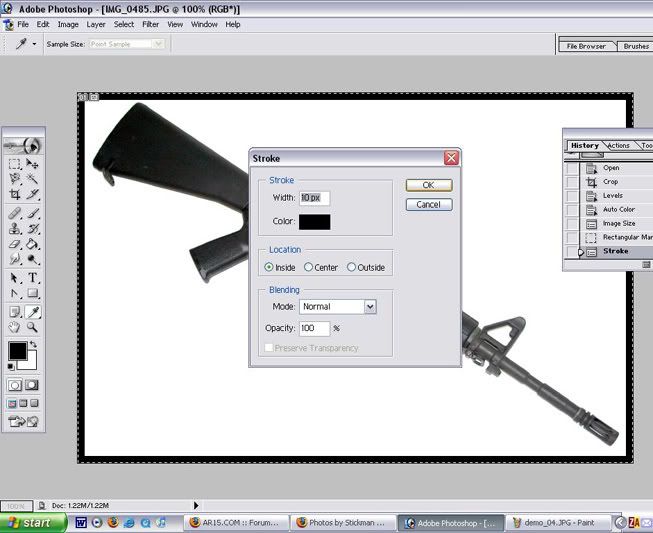 I usually save this as a different file so I have a hi-res version, and smaller version for web use. Here is the finished product: 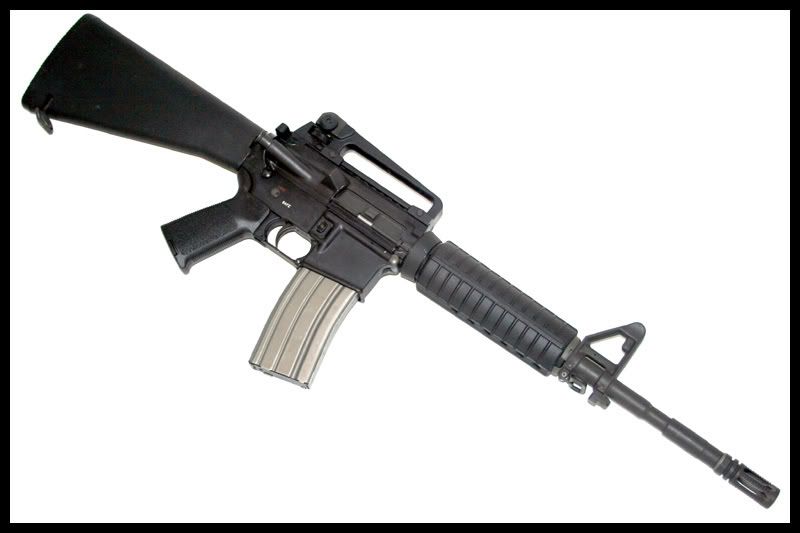 You may notice a lack of detail in the darker parts of the rifle. This is due to using direct flash on a dark rifle--the recorded image just lacks the digital information in these areas. If you can find a way of bouncing the flash off of the ceiling (and subsequently the white shower walls) so that it's not direct, the photo will be much better lit and have a lot more detail. Here is the same setup using the same photoshop manipulations only with the flash bounced off of the ceiling: 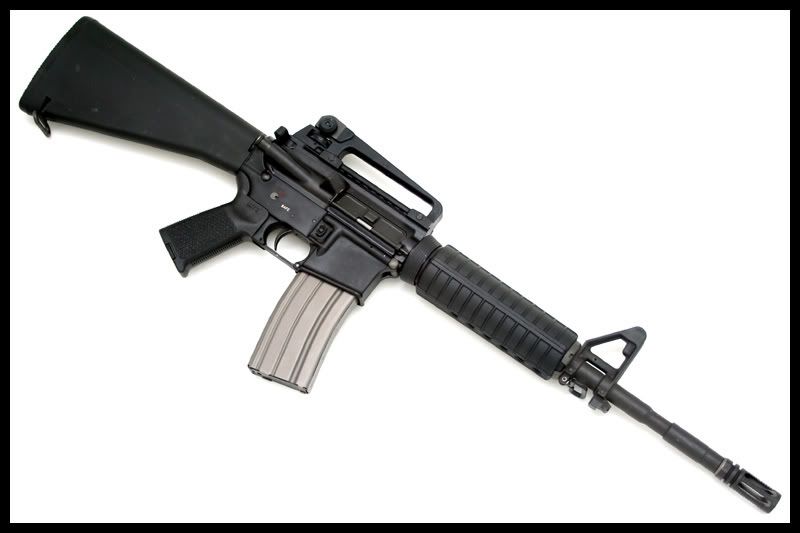 Anyway this same method will work for any of your black rifles and easy to do the same every time. It's a simple way of producing decent pictures for those who lack the equipment, space, or creativity needed for the outdoor, natural light, or studio photography that produce excellent photos. Here's a few more photos using the same photoshop method. The only difference is that I was using the external flash and white shelving background in my bathroom that I mentioned above.  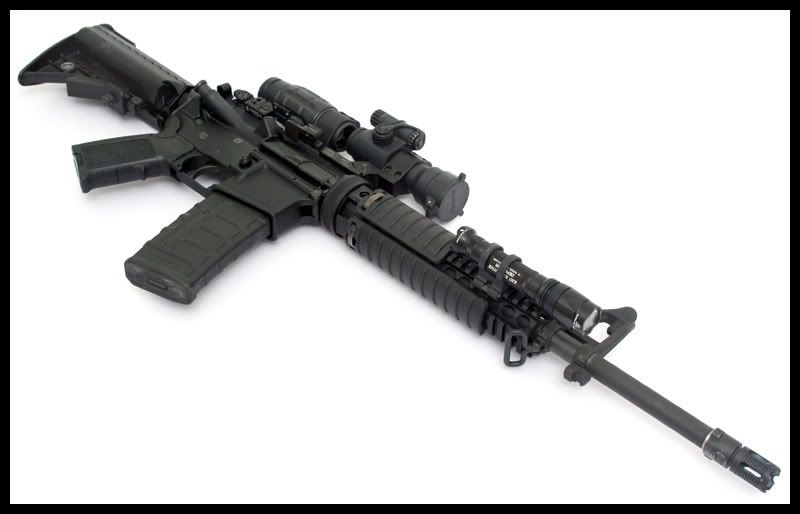 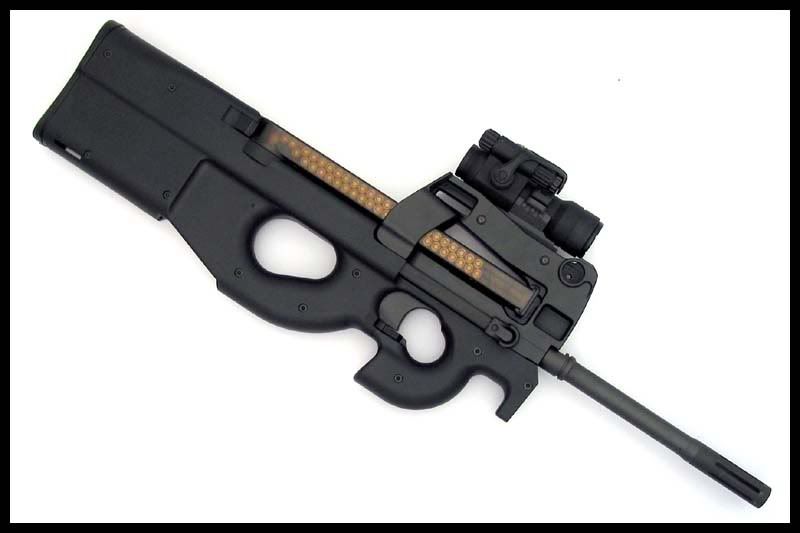  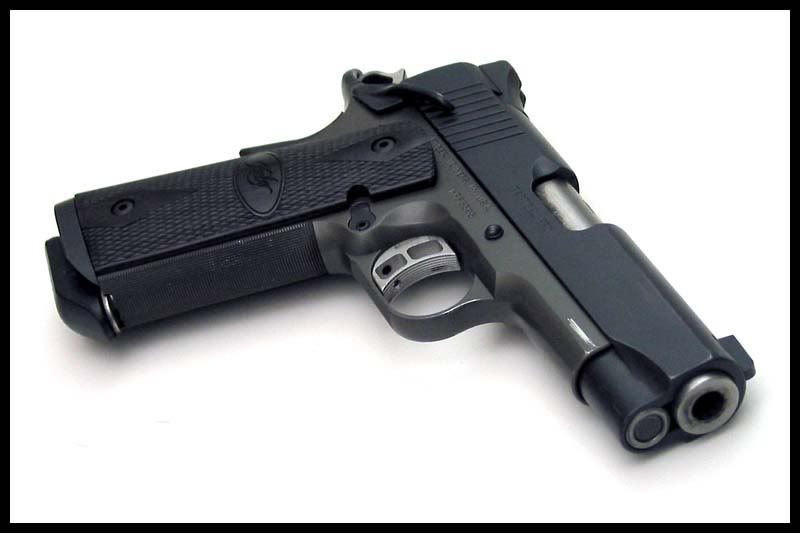 |
|
|
|
[#1]
wow, thanks for the info. never thought to try that.
|
|
|
|
[#2]
Great idea. Nice tutorial.
|
|
|
|
[#3]
Very nice
|
|
|
|
[#4]
Until you miss a short curly hair next to your rifle.
|
|
|
|
[#5]
 
|
|
|
|
|
[#6]
Me thinks this should be tacked
|
|
|
|
[#7]
Took some pics last night, my card reader has gone fail and couldnt get em on my computer
|
|
|
|
[#8]
OK thanks topgunpilot20..... What an easy way to take pics. I don't have photoshop so I had to use Corel photopaint. Different menus but your directions work the same. Here's my first attempt.
I tried others but set my ISO too high on my casio exilim(crap) and they are grainy as hell, so this is the only one that worked out. Ruger P345 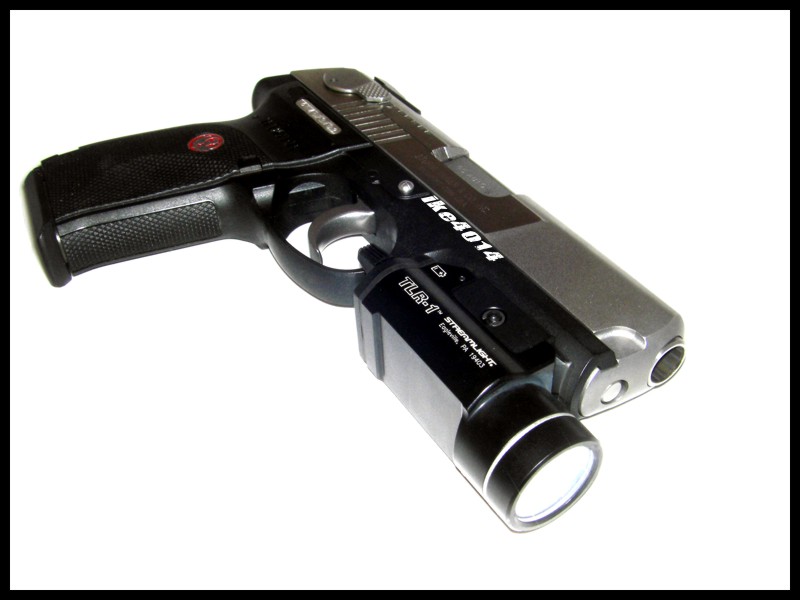 Thanks for the help. I would love to see everyone else's attempt. |
|
|
|
[#9]
i only have a shower stall and the river.
great post though, thanks! |
|
|
|
[#10]
Looks good. I would love for everyone who tries this to post their pics in this thread to see how they turn out. |
|
|
|
|
[#11]
Shoot! Now I've got the photoshop bug, again!
 I haven't used it in nearly a year, but image editing has never been easy since my photo class ended... I can barely use the GIMP now. And on my budget... I guess I can dream about the good 'ole days. I haven't used it in nearly a year, but image editing has never been easy since my photo class ended... I can barely use the GIMP now. And on my budget... I guess I can dream about the good 'ole days.
|
|
|
|
[#12]
are there any good photo editors available for download?
|
|
|
|
[#13]
the best LEGALLY free photo editor is GIMP. you can do what the OP did, under Tools > Color Tools > Levels |
|
|
|
|
[#14]
Can this technique be applied in reverse? Which is to say, can it be used on a black background when the subject isn't an EBR?
I'll be shooting jewelry for the wife.
|
|
|
|
[#15]
It should, it's the same concept. However, you won't get the light bouncing effect that you get using a white bathtub, so the light will be more direct. Not too much light actually gets bounced onto the subject using direct flash anyway, so it may not even make a difference. Try it and post the results. |
|
|
|
|
[#16]
TAG
|
|
|
|
[#17]
Nice little tutorial, thanks. Heres my attempt on my SA 1911 using a Rebel XTi with kit lens, edited with CS2.
 What do you think? |
|
|
|
[#18]
Looks great. Thanks for posting. Most of the pictures above were taken with a Rebel XT and kit lense. Some were even taken with an old Canon Powershot G2. |
|
|
|
|
[#19]
tagscribe...thank you for taking the time to post this
|
|
|
|
[#20]
bump
my camera sucks (hand-me-down) but i applied your tutorial on GIMP. didnt use color enhancement on GIMP, turned out horrible when i tried it (some weird purple and greens popped out of nowhere) heres an inspiration to everyone out there with a not so great camera!  
|
|
|
|
[#21]
Here's my contribution. Camera was a Canon SD550.
Ruger PC9GR  My GF was so happy that I was cleaning the bathroom without her bugging me about it...I didn't have the heart to tell her the reason. |
|
|
|
[#22]
Nice. |
|
|
|
|
[#23]
I have a 25-page paper to write . . . but once I'm done, I'm going to go crazy in the tub!!!
|
|
|
|
[#24]
A bump to keep this alive, and an attempt by me...not in a bath tube, but on a table...a friend's 5.56 Krink...

|
|
|
|
[#25]
Quoted:
A bump to keep this alive, and an attempt by me...not in a bath tube, but on a table...a friend's 5.56 Krink... http://i17.photobucket.com/albums/b100/89Sunbird/Dsc31.jpg Outstanding! |
|
|
|
[#26]
I thought this deserved a bump to sent it back to page 1.
I'll be trying this in a day or two and will post the results. (Just waiting for my new Colt 6920 to arrive) |
|
|
|
[#27]
Quoted:
Can this technique be applied in reverse? Which is to say, can it be used on a black background when the subject isn't an EBR? I'll be shooting jewelry for the wife. If all you're shooting is jewelry, then something like this should do well, and it would be better than a black bathtub. 
|
|
|
|
[#28]
Tag for when someone tries this in a toilet.
|
|
|
|
[#29]
Nice Taggage!!
|
|
|
|
[#30]
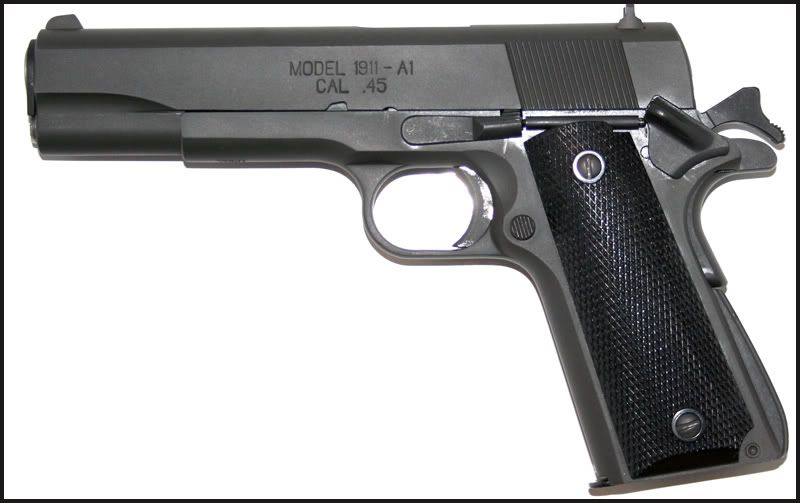
Gave it a whirl...
Old school Sony Cybershot. The flash bounce was not attempted, although I'm sure it would help immensely with the detail. Our tile is beige, and the ceiling is blue/green... 
Thanks for the tips. 

|
|
|
|
[#31]
Well done!
|
|
|
|
[#32]

|
|
|
|
[#33]
I finally got to try this.
Here's one of my first attempts with some very light editing: 
And here's after I played around a bit. I was trying to get a "charcoal sketch" sort of look. 
|
|
|
 Win a FREE Membership!
Sign up for the ARFCOM weekly newsletter and be entered to win a free ARFCOM membership. One new winner* is announced every week!
You will receive an email every Friday morning featuring the latest chatter from the hottest topics, breaking news surrounding legislation, as well as exclusive deals only available to ARFCOM email subscribers.

AR15.COM is the world's largest firearm community and is a gathering place for firearm enthusiasts of all types.
From hunters and military members, to competition shooters and general firearm enthusiasts, we welcome anyone who values and respects the way of the firearm.

Subscribe to our monthly Newsletter to receive firearm news, product discounts from your favorite Industry Partners, and more.
Copyright © 1996-2024 AR15.COM LLC. All Rights Reserved.
Any use of this content without express written consent is prohibited.
AR15.Com reserves the right to overwrite or replace any affiliate, commercial, or monetizable links, posted by users, with our own.


