|
[#1]
Pictures would help. When I look at underside of TPC trigger box, doesn't look any thicker than standard HK box.

Elbow spring goes around the spacer, installed between the ears on the left side in the above photo, correct? 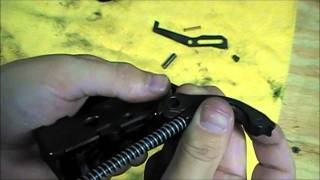 H&K Semi Auto SEF Pack Re-Assembly Skip to 1:43 to see elbow spring and spacer install. |
|
|
|
[#2]
I wish mine had that spring! The Zenith Z5P has what HK Parts lists as the roller sear that consists of the catch, spacer and elbow spring with the roller. On your picture it would use the pin hole the other spring uses but there is not enough space for the catch or roller sear to fit. I will likely get the other spring or a US made trigger and call it done.
|
|
|
|
[#3]
That's because those parts you're talking about would normally be the auto sear assembly, but MKE modified them a little. TPC didn't leave room for those parts in their box.
|
|
|
|
[#4]
It would be better if the vendor who states it will fit a Zenith would add a note about changing out that spring assembly. Oh well, at least I know it was not my lack of ability.
|
|
|
|
[#5]
I would like to see pics of the parts that don't fit, if you have time.
|
|
|
|
[#6]
The Zenith boxes have stops welded in for the trigger......but actually still retain the FA friction sear......the trip lever is removed, and the catch is removed from the hammer....so it's not even close to an HK94 or typical clone pack.....
|
|
|
|
[#7]
Quoted:
The Zenith boxes have stops welded in for the trigger......but actually still retain the FA friction sear......the trip lever is removed, and the catch is removed from the hammer....so it's not even close to an HK94 or typical clone pack..... Ahh I see... wierd that they keep friction sear but no trip lever or catch... bizarre. But yes he will need a new semi-auto elbow spring. |
|
|
|
[#8]
If I were going to build a full trigger pack, is this parts list correct?
HK Trigger Pack US Trigger Box $49.95 US Hammer $24.95 Hammer Strut $9.95 Hammer Spring $7.95 Ejector $47.95 Ejector Lever Spring $6.95 US Sear $24.95 US Trigger $25.95 Sear and Trigger Axle (X2) $1.99 Ejector Lever Axle $5.95 Hammer Axle $2.95 Trigger Spring $7.95 Semi Auto Spacer with elbow spring $14.95 |
|
|
|
[#9]
Quoted:
The Zenith boxes have stops welded in for the trigger......but actually still retain the FA friction sear......the trip lever is removed, and the catch is removed from the hammer....so it's not even close to an HK94 or typical clone pack..... This. Totally different design. The sear is in the original location and not relocated like the 80's HK's. It won't match up. Your other alternative to binning it is to build your semi box using the roller from hkparts and bent spring. |
|
|
|
[#10]
Is there some trick to getting the hammer strut through on the US trigger box while installing the hammer?
I am using a US hammer and a separate hammer strut, and I can't things to line up to get the tail to feed through the hole in the trigger box... |
|
|
|
[#11]
You may have to grab the spring near the rear pointy end of the strut and compress it until the point of the strut is sticking out of the compressed spring. Then, holding it like that, insert the point into the hole in the back of the box. Once aligned, it's more easily compressed from the front while the hammer is installed.
|
|
|
 Win a FREE Membership!
Sign up for the ARFCOM weekly newsletter and be entered to win a free ARFCOM membership. One new winner* is announced every week!
You will receive an email every Friday morning featuring the latest chatter from the hottest topics, breaking news surrounding legislation, as well as exclusive deals only available to ARFCOM email subscribers.

AR15.COM is the world's largest firearm community and is a gathering place for firearm enthusiasts of all types.
From hunters and military members, to competition shooters and general firearm enthusiasts, we welcome anyone who values and respects the way of the firearm.

Subscribe to our monthly Newsletter to receive firearm news, product discounts from your favorite Industry Partners, and more.
Copyright © 1996-2024 AR15.COM LLC. All Rights Reserved.
Any use of this content without express written consent is prohibited.
AR15.Com reserves the right to overwrite or replace any affiliate, commercial, or monetizable links, posted by users, with our own.


