|
Posted: 2/2/2012 1:43:51 AM EDT
––MODS: If you see fit, please grace this with a tack
I started looking at this project about 6 months ago when I sent in my form 1 and could not find a really good source of information as far as DIY in one place. I have gathered a wealth of information and documented the process from start to finish and am sharing it here as a "One-Stop" tutorial for anyone else wanting to build one of these awesome weapons. I will start out by stating that I am an engineer and have worked with many complex guns and build/conversion projects and I rank this one's difficulty as moderate as it requires a lot of hand fitting plus machining skills and equipment. That being said, you will know if you are comfortable with taking on the project yourself after reading this and if not, I have listed contact info of places that offer conversion services. NOTE: I am in no way affiliated with any of the companies listed, I am just giving them the credit they deserve for helping out with information on this project. Also I apologize for the quality of some of the images as some were taken with my phone. So without further ado, let's get started. FIRST ORDER OF BUSINESS; Before doing ANY kind of barrel work, be sure to have an approved ATF 5320.1 in your hands. I started with the barrel. Remove factory barrel by punching out the single roll pin located underneath the serial number. The barrel will then slide out the rear of the receiver along with the ejector blade. Pay close attention to how this fits for reassembly. I used a bandsaw to cut the barrel to approximately 7.95". 
Once cut, I used a lathe to turn the length to UMP spec of 7.870" and reduce the end OD to 0.578" for 0.500" from the end. 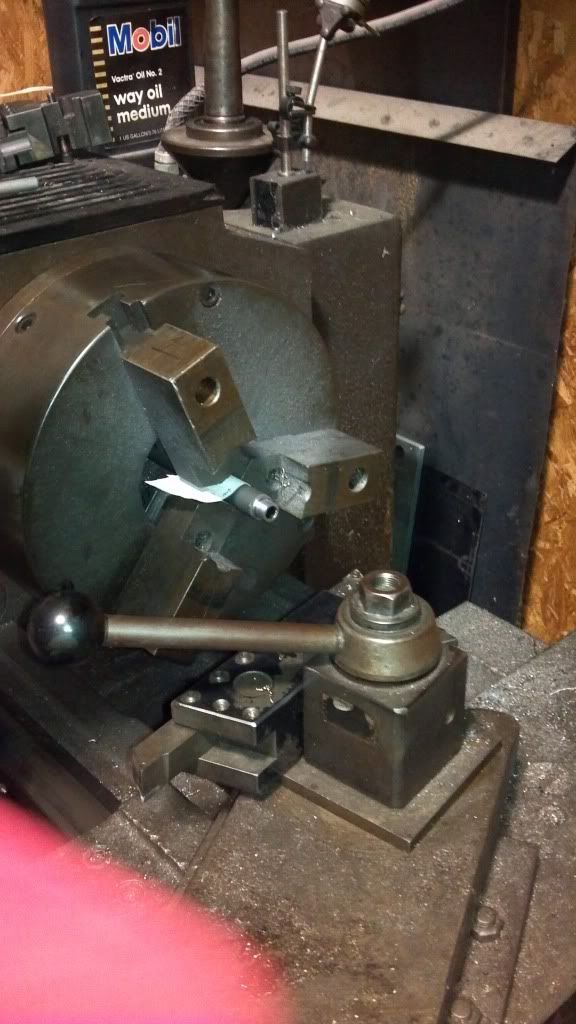
NOTE: I chose .578x28 RH threads to match my suppressor in lieu of the M16X1 LH traditionally associated with HK. All dimensions given are for 578x28 RH thread pattern. I then threaded the end 60°@ 28 TPI back 0.400" from the end at a depth of 0.040" and finished with a chasing die to clean the threads. I then used an 11° crowning tool to recess the crown and hand polished to perfection. 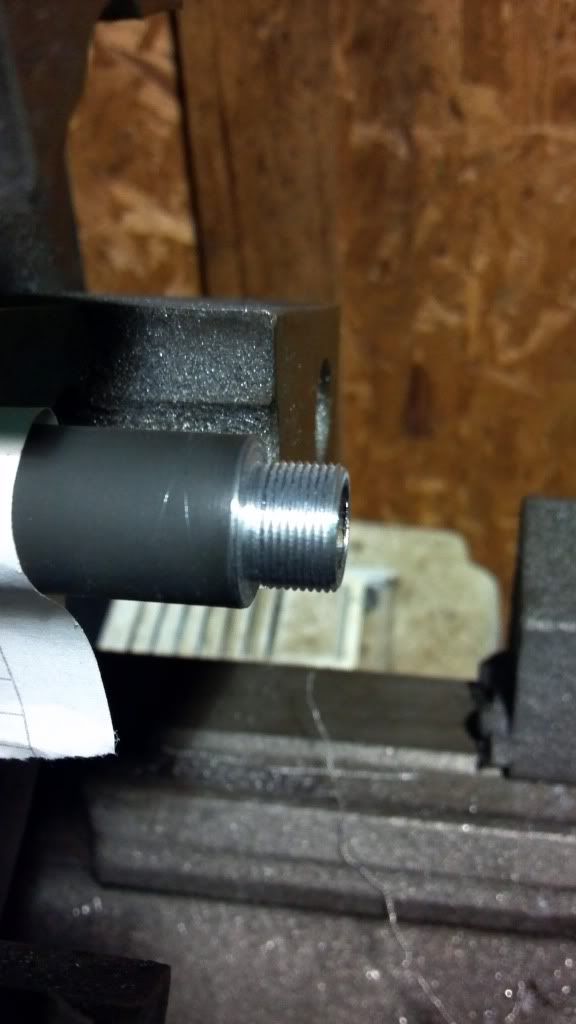
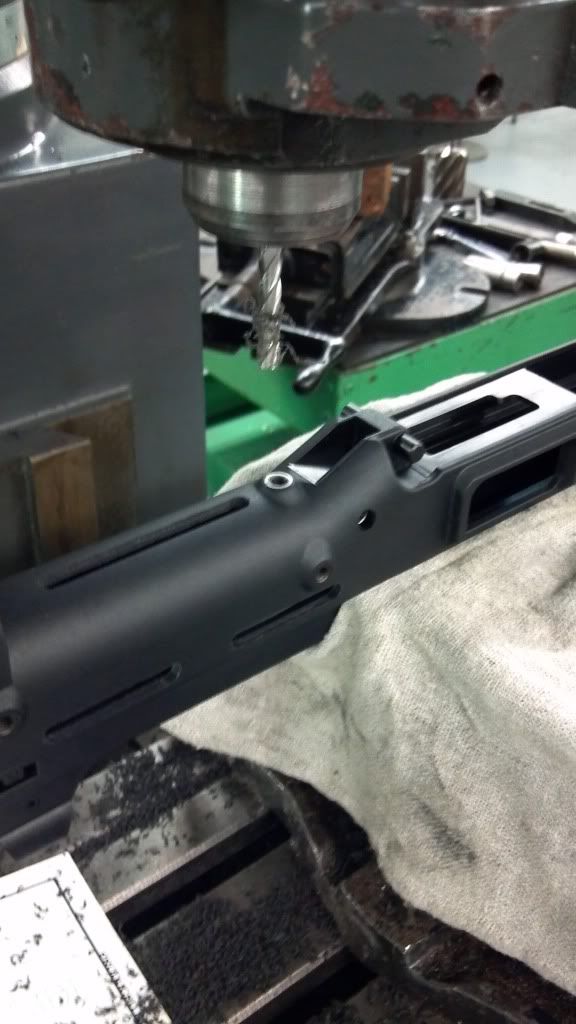
The next part required a lot of research to find factory specifications and ended up drafting the official dimensions myself. I used a 1/4" 4-flute end mill to cut the 5 vent slots on the forend of the receiver. 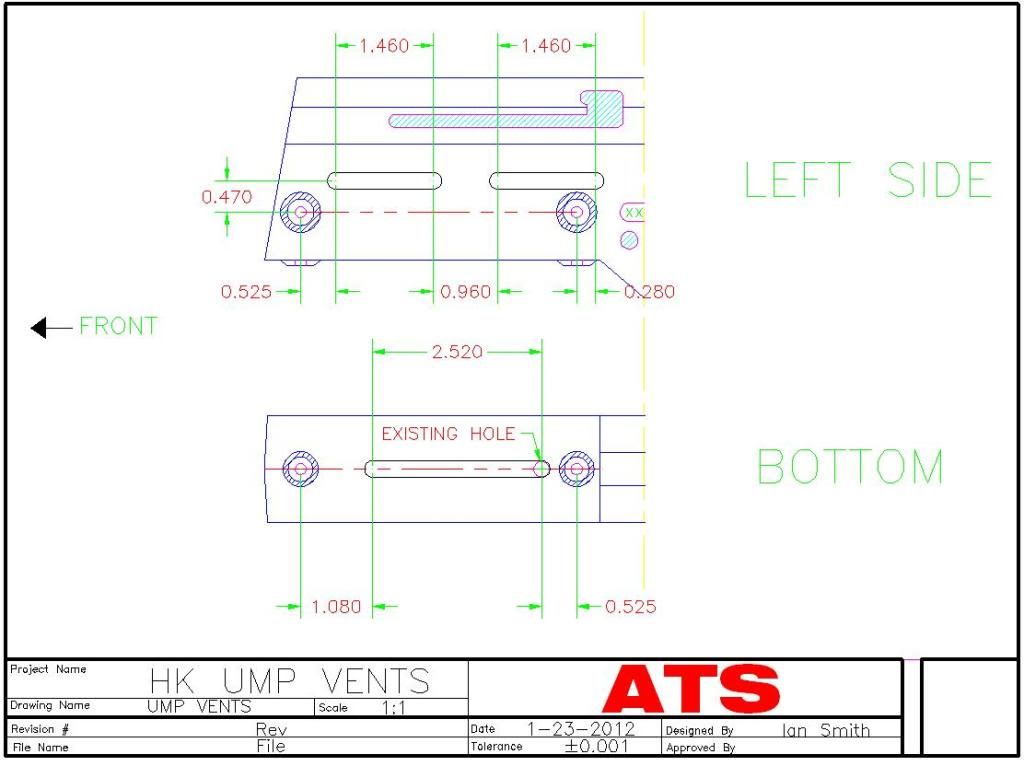
I used the existing hardpoints to step off the beginning cuts. You will have to sand the burrs from the edges to achieve a factory-finished look. I recommend 800 grit finished out with 1500 grit using oil medium. 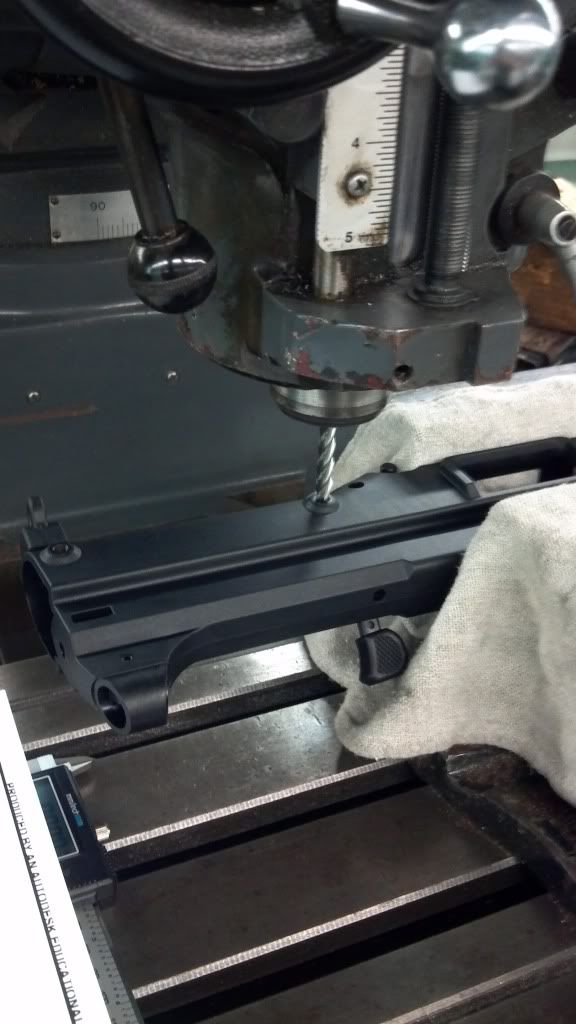
Now let's get to the new stuff. LIST OF REQUIRED PARTS: -UMP lower (4-POS, Navy, or FBI) -UMP magazine (USC mags will work in UMP lowers but fit loosely) -UMP stock -Rear block adapter (I used Block B from HDPS) -Stock axle pin 922(r) compliance parts are available through the vendors listed at the end of this writeup. Pick any 3 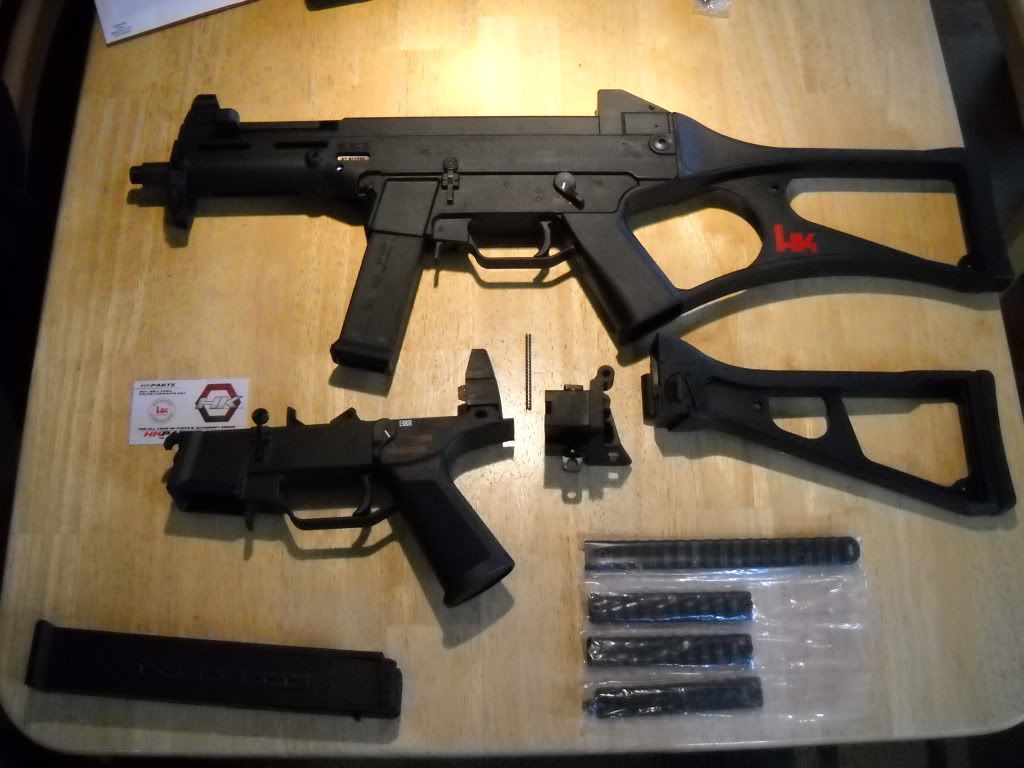
Remove the forward disconnector from the UMP lower FCG and replace the axis pin. This is done with a punch and light hammer. Lower will not mate to the USC upper with it installed. Next, you will have to open the forward mounting hooks to accommodate the USC upper's larger diameter pins. I used a centered 0.275" drill and sanded to fit. This is the first of many tedious hand-fitting steps in this project so go slowly and be patient. You will also need to remove the rear buffer block from the lower by lifting the small tab over the retainer detent and sliding the block rearward. 
The next machining step is to open the mag well in the upper receiver to accommodate the UMP double-stack mags. To do this, dry-fit the UMP lower to the upper and trace out the areas covered by the mag well to get the well bounds. Then you will need to remove the lower and dry-fit the magazine within these bounds and trace around it to get your inlet bounds. Be sure to set your depth to the exact thickness of the polymer in the center of the crosspiece, else you will cut into the tracks for the bolt causing major function impairment. Use the same 1/4" 4-flute end mill that you used for the forend vents to do this. 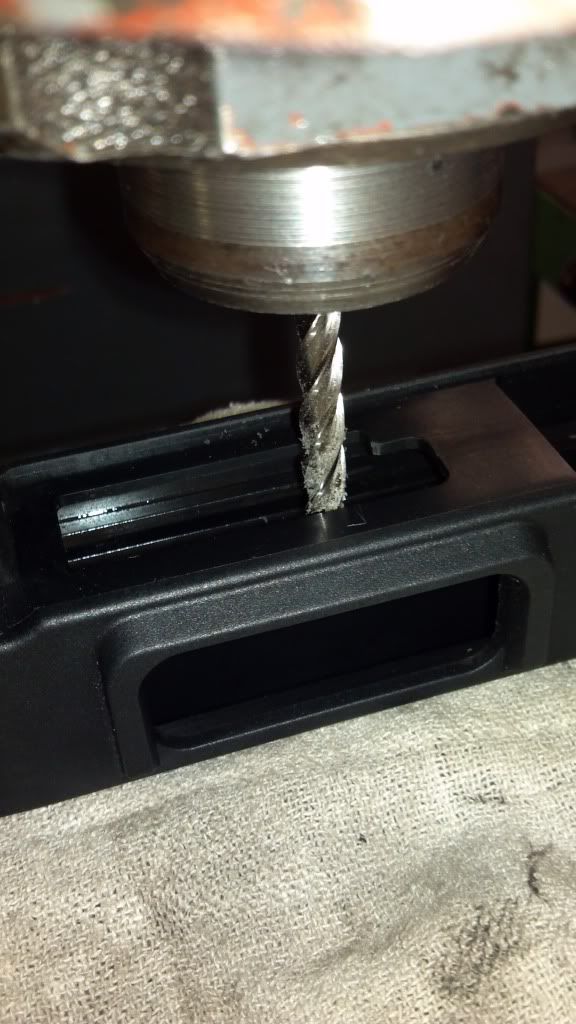
After the cut, it will look something like this. Because the different lowers mate slightly differently, exact specs cannot be assigned so you just have to trace out your mag well. 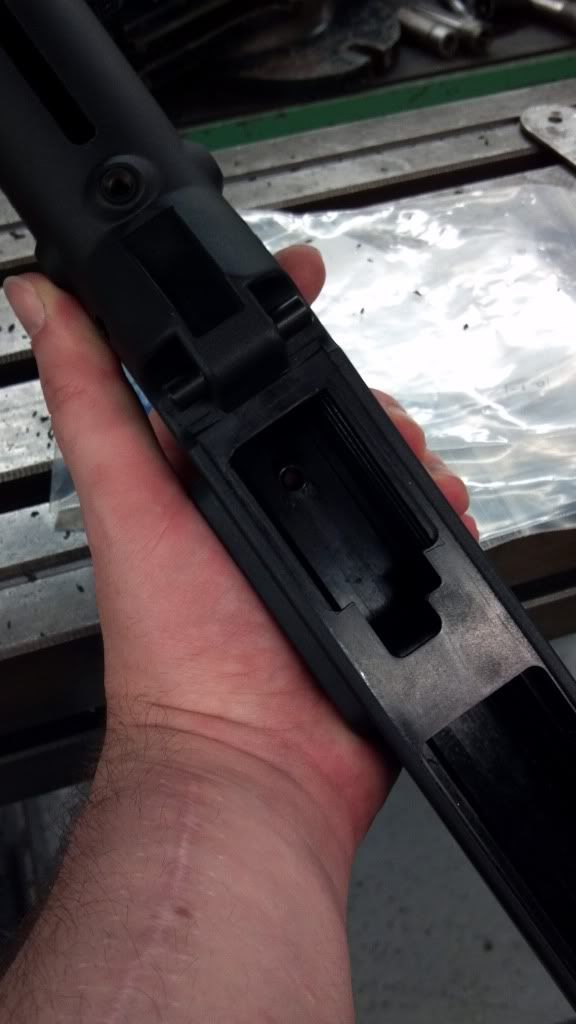
A better look at the bolt tracks that you DO NOT cut into. Depth is imperative––you only get one shot at this so NO DREMELS. 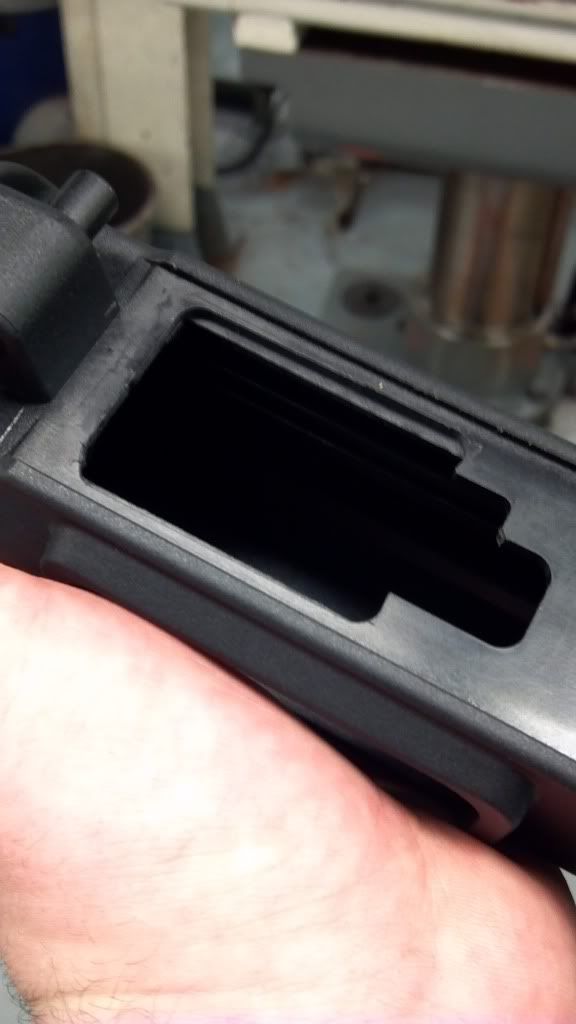
Now you will need to mount the stock to the mounting block. I chose to use Stock Block B from HDPS. To do this, dry-fit the stock into the block, lining up the outside of the axle tube. If you look down the hole, the inside diameters probably will not match up so you will need to use the block hole as a guide and bore out the stock hole with a 11/64" hand drill. Detailed instructions on this process are included with the HDPS blocks. 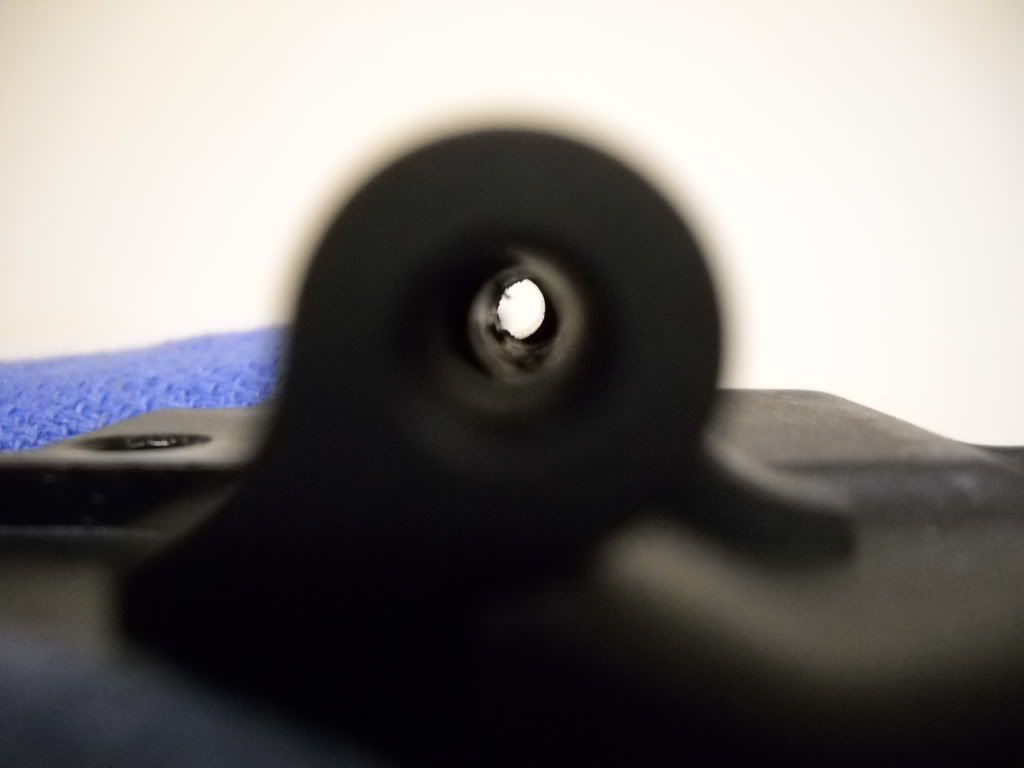
Drive in stock axle pin with an oversized punch and small hammer. Additional hand-fitting will probably be required to the stock's inside flat and locking catch to achieve a rock-solid lockup. Once again, be patient and go slowly. I spent over 2 hours on this part alone. 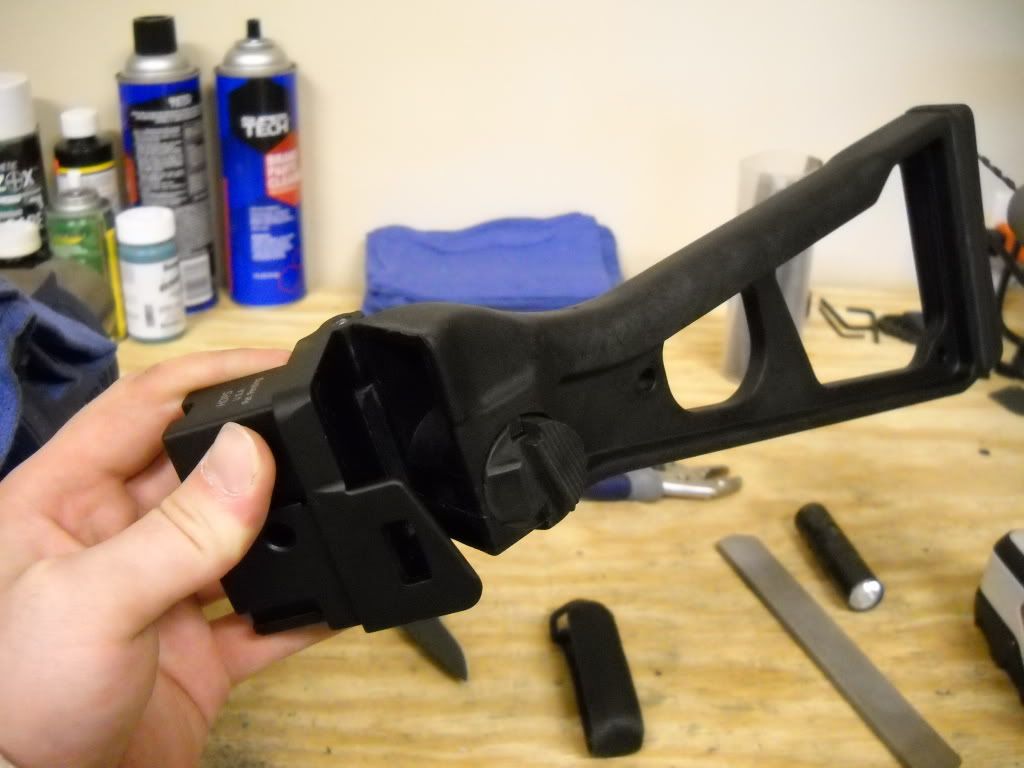
Now you will need to extract the recoil buffer from either the old UMP buffer block or the USC stock. This can be tricky because there isn't a whole lot of exposed material to grab onto and you do not want to damage it. I inserted a tapered punch into the center hole and pulled to one side while gently digging it out with a narrow flat driver. It will pop right out with little leverage. 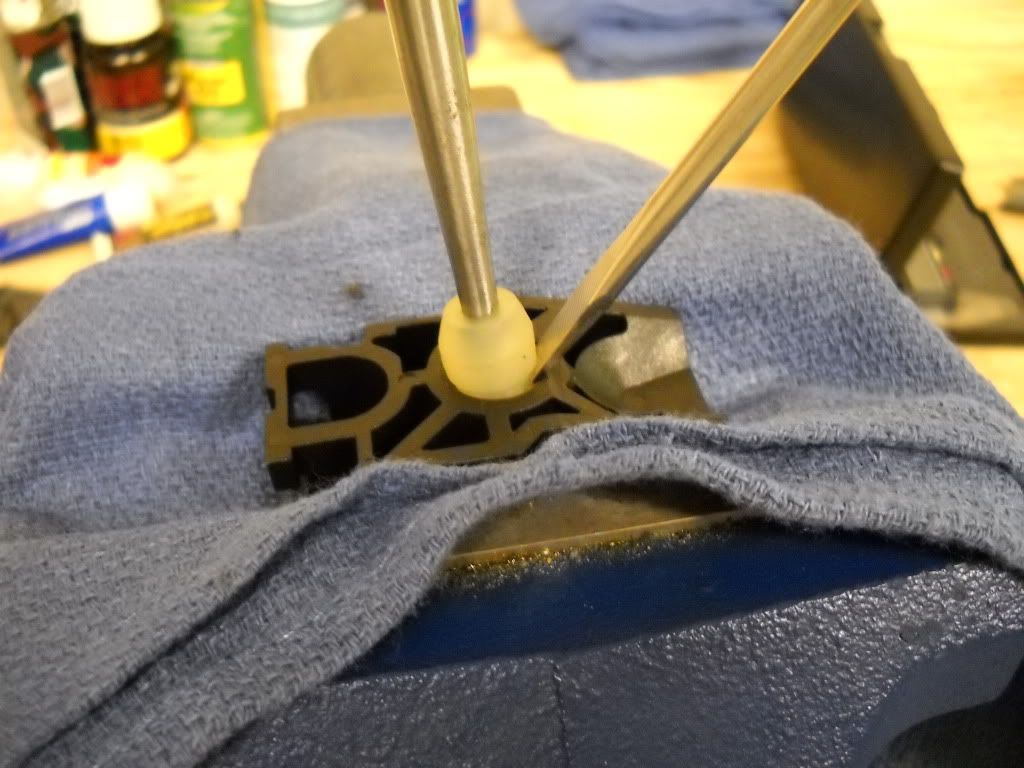
Insert the buffer into the stock block. 
You will now need to remove the detent nub from the lower that held on the buffer block. I used a file and fine sand paper for this. 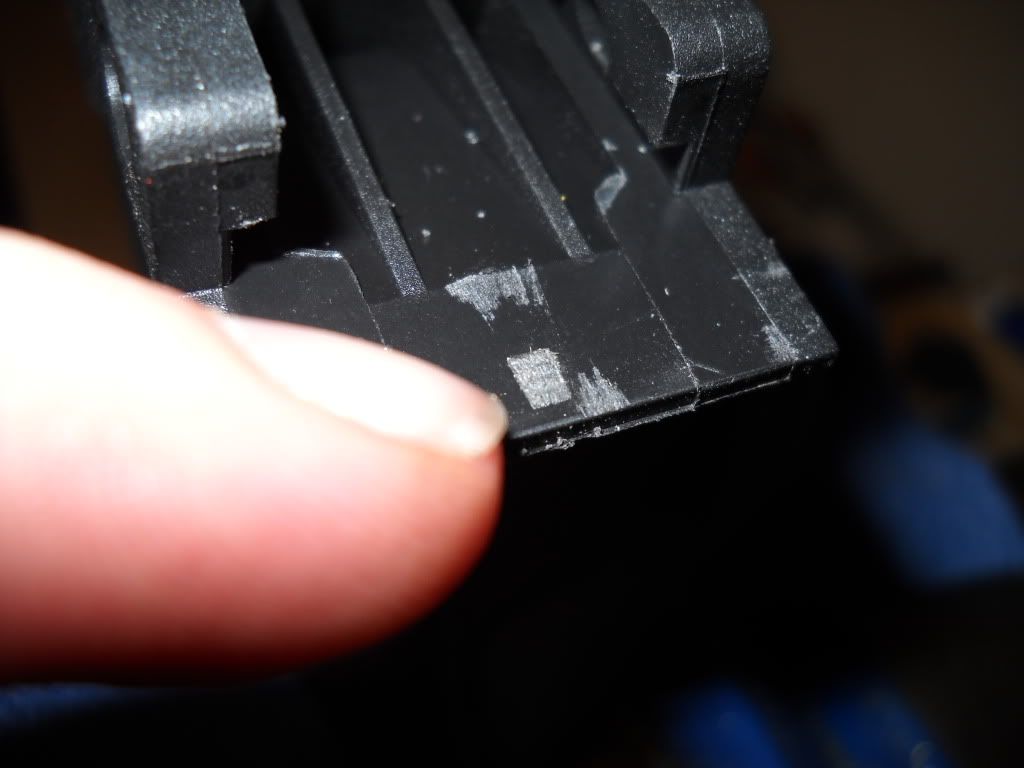
Now it will all slide together just as it came apart. Here is the fitted product. Everything should be tight with no rattles or movement. 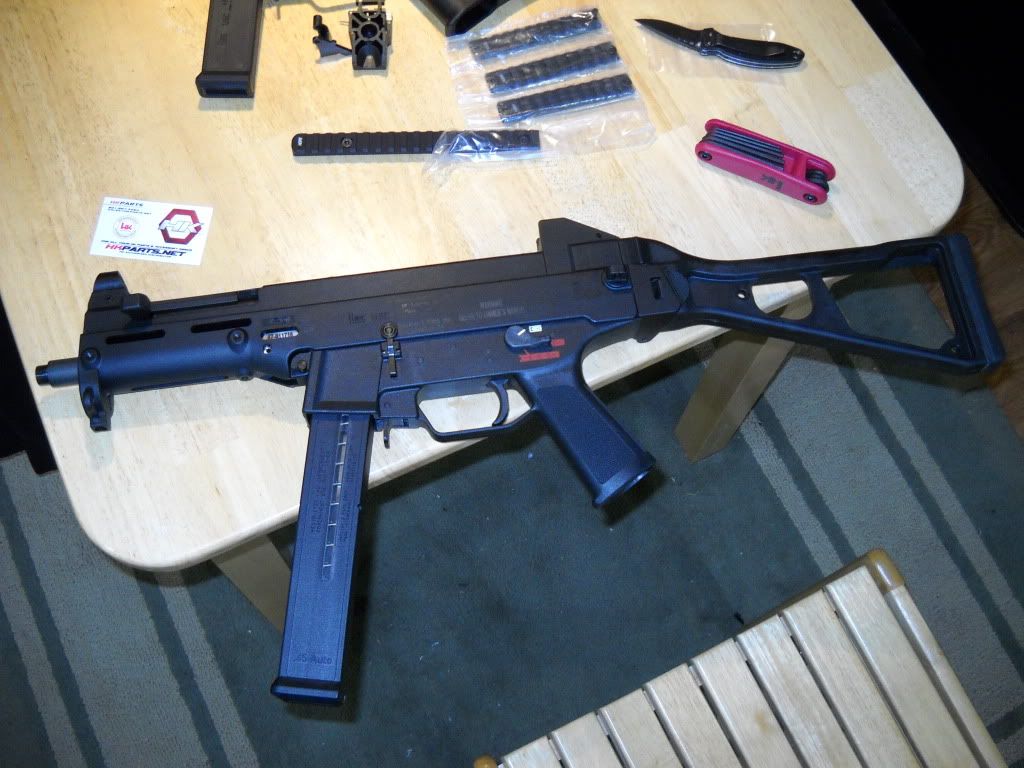
Add a full set of rails, pat yourself on the back, snap some pics, and post them in this thread to show off your accomplishment and fine new toy 
Obligatory ARFCOM picture of gun with feet 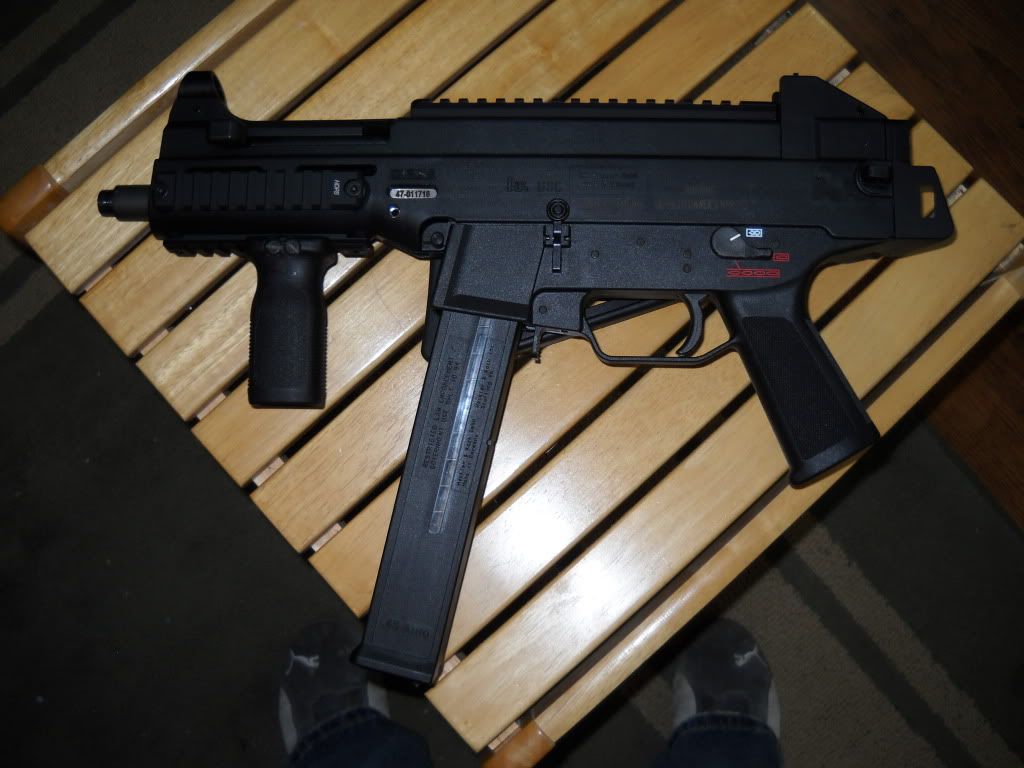
Doing all labor myself and excluding the price of machinery and tooling, total cost of this project ran $2850 including the NFA tax. If you are not equipped to do all steps yourself, HDPS offers itemized labor through their website. Special thanks to: HDPS.org -> [email protected] H&K USA -> 706.568.1906 HKparts.net -> 801.987.3494 ETA: By popular demand, I bring pics with the can. I have had to neglect you guys for a couple months due to work travel 


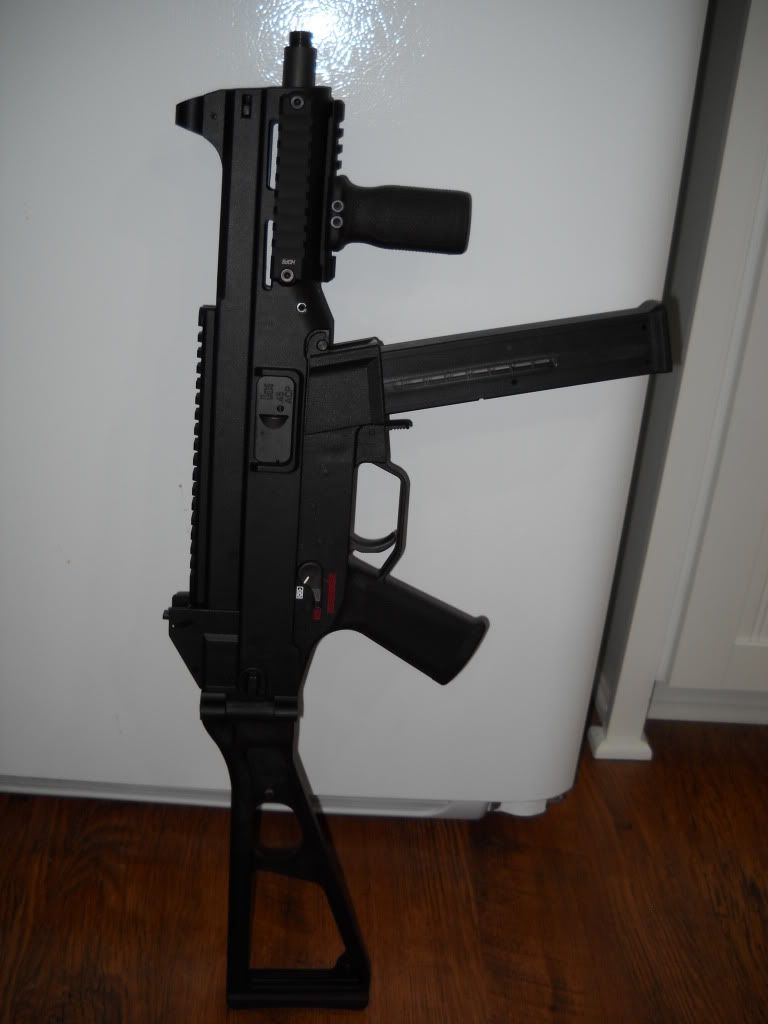
And with other short friends... 
...short, quiet friends... 
|
|
|
|
[#1]
Great pics and write-up. I was thinking about cutting down a 16" barrel and threading the end to 578x28 as well so I could interchange suppressors with .45 handguns. I found that HK Parts sells a flash hider with those threads that could enhance the look of the UMP, more so than just a thread protector:
http://www.hkparts.net/shop/pc/4-Prong-Pistol-Flash-Hider-578-X-28-RH-p2188.htm |
|
|
|
[#2]
|
|
|
|
[#3]
Very nice. Any pics with the suppressor on?
|
|
|
|
[#4]
FYI, you don't have to bore out the upper receiver to the dimensions of the lower's magwell opening. Doing so ends up cutting into the rails that the bolt carrier rides on. You would be better served by opening the upper receivers hole to fit the feed lips of the mag. Look at the mag. The main body comes up and Flattens out. From there it narrows down as the feed lips take the mag from a double stack to a single feed. You only need to open the upper so that to the dimensions of the top base/ feed lip intersection. I know that is hard to follow. Maybe I can get some photos up. It's hard to tell from your photos if that's what you did or not. I know you mentioned it in your post but I looks like you opened it up to the same dimensions of the lower's magwell opening and not the feed lips dimensions.
|
|
|
|
[#5]
|
|
|
|
[#6]
Bored out- opened up, whatever. The links to the magwell template openings aren't working for me.
IMHO a lot people open the magwell on the upper more than it needs to be. I really need to take some photos and/or measurements to explain what I mean better. |
|
|
|
[#7]
|
|
|
|
[#8]
John,
Cool. That one works and is correct. I see a lot of folks recommend throwing the UMP lower on, tracing the magwell opening onto the upper and milling out to those dimensions. Doing so opens the upper too wide and too far forward. Probably an 1/8" too wide and too long in the front. |
|
|
|
[#9]
Quoted:
I see a lot of folks recommend throwing the UMP lower on, tracing the magwell opening onto the upper and milling out to those dimensions. Doing so opens the upper too wide and too far forward. Probably an 1/8" too wide and too long in the front. Nice write up. Another real easy way it to take a UMP mag and place it in the USC upper receiver , only the magazine feed lips will fit in the opening. Simply trace around the magazine body where it interfaces with the upper receiver and cut that out and clean up with a flat file. It will make a perfect fit and is easily done. As mentioned, do not cut upper where it will accept the disconnector. |
|
|
|
[#10]
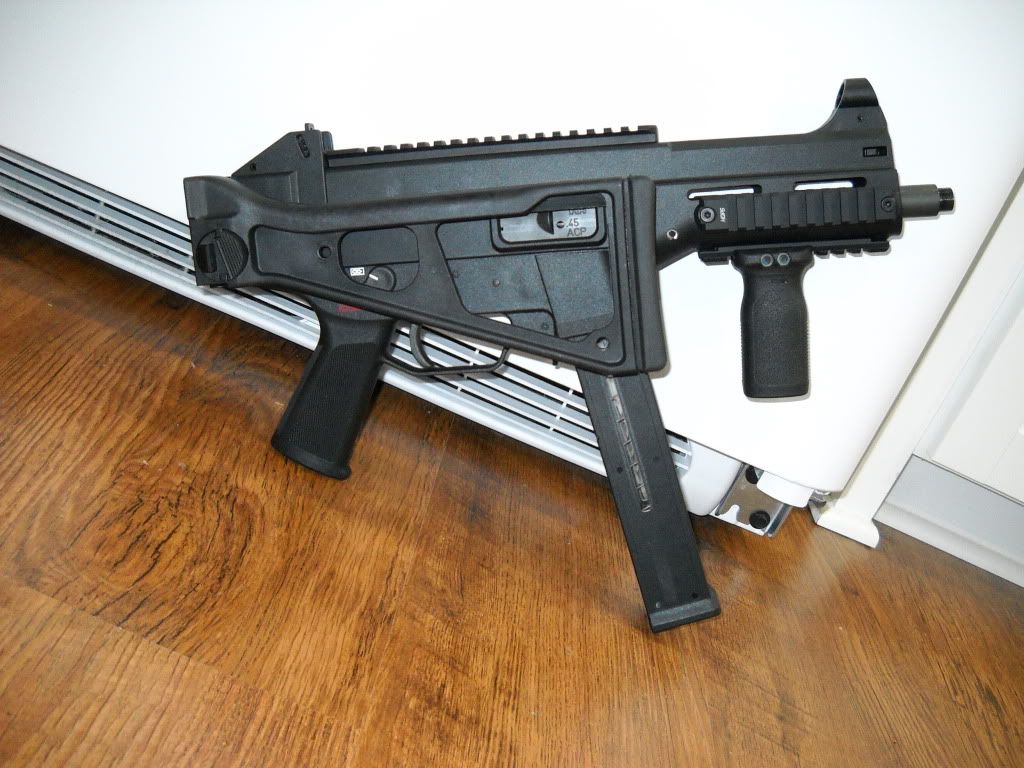
very nice. what fore grip is that?
|
|
|
|
[#11]
Foregrip is a magpul RVG. As far as the magazine inletting goes, I used the lower to get the bounds of the magwell and got the actual cut dimensions from the magazine as stated in several posts above. I guess I wasn't clear on the process of that step so I will go back and edit in more details. As stated, I used actual depth of the cross piece to ensure that the bolt tracks were not harmed as stated several times.
|
|
|
|
[#12]
If you cut it to the 1" dimensions (wide) like John linked, there is nothing to hit. The cuts go right to the edge of the bolt tracks/rails. There was nothing to hit inside the receiver. However, doing as you say and montitoring the depth is certainly the safe way to go. If you blow it out to the dimensions of the lower's magwell opening (NOT RECOMMENDED) then you will be cutting into the carrier tracks/rails. In this case you would need to worry about the milling depth, as you will not only cut into both the lower rails but the upper carrier rails as well.
If you are wondering why I beat this to death, take a look at how the big name guys do it... |
|
|
|
[#13]
I had Jason at IGF use the template on my last one. Came out fine. TE did the same on the first one - again ok. Really up to the person and his gun.
|
|
|
|
[#14]
Nice!!!!!
|
|
|
|
[#15]
Nice project & nice write up! Thanks!
|
|
|
|
[#16]
Thanks for doing this... I might take on this project in the future. Nice work too!
|
|
|
|
[#17]
God Damn it! I thought I was done purchasing guns for a while.
|
|
|
|
[#18]
Very nice write up, thanks!
However, what did you use to permanently block off the auto sear location in the new lower? I've seen this service offered on the HDPS and some other tutorial websites, I'm just wondering if it is absolutely necessary. Also, did you have any trouble swapping out the FC/trigger internals from the USC to the new lower that uses a different selector switch setup? I will be doing this soon hopefully |
|
|
|
[#19]
Quoted:
God Damn it! I thought I was done purchasing guns for a while. Yeah, that's what we all think... Now, I have to evaluate if spending three grand for another gun is a good idea... |
|
|
|
[#20]
Although recommended by some manufacturers, blocking the sear area is not required because without machining of the upper for the sear/bolt engagement ATF does not deem it capable of automatic fire. Same with the FCG. I simply removed the sear and because it is unable to be assembled otherwise, you are GTG.
|
|
|
|
[#21]
Quoted:
Although recommended by some manufacturers, blocking the sear area is not required because without machining of the upper for the sear/bolt engagement ATF does not deem it capable of automatic fire. Same with the FCG. I simply removed the sear and because it is unable to be assembled otherwise, you are GTG. Thanks for the reply |
|
|
|
[#22]
Still no suppressor pics
|
|
|
|
[#23]
Quoted:
Still no suppressor pics Here. 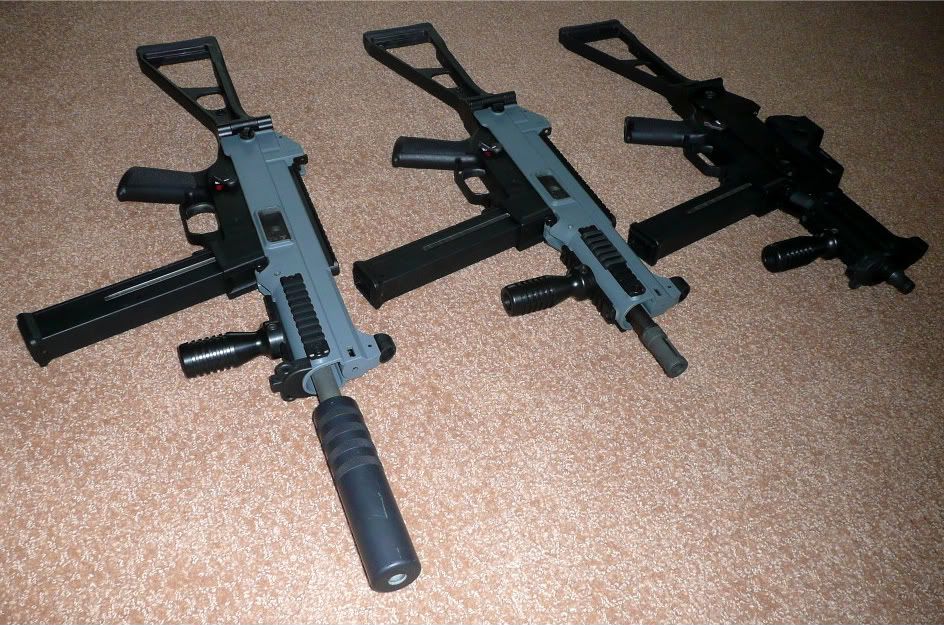
|
|
|
|
[#24]
Quoted: Still no suppressor pics  |
|
|
|
[#25]
@Crazy_Harry: Did you have to remark the selector on your Navy UMP lower? If so, how hard was it? Or did you just replace the selector with the one from the UMP lower and just cut the selector to fit the USC internal?
|
|
|
|
[#26]
I never knew about the USC, till I seen one today at the Gunshop
I knew as soon as I saw it, that I wanted one and then I came home to discover how much it cost to convert it to UMP status I guess I will not have one Fucking 922R and Import Ban BS "Shall not be infringed" 
Well since I ruined page 2 with a rant, |
|
|
|
[#27]
Well I took the plunge yesterday!!! Everything on here is completely accurate. Thanks to OP for all the help. I used the dreaded dremel on the magwell opening and didn't have any problems. I have a very steady hand and I really took it slow. All said, it took me about 4 hours, but like i said I really went slow and enjoyed the project. Moving the internals from the USC lower to the UMP lower was every bit as difficult as everyone describes here and on HKPRO. Overall, it was an enjoyable project.
Now for the wait on the SBR stamp... http://i830.photobucket.com/albums/zz224/arnoldstrong1/IMG_0274.jpg http://i830.photobucket.com/albums/zz224/arnoldstrong1/IMG_0272.jpg http://i830.photobucket.com/albums/zz224/arnoldstrong1/IMG_0271.jpg |
|
|
|
[#28]
Update with can pics in OP
|
|
|
|
[#29]
Quoted: Update with can pics in OP Thanks! |
|
|
|
[#30]
This thread is full of win. I have a USC in hand with HDPS rails mounted. I also have a factory stock and a UMP .45 mag. The rest of the parts I need have been shipped (FBI lower, stock pin, HDPS Stock block B, U.S. made sear, U.S. mag compliance kit), and I should have them by the end of the week. I will post pics when I am done.
Once it is running, I'll send off my Form 1 to make it an SBR. |
|
|
|
[#31]
Of this entire site, only the HK guys make such an outspoken issue of 922(r) compliance and redundant statements like "Before doing ANY kind of barrel work, be sure to have an approved ATF 5320.1 in your hands".
The nanny-statism from HKpro and related sites, rubs off in here. If someone is going to form 1 a firearm, they can do "any kind of barrel work" they want before ATF approval. Manufacturing of a short barrel rifle is verboten until ATF approval. But before approval, owning modified parts is not illegal. Where and how you keep those parts is your own issue, but it is NOT illegal to have them. |
|
|
|
[#32]
I'm not sure what your authority is for your legal opinions. Constructive possession is a very real and viable legal theory that is used to prosecute people for NFA offenses.
The ATF has finally brought its espoused policy into line with United States v. Thompson-Center Arms Company, 504 U.S. 505 (1992). I believe this is an accurate statement of the law: http://www.atf.gov/regulations-rulings/rulings/atf-rulings/atf-ruling-2011-4.pdf I would strongly advise against possessing a short barrel for your USC before you have an approved Form 1. There is no lawful use for that combination of parts. Yes, I am a lawyer. |
|
|
|
[#33]
Quoted:
I'm not sure what your authority is for your legal opinions. Constructive possession is a very real and viable legal theory that is used to prosecute people for NFA offenses. The ATF has finally brought its espoused policy into line with United States v. Thompson-Center Arms Company, 504 U.S. 505 (1992). I believe this is an accurate statement of the law: http://www.atf.gov/regulations-rulings/rulings/atf-rulings/atf-ruling-2011-4.pdf I would strongly advise against possessing a short barrel for your USC before you have an approved Form 1. There is no lawful use for that combination of parts. Yes, I am a lawyer. Yes you are a lawyer and that is your legal OPINION. I'll give you my opinion. Being prosecuted for "Constructive Possession" is absolutely frivolous in the majority of cases (of which, there are not many). If owning the parts is not against the law (which it isn't), why would you claim that there is "no lawful use for that combination of parts". It is either legal or illegal. Additionally, "owning" is not "using". Constructive Possession exists when a person knowingly has the power and intention at a given time to exercise dominion and control over an object, either directly or through others. US v. Turnbough, 1997 U.S. App. LEXIS 11886, *6. The government may establish constructive possession by demonstrating that the defendant exercised ownership, dominion or control over the premises in which the contraband is concealed.
Looking back at convictions of "constructive possession" regarding NFA laws, there was the drug dealer who kept a lower literally right next to a pistol upper. That is pretty clear case of "constructive possession". There is also the case of the SP89 that had a foregrip, stock, and case cut out for a foregrip that was for sale. This also passes the "constructive possession" test. If you read my post, I stated that "But before approval, owning modified parts is not illegal. Where and how you keep those parts is your own issue, but it is NOT illegal to have them." I stand by my statement. Nowhere is there a law that states owning a barrel shorter than 16" (or 18" for a shotgun) is illegal. Also, I wrote that "where and how you keep those parts is your own issue". I also stand by that comment. "Where" and "how" you keep a barrel shorter than title I length is something you should be concerned about. How and where you store those parts will either successfully defend a frivolous "constructive possession" case or will sink you. It would be a very far and frivolous legal stretch to suggest that a barrel located at A residence (under the control of X) and the firearm lacking barrel at B residence (under the control of Y) is NFA contraband. Your link from the ATF states: However, the Court also explained that an NFA firearm is made if aggregated parts are in close proximity such that they: (a) serve no useful purpose other than to make an NFA firearm (e.g., a receiver, an attachable shoulder stock, and a short barrel); or (b) convert a complete weapon into an NFA firearm (e.g., a pistol and attachable shoulder stock, or a long-barreled rifle and attachable short barrel). Id. at 511-13. The court's definition of NFA includes "close proximity" to be a defining factor. I'd say storage of parts at different locations negates "close proximity". Lastly, "owning" is not "use". There is no law against "owning" barrels less than title I length. Also per NFA, you must pay the tax prior to "manufacture" of the firearm. "Owning" is not "manufacture". I'm not a lawyer and I do respect your legal opinion, but my opinion (and the opinion of many others) on the matter differs greatly. |
|
|
|
[#34]
You can post whatever you like. I don't like the NFA either, and I think parts of it are unconstitutional, but so far the courts disagree with me.
What I posted was the law as I am able to discern it. Determining what the law is by synthesizing the Constitution, statutory law, case law, and administrative regulations is most of what law school teaches you. Given what I know about the law in this area, I do not advise anyone to possess a short barrel for a USC/UMP and the gun at the same time without a tax stamp. Anyone who relies on a post on an Internet forum as a source of legal advice is a fool. Consult a lawyer licensed to practice in the jurisdiction in whcih you reside if you want to know for sure. It will be much cheaper than hiring him after you get arrested and indicted. I have a personal rule that I don't get in arguments on Internet forums, so this will be my final post on the subject. |
|
|
|
[#35]
Quoted:
You can post whatever you like. I don't like the NFA either, and I think parts of it are unconstitutional, but so far the courts disagree with me. What I posted was the law as I am able to discern it. Determining what the law is by synthesizing the Constitution, statutory law, case law, and administrative regulations is most of what law school teaches you. Given what I know about the law in this area, I do not advise anyone to possess a short barrel for a USC/UMP and the gun at the same time without a tax stamp. Anyone who relies on a post on an Internet forum as a source of legal advice is a fool. Consult a lawyer licensed to practice in the jurisdiction in whcih you reside if you want to know for sure. It will be much cheaper than hiring him after you get arrested and indicted. I have a personal rule that I don't get in arguments on Internet forums, so this will be my final post on the subject. This is something we agree on 
|
|
|
|
[#36]
If I owned a weapon physically incapable of accepting all of the parts to make it full auto... specifically my gun has a block welded in it to stop it from accepting a full auto carrier, and I owned a full auto lower and carrier, (the lower would fit, but the carrier won't), and they and the gun were in proximety of each other. Would that constitute a violation of NFA Laws?... In your opinion?
|
|
|
|
[#37]
|
|
|
|
[#38]
Yea, will do... sorry to scum up the thread.
I always wanted a USC - UMP conversion. I actually saw a 9mm prototype on Gunbroker a while back.... I wanted it bad... I think it was a clone though.... SW maybe. |
|
|
|
[#39]
I have seen a bunch of conversions, both SBR and otherwise, on GB lately. You can do it cheaper yourself if you have even modest WECSOG skills. I just finished mine. I need to post some pics. I also need to get my Form 1 in the mail.
|
|
|
|
[#40]
Quoted:
Yea, will do... sorry to scum up the thread. I always wanted a USC - UMP conversion. I actually saw a 9mm prototype on Gunbroker a while back.... I wanted it bad... I think it was a clone though.... SW maybe. If it was a 9mm it probably wasn't a SW. I don't think they made theirs in a 9mm. It was probably one of the kits that SEF Tactical or MM makes. It's also possible to convert it to .40 with modified factory parts. Having a sbr that you can convert from .45 to .40 to 9mm.. very cool! |
|
|
|
[#41]
Quoted:
Quoted:
Yea, will do... sorry to scum up the thread. I always wanted a USC - UMP conversion. I actually saw a 9mm prototype on Gunbroker a while back.... I wanted it bad... I think it was a clone though.... SW maybe. If it was a 9mm it probably wasn't a SW. I don't think they made theirs in a 9mm. It was probably one of the kits that SEF Tactical or MM makes. It's also possible to convert it to .40 with modified factory parts. Having a sbr that you can convert from .45 to .40 to 9mm.. very cool! Special Weapons SP10 Not really a UMP, it uses hk94 internals. |
|
|
|
[#42]
It's threads like this that get me depressed. Beautiful gun. I passed on a chance to get a USC a few years ago for less than $1,000.00. If that wasn't bad enough, I had a friend not long after state he had some parts I could have bought pretty cheap to do the transfer from USC to a UMP.
|
|
|
 Win a FREE Membership!
Sign up for the ARFCOM weekly newsletter and be entered to win a free ARFCOM membership. One new winner* is announced every week!
You will receive an email every Friday morning featuring the latest chatter from the hottest topics, breaking news surrounding legislation, as well as exclusive deals only available to ARFCOM email subscribers.

AR15.COM is the world's largest firearm community and is a gathering place for firearm enthusiasts of all types.
From hunters and military members, to competition shooters and general firearm enthusiasts, we welcome anyone who values and respects the way of the firearm.

Subscribe to our monthly Newsletter to receive firearm news, product discounts from your favorite Industry Partners, and more.
Copyright © 1996-2024 AR15.COM LLC. All Rights Reserved.
Any use of this content without express written consent is prohibited.
AR15.Com reserves the right to overwrite or replace any affiliate, commercial, or monetizable links, posted by users, with our own.


