|
Posted: 8/16/2011 5:55:33 PM EDT
I've been toying around with the idea of taking one of my Garand's and
doing a complete accurizing job on it. Lately I've been shooting out to 600 yards, and I am seeing just how the groups start to really open up at that distance. I've collected several good publications on accurizing including Jerry Kuhnhausen's shop manual, the NRA reprint of the The M1 Rifle, Clint Fowler's M1 Garand Accuracy Job and other documents as well over the years and I have a good idea of what I want to try to accomplish with this project. This includes a new barrel, glass bedding, floating the handguards, trigger work and a few other modifications. So I decided to start with the first Garand I ever purchased, which I bought some 20+ years ago. I started shooting Garand matches with it, then moved into High Power over the years. I've lost count of the number of rounds I've put through it, and its been one reliable rifle and a blast to shoot. Now that I'm done with JC Garand and High Power matches, I can make any modification I want without worrying about the rules, so I plan to throw all the tricks into this one.  Here's some of the parts for the project:  Barrel that came with the Garand when I bought it and will be replaced by a new Krieger heavy barrel.  To start things off, I ordered a Heavy barrel from Krieger (CM, 1/10 twist, 4 groove) that should be here in a few weeks. While I'm waiting for the barrel, I've started working on the stock. After trying several different stocks, I ended up using the Boyds' that's been on the rifle since I bought it. This one seems to be smaller than the newer Boyds' stock, although it's still larger than a Korean War era stock.  I know there is lot's of arguments over Boyds' stocks - some like them, while others hate them. I like the oversize stock and have really grown accustomed to it , and it gives me plenty of wood for inletting and fitting the heavy barrel. But before I started inletting it for the glass bedding, I wanted to "fix" one of the things I really dislike about the stock - and that's the cut off pistol grip. You can see the hard lines and abrupt cutoff on the grip in the above picture. Here is the Boyds' stock next to a Korean War IHC. The "flat spot" at the bottom of the grip is much larger, and the curve up to the flat spot is much shorter on the Boyds' stock. The grip is also fatter than it needs to be, to the point it's hard to wrap your hand around.  You can also see how much it overhangs the butt plate.  After building a couple of fixtures to hold the stock, I got everything setup to start reshaping. I plan on draw filing to reshape the pistol grip, and to remove the overhang at the butt plate.  Pistol grip reshaped with draw filing. Before I started reshaping the grip, my pinky finger would not fit on the curve and would slip down onto the flat part of the grip. Now that I extended the curve and "moved" the flat spot back, all of my fingers fit nicely on the curve. I also trimmed the grip thickness down.  The Boyds' stock compared again to the IHC after reshaping. Now the flat spot starts at the same place on both stocks and the curve matches. The end of the grip now blends into the stock instead of having the hard lines it originally had. I still need to remove some thickness and "pull" the back of the grip in some, so some more draw filing then the sanding.  More updates to come as the work continues... |
|
|
|
[#1]
A friend has a NM Garand built by Orion 7. It has it all. It will shoot better than we can.
|
|
|
|
[#2]
Outstanding. I'm looking forward to watching your progress.
Good luck. ––Eight_Ring |
|
|
|
[#3]
Quoted: A friend has a NM Garand built by Orion 7. It has it all. It will shoot better than we can. Speaking of NM, here's a few parts that I've been collecting over the years that will be used -    |
|
|
|
[#4]
Quoted: Outstanding. I'm looking forward to watching your progress. Good luck. ––Eight_Ring Thank you sir. This might drag out for awhile, but I'm taking lots of pictures as I go. I've gotten many how-to questions, or which tool do I need so I decided to document as much of the process as I can. |
|
|
|
[#5]
Hey, Gatorcountry––
If you want to match-fit your gas cylinder lock (timing it to 5:30), think about ordering in a bunch of them from Numrich Arms––you can return whatever ones don't time. I think I recall reading that the NM armorers liked to use the postwar/hardened/non-high hump ones. i bought about a dozen of them from Numrich (in baches of 6) and swapped all of mine out. It doesn't make a huge difference––but past barrel and bedding, accurizing the Garand (as I'm sure you know) is all about reaping the accrued beneifts of all the small, incremental improvements, yeah? Anyhow––good luck. ––Eight_Ring |
|
|
|
[#6]
Couple of pictures of the stock after filing and rough sanding (no finish on the stock yet, I just wiped it down with a damp rag). The butt plate has been fitted to the stock so there is no movement and no overhang. It has a tight even fit without the screws. Now that I'm happy with the shape of the stock, I'll be moving on to other modifications.
     |
|
|
|
[#7]
The rest of the stock work basically is to accomplish two goals. First is to allow the receiver to go undistributed through its full range of motion during recoil. I'm trying to achieve the same range and pattern of harmonic motion each time the trigger is pulled and a shot is fired. The second goal is getting everything to return to the same starting point after each shot.
First, setting up the rear of the stock for inletting needed for the glass bedding. A sharp metal scribe is used to trace the outline of the horseshoe.   This next picture shows the "air gap" I created between the front of the horseshoe and the rear of the receiver legs. When pushing down on the rear of the receiver, the area under the rear of the horseshoe up to the two lines I scribed should be perfectly mated to the stock with no visible space. The bedding under the rear of the horseshoe will provide a solid foundation for the receiver. The area of the stock in front of the two scribe lines to the rear of the receiver legs should not touch, and instead have an air gap which will allow the receiver to flex through its range of motion when under recoil. This is a larger gap than needed on most Garands, but I did this intentionally.  |
|
|
|
[#8]
One of the work areas I'm using for this project.
 Stock setup for inletting the horseshoe. Foredom tool with an H.8 handpiece and carbide burs will be used to remove the wood. The Foredom is simple to work with due to the fact that speed is controlled by a foot pedal, leaving both hands free. The H.8 handpiece is just about the perfect size for this type of work.  Inletting for the horseshoe finished (specifications followed the Natch Match Rifle bulletin with modifications). The inletting is 1/16" larger than the receiver so the horseshoe of the receiver will contact only the bedding and not the wood . Living in a high humidity area plays hell with wood stocks, so I want to make sure that changes in the wood due to temperature or humidity have no impact on the rear of the receiver (which would impact group size). I also think a nice clean line around the receiver looks much better than having bedding compound sticking out all over the place.  |
|
|
|
[#9]
Looks good. Having re-contoured a Boyd's stock myself; good job! You have to be careful below the pistol grip as it doesn't take long before you find yourself cutting into the cleaning kit cavities. Been there. You're doing to top first, then cleaning up and bedding the bottom, right?
I'd go with 2 coats of poly on the inside and a lot of tung oil on the outside. Bedding cleans up easier if the stock is already finished, FWIW. |
|
|
|
[#10]
What are you going to bed it with, BTW?
|
|
|
|
[#11]
Quoted: Thanks for the comments! Right about starting at the top and then working my way down to the trigger area. Next I'll inlet the inside of the stock along the bearing flats (moving the bearing flats back away from the receiver legs), then work on where the trigger guard meets the stock.Looks good. Having re-contoured a Boyd's stock myself; good job! You have to be careful below the pistol grip as it doesn't take long before you find yourself cutting into the cleaning kit cavities. Been there. You're doing to top first, then cleaning up and bedding the bottom, right? I'd go with 2 coats of poly on the inside and a lot of tung oil on the outside. Bedding cleans up easier if the stock is already finished, FWIW. I've got a can of wipe-on poly that that I am planning to use prior to applying the bedding compound. I'll restain the inside once I'm finished with everything and then poly it. |
|
|
|
[#12]
Quoted: What are you going to bed it with, BTW? Devcon 10110 steel putty  |
|
|
|
[#13]
Quoted:
Quoted:
What are you going to bed it with, BTW? Devcon 10110 steel putty http://accurateshooter.net/RichardsCustom/beddingdevsteel.jpg Would this work in a ramline stock? |
|
|
|
[#14]
Jdubya87––
IM raf (I think he is a mod), he has spoken of bedding the Ramline, but only mentioned it briefly in passing. I'd actually be interested in reading more of what he has to say inre: bedding the Ramline. ––Eight_Ring. ETA: Coming along nicely, Gatorcountry. Thanks for the pics. |
|
|
|
[#15]
Quoted: Quoted: Quoted: What are you going to bed it with, BTW? Devcon 10110 steel putty Would this work in a ramline stock? Injection molded stocks can be tricky to glass bed, but it can be done. First, make sure to remove all of the release agent used to get it out of the mold (any release agent left on the stock will prevent the bedding compound from adhering ). The slick surfaces then need to be roughed up (carbide bur works good), or you can cut grooves into it. Some embed pins into the stock and run the bedding compound over them. The key is getting a clean roughed up area for the bedding compound to grab onto. |
|
|
|
[#16]
Quoted: Quoted: What are you going to bed it with, BTW? Devcon 10110 steel putty http://accurateshooter.net/RichardsCustom/beddingdevsteel.jpg I've used that and it worked well. It's thick. I like the Devcon Plastic Steel in the syringe for touch-up and skim bedding (repairs). It's a little runnier. Way easier to mix in small amounts too. |
|
|
|
[#17]
A couple of pictures of more stock work on the area around the trigger housing and trigger guard.
Trued up the wood around around the rear of the trigger housing. Added more clearance so the tip of the trigger guard does not hit any wood when its fully closed.  More work around the front of the trigger guard. Opened up both sides of the wood around the trigger guard so there is no contact.  It's hard tell in this picture but the gap between the trigger housing and stock isn't even, and a portion of the trigger housing digs into the wood. I'll even the gap between the stock and trigger housing up leaving about 1/16" between the stock and housing so that if the wood swells any it won't put torque on the trigger housing.  |
|
|
|
[#18]
Earlier this week I spent some time tweaking one of the bends in my op rod. Using just the barreled receiver, I got the the op rod working smooth as glass on the tilt test. When I tried the tilt test with the stock I noticed there was a hang up with the op rod. Found out the barrel is off center in the stock - its positioned too far to the left of center. This shows how much off of the center line a barrel can be with some stocks.
You can see how much the barrel is off center line using the ferrule tenons as reference.  Left side of barrel rubbing against the stock channel.  Op rod marked to indicate where it contacts the stock ferrule. Contact like this certainly won't help keep group size small  Good thing the bedding job will take care of this problem. I had already planned on opening up the stock channel some, so afterwards I just need to make sure the dimensions on both sides are the same. The barrel will be centered in the stock using a centering fixture when the receiver is bedded. |
|
|
|
[#19]
Couple of books, manuals and a stock of my notes I'm using as reference and to get ideas from
 |
|
|
|
[#20]
First thing I do on any( even USGI) stock is check barrel channel clearence. You should removed extra wood as barel will move when fired
Also alot of guys complain about thier Garands shooting high with new commercial stocks, this is the problem. The barrel is being held up out of the channel 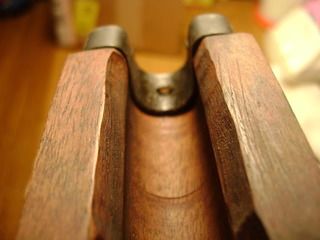
|
|
|
|
[#21]
Quoted: First thing I do on any( even USGI) stock is check barrel channel clearence. You should removed extra wood as barel will move when fired Also alot of guys complain about thier Garands shooting high with new commercial stocks, this is the problem. The barrel is being held up out of the channel http://i47.photobucket.com/albums/f197/Garandlover/Boyds%20Stock%20Rework/DSC00574.jpg Great picture showing how to fix the problem - I'll be opening up the stock channel just like you show once my Krieger barrel gets here so I can reference off it. Modifications like this really can change how a Garand shoots. I'll keep posting pictures of issues like this as I run into them |
|
|
|
[#22]
Well, I spent the entire day today working on three little pieces of metal so that I can get ready to inlet the stock. The point of all this work is to get everything in alignment with the center line of the stock, and to make sure the barrel rests along the center line when under compressive pressure. For accuracy, nothing should be pulling the barrel left or right of center line, meaning pressure on the barrel must be vertical to center line. So, before permanently bedding the stock ferrule to the stock, I wanted to vertically align it with the lower band. When I started, one of the legs on the lower band was bent forward of the other one which is not what I wanted. So off to the vice to get everything back into alignment.
Worked started with files, hammers and a vice. Using the vice and a brass hammers, I was able to get the lower band straightened out. Once I got it straightened out, I leveled everything using an assortment of files.  Now here's where the fun begins. Once I straightened out the lower band, it didn't contact the stock ferrule evenly when under vertical load. In fact, one side of the lower band barely contacted the stock ferrule at all. If it's uneven now, it won't get any better when I bed the stock, so the barrel will end up having angular stress to one side. The other side of the band hit the ferrule by only a very small contact point. Fixing this problem was a matter of mounting a grinding stone in the drill press and working on the lower band. This is one area to go slow and steady because you can easily trash the lower band. I would grind some on the lower band, test fit it to the stock ferrule, rinse and repeat. I used grease as a visual aide so I could see the contact pad where the lower band meets the stock ferrule.  Now for the other side. Here the contact pad is the very close in size to the other side, and is located in the same relative position. Now, there an even amount of contact on both sides when vertical pressure is applied. Getting both sides to match took grinding, filing and a whole lot of test fitting.  The specifications on the lower band call for the op rod opening to be .510" + .010". I didn't want to open this up too much, but I was willing to trade being over spec by a small amount with having even contact points on both side of the stock ferrule. When making modifications like this, you need to know what the specifications are so you don't end up modifying something too far past specifications.  To get the contact I wanted, I ended up at .542" which is within the limit I wanted to be at. These are some of the trade-offs that must be considered when building a match rifle vs. a battle rifle. If needed, I could use a .015" - .020" shim at the contact points now that both sides are even. |
|
|
|
[#23]
I would suggest getting a NOS lower band. They should fit tight on the barrel, best fit is they need to be driven on. Most are worn and slide on or off easily. Some guys will knurl the barrel where the band sets for a tight fit.
|
|
|
|
[#24]
After getting the parts fitting just right, I trued them using a large piece of granite and sandpaper. Now all three parts lay nice and flat without any wobble. Next I'll bead blast and reparkerize them.
The stock ferrule has been opened up giving the op rod about .020" clearance all around.  Both side now true and flat.  All three parts nice and flat - no wobbling allowed  |
|
|
|
[#25]
Quoted: I would suggest getting a NOS lower band. They should fit tight on the barrel, best fit is they need to be driven on. Most are worn and slide on or off easily. Some guys will knurl the barrel where the band sets for a tight fit. I should be good with this one (especially with all the work that's gone into it  ). It was a somewhat tight fit getting it off, and it gauges good (.7245"), plus I need to see how it fits the new barrel. Good idea on knurling, I'll do some of that when I glue the band to the barrel (not planning on using the pin for this one). ). It was a somewhat tight fit getting it off, and it gauges good (.7245"), plus I need to see how it fits the new barrel. Good idea on knurling, I'll do some of that when I glue the band to the barrel (not planning on using the pin for this one).Thanks for your suggestions and keep them coming as I can use the help! Anyway, here's a shot of gauging the lower band for those interested (lower band is centered on top of the calipers).  |
|
|
|
[#26]
Whats the reasoning opening up the lower band? The band needs to fit around the stock ferrule for stock draw. Or am I missing something?
|
|
|
|
[#27]
Quoted: Whats the reasoning opening up the lower band? The band needs to fit around the stock ferrule for stock draw. Or am I missing something? Absolutely right regarding stock draw and compressive pressure. When I first started fitting the parts, the lower band had very uneven contact on the stock ferrule when I pulled on them laterally. One of the lower band legs was bent when I started, so this could have been part of the problem after I straightened it (although from the inside wear marks, there never was very good contact). On one side of the lower band, there was uneven contact with the ferrule, and on the other side the lower band was hitting just on the point of the "leg". Basically, I hand fitted and lapped the lower band to the stock ferrule to make sure I get even (and repeatable) pressure on both sides of each (to ensure the barrel is pulled straight down). As I fitted them, I would put grease on the stock ferrule and lower band and then applied lateral pressure to pull them apart. I stopped fitting once both sides had the same amount of contact and the contact points were the same size. As I mentioned before, this did increase the opening between the ends of the legs somewhat, but not so much it's a problem. Now this lower band really only fits this stock ferrule, but with the stock ferrule being bedded to the stock, and the lower band being glued to the barrel, both of them are toast if I ever try and change them anyway. I really only opened up the bottom of the stock ferrule and the top of the op rod opening on the lower band for more op rod clearance. I also trued everything up so that when I put a .015" spacer between them, the back of the lower band will not touch the stock ferrule. |
|
|
|
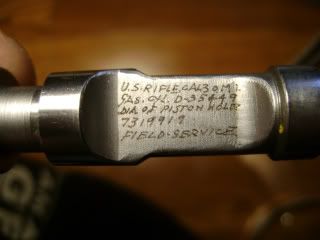
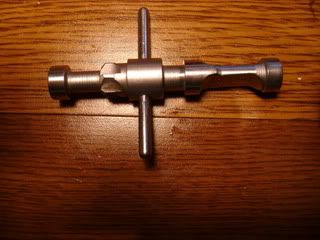
[#28]
Anybody know what this is?????
 |
|
|
|
[#29]
Quoted:
Anybody know what this is????? http://i140.photobucket.com/albums/r24/Gatorcountry/IMGP0305.jpg Looks like a tool for reaming the gas cylinder, well that's what it looks like to me. |
|
|
|
[#30]
Gas cylinder gauge
|
|
|
|
[#31]
Quoted: Gas cylinder gauge Right - and without any of the plug part of the gauge showing. The plug is just under flush with the cylinder, so this cylinder is going to get replaced, which unfortunately I don't have a spare sitting around. Best line of the day yesterday came from my wife when I tried explaining how the gauge works, and that I need to buy yet another part for this project. She simply asked "Why don't you quit measuring things?". |
|
|
|
[#32]
Quoted:
Quoted:
Gas cylinder gauge Right - and without any of the plug part of the gauge showing. The plug is just under flush with the cylinder, so this cylinder is going to get replaced, which unfortunately I don't have a spare sitting around. Best line of the day yesterday came from my wife when I tried explaining how the gauge works, and that I need to buy yet another part for this project. She simply asked "Why don't you quit measuring things?". There are still a few new old stock ones for sale on gunbroker. Let me know if you don't find one, I may have a few NOS I've been hoarding somewhere. |
|
|
|
[#33]
Might be cheaper to just have a over-sized button soldered to your oprod.
|
|
|
|
[#34]
Quoted:
Might be cheaper to just have a over-sized button soldered to your oprod. Or you could always use one of the new BM 59 gas cylinders... 
|
|
|
|
[#35]
Quoted: Funny you should mention BM 59. I just bought a BM 59 op rod yesterday for another project (30-06 tanker), so I'm looking at Standard Parts to buy a new BM 59 gas cylinder to go with it. I'm checking around now for a NOS cylinder, which I should be able to find for a reasonable price. BTW, thanks for the offer of looking to see if you have one laying around.Quoted: Might be cheaper to just have a over-sized button soldered to your oprod. Or you could always use one of the new BM 59 gas cylinders... |
|
|
|
[#36]
Heres a USGI gauge that I once had, I sold it and bought pin guages. I feel you can learn alot more about the condition of the cylinder with them

|
|
|
|
[#37]
Quoted:
Quoted:
Funny you should mention BM 59. I just bought a BM 59 op rod yesterday for another project (30-06 tanker), so I'm looking at Standard Parts to buy a new BM 59 gas cylinder to go with it. I'm checking around now for a NOS cylinder, which I should be able to find for a reasonable price. BTW, thanks for the offer of looking to see if you have one laying around.
Quoted:
Might be cheaper to just have a over-sized button soldered to your oprod. Or you could always use one of the new BM 59 gas cylinders... I don't want to derail the thread, maybe you could start a tanker thread with your other rifle? I've been thinking about swapping the gas cylinder and op rod on mine. Maybe down the road. No sweat on the offer. The info in this thread is awesome. I know what I'm doing with my next CMP rifle. |
|
|
|
[#38]
This is the most interesting thread currently on ARFCOM. Please keep posting!
|
|
|
|
[#39]
Quoted: Quoted: Quoted: Funny you should mention BM 59. I just bought a BM 59 op rod yesterday for another project (30-06 tanker), so I'm looking at Standard Parts to buy a new BM 59 gas cylinder to go with it. I'm checking around now for a NOS cylinder, which I should be able to find for a reasonable price. BTW, thanks for the offer of looking to see if you have one laying around.Quoted: Might be cheaper to just have a over-sized button soldered to your oprod. Or you could always use one of the new BM 59 gas cylinders... I don't want to derail the thread, maybe you could start a tanker thread with your other rifle? I've been thinking about swapping the gas cylinder and op rod on mine. Maybe down the road. No sweat on the offer. The info in this thread is awesome. I know what I'm doing with my next CMP rifle. Once I collect a few more parts for the tanker, I'll start another thread. |
|
|
|
[#40]
Next thing is verifying the op rod is within specs. The guide stud on mine was dinged up some, but since this is a 7790722-RA I figure it's worth the time saving it. The biggest problem was that at some point, it looks like something got between the receiver and the back of the guide stud which resulted in the top rear corner of the stud peening down onto the face of the stud. Working with needle files, sandpaper and buffing wheels, I smoothed out the guide stud and removed all burrs (being extra careful to keep everything straight and not round off any edges or corners). Now the op rod hardly makes a sound as it slides down the receiver.
Op Rod bearing surface being reworked. One thing to add is that you need to be careful when working on heat treated parts (so it's important to know which parts are heat treated). All I wanted to do here is knock down any high spots and polish out the roughness. If you start hacking too much, you can break through the heat treat and cause the part to wear substantially faster. In this case, I used a very fine equalizing needle file and fine grit sandpaper.  After reworking the bearing surface and guide stud, I checked to make sure the guide stud was still in spec. Came in right at .100" on this part of the guide stud.  The guide stud here should be .320" -.003". Good to go here as well. You can see where there is a small amount missing on the top rear of the guide stud, but the rest of the bearing surface is good.  Testing op rod fit after cleaning up the rear bearing surface.  The gas piston on this op rod should should measure .526" max. Measures just under, so this piston is in great shape.  |
|
|
|
[#41]
Are you planning on doing any trigger work? I can send you step by step proceedure. Its very simple, just need a fine file and 15-20 minutes time to get trigger pull down under 5lbs
|
|
|
|
[#42]
Quoted:
Next thing is verifying the op rod is within specs. The guide stud on mine was dinged up some, but since this is a 7790722-RA I figure it's worth the time saving it. The biggest problem was that at some point, it looks like something got between the receiver and the back of the guide stud which resulted in the top rear corner of the stud peening down onto the face of the stud. Working with needle files, sandpaper and buffing wheels, I smoothed out the guide stud and removed all burrs (being extra careful to keep everything straight and not round off any edges or corners). Now the op rod hardly makes a sound as it slides down the receiver. Op Rod bearing surface being reworked. http://i140.photobucket.com/albums/r24/Gatorcountry/IMGP0313.jpg After reworking the bearing surface and guide stud, I checked to make sure the guide stud was still in spec. Came in right at .100" on this part of the guide stud. http://i140.photobucket.com/albums/r24/Gatorcountry/IMGP0306.jpg The guide stud here should be .320" -.003". Good to go here as well. You can see where there is a small amount missing on the top rear of the guide stud, but the rest of the bearing surface is good. http://i140.photobucket.com/albums/r24/Gatorcountry/IMGP0312.jpg Testing op rod fit after cleaning up the rear bearing surface. http://i140.photobucket.com/albums/r24/Gatorcountry/IMGP0316.jpg The gas piston on this op rod should should measure .526" max. Measures just under, so this piston is in great shape. http://i140.photobucket.com/albums/r24/Gatorcountry/IMGP0319.jpg Man, this reminds me of the first M-1 I ever put together. I was seventeen and buying parts piecemeal from pawn shops in Omaha. Ordered the receiver from Dupage Trading when I turned 18. Unfortunately, I didn't learn what a caliper was for until it started short cycling and then wouldn't cycle the action at all. Had to replace the gas cylinder and the op rod. 
|
|
|
|
[#43]
Quoted:
Are you planning on doing any trigger work? I can send you step by step proceedure. Its very simple, just need a fine file and 15-20 minutes time to get trigger pull down under 5lbs How about shortening the reset? Is this something you can do? I have never actually messed with trigger work. I have a pdf somewhere... |
|
|
|
[#44]
Not sure you mean by shortening the reset??
|
|
|
|
[#45]
Quoted:
Not sure you mean by shortening the reset?? Just the trigger reset. Distance trigger travels between shots. |
|
|
|
[#46]
Quoted:
Quoted:
Not sure you mean by shortening the reset?? Just the trigger reset. Distance trigger travels between shots. Dont really know or know what benafit it would be for a Garand.two stage trigger |
|
|
|
[#47]
Quoted: Are you planning on doing any trigger work? I can send you step by step proceedure. Its very simple, just need a fine file and 15-20 minutes time to get trigger pull down under 5lbs Absolutely - and I'll take any help or suggestions you offer. Getting the pull under 5lbs is right where I want to be. |
|
|
|
[#48]
Quoted: Quoted: Next thing is verifying the op rod is within specs. The guide stud on mine was dinged up some, but since this is a 7790722-RA I figure it's worth the time saving it. The biggest problem was that at some point, it looks like something got between the receiver and the back of the guide stud which resulted in the top rear corner of the stud peening down onto the face of the stud. Working with needle files, sandpaper and buffing wheels, I smoothed out the guide stud and removed all burrs (being extra careful to keep everything straight and not round off any edges or corners). Now the op rod hardly makes a sound as it slides down the receiver. Op Rod bearing surface being reworked. http://i140.photobucket.com/albums/r24/Gatorcountry/IMGP0313.jpg After reworking the bearing surface and guide stud, I checked to make sure the guide stud was still in spec. Came in right at .100" on this part of the guide stud. http://i140.photobucket.com/albums/r24/Gatorcountry/IMGP0306.jpg The guide stud here should be .320" -.003". Good to go here as well. You can see where there is a small amount missing on the top rear of the guide stud, but the rest of the bearing surface is good. http://i140.photobucket.com/albums/r24/Gatorcountry/IMGP0312.jpg Testing op rod fit after cleaning up the rear bearing surface. http://i140.photobucket.com/albums/r24/Gatorcountry/IMGP0316.jpg The gas piston on this op rod should should measure .526" max. Measures just under, so this piston is in great shape. http://i140.photobucket.com/albums/r24/Gatorcountry/IMGP0319.jpg Man, this reminds me of the first M-1 I ever put together. I was seventeen and buying parts piecemeal from pawn shops in Omaha. Ordered the receiver from Dupage Trading when I turned 18. Unfortunately, I didn't learn what a caliper was for until it started short cycling and then wouldn't cycle the action at all. Had to replace the gas cylinder and the op rod. Too funny! We've all been there at one time or another. I could write several chapters just on my screw ups alone. What I like about this site is the amount of knowledge you can find here. With members like BigBore (who has forgotten more about Garands than I'll ever know), M1G (his posts are always spot on), Eight_Ring, yourself and others, you can get the information you need here. I'm certainly no expert on the subject and never will be, but I've been around Garands for many years, and shoot them quite a bit. I thought starting a post with lots of pictures showing a bunch of different things you can do with a Garand would be helpful, especially for anyone who may not know where to start, or may be somewhat intimidated by a lack of knowledge. With some simple tools, lot's of patience and attention to detail like measuring the heck out of everything, you can end up with a nice shooting and reliable Garand. I'm showing one way to do things, but there's always hundreds of different ways to accomplish the same thing. Asking a question about working on a gun is like asking the IRS a tax question - ask 5 people the same question and you'll get 6 different answers. The really good thing is when someone jumps in and shows a different, and maybe better way to do something, or suggests something I didn't think about. Heck, I'm all about trying to learn everything I can about this hobby, so I'm hoping to get as many suggestions and ideas as possible. The really cool thing about this type of work is I can decide how much I want to attempt. If I'm not sure about something, or if it's over my head, I can send the work out to someone like Adco who can handle it for me or bail me out of a tough spot. This way, I can learn as much as I want, and have fun doing what I'm comfortable with. My only worry now is finishing this thing and having it pattern like a rusty old shotgun with a missing choke. |
|
|
|
[#49]
While you are at it I would also suggest lapping the bolt
PM sent |
|
|
|
[#50]
Quoted: While you are at it I would also suggest lapping the bolt PM sent Right on - in fact, here is part of my bolt lapping "tool"  |
|
|
 Win a FREE Membership!
Sign up for the ARFCOM weekly newsletter and be entered to win a free ARFCOM membership. One new winner* is announced every week!
You will receive an email every Friday morning featuring the latest chatter from the hottest topics, breaking news surrounding legislation, as well as exclusive deals only available to ARFCOM email subscribers.

AR15.COM is the world's largest firearm community and is a gathering place for firearm enthusiasts of all types.
From hunters and military members, to competition shooters and general firearm enthusiasts, we welcome anyone who values and respects the way of the firearm.

Subscribe to our monthly Newsletter to receive firearm news, product discounts from your favorite Industry Partners, and more.
Copyright © 1996-2024 AR15.COM LLC. All Rights Reserved.
Any use of this content without express written consent is prohibited.
AR15.Com reserves the right to overwrite or replace any affiliate, commercial, or monetizable links, posted by users, with our own.


