|
[#1]
If the locking lugs engage only at the front of the receiver, then only the front needs to be steel. The rest just supports and aligns.
|
|
|
|
[#2]
The bolting part of the receiver is really the middle of the receiver to the stock, and then you have the barrel weight hanging out the front of the receiver.
This is the reason that you want to make the receiver out of one piece of steel. As for if broaching is not your cup of tea, then just try to find a EDM cut receiver blank to start with instead. 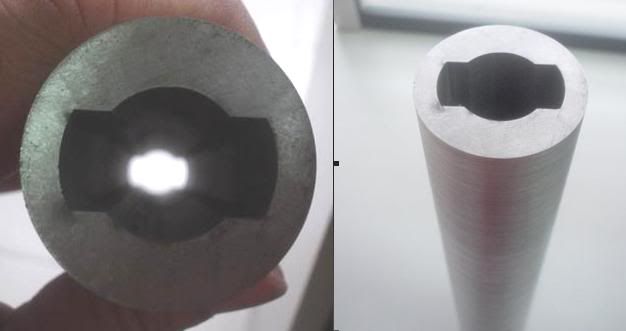
http://www.homegunsmith.com/archive/T11493.html |
|
|
|
[#3]
I don't know anyone selling a broached blank. Last guy I seen wants like 250 for it.
|
|
|
|
[#4]
There have been receiver blanks available, I don't know if they are now; should have stocked up!
There are a few two piece actions sold now with an aluminum race and a steel insert for the lugs. They work fine, they're used on the finest benchrest guns made. |
|
|
|
[#5]
I have seen guys broach barrels by hand with a jig. I'm sure it would be a lot easier to do receiver raceways since it's straight and not twisted. It may take a very long time to do, but I'm sure it's cheaper than wire EDM. I read guys use shaper for this too, I don't have one, nor do I have space for one... but I'm just thinking of maybe building a hand shaper jig or something.
|
|
|
|
[#6]
A shaper needs a long stroke and a long tool holder to reach the length of an action, plus they have just about disappeared except in home shops. Anyway, the flexibility of a tool holder long enough is a strong consideration.
A search of archive.org will turn up a copy of a book that documents the manufacture of the 1903 rifle in detail. A look through there might have interesting ideas on machining the action. I don't recall noticing anything in particular, but I would be surprised if there isn't something useful. There is an article about building a Mauser action clone on the internet, I think it's posted on the JPFO web site. Not a great article, but probably sufficient to get a start. One of the articles at JPFO: http://jpfo.org/pdf/boltaction1.pdf http://jpfo.org/filegen-a-m/boltaction.htm United States Rifles and Machine Guns |
|
|
|
[#7]
Panda actions use aluminum for most of the action.
There is a steel ring at the front of the action that transfers the loads between barrel and bolt. |
|
|
|
[#8]
I was actually just thinking to machine out the ejection port, and machine that portion of the rail with T slot cutters. Then just drill and broach the much shorter section on the front and back, I mean that's about 2 inches tops, that can be easily done the same way AR15 magwell is done.
|
|
|
|
[#9]
I just ordered a 1.575" x 9" 4140 pre hardened round bar. I think I'm going to give it a try with whatever I got... (The bar was precision turned to 1.575")
Looking at the Remington 700 receiver plan I think what I can do is, machine out the ejection port section, and then machine part of the raceway at the same time. That is going to take care of a large portion of the raceway. The front part is less than 2 inches and I think what I can do is what people do with AR15 magazine well, basically drill a series of holes into the profile of the raceway and hole, and then bore out the center portion, and mill out the raceway, finishing with a file or something. I don't have a lathe right now, but I will do what I can. If I only need to broach 2 short sections I think it's doable. Probably won't be pretty but only the receiver face is critical anyways. |
|
|
|
[#10]
Hope you have some Carbide end mills and tooling, since HSS tooling is not going to put a dent in the Hardened 4140 isntead.
When you need to order a new piece of 4140 that is annealed instead. https://www.onlinemetals.com/merchant.cfm?step=2&id=804 |
|
|
|
[#11]
I have carbide end mills, and besides they are not really that expensive as long as they are under 1/2" in diameter. HSS will cut pre hardened steel, just slowly and you must prevent work hardening. Carbide is all I will ever use anyways because HSS just isn't going to cut it.
Problem with annealed steel is that the steel must be heat treated after machining, which means it will warp a bit and will require finish machining. Also for a firearms receiver it also creates the problem of the guy doing the heat treating needs a FFL. |
|
|
|
[#12]
4140 prehard is easily machined with HSS, if that's what he has. I actually prefer machining the hardened stuff over the annealed condition. It's become my go to material for making tooling and gun parts.
I'm interested to see what you come with for the broaching process. I have thought of trying to use an arrangement similar to a rifling head where you could adjust the scraper tools out a bit with each stroke. |
|
|
|
[#13]
Like I mentioned before there are really about two 1.6" sections in a bolt action receiver that the raceway is of consequence, the front locking ring and the rear bridge. I think it's a lot easier to "broach" those shorter sections at different time than try to broach 9" of hardened steel at a time. I mean people have made AR15 magazine well without using a broach by drilling holes so I think similar strategies could be used, and then a file can be used to finish the corner until the bolt fits. The ejection port of most bolt action rifle is so large that you could practically go in there with a standard end mill, or maybe a T slot cutter and finish those off. It's going to require many different setup work to set the cut, and it obviously would not work in a production environment (where it's far easier to just shove a long broach down the hole with a giant press) but for home gunsmiths it offers the possibility of making the receiver without requiring tons of equipment.
For the barrel threads, they sell taps to tap receiver threads (mainly for blueprinting), which may sound weird but that means I wouldn't even need a lathe to finish the project, just a means to counterbore the hole to create the locking shoulder, and then the tap can be used to thread it. The JFPO pdf file in fact stated the use of a tap to do the receiver thread. I think what I need more is an engineer drawing of a Remington 700 receiver which I can base off of. I can't seem to find it though. Looking at a working Mauser 91 rifle, and what information I can find on the Remington 700 it looks like there are really about 1/2" to 5/8" of steel behind the locking lug, and that means if I can counterbore the hole first (which is not really that hard to do) I can do the raceway after that, and that minimizes the amount of material I must try and broach. |
|
|
|
[#14]
I miss having access to a wire EDM. I was going to cut a blank just because but never got around to it.
|
|
|
|
[#15]
This thread isn't all that old: http://bbs.homeshopmachinist.net/archive/index.php/t-67750.html
But it's the last mention I've found of Breiling making blanks. It might be worth contacting him if you are really interested. Sounds like there is enough interest around here to justify a small run. I was just about to look into it a few months back but then I looked around at my shop and stopped myself. I have way too many irons in the fire right now. |
|
|
|
[#16]
That guy wants over 200 dollars for the blank, and it looks like all it is is the hole for the bolt, and the raceway broach. I don't know if he did it on a EDM but if it was done on a broach it shouldn't cost that much machining time to do.
Honestly if I could even get someone to drill the hole for the bolt, it would have made things slightly easier as it means the hole becomes a guide for machining out everything else, as well as any attempt at broaching. Drilling a long/deep hole like this requires the same type of drill for gun barrels. In fact I was looking into using a surplus shot out 50BMG barrel as a base... but I couldn't find such a thing. I was proposing drilling the bolt hole about 2" down from both ends, and then machining out the ejection port to connect the holes. |
|
|
|
[#17]
If you want the result to end up square to the world, bore the centerline first, then broach full length, and leave some material for truing after the other features are cut.
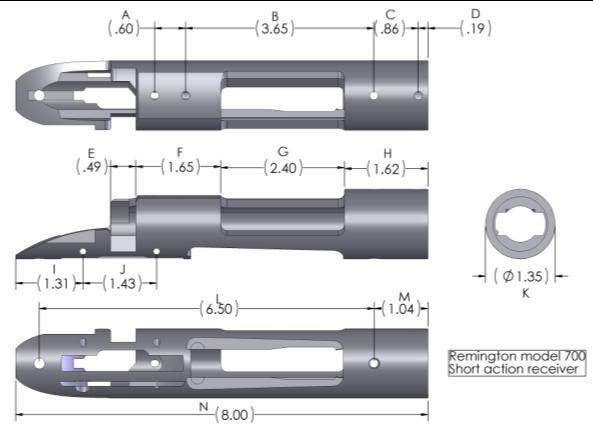
The reciever raceways for the bolt lugs pass the ejection port, there are not two short sections to broach. The recess for the barrel tenon will remove material back to the locking lugs. Some broaching length could be removed by machining part of the length of that bore, but I would leave material for clean up at the end of the broached grooves. Machining to net dimensions will probably result in scrap, especially on the first try. Might be a good idea to make a trial run on a piece of 1095 steel bar first. That drawing above is not sufficient for machining a Model 700 clone action. I didn't look at the link to find out whether there are more drawing with the rest of the dimensions. What's your plan for getting a tap square to the bore centerline, and then to turn it? Are you going to buy two honking big taps, because that is what you'll need. There's a book full of drawings for fixtures you should consider before you pile into this project. Right how I can't recall the title or author, I'll update when I do. |
|
|
|
[#18]
I realize that but of course I could machine undersized and then use a file or something to finish it off. It's not critical dimension anyways because if the raceway were a little too big it's not going to result in a kaboom though the action may not be quite so smooth. It won't even affect accuracy either. I can't broach the entire length without buying some big machines.
As for aligning the tap, Use a mill to align everything and turn by hand? That's how AR15 buffer tube is done. |
|
|
|
[#19]
I just ordered a broached blank from that guy. It's expensive but will see how it turns out.
I am still going to try and see about getting around the need to broach though. If successful I will publish my findings and hopefully everyone else will benefit from it. I asked the guy if he would be willing to broach a round I have, and he said he wanted 200 dollars, not including shipping both ways, and I decided it was better to buy his blanks since he uses superior material. |
|
|
|
[#20]
If you ask me, $200 is a bargain for that blank. EDM machines are expensive. I think you'll find that getting around the lathe is going to be a bigger challenge than the broaching stuff.
|
|
|
|
[#21]
Actually a rotary table and tailstock can replace lathes if necessary
|
|
|
|
[#22]
I wish I knew that before I spent a bunch of money on a lathe.

|
|
|
|
[#23]
Ok, a mill isn't going to turn some huge stocks but in a pinch I have used the mill to turn small stocks before, by clamping the bit in a mill vise and the stock in a collet (they also sell a R8/lathe chuck adapter for this).
I'm not going to be turning barrel blanks or anything but a receiver is small enough that I can probably do the shoulder using a rotary table. The thread I will probably have to use a tap, just like that JFPO document. |
|
|
|
[#24]
Here is what I got so far:

It doesn't look pretty at the moment but the original idea is to drill a .700" hole down to a depth of around 2 inches or so, then bore out the shoulder for the receiver. However the problem is HSS does not like the material much. It will work if you are aggressive but as soon as it work hardens, it's done. Luckily I have carbide end mills (it is all I have) and I was able to cut around the hardened portion. The goal at the moment is to enlarge the hole by taking a 3/8" carbide end mill and boring around the existing hole much under the final size, large enough that I can use a boring head to enlarge that to the final size. The boring head will also be used to create the shoulder. Once that's done, I must establish a plane, and then I will use that same 3/8" end mill to create what will eventually become the bolt raceway. If I can get it close I may be able to finish it off with a file... Now for anyone who's wondering, I ordered a blank from Gary (and I was surprised he's still in the business). All I need to do in that case is to use the boring head to create the shoulder (I asked if he could do it, he wanted 50 dollars for the job and I decided I can spend that money on a boring head and a set of bars, I can use that for other stuff such as 0% lowers) I don't have the dimension for the stuff like trigger sear slot, bolt rest, etc. so if I can find it it would be helpful. |
|
|
|
[#25]
The next thing you need to do is make a drawing with at least rudimentary dimensions. One should be a datum down the centerline of the action.
If you start with a 0.7 inch diameter hole not even a third of the final length needed, how in the world will you end up with a 0.7 inch hole full length that is remotely straight? The cruder the method used, the more leeway and likely hand work needed to sneak up on the final dimensions. Leave enough extra length at the locking lug end for a barrel tenon, recoil lug, and facing the end true. |
|
|
|
[#26]
A remington 700 uses a separate recoil lug that is sandwiched between the barrel and the receiver, so no recoil lug is needed. Also, I'm looking at the JPFO pdf file on making a mauser receiver, the guy drilled a half inch hole about 6" deep from both ends. The only area that really needs broaching is the front of the receiver and the rear. So basically as the ejection port is milled the holes from both end will be connected (since drilling a long hole is really hard for me at the moment). The bottom of the receiver will be milled with a ball end mill, while the bolt raceway portion can be milled with standard end mills.
Like I said in the old days everyone thought machining a 0% AR lower is impossible because it requires a EDM for the magazine well. Then the guy from Home Gunsmith Forum did it by drilling holes and milling. Now virtually all manufacturers do it this way. |
|
|
|
[#27]
No one has ever heard me claim EDM or even a mill is required for AR receivers.
I misspoke my intent about the recoil lug, what I meant was have a plan to include one, which affects the barrel tenon length. Without a drawing, you're going to find yourself with a paper weight. Since you're starting out with stock, why not machine the action bottom flat and include a Mauser style integral lug? |
|
|
|
[#28]
The stock isn't big enough for that. The JPFO file started with a 1 3/4" round, I got a 1.5" round. I do plan on machining a very small flat on all sides to help establish a plane however, which should be removed later on. I may decide to machine an integral scope mount however if I can ever figure out how to do it.
As for plans I am fully aware of the barrel tenon size. However I don't really have a conclusive drawing or plans to go on. One plan says the barrel hole should be 1.35" deep, however another says it's supposed to be 1.15" deep. I am also aware of the fact that the barrel shank itself is a bit longer to account for the recoil lug, and the barrel face has a recess for the bolt head. One thing I will need to do is figure out a way to set the barrel shank back so I can turn it into a "short chambered" barrel (the barrel is a stock Remington 700 barrel I got off of ebay cheap). I will have to buy a bolt before I can finalize everything, otherwise all dimensions will have to be approximate on the small side so I can dial it in. Ironically the bolt is much more expensive than the barrel, even a used one... For that matter the prices they are asking for a used bolt is so much that I'm better off just buying one from PTG. If anyone has a good detailed drawing that I can go with, it would be very helpful. I'm not saying you claimed anything but years ago most people agreed that you either needed a 6 foot long broach, or a EDM to do AR15 magazine wells. Some creative individual proved that wrong. It just depends on what level of accuracy you need, but to be honest with you once the bolt is locked, the raceway should not matter at all. |
|
|
|
[#29]


I'll post a table that accompanies these two drawings. I could dig up the measured dimensions from a short action Model 700 I rebarreled; it has the "Trinidad" improvements for rebarreling without going through the complete action truing process. |
|
|
|
[#30]
I have that measurement. I got a spare barrel around plus I have a book with that dimension. What I'm looking for is the location and size of the ejection port, magazine cutout, sear cutout, receiver notch for the bolt handle, and anything else I might have missed. I can't find those dimensions.
|
|
|
|
[#31]
Is pre-hardened 4140 the standard for receiver material ? What stainless is the preferred choice?
All the talk of EDM cut raceways has reminded me that I often sit and stare at an EDM machine working when I take a break from my Bicycle ride and stop at my buddy's machine shop. He has a small, but well equipped shop that produces a lot of custom designed CNC work, some of which is passing over your head..... A precursory look says I can buy pre-hardened 4140 1.5" rod for around $22 for a 10" piece if you get it in bulk. Might see what he would throw back price wise to drill and EDM cut the raceways. He might give me a good price, especially if it was a side job to keep his guys busy during slow periods. I'm assuming that the bore and EDM could be done from cut stock, and the trueing could be done from the bore by the end user. Or would each blank need to be trued up prior to boring? It seems to me that if a 10" blank with the bore and raceways already in it were available, all the other operations could be accomplished with lathe and mill and standard tooling. Thoughts? |
|
|
|
[#32]
I think 4140 pre-hard is just easier to deal with for those building receivers in home shops. You can machine it easily with cheap HSS tools and it's still hard enough you don't need to send it off for heat treating after.
If your buddy can beat $200, I think he'd get some business. I have been thinking of ordering from the guy mentioned above now that I know he's still selling them. I think selling them in larger blanks that would allow integral scope rails and recoil lugs would be pretty awesome too. Like maybe even a rectangular cross section in lieu of the rounds they are making now. I do remember reading one of the guys that are already doing this defending their pricing somewhere a while back. I don't think the material cost is much of a driver. I think that most of it was the cost of the machine, and running it. |
|
|
|
[#33]
My understanding of EDM (I have not seen such a machine or used one) is that they do cost a lot in both time and material to use. It seems EDM's are SLOW, as in it takes many hours, possibly a full day to broach a single blank, which is why shops charge so much to do them, and that the guy doing it for 250 dollars is a bargain. Commercially they do not EDM them, the cost would be too high, but rather they broach it with specialized broaches that costs more than 10,000 to make with giant presses that makes it conducive to mass production (when it takes a day to EDM a blank it makes no sense from a mass production perspective).
So if you ask you may end up getting a quote of over 100 dollars simply because EDM consumes large amount of expensive brass wires during its use. We use pre hardened 4140 because that is what barrels are made from. You can buy annealed 4140, machine it, and then heat treat it but heat treating is a lot harder than machining, but also pre hardened 4140 is actually easier to machine compared to annealed state since it's no longer so gummy but carbide tool is encouraged since the worry about work hardening is greatly diminished (and it's not like annealed 4140 is immune to work hardening either) So what I propose is to bore a .700 hole through the entire blank, then machine out the rough profile of a raceway from both ends of the receiver. The raceway really only needs to be deep enough to overlap the ejection port a little bit because guess what? The raceway is completely exposed once the ejection port is machined. So you can machine the raceway in that portion using standard end mills. Once that's done, you could use whatever method you have available to sharpen the corner of the raceway you created earlier until a bolt will fit. Alternatively, start with a larger blank and just use an end mill to "drill" the raceway past what it should be, so you have a deeper raceway than standard but you will need thicker blank to maintain structural integrity. If this works out, I can post my findings and everyone else can create bolt action receivers without requiring specialized tools. For you what may work better is use standard keyway broach and a 20 ton shop press... |
|
|
|
[#34]
Well, I'm going to ask questions next time I'm out for a bike ride!
 ' '
I will see if I can get some answers on feasibility. I've watched him set up the EDM, it is labor intensive because each part has to be fixtured and the wire run through, but I didn't think the cutting process was that slow. I'll check it out, I'm curious now........ |
|
|
|
[#35]
Quoted:
Well, I'm going to ask questions next time I'm out for a bike ride! '
I will see if I can get some answers on feasibility. I've watched him set up the EDM, it is labor intensive because each part has to be fixtured and the wire run through, but I didn't think the cutting process was that slow. I'll check it out, I'm curious now........ EDM is very precise but compared to other machining methods SLOW. A broach is is actually pretty fast. The tooling is prone to wear, requires significant setup, and expensive for anything large [like bolt raceways]. The press for something that large is a major capital asset. The shop we used years ago ran the machine 3 shifts and 7 days. They closed between Christmas and New Years only. |
|
|
|
[#36]
I think a CNC machine could solve this... Machine the bolt raceway as close to perfect as it can, but redesign everything so a bolt could still fit (even with the small rounded corner). The CNC machine could cut the right profile 2" down (I think that is a fairly realistic depth to machine to) from both ends and then machine the rest through the ejection port as well.
This cuts down on big capital investments and it means even a normal machine shop can create 80% bolt action receivers... Assuming we can find someone who does this and gets the ATF determination letter. |
|
|
|
[#37]
This is going to be BORRRIINNNGGG!!!

I got my boring head today, and been playing around a bit. One thing to note is Carbide doesn't really like interrupted cut so I had to cut REALLY light, in fact I need to back off and true up the hole before increasing the diameter, but otherwise the boring bars can actually make a fairly deep cut. The boring head set comes with several bars, and in varying diameters too so I can bore small holes, or really big ones. I start with the shortest bars I can get away with, and then switch to longer and longer bars as necessary to get the job done. Taking light cuts I can bore it all the way down as much as I need to at least get the bolt hole machined about 2 inches down. I'm not worried about what goes on beyond that, because I'm going to flip it over, machine the same profile, and when the ejection port is machined in, I can connect the dot anyways. A bonus is the boring bar setup is great for doing 0% AR lower and 80% 10/22 barrel hole. You can machine that hole to any precise dimension you want. It's almost like a flycutter, except for holes. |
|
|
|
[#38]
Boring excels at precision round holes.
Raceway slots are not normally round. |
|
|
|
[#39]
I'm not going to use boring head to do raceways. I will use a combination of end mills, drilling really small 1/8" holes, and some file/dremel/elbow grease to get it as close as I can. I'm also going to modify the design of the ejection port so that the port extends below the centerline to the width of the raceway (like Mausers), that way I can mill that portion with end mills. I will probably not cut a magazine cutout and make it signle shot to simplify machining and maintain certain strength.
|
|
|
|
[#40]
Quoted:
I'm not going to use boring head to do raceways. I will use a combination of end mills, drilling really small 1/8" holes, and some file/dremel/elbow grease to get it as close as I can. I'm also going to modify the design of the ejection port so that the port extends below the centerline to the width of the raceway (like Mausers), that way I can mill that portion with end mills. I will probably not cut a magazine cutout and make it signle shot to simplify machining and maintain certain strength. Good luck. Make sure you leave enough metal after drilling for the slop that always occurs in deep hole drilling. Start drills need a decent amount of metal to come even close to straight. A barrel drilling bit excels at drilling deep straight (approximately) holes. It hardly looks like a drill. More like a steel shaft with a groove for lubricant (maybe another larger groove for ship ejection) and a very small pair of Short shallow milling teeth. cutting edges almost perpendicular to the outer diameter of the rod. Steels that do not form chips well are an absolute nightmare. |
|
|
|
[#41]
I never said anything about deep hole drilling. I'm aware of the problem of deep hole drilling. I will drill in about 1 inch into the receiver shoulder with a 1/8" drill bit, then form the raceway about that much in. Then I will machine the ejection port, and machine the second portion of the raceway through the ejection port.
The goal isn't to make a 1/8 MOA rifle, but a shootable rifle. If the raceway has a little bit of slop it's no big deal because it's the shoulder that holds the bolt to the breech anyways. |
|
|
|
[#42]
Quoted:
Actually a rotary table and tailstock can replace lathes if necessary Yeah, but you have to crank the hell out of it, and match your speed with the X axis handle to get those inside threads. Takes a really small right angle head and a 60* included angle mill, too. Very rare. |
|
|
|
[#43]
A serious post.
You're chasing your tail, OP, in too many ways to list. If you do happen to wind up chewing something out, beaver style, that is remotely useful, you'll have 1000s of dollars worth of time in something of less quality than you can buy for 350 bucks. If that's what you want, more power to you. Imho and e, you'd be far better off getting a reciever/bolt/bbl blank and learning how to correctly put them together. There's already plenty of work to be done in that endeavor. 4140 PHT is not hard enough for cartridges like .308 Winchester. You will experience locking lug upset because of lack of surface hardness@ 28-32 Rc. Those wired blanks are a serious bargin. To get anywhere near decent accuracy and parallelism over that distance, they have at least one if not two skim cuts and yes, it's very slow. I'm frankly surprised they are that cheap. I'd lay dollars to donuts they are running them in downtime just to have something across the machines instead of nothing. Here is the style of broach used for lug raceways. They're not hobbed with single point broaches like gears or how we broach stuff in a mill. 
Not trying to be an ass or burst your bubble. I do this for a living. |
|
|
|
[#44]
What is that thing, is it a broach that commercial manufacturers use to broach receivers? Why the mysticism over what's acceptable for a bolt action rifle like it's some kind of a unobtainium for someone to make it themselves? My time ain't worth much after work so I really don't care about spending 100 hours machining something anyways, as long as it doesn't replace my day job (it won't).
The steel blank I am machining now has been hardness tested to about 40rc. Given how hard it has been on my tooling and the number of broken boring bars I have now, I believe it. It's not impossible to machine by any means but it just means I need to take it slower. I would not use HSS on this piece of steel unless it was under ideal conditions. I have purchased Gary's blank by the way but I elected to continue this experiment to see if it can be done. From studying the JPFO file it seems like you don't have to use extremely expensive machines if you have the right methods and are willing to accept some things... By the way that file suggested using keyway broach for the work. So what if the raceway isn't as tight as it needs to be? It's out of the equation once the bolt's closed anyways. Guns are simple machines but sometimes Gunsmiths complicate the heck out of it. I've said it a million times, the goal is to create a shootable rifle, not a 1/8 MOA precision machine. Besides it's prudent to test concepts on a 11 dollar piece of steel rather than ruin a blank I spent 250 dollars on. |
|
|
|
[#45]
Quoted:
4140 PHT is not hard enough for cartridges like .308 Winchester. You will experience locking lug upset because of lack of surface hardness@ 28-32 Rc. . What steel would you recommend? What's available for the hobbyist that would suffer a .308 or .300 win mag? I have a .300 ultra mag barrel that is purposed for a tube gun build along the lines of the Bill Holmes .50 . What steels should I be looking at if not 4140 PH? |
|
|
|
[#46]
According to all the google searches I can muster 4140 PH is good enough. The JPFO file says it's ok, and I suspect that all commercial actions are made of that material. Heck barrels are made of 4140 PH so why wouldn't it work??
If you think it's not enough then overbuild the action to compensate... make the lug bigger, make the receiver ring bigger, and make the area behind the lugs longer. It would probably result in a more accurate action at that too. Proof test it and then measure for any lug setback, cracks, etc. if you really feel insecure about it. The other option is 17-4 PH Stainless steel H1025. That's what Gary uses, and I think it machines similar to 4140PH and in fact probably behaves like 4140PH. On my mini mill I really have to take light cuts but after learning how the boring bars react to 4140PH I can make it work as long as I work within the limitation of the machine. If I truly succeed in this then I will have proven to you that you do not need a huge machine shop to make receivers, and that would make the G0704 mill that much more useful. By the way you really don't want the receiver to be harder than about 40RC anyways because the harder steel is, the more brittle it becomes. Yield strength is more important here (you could purposely work harden the shoulder if wear resistance is a concern) |
|
|
|
[#47]
I don't want to get into a pissin' contest. I offered advice based on 30 years in and 24 years owning a machine shop that does prototype, special machine parts of all varieties.Getting that out of the way,
Your steel is out of spec if it's 40 Rc. "4140 is an alloy steel that is supplied in either the annealed or prehardened condition. The prehardened condition is heat treated to a medium hardness (HRC 28/32) and is designated as 4140 HT." M14 receivers were 8620 carb and hard which gives the best of both worlds. A tough core and hard surface. Remington 700s I've seen tested run in the 36-40 range, so if your piece tested at 40 you should be gtg as far as deformation of the lugs and strength go. Not so much on ease of machining. 4140 is relatively stable but not perfect, hence the aftermarket of "blueprinting" 700 receivers which involves truing of important surfaces. (some go so far as to true the through diameter and grind a custom bolt body. Bolts tend to run a bit harder at 39-42. You don't want same hardness materials bearing together, as a general rule. Barrels are made of different materials. Some are indeed 4140HT. Military uses 4150 HT. Some of the other barrels I've cut are noticeably harder than the 28-32 Rc. Some are softer. As far as your machine goes, you will find that getting a non tapered hole is a challenge. The reason is rigidity. As your quill extends, the amount of engagement surface between the quill and the machine will decline and the clearance between them will be exacerbated. The same thing happens on full size knee mills, just to a lesser extent. Broaching will display a even more noticeable effect. Your tool, quill, head will all deflect as you attempt to broach. You may get away with milling the vast majority of the stock out, graduating down to smaller endmills to get into the corners and finish as much of the side surfaces as possible, only leaving the corners. An alternative is to have radii on the corners of your bolt lugs and eliminate broaching altogether. So you know I'm not blowing smoke: I've done some broaching here and there. 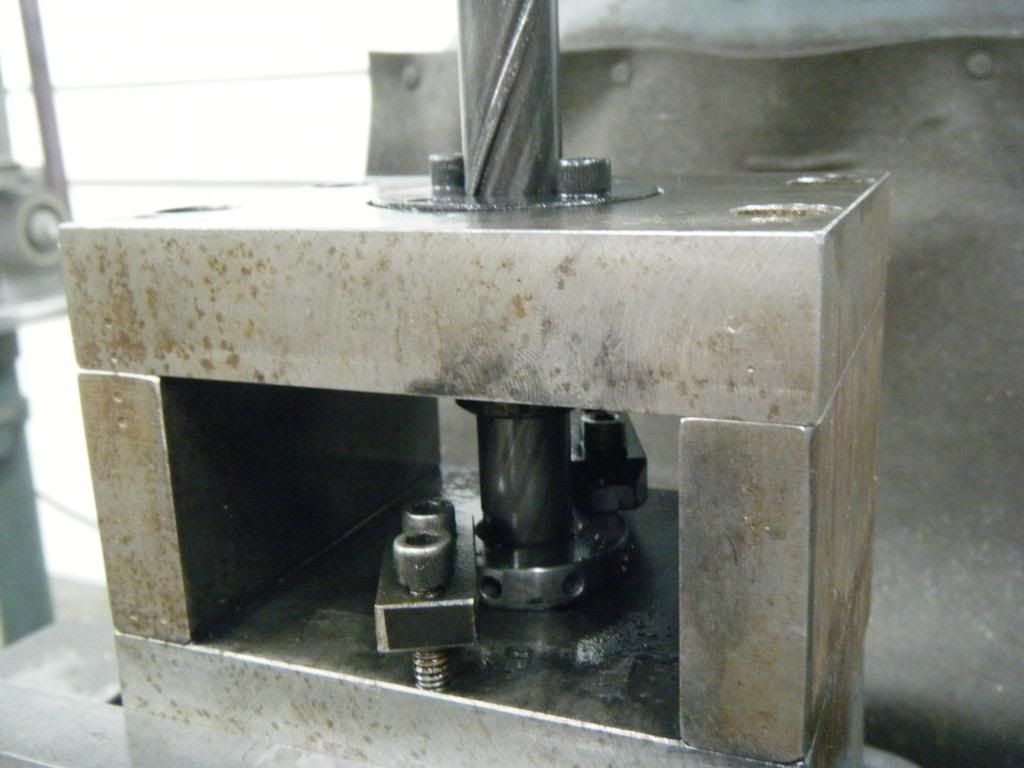 " /> " />
 " /> " />
The helical key guide on the broach shaft was relief cut in an index fixture, manually. Move a degree, move over the right amount for the lead, and plunge to depth, over and over...both sides. Then relieve everything else to diameter. 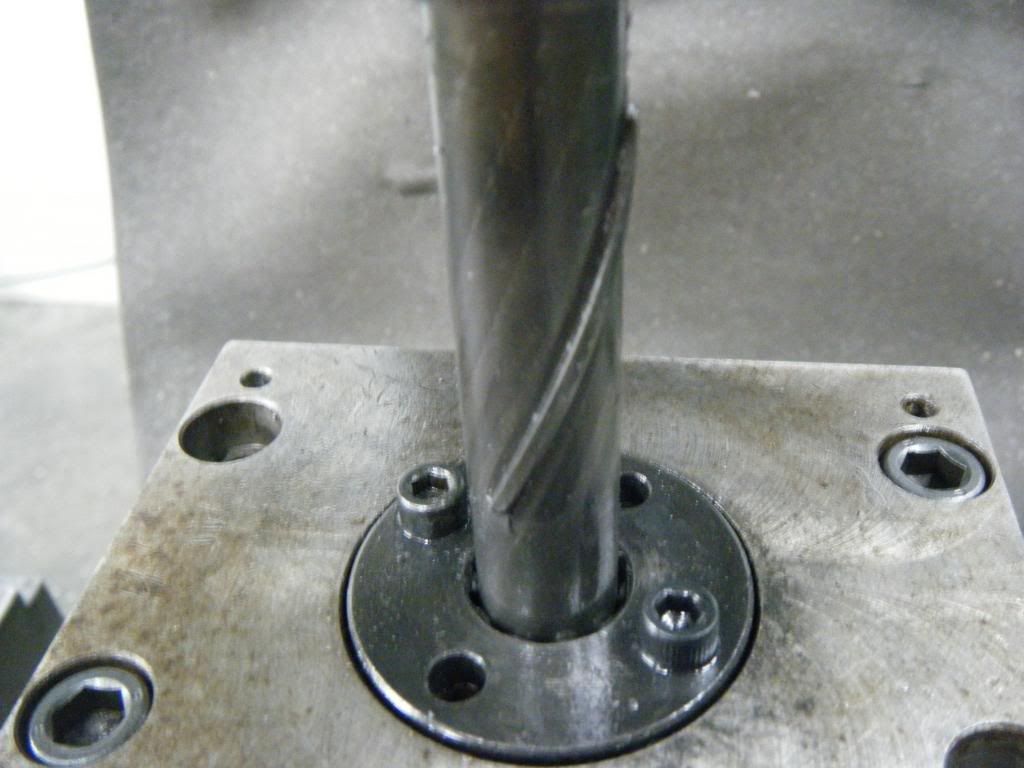 " /> " />
|
|
|
|
[#48]
Quoted:
This is going to be BORRRIINNNGGG!!! <a href="http://s107.photobucket.com/user/rahimiiii/media/001_zpsygcvizl1.jpg.html" target="_blank">http://i107.photobucket.com/albums/m320/rahimiiii/001_zpsygcvizl1.jpg</a> I got my boring head today, and been playing around a bit. One thing to note is Carbide doesn't really like interrupted cut so I had to cut REALLY light, in fact I need to back off and true up the hole before increasing the diameter, but otherwise the boring bars can actually make a fairly deep cut. The boring head set comes with several bars, and in varying diameters too so I can bore small holes, or really big ones. I start with the shortest bars I can get away with, and then switch to longer and longer bars as necessary to get the job done. Taking light cuts I can bore it all the way down as much as I need to at least get the bolt hole machined about 2 inches down. I'm not worried about what goes on beyond that, because I'm going to flip it over, machine the same profile, and when the ejection port is machined in, I can connect the dot anyways. A bonus is the boring bar setup is great for doing 0% AR lower and 80% 10/22 barrel hole. You can machine that hole to any precise dimension you want. It's almost like a flycutter, except for holes. I meant to mention that you'll use less horsepower if your boring bar face is parallel with the ways of your boring head. i.e. cutting face should be parallel to radius or just a smidge positive rake. I know hardened steels call for negative rake but that is for sturdy machines taking larger cuts. With the small cuts and fine feeds you're using, a neutral or minor positive rake will yield better results. Less deflection and truer hole. |
|
|
|
[#49]

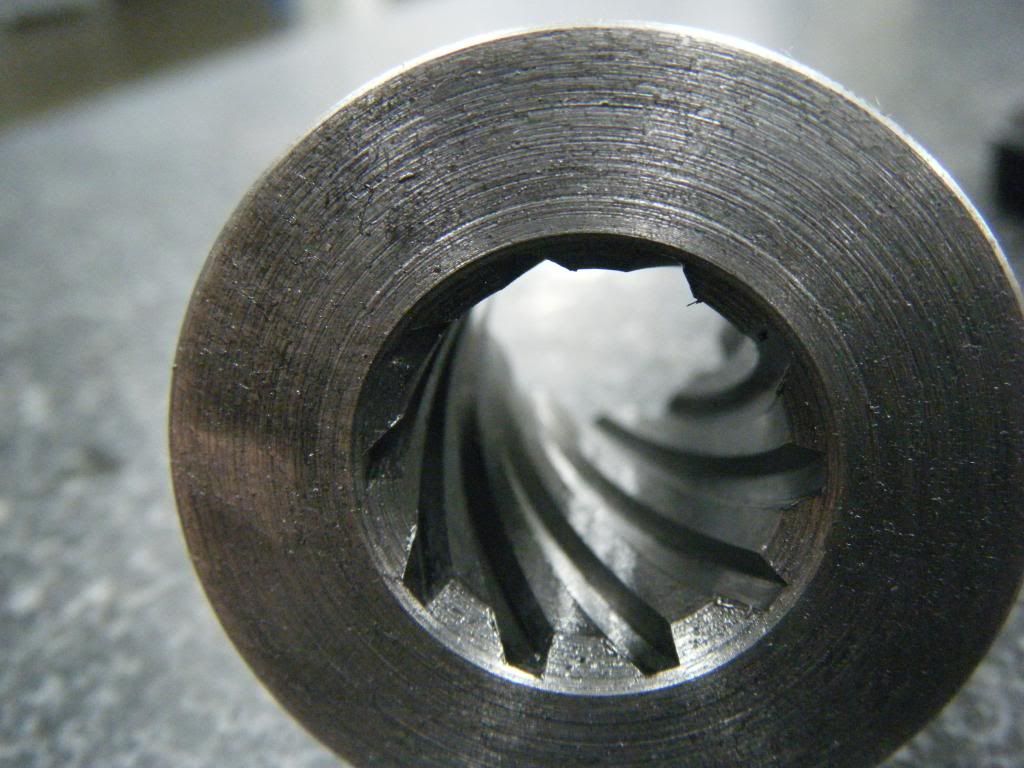
I got the bolt bore a smidge under .700 and begun boring the barrel shank. Now I do move the table from the cutter from time to time so I can clear the swarf, but since I have DRO I can re-position them with perfect accuracy. The barrel shank is being bored down to a depth of 1.15" with a diameter of 1". I bore them in .01" increments so I don't overload and break the cutter... I do wish the cutter is ground with a less aggressive angle though so I don't break them so easily. |
|
|
|
[#50]
There's no way they should be breaking, especially with that light a cut.
You can change the angle by rotating the bar in the head. It still appears that you have the bar rotated too far ccw (looking down from the top) creating a negative rake and vastly increasing tool pressure. Having trouble finding a decent stock diagram. Here's a pic. Notice the face of the cutter is slightly positively raked. 
|
|
|
 Win a FREE Membership!
Sign up for the ARFCOM weekly newsletter and be entered to win a free ARFCOM membership. One new winner* is announced every week!
You will receive an email every Friday morning featuring the latest chatter from the hottest topics, breaking news surrounding legislation, as well as exclusive deals only available to ARFCOM email subscribers.

AR15.COM is the world's largest firearm community and is a gathering place for firearm enthusiasts of all types.
From hunters and military members, to competition shooters and general firearm enthusiasts, we welcome anyone who values and respects the way of the firearm.

Subscribe to our monthly Newsletter to receive firearm news, product discounts from your favorite Industry Partners, and more.
Copyright © 1996-2024 AR15.COM LLC. All Rights Reserved.
Any use of this content without express written consent is prohibited.
AR15.Com reserves the right to overwrite or replace any affiliate, commercial, or monetizable links, posted by users, with our own.


