|
[#1]
It is doubtful the barrel is loctited on. But if it were, a heat gun will be safer to use than anything with an open flame.
|
|
|
|
[#2]
Reveiver wrench and a barrel vise.
A Winchester Mod 70 receiver wrench should fit the FN SPR action. |
|
|
|
[#3]
Quoted:
It is doubtful the barrel is loctited on. But if it were, a heat gun will be safer to use than anything with an open flame. All the Loctite compounds will break down at 450 degrees or less. |
|
|
|
[#4]
is there any standard for right or left threading? no threads are exposed so I am unsure.
I have vise blocks for the barrel and an action wrench will soon be on its way. Thanks |
|
|
|
[#5]
Quoted:
is there any standard for right or left threading? no threads are exposed so I am unsure. I have vise blocks for the barrel and an action wrench will soon be on its way. Thanks No. |
|
|
|
[#6]
Headspace gages?
Instead of screwing around trying to work through the headstock, put the barreled action into a dog and the steady rest, line 'er up, and thread the barrel. How long is the headstock on this lathe that the action doesn't stick completely out the back side? |
|
|
|
[#7]
Some are interference fits that deform the threads to lock them tight.
Used a longer cheater bar. |
|
|
|
[#8]
Quoted:
Headspace gages? Instead of screwing around trying to work through the headstock, put the barreled action into a dog and the steady rest, line 'er up, and thread the barrel. How long is the headstock on this lathe that the action doesn't stick completely out the back side? From what I have gathered, if I put the same barrel back into the same receiver (making sure to line up the index marks), then headspacing won't change. Is this not correct? As to the dog and steady rest, I don't trust myself using a steady rest enough yet and don't have all the tooling for the lathe to set up that type of job just yet. I am fairly mechanically inclined and like to do my own work where I can, that being said I'm not a machinist and what I have learned has been self taught. My thinking is I can take the receiver off the barrel easy enough and do the threading ( I have already done some barrel threading and made a form1 can). If I can't manage to get the receiver off, I'll likely just send it off to ADCO, but I'd like to give it a try before I go that route. My headstock with the chuck in place is 1.5" throughbore around 24" long. Barrel on the SPR is 20" I believe, it doesn't even make it out without the chuck mounted |
|
|
|
[#9]
From what I have gathered, if I put the same barrel back into the same receiver (making sure to line up the index marks) Getting it to this position can be anything from not bad to nearly impossible. Many guns have hard interference fits, especially military actions. Some are so tight they cannot be released without turning a clear section in the barrel right against the receiver. |
|
|
|
[#10]
4 jaw chuck?
|
|
|
|
[#11]
Quoted:
4 jaw chuck? yes |
|
|
|
[#12]
Quoted:
From what I have gathered, if I put the same barrel back into the same receiver (making sure to line up the index marks), then headspacing won't change. Is this not correct? As to the dog and steady rest, I don't trust myself using a steady rest enough yet and don't have all the tooling for the lathe to set up that type of job just yet. I am fairly mechanically inclined and like to do my own work where I can, that being said I'm not a machinist and what I have learned has been self taught. My thinking is I can take the receiver off the barrel easy enough and do the threading ( I have already done some barrel threading and made a form1 can). If I can't manage to get the receiver off, I'll likely just send it off to ADCO, but I'd like to give it a try before I go that route. My headstock with the chuck in place is 1.5" throughbore around 24" long. Barrel on the SPR is 20" I believe, it doesn't even make it out without the chuck mounted Quoted:
Quoted:
Headspace gages? Instead of screwing around trying to work through the headstock, put the barreled action into a dog and the steady rest, line 'er up, and thread the barrel. How long is the headstock on this lathe that the action doesn't stick completely out the back side? From what I have gathered, if I put the same barrel back into the same receiver (making sure to line up the index marks), then headspacing won't change. Is this not correct? As to the dog and steady rest, I don't trust myself using a steady rest enough yet and don't have all the tooling for the lathe to set up that type of job just yet. I am fairly mechanically inclined and like to do my own work where I can, that being said I'm not a machinist and what I have learned has been self taught. My thinking is I can take the receiver off the barrel easy enough and do the threading ( I have already done some barrel threading and made a form1 can). If I can't manage to get the receiver off, I'll likely just send it off to ADCO, but I'd like to give it a try before I go that route. My headstock with the chuck in place is 1.5" throughbore around 24" long. Barrel on the SPR is 20" I believe, it doesn't even make it out without the chuck mounted Be sure to add index marks on the barrel and receiver. You may need a monster vise and wrench to get the barrel loose, but it will come off. A FN or Winchester receiver has right hand threads. That is a long head stock. You can shorten the effective length by replacing the chuck with a dedicated spider. You ought to install a support inside the spindle on the out board end with the chuck, too, in order to get the working end aligned, and you'll need one with a spider in any case. I don't understand why you think you don't have the tools to set the job up in a steady rest, they're the same as working in the headstock. Unless you're trusting the bore in the barrel to be in the center of the barrel and parallel to the spindle bearings. |
|
|
|
[#13]
Quoted:
Be sure to add index marks on the barrel and receiver. You may need a monster vise and wrench to get the barrel loose, but it will come off. A FN or Winchester receiver has right hand threads. That is a long head stock. You can shorten the effective length by replacing the chuck with a dedicated spider. You ought to install a support inside the spindle on the out board end with the chuck, too, in order to get the working end aligned, and you'll need one with a spider in any case. I don't understand why you think you don't have the tools to set the job up in a steady rest, they're the same as working in the headstock. Unless you're trusting the bore in the barrel to be in the center of the barrel and parallel to the spindle bearings. Quoted:
Quoted:
Quoted:
Headspace gages? Instead of screwing around trying to work through the headstock, put the barreled action into a dog and the steady rest, line 'er up, and thread the barrel. How long is the headstock on this lathe that the action doesn't stick completely out the back side? From what I have gathered, if I put the same barrel back into the same receiver (making sure to line up the index marks), then headspacing won't change. Is this not correct? As to the dog and steady rest, I don't trust myself using a steady rest enough yet and don't have all the tooling for the lathe to set up that type of job just yet. I am fairly mechanically inclined and like to do my own work where I can, that being said I'm not a machinist and what I have learned has been self taught. My thinking is I can take the receiver off the barrel easy enough and do the threading ( I have already done some barrel threading and made a form1 can). If I can't manage to get the receiver off, I'll likely just send it off to ADCO, but I'd like to give it a try before I go that route. My headstock with the chuck in place is 1.5" throughbore around 24" long. Barrel on the SPR is 20" I believe, it doesn't even make it out without the chuck mounted Be sure to add index marks on the barrel and receiver. You may need a monster vise and wrench to get the barrel loose, but it will come off. A FN or Winchester receiver has right hand threads. That is a long head stock. You can shorten the effective length by replacing the chuck with a dedicated spider. You ought to install a support inside the spindle on the out board end with the chuck, too, in order to get the working end aligned, and you'll need one with a spider in any case. I don't understand why you think you don't have the tools to set the job up in a steady rest, they're the same as working in the headstock. Unless you're trusting the bore in the barrel to be in the center of the barrel and parallel to the spindle bearings. Even with the chuck removed it doesn't exit the spindle unfortunately. As far as supporting the other end, the couple I have done so far I used shims to keep the end supported inside the headstock. Not as precise as a cat's paw but it got the job done successfully. As far as not having all the tooling, I do have a steady rest, but I would have to use the four jaw on the receiver and wouldn't have anything to index for zero other than the outside of the barrel. Then dialing in the steady rest is its own, how shall we say ..., experience! Mainly I don't have enough confidence in my experience with that type of setup yet to try it with a higher value firearm. |
|
|
|
[#14]
I would not remove the barrel from the receiver, since this will end with you having to reset the head space when you reinstall the barrel to the receiver.
Instead set screw type receiver receiver mandrel in the receiver (inside the receiver) with Dog leg to drive it, live end on the muzzle, and thread the barrel. Hence, Indicate off the barrel just in front of the receiver to set the 4 jaw chuck so the receiver side is running true, and if you have trued the end stock ,then the bore muzzle should be running true with the live end. Using the live end, thread the barrel as needed, Now thread on a extra over size muzzle thread protector that is just short of the end of barrel, put the live center back in the bore, take a pass on the thread protector to make sure it's OD is true with the bore on the live end, install the steady rest to the outside of the trued thread protector, back the live end away, take a quick check with a indicator to make sure that the muzzle is running true, and take a light pass on the crown to clean up the end of bore distortion caused by the live end when you where threading. Done this way, you are done in mins, verse having to pull the barrel and dealing with head space when you put the barrel back on. |
|
|
|
[#15]
Quoted:
I would not remove the barrel from the receiver, since this will end with you having to reset the head space when you reinstall the barrel to the receiver. Instead set screw type receiver receiver mandrel in the receiver (inside the receiver) with Dog leg to drive it, live end on the muzzle, and thread the barrel. Hence, Indicate off the barrel just in front of the receiver to set the 4 jaw chuck so the receiver side is running true, and if you have trued the end stock ,then the bore muzzle should be running true with the live end. Using the live end, thread the barrel as needed, Now thread on a extra over size muzzle thread protector that is just short of the end of barrel, put the live center back in the bore, take a pass on the thread protector to make sure it's OD is true with the bore on the live end, install the steady rest to the outside of the trued thread protector, back the live end away, take a quick check with a indicator to make sure that the muzzle is running true, and take a light pass on the crown to clean up the end of bore distortion caused by the live end when you where threading. Done this way, you are done in mins, verse having to pull the barrel and dealing with head space when you put the barrel back on. Interesting, part of not having the tooling I mentioned, was I don't have any mandrels of any kind or any dogs. But I could set up something similar with a lathe bar and the four jaw chuck. If I bolt the receiver to the bar, shimming if needed to true, this operation would still work correct? |
|
|
|
[#16]
Unless you have a 3-phase lathe (with a way overpowered motor) you should be able to develop far more torque manually than under power.
Make a steel barrel block that is exactly the barrel diameter before slotting. You should only need one slot to 'spring' it enough to slide on. Use fine larger mechanical threads (hardened if you can) for the clamp. Tighten a high grade bolt (8 would be good). If the clamp is large enough use two bolts. Use the largest pipe wrench you can lay your hands on to grab the block. Have another person hold wrench while you use an action wrench in the receiver lugs. Slide a section of steel pipe on the action wrench. If you have to, put multiple people on the pipe wench. I have been known to use a hydraulic jack against the weight of a house to hold the wrench in place. |
|
|
|
[#17]
Quoted:
Interesting, part of not having the tooling I mentioned, was I don't have any mandrels of any kind or any dogs. But I could set up something similar with a lathe bar and the four jaw chuck. If I bolt the receiver to the bar, shimming if needed to true, this operation would still work correct? Yes, you can make a mandrel out of a piece of bar stock, and some square stock bolted to the sides of the turned down round stock to fit the receiver lugs channels. Not only will this come in handy to thread the barrel now, but to go back in and clean up the crown down the road as well. Note: 11* crown cutter comes in handy, but not needed since you can cut the needed crown angle with a HHS single cutter instead. Work from the bore outwards on the cut with the compound slide, not from the OD inward to the bore. This will leave the end of cut bur on the outside of the barrel at the start of the threads, and it will be cleaned off when you make the end of threads cut for the taper into the threads. Also, not a fan of making the chamfer cut to the bore after the 11* cut (or even going back in with a brass taper to chamfer the edge) , but leaving it sharp'ish instead after the crown polishing that will slightly break the edge. The reason for this, just too easy to go back later to clean up the crown every 700 rounds or so, plus I don't buck wild scrubbing the hell out of barrel during cleaning to screw up the edge, but use Sweets that will removed the copper without having the jack the shit out of the crown/rifling by over scrubbing back and forth instead (read brush from chamber to muzzle, and pull off the brush instead of yanking it back down to the chamber instead). https://www.youtube.com/watch?v=HJyNiQax4eQ |
|
|
|
[#18]
Quoted:
Unless you have a 3-phase lathe (with a way overpowered motor) you should be able to develop far more torque manually than under power. Make a steel barrel block that is exactly the barrel diameter before slotting. You should only need one slot to 'spring' it enough to slide on. Use fine larger mechanical threads (hardened if you can) for the clamp. Tighten a high grade bolt (8 would be good). If the clamp is large enough use two bolts. Use the largest pipe wrench you can lay your hands on to grab the block. Have another person hold wrench while you use an action wrench in the receiver lugs. Slide a section of steel pipe on the action wrench. If you have to, put multiple people on the pipe wench. I have been known to use a hydraulic jack against the weight of a house to hold the wrench in place. 3hp 3phase, shit tons of torque in low gear |
|
|
|
[#19]
Quoted:
Yes, you can make a mandrel out of a piece of bar stock, and some square stock bolted to the sides of the turned down round stock to fit the receiver lugs channels. Not only will this come in handy to thread the barrel now, but to go back in and clean up the crown down the road as well. Note: 11* crown cutter comes in handy, but not needed since you can cut the needed crown angle with a HHS single cutter instead. Work from the bore outwards on the cut with the compound slide, not from the OD inward to the bore. This will leave the end of cut bur on the outside of the barrel at the start of the threads, and it will be cleaned off when you make the end of threads cut for the taper into the threads. Also, not a fan of making the chamfer cut to the bore after the 11* cut (or even going back in with a brass taper to chamfer the edge) , but leaving it sharp'ish instead after the crown polishing that will slightly break the edge. The reason for this, just too easy to go back later to clean up the crown every 700 rounds or so, plus I don't buck wild scrubbing the hell out of barrel during cleaning to screw up the edge, but use Sweets that will removed the copper without having the jack the shit out of the crown/rifling by over scrubbing back and forth instead (read brush from chamber to muzzle, and pull off the brush instead of yanking it back down to the chamber instead). https://www.youtube.com/watch?v=HJyNiQax4eQ Quoted:
Quoted:
Interesting, part of not having the tooling I mentioned, was I don't have any mandrels of any kind or any dogs. But I could set up something similar with a lathe bar and the four jaw chuck. If I bolt the receiver to the bar, shimming if needed to true, this operation would still work correct? Yes, you can make a mandrel out of a piece of bar stock, and some square stock bolted to the sides of the turned down round stock to fit the receiver lugs channels. Not only will this come in handy to thread the barrel now, but to go back in and clean up the crown down the road as well. Note: 11* crown cutter comes in handy, but not needed since you can cut the needed crown angle with a HHS single cutter instead. Work from the bore outwards on the cut with the compound slide, not from the OD inward to the bore. This will leave the end of cut bur on the outside of the barrel at the start of the threads, and it will be cleaned off when you make the end of threads cut for the taper into the threads. Also, not a fan of making the chamfer cut to the bore after the 11* cut (or even going back in with a brass taper to chamfer the edge) , but leaving it sharp'ish instead after the crown polishing that will slightly break the edge. The reason for this, just too easy to go back later to clean up the crown every 700 rounds or so, plus I don't buck wild scrubbing the hell out of barrel during cleaning to screw up the edge, but use Sweets that will removed the copper without having the jack the shit out of the crown/rifling by over scrubbing back and forth instead (read brush from chamber to muzzle, and pull off the brush instead of yanking it back down to the chamber instead). https://www.youtube.com/watch?v=HJyNiQax4eQ Thanks, I'm going to have to check that out! |
|
|
|
[#20]
Ok, first off I want to thank Aero and Dano, you guys convinced me to go ahead and try doing this "across centers" if you will. I am excited over the challenge and figured I'd share my documentation along the way.
First I zeroed and turned down a chunk of stainless rod for a mandrel. 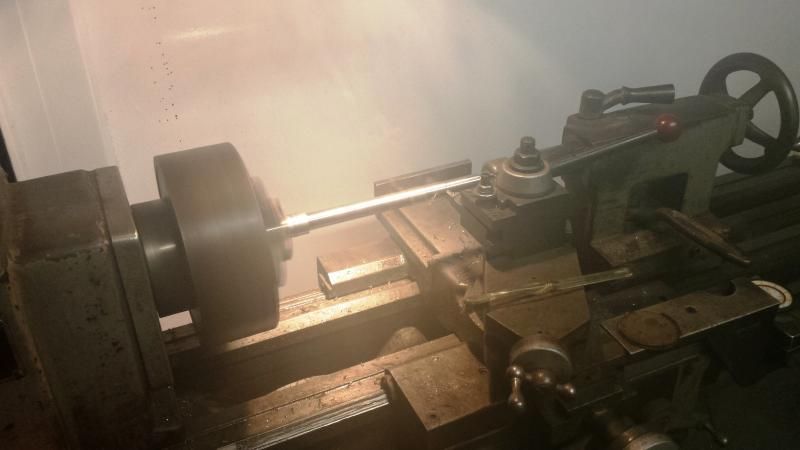
Barreled action mounted on mandrel with live center 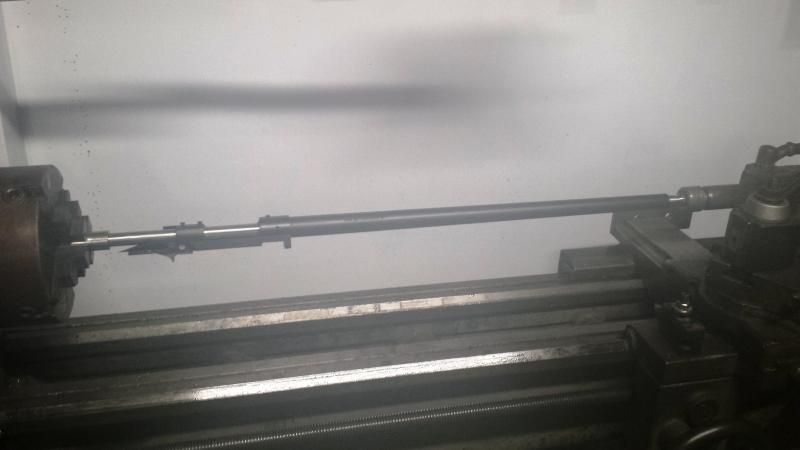
Close up of receiver, I used the screws for the scope ring base to help hold the action to the mandrel 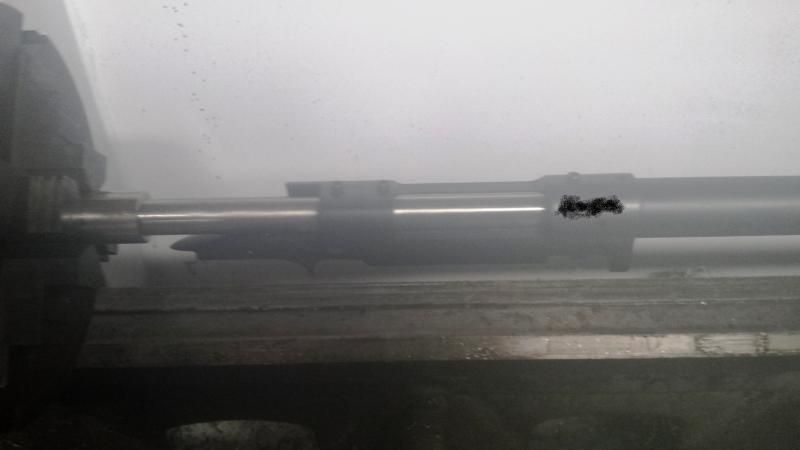
Turned down the end and ready to thread 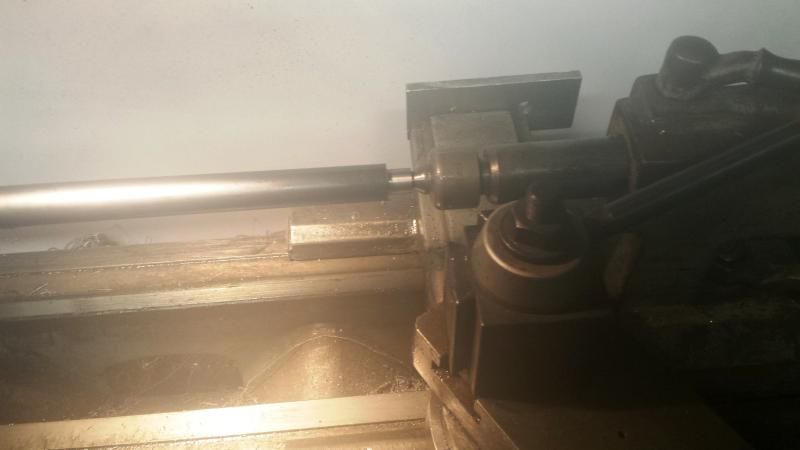
Now I ran into a slight problem. My threading tool is too large to fit between the live center and the end of the barrel. So waiting on new micro thread tool that will fit in the space available. 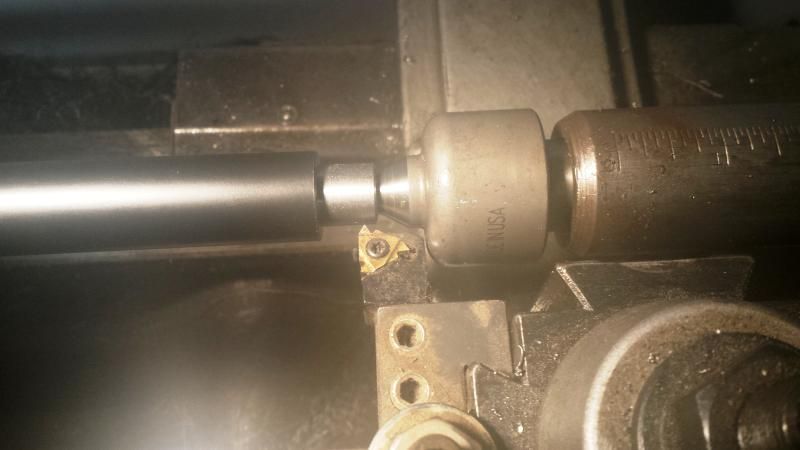
So let me have it! How am I doing? Any advice or critiques welcome. |
|
|
|
[#21]
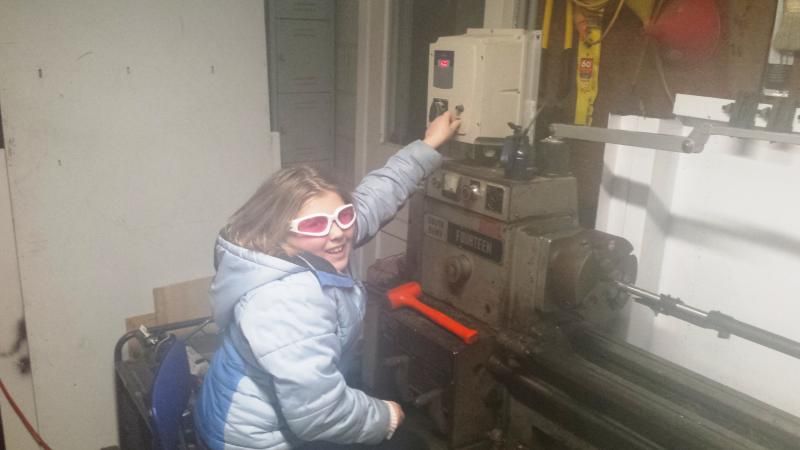
Oh yeah, I almost forgot a shout out to my very helpful apprentice! My daughter loves helping her Daddy!!
|
|
|
|
[#22]
Quoted:
So let me have it! How am I doing? Any advice or critiques welcome. Before you start to thread, make sure to square the barrel shoulder (barrel shoulder cut looks concave now) and make your end of threads relief cut just before the shoulder for threading. This gives you a clean area to kick out with the tool no longer making contact to the steel after each threading pass. 
As for the only other thing I can think up, have you already make a threaded slave sleeve for the crown refacing using a steady rest. I ask since once you get the receiver/barrel trued up in the lathe, the last thing you want to have to do is pull it and re-chuck it again. Also not sure you caught in the video I linked, but once you have the slave sleeve threaded on the barrel tight against the barrel shoulder, make a small cut pass across the sleeve OD to true it's OD to the bore, (before installing the steady rest to the slave sleeve for crowning). P.S, Good deal on putting the kid to work helping you now. Give her a few years, and will be able to hand the entire project off to her while sit back in the rocking chair sipping your drink instead. |
|
|
|
[#23]
yep, definitely going to square the shoulder and cut the thread relief next. Just happened to see the thread tool wasn't going to fit and it was time to stop for the night, so I snapped a quick pic and left it sit.
As to the threaded sleeve, I have not made one yet. I could always single point it, but I don't like single pointing internal threads without a go/no go gage. My plan was to just drill and tap a piece of stock on the mill. Then I would use that for a go/no go gage for the barrel threads before using it for the steady rest sleeve. I also figured if I needed to, I could pop the 4 jaw off and use the 3 jaw to make up the sleeve. I have the chucks marked so they get mounted the same way everytime. Not ideal, but the repeatability has been very good doing this in the past |
|
|
|
[#24]
Now it's time to put the barrel into the steady rest for threading so the tail stock can be pulled out of the way. I would recut the crown to insure is't square to the bore before threading.
My receiver mandrel has a hole drilled and tapped for a clamp screw with a thick washer to clamp against the action rails. Looks like scope screws work, too. |
|
|
|
[#25]
You have gotten some great guidance here.
I will frequently thread barreled actions in a similar way, chuck the the reciever but instead of running my live center directly on the crown I will turn a bore sized spud out of aluminum or brass. Turn a 2-3 inch section that is a tight slip fit in your bore with a shoulder for the muzzle to register on that is an inch or so long and center drill. For 5/8 diameter threads I turn the shoulder a fat 9/16 or so diameter. Slip that spud in your bore and run the live center in the center drilled end of the spud. That way you aren't putting a hardened live center into fairly soft barrel steel crown, saves you from recrowning it too. Plus it solves your threading tool dilemma, you will now have enough clearance to get your tool in there. The only issue is you need to mind your speed and feed, with the length of the barrel you can get vibration. |
|
|
|
[#26]
Quoted:
Now it's time to put the barrel into the steady rest for threading so the tail stock can be pulled out of the way. I would recut the crown to insure is't square to the bore before threading.. Not really needed (and kind of late for this check if the areas of the barrel has been final passed to start threading), since the Live end has already bruised/flared the crown/rifling edges to center the live end in the bore as he was making the OD cuts to begin with; unless the crown was a disaster to begin with, and the live end had no chance of centering in the bore rifling to begin with (no way to get around this, since the side cuts puts pressure of rifling to the live end, and the reason that you always have to clean up the crown afterwards). As for using a softer live end piece, then the live end distorts, and the OD is not longer running true to the bore instead. If such needs to be checked now (shouldn't since FN is very good with crowning their bolt action barrels), then back out the live end, prussian blue the end of the crown where the live end makes contact to the crown rifling, reset the live end to the crown, turn the lathe on, and run it for a min or two, then back out the live end and take a look at the contract ring of the live end to crown rifling. If it's a mess/ live end did not centered to the bore, then the section that you just turned will need to be removed, and start fresh again. Here, start off by just taking a few passes on the end of barrel to get it's OD squared for the new threaded section (left way over size for threading), switch over to the steady rest on the the new square over sized turned section for the new thread area, remove the section of barrel you turned down before for the old threading that is not true to the bore since the crown was screwed from the start, then start making ID to OD passes at what every angle you are going to set the crown face to; to get the end of rifling clean edged to the end of the bore. Once you have the end of rifling clean so the live end will embed cleanly, you can go back to the orignal game plan start point again. Note here, even the best machinist will have around .0005" of run out/off axis (or more) from the bore to OD on threading, even with the barrel chucked in the lathe bore and only sticking out the needed amount for threading. This is due to the work piece not being completely perfect in the machine during set up and running true to begin with on both x and z on the machine (lot has to do with the machine,indicator and set up of it, plus how straight the bore is from the chuck to spider), plus the heat generated/light flex when machining the metal as well. Really, since this is a FN bolt action barrel and banking that the crown was clean to begin with/live end embedded cleanly to the bore), all crazyelece has to remember, when he is squaring the shoulder now to start threading the barrel section that he already turned down, take in account the amount that you will be setting back the end of barrel to clean up the live end damage to get you back to clean rifling with the steady rest and thread sleeve for the final crowning, and add that in to the math of the distance back for the shoulder So the math back to the square barrel shoulder with threading relief cut should be depth that the barrel will thread into the suppressor/adapter for a full imbed (minus maybe .100), then the amount that will be first facing the crown back to get clean undamaged rifling to re-crown in the end. Also to point out I don't see your math/lay out sheet anywhere in the photo's, and it should be pinned somewhere in front of you as you are working so you can always glance at it to stay on the correct path for all your cuts. Hence even when working with DRO's that I pre-set off my cut work sheets, I still keep my original cut sheet in eye sight in front of me as I am machining, so I can double check the DRO move distances back to the sheet. It too easy to screw up the numbers in your original work sheets, or even punch in the wrong move coordinates/tool sizes in the DRO, and with your work sheet in front of you, can catch the problem a lot faster to maybe save the work piece, then after you have made a bunch of cuts and not only destroyed the work piece, but wasted a lot of time of cuts after the piece as destroyed as well. Plus saves you from having extra lumps of your head at the end of day, if you just happen to be learning how to machine in a shop that every time you screw up, someone chucks a dead blow mallet at your head. 
|
|
|
|
[#27]
The steady rest is going to be needed to clear the threading tool. There might be clearance in there to get a HS steel tool in to cut the threads with the muzzle in the center.
|
|
|
|
[#28]
Quoted:
My receiver mandrel has a hole drilled and tapped for a clamp screw with a thick washer to clamp against the action rails. Looks like scope screws work, too. After mounting the barreled action, I have marked the mandrel where the bolt locks up and will be drilling and tapping later for a cap screw. That way the action will slip on and twist into position locking onto the cap screw like the bolt locking closed. With the direction the lathe turns, this should prevent any slip combined with the rail bolts as set screws. I didn't want to remove the mandrel here but figured it would be a nice addition for any future use. |
|
|
|
[#29]
Quoted:
Also to point out I don't see your math/lay out sheet anywhere in the photo's, and it should be pinned somewhere in front of you as you are working so you can always glance at it to stay on the correct path for all your cuts. Hence even when working with DRO's that I pre-set off my cut work sheets, I still keep my original cut sheet in eye sight in front of me as I am machining, so I can double check the DRO move distances back to the sheet. It too easy to screw up the numbers in your original work sheets, or even punch in the wrong move coordinates/tool sizes in the DRO, and with your work sheet in front of you, can catch the problem a lot faster to maybe save the work piece, then after you have made a bunch of cuts and not only destroyed the work piece, but wasted a lot of time of cuts after the piece as destroyed as well. Plus saves you from having extra lumps of your head at the end of day, if you just happen to be learning how to machine in a shop that every time you screw up, someone chucks a dead blow mallet at your head.
Good point usually I have a sketch with needed dimensions and any math to go with it stuck to the splash guard with a magnet. Most of these shots were taken before starting or after finishing. I find the cheat sheet especially helpful for threading. |
|
|
|
[#30]
Quoted:
The steady rest is going to be needed to clear the threading tool. There might be clearance in there to get a HS steel tool in to cut the threads with the muzzle in the center. Problem I see is the insert holder he is using. It might be fine for larger pieces where he has plenty of space to work with, but not in this case. Might be better off with one of the Mesa threading tools instead if he is looking for something that is index-able for tight space work and store bought. http://www.mesatool.com/products/threading-tools/

|
|
|
|
[#31]
that's a nice looking threading tool, not too pricey either. Picked one of those up to try out as well. You can never have too many tools!!
|
|
|
|
[#32]
Ok, got the job finished up so I thought I'd add a few more photos. Now if the rain ever stops I can put some rounds through it!
New thread tool fit great 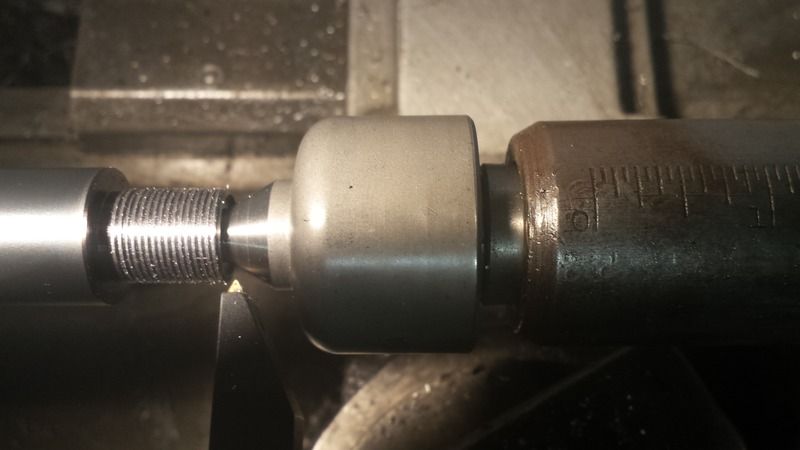
Picked up a nice thread protector to use as a thread gauge 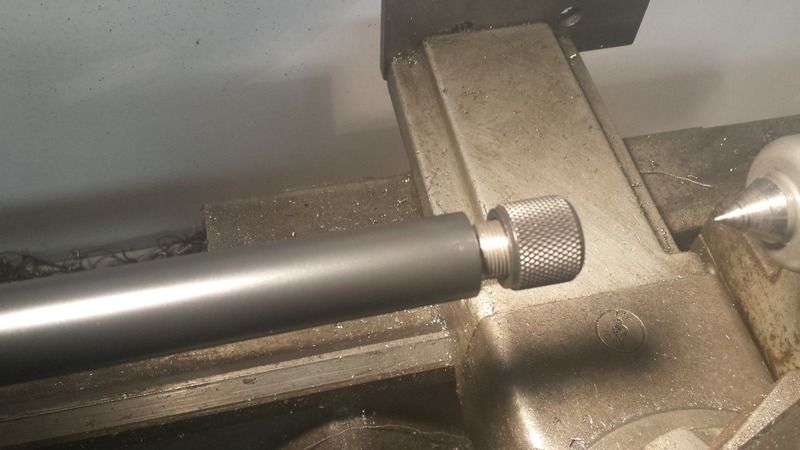
Steady rest setup and muzzle face cleaned up 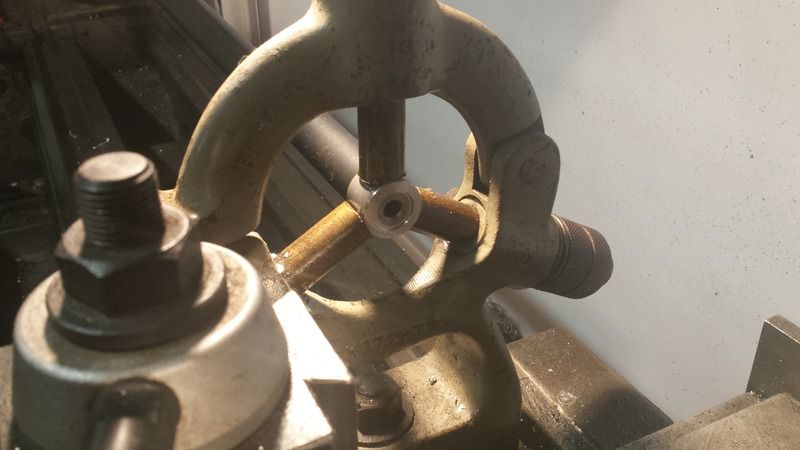
And finished 
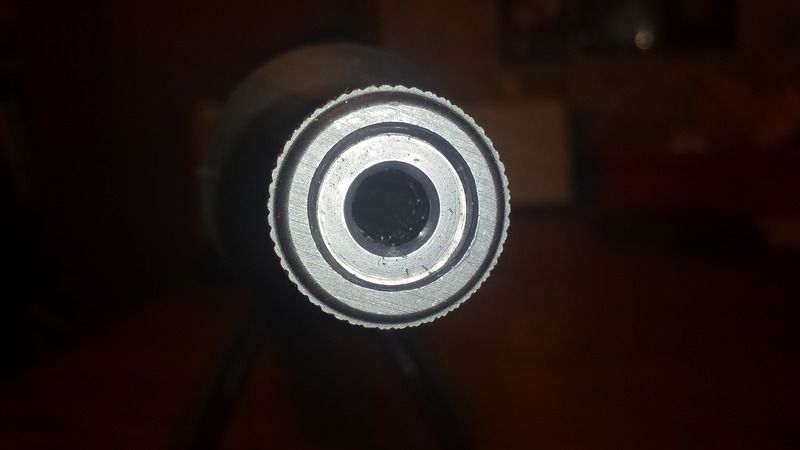
I debated over cutting an 11 degree target crown but the barrel didn't have one originally. They just used a recessed flat crown originally with what looked to be a slight 60 degree cut. I cut in with a 0 degree boring bar until just touching the recessed face and then just gave the 60 degree cut a light touch where the live center engaged. I was going to get a piloted reamer for the cut, but they are currently out of stock. I may have to come back to that if the accuracy has suffered. Thanks again for all the input! |
|
|
|
[#33]
Here is where we differ, Since I have a lathe, and can clean up a crown at will in a few mins any time I want/do not pull back on a brush, back through the muzzle when cleaning a barrel and wear the hell out of the end of rifling from cleaning, I leave the crown sharp, and just touch off on it when doing a final polishing of the crown after the cut. And again, cutting the muzzle face from ID to OD, to leave the edges lands and groove bur (crown) free after the muzzle front end polishing. Crown edge be this sharp, 
At most, may take a taper brass plug to the crown with lapping compound if the barrel is for someone else that is local, and that I will be re-crowning it in 1K anyways. This light taper at most to the crown, using a crowning plug with lapping compound. 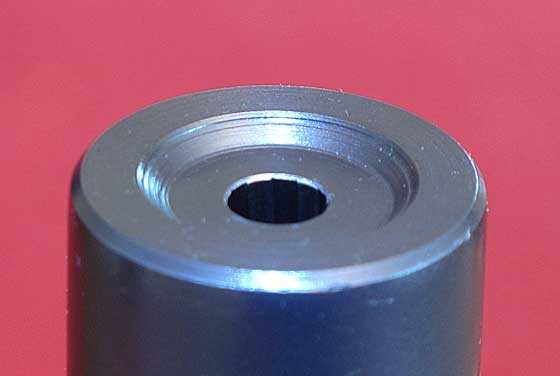
Note, outer high rims edges are gun case protectors, and since you are using a protruding thread protector, do not need to leave the high outer rim edge instead. 
The reason for this, want to keep the bullet embedded to the rifling as the last possible moment, since as soon as the bullet has left the rifling, it's subjected to the back blast of the first blast chamber on the can. Take the rig out for a test spin, and if it does not print, then re-crown, and this time, Taper brass plug with lapping compound if you want to taper the crown edge of rifling any more than just the light polish to the edge of the rifling when you are polishing the muzzle front edge after crowning instead. And again, the back cut angle to the crown with a single point cutter (edge of rifling to edge of muzzle face) and 118 crown is for cleaning purposes. The 11* and back cut are to angle the brush bristles to slow down the wear to the crown when the brush is being pulled back towards the chamber ones out side the barrel. So if you are using Sweets copper solvent that requires very little brush scrubbing, and always pushing the brush only forwards down the barrel and out the bore, then the bore counter taper is counter productive instead. Hence the degree of taper that you have cut into the crown, barrel looks like it's for a muzzle loader instead. P.S, when you go to re-crown, just set the shoulder back the amount that you will be removing from the muzzle face. This works out for the best anyways, since you will need to use the live center to start with to at least take a pass off the thread sleeve to make sure that eccentric with the bore before attaching the live center to it, and can set the barrel shoulder back during this step as well. |
|
|
|
[#34]
yeah, after reading up on crowning I wasn't too impressed with the factory job but the rifle shot 1/2 MOA so I guess it couldn't be too bad.
My main reason for not changing it was the chrome lining. I didn't want the chrome to chip and cause bigger issues |
|
|
|
[#35]
Work ID to OD, and the chrome on the rifling will be fine/will not flake off from use.
FN just crowns that way so idiots will not destroy the rifling quickly by yanking brushes back through through the muzzle to the chamber, plus need to re-crown since you used a live end in the bore for threading (lateral pressure of the cutter to the barrel, translated to lateral pressure of the live end to the crown, and rifling as well to slightly budge/distort it). |
|
|
|
[#36]
Nice lathe! Here's mine when I went to pick it up:

|
|
|
 Win a FREE Membership!
Sign up for the ARFCOM weekly newsletter and be entered to win a free ARFCOM membership. One new winner* is announced every week!
You will receive an email every Friday morning featuring the latest chatter from the hottest topics, breaking news surrounding legislation, as well as exclusive deals only available to ARFCOM email subscribers.

AR15.COM is the world's largest firearm community and is a gathering place for firearm enthusiasts of all types.
From hunters and military members, to competition shooters and general firearm enthusiasts, we welcome anyone who values and respects the way of the firearm.

Subscribe to our monthly Newsletter to receive firearm news, product discounts from your favorite Industry Partners, and more.
Copyright © 1996-2024 AR15.COM LLC. All Rights Reserved.
Any use of this content without express written consent is prohibited.
AR15.Com reserves the right to overwrite or replace any affiliate, commercial, or monetizable links, posted by users, with our own.


