|
Posted: 11/18/2015 9:34:37 PM EDT
So, I was asked about making a thread with all the parts and pieces need to build a PID for controlling a lead casting furnace, so here it is.
What it is, A PID is a digital thermostat that will allow You to control the temperature of Your casting pot. No guessing, no adjusting, just simply program it to the temp You want. Also great for keeping track of what temp works best for a certain mould or alloy. 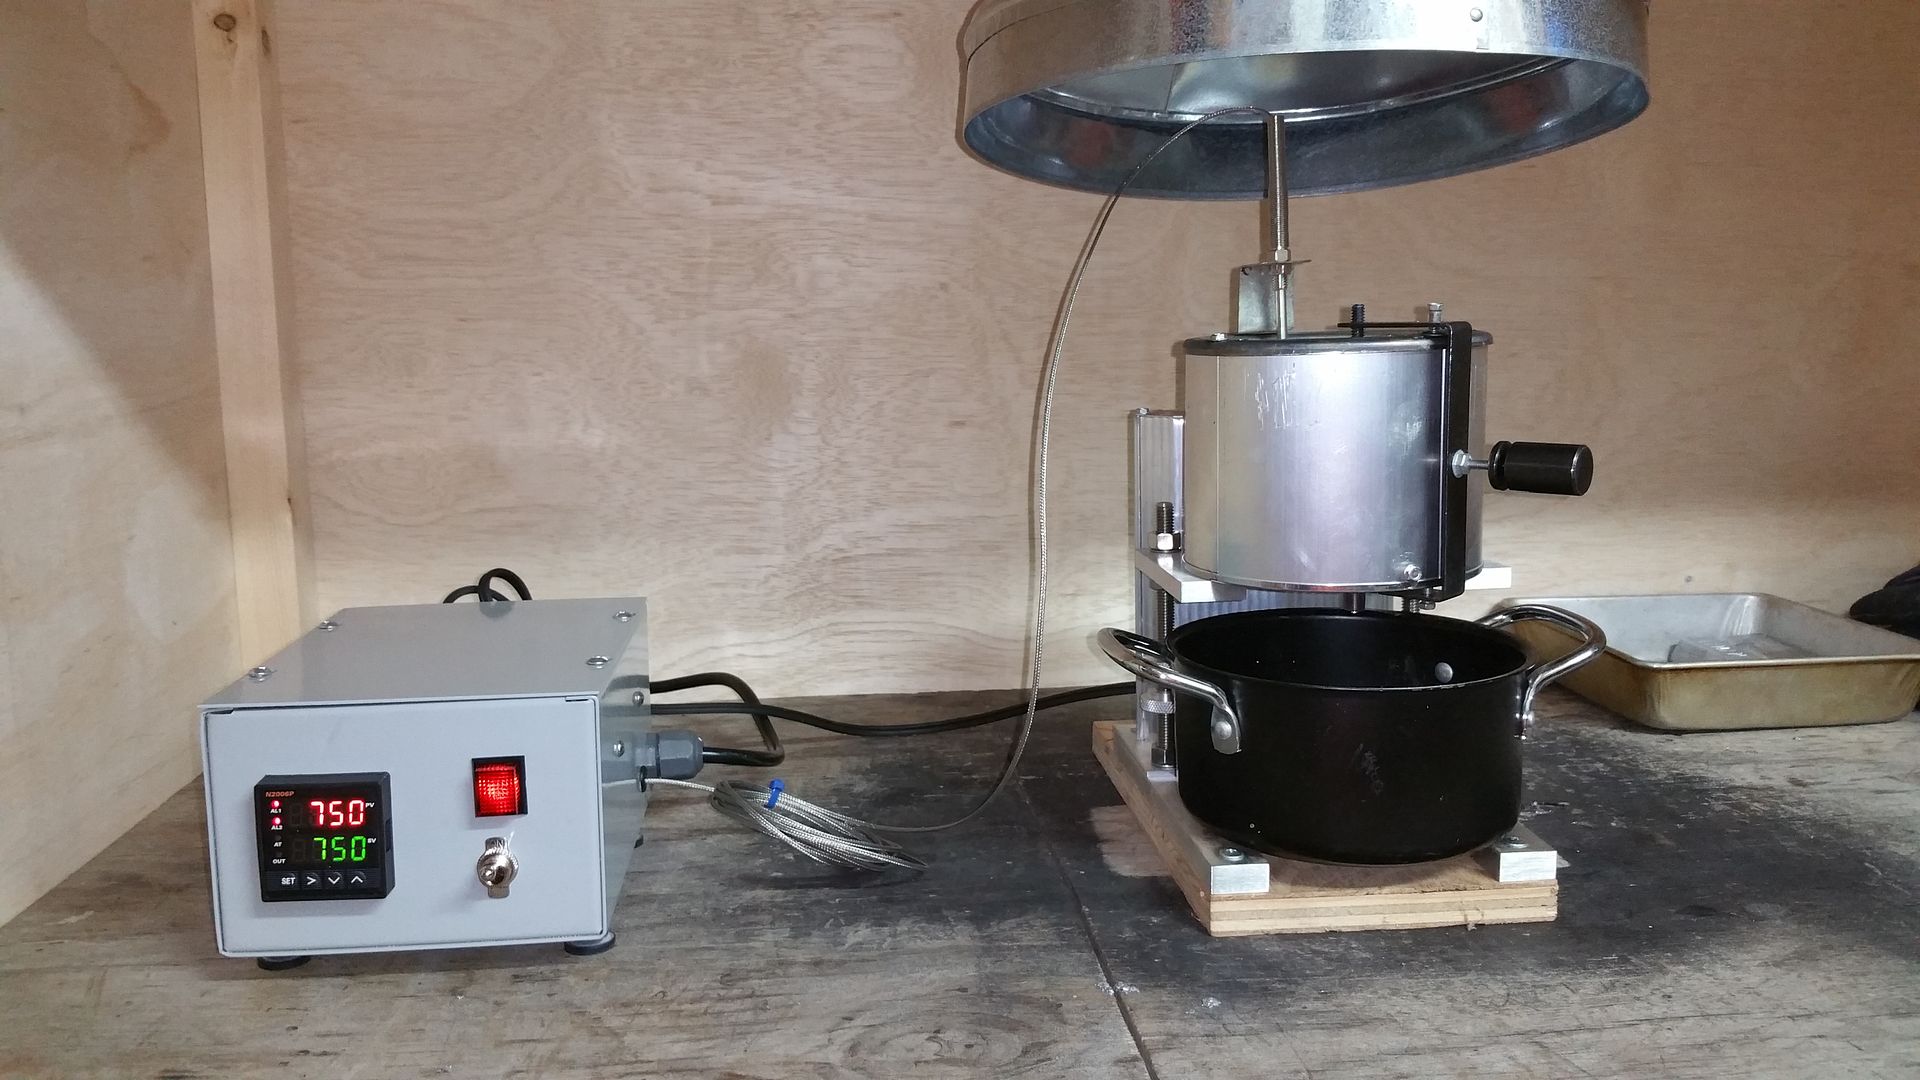
I found ALOT of good info at CastBoolits, PID schematic Wiring a PID Building a PID So You can see the list of parts in the other thread. If I did it again, I'd order the stuff from Amazon, cheaper, and no 3 weeks or more waiting. Here's the big item's, the rest is in the other thread, just little stuff. PID Box A little bit bigger of a Box SSR Fuse K-Type Thermocouple Terminal Strip Power Cord ON/OFF Switch Power Indicator Cord Fitting Some Item's are optional, depending on how You want to build Yours. You'll need 5' of 12GA and 5' of 16GA wire ()Red, Green, Black, White)( crimp on connectors, machine screws etc.... Here is the wiring diagram I used to wire Mine with. 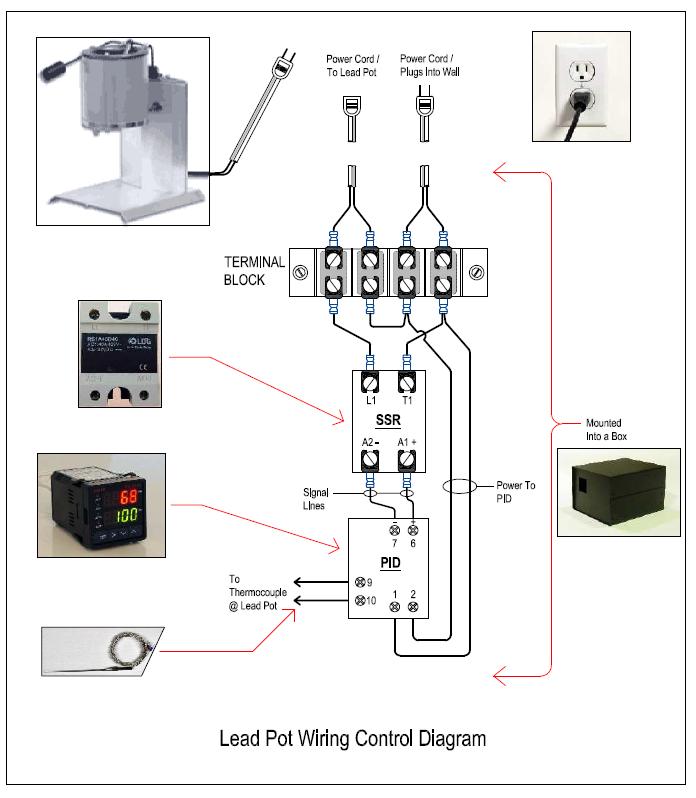
I used this diagram to wire the Switch, indicator light and fuse. 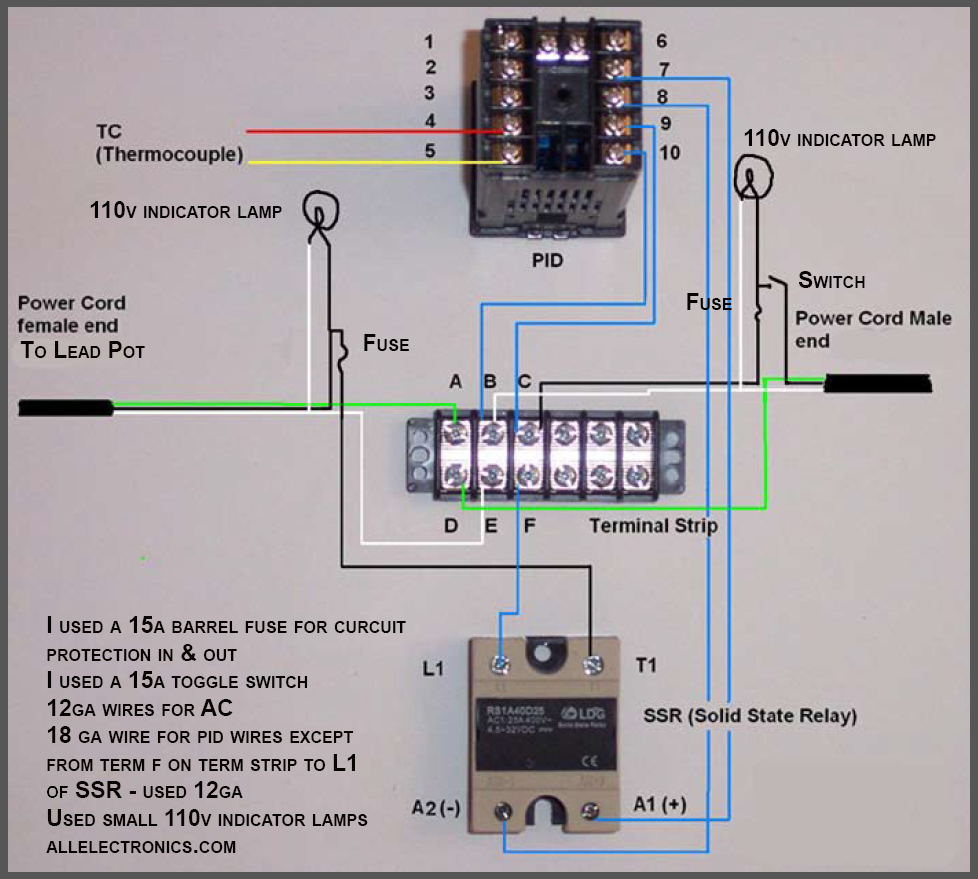
Pics of Mine inside, I left the wires long, I can remove each piece and unwire/wire it outside the box. Easy replacement. 
Here is a shot of the back of Mine, I chose to install an outlet. I think the PID can control two units. I may be wrong on that, I just don't like the idea of a "pigtail" hanging out of the box. 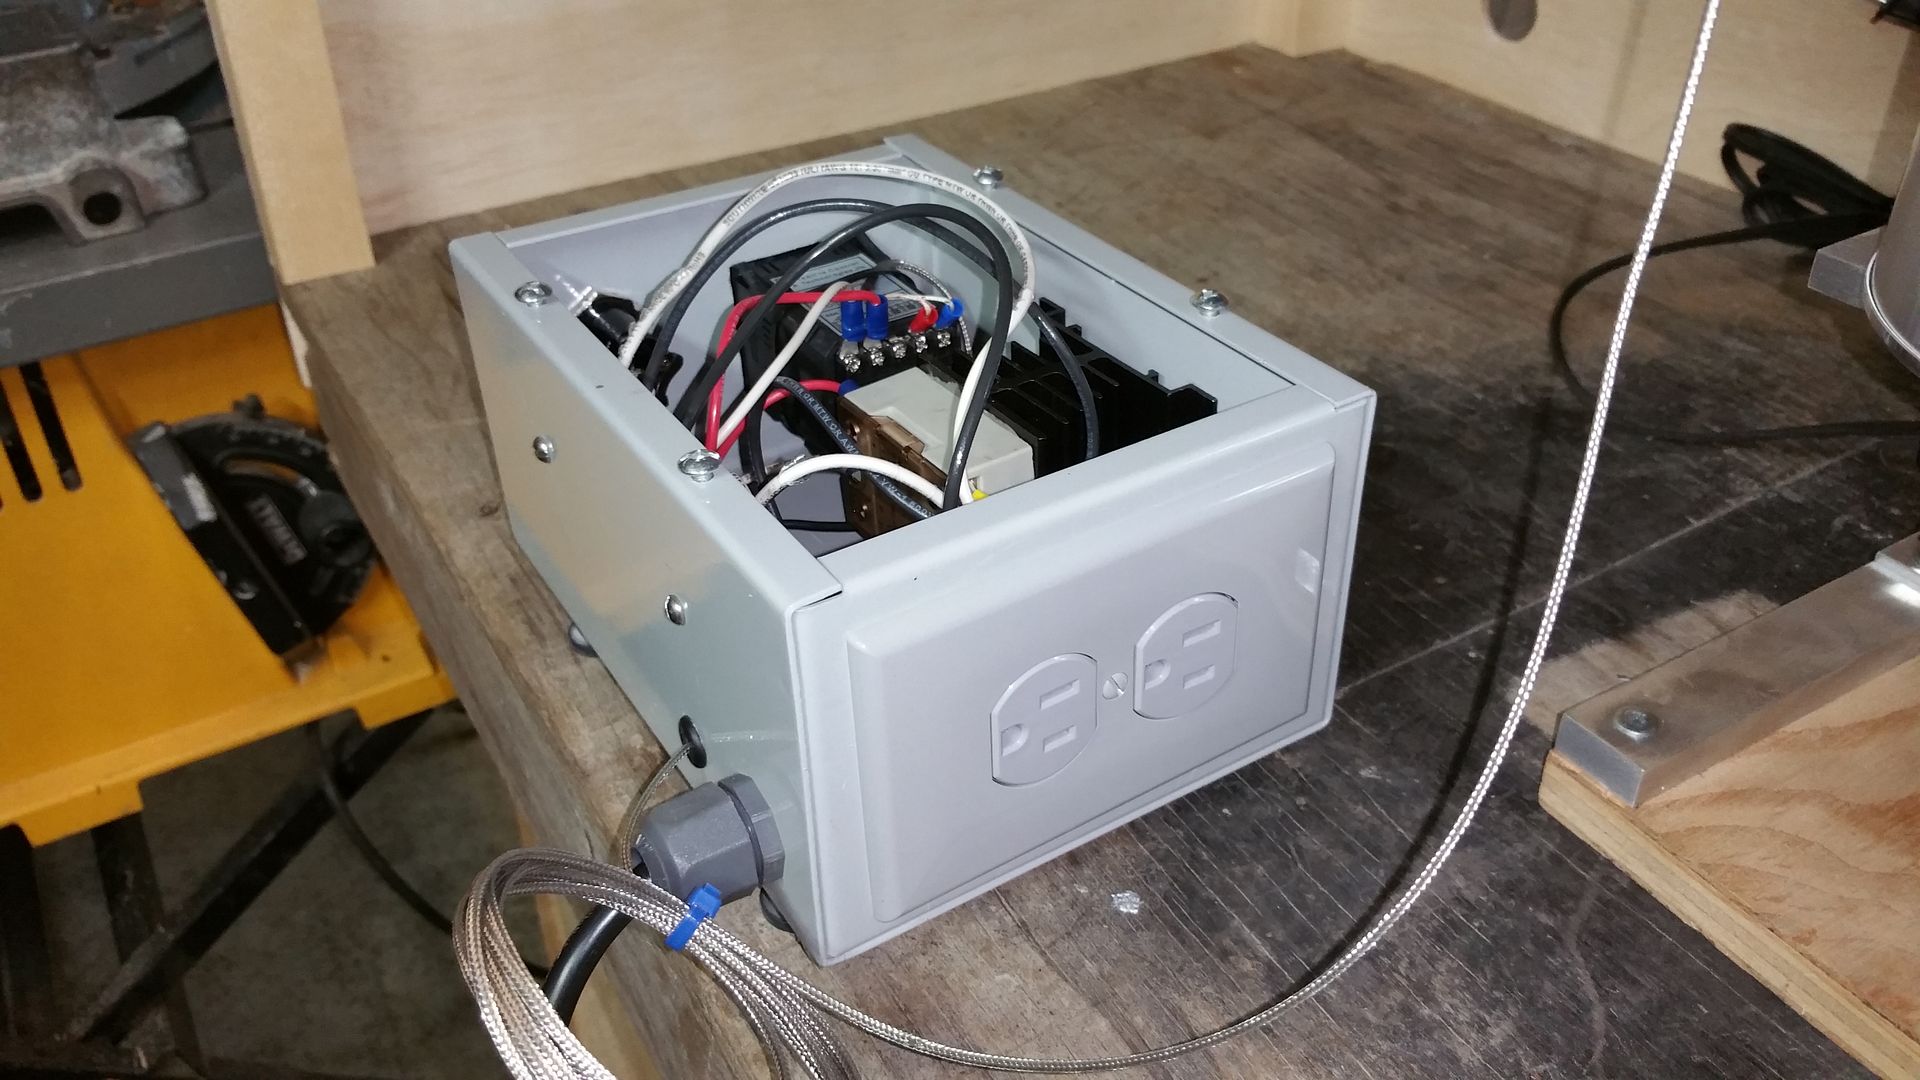
|
|
|
|
|
[Last Edit: ChevelleDave]
[#1]
More to come.
Done for Tonite, I will edit anything else I got to this, Tomorrow. |
|
|
|
TX, USA
|
[Last Edit: djryan13]
[#2]
In for more details.. any chance you could give rough estimates of costs?
I have not spent a ton of time casting.. But I do know I hate the Lee bottom pours. Dumped it and got the RCBS. Very nice but very expensive. Seems to regulate temp better too but maybe not as good as your contraption. A head to head cost estimate of yours vs the better furnaces will help new guys thinking of diving in I think. Thanks for detailed post! |
|
|
OR, USA
|
[#3]
After completing the write up on this project, can you make a eddy current case mouth annealer with a programmable timer and do a similar how to write up?
|
|
|
|
[#4]
I also built this setup and it works great!
The top (on) position bypasses the controller and just applies voltage to the pot to quickly heat up your lead. Then when the temp gets near your setpoint you switch to the bottom (on) position for the controller to take over. Since the controller is fuzzy logic it learns the best way to control the temperature (as I understand it) so it works better as you use it. |
|
|
|
|
[#5]
Originally Posted By djryan13:
In for more details.. any chance you could give rough estimates of costs? I have not spent a ton of time casting.. But I do know I hate the Lee bottom pours. Dumped it and got the RCBS. Very nice but very expensive. Seems to regulate temp better too but maybe not as good as your contraption. A head to head cost estimate of yours vs the better furnaces will help new guys thinking of diving in I think. Thanks for detailed post! All the stuff listed above comes out to $90.00 from Amazon, add wire and Buttsplices, outlet, cover, I bet it could be done for $110.00. A lot of People use this for Their Lyman, Lee, RCBS, Magma, Lubrisizer's, Powder Coat oven, from what I have read. I believe it could even be rigged to a gas valve, if You knew what You were doing. |
|
|
|
|
[Last Edit: ChevelleDave]
[#6]
Originally Posted By drfroglegs:
I also built this setup and it works great! The top (on) position bypasses the controller and just applies voltage to the pot to quickly heat up your lead. I just run Mine through the SSR, it stays on full blast till it gets to temp, then regulates itself. Then when the temp gets near your setpoint you switch to the bottom (on) position for the controller to take over. Since the controller is fuzzy logic it learns the best way to control the temperature (as I understand it) so it works better as you use it. I got My pot up to 750 by the Lyman Thermometer, then turned on the PID, hit the "learn" button, and it programs itself to the Lee lead pot. Whenever You move it to another device, rehit the "learn" program, it will teach itself the best way to use whatever it is controlling to achieve the programmed temperature. |
|
|
|
|
[Last Edit: ChevelleDave]
[#7]
Originally Posted By pepe-lepew:
After completing the write up on this project, can you make a eddy current case mouth annealer with a programmable timer and do a similar how to write up? Been there, KINDA did that. DIY Annealer |
|
|
|
|
[#8]
Set the toggle to keep this thread out of the archives.
ChevelleDave, any time you want to find this thread, click on My Topics in this forum, and it will be there. Thanks for sharing this info. |
|
|
|
|
[#9]
You are Welcome.
|
|
|
|
TX, USA
|
[#10]
That's awesome.
|
|
|
NM, USA
|
[Last Edit: GWhis]
[#11]
Excellent thread Dave! This is the reason AR15.com remains at the top of the reloading forums. "Helpful" here is beyond the usual expectations at gun forums....the toggled threads here, that keep references permanent, is the key, which means that it's worth the effort to create and post such a thread as this, so skilled people like Dave will. As for casting, that's the next frontier for me, waiting for my coming retirement (pipe dream at the moment), can't wait!
Great diagrams & pictures, BTW, Dave! Makes it all very clear, thanks for the effort! |
|
|
|
[#12]
Thank You G.
|
|
|
|
|
[#13]
Originally Posted By ChevelleDave: Thank You G. |
|
|
|
|
[Last Edit: brickeyee]
[#14]
http://www.amazon.com/gp/product/B0087O6S2A?keywords=pid%20controller&qid=1448037258&ref_=sr_1_1&s=industrial&sr=1-1
You need a chassis box, some cordage, and a thermocouple. A Type K is adequate. I use a short round cord cut in half to get a male (power in) and female( plug for device) with nice molded cord ends. The PID controllers are pretty standard. |
|
|
|
|
[Last Edit: drfroglegs]
[#15]
Originally Posted By ChevelleDave:
I got My pot up to 750 by the Lyman Thermometer, then turned on the PID, hit the "learn" button, and it programs itself to the Lee lead pot. Whenever You move it to another device, rehit the "learn" program, it will teach itself the best way to use whatever it is controlling to achieve the programmed temperature. Originally Posted By ChevelleDave:
Originally Posted By drfroglegs:
I also built this setup and it works great! The top (on) position bypasses the controller and just applies voltage to the pot to quickly heat up your lead. I just run Mine through the SSR, it stays on full blast till it gets to temp, then regulates itself. Then when the temp gets near your setpoint you switch to the bottom (on) position for the controller to take over. Since the controller is fuzzy logic it learns the best way to control the temperature (as I understand it) so it works better as you use it. I got My pot up to 750 by the Lyman Thermometer, then turned on the PID, hit the "learn" button, and it programs itself to the Lee lead pot. Whenever You move it to another device, rehit the "learn" program, it will teach itself the best way to use whatever it is controlling to achieve the programmed temperature. I also use mine at the top my column when I'm.... Desalinating water 
So I like having the switch that allows me to use it as a thermometer only. I also have multiple thermocouples that just plug into the back. I used a RadioShack project box and used computer plug/socket to power the unit. The top of the box has a cutout the size of the SSR. The relay is mounted to the radiator, which is mounted to the box. This keeps the SSR cool and prevents it from failing. Here is some pics of mine : It's not as hard as it looks... 

This is before I added the ktype plug so I can swap thermocouples. 
|
|
|
|
USA
|
[#16]
ChevelleDave,
I just wanted to pop in and thank you for this thread. About 7 years ago I had looked into using PIDs for some of my projects but they were several hundred dollars at the time. I was giddy to find they are now available for peanuts! I followed your instructions loosely and just finished my multi-use version of your temp controller. I make knives and needed more precise regulation of my tempering oven. But I also cast bullets. So I set out with the intention of making a controller that could do both jobs. I wired a thermocouple bulkhead connector on the box, and a matching plug on my thermocouples. A dedicated thermocouple lives on both my lead pot and my tempering oven. I can simply plug in whichever one I want to regulate at the time. A tip for anyone else wanting to do this: you must use thermocouple wire to jumper between the bulkhead connector and the PID, and polarity matters. If you use copper wire it will introduce a voltage change (dissimilar metals) and your temps will be off. Mine were off about 30 degrees when I used copper wire. When I replaced the copper jumper with a section of thermocouple wire snipped from the thermocouple my temps were within 1 degree of a known control source. The bulkhead and plugs come polarity-marked making it all very simple. I got everything from Amazon for about $70 total. Thanks again! Back side with thermocouple bulkhead port, AC-out, and AC-in/fuse/switch combo. 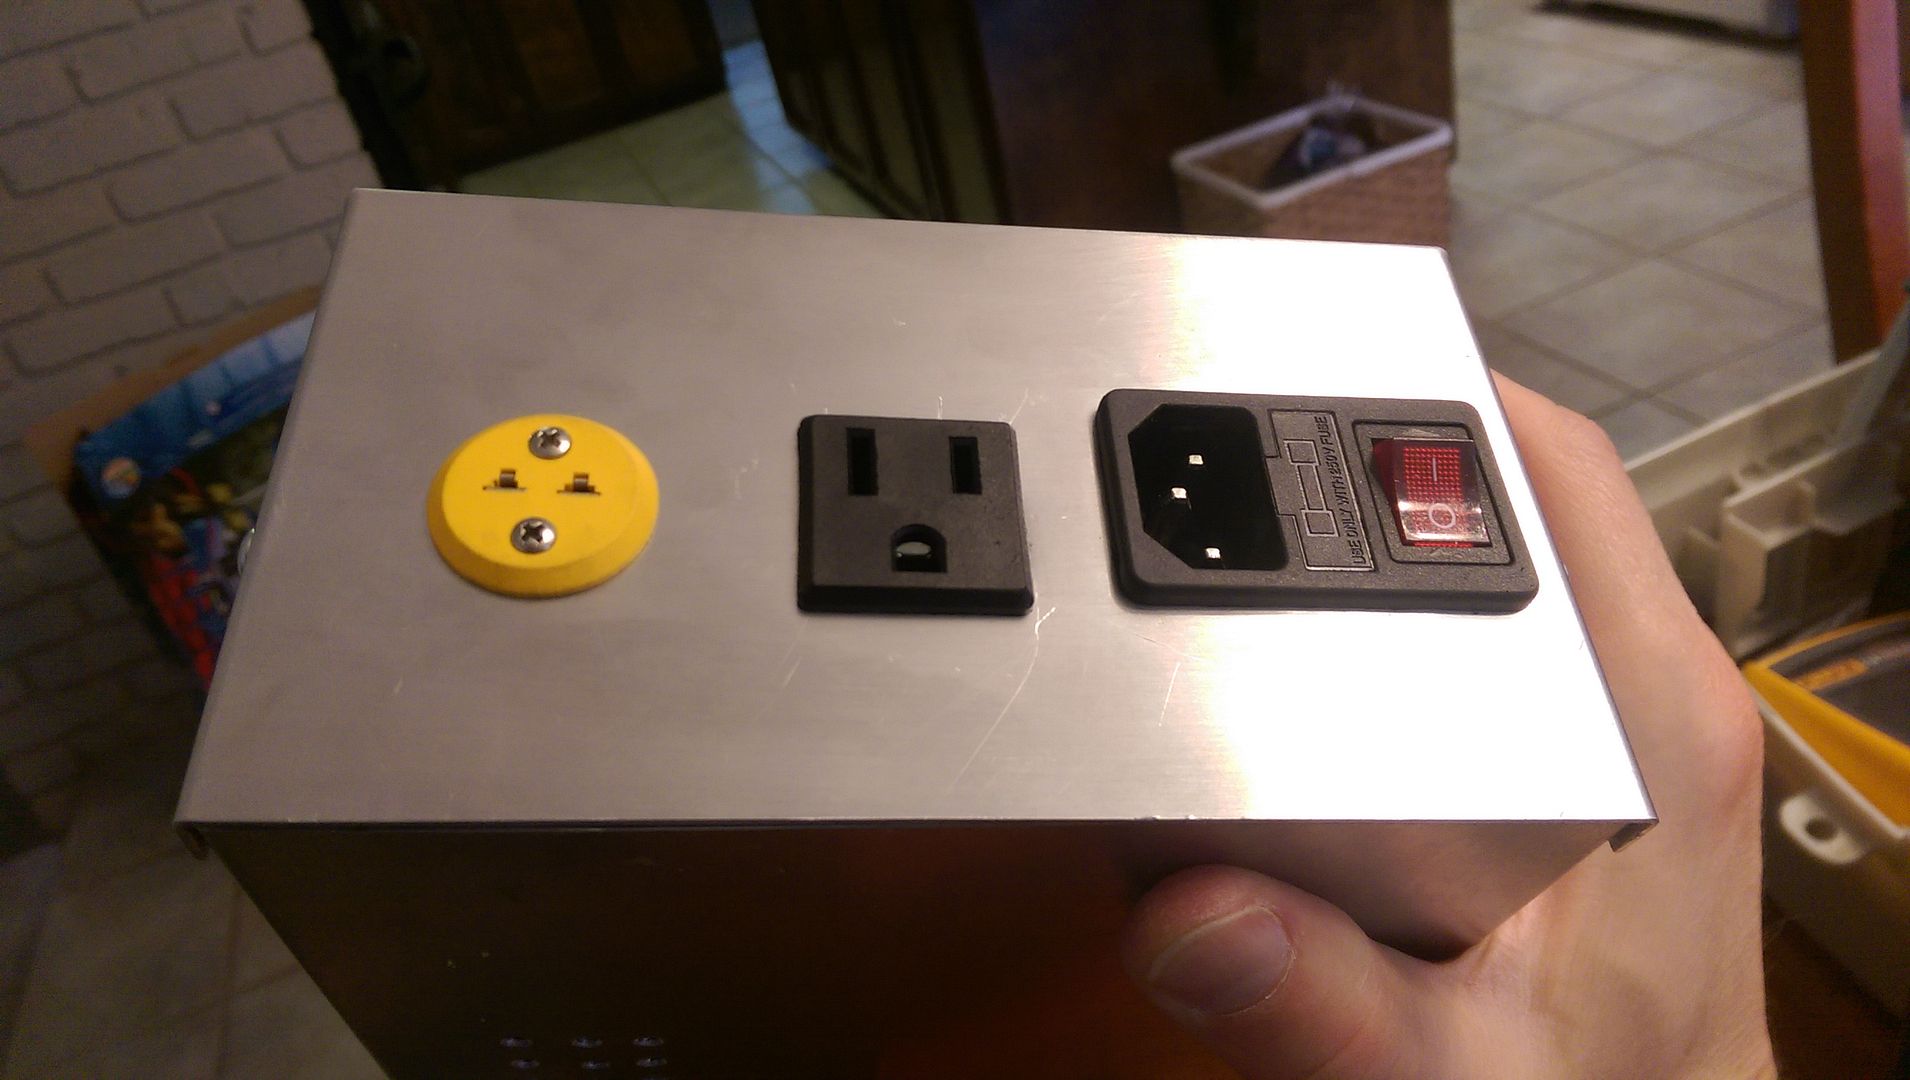
Thermocouple with plug added. 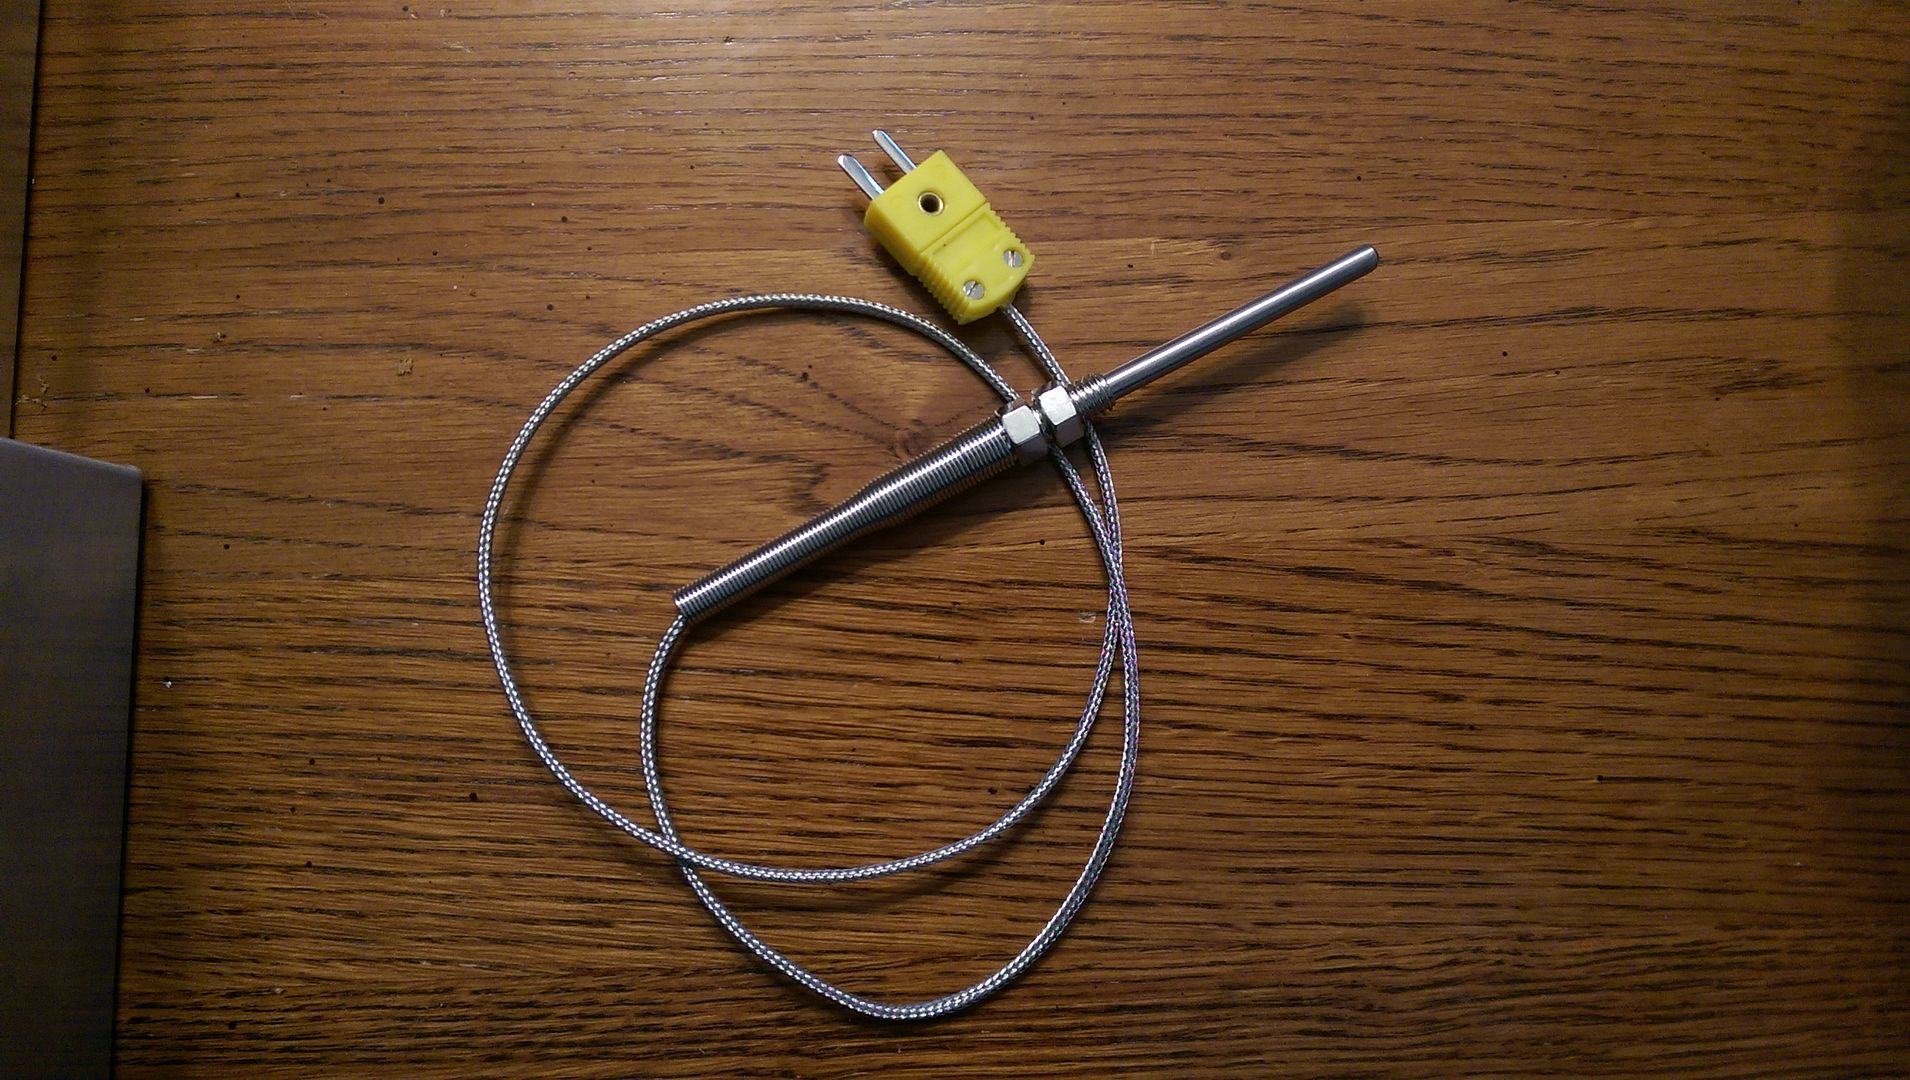
Backside of bulkhead wired with a pice of thermocouple wire snipped from the thermocouple. 
Up and running. 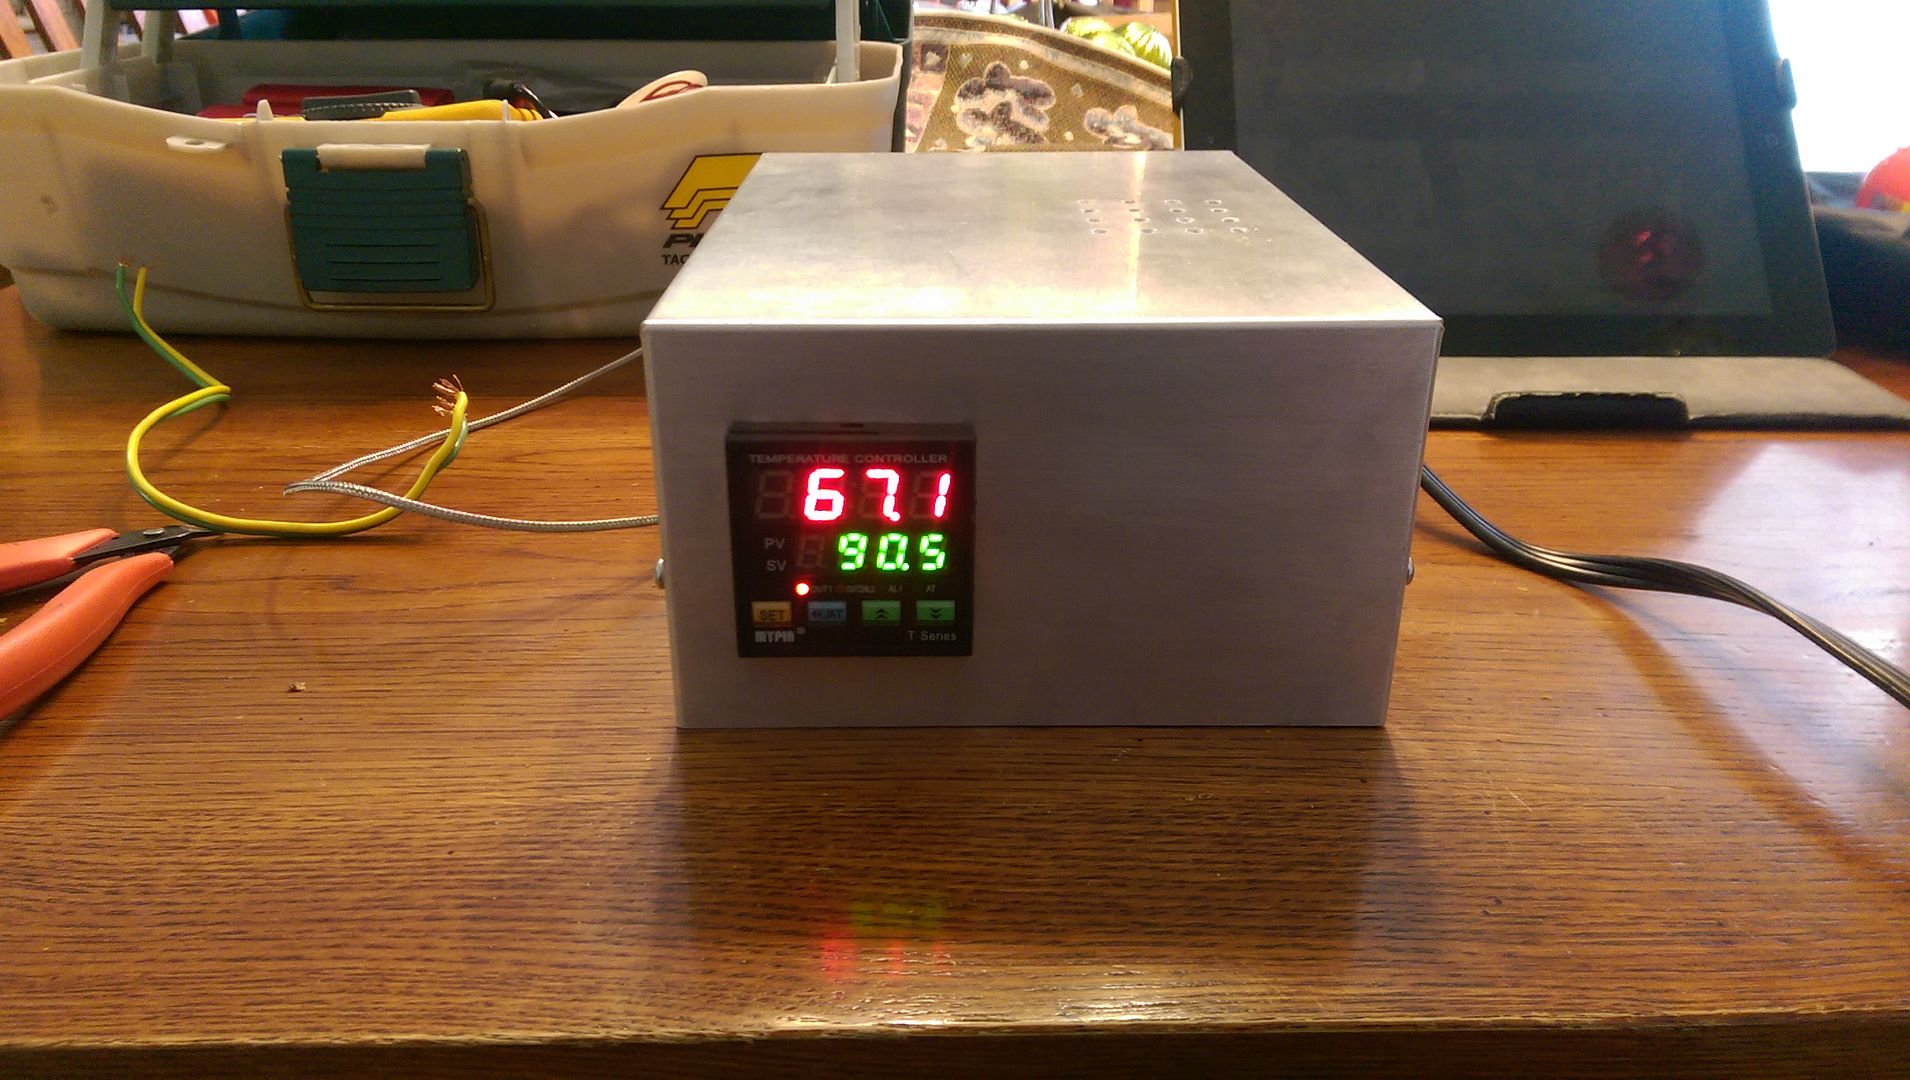
|
|
|
|
[#17]
Kool,
|
|
|
|
|
[Last Edit: ChevelleDave]
[#18]
So, I wanna add a T/C wall mount plug and socket, but cant seem to find a decent set that are the proper metals.
There is a lot of false advertising from what I see, companies advertising them as TYPE-K, instead of K-TYPE. Anyone have a good source?[sup][/sup] |
|
|
|
|
[#19]
Try Auber Instruments for thermocouples and such. The actually have everything to build PIDs and much more, but they're not as cheap as the Chinese crap. BTW, my PID stuff originally came through Amazon, and I had to wait 4 weeks for delivery from... China. Here's a pic of my first PID, I'm planning another build this winter to control a heat-treating oven for cast bullets, and to also control temps in a baking oven for coating guns. My original PID can handle the job just fine due to its interchangable TCs. BTW, I bought five Chinese thermocouples for my pot when I bought the rest of parts for the build. My first TC lasted a year, the second lasted a week, and the others failed on startup one after another. My Auber TC are all over a year old and have never failed me.

I wired my Lyman pot to completely eliminate the original bimetal temp control. 
|
|
|
|
[#20]
Thank you, I'll go and check them out.
|
|
|
|
|
[#21]
Okay so I found them at Aubur Instruments, there's a couple different kinds I will linked to.
Panel mount mini connector Panel mount many connector Round And if you want just a panel mount socket alone, Panel mount socket If you're building a PID, or one of the homemade case Annealers, check this place out. Aubur Instruments, seems like they have everything that would be needed, good prices and the ship from the US. |
|
|
|
|
[#22]
Auber is a very good company to deal with, and their service is impeccable. I never considered them for annealer parts, thanks for the tip Dave!
|
|
|
NH, USA
|
[#23]
I would move the heat sink part of the SSR outside of the box. Those relays do make some heat and you have it trapped inside the box
|
|
|
|
[#24]
Originally Posted By jamie930:
I would move the heat sink part of the SSR outside of the box. Those relays do make some heat and you have it trapped inside the box SSRs do generate some heat, but mine has never gone past lukewarm, even running for 6-8 hours at a time. I left the top off my PID so I could monitor everything a little easier and put the top back on after the second session and quit worrying about it. I do have mine on a heatsink in an area with good ventilation. You probably noticed that mine is made from a computer power supply box. I removed all its innards and found there was plenty of room to build a PID inside, and it was free! |
|
|
MN, USA
|
[#25]
If you were my friend, I'd really like you.
|
|
|
|
[#26]
One other little thing. Things like switches, plug-ins, cords, wire, switches, indicator lights, fuse holders, and outlets were all readily available at my local Ace Hardware store. Being the anal type, I also color coded all my circuits using wire with different insulation colors. Ace had six or eight different colors of 10 gauge wire. You'll find wire gauge can be a source of discussion on some sites, but I chose 10 gauge. 12 might also work, but since I'm controlling a heating device, I went a little heavier. I wouldn't consider 14 gauge or smaller under any circumstances myself. I saw one guy build one similar to mine that salvaged 18 gauge wire from the power box for some circuits. I only used one foot each of six different wire colors, new wire cost me something like 12 bucks. My case is metal, but I ran auxiliary grounds for everything anyway. There were plenty of open connectors on the Buss bar that made this easy to do.
|
|
|
|
[#27]
I use a very similar setup for the old toaster oven I use for Cerakoting/powder coating, and I also use it to power/control my heat treating oven and smoker. Super useful and versatile. If you want optimally accurate control, be sure to run the autotune sequence at the temperature you want to run steady-state. Vents in the casing should be enough to keep the heatsink in check.
|
|
|
|
 Win a FREE Membership!
Sign up for the ARFCOM weekly newsletter and be entered to win a free ARFCOM membership. One new winner* is announced every week!
You will receive an email every Friday morning featuring the latest chatter from the hottest topics, breaking news surrounding legislation, as well as exclusive deals only available to ARFCOM email subscribers.

AR15.COM is the world's largest firearm community and is a gathering place for firearm enthusiasts of all types.
From hunters and military members, to competition shooters and general firearm enthusiasts, we welcome anyone who values and respects the way of the firearm.

Subscribe to our monthly Newsletter to receive firearm news, product discounts from your favorite Industry Partners, and more.
Copyright © 1996-2024 AR15.COM LLC. All Rights Reserved.
Any use of this content without express written consent is prohibited.
AR15.Com reserves the right to overwrite or replace any affiliate, commercial, or monetizable links, posted by users, with our own.


