|
Posted: 12/6/2009 9:55:00 AM EDT
My current reloading table is inadequate, so I'm working on a reloading bench to replace it. Here is the current design:

The area on the left is for gun cleaning, projects or whatever else. The area on the right is for reloading. The legs and bracing will be 2x4s. The upper shelving and lower shelf will be 3/4" plywood and I'm planning to make the top from 2x6s. I'm considering overlaying the top with a thin sheet of something for a consistent surface. I also plan to bolt the bench to the concrete block wall behind it. My brother and/or nephew will be helping me with this (or I will be helping them - they make custom cabinets). I'm looking for any feedback pr design or construction changes. Is there anything I should add or remove? I've already bought all the lumber but the plywood, but nothing has been started. Thanks in advance! Google SketchUp is great, BTW. |
|
|
|
[#1]
Looks very good.....reminds me of my bench..in that case I love it!
|
|
|
|
[#2]
Consider a taller bench top. Mine is 40" and I wish I had gone a bit higher –– not much, but a bit.
It is easier to work up to a tall bench then it is to work down to a short one. Further, some form of triangulation in the base is important to keep it from wracking. I'd suggest plywood panels on back and sides of base. One of my benches has a 2x6 top, covered with particle board, covered with masonite. I like it. |
|
|
|
[#3]
+1 on the particle board and masonite top. I made one heavy duty bench with 3/4" particle board topped with masonite that was attached with liquid nails construction adhesive the 2nd light duty bench same as the 1st except with 1/2" particle board. Both benches well over 6-7 years old and the masonite is holding up very well.
|
|
|
|
[#4]
Looks good, +1 on taller; also consider peg board back panel to
hang items. sdshooter..................... |
|
|
|
[#5]
oops 's
peg board insert sdshooter................ |
|
|
|
[#6]
looks good! i might put an extra shelf somewhere under the top for stuff but you have a good idea going.
|
|
|
|
[#7]
That is a pretty sound design. I would make sure that bottom shelf is VERY stout. I added mass and stabilty to my bench by putting several hundred pounds of lead and brass on that bottom shelf.
I also made my presses rock solid by putting metal plates above and below the mounting bolts and cinched them down TIGHT. Lag bolts loosen in time when swaging. |
|
|
|
[#8]
Looks good. +1 on being taller.
Scott |
|
|
|
[#9]
I would put shelf's where you have the pegboard. A lot more storage with shelf's.
The fold down door for the scale is a great idea. 
I mounted the powder measure near the scale for a smooth work flow. |
|
|
|
[#10]
Getting back to this.... Thanks to everyone for the feedback. I decided to raise the height to 40". My brother runs a cabinet shop and my nephew helped refine the design. We ended up raising the scale shelf and changing the shelving to have vertical dividers. I'm holding off on changing the construction of the top and on additional bracing, but we did make allowances for adding on in the future. We cut out everything today (it's nice to have a commercial woodworking shop and the correct tools!) and we'll be assembling it tomorrow. Pictures to follow!
|
|
|
|
[#11]
tag for pics
|
|
|
|
[#12]
Quoted:
tag for pics |
|
|
|
[#13]
Looking forward to pics!
|
|
|
|
[#14]
Looks like it'll work pretty good to me. I like it.
|
|
|
|
[#15]
Here's mine.....it's a dual purpose work bench/reloading bench. My reloading press and powder measure are mounted on some 3/4" MDF that I clamp to the working surface. I've moved the peg board around since the pic was taken, just got it up yesterday, and have my scale on a small shelf on the peg board at eye level with my powder trickler.
 It was a pretty cheap build too, less than $150 IIRC. The base cabinets are Coleman brand garage cabinets from Lowes. The countertop is a formica top that has a scratch running the length of it which I got for $20 from Lowes (had to talk with the dept manager). The top is secured to the cabients by some screws on the underside. If you want to stiffen it up get a sheet of MDF and put it underneath. It was primarily built as a workbench as you can tell but I can easily clamp my reloading setup onto it or my vise using either the C-clamps you see hanging on the steel I beam or any number of my dad/gramps wood working clamps. |
|
|
|
[#16]
Height will depend on whether you want to sit or stand. I sit and mine is at about 33.5". 36 would be a bit high for siting. For standing around 40 " would be close. I suppose that height would work for a bar stool too but I prefer comfort so I go shorter and sit on my computer chair with rollers. It is about the height of most other standard chairs at about 15"-16". Go with your preference.
|
|
|
|
[#17]
OK, I'm a slacker, but here are the pictures as promised.
Here's where it all started: 
Here is the space with some things already moved out of the way. The green cabinet was moved too: 
All the pre-cut components: 
Components unwrapped and beginning assembly of the frame: 
More frame assembly: 


Bottom shelf installed: 
Bolted to the wall: 
Top installed and beginning shelf assembly: 
Shelf assembled: 

Mounting shelves, pegboard, etc: 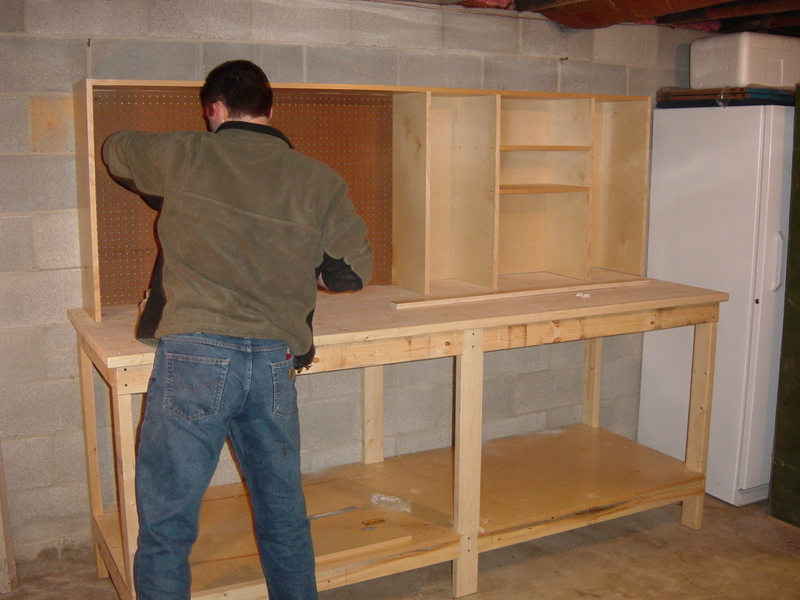


All done! 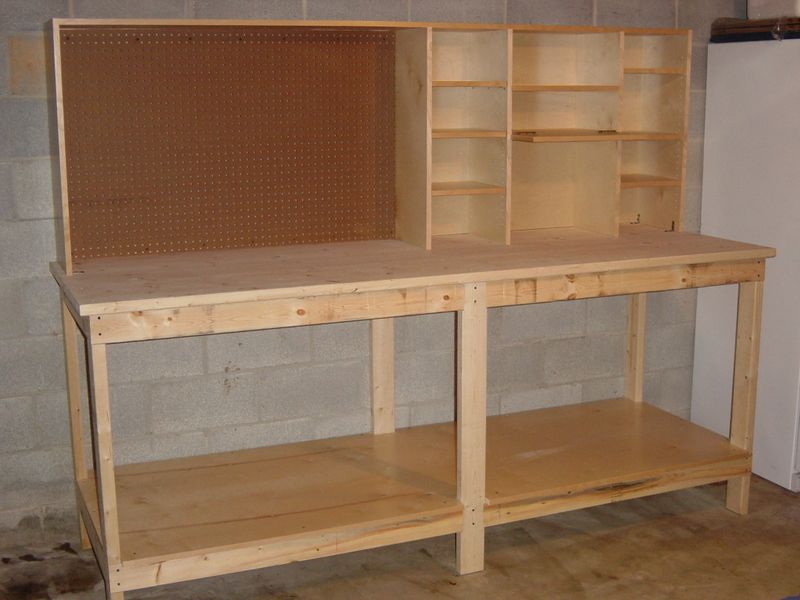
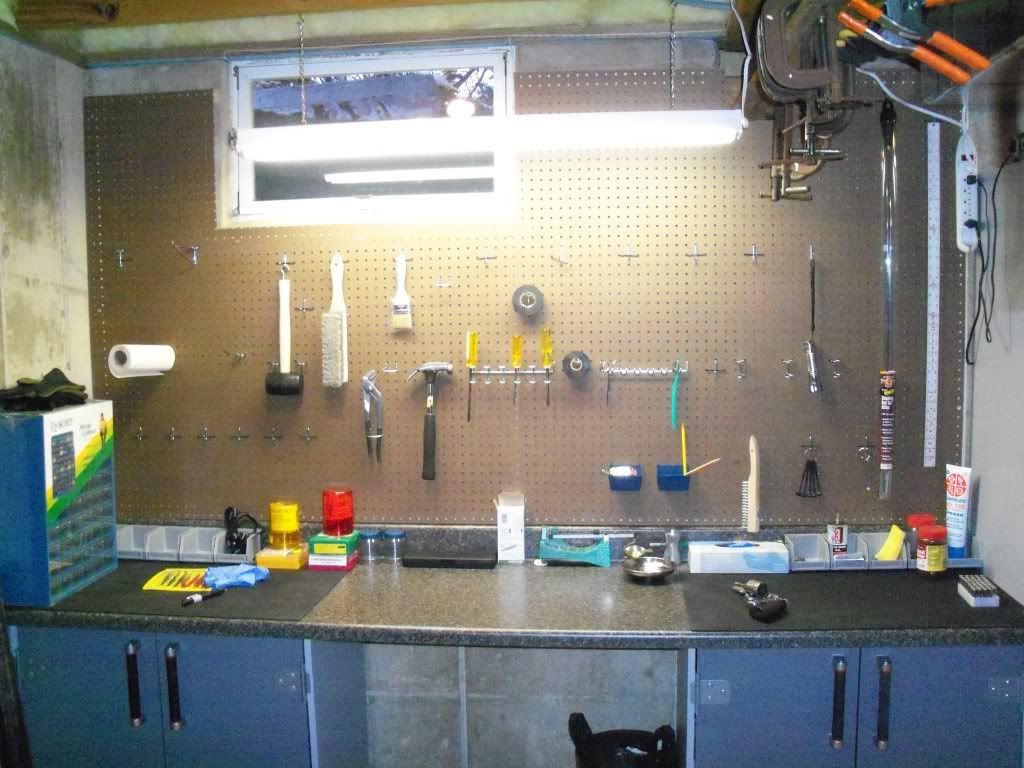
...and everything moved over: 
It all went pretty smooth. Some things weren't cut quite right, but otherwise it went right together. Thanks Jesse (my nephew and the guy in the pictures)! I'm quite happy so far. The bench is sturdy, but the way I have mounted the Rock Chucker isn't. It's not bad, but there is some flex. |
|
|
|
[#18]
That looks good. It is larger than I pictured it being.
I just built a bench and have finally got started reloading, but I have not taken any pictures yet. It is not anywhere near as nice as your bench though. |
|
|
|
[#19]
That's so cheating if the bench came as a kit!
Regardless, looks good! |
|
|
|
[#20]
Kit or not. Pretty nice.,
I can't wait to redo my basement... |
|
|
|
[#21]
The bench looks good. One thing I like with my bench is that I put the current in use powder,primers and bullets on the same shelf as the scale. That way it insures that I won't grab an incorrect item.
Jeff |
|
|
|
[#22]
Looks real good, similar to mine but I had to design and build my own from scratch. Cheater!
|
|
|
|
[#23]
Now, hold on. No kit here folks, just a smart nephew who works with wood all day long.
|
|
|
|
[#24]
Quoted:
The bench looks good. One thing I like with my bench is that I put the current in use powder,primers and bullets on the same shelf as the scale. That way it insures that I won't grab an incorrect item. Jeff Good idea. I'm a bit leery of bumping the scale, but I'll try it out. |
|
|
|
[#25]
Quoted:
Now, hold on. No kit here folks, just a smart nephew who works with wood all day long. I didn't see any scrap lumber in any of those pic's, just unwrap and screw together, that's a kit no matter who made it I would say. |
|
|
 Win a FREE Membership!
Sign up for the ARFCOM weekly newsletter and be entered to win a free ARFCOM membership. One new winner* is announced every week!
You will receive an email every Friday morning featuring the latest chatter from the hottest topics, breaking news surrounding legislation, as well as exclusive deals only available to ARFCOM email subscribers.

AR15.COM is the world's largest firearm community and is a gathering place for firearm enthusiasts of all types.
From hunters and military members, to competition shooters and general firearm enthusiasts, we welcome anyone who values and respects the way of the firearm.

Subscribe to our monthly Newsletter to receive firearm news, product discounts from your favorite Industry Partners, and more.
Copyright © 1996-2024 AR15.COM LLC. All Rights Reserved.
Any use of this content without express written consent is prohibited.
AR15.Com reserves the right to overwrite or replace any affiliate, commercial, or monetizable links, posted by users, with our own.


