|
[#1]
There is a terrific book,"The Razor Edge Book of Sharpening." These guys do nothing but sharpen dull stuff. Hell, they could even make Frank Symptoms look sharp!
The book is available on Amazon.com or from their own web site; google "The Razor Edge Book." Be prepared to LEARN some stuff, because they'll dispell some myths about sharpening stuff. (For example: for a good edge, DO NOT use oil!) Lemme go get some pictures, BRB. Okay, I'm back. Check out this picture, cleverly made in advance (in response to another post like yours): 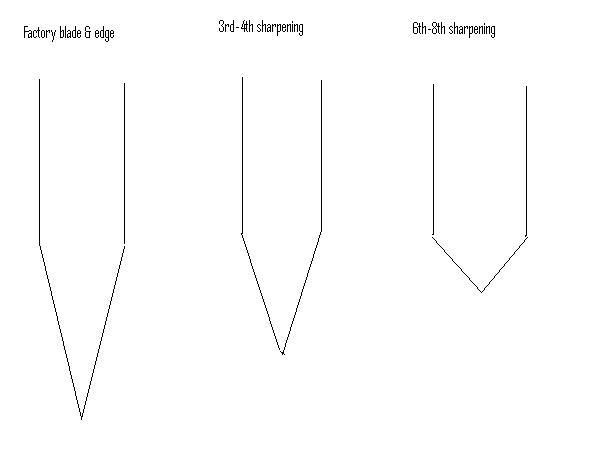
As you see, there is a progression to the way your knife gets sharpened. Most people go for what I call the 'cheap grind:' They try to raise the heel (the part of the knife farthest from the cutting edge) to get an easy edge. This works for the first 3-4 sharpenings, but as you can see by the middle picture, the angle of the edge is reducing. Eventually, they raise the edge so much that the actual edge is no real edge at all. If this is taken to a ridiculous extreme, eventually the edge will look like the one on the far right of the picture. Time for another pic, BRB. Here's how to PROPERLY sharpen your knife. And, my apologies in advance: This will take some time and WORK. In the end, it will be worth the trouble. Look at this pic: 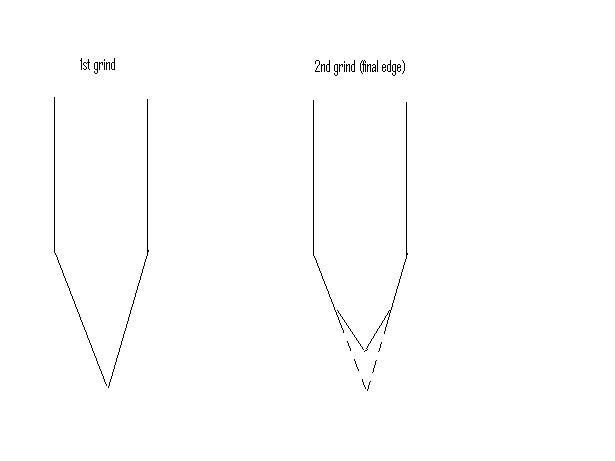
To properly sharpen your knife, you must put some elbow grease into it. Believe me, if your knife is like some of mine were, your hands and arms will be sore as hell after a sharpening session. (Remember that these pics are kind of extreme: they are exaggerated to show the lesson.) The edge on the far left of the 2nd pic shows a factory edge. This is also the edge you wish to cut with your first grind. I will call this the Primary Grind. This is the one that takes forever to achieve; once you have gotten this grind angle, you are about 9/10s of the way there. After you achieve the primary grind, raise the edge (the "heel") of your knife about 4-5 degrees. (Call this the secondary grind.) Start grinding at this angle. You will see that your knife edge will start to look more like the edge on the right of the 2nd pic. When you have this edge, you are ALMOST finished. As you grind your knife, you want to grind both sides of the blade evenly so that the 'wedge' made by the sharp edge is even on both sides of the knife blade... like the left side of the 2nd pic. Eventually, as the sides of the blade converge (as you are grinding), you will find that you develop a wire edge. Rejoice! This is a good sign! You don't want to keep the wire edge, but you will grind it off; the wire edge shows that the sharpening process is almost finished. You will get a wire edge as you finish the secondary grind. When you do, start sharpening on the other side of the blade. When you get a wire edge here, then alternate 1-2 strokes on each side until the wire edge is gone. THEN go to a finer grade of stone, develop a wire edge, and again alternate 1-2 strokes on each side until the wire edge is gone. NOW you are finished! Your blade should be able to cut hairs from the back of your wrist (assuming you don't cut your arm instead)! This process is explained much better in the book I mentioned earlier. I cannot overstate the value of this book. I think this book should be included with every knife sold, and should be a prerequisite to receiving one's man card. Good luck! One thing I haven't made clear: After you have achieved the primary grind, you can keep refreshing the secondary grind for 6 to 8 sharpenings; this makes sharpening your blade much easier. BTW Be prepared to buy 2 or 3 different stones, with different grades of coarseness. The finest stone most people use is called an Arkansas stone (also a Washita stone). |
|
|
|
[#2]
Quoted:
<snip> Great post. I have long considered back beveling my knives but have been too lazy to do it. OP- most of the "high performance" stainless steels are very difficult to sharpen compared to most of the carbon and tool steels. In my experience, ATS-34 and VG-10 are the most time consuming. S30V for me has been much easier and seems to resist a shade better as well. You mentioned a spyderco- I have an endura 4 in VG-10 that took hours to "fix" as the bevels were miserably uneven from the factory. Again, the VG-10 took me a long time to work. The best knife types to sharpen without jigs/expertise are the Swedish Mora Grinds and convexed blades. |
|
|
|
[#3]
It takes quite awhile for me to sharpen zdp-189, but the spyderco sharpmaker with the white rods seems to sharpen anything, eventually.
The chinese steel in the spyderco tenacious sharpens more quickly than the other steels they use Posted Via AR15.Com Mobile |
|
|
|
[#4]
I had an older BM in ATS-34 and could never seem to get a decent edge on it. I had other BM's with ATS-34 that were fine. I called BM and they said it was possibly due to improper hardness / heat treating and they would replace the blade for free. It was fine after that.
|
|
|
|
[#5]
Quoted:
There is a terrific book,"The Razor Edge Book of Sharpening." These guys do nothing but sharpen dull stuff. Hell, they could even make Frank Symptoms look sharp! Great info! Does the book mention the convex edge at all? |
|
|
|
[#6]
Quoted:
Quoted:
There is a terrific book,"The Razor Edge Book of Sharpening." These guys do nothing but sharpen dull stuff. Hell, they could even make Frank Symptoms look sharp! Great info! Does the book mention the convex edge at all? I am rapidly becoming a convert to convex after picking up a BRKT Bravo-1. |
|
|
|
[#7]
The Spyderco Tenacious was actually then knife that I was thinking about replacing it with. For $42 I think that I will give it a try. I need a good sharpener either way, so I will buy something to sharpen with first.
|
|
|
|
[#8]
Quoted:
Quoted:
Quoted:
There is a terrific book,"The Razor Edge Book of Sharpening." These guys do nothing but sharpen dull stuff. Hell, they could even make Frank Symptoms look sharp! Great info! Does the book mention the convex edge at all? I am rapidly becoming a convert to convex after picking up a BRKT Bravo-1. Between my Fallkniven, Busse, and Bark Rivers I'm sold on the convex edge. Wait till you find how easy it is to maintain and keep very sharp not to mention it's stronger than a V edge. |
|
|
|
[#9]
Quoted: The Spyderco Tenacious was actually then knife that I was thinking about replacing it with. For $42 I think that I will give it a try. I need a good sharpener either way, so I will buy something to sharpen with first. I've had a Tenancious as beater knife for about a year now. Great value for the $ 35 I paid for it. It will dull faster than some of the "better" steels but it sharpens quickly and is easy to get scary sharp. The blade and handle are a good size. Better as far as I am concerned than the delica or endura. It is a liner lock but I have not noticed any problems, except if you grip it just exactly a certain way and really clench down on it you touch the lock and the blade feels a little loose. I've treated it really badly and it's still in pretty good shape, no rust or stains on the blade. I think it would make a great economical edc knife. The only sharpener I use is a spyderco sharpmaker. I guess hardcore knife guys snear at it, but I have been very happy with it. |
|
|
|
[#10]
i have 2 benchmade emerson tantos. they would never hold an edge. a friend also has one and its the same way.
|
|
|
|
[#11]
They don't hold an edge because Benchmade steel is over priced junk
|
|
|
|
[#12]
Some good info on here:
http://tech.groups.yahoo.com/group/HowToSharpen/ I use a belt sander with a 300 or 400 grit, then polish the edge with a paper wheel on plain blades, serrated blades are more of a pain, but if you have a diamond sharpening rod and a paper wheel, you can do it too. Heat is your enemy. It took some practice, but once I figured it out, every knife in the house was razor sharp. Even some old knives that I thought were complete POS's were sharper than ever. There are some techniques for using fine grit sandpaper on a glass block, but you're still gonna have to get the angles right. I tried the Lansky stuff for a long time, finally gave it up when I went to the sander and paper wheel. Or better yet, go around to your local barbershops, find out who they use to sharpen their scissors and clippers. They won't keep using guys who screw up their blades. When you get a couple of positive recommendations, pay that guy to sharpen your knife correctly. |
|
|
|
[#13]
Quoted:
Quoted:
There is a terrific book,"The Razor Edge Book of Sharpening." These guys do nothing but sharpen dull stuff. Hell, they could even make Frank Symptoms look sharp! Great info! Does the book mention the convex edge at all? They do have a chapter or so about sharpening this kind of edge, and IIRC some info about restoring the convex edge. |
|
|
|
[#14]
Quoted:
They don't hold an edge because Benchmade steel is over priced junk 100% incorrect. Benchmade uses a variety of steel such as CPM-M4, M2, 154CM, S30V, D2, ATS-34, 440C, N690, 9Cr13CoMoV, AUS-8, 8Cr14Mov, X15 T.N, Devin Thomas Damascus, and Damasteel. Some are just easier to sharpen that others. OP buy one of these, its all you will ever need to make any knife shaving sharp. EdgePro Apex kit 3 |
|
|
|
[#15]
I know that it isn't overpriced junk. I love the knife........have carried it every day for 10 years. Originally, I bought it as gift to myself on my birthday. Maybe I was drinking the Koolaid when I wanted the Benchmade brand. At the time I had previously owned 2 Sypdercos and liked them both. But, they were serrated models that never really needed sharpening. This Benchmade has never really gotten sharp. I have gotten the belly of the blade sharp once or twice, but never the whole thing.
That Edge Pro is too expensive for me. I appreciate the advice, though. If I had this knife in an easier steel then I would be happy. Why doesn't anyone make a carbon steel, thumb assisted knife anyway? |
|
|
|
[#16]
Perhaps if you are having trouble with the ATS 34, maybe you should find a different material for your next knife (AUS8, 440C etc). Something with a Rockwell hardness less than 60. The reason those materials you mentioned are harder to sharpen isn't the material as much as the Rockwell hardness. Anything above 55 will be progressivly harder to sharpen as the number goes up. Buck used to go to about 56-58 on their stuff.
|
|
|
|
[#17]
there are some carbon steel knives out there but not many, and most are not assisted. Don't ever, EVER, use a belt sander on your knife unless you know for sure exactly what you are doing. They can catch on the belt andfly around your shop at supersonic speeds or burn the temper out and ruin a good knife. Take your time or even have a pro do it.
|
|
|
|
[#18]
It has to do with hardness and heat treat more than matterials. Some matterials are more or less inducive to more wear but you could take a 440c blade and put it up there so hard you could not sharpen it at all. Maintaining a good, consistant angle to sharpening your knives is important and will get you further along with keeping a good edge than anything. Benchmade, btw, should fix that blade for you. Contact them.
|
|
|
 Win a FREE Membership!
Sign up for the ARFCOM weekly newsletter and be entered to win a free ARFCOM membership. One new winner* is announced every week!
You will receive an email every Friday morning featuring the latest chatter from the hottest topics, breaking news surrounding legislation, as well as exclusive deals only available to ARFCOM email subscribers.

AR15.COM is the world's largest firearm community and is a gathering place for firearm enthusiasts of all types.
From hunters and military members, to competition shooters and general firearm enthusiasts, we welcome anyone who values and respects the way of the firearm.

Subscribe to our monthly Newsletter to receive firearm news, product discounts from your favorite Industry Partners, and more.
Copyright © 1996-2024 AR15.COM LLC. All Rights Reserved.
Any use of this content without express written consent is prohibited.
AR15.Com reserves the right to overwrite or replace any affiliate, commercial, or monetizable links, posted by users, with our own.


