|
Posted: 1/7/2017 3:39:39 PM EDT
Hey guys,
So I am wanting to get into building my own AR's, I hear they are like legos but for grown ups. So I've watched several different AR build videos on YouTube and they show what tools are required. But I am wondering which specific tools have you guys learned to trust and lean on, looking at brownells, they have a bazillion different options for every tool. I'm not sure which are a safe buy and which might be more prone to breaking quickly. I don't really have a budget in mind, I'm not trying to spend anything like $1000. But I want the tools I buy to last for longer than just a couple of builds. So I'm not looking for full blown professional Gunsmith tools, but I'm also not looking for the cheapest/weakest. Can y'all make some recommendations on which specific tools (brand, model) you use/recommend? I'm trying to build a solid tool set. (Right now I have zero tools as far as gun smithing goes.) Any insight y'all could provide would be extremely helpful, I'm a complete novice so the more recommendations you make the better off I'll be. |
|
|
|
[#1]
Roll pin punch set
Small brass hammer Razor blade Electrical tape Vise block Blue loctite Needle nose pliers Castle nut wrench Auto punch For a lower at least. |
|
|
|
[#2]
I'd highly recommend the Magpul BEV block for barrel/muzzle device installation and removal, as well as it's function as a mag well block. When used in the mag well, you can install optics and stocks without needing three hands.
Of course, that necessitates having a good bench vise. I have one with a 5" jaw and a wide range of adjustment. A good torque wrench for barrels and a small one for in-lbs for scope mounts is a good deal. A good set of punches. A good screwdriver set. A decent AR wrench for stocks and muzzle devices. I'd invest in a good cleaning rod like a Dewey rod. That'll get you started. |
|
|
|
[#3]
The Geisselle gas block roll pin starter is also helpful if you are assembling a complete upper.
|
|
|
|
[#4]
+1 magpul bev block, love it
|
|
|
|
[#5]
Kypnex pliers.
|
|
|
|
[#6]
Topic Moved
|
|
|
|
[#7]
+1 on the Bev block from Magpul. Also there is a company called Arnzen Arms that sells their locally made version of the reaction rod for about half price. I have Geissele, Bev blocks, AND Arnzen Arms RR's in the shop. They both work as designed. Good set of ROLL PIN punches, AR multi-tools, Allen wrenches. Vise and a bench to put it on. Feel free to IM me if you have any questions.
|
|
|
|
[#8]
Quoted:
Kypnex pliers. You can lead a horse to water, everything looks like a nail. err, wait When all you have is a hammer, you can't make it drink. 
But really, the 7" Knipex pliers are the cats knees for putting the pins in. Hammer and drift are only needed for taking them back out. These here, and very handy for non-gun stuff also. 
|
|
|
|
[#9]
Holy Smokes!! Those pliers ain't cheap. Thought they looked nifty to have around for all kinds of jobs but I'll have to pass unless I find someone selling them reasonable.
|
|
|
|
[#10]
Quoted:
Holy Smokes!! Those pliers ain't cheap. Thought they looked nifty to have around for all kinds of jobs but I'll have to pass unless I find someone selling them reasonable. I decided I'm not falling for some stupid overpriced German pliers, especially something so specialized. I've never been more wrong! The things are pure gold - they're worth EVERY PENNY! They'll pay for themselves the first time you (don't) crack a lower, but more importantly, I was dead-wrong about parallel-closing jaws being 'specialized'. I catch myself using 'em (instead of pliers or vice-grips) all the time. The only thing I regret is not buying a set twenty years ago. I know they're not cheap, but they're so rugged they'll last a lifetime (or more). Not like something you'll have to replace every few years. |
|
|
|
[#11]
What I have:
Tapco vice block for the lower and to hold the completed assembled rifle. I have the wheeler front takedown pin tool, not really needed. Kinda wish I had that $10 back. I have a big set of vice grips that kind of looks like a whale to walk in the bolt catch roll pin. A few turns, click, a few more turns, click... Wheeler upper clamshell for the upper. Bevblock looks cool, not cool enough to replace a tool I had before it came out and for a rifle I am not going to assemble a bunch of. My clamshell also has the insert with the gas block alignment tool which works great. No complaints with it all. Borrowed a DPMS armorer's wrench. Going to get a Magpul wrench with a gift card from Christmas. The green Tapco is supposed to be a good one, it was my first pic but the Magpul with a gift card costs about the same as the Tapco without. Depending on what config you do it may not be required. Most full float handgaurds with a proprietary barrel nut come with their own wrench. A2 stocks don't use anything special to tighten down, I just used a good tight fitting open end wrench same as flash hider. Just a stock wrench is much cheaper if you don't need the barrel nut part of the wrench but are planning on installing a telescoping stock. Bench vice. I use it to press in the trigger guard rollpin. Hard clear plastic packaging to use on the backside of the receiver when I am pressing the pins in to not harm the finish. (per iraqvetteran88's youtube video) Kinda missed the boat but Sears has torque wrenches on sale at Christmas time for around $50. Darn good deal. I have a 1/2" drive one of those (not digital) Rollpin punches. I had a set of Wheeler ones, they bent like wet noodles the first time out. I got a set of Mayhew ones and it has been good since. A smaller ball peen hammer. And headspace gauges for whatever caliber you are playing with. |
|
|
|
[#12]
Quoted:
They are expensive. I made without a set for at least a decade after someone here recommended them. I decided I'm not falling for some stupid overpriced German pliers, especially something so specialized. I've never been more wrong! The things are pure gold - they're worth EVERY PENNY! They'll pay for themselves the first time you (don't) crack a lower, but more importantly, I was dead-wrong about parallel-closing jaws being 'specialized'. I catch myself using 'em (instead of pliers or vice-grips) all the time. The only thing I regret is not buying a set twenty years ago. I know they're not cheap, but they're so rugged they'll last a lifetime (or more). Not like something you'll have to replace every few years. ^^ For real! They are one of those tools that has a place in the box, but very rarely stay there. Stupid handy in so many applications. Have a compound jaw so you can pinch the shit out of stuff, with little effort. Matco guy was always folding nickels up with them to show off. I think he just liked doing it, prob folded up his retirement doing that shit. lol They do all the things that normal pliers do, and- Better than a crescent wrench for bending sheet metal and stripping nuts. Great for crimping insulated wiring ends without cutting the insulation, esp the heat shrink ones. I have cold forged tools out of paper clips to push the pins out of wiring connectors many times. Lost the spring bail off the back of your headlight? Let me see what the other one looks like and your key ring They will become one of your goto tools when you get used to having them around. One of the few prized ones that you don't let anybody borrow. Like that really fkn sweet pair of scissors your wife has an actual restraining order preventing you from getting within 10ft of, these are their manly counterpart
|
|
|
|
[#13]
Quoted:
You can lead a horse to water, everything looks like a nail. err, wait When all you have is a hammer, you can't make it drink.
But really, the 7" Knipex pliers are the cats knees for putting the pins in. Hammer and drift are only needed for taking them back out. These here, and very handy for non-gun stuff also. https://images-na.ssl-images-amazon.com/images/I/61Vtw6Op7NL._SL1500_.jpg Quoted:
Quoted:
Kypnex pliers. You can lead a horse to water, everything looks like a nail. err, wait When all you have is a hammer, you can't make it drink.
But really, the 7" Knipex pliers are the cats knees for putting the pins in. Hammer and drift are only needed for taking them back out. These here, and very handy for non-gun stuff also. https://images-na.ssl-images-amazon.com/images/I/61Vtw6Op7NL._SL1500_.jpg This, a set of camshells for the upper, and a barrel nut wrench are all you need (and maybe a screwdriver for the grip screw). A pair of needle nose pliers are helpful to study the pins when you're starting to push them in. FWIW, kobalt makes parallel jaw pliers for about half the price. |
|
|
|
[#14]
A roll pin pusher and bolt catch tool from Little Crow Gunworks.
|
|
|
|
[#15]
As far as punches go, I have multiple sets of Grace USA and they have worked great for several builds.
|
|
|
|
[#16]
It had been awhile since I put a lower together and forgot how nice it was to have a pivot pin installation tool. So much easier.
I got mine from squirelldaddy.com but I believe brownells and a couple other places carry them too. |
|
|
|
[#17]
I keep collecting tools to make my life easier.
1. Set of punches 2. Roll pin starter punches 3. KAK Industries Walt's tool 4. 1/2" Torque wrench 5. Armor's Wrench 6. Magpul BEV block 7. Tapco Castle nut wrench 8. Brass hammer 9. Rubber mallet dual end soft hard 10. 1/4" x2" clevis pin 11. 1/4"x2"x2" wood block to support trigger guard ears 12. Geiselle gas block punches |
|
|
|
[#18]
Quoted:
10. 1/4" x2" clevis pin Every new builder should add one on to their next Amazon order (or keep an eye out for one at Lowes, Home Depot, or wherever). Even a "universal" 1/4" clevis-pin with multiple holes saves a lot of headaches (looking for front TD pin detents launched into orbit). Best 79 cents you'll ever spend.


|
|
|
|
[#19]
Magpul Bev block if you are building an upper. They are great! As far as a barrel nut wrench, it's all dependent on the handguard you buy, some even supply a wrench. ALG used to now I think you have to buy it. Last one I built I just used an large adj wrench I had because 1-3/16 crow foot wrenches are rare and/or expensive. Knipex pliers are expensive and just large jaw pliers will work but i just tapered my pins on last build and tapped em in. You'll need some punch sets. I've just used plain punches being careful.
On my second build I did make a block to help me with the assembly of the gas tube being pinned to the gas block. I just used a dremel to hollow into the wood block so I could contain the block while tapping in the pin. Everybody makes a big deal out of starting the detent pin and pivot pin. It's really easy. I just use a small thin blade from a small swiss army knife to hold the pin back while I start in the pivot pin. A 3rd hand from a friend does help a lot. So the only dedicated tools you should need are a castle nut wrench, a bev block if you are building your upper, maybe a proprietary barrel nut wrench, some punches, oh a brass&nylon mallet are nice, Just rent a torque wrench from AutoZone etc to torque the barrel nut. ETA, here is the simple block I made to help me pin and unpin gas tubes/gas blocks. 
|
|
|
|
[#20]
Wheeler upper receiver clam shell and/or reaction rod
Armorers wrench - I have the tapco wrench and it gets the job done but im looking for a nicer one. Hate the coating on it. Set of punches Squirrel Daddy roll pin starter punches Multi bit screw driver set Nylon or brass hammer (small regular hammer if you're brave) small file collection (not necessary but always useful) 3/8 torque wrench (ft lbs) 1/4 torque wrench (in lbs) - I use the harbor freight ones. Not the best but they work. That should get you started. If you do enough searching and stay to the cheaper side you wont be spending much more than $200 |
|
|
|
[#21]
I use on a regular basis:
Roll Pin punches Standard punches small brass hammer (harbor freight) Wheeler clamshell with gas tube alignment insert Armoror's wrench (can't remember the brand...Gem state or something, but recommended here and awesome) 1/4" clevis Vise torque wrench (harbor freight) Allen wrenchs screwdrivers I still want to get some sort of barrel vise clamp, reaction rod or the BEV block. I use the clamshell for barrel nut work, but for muzzle devices I've just made an impromptu V block out of heavy cardboard to clamp the barrel in a vice. It works, but is obviously not ideal. I also used a hacksaw to cut down through the end of the clevis pin to make a tool that I can use for installing the spring/pin in a rear carry handle style sight. You need something if you're going to assemble stripped A2 uppers. |
|
|
|
[#22]
Certainly not a requirement, but a very nice to have is a Wheeler FAT Wrench (or something similar). For attaching accessories and mounting scopes and prevent over and under torquing screws, this is a really handy tool. I recently bought one when it was on sale for under $50 shipped and used it on my last build. It sure is nice to know that you have the appropriate amount of torque on all the various small threaded fasteners on your rifle. I use it a lot! If you're like me and don't have calibrated hands like a lot of you do, this tool really is worth it.
|
|
|
|
[#23]
Quoted:
Certainly not a requirement, but a very nice to have is a Wheeler FAT Wrench (or something similar). For attaching accessories and mounting scopes and prevent over and under torquing screws, this is a really handy tool. I recently bought one when it was on sale for under $50 shipped and used it on my last build. It sure is nice to know that you have the appropriate amount of torque on all the various small threaded fasteners on your rifle. I use it a lot! If you're like me and don't have calibrated hands like a lot of you do, this tool really is worth it. https://www.AR15.Com/media/mediaFiles/415329/FAT-Wrench-131985.JPG I just used my Fat wrench to mount a new scope yesterday. |
|
|
|
[#24]
Hey - Have you guys seen this upper receiver vise block fixture from Brownells? If you have money to burn ($279) , this looks pretty dang robust (7075-T6 Aluminum construction). There is a video at that link that demonstrates how this works. Really slick, but really expensive.
|
|
|
|
[#25]
I've built around 15-20 AR's that are all still out there working great.
I have a small cheap tool box Harbor Freight punches, pliers, screw drivers DPMS vise block set NC Star Barrel Nut wrench Husky Torque wrench Other misc stuff. Nothing is really specialized or expensive in my tool box. I've also never broken a receiver ear....
It's usually not the tools but the tool using the tools. |
|
|
|
[#27]
The Magpul Armorer's Wrench is spendy, but it's my "go to". Once you use one, you never go back to the NCStar, DPMS, etc...
The Bev Block is also worth it's weight in gold. +1 on Walt's tool. It helps to keep from scratching your receiver when installing bolt catch pins. The Wheeler handguard removal tool is also a must have, if you ever work on rigs that don't have free float hand guards (especially for the Magpul SL line of handguards). I have worn out the protective plastic finish on mine, so I wrapped some electrical tape around it. Aside from the typical tools available from retail outlets, I love seeing all of the homemade tools that people have built or purposed for building AR's. I use a chopstick to install my magazine releases. Doesn't scratch and make it super easy to install. The plastic chamber flags work well for this too. For fancy muzzle devices, i wrap them with painter's tape, then use a large crescent wrench to install. Keeps them scratch free. |
|
|
|
[#28]
Quoted:
Yes! Every new builder should add one on to their next Amazon order (or keep an eye out for one at Lowes, Home Depot, or wherever). Even a "universal" 1/4" clevis-pin with multiple holes saves a lot of headaches (looking for front TD pin detents launched into orbit). Best 79 cents you'll ever spend.
https://images-na.ssl-images-amazon.com/images/I/41KJK2pBoQL._AA160_.jpg http://www.towsmart.us/wp-content/uploads/2013/12/1204_ClevisPin.jpg https://www.pivotpins.com/products/images/clevis-pin-single-II.jpg Quoted:
Quoted:
10. 1/4" x2" clevis pin Every new builder should add one on to their next Amazon order (or keep an eye out for one at Lowes, Home Depot, or wherever). Even a "universal" 1/4" clevis-pin with multiple holes saves a lot of headaches (looking for front TD pin detents launched into orbit). Best 79 cents you'll ever spend.
https://images-na.ssl-images-amazon.com/images/I/41KJK2pBoQL._AA160_.jpg http://www.towsmart.us/wp-content/uploads/2013/12/1204_ClevisPin.jpg https://www.pivotpins.com/products/images/clevis-pin-single-II.jpg What do you use them for? |
|
|
|
[#29]
Quoted:
What do you use them for? Quoted:
Quoted:
Quoted:
10. 1/4" x2" clevis pin Every new builder should add one on to their next Amazon order (or keep an eye out for one at Lowes, Home Depot, or wherever). Even a "universal" 1/4" clevis-pin with multiple holes saves a lot of headaches (looking for front TD pin detents launched into orbit). Best 79 cents you'll ever spend.
https://images-na.ssl-images-amazon.com/images/I/41KJK2pBoQL._AA160_.jpg http://www.towsmart.us/wp-content/uploads/2013/12/1204_ClevisPin.jpg https://www.pivotpins.com/products/images/clevis-pin-single-II.jpg What do you use them for? http://www.ar15.com/forums/t_3_4/362116_How_to_install_the_front_Pivot_Pin_using_a__1_clevis_pin___56K_death.html This is outright plagiarism from @Desert_AIP , but I think he'll forgive me.
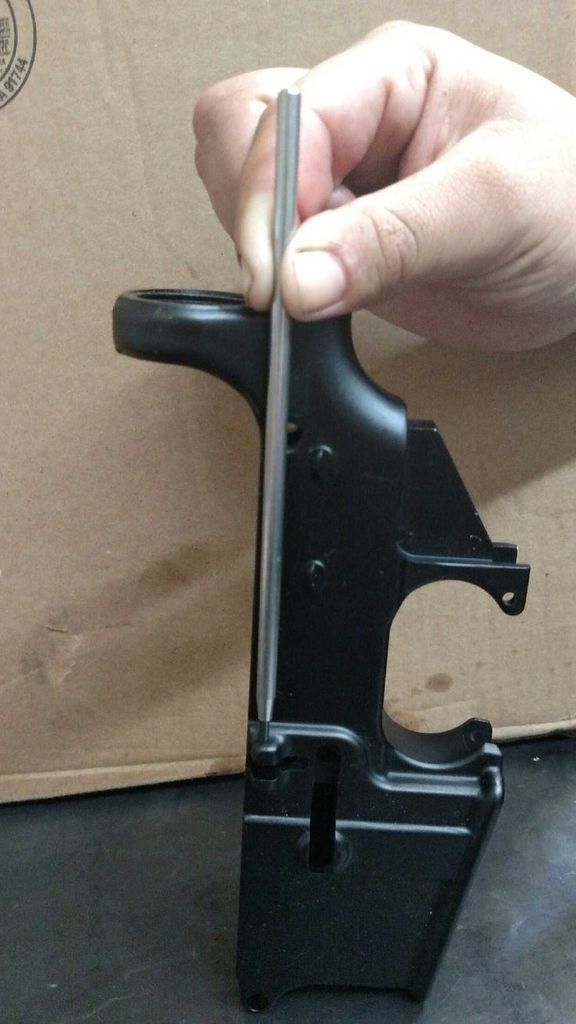
This is one of the best tips I've ever seen posted on ARFCOM. It's certainly not a "necessary tool", but it's makes my life a little easier by turning a 5-minute task into a 20-second task (no doubt it also saved a few detents & springs over the years). YMMV Most importantly, the tool is practically free. ___________________________________________________________ "If you are only doing one build, it's hard to justify spending money on a single use tool, if you're building 100 the technique below works equally well. Many here have talked about using a 1/4" clevis pin to install the Pivot Pin but there are always follow up questions as to the technique. Below is a step by step procedure to install the Pivot Pin using a clevis pin, this takes 10 times longer to describe than to actually perform and costs nearly nothing. Got to your local hardware store and buy a 1/4" clevis pin. Get the kind with at least one hole through it not the kind with a captured ball bearing on the end. I use a 2" long pin which reaches completely across the front of the lower. Get one at least this long. I paid 65¢ for mine. 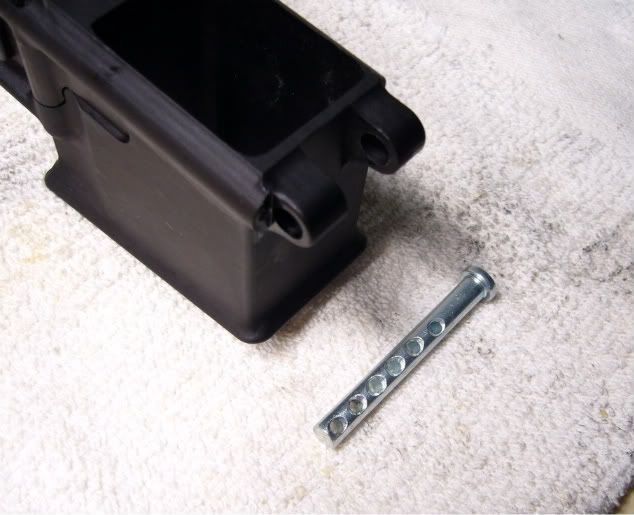
Insert the clevis pin through the pivot pin holes in the front of the lower from the left side. Align the hole (or one of the holes) in the clevis pin with the pivot pin detent channel in the lower. 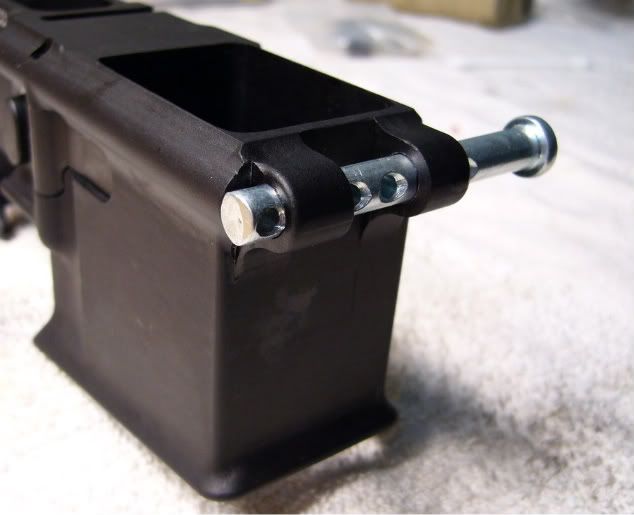
Insert the pivot pin detent spring through the hole and into the channel in the lower. 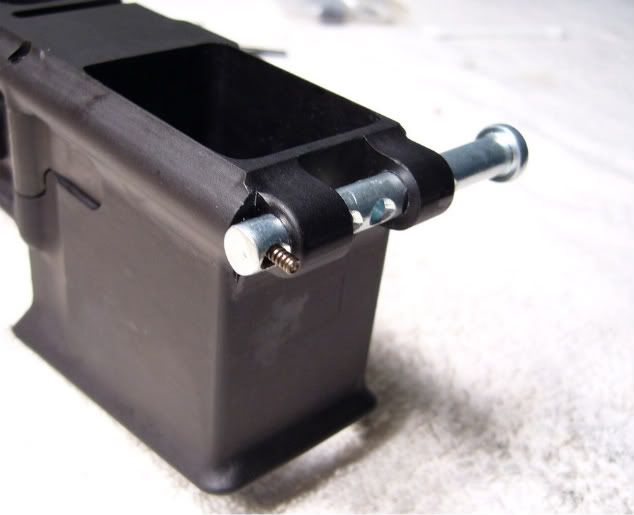
Insert the pivot pin detent through the hole. The spring will not let it go in very far without pressure. 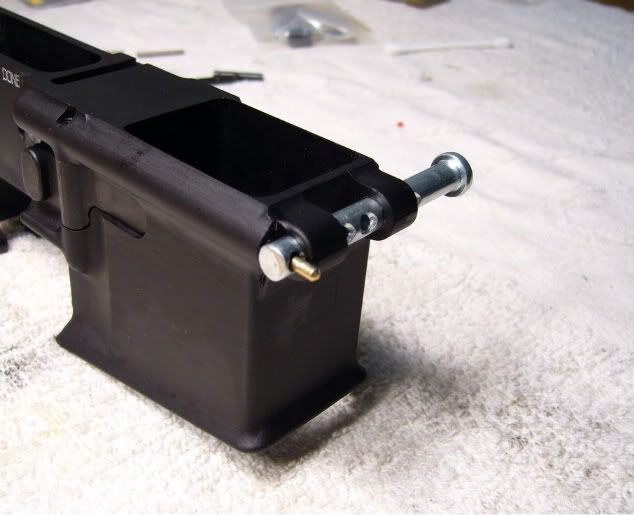
I perform the next three steps inside a 2 gallon zip-loc bag so I don't lose the detent or spring in case it gets away from me. With a punch or other suitable tool (like an allen wrench) push the detent through the hole in the clevis pin and into the lower while compressing the spring. The detent and spring are now inside the lower and clear of the clevis pin. The only thing holding them in place is pressure on the punch. 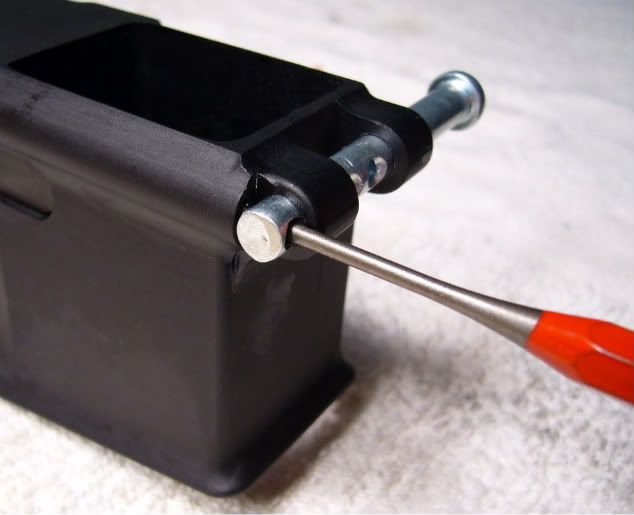
Turn the punch or allen wrench 90 degrees counter-clockwise so the hole is now at the top of the clevis pin. This will capture the detent and spring along the side of the clevis pin. 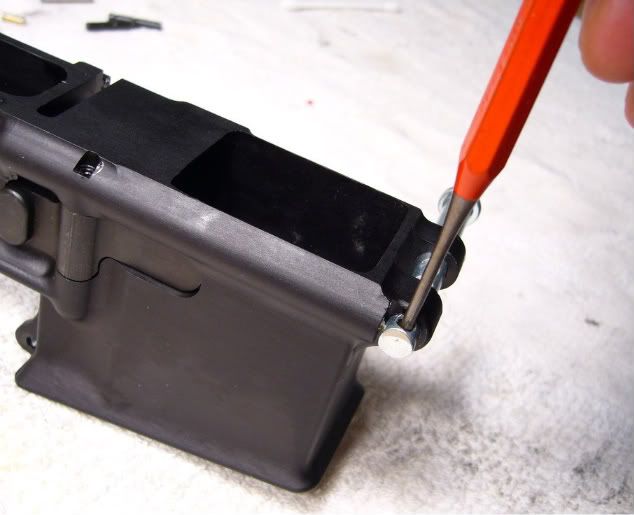
Remove the punch. You can see the detent poking out of the hole. 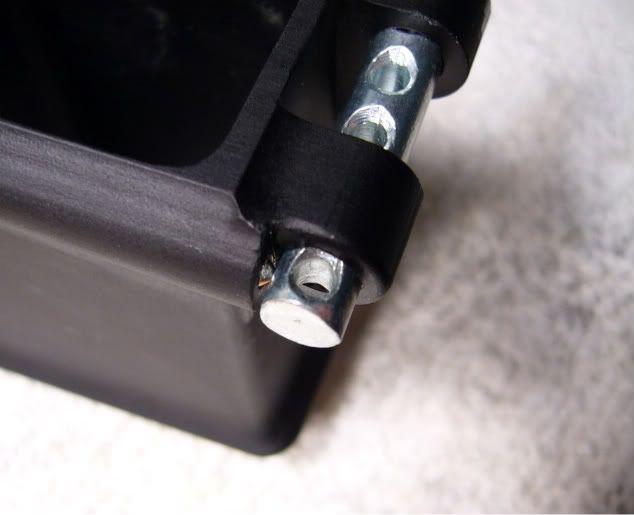
Start the pivot pin into the lower from the right side. Make sure the groove in the pivot pin is at the top. 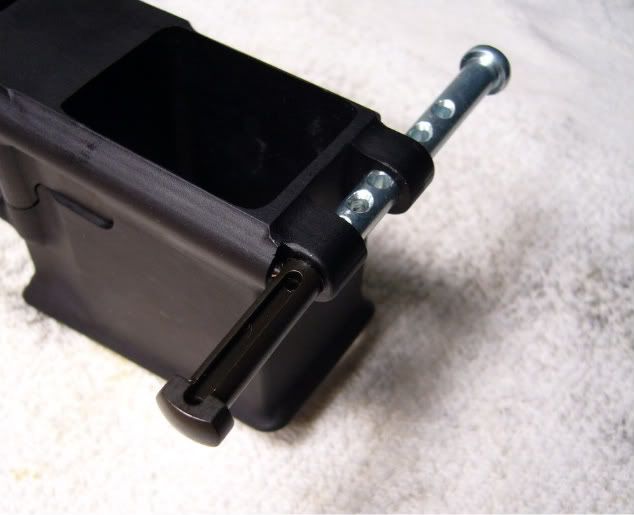
As you push the clevis pin out of the hole, keep sideways pressure on the detent until it is captured by the pivot pin. 
Keep pushing the pivot pin though the right side pivot hole. Once it is in the hole and won't fly out under spring pressure, remove the clevis pin. 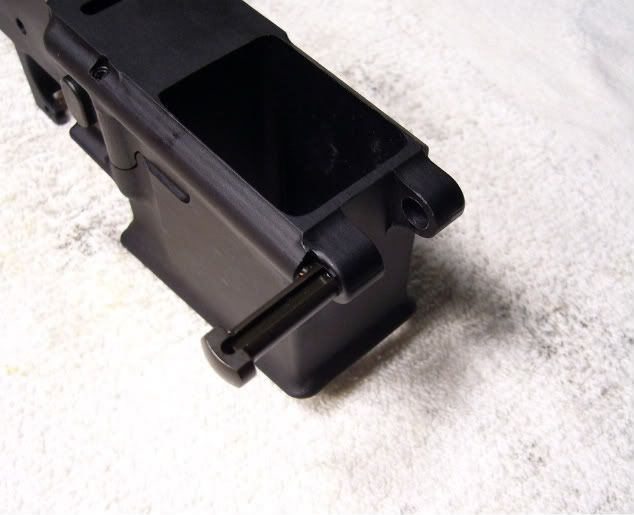
Rotate the pivot pin 90 degrees counter-clockwise until the groove in the pivot pin captures the detent. 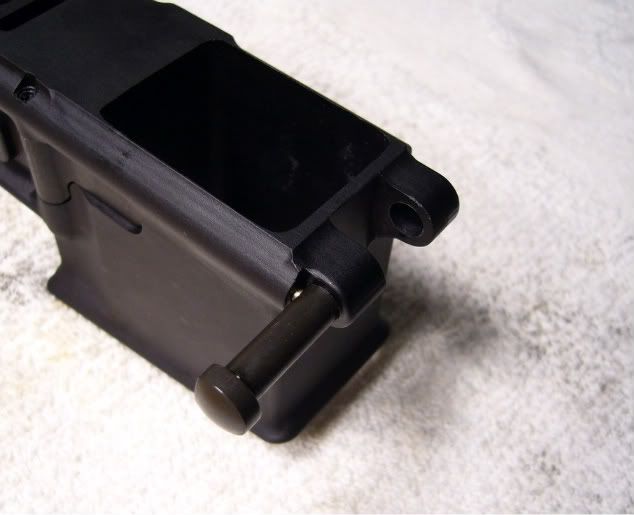
You are finished! " 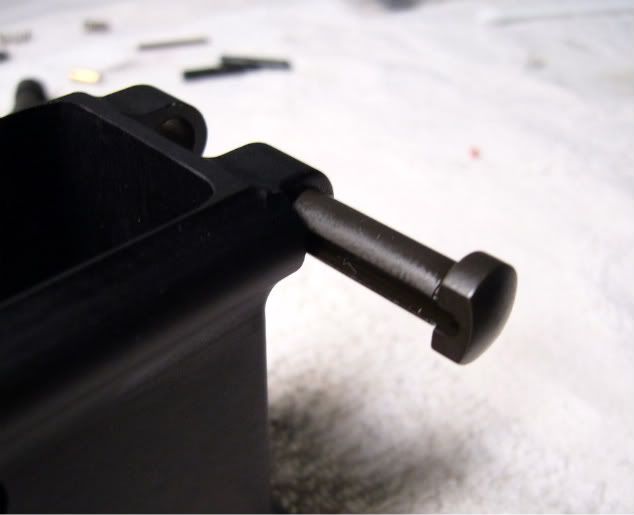
|
|
|
|
[#30]
PRI barrel nut wrench
|
|
|
 Win a FREE Membership!
Sign up for the ARFCOM weekly newsletter and be entered to win a free ARFCOM membership. One new winner* is announced every week!
You will receive an email every Friday morning featuring the latest chatter from the hottest topics, breaking news surrounding legislation, as well as exclusive deals only available to ARFCOM email subscribers.

AR15.COM is the world's largest firearm community and is a gathering place for firearm enthusiasts of all types.
From hunters and military members, to competition shooters and general firearm enthusiasts, we welcome anyone who values and respects the way of the firearm.

Subscribe to our monthly Newsletter to receive firearm news, product discounts from your favorite Industry Partners, and more.
Copyright © 1996-2024 AR15.COM LLC. All Rights Reserved.
Any use of this content without express written consent is prohibited.
AR15.Com reserves the right to overwrite or replace any affiliate, commercial, or monetizable links, posted by users, with our own.