|
[#1]
The commentary is the best part!
|
|
|
|
[#2]
Well, something happened and my mold silicone went insane. Had to chip the mold off the lower. Well, have to get more silicone for the mold I guess.
|
|
|
|
[#3]
Looks like someone is profiting off your idea www.ar15mold.com
Posted Via AR15.Com Mobile |
|
|
|
[#4]
Quoted:
I bet it would work. If you look at the inside of most plastic handguards, they've got reinforcing ribs and such. Quoted:
I bet it would work. If you look at the inside of most plastic handguards, they've got reinforcing ribs and such. Yeah, that's probably good enough. Something you could even do would be the leave the heatshields in, and perhaps fill the space between the heatshield and the handguard with clay. This would thicken the handguards in your final product. I am not sure I'd need that strong if I used the right plastic. With a .22 you shouldn't need the heatshields anyway. Yeah, I have a dedicated .22 AR upper (Spikes) and it never really gets that hot. |
|
|
|
[#5]
Quoted: Looks like someone is profiting off your idea www.ar15mold.com Posted Via AR15.Com Mobile I'm thinking about asking them for the MSDS sheet for their resin.... Interesting that their mold uses much of the same ideas we've mentioned throughout this thread, and some stuff we didn't think of. Looks like the ideas for forming the channels using plugs/pins is a solid idea. I have been thinking that the silicone mold might be the cause of some of the issues we're seeing with molding, seeing as this is a rigid mold it won't have any of the alignment issues. |
|
|
|
[#6]
Quoted:
We're talking past each other. I wasn't referring to the technology of 3-D printers - the cost is slowly coming down, but consumer level machines use a pretty large drop compared to expensive ones - I was referring to the technology of the printed lower. WarFairy's Charon was a CavArms type integrated lower, which greatly reinforced the buffer tube region - and was printed in 4 parts, allowing it to be printed on rather small printers. The latest printed lowers have a significantly reinforced buffer tube boss. Quoted:
We're talking past each other. I wasn't referring to the technology of 3-D printers - the cost is slowly coming down, but consumer level machines use a pretty large drop compared to expensive ones - I was referring to the technology of the printed lower. WarFairy's Charon was a CavArms type integrated lower, which greatly reinforced the buffer tube region - and was printed in 4 parts, allowing it to be printed on rather small printers. The latest printed lowers have a significantly reinforced buffer tube boss. Oh! Well that makes much more sense. Yes. I absolutely agree that the design in the printed lowers has increased substantially. I'd still best that they will rely on using well-placed additional material than inserts that the injection molded lowers can use because of the production method. Having just downloaded the WarFairy's CAD files, I can see exactly what you mean. Quoted:
Zman, thanks for your input. I just want to make sure we're all on the same page: I'm not necessarily wanted to print an AR15 lower and use it as a firearm part. I'm simply wanting a dimensionally reinforced lower that I can use as a form for casting using Boris' and F3D's processes. Printing one myself seems to be the most expedient way to acquire one, since no one is selling 3D printed lowers that I've found. The 3D printed designs have been reinforced substantially so that they will last at least short-term. I think that using the same reinforced design, only cast out of Task 9 or Smoothcast 300 (which are apparently considerably stronger than a 3D printed product) would be wonderfully suited for long-term use. ... Right now I only have access to standard lowers, and even if I bought an expensive billet lower with integrated trigger guard, it's still not going to be dimensionally reinforced around the buffer tower or the take-down pins, like the 3D printed designs are. I could build up a standard lower with modeling clay and install an arched trigger guard, but I'm afraid the end product won't be near as 'neat' looking as a 3D printed lower. Once again, I'm asking which of the consumer grade 3D printers would be capable of printing a nice looking AR15 lower to use as a form. Does anybody have any recommendations? I'd still worry about the accuracy of the threads and even potentially some hole positions depending on the consumer model. The same is true for the surface finish, as you'd have the layer marks that would show up in the mold. The outsides I could see being sanded fairly well, but the inside would be an absolute pain. As for machines currently on the market, the one I use just got discontinued and the Gen 5 MakerBot's had huge extruder problems (for which they just launched a fix for). I used on the the Gen 5 Replicators for a while and it printed quite when when the extruder would behave. If they get the extruder issue fixed, that is a nice machine and quite sizeable. The FormLabs machine is fantastic, but limited build-size and material wise and is a bit more costly. The Ultimaker 2 I've heard to be very good, the same with the LulzBot Mini. There are some other newer ones out that I am not as familiar with, so keep an eye out for them. MAKE! magazine is a good resource as they do some nice tests on the machines they get. However you do give me a great idea. Instead of printing an entire lower to use as a pattern, why not just print out additional reinforcement parts for a standard lower? Take a standard lower, print out some reinforcement parts, adhere them to the lower where they need to go, then use this "assembled" lower as the pattern for your mold? This would allow you to keep the accuracy of a proper lower where it matters while adding on to the areas that need reinforcing in a cleaner way than sculpting clay. Plus, you wouldn't need a printer anywhere near as big and the parts you would print would use less material, take less time, and be easier to sand as they would be of simpler geometry. I should also admit that if someone told me to make a lower that was more reinforced for simple, at home plastic molding, I'd go the simple route and it wouldn't be graceful but it would probably get the job done. Using a printer and CAD would allow you to go a bit more design friendly if you want to. Now you guys are giving me ideas of things to do in my off time. That's not always a good thing. 
|
|
|
|
[#7]
Quoted: I'm thinking about asking them for the MSDS sheet for their resin....
Interesting that their mold uses much of the same ideas we've mentioned throughout this thread, and some stuff we didn't think of. Looks like the ideas for forming the channels using plugs/pins is a solid idea. I have been thinking that the silicone mold might be the cause of some of the issues we're seeing with molding, seeing as this is a rigid mold it won't have any of the alignment issues. This page is particularly interesting: http://ar15mold.com/spare-freedom-15-small-parts-kit/ 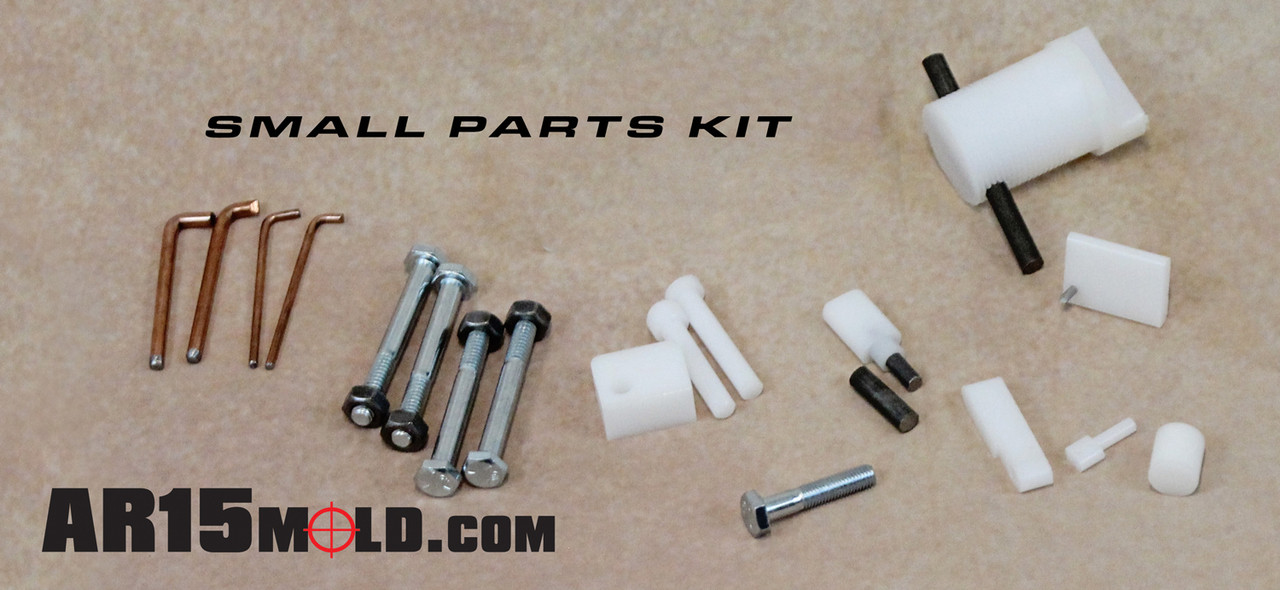
|
|
|
|
[#8]
Quoted:
I'm thinking about asking them for the MSDS sheet for their resin.... Interesting that their mold uses much of the same ideas we've mentioned throughout this thread, and some stuff we didn't think of. Looks like the ideas for forming the channels using plugs/pins is a solid idea. I have been thinking that the silicone mold might be the cause of some of the issues we're seeing with molding, seeing as this is a rigid mold it won't have any of the alignment issues. Quoted:
Quoted:
Looks like someone is profiting off your idea www.ar15mold.com Posted Via AR15.Com Mobile I'm thinking about asking them for the MSDS sheet for their resin.... Interesting that their mold uses much of the same ideas we've mentioned throughout this thread, and some stuff we didn't think of. Looks like the ideas for forming the channels using plugs/pins is a solid idea. I have been thinking that the silicone mold might be the cause of some of the issues we're seeing with molding, seeing as this is a rigid mold it won't have any of the alignment issues. Anyone care to speculate on how well their mold would work with cheaper resins like Task 2, Task 9 or Task 12? Which one of the Task or Smothcast resins is best for lowers? |
|
|
|
[#9]

|
|
|
|
[#10]
Quoted: Anyone care to speculate on how well their mold would work with cheaper resins like Task 2, Task 9 or Task 12? Which one of the Task or Smothcast resins is best for lowers? Quoted: Quoted: Quoted: Looks like someone is profiting off your idea www.ar15mold.com Posted Via AR15.Com Mobile I'm thinking about asking them for the MSDS sheet for their resin.... Interesting that their mold uses much of the same ideas we've mentioned throughout this thread, and some stuff we didn't think of. Looks like the ideas for forming the channels using plugs/pins is a solid idea. I have been thinking that the silicone mold might be the cause of some of the issues we're seeing with molding, seeing as this is a rigid mold it won't have any of the alignment issues. Anyone care to speculate on how well their mold would work with cheaper resins like Task 2, Task 9 or Task 12? Which one of the Task or Smothcast resins is best for lowers? I sent an email asking for the MSDS to try to figure out what resin/polymer it is. They have no legal obligation to provide it but we shall see, but I'd like to know in general what I'm working with so I can take appropriate safety measures when working with chemicals. Whatever it is it's an opaque tintable fairly thin epoxy/resin (probably around 300CPS) with a fairly long pot life (around 6min based on the videos). |
|
|
|
[#11]
|
|
|
|
[#12]
Quoted:
Interesting that their mold uses much of the same ideas we've mentioned throughout this thread, and some stuff we didn't think of. Looks like the ideas for forming the channels using plugs/pins is a solid idea. I have been thinking that the silicone mold might be the cause of some of the issues we're seeing with molding, seeing as this is a rigid mold it won't have any of the alignment issues. Agree regarding the mold rigidity. With all of the fixed pieces I've added to my molds, there's less reason to rely on the flexibility of the mold, and it was that flexibility I added those pieces to fix. Looks from the surface striations in some of the photos that the commercial mold might be 3D printed, or perhaps taken from a 3D printed template. |
|
|
|
[#13]
Quoted:
Agree regarding the mold rigidity. With all of the fixed pieces I've added to my molds, there's less reason to rely on the flexibility of the mold, and it was that flexibility I added those pieces to fix. Looks from the surface striations in some of the photos that the commercial mold might be 3D printed, or perhaps taken from a 3D printed template. In one of the scrolling product images where the lower is in the mold half with the flashing still present, you can see what appears to be end mill marks on the magwell and area where the receiver extension threads in. It suggests to me that they were machined from two blocks of polymer. Neat product regardless, but to me I can't really justify the price. If I recall, there are 80% jig kits for about half that price. While the 80% are more expensive, they'll also last longer than a polymer one. Sure they'd take more time to make and need more tools, but for the same price I'd probably for that direction. |
|
|
|
[#14]
Quoted: In one of the scrolling product images where the lower is in the mold half with the flashing still present, you can see what appears to be end mill marks on the magwell and area where the receiver extension threads in. It suggests to me that they were machined from two blocks of polymer.
Neat product regardless, but to me I can't really justify the price. If I recall, there are 80% jig kits for about half that price. While the 80% are more expensive, they'll also last longer than a polymer one. Sure they'd take more time to make and need more tools, but for the same price I'd probably for that direction. The advantage w/ the commercial product, as well as w/ Fruity Ghost, is you could ship it to your hunting lodge on the opposite side of a ban state, and then make yourself a gonne the night before you went hunting/shooting. Pour it, go to sleep, wake up in the morning to your new rifle. 80% aluminum is a less expensive route, but more labor intensive than this commercial product. Is the same commercial product folks from several pages back, or is this a new company? |
|
|
|
[#15]
Quoted:
The advantage w/ the commercial product, as well as w/ Fruity Ghost, is you could ship it to your hunting lodge on the opposite side of a ban state, and then make yourself a gonne the night before you went hunting/shooting. Pour it, go to sleep, wake up in the morning to your new rifle. 80% aluminum is a less expensive route, but more labor intensive than this commercial product. Is the same commercial product folks from several pages back, or is this a new company? Yeah, that's a very valid point. The polymer needs no electricity if you used a gas stove to heat the resin before pouring and then a knife to trim away the flash. Theoretically less knowledge required as well. It is a very neat concept and the casting in general makes me wonder what other materials you could make an AR out of. Someone mentioned brass or bronze: completely different but man seeing a brass/bronze AR with wood furniture would be a trip. |
|
|
|
[#16]
Quoted: Yeah, that's a very valid point. The polymer needs no electricity if you used a gas stove to heat the resin before pouring and then a knife to trim away the flash. Theoretically less knowledge required as well.
It is a very neat concept and the casting in general makes me wonder what other materials you could make an AR out of. Someone mentioned brass or bronze: completely different but man seeing a brass/bronze AR with wood furniture would be a trip. An entirely pine lower has been made - it lasted 3 shots. Doubtless a harder wood would result in better results.
|
|
|
|
[#17]
Got a response back from the company. A MSDS is free with purchase of their resin.
Posted Via AR15.Com Mobile |
|
|
|
[#18]
Quoted:
I'd still worry about the accuracy of the threads and even potentially some hole positions depending on the consumer model. The same is true for the surface finish, as you'd have the layer marks that would show up in the mold. The outsides I could see being sanded fairly well, but the inside would be an absolute pain. <Snip> However you do give me a great idea. Instead of printing an entire lower to use as a pattern, why not just print out additional reinforcement parts for a standard lower? Take a standard lower, print out some reinforcement parts, adhere them to the lower where they need to go, then use this "assembled" lower as the pattern for your mold? This would allow you to keep the accuracy of a proper lower where it matters while adding on to the areas that need reinforcing in a cleaner way than sculpting clay. Plus, you wouldn't need a printer anywhere near as big and the parts you would print would use less material, take less time, and be easier to sand as they would be of simpler geometry. I should also admit that if someone told me to make a lower that was more reinforced for simple, at home plastic molding, I'd go the simple route and it wouldn't be graceful but it would probably get the job done. Using a printer and CAD would allow you to go a bit more design friendly if you want to. Now you guys are giving me ideas of things to do in my off time. That's not always a good thing. Thanks for recommending some printers to look at, I'm doing research and making comparisons on those models. I really appreciate you giving a shorter list of machines to look at, there's so many out there that my eyes glaze over trying to make comparisons. Your point about using a 3D printed lower for the form is excellent! I've been a little worried, wondering how the buffer tube threads would turn out being printed. I don't want imperfect threads to be replicated in every lower I cast. Same for hole placements, and I assumed I'd have to bondo and sand the lower first so I didn't wind up with layer lines. However, your point about drawing 'additions' and printing those, gluing them to said lower and using it as a form is genius!, for exactly all the reasons you listed. It hadn't occurred to me at all, and I think that's exactly the way I'll do it. Could even see if I can draw them, and then find someone who will print them for me. It'd be a bunch of small, nondescript parts, instead of a stripped lower. Should be pretty easy to do, and I can use glue and some careful application of bondo or similar filler to make it look really decent before I make the mold. ZMan941, I owe you a beer. Thanks for the excellent points! |
|
|
|
[#19]
Quoted:
Has anyone used a "fruity ghost" lower for a dedicated .22LR build? With a lot less powerful cartridge they should hold up better right? What about casting an upper? I would assume that it would need to be fiber reinforced like with fiberglass or kevlar or something? Would it be best to make the mold from a commercial plastic upper instead of an aluminum one to take advantage of any dimensional changes they've done to strengthen the upper? I've seen the posts about plastic LPK parts which is cool... but how about plastic parts like an FSB or even a plastic .22LR barrel cast around one of the .22LR liners that are commercially available. I know newer 10/22s use a lot of plastic parts and others over the years have as well back as far as the Remington Nylon 66 from the 1960s. Seems like a .22LR AR could be build that had very few metal parts in it at all. Should be super lightweight. The DPMS LoPro is actually heavier than some of the other uppers; while they got rid of the door and the shell deflector they substantially upped the wall thickness. But a dedicated .22 lower is intriguing in that, since there's no buffer, you have options for the rear of the lower. Likewise the magwell could be modified to take, say, 10/22 mags. |
|
|
|
[#20]
Quoted:
Oh! Well that makes much more sense. Yes. I absolutely agree that the design in the printed lowers has increased substantially. I'd still best that they will rely on using well-placed additional material than inserts that the injection molded lowers can use because of the production method. Having just downloaded the WarFairy's CAD files, I can see exactly what you mean. I'd still worry about the accuracy of the threads and even potentially some hole positions depending on the consumer model. The same is true for the surface finish, as you'd have the layer marks that would show up in the mold. The outsides I could see being sanded fairly well, but the inside would be an absolute pain. As for machines currently on the market, the one I use just got discontinued and the Gen 5 MakerBot's had huge extruder problems (for which they just launched a fix for). I used on the the Gen 5 Replicators for a while and it printed quite when when the extruder would behave. If they get the extruder issue fixed, that is a nice machine and quite sizeable. The FormLabs machine is fantastic, but limited build-size and material wise and is a bit more costly. The Ultimaker 2 I've heard to be very good, the same with the LulzBot Mini. There are some other newer ones out that I am not as familiar with, so keep an eye out for them. MAKE! magazine is a good resource as they do some nice tests on the machines they get. However you do give me a great idea. Instead of printing an entire lower to use as a pattern, why not just print out additional reinforcement parts for a standard lower? Take a standard lower, print out some reinforcement parts, adhere them to the lower where they need to go, then use this "assembled" lower as the pattern for your mold? This would allow you to keep the accuracy of a proper lower where it matters while adding on to the areas that need reinforcing in a cleaner way than sculpting clay. Plus, you wouldn't need a printer anywhere near as big and the parts you would print would use less material, take less time, and be easier to sand as they would be of simpler geometry. I should also admit that if someone told me to make a lower that was more reinforced for simple, at home plastic molding, I'd go the simple route and it wouldn't be graceful but it would probably get the job done. Using a printer and CAD would allow you to go a bit more design friendly if you want to. Now you guys are giving me ideas of things to do in my off time. That's not always a good thing. Quoted:
Quoted:
We're talking past each other. I wasn't referring to the technology of 3-D printers - the cost is slowly coming down, but consumer level machines use a pretty large drop compared to expensive ones - I was referring to the technology of the printed lower. WarFairy's Charon was a CavArms type integrated lower, which greatly reinforced the buffer tube region - and was printed in 4 parts, allowing it to be printed on rather small printers. The latest printed lowers have a significantly reinforced buffer tube boss. Oh! Well that makes much more sense. Yes. I absolutely agree that the design in the printed lowers has increased substantially. I'd still best that they will rely on using well-placed additional material than inserts that the injection molded lowers can use because of the production method. Having just downloaded the WarFairy's CAD files, I can see exactly what you mean. Quoted:
Zman, thanks for your input. I just want to make sure we're all on the same page: I'm not necessarily wanted to print an AR15 lower and use it as a firearm part. I'm simply wanting a dimensionally reinforced lower that I can use as a form for casting using Boris' and F3D's processes. Printing one myself seems to be the most expedient way to acquire one, since no one is selling 3D printed lowers that I've found. The 3D printed designs have been reinforced substantially so that they will last at least short-term. I think that using the same reinforced design, only cast out of Task 9 or Smoothcast 300 (which are apparently considerably stronger than a 3D printed product) would be wonderfully suited for long-term use. ... Right now I only have access to standard lowers, and even if I bought an expensive billet lower with integrated trigger guard, it's still not going to be dimensionally reinforced around the buffer tower or the take-down pins, like the 3D printed designs are. I could build up a standard lower with modeling clay and install an arched trigger guard, but I'm afraid the end product won't be near as 'neat' looking as a 3D printed lower. Once again, I'm asking which of the consumer grade 3D printers would be capable of printing a nice looking AR15 lower to use as a form. Does anybody have any recommendations? I'd still worry about the accuracy of the threads and even potentially some hole positions depending on the consumer model. The same is true for the surface finish, as you'd have the layer marks that would show up in the mold. The outsides I could see being sanded fairly well, but the inside would be an absolute pain. As for machines currently on the market, the one I use just got discontinued and the Gen 5 MakerBot's had huge extruder problems (for which they just launched a fix for). I used on the the Gen 5 Replicators for a while and it printed quite when when the extruder would behave. If they get the extruder issue fixed, that is a nice machine and quite sizeable. The FormLabs machine is fantastic, but limited build-size and material wise and is a bit more costly. The Ultimaker 2 I've heard to be very good, the same with the LulzBot Mini. There are some other newer ones out that I am not as familiar with, so keep an eye out for them. MAKE! magazine is a good resource as they do some nice tests on the machines they get. However you do give me a great idea. Instead of printing an entire lower to use as a pattern, why not just print out additional reinforcement parts for a standard lower? Take a standard lower, print out some reinforcement parts, adhere them to the lower where they need to go, then use this "assembled" lower as the pattern for your mold? This would allow you to keep the accuracy of a proper lower where it matters while adding on to the areas that need reinforcing in a cleaner way than sculpting clay. Plus, you wouldn't need a printer anywhere near as big and the parts you would print would use less material, take less time, and be easier to sand as they would be of simpler geometry. I should also admit that if someone told me to make a lower that was more reinforced for simple, at home plastic molding, I'd go the simple route and it wouldn't be graceful but it would probably get the job done. Using a printer and CAD would allow you to go a bit more design friendly if you want to. Now you guys are giving me ideas of things to do in my off time. That's not always a good thing. I've thought for a while taht the real value of a 3-d printer for AR lowers would be for rapid prototyping casting cores - and now mold forms. The printer would let you make modifications that would simplify the casting process. For instance, what about incorporating a Magpull MIAD "core" right into the lower, and then just add the components? |
|
|
|
[#21]
Quoted:
Thanks for recommending some printers to look at, I'm doing research and making comparisons on those models. I really appreciate you giving a shorter list of machines to look at, there's so many out there that my eyes glaze over trying to make comparisons. Your point about using a 3D printed lower for the form is excellent! I've been a little worried, wondering how the buffer tube threads would turn out being printed. I don't want imperfect threads to be replicated in every lower I cast. Same for hole placements, and I assumed I'd have to bondo and sand the lower first so I didn't wind up with layer lines. However, your point about drawing 'additions' and printing those, gluing them to said lower and using it as a form is genius!, for exactly all the reasons you listed. It hadn't occurred to me at all, and I think that's exactly the way I'll do it. Could even see if I can draw them, and then find someone who will print them for me. It'd be a bunch of small, nondescript parts, instead of a stripped lower. Should be pretty easy to do, and I can use glue and some careful application of bondo or similar filler to make it look really decent before I make the mold. ZMan941, I owe you a beer. Thanks for the excellent points! Genius? Nah. I just have those moments where I'm useful.
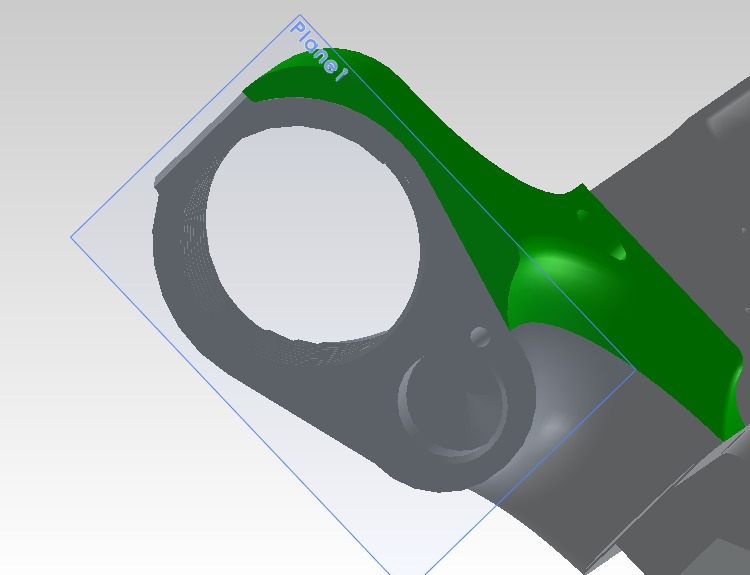
On that same note, I had some time to mess around with an idea. 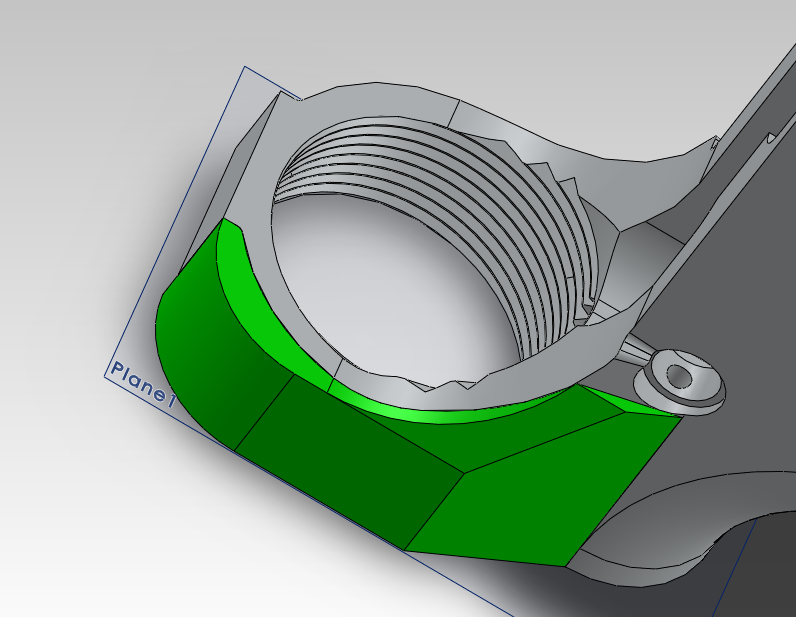
Quick, dirty, and not the prettiest thing, but it adds thickness to the rear without creeping into the grip area. It could be easily printed, sanded, then stuck on a lower that you are using for a form. |
|
|
|
[#22]
Quoted:On that same note, I had some time to mess around with an idea.
http://i70.photobucket.com/albums/i86/Squeethm/Polymer%20Lower%20Reinformcent%20Concept_zpsrlf7ddgi.png Quick, dirty, and not the prettiest thing, but it adds thickness to the rear without creeping into the grip area. It could be easily printed, sanded, then stuck on a lower that you are using for a form. Very nice idea. Should make reinforcements a lot cleaner for those of you who have a 3D printer. You might already be planning this, but it will probably be helpful to extend that piece forward around the rear takedown pin hole, at least around the top, as that hole seems typically the first place where a weak lower will fail. The ring around the receiver extension is sometimes the point of failure, but in my testing with castings which are not dimensionally reinforced, the failures there are less often and mostly when I've heavily reinforced around the pin hole with fiberglass but have failed to reinforce the ring so well due to the difficulties of keeping the fiberglass in place as the mold is closed up and pinned together. |
|
|
|
[#23]
Quoted:
Genius? Nah. I just have those moments where I'm useful.
On that same note, I had some time to mess around with an idea. http://i70.photobucket.com/albums/i86/Squeethm/Polymer%20Lower%20Reinformcent%20Concept_zpsrlf7ddgi.png Quick, dirty, and not the prettiest thing, but it adds thickness to the rear without creeping into the grip area. It could be easily printed, sanded, then stuck on a lower that you are using for a form. Quoted:
Quoted:
Thanks for recommending some printers to look at, I'm doing research and making comparisons on those models. I really appreciate you giving a shorter list of machines to look at, there's so many out there that my eyes glaze over trying to make comparisons. Your point about using a 3D printed lower for the form is excellent! I've been a little worried, wondering how the buffer tube threads would turn out being printed. I don't want imperfect threads to be replicated in every lower I cast. Same for hole placements, and I assumed I'd have to bondo and sand the lower first so I didn't wind up with layer lines. However, your point about drawing 'additions' and printing those, gluing them to said lower and using it as a form is genius!, for exactly all the reasons you listed. It hadn't occurred to me at all, and I think that's exactly the way I'll do it. Could even see if I can draw them, and then find someone who will print them for me. It'd be a bunch of small, nondescript parts, instead of a stripped lower. Should be pretty easy to do, and I can use glue and some careful application of bondo or similar filler to make it look really decent before I make the mold. ZMan941, I owe you a beer. Thanks for the excellent points! Genius? Nah. I just have those moments where I'm useful.
On that same note, I had some time to mess around with an idea. http://i70.photobucket.com/albums/i86/Squeethm/Polymer%20Lower%20Reinformcent%20Concept_zpsrlf7ddgi.png Quick, dirty, and not the prettiest thing, but it adds thickness to the rear without creeping into the grip area. It could be easily printed, sanded, then stuck on a lower that you are using for a form. Do you have that as a .STL file I could get? |
|
|
|
[#24]
Quoted:
Do you have that as a .STL file I could get? Quoted:
Quoted:
Genius? Nah. I just have those moments where I'm useful.
Quick, dirty, and not the prettiest thing, but it adds thickness to the rear without creeping into the grip area. It could be easily printed, sanded, then stuck on a lower that you are using for a form. Do you have that as a .STL file I could get? Absolutely! I'd want to mirror it first so you can get one for each side. However, looking through the thread and seeing that one of the main areas of failure was the takedown pin, I advanced the design a bit further. Here is v3. v2 was the same but with chamfered edges instead of fillets and rounds. It is a much larger piece but it goes all the way over the takedown pin area and then tapers off to stop right before the selector hole. In it's current form, ambidextrous safeties would not be possible. The sweep above the grip area tries to mimic the same curve to both look better and prevent harshness on the hand. 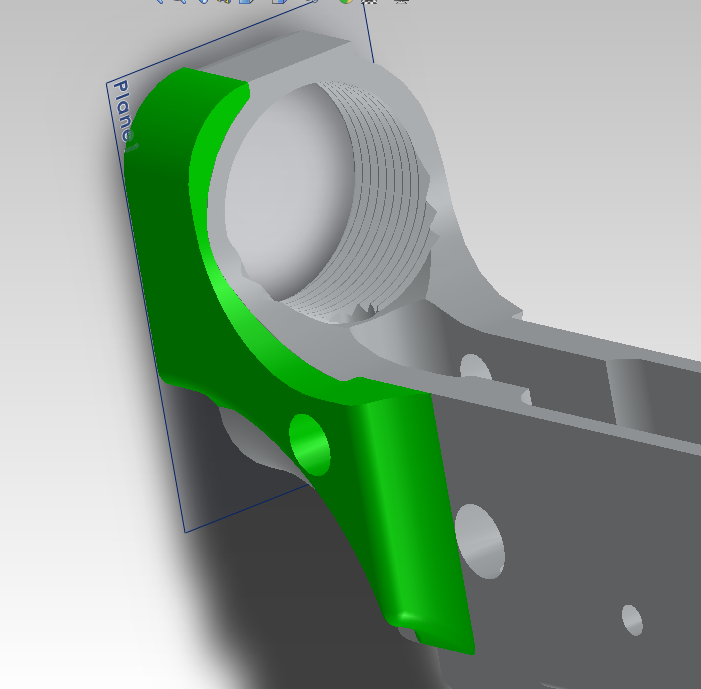
I'm working on filling a small gap in the model right above the detent/takedown pin hole. If that isn't filled you'll get some strange thing. Theoretically it could just be fixed by the user with clay to prevent the silicone from filling it when you make the mold, but where's the fun in that? I'd like to get it down and fixed. |
|
|
|
[#25]
That would be perfect!
Especially because I bought a bunch of the adjustable clevis pins with multiple holes and a cotter pin to secure them, figuring that different lengths would be needed to accommodate thickened areas on lowers adjusted for polymer. |
|
|
|
[#26]
I got the right side done (using the right method makes things much easier) and was just going to mirror it, but then I remembered that the left side of the AR has that pesky selector.
I took the same base design and modified it. It doesn't come down as low and then cuts across to about the same point forward. I cut out the area for the selector stop, allowing it to still be easy (I hope) to work the selector while also doubling as a method to locate the reinforcement piece. STL's will be available to those who wanted it once I get home and can upload them to a file sharing thing. Right Side Plate 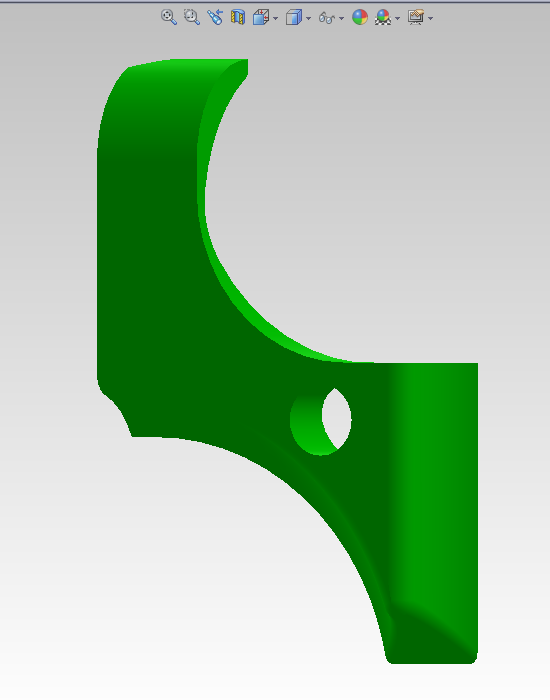
Left Side Plate 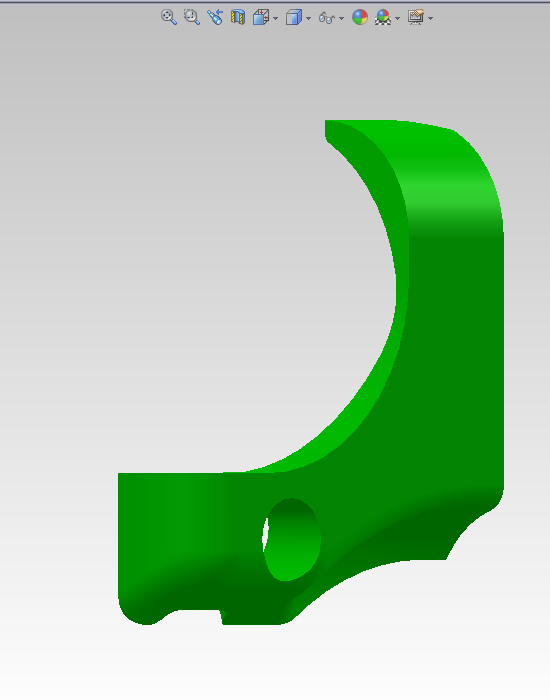
"Assembled" Right Side 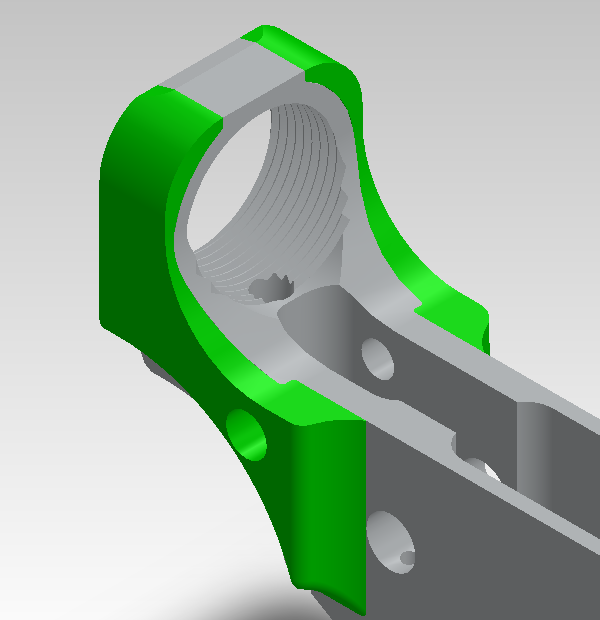
"Assembled" Left Side 
I hope you guys are happy. I now have a folder called "Fruity Ghost Reinforcement Ideas".
Might work on something for the front end as well. |
|
|
|
[#27]

|
|
|
|
[#28]
I'd be curious if the AR15Mold.com people took into account any of the shrinkage from the material.
|
|
|
|
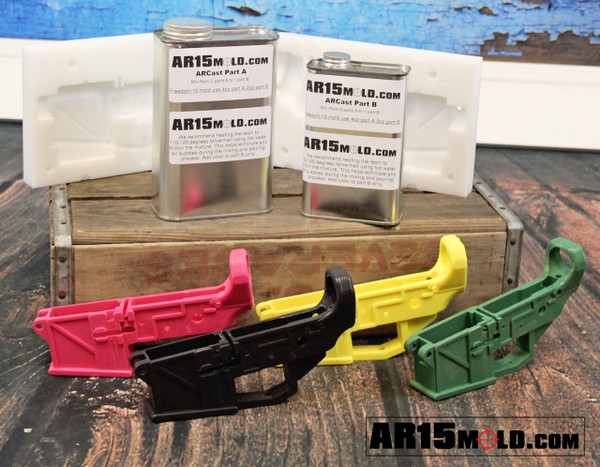
[#29]
Quoted:
I'd be curious if the AR15Mold.com people took into account any of the shrinkage from the material. I hope so... I should know how well their "Freedom-15" lowers work pretty soon... I couldn't resist and ended up buying a 10 pour kit with the 8 color pack. |
|
|
|
[#30]
Quoted:
I got the right side done (using the right method makes things much easier) and was just going to mirror it, but then I remembered that the left side of the AR has that pesky selector.
I took the same base design and modified it. It doesn't come down as low and then cuts across to about the same point forward. I cut out the area for the selector stop, allowing it to still be easy (I hope) to work the selector while also doubling as a method to locate the reinforcement piece. STL's will be available to those who wanted it once I get home and can upload them to a file sharing thing. Right Side Plate http://i70.photobucket.com/albums/i86/Squeethm/Fruity%20Ghost%20Reinforcements/Fruity%20Ghost%20Reinforcement%20-%20Right_zpsnr9kf4cm.png Left Side Plate http://i70.photobucket.com/albums/i86/Squeethm/Fruity%20Ghost%20Reinforcements/Fruity%20Ghost%20Reinforcement%20-%20Left_zpspjp2u9zb.png "Assembled" Right Side http://i70.photobucket.com/albums/i86/Squeethm/Fruity%20Ghost%20Reinforcements/Fruity%20Ghost%20Reinforcements%20Assembled_zpsatlfdcqj.png "Assembled" Left Side http://i70.photobucket.com/albums/i86/Squeethm/Fruity%20Ghost%20Reinforcements/Fruit%20Ghost%20Left%20Installed_zpsu2rynora.png I hope you guys are happy. I now have a folder called "Fruity Ghost Reinforcement Ideas".
Might work on something for the front end as well. Printing the Right side one now. It's got about 10 minutes to go, and I think I'll be able to knock out the left side this afternoon before 5 and take them home and stick them on my bare receiver I'm going to make my mold with. . 
|
|
|
|
[#31]
Quoted:
Printing the Right side one now. It's got about 10 minutes to go, and I think I'll be able to knock out the left side this afternoon before 5 and take them home and stick them on my bare receiver I'm going to make my mold with. . <a href="http://s156.photobucket.com/user/AJ_Dual/media/printing_zpspgbw8grt.png.html" target="_blank">http://i156.photobucket.com/albums/t33/AJ_Dual/printing_zpspgbw8grt.png</a> 
Do it and post pictures. I wan't to see what the receiver will look like and then see if the reinforcement adds to the life! I'm already poking at a front pivot pin reinforcement concept as well. |
|
|
|
[#32]
Quoted: I hope so... I should know how well their "Freedom-15" lowers work pretty soon... I couldn't resist and ended up buying a 10 pour kit with the 8 color pack. Quoted: Quoted: I'd be curious if the AR15Mold.com people took into account any of the shrinkage from the material. I hope so... I should know how well their "Freedom-15" lowers work pretty soon... I couldn't resist and ended up buying a 10 pour kit with the 8 color pack. |
|
|
|
[#33]
These are great .
Posted Via AR15.Com Mobile |
|
|
|
[#34]
Has anyone tried Smoothcast ONYX?
|
|
|
|
[#35]
Quoted:
Has anyone tried Smoothcast ONYX? Boris did. He talks about it back on page 7. FP3D also tested it. I believe both found it to be rather brittle. |
|
|
|
[#36]
This entire thing is just cool. I may mill out a "Master" out of 6061 with improvements as made here on the thread and make a silicone mold to play with. Just because I make AR's for a living does not mean I dont like to play also!
Great thread! |
|
|
|
[#37]
A buddy of mine bought one of the AR15Mold.com kits and posted on his blog about it. Linky
They accidentally sent a pre-production half to him but are making it right and hooking him up with more plastic to compensate. |
|
|
|
[#38]
I'm working on beefing up the lower by using some clay to add some strength to a few areas. Also added a rite-pull to add more meat between the pistol grip and the buffer. We'll see how it goes.
Still rough, but on it's way..... 

|
|
|
|
[#39]
Quoted:
I'm working on beefing up the lower by using some clay to add some strength to a few areas. Also added a rite-pull to add more meat between the pistol grip and the buffer. We'll see how it goes. Still rough, but on it's way..... http://i.imgur.com/OppSn7T.jpg http://i.imgur.com/4XXoAE1.jpg Are you going to add fiberglass cloth or metal reinforcement? The really thick reinforced 3D printed one benefitted immensely from the fiberglass cloth in the hammer tests! FYI, having your finger prints molded into the receiver may defeat the purpose of having one "off the books"! |
|
|
|
[#40]
Quoted:
Are you going to add fiberglass cloth or metal reinforcement? The really thick reinforced 3D printed one benefitted immensely from the fiberglass cloth in the hammer tests! FYI, having your finger prints molded into the receiver may defeat the purpose of having one "off the books"! Quoted:
Quoted:
I'm working on beefing up the lower by using some clay to add some strength to a few areas. Also added a rite-pull to add more meat between the pistol grip and the buffer. We'll see how it goes. Still rough, but on it's way..... http://i.imgur.com/OppSn7T.jpg http://i.imgur.com/4XXoAE1.jpg Are you going to add fiberglass cloth or metal reinforcement? The really thick reinforced 3D printed one benefitted immensely from the fiberglass cloth in the hammer tests! FYI, having your finger prints molded into the receiver may defeat the purpose of having one "off the books"! I haven't made my mold yet, and no the fingerprints will be smoothed out before that gets made. I wanted to try a reinforced version with more meat to it before I tried fiberglass cloth. I've heard good things about that method. Seems to work better than some metal insert methods some couldn't get to bond with the plastic. |
|
|
|
[#41]
Quoted:
Still rough, but on it's way..... http://i.imgur.com/OppSn7T.jpg http://i.imgur.com/4XXoAE1.jpg You probably know this already, but just in case it's slipped your mind thus far: make sure that you have clearance below the safety for the lever to swing, and also make sure that lever remains easily accessible to your thumb. I love what you're doing here. Part of the fun of prototyping things is being able to play with ideas without worrying about aesthetics. |
|
|
|
[#42]
Quoted:
I got the right side done (using the right method makes things much easier) and was just going to mirror it, but then I remembered that the left side of the AR has that pesky selector.
I took the same base design and modified it. It doesn't come down as low and then cuts across to about the same point forward. I cut out the area for the selector stop, allowing it to still be easy (I hope) to work the selector while also doubling as a method to locate the reinforcement piece. STL's will be available to those who wanted it once I get home and can upload them to a file sharing thing. Right Side Plate http://i70.photobucket.com/albums/i86/Squeethm/Fruity%20Ghost%20Reinforcements/Fruity%20Ghost%20Reinforcement%20-%20Right_zpsnr9kf4cm.png Left Side Plate http://i70.photobucket.com/albums/i86/Squeethm/Fruity%20Ghost%20Reinforcements/Fruity%20Ghost%20Reinforcement%20-%20Left_zpspjp2u9zb.png "Assembled" Right Side http://i70.photobucket.com/albums/i86/Squeethm/Fruity%20Ghost%20Reinforcements/Fruity%20Ghost%20Reinforcements%20Assembled_zpsatlfdcqj.png "Assembled" Left Side http://i70.photobucket.com/albums/i86/Squeethm/Fruity%20Ghost%20Reinforcements/Fruit%20Ghost%20Left%20Installed_zpsu2rynora.png I hope you guys are happy. I now have a folder called "Fruity Ghost Reinforcement Ideas".
Might work on something for the front end as well. I haven't read through all this so maybe this has been asked. Why doesn't somebody just beef up a latch plate so that it has sides that catch the rear takedown pin and upper rail? You'd also need a new takedown pin that was longer and had the slot reconfigured. In order to take the moment of the recoil on the latch plate it would also need a metal strap above the selector (ideally both sides) that could tie into the rail on the upper, needs QD for takedown and cannot interfere with charging handle (much easier if you run a side charger, and better). Could probably have these mass produced for very little money and make these plastic lowers significantly more reliable. Just some thoughts. |
|
|
|
[#43]
Quoted:
You probably know this already, but just in case it's slipped your mind thus far: make sure that you have clearance below the safety for the lever to swing, and also make sure that lever remains easily accessible to your thumb. I love what you're doing here. Part of the fun of prototyping things is being able to play with ideas without worrying about aesthetics. Quoted:
Quoted: Still rough, but on it's way.....
http://i.imgur.com/OppSn7T.jpg http://i.imgur.com/4XXoAE1.jpg You probably know this already, but just in case it's slipped your mind thus far: make sure that you have clearance below the safety for the lever to swing, and also make sure that lever remains easily accessible to your thumb. I love what you're doing here. Part of the fun of prototyping things is being able to play with ideas without worrying about aesthetics. Or he can run a crossbolt safety, now that there's one on the market. |
|
|
|
[#44]
Quoted:
You probably know this already, but just in case it's slipped your mind thus far: make sure that you have clearance below the safety for the lever to swing, and also make sure that lever remains easily accessible to your thumb. I love what you're doing here. Part of the fun of prototyping things is being able to play with ideas without worrying about aesthetics. Quoted:
Quoted:
Still rough, but on it's way..... http://i.imgur.com/OppSn7T.jpg http://i.imgur.com/4XXoAE1.jpg You probably know this already, but just in case it's slipped your mind thus far: make sure that you have clearance below the safety for the lever to swing, and also make sure that lever remains easily accessible to your thumb. I love what you're doing here. Part of the fun of prototyping things is being able to play with ideas without worrying about aesthetics. Thanks, I'll keep that in mind. Its easy to get carried away with the clay..... |
|
|
|
[#45]
Quoted:
Thanks, I'll keep that in mind. Its easy to get carried away with the clay..... Quoted:
Quoted:
Quoted: Still rough, but on it's way.....
http://i.imgur.com/OppSn7T.jpg http://i.imgur.com/4XXoAE1.jpg You probably know this already, but just in case it's slipped your mind thus far: make sure that you have clearance below the safety for the lever to swing, and also make sure that lever remains easily accessible to your thumb. I love what you're doing here. Part of the fun of prototyping things is being able to play with ideas without worrying about aesthetics. Thanks, I'll keep that in mind. Its easy to get carried away with the clay..... Might throw some clay on front under the lugs. |
|
|
|
[#46]
What a beautiful thread. Subbed, and I'm going to have to try this. Thanks for this, Boris.
|
|
|
|
[#47]
Wonder if this could be incorporated into this some how?
http://fallfordiy.com/blog/2014/04/27/how-to-make-a-silicone-mould/ |
|
|
|
[#48]
Quoted: Wonder if this could be incorporated into this some how? http://fallfordiy.com/blog/2014/04/27/how-to-make-a-silicone-mould/ I don't see why not...though with as inflexible as some of that stuff is you better plan ahead with making your multi-piece mold. You'll also need to use some sort of mold release agent to ensure it doesn't stick to the lower or the previously made pieces of the mold. I wonder how much it is for a tube of that stuff and how far a tube will go. I bet it'll take several and add up close to the cost of 2 of the trial kits. |
|
|
|
[#49]
Quoted:
What a beautiful thread. Subbed, and I'm going to have to try this. Thanks for this, Boris. I've made an entire mold using just this material, i.e. silicone caulking. The big problem is that a lot of details don't come out well, it traps bubbles and once cured is not as tear resistant as some of these pour-in silicones. I have the whole lot of pictures making it, I will get around posting. Even if it worked, it's not all that cost effective, the caulking is still around $5 a tube and you need a bunch. Also, only use silicone I, I believe that II was no bueno. |
|
|
|
[#50]
So have we established that Task 9 is the best kind of resin to use for casting the lowers with/without fiberglass reinforcement?
|
|
|
 Win a FREE Membership!
Sign up for the ARFCOM weekly newsletter and be entered to win a free ARFCOM membership. One new winner* is announced every week!
You will receive an email every Friday morning featuring the latest chatter from the hottest topics, breaking news surrounding legislation, as well as exclusive deals only available to ARFCOM email subscribers.

AR15.COM is the world's largest firearm community and is a gathering place for firearm enthusiasts of all types.
From hunters and military members, to competition shooters and general firearm enthusiasts, we welcome anyone who values and respects the way of the firearm.

Subscribe to our monthly Newsletter to receive firearm news, product discounts from your favorite Industry Partners, and more.
Copyright © 1996-2024 AR15.COM LLC. All Rights Reserved.
Any use of this content without express written consent is prohibited.
AR15.Com reserves the right to overwrite or replace any affiliate, commercial, or monetizable links, posted by users, with our own.


