|
[#1]
Quoted:
Well - you can always glue some Legos to the top, they're nice & round & closely fit a mil-spec tube. They're ABS plastic, however, so w/ the 2-part epoxy it might add some weight. http://www.feinsteinproject.org/loes/effortthumbhole/fgwMk8/IMAG0456.jpg Quoted:
Quoted:
I'll be making this stock soon out of carbon fiber. I haven't seen anything out there aesthetically pleasing as well as lightweight so i'll build my own. I want to somehow incorporate a cheek riser but i haven't quite figured it out yet. Any ideas? <a href="http://s81.photobucket.com/user/anibal999r/media/CARBONSTOCK-1.jpg.html" target="_blank">http://i81.photobucket.com/albums/j203/anibal999r/CARBONSTOCK-1.jpg</a> <a href="http://s81.photobucket.com/user/anibal999r/media/CARBONSTOCK-3.jpg.html" target="_blank">http://i81.photobucket.com/albums/j203/anibal999r/CARBONSTOCK-3.jpg</a> <a href="http://s81.photobucket.com/user/anibal999r/media/CARBONSTOCK-2.jpg.html" target="_blank">http://i81.photobucket.com/albums/j203/anibal999r/CARBONSTOCK-2.jpg</a> Well - you can always glue some Legos to the top, they're nice & round & closely fit a mil-spec tube. They're ABS plastic, however, so w/ the 2-part epoxy it might add some weight. http://www.feinsteinproject.org/loes/effortthumbhole/fgwMk8/IMAG0456.jpg That's pretty awesome! I have a good idea on how I will be doing it now, but I haven't had the time to model it. |
|
|
|
[#2]
Quoted:
Love it. Thank you, your receivers made it happen! If you guys make a ambi lower like this please put me down. |
|
|
|
[#3]
Have you sourced your carbon fiber for the stock yet? I used to make fairly complex small parts machined from carbon fiber plate material that was laid up to my specifications. I made well over a thousand of these little parts via a combination of machining and hand shaping, so I learned quite a bit of the joy and heartbreak associated with working the material in the manner you describe. The best plates I ever used were made of alternating layers of unidirectional prepreg material with an outer layer of either 2x2 twill or plain weave (plain weave had a more suitable appearance for the small parts I was making) to give it the look that my customers wanted. These plates were autoclave cured which made all the difference in the world when it came to eliminating small voids between the layers. Though they are not the people I used, there is a company called Rock West Composites that seems to offer very similar, ready made plates. Hope this helps.
|
|
|
|
[#4]
Oops!
|
|
|
|
[#5]
Quoted:
Have you sourced your carbon fiber for the stock yet? I used to make fairly complex small parts machined from carbon fiber plate material that was laid up to my specifications. I made well over a thousand of these little parts via a combination of machining and hand shaping, so I learned quite a bit of the joy and heartbreak associated with working the material in the manner you describe. The best plates I ever used were made of alternating layers of unidirectional prepreg material with an outer layer of either 2x2 twill or plain weave (plain weave had a more suitable appearance for the small parts I was making) to give it the look that my customers wanted. These plates were autoclave cured which made all the difference in the world when it came to eliminating small voids between the layers. Though they are not the people I used, there is a company called Rock West Composites that seems to offer very similar, ready made plates. Hope this helps. Great info! I did source my carbon from Rockwest, they have so much to choose from along with smaller quantities for hobbyist like me. What did you find to be most troublesome? Did you use loctite 608 to make the joints? I know it can't be seen on the model but all the joints are slotted for added strength. |
|
|
|
[#6]
Quoted:
Great info! I did source my carbon from Rockwest, they have so much to choose from along with smaller quantities for hobbyist like me. What did you find to be most troublesome? Did you use loctite 608 to make the joints? I know it can't be seen on the model but all the joints are slotted for added strength. The parts I made were one piece so I never had to join different components. About all else that I can offer which may be relevant to your project is what I learned by cutting the carbon fiber. I would order the plates which were to be approximately 12"x12"x.265 and then deliver them to my machinist. He would mount them to a fixture and using a carbide end mill would produce 75 or so pieces per plate of what I called "blanks". These blanks were rough approximations of the final part which I then finished shaping by hand on various abrasive machines consisting of stones, abrasive belts, and sanding sleeves followed by fines hand sanding and buffing. These hand forming steps were necessary because the milling cutters dulled quickly enough that the edges would begin to slightly chip after cutting only one or two blanks and taking the parts down to their final dimensions via the abrasives got rid of the rough edges. Water jetting was tried, but the thickness of the material caused the layers to separate under the water pressure. This combined machining and hand shaping method was used only on "production" pieces, and the one-off custom parts I made skipped the milling process altogether. For these, I roughly cut out the beginning shape using a Roto-Zip tool mounted upside down with the cutter protruding through a hole in a table top type deal that I constructed and the work was fed to the tool for shaping...Think mini router table to get an idea of what I'm talking about. The cutter used in the Roto-Zip was the carbide one sold for cutting ceramic tile. This resulted in a very rough cut, so the abrasive steps described above for final shaping were necessary. The HSS cutters (and the different bandsaw blades) I tried in an effort to get a cleaner cut dulled beyond use almost immediately upon contact with the carbon fiber. For the abrasive steps, I never needed anything more coarse than 120 grit, with 220 and finer grits used more than 90% of the time even when I had to remove material quickly. I only go into such detail in hopes of saving you some grief over chipped edges. |
|
|
|
[#7]
OP, what rendering software are you using?
|
|
|
|
[#8]
Quoted:
OP, what rendering software are you using? I use Autodesk Inventor at home and Soilidworks at work. |
|
|
|
[#9]
Quoted:
The parts I made were one piece so I never had to join different components. About all else that I can offer which may be relevant to your project is what I learned by cutting the carbon fiber. I would order the plates which were to be approximately 12"x12"x.265 and then deliver them to my machinist. He would mount them to a fixture and using a carbide end mill would produce 75 or so pieces per plate of what I called "blanks". These blanks were rough approximations of the final part which I then finished shaping by hand on various abrasive machines consisting of stones, abrasive belts, and sanding sleeves followed by fines hand sanding and buffing. These hand forming steps were necessary because the milling cutters dulled quickly enough that the edges would begin to slightly chip after cutting only one or two blanks and taking the parts down to their final dimensions via the abrasives got rid of the rough edges. Water jetting was tried, but the thickness of the material caused the layers to separate under the water pressure. This combined machining and hand shaping method was used only on "production" pieces, and the one-off custom parts I made skipped the milling process altogether. For these, I roughly cut out the beginning shape using a Roto-Zip tool mounted upside down with the cutter protruding through a hole in a table top type deal that I constructed and the work was fed to the tool for shaping...Think mini router table to get an idea of what I'm talking about. The cutter used in the Roto-Zip was the carbide one sold for cutting ceramic tile. This resulted in a very rough cut, so the abrasive steps described above for final shaping were necessary. The HSS cutters (and the different bandsaw blades) I tried in an effort to get a cleaner cut dulled beyond use almost immediately upon contact with the carbon fiber. For the abrasive steps, I never needed anything more coarse than 120 grit, with 220 and finer grits used more than 90% of the time even when I had to remove material quickly. I only go into such detail in hopes of saving you some grief over chipped edges. Quoted:
Quoted:
Great info! I did source my carbon from Rockwest, they have so much to choose from along with smaller quantities for hobbyist like me. What did you find to be most troublesome? Did you use loctite 608 to make the joints? I know it can't be seen on the model but all the joints are slotted for added strength. The parts I made were one piece so I never had to join different components. About all else that I can offer which may be relevant to your project is what I learned by cutting the carbon fiber. I would order the plates which were to be approximately 12"x12"x.265 and then deliver them to my machinist. He would mount them to a fixture and using a carbide end mill would produce 75 or so pieces per plate of what I called "blanks". These blanks were rough approximations of the final part which I then finished shaping by hand on various abrasive machines consisting of stones, abrasive belts, and sanding sleeves followed by fines hand sanding and buffing. These hand forming steps were necessary because the milling cutters dulled quickly enough that the edges would begin to slightly chip after cutting only one or two blanks and taking the parts down to their final dimensions via the abrasives got rid of the rough edges. Water jetting was tried, but the thickness of the material caused the layers to separate under the water pressure. This combined machining and hand shaping method was used only on "production" pieces, and the one-off custom parts I made skipped the milling process altogether. For these, I roughly cut out the beginning shape using a Roto-Zip tool mounted upside down with the cutter protruding through a hole in a table top type deal that I constructed and the work was fed to the tool for shaping...Think mini router table to get an idea of what I'm talking about. The cutter used in the Roto-Zip was the carbide one sold for cutting ceramic tile. This resulted in a very rough cut, so the abrasive steps described above for final shaping were necessary. The HSS cutters (and the different bandsaw blades) I tried in an effort to get a cleaner cut dulled beyond use almost immediately upon contact with the carbon fiber. For the abrasive steps, I never needed anything more coarse than 120 grit, with 220 and finer grits used more than 90% of the time even when I had to remove material quickly. I only go into such detail in hopes of saving you some grief over chipped edges. Thanks good stuff! The milling bits I use have to be centered to the thickness of the part, they have a unique helix cut into them that does not cause a frayed edge. It looks like it moves the material into the cut instead of out, that's why the bit needs to be centered so that you can get the same results on the top and bottom of the plate. I did have some crapy results with a hss ball nose, it didn't last too long so I switched to carbide. |
|
|
|
[#10]
Just out of Curiosity when doing your research where there any steel barrels that that competed in weight?
|
|
|
|
[#11]
Quoted:
Just out of Curiosity when doing your research where there any steel barrels that that competed in weight? There were barrels that competed but would not give the same performance. The carbon fiber barrel shoots like a bull barrel at the weight of a pencil barrel. That was my main reason behind it, from what i can remember BCM made a light barrel and now Voodoo Innovations is in the mix. If build another it will be with a dimpled barrel or a 14.5" proof research carbon barrel. |
|
|
|
[#12]
Very nice.
I think a Sig brace will make it perfect, but will add a lot of weight, and how does it shoot?
|
|
|
|
[#13]
that thing looks fantastic! you're giving me naughty thoughts about what to do with the KMR13 I've got... I might have missed it but did you put some sort of coating on the handguard after machining, or did you leave the machined areas raw?
|
|
|
|
[#14]
Interesting. What are you going to do for a butt pad for it? I don't think I'd want those edges hitting into my shoulder especially only wearing a t-shirt.
|
|
|
|
[#15]
Quoted:
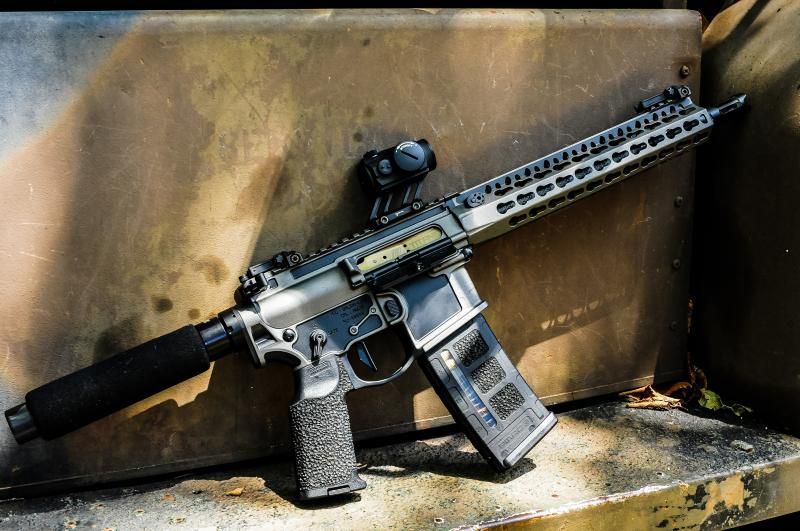
Very nice. I think a Sig brace will make it perfect, but will add a lot of weight, and how does it shoot? Thanks! I wouldn't mind the sig brace but it would defeat the purpose of all my work. lol I'm just going to wait for the stamp and put a stock on it. It shoots like any ar with a crappy birdcage muzzle device. I spoke to V7 Weapon systems and they will be coming out with a Furion in 30 cal here in the near future. That should help the recoil. Another option is to make a Ti Silencerco Trifecta Brake to mount my 762 Saker, which is the soul purpose of this Blkout build. Although i know this can will make it extremely front heavy. So i'm not too sure i want to can it anymore. |
|
|
|
[#17]
Quoted:
that thing looks fantastic! you're giving me naughty thoughts about what to do with the KMR13 I've got... I might have missed it but did you put some sort of coating on the handguard after machining, or did you leave the machined areas raw? Thanks! After machining i just cerakoted it. It feels just as rigid as it did out the box. |
|
|
|
[#18]
Quoted:
Thanks! I like the slim profile it has now. <a href="http://s81.photobucket.com/user/anibal999r/media/Railweight.jpg.html" target="_blank">http://i81.photobucket.com/albums/j203/anibal999r/Railweight.jpg</a> Quoted:
Quoted:
Quoted:
Quoted:
I built a lightweight but wasn't trying to get it ridiculously light, I just used a 14.5 BM superlite barrel w/pinned A2X, Carbon fiber FF tube, A1 604 Slickside receiver w/ Colt halfmoon BCG, and a 3 position Fiberlite carbine Stock assembly, weighs 4.79lbs with an empty 20 round Colt magizine inserted. That is good enough for me. Your 3lb. build is off the charts.....but not tipping the scale.  Sounds like a sweet build! Yeah I went ridiculous with this build I really wanted to push the envelope without sacrificing reliability and strength. Then a added ambi to that list as well. I still can't believe how much aluminum you shaved off that KMR. Looks so good that it looks like it came that way from the factory Thanks! I like the slim profile it has now. <a href="http://s81.photobucket.com/user/anibal999r/media/Railweight.jpg.html" target="_blank">http://i81.photobucket.com/albums/j203/anibal999r/Railweight.jpg</a> |
|
|
|
[#19]
Also, how much weight was removed from the rail itself?
How much less does your aluminum barrel nut weigh than BCM's steel barrel nut? How much less does the Strike Industries dust cover weigh than V7WS aluminum port door and rod? In order to fit the V7WS port-door rod into my Balios-lite upper I filed the taper off of the rod and touched it up with Alumablack. |
|
|
|
[#20]
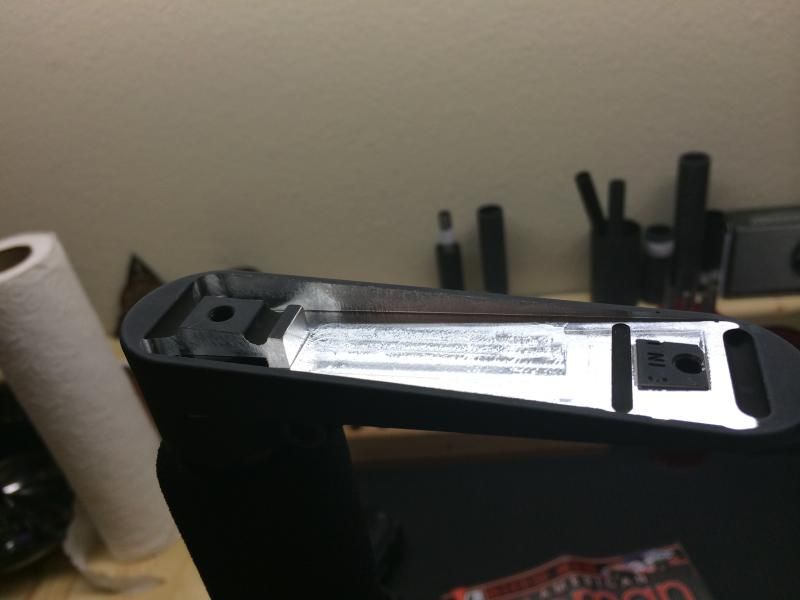
Not build it yourself as much as make it yourself. I did add a .250 thick Sintra check piece to the stock to get my eye a touch higher.


|
|
|
|
[#21]
Quoted:
Not build it yourself as much as make it yourself. I did add a .250 thick Sintra check piece to the stock to get my eye a touch higher. <a href="http://s146.photobucket.com/user/908ssp/media/machinework/_1012537_zpsfa5b1a9b.jpg.html" target="_blank">http://i146.photobucket.com/albums/r245/908ssp/machinework/_1012537_zpsfa5b1a9b.jpg</a> <a href="http://s146.photobucket.com/user/908ssp/media/machinework/_1012536_zpsaeca6b2f.jpg.html" target="_blank">http://i146.photobucket.com/albums/r245/908ssp/machinework/_1012536_zpsaeca6b2f.jpg</a> That's bad ass man! Are you running a buffer less system similar to Para Ord? I have a elcan on my scar, I love that optic but it's a bit heavy. |
|
|
|
[#22]
Where do you shoot in Houston? Really like to see that thing in person.
|
|
|
|
[#23]
Quoted:
Where do you shoot in Houston? Really like to see that thing in person. I go out to some land in mont belvieu, but I'll meet up anywhere in the Clearlake-Baytown area. |
|
|
|
[#24]
Quoted:
Also, how much weight was removed from the rail itself? How much less does your aluminum barrel nut weigh than BCM's steel barrel nut? How much less does the Strike Industries dust cover weigh than V7WS aluminum port door and rod? In order to fit the V7WS port-door rod into my Balios-lite upper I filed the taper off of the rod and touched it up with Alumablack. Thank you! I think from the rail it was .5 oz, (I need to check to make sure) the stock barrel nut weighs 1.6 oz the aluminum nut I made weighs .65 oz. The Strike dust cover is a bit heavier than the v7 dust cover by .1 of a ounce but I went with it because I like that it doesn't slam up against the lower. |
|
|
|
[#25]
No just a gutted rifle buffer and spring. I also made an adjustable gas block, it is aluminum and is two piece so I can remove it if I have to without cutting off the comp. The forward charging assembly is delrin housing, carbon push rod and aluminum handle and bolt pusher. I shot it today still needs bit of tuning . Love that scope.
|
|
|
|
[#26]
FYI, Magpul K Grip ver. 1 is a little lighter that ver. 2 which is thicker.
|
|
|
|
[#27]
Quoted:
No just a gutted rifle buffer and spring. I also made an adjustable gas block, it is aluminum and is two piece so I can remove it if I have to without cutting off the comp. The forward charging assembly is delrin housing, carbon push rod and aluminum handle and bolt pusher. I shot it today still needs bit of tuning . Love that scope. That would be cool to see in person, i seen the raised rail and it looked like you moved the buffer system up. If you did do that you could fold the stock, it seems like the perfect candidate. I don't know if it's the comp or the lightweight on mine, but it's a bit "kicky". I'm betting its the birdcage design on the comp i guess that's my next project. Lathe work is harder for me to do since i don't have one i have to run a R8 three jaw chuck in the vertical position which i dont like too much. Programming is confusing. |
|
|
|
[#28]
Quoted:
FYI, Magpul K Grip ver. 1 is a little lighter that ver. 2 which is thicker. I ended up switching back to a modified K2. I didn't like the super slim profile of the K grip. I cut off the beaver tail and epoxied the cavity, it weighs 2.2oz the same as the K_R2 grip without the bottom insert. 

|
|
|
|
[#29]
Quoted:
I go out to some land in mont belvieu, but I'll meet up anywhere in the Clearlake-Baytown area. Quoted:
Quoted:
Where do you shoot in Houston? Really like to see that thing in person. I go out to some land in mont belvieu, but I'll meet up anywhere in the Clearlake-Baytown area. Well shoot... opposite side of the world from me... I do Top Gun, Shiloh, Carters, and ASC in Katy. Might have to find an excuse to broaden my horizons... |
|
|
|
[#30]
Man that thing looks awesome...
I must say, it's real cool to see our product being utilized for custom builds like this. Thanks so much for sharing. |
|
|
|
[#31]
Quoted:
Well shoot... opposite side of the world from me... I do Top Gun, Shiloh, Carters, and ASC in Katy. Might have to find an excuse to broaden my horizons... Quoted:
Quoted:
Quoted:
Where do you shoot in Houston? Really like to see that thing in person. I go out to some land in mont belvieu, but I'll meet up anywhere in the Clearlake-Baytown area. Well shoot... opposite side of the world from me... I do Top Gun, Shiloh, Carters, and ASC in Katy. Might have to find an excuse to broaden my horizons... ha ha! just let me know and i'll meet up with you. Bring some ammo. lol |
|
|
|
[#32]
Quoted:
Man that thing looks awesome... I must say, it's real cool to see our product being utilized for custom builds like this. Thanks so much for sharing. Thanks! I'm just waiting to see what you guys cook up next! The quality of the receiver set is awesome and y'all's manufacturing shop is out of this world! I would sit in front of those machines watching chips fly all day. |
|
|
|
[#33]
First off, WOW! Awesome rifle, I'm very jealous.
Do you remember how much the Smoke composites carbon fiber buffer tube weighed with the castle nut? Was it the lightest you found? Thanks! |
|
|
|
[#34]
Quoted:
That would be cool to see in person, i seen the raised rail and it looked like you moved the buffer system up. If you did do that you could fold the stock, it seems like the perfect candidate. I don't know if it's the comp or the lightweight on mine, but it's a bit "kicky". I'm betting its the birdcage design on the comp i guess that's my next project. Lathe work is harder for me to do since i don't have one i have to run a R8 three jaw chuck in the vertical position which i dont like too much. Programming is confusing. Quoted:
Quoted:
No just a gutted rifle buffer and spring. I also made an adjustable gas block, it is aluminum and is two piece so I can remove it if I have to without cutting off the comp. The forward charging assembly is delrin housing, carbon push rod and aluminum handle and bolt pusher. I shot it today still needs bit of tuning . Love that scope. That would be cool to see in person, i seen the raised rail and it looked like you moved the buffer system up. If you did do that you could fold the stock, it seems like the perfect candidate. I don't know if it's the comp or the lightweight on mine, but it's a bit "kicky". I'm betting its the birdcage design on the comp i guess that's my next project. Lathe work is harder for me to do since i don't have one i have to run a R8 three jaw chuck in the vertical position which i dont like too much. Programming is confusing. Kinda like this? Runs like a top. 

|
|
|
|
[#35]
Quoted:
That would be cool to see in person, i seen the raised rail and it looked like you moved the buffer system up. If you did do that you could fold the stock, it seems like the perfect candidate. I don't know if it's the comp or the lightweight on mine, but it's a bit "kicky". I'm betting its the birdcage design on the comp i guess that's my next project. Lathe work is harder for me to do since i don't have one i have to run a R8 three jaw chuck in the vertical position which i dont like too much. Programming is confusing. Quoted:
Quoted:
No just a gutted rifle buffer and spring. I also made an adjustable gas block, it is aluminum and is two piece so I can remove it if I have to without cutting off the comp. The forward charging assembly is delrin housing, carbon push rod and aluminum handle and bolt pusher. I shot it today still needs bit of tuning . Love that scope. That would be cool to see in person, i seen the raised rail and it looked like you moved the buffer system up. If you did do that you could fold the stock, it seems like the perfect candidate. I don't know if it's the comp or the lightweight on mine, but it's a bit "kicky". I'm betting its the birdcage design on the comp i guess that's my next project. Lathe work is harder for me to do since i don't have one i have to run a R8 three jaw chuck in the vertical position which i dont like too much. Programming is confusing. I do all my machining by hand digital readout yes CNC no. The buffer is in the stock location the bit of extra stuff where the buffer tube connects to the upper receiver is there to take all the strain off the poly lower. By connecting the extension to the lower, buffer tube and then the upper where the charging handle used to be there is no chance the poly lower will break under any conditions that a would not break an aluminum lower. I've been making and using that style comp for 25 years. It works what else is there to say. It is bit of a pain to make in titanium which I do, because ti doesn't like to be drilled. The Faxon upper is the only upper I know of that moves the buffer and recoil spring into the upper receiver. I made use of that fact when I designed built this AR/ Faxon based bullpup. The Faxon upper is not light . The lower is all delrin and I still can't get the finished rifle much under 8 pounds with SRS. 

|
|
|
|
[#36]
Quoted:
The Faxon upper is the only upper I know of that moves the buffer and recoil spring into the upper receiver. As far as off the shelf options, there are also the Olympic OA93/96, ZM LR-300 (Para TTR), and Rock River PDS. The ZM/Para is out of production at the moment. Any of these should be significantly lighter than the Faxon upper, just without the quick barrel change feature and pretty billet parts. |
|
|
|
[#37]
Quoted:
As far as off the shelf options, there are also the Olympic OA93/96, ZM LR-300 (Para TTR), and Rock River PDS. The ZM/Para is out of production at the moment. Quoted:
Quoted:
The Faxon upper is the only upper I know of that moves the buffer and recoil spring into the upper receiver. I made use of that fact when I designed built this AR/ Faxon based bullpup. The Faxon upper is not light . The lower is all delrin and I still can't get the finished rifle much under 8 pounds with SRS. As far as off the shelf options, there are also the Olympic OA93/96, ZM LR-300 (Para TTR), and Rock River PDS. The ZM/Para is out of production at the moment. Do you know if it takes a standard Mil Spec barrel nut? And nice rifle i have a similar build i did with a NEA stock, but i made my own buffer tube and butt pad that allows me to break it down traditionally. 
|
|
|
|
[#38]
That is a really sweet build! |
|
|
|
[#39]
Quoted:
Do you know if it takes a standard Mil Spec barrel nut? And nice rifle i have a similar build i did with a NEA stock, but i made my own buffer tube and butt pad that allows me to break it down traditionally. <a href="http://s81.photobucket.com/user/anibal999r/media/imagejpg1.jpg.html" target="_blank">http://i81.photobucket.com/albums/j203/anibal999r/imagejpg1.jpg</a> Which one are you asking about? The Oly could use a mil spec barrel nut, but I believe the RRA and ZM are proprietary. Mine uses a modified nut from the modified Bushmaster tube I've got on there. 
|
|
|
|
[#40]
Quoted:
Which one are you asking about? The Oly could use a mil spec barrel nut, but I believe the RRA and ZM are proprietary. Mine uses a modified nut from the modified Bushmaster tube I've got on there. http://i241.photobucket.com/albums/ff206/devtucker/IMG_20130704_231500_079.jpg Quoted:
Quoted:
Do you know if it takes a standard Mil Spec barrel nut? And nice rifle i have a similar build i did with a NEA stock, but i made my own buffer tube and butt pad that allows me to break it down traditionally. <a href="http://s81.photobucket.com/user/anibal999r/media/imagejpg1.jpg.html" target="_blank">http://i81.photobucket.com/albums/j203/anibal999r/imagejpg1.jpg</a> Which one are you asking about? The Oly could use a mil spec barrel nut, but I believe the RRA and ZM are proprietary. Mine uses a modified nut from the modified Bushmaster tube I've got on there. http://i241.photobucket.com/albums/ff206/devtucker/IMG_20130704_231500_079.jpg The ZM, but you've already answered my question. How does your carrier and op rod look like? |
|
|
|
[#41]
Quoted:
The ZM, but you've already answered my question. How does your carrier and op rod look like? Quoted:
Quoted:
Quoted:
Do you know if it takes a standard Mil Spec barrel nut? And nice rifle i have a similar build i did with a NEA stock, but i made my own buffer tube and butt pad that allows me to break it down traditionally. <a href="http://s81.photobucket.com/user/anibal999r/media/imagejpg1.jpg.html" target="_blank">http://i81.photobucket.com/albums/j203/anibal999r/imagejpg1.jpg</a> Which one are you asking about? The Oly could use a mil spec barrel nut, but I believe the RRA and ZM are proprietary. Mine uses a modified nut from the modified Bushmaster tube I've got on there. http://i241.photobucket.com/albums/ff206/devtucker/IMG_20130704_231500_079.jpg The ZM, but you've already answered my question. How does your carrier and op rod look like? It looks like a slightly shorter, beefier ZM gas tube. ZM on top, mine on bottom. 

Charging handle 
Rotating and partially pulling the non-reciprocating charging handle pulls the spring off the keeper, so it can be removed for tool-less disassembly, and the spring stays captive in the spring tube. 
|
|
|
|
[#42]
Quoted:
Do you know if it takes a standard Mil Spec barrel nut? And nice rifle i have a similar build i did with a NEA stock, but i made my own buffer tube and butt pad that allows me to break it down traditionally. <a href="http://s81.photobucket.com/user/anibal999r/media/imagejpg1.jpg.html" target="_blank">http://i81.photobucket.com/albums/j203/anibal999r/imagejpg1.jpg</a> Quoted:
Quoted:
Quoted:
The Faxon upper is the only upper I know of that moves the buffer and recoil spring into the upper receiver. I made use of that fact when I designed built this AR/ Faxon based bullpup. The Faxon upper is not light . The lower is all delrin and I still can't get the finished rifle much under 8 pounds with SRS. As far as off the shelf options, there are also the Olympic OA93/96, ZM LR-300 (Para TTR), and Rock River PDS. The ZM/Para is out of production at the moment. Do you know if it takes a standard Mil Spec barrel nut? And nice rifle i have a similar build i did with a NEA stock, but i made my own buffer tube and butt pad that allows me to break it down traditionally. <a href="http://s81.photobucket.com/user/anibal999r/media/imagejpg1.jpg.html" target="_blank">http://i81.photobucket.com/albums/j203/anibal999r/imagejpg1.jpg</a> Do you have more info on buffer tube and stock you made for the NEA? I recently acquired a rifle with one and am looking at putting it on my SBR but the take down procedure its terrible. |
|
|
|
[#43]
Quoted:
Do you have more info on buffer tube and stock you made for the NEA? I recently acquired a rifle with one and am looking at putting it on my SBR but the take down procedure its terrible. Quoted:
Quoted:
Quoted:
Quoted:
The Faxon upper is the only upper I know of that moves the buffer and recoil spring into the upper receiver. I made use of that fact when I designed built this AR/ Faxon based bullpup. The Faxon upper is not light . The lower is all delrin and I still can't get the finished rifle much under 8 pounds with SRS. As far as off the shelf options, there are also the Olympic OA93/96, ZM LR-300 (Para TTR), and Rock River PDS. The ZM/Para is out of production at the moment. Do you know if it takes a standard Mil Spec barrel nut? And nice rifle i have a similar build i did with a NEA stock, but i made my own buffer tube and butt pad that allows me to break it down traditionally. <a href="http://s81.photobucket.com/user/anibal999r/media/imagejpg1.jpg.html" target="_blank">http://i81.photobucket.com/albums/j203/anibal999r/imagejpg1.jpg</a> Do you have more info on buffer tube and stock you made for the NEA? I recently acquired a rifle with one and am looking at putting it on my SBR but the take down procedure its terrible. I took the buffer and spring system from a LWRC ultra compact stock (smaller buffer and flat coil spring), the buffer tube on the LWRC ultracomact stock is shorter than a carbine buffer tube so i took that internal length dimension which i think if i remember correctly was 6". Then i just made a buffer tube that fit inside the NEA slide block with that same internal length dimension. So it's not as short as the stock NEA stock but i'd rather have the extra length and take it down traditionally. |
|
|
|
[#44]
Quoted:
It looks like a slightly shorter, beefier ZM gas tube. ZM on top, mine on bottom. http://i241.photobucket.com/albums/ff206/devtucker/AR%20Pistol/AR%20Pistol%20and%20ZM%20Bolt/DSCN0684.jpg http://i241.photobucket.com/albums/ff206/devtucker/AR%20Pistol/AR%20Pistol%20and%20ZM%20Bolt/DSCN0686.jpg Charging handle http://i241.photobucket.com/albums/ff206/devtucker/AR%20Pistol/AR%20Pistol%20and%20ZM%20Bolt/DSCN0694.jpg Rotating and partially pulling the non-reciprocating charging handle pulls the spring off the keeper, so it can be removed for tool-less disassembly, and the spring stays captive in the spring tube. http://i241.photobucket.com/albums/ff206/devtucker/AR%20Pistol/AR%20Pistol%20and%20ZM%20Bolt/DSCN0695.jpg Quoted:
Quoted:
Quoted:
Quoted:
Do you know if it takes a standard Mil Spec barrel nut? And nice rifle i have a similar build i did with a NEA stock, but i made my own buffer tube and butt pad that allows me to break it down traditionally. <a href="http://s81.photobucket.com/user/anibal999r/media/imagejpg1.jpg.html" target="_blank">http://i81.photobucket.com/albums/j203/anibal999r/imagejpg1.jpg</a> Which one are you asking about? The Oly could use a mil spec barrel nut, but I believe the RRA and ZM are proprietary. Mine uses a modified nut from the modified Bushmaster tube I've got on there. http://i241.photobucket.com/albums/ff206/devtucker/IMG_20130704_231500_079.jpg The ZM, but you've already answered my question. How does your carrier and op rod look like? It looks like a slightly shorter, beefier ZM gas tube. ZM on top, mine on bottom. http://i241.photobucket.com/albums/ff206/devtucker/AR%20Pistol/AR%20Pistol%20and%20ZM%20Bolt/DSCN0684.jpg http://i241.photobucket.com/albums/ff206/devtucker/AR%20Pistol/AR%20Pistol%20and%20ZM%20Bolt/DSCN0686.jpg Charging handle http://i241.photobucket.com/albums/ff206/devtucker/AR%20Pistol/AR%20Pistol%20and%20ZM%20Bolt/DSCN0694.jpg Rotating and partially pulling the non-reciprocating charging handle pulls the spring off the keeper, so it can be removed for tool-less disassembly, and the spring stays captive in the spring tube. http://i241.photobucket.com/albums/ff206/devtucker/AR%20Pistol/AR%20Pistol%20and%20ZM%20Bolt/DSCN0695.jpg Thanks for posting this! This design gave me a great idea. |
|
|
|
[#45]
Quoted:
First off, WOW! Awesome rifle, I'm very jealous. Do you remember how much the Smoke composites carbon fiber buffer tube weighed with the castle nut? Was it the lightest you found? Thanks! I don't remember how much it weighed, i took the hack saw to it as soon as i received it and figured out it was a rifle length tube. Luckily i had some carbon fiber ferrules the exact size i needed for the hack job. It ships with a standard steel castle nut that i replaced with a V7 nut and end plate. I can tell you for sure that it's the lightest out there, i thought i had the weight pretty well calculated before i received the tube, only to find out my calculations were way over. So i was very happy to be even lighter than what i had predicted. |
|
|
|
[#46]
I have never seen any of those uppers with the recoil built in the only one I was aware of was the Faxon. I also have the 300blk barrel for it but I have tried it yet.
This gun is built around the 4" buffer tube for pistol use. The bolt carrier is proprietary it is cut down on the OD to allow a long recoil spring to go over the BCG. It actually shoots rather nice no kick or issues . I did add a small urethane bumper to the end of the bolt carrier so it bottoms out on that instead of coil bind or just hitting the end of the tube. The biggest negative is you have to disassemble the buffer and remove the spring from the end of the tube before you can open the rifle up. 
|
|
|
|
[#47]
Quoted:
I have never seen any of those uppers with the recoil built in the only one I was aware of was the Faxon. I also have the 300blk barrel for it but I have tried it yet. This gun is built around the 4" buffer tube for pistol use. The bolt carrier is proprietary it is cut down on the OD to allow a long recoil spring to go over the BCG. It actually shoots rather nice no kick or issues . I did add a small urethane bumper to the end of the bolt carrier so it bottoms out on that instead of coil bind or just hitting the end of the tube. The biggest negative is you have to disassemble the buffer and remove the spring from the end of the tube before you can open the rifle up. <a href="http://s146.photobucket.com/user/908ssp/media/machinework/_1012543_zps55923337.jpg.html" target="_blank">http://i146.photobucket.com/albums/r245/908ssp/machinework/_1012543_zps55923337.jpg</a> That's pretty much exactly how the NEA bolt carrier is, but it has a built in buffer at the end with a shake weight. Since the part of the spring rides on the bolt carrier you cannot break it down traditionally, you have to remove both pins and slide it forward. 
|
|
|
|
[#48]
Quoted:
I have never seen any of those uppers with the recoil built in the only one I was aware of was the Faxon. I also have the 300blk barrel for it but I have tried it yet. This gun is built around the 4" buffer tube for pistol use. The bolt carrier is proprietary it is cut down on the OD to allow a long recoil spring to go over the BCG. It actually shoots rather nice no kick or issues . I did add a small urethane bumper to the end of the bolt carrier so it bottoms out on that instead of coil bind or just hitting the end of the tube. The biggest negative is you have to disassemble the buffer and remove the spring from the end of the tube before you can open the rifle up. <a href="http://s146.photobucket.com/user/908ssp/media/machinework/_1012543_zps55923337.jpg.html" target="_blank">http://i146.photobucket.com/albums/r245/908ssp/machinework/_1012543_zps55923337.jpg</a> My bufferless AR above has a delrin plug in the stock over a fat Oring to absorb any impact from the carrier. At full rear travel, the short carrier is only sticking out of the upper about 1/8" Everything else is out over the barrel. |
|
|
|
[#49]
All of these builds are awesome! That super light is crazy and those custom fab, buffer-less designs are also things of beauty! Its seeing innovative builds like these that made me finally get an account.
|
|
|
|
[#50]
That is pretty great. I've enjoyed the renewed interest in the lightweight builds here. I still have a CavArms I need to build a rifle around...
|
|
|
 Win a FREE Membership!
Sign up for the ARFCOM weekly newsletter and be entered to win a free ARFCOM membership. One new winner* is announced every week!
You will receive an email every Friday morning featuring the latest chatter from the hottest topics, breaking news surrounding legislation, as well as exclusive deals only available to ARFCOM email subscribers.

AR15.COM is the world's largest firearm community and is a gathering place for firearm enthusiasts of all types.
From hunters and military members, to competition shooters and general firearm enthusiasts, we welcome anyone who values and respects the way of the firearm.

Subscribe to our monthly Newsletter to receive firearm news, product discounts from your favorite Industry Partners, and more.
Copyright © 1996-2024 AR15.COM LLC. All Rights Reserved.
Any use of this content without express written consent is prohibited.
AR15.Com reserves the right to overwrite or replace any affiliate, commercial, or monetizable links, posted by users, with our own.