|
Posted: 3/1/2005 12:58:17 PM EDT
[Last Edit: FALARAK]
Assemble your own AR15 rifle from parts.... for dummies.
This post is dedicated to demonstrate how simple it is to assemble your own rifle, from parts. By assembling your own rifle, you can build it the way you want, or upgrade your rifle with options you can easily add yourself. First, it is good to become familiar with these guides, which will go into more detail than what is covered in my step by step instructions, and there is a wealth of information here: https://www.ar15.com/guides/ Direct link to the Technical Manual The posts below cover the following projects: How to assemble a stripped lower receiver with a lower parts kit How to assemble a barrel to an upper receiver, or change your barrel How to install a free float tube to your upper: (LARUE, TROY, and YHM examples!) How to upgrade/install a match trigger How to make your own cut-down low profile gas block Remove your permanently attached muzzle device Build your own "SPR" Project How to permanently attach a muzzle device When you are done - always visit the Examination, Inspection, and Troubleshooting checklist, HERE And remember - if you feel this thread, or any other information you find here has saved you $24... please help promote this site and buy a membership! Store Link |
|
|
|
|
[Last Edit: FALARAK]
[#1]
Building a complete lower receiver from a stripped receiver, step by step:
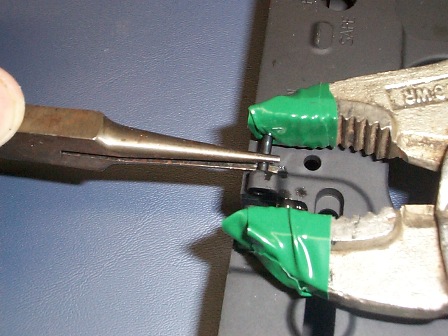
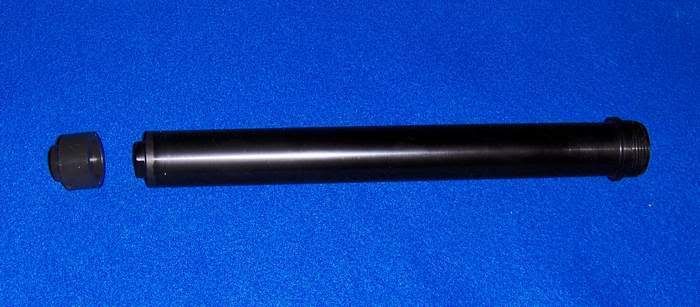
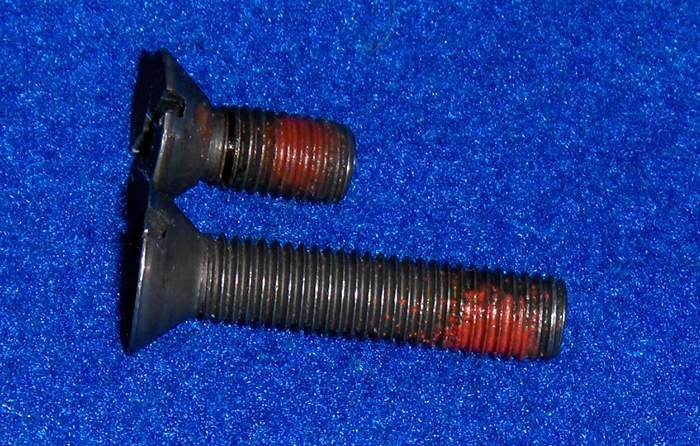
(or..... "assemble your own lower for dummies") This web page will demonstrate just how easy it is to build a lower receiver from a stripped receiver. This whole process, start to finish, takes 30 minutes to an hour.... depending on your skill level. If you can poke small objects into small holes, then you can build your own receiver. Ok, lets cover the necessary tools. What you need: Honestly... there are NO special tools necessary. Some will argue its good to have roll pin holder tools, roll pin punches, etc..etc... the only tools I feel are really necessary are a small brass punch.... and light hammer. Everything else can be improvised. That’s it for tools! Now here are the step-by-step instructions: There is not really a special order you have to go in... common sense will tell you some things have to be put in first, before others... but for the most part its not really important. The order shown here is just the way I happened to go... I started with a stripped lower receiver:  Here is the parts list that comes with a lower parts kit.... 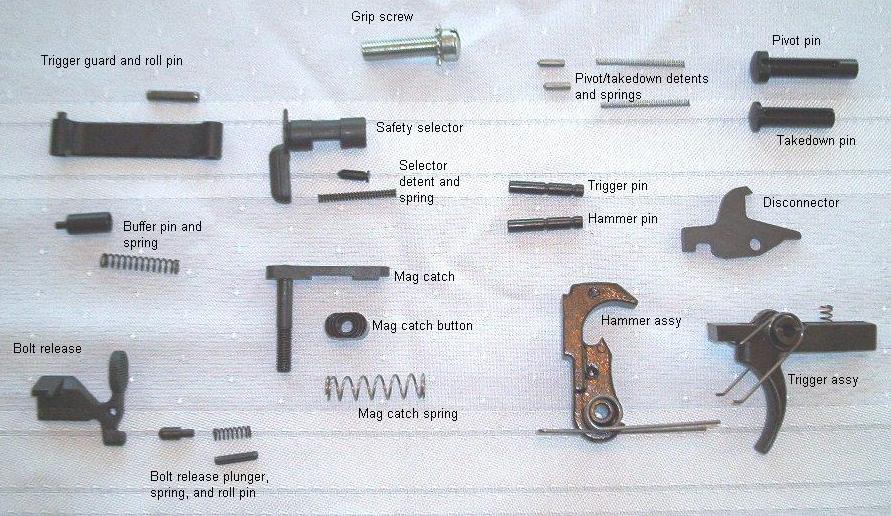 Here are some helpful pictures on the trigger and lower parts kits, common areas of confusion: 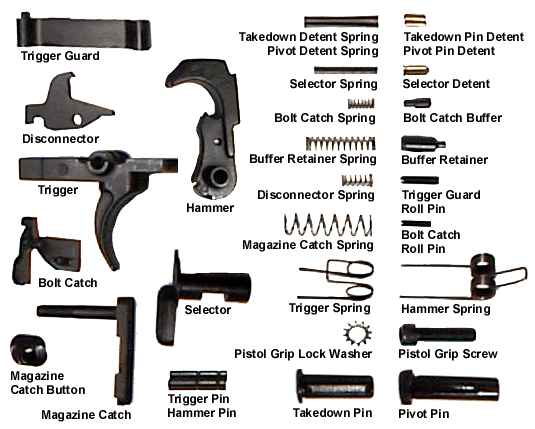 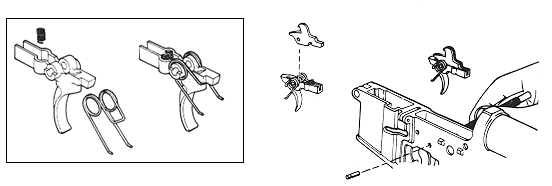 1. Insert the mag catch on the left side of the receiver (side with all the words on it) and then install the mag catch spring from the right side.  Then, grab the mag catch button and push it towards the mag catch. Then, spin the mag catch to tighten it. Stop when the mag catch threaded post is flush or nearly flush with the button:  2. On to the bolt catch. Get some masking tape and cover the lower receiver here: This is to keep accidental scratching from occurring as we tap in the bolt catch roll pin in place.  Insert the roll pin, and tap lightly to get it started... but do NOT tap it all the way in yet. Insert the bolt catch spring and buffer, with the spring in first and the buffer facing out:  Then, install the bolt catch, holding spring tension on the plunger, while aligning the hole in the bolt release with the roll pin hole in the lower.... and using a punch, tap the roll pin all the way in. If you want to avoid marring the finish, place more tape over the roll pin area as it gets close to flush to drive it all the way home. 3. On to the front pivot pin. Some people have trouble with this one, with the detent being lauched across the room. Just be careful, and its really no big deal. insert the spring into the detent hole:  Then insert the detent. It will barely even start in the hole before you really have to push for all the spring pressure. Then, using the pivot pin, push the detent back while you insert the pivot pin into it's hole in the receiver. Snap... bamn.... it just falls into place. :-)  4. Trigger guard. This is pretty straightforward... insert in the trigger guard with single hole side in the receiver. Then align the roll pin hole up with the hole in the "ears" of the receiver. BE VERY CAREFUL HERE. You must support the "ears" on the bottom side if you tap the roll pin in place. If you dont support the bottom ear, you could break it off when tapping the pin in place. Also, some roll pins or trigger guards are out of spec. If it takes what you think is too much force, or starts to deform your roll pin, STOP. Also - see below for an alternative method of installing this pin by squeezing the pin in place.  5. Drop the trigger and trigger spring assembly into the receiver.  Then push the disconnector on the top of the trigger, with the notch in the disconnector over the coil spring in the top of the trigger. Then using a trigger pin, insert it through the lower receiver... into the trigger, through the disconnector, and back into the other end of the receiver. This takes a lot of wiggling to get it though... but you can do it!  6. Next, grab the hammer/hammer spring assembly, and insert it in the lower. The two long legs of the hammer spring should rest on the top of the trigger ping installed in step 5. There is quite a bit of hammer spring tension... but squeeze the hammer into the receiver so that the hammer pin hole lines up with the holes in the lower receiver, and install the hammer pin. You might have to tap lightly to get the pin through the hammer, but just LIGHTLY. Cock the hammer.  7. Next, install the safety selector into the left side of the reciever. Install the selector detent, and spring into the detent hole:  Install the pistol grip and grip screw, taking care to ensure the selector spring goes into the hole in the grip. 8. Rear takedown pin: Install the detent and then the spring... and the takedown pin into the rear of the receiver. The stock will hold tension on this spring/detent, when it is installed, next:  9. Thread the rifle/carbine buffer tube slowly into the receiver... taking care with the takedown pin spring. The tube should be threaded in just up to the buffer hole.... and then insert the buffer stop pin and spring:  Then thread the tube a little more, so that it holds the pin in place, but does not touch the center part of the pin and bind its movement:  Then tighten the stock in place... this is a carbine stock. You can use the CAR wrench for the castle nut (shown) or the CAR nut.... and some people like to add a little blue loctite to this nut so it wont back off in the field: NOTE - you may not wish to use Loctite. It is not required. Especially if you think you might be taking it apart again soon. Loctite just helps assure it wont get loose on you while shooting, and some people never have a problem with this. Just use a DROP or two and it will break loose pretty easily though.  Now, just insert the carbine/rifle buffer and spring. Cock the hammer back to make this easy. The spring goes in first, with the buffer in next... and push the buffer in past the buffer pin sticking up.  You are all done! Perform a trigger mechanism safety check, install your upper, and go shooting! Safety function check is described HERE DO NOT DRY FIRE A LOWER. Dry firing of the assembled weapon is fine. However, if you allow the hammer to drop on a lower that does not have an upper installed, it will potentially damage the lower receiver. The hammer will strike the bolt catch, which will damage the bolt catch receiver area and pin. If you do it a couple times it will be fine... but continued dropping of the hammer will likely result in damaging the bolt catch, receiver, or both. |
|
|
|
|
[Last Edit: FALARAK]
[#2]
Building a complete lower receiver from a stripped receiver, step by step: (continued)
As an alternative to driving pins in with punches, you can press them in:
|
||
|
|
|
[Last Edit: FALARAK]
[#3]
Building a complete lower receiver from a stripped receiver, step by step: (continued)
Common Q&A: Q1. do any of the lower receiver parts need to lubed? A1. CLP is all you *need* for any part on the AR15/M16 rifle.... and at a minum should wipe down the FCG, safety, and pins, with CLP. That being said, on initial assembly, I like to use a little moly-grease on the sear engagement surfaces on the trigger and hammer, and inside the trigger and hammer pin holes. I place a dab of grease on the new pins, and work them in and out to lube the inside of the new fire control group. I also add a dab of grease to the safety selector, and takedown/pivot pins. Q2. do you ever find the trigger and hammer pin move, or are they held in place fairly well? Ive seen some locking pins, are they necessary? A2. If the FCG is installed correctly.... there will be no movement of the pins. There is a "j" hook installed in the hammer that firmly holds the hammer pin in place..... so that cannot move. Then, when the hammer is installed, one of the legs of the spring rest in the groove on the trigger pin, so that one cannot move. I dont see the real use of "anti-walk" pins unless you are running some sort of custom trigger that does not have these designs in place. Or, if you do not want the pins to rotate in the receiver, you can install oversized pins like in the RRA triggers, or a KNS pin set which locks them from moving sideway or rotating. Q3. Any grease necessary on the buffer spring? A3. NO!!! A light wipe with CLP is all you need. NO GREASE on the buffer tube! That SPROING noise is NORMAL, and is a good thing. When you hear the noise change, that lets you know you need a fresh mag. Q4. My bolt catch is sticky. My bolt wont lock back or it is VERY hard to release. Is this normal? A4. NO!!! This is a common issue with new parts. The hole in the bolt catch should be large enough to easily allow the bolt catch roll pin to pass through. If it does not, then the bolt catch hole is out of spec. You can contact the vendor and have it replaced, or you can ream it out larger with a tiny drill or grinding bit in a dremel, or very small round needle file. This is a cast hardened part, and does not drill easily. |
|
|
|
|
[Last Edit: FALARAK]
[#4]
Changing your own AR15 barrel for dummies
This web page will demonstrate just how easy it is to re-barrel your AR-15 upper. This whole process, start to finish, on my very first build, took less than 30 minutes…. And that was taking notes and pictures! If you can tighten a single nut, then you can change your barrel, and build your own uppers, in minutes. I cannot get over how simple this is. Ok, lets cover the necessary tools. What you need: 1. A quality upper receiver action block. I went with the Bushmaster model (~$40):  2. A quality armorer’s wrench. Based on what I read about all the choices, I chose the DPMS model (~$35): http://www.bravocompanyusa.com/DPMS-Armorer-AR15-Barrel-Wrench-p/dpms%20tl-mw%20wrench.htm  3. A small punch to knock out the gas tube roll pin. I used a 1/16” drill bit because I did not have a punch that small. 4. A set of snap ring pliers. I had a set laying around, but you can get these at any hardware store. 5. Molybdenum-Disulfide grease (per the TM) This is for the upper receiver threads. This is found at any auto parts store or hardware store for cheap. At the auto parts store - just buy generic WHEEL BEARING grease. 6. A vise. Pretty much any size will do, but must be firmly mounted to a bench of some sort. That’s it for tools! Now here are the step-by-step instructions: 1. First thing is first. Remove the upper from the rifle. Remove the bolt/carrier/charging handle from the upper. 2. Remove the hand-guards from the upper. (This assumes you have typical carbine/rifle guards) You do this by pulling on the delta ring toward the receiver, while using your other hand to slip off the upper and lower guard. It’s a little tricky at first, but you will get the hang of it with practice.  3. Next, we need to knock out the roll pin that holds the gas tube into the front sight assembly. The correct size if 5/64". Try finding a 5/64" punch at your locl hardware store!. Use a 1/16” punch. I didn't have one that small, so I just used a really small drill bit to knock it out. It can be tapped out from either direction. Here is a close-up of the roll pin to knock out:  4. Once that is knocked out, you can remove the gas tube. Pull the tube from the front sight base into the upper receiver, until the tube can clear the front sight, then pull it forward to remove it. Sometimes they can be stubborn, and you might have to LIGHTLY grab the tube with a pair of pliers and tap the pliers rearward with a light hammer. Don’t crush the gas tube. If for any reason you damage it, they are cheap. Replace with a new one. Note the gas port on the tube faces down, and note the hole for the roll pin:  5. Now, we are ready to slap on the action block. It only goes on one way, so you cannot screw it up. Clamp the upper/block into the vise as shown:  6. Take your armorer’s wrench out, push it onto the barrel nut, and unscrew the nut. There is spring pressure here, so you must push in towards the receiver whille you turn. It uses standard threads. Righty-tighty, Lefty-loosey. Once it breaks free, it should unscrew fairly easily. Take off the delta ring assembly as shown:  7. Now, your barrel will just pull straight from the receiver. Remove the barrel. 8. At this point, we need to remove the delta ring, spring, and snap-ring that holds it all together. Grab your snap ring pliers, and slide off the snap ring, spring, and delta ring as shown:  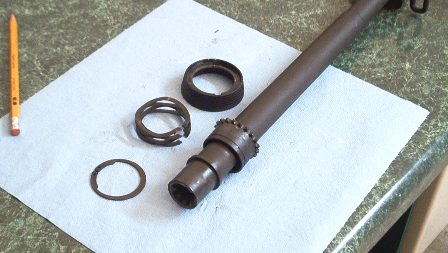 9. Halfway there! Now, we need to clean the surfaces of the new barrel, and the threaded area of the upper receiver, to make sure they are free of grit and particles that might keep them from going together smoothly. I like to use gunscrubber, or brake parts cleaner for this. Then, per the TM, apply a little moly grease to the threads of the upper receiver:  10. If necessary, assemble the delta ring assembly on the new barrel. Now, slide the new barrel into the receiver. There is a locator stub on the barrel that fits in a notch in the upper receiver. If there is any play here, line up your front sight so that it is the straightest with the rear sights. Sometimes, it *may* necessary to file this notch open in one direction, if your front sight will not line up straight. I dont recommend cutting anything at first; assemble your barrel, and only perform this procedure if your sights require a lot of windage adjustment in one direction to zero it. 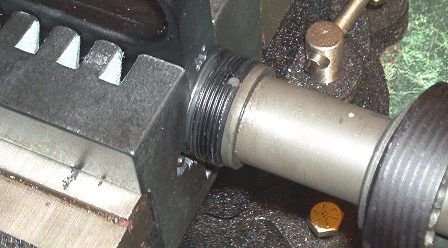 11. Thread on the barrel nut. Be careful not to cross-thread it, so just go easy at first. Some people like to take a short piece of gas tube or 3/16" bar and insert into the receiver, to hold the spring/snap ring from spinning as you tighten the barrel nut. Then use your armorers tool to get the barrel nut snug (not fully tight). Inspect the barrel nut lugs, and continue to tighten the nut until the lugs line up with the gas tube hole in the receiver. Once that is done, you need to make sure that the hole in the spring and the snap ring is aligned so you can insert the gas tube. Insert the gas tube through the barrel nut, delta ring, and into the receiver. Then insert the other end into the front sight block:  12. Now, you can remove the upper from the vise. Tap the roll pin back into the front sight block to hold the gas tube in place. Install the handguards. 13. Sight the upper in and go shooting! |
|
|
|
|
[Last Edit: FALARAK]
[#5]
Changing your own AR15 barrel for dummies: (continued)
Common Q&A: Q1. Can I use a barrel vise instead of an action block? A1. Yes, but a barrel vise will often allow the barrel to spin while torquing, which will marr the barrel. The barrel vise will also put all the pressure during barreling on the index pin in the upper receiver. Thsi will increase the potential for a canted front sight. It is not as simple or effective as an action block. Spend the $38. Q2. What about the torquing three times, to 80ft/lbs like the TM says? A2. While using a torque wrench is never a bad idea, it is not required. Snug it up, three times, then line up with next gas tube hole. Sometimes this will take a lot of force, sometimes just a little. If you arent sure, or nervous, go to the local auto parts store and borrow a torque wrench for ft. pounds. The point of snugging it up three times, is to mate the aluminum upper receiver threads together with the barrel nut. Q3. What about checking the headspace after I assemble? A3. While checking your headspace is never a bad idea, it isn't required for this operation. The headspace of an AR is set by the bolt's fit into the barrel extension. As long as you are using a good quality bolt and barrel, that was headspaced by the manufacturer, you are good to go. If you are assembling very old/used barrel/bolt, then you might want to consider checking headspace. Changing the barrel has no effect on headspace, because the barrel's seating in the upper receiver makes no difference, it is all in the bolt and barrel extension. Q4. I am confused about the moly grease for the upper receiver threads. I cant seem to find any grease that just says "moly grease" on it? A4. There is a lot of noise about this on the boards. Truth is, you just want a decent grease that will keep the barrel nut from galling, and has a high temperature rating so it wont run out and dissipate over time. It's really not all that important. Any standard wheel bearing grease, available at ANY auto parts store, will do just fine. Q5. "I installed my barrel, but my FSB seems canted in one direction, and in order to zero, I had to move my rear sight all the way to one side, and sometimes it still wont zero because I ran out of windage" A5. This is a direct quote from Homo_Erectus on the issue:
|
||
|
|
|
[Last Edit: FALARAK]
[#6]
Install your own free-float rail system, step by step:
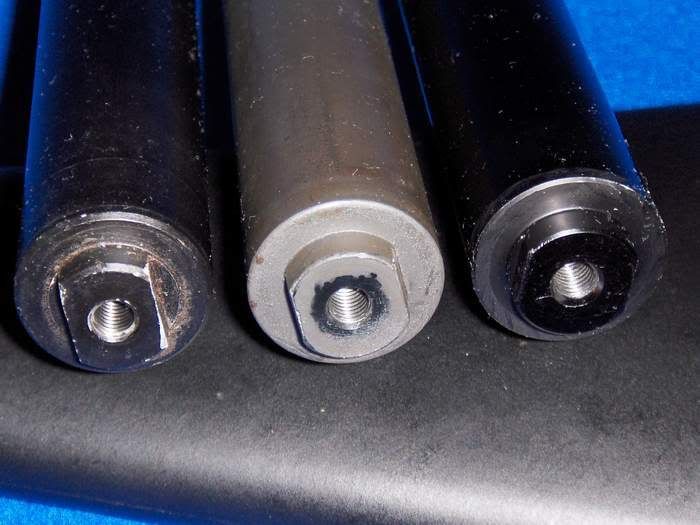
YHM ultralight carbine step by step: This first post is the YHM model, but see below posts for LARUE and TROY FF tube installs. (or..... "free float your barrel for dummies") This web page will demonstrate just how easy it is to install a free float tube on your upper. This whole process, start to finish, takes 30 minutes to 1.5 hours.... depending on your skill level. If you can tighten a few nuts, then you can install your own free float. This section will cover installing a YHM brand ultralight carbine float tube ($~90)  Ok, lets cover the necessary tools. What you need: Since this procedure requires removal of the barrel/barrel nut, you will need many of the same tools as listed in the Step by step guide to building a complete upper, above. See the above post... but to sum it up, you will need a good action block, armorers wrench, 1/16" punch, snap ring pliers, moly-grease, and a vise. In addition, depending on the free float tube you choose, you might need a special float tube wrench. I opted to get this from YHM, didnt need it, but since this was my first one, couldnt hurt. You will also need a couple punches. You just need a good sized (1/4") soft brass punch and a steel 1/8" punch. I got this punch set (also available HERE ) and really like it.... but you can find what you need at sears or harbor freight, etc... That’s it for tools! Now here are the step-by-step instructions: 1. Remove the upper from the rifle. Remove the handguards. Using the instructions listed in the above posts, remove the barrel from the upper receiver. (you dont have to fully remove the barrel.... just the barrel nut/delta ring assembly, and you could leave the gas tube in the FSB) We will be assuming a full dis-assembly for this guide) You MUST remove any type of muzzle device first.... flash hider, muzzle brake, etc... If these are permanently mounted, then they will have to be removed. Depending on their method of attachment, it may be adviseable to have a competent gunsmith remove them and reinstall them. Now we need to remove the FSB (front sight base) from the barrel. The pins in the FSB are typically tapered. This means they can only be removed one way. (I am told that RRA and LMT use straight pins, not tapered, so those should be even easier) Look on both sides of the FSB and determine which side of the pins is the SMALLER end. It should be the left side, and we will be knocking the pins out from left to right. NOTE - Stag Arms has been shipping uppers with FSB taper pins on the opposite side of most uppers - so be sure to examine your FSB!  2. Support the barrel so that when we knock the pins out, we wont stress the barrel at all... I used a couple pieces of 2x4. Using a large diameter (~1/4") brass punch, firmly knock the pins loose. Use masking tape all round the FSB is you are worried you might slip and scratch something. I must admit... on most of the barrels I have done, a couple sharp hits with a punch knocked the pins loose.... but I finally had one Bushmaster 20" barrel that the pins absolutely would not come loose on. I ended up having to dremel the FSB down and then was able to punch them out, but I ruined the FSB. I was replacing with a flip up FSB anyway, so it wasnt a great concern... but keep this in mind, should you come across one that is not very friendly.  It will take the most force just to break the pins loose... once they are loose, we can use the small punch to tap them all the way out:  3. Now, lubricate the FSB and the area on the barrel in front of the FSB with CLP, WD40, gun oil...etc... this it to ensure we will scratch the barrel as little as possible upon removing the FSB. Wiggle the FSB back and forth to loosen it... you may need to put the barrel back in the upper receiver to hold it for this step. Then, pull the FSB from the barrel, going slow and taking care. If you go slowly, you shouldnt place any marks on the barrel from this step. Remove the barrel nut and delta ring as well:  4. Disassemble the YHM free float... into the float tube, aluminum barrel nut, and float tube lock nut.  5. Insert the barrel into the upper receiver. Apply a little moly grease to the threads of the upper receiver.  6. Install the barrel nut, and get it snug (this should be tightened just like any other barrel nut, torque it to spec).... then tighten until you align with the next possible gas tube hole. Slip the gas tube in from the rear to ensure you are aligned:  7. Install the float tube lock nut. Thread it all the way to the rear, flush with the back edge of the barrel nut. I like to use a little blue locktite on this, to ensure it wont back off in the field. A little Loctite makes all the difference!  8. Spin on the float tube.... right up to the lock nut. Ensure the rail is aligned with the rail on the upper receiver. I used a A3 carry handle, half on the receiver, and half on the float rail, to acheive this. Then tighten the locking nut. You can use the YHM tool for this, or a hammer/punch/flat blade screwdriver.  9. Now install the FSB back on the barrel, and the gas tube. Remember to put the roll pin back in the gas tube if you removed it:  10. Using the large brass punch, tap the taper pins back in, from the RIGHT, to the LEFT, this time... driving them home.  11. DONE! Wasnt that simple? Finished product... time to go shooting!  There are several different types of free float tubes on the market, and their installation will vary slightly from this specific one... some have integrated barrel nuts, some require a strap wrench, but all have the same principles involved above. |
|
|
|
|
[Last Edit: FALARAK]
[#7]
Install your own free-float rail system, step by step:
LaRue 7.0 step by step: This section specifically relates to installing a LaRue Tactical 7.0 float tube. Thus far, this is one of the finest float tubes on the market. It covers everything you need in a float tube, and is priced right for the quality of manufacturing. A couple points..... it has an indexing (anti-rotation) device that located on the upper receiver, and will not allow the tube to spin. It also is not as "fat" as some of the other tubes, which provides a better grip with rail panels installed. I REALLY like this rail system! As a new addition - LaRue has also added a quick release sling mount near the receiver, compatible with Vltor quick release sling attachments. It also has an anti-rotation device to keep your sling from getting twisted. This guide will cover installing a LaRue 7.0 lightweight carbine float tube, from LaRue Tactical.  Ok, lets cover the necessary tools. What you need: Since this procedure requires removal of the barrel/barrel nut, you will need many of the same tools as listed in the Step by step guide to building a complete upper, above. See the above post... but to sum it up, you will need a good action block, armorers wrench, 1/16" punch, snap ring pliers, moly-grease, and a vise. You will also need a couple punches. You just need a good sized (1/4") soft brass punch and a steel 1/8" punch. (allen wrench and blue loctite supplied with tube!) That’s it for tools! Now here are the step-by-step instructions: 1. Remove the upper from the rifle. Remove the handguards. Remove the muzzle device. Remove the front sight base. Unscrew the factory barrel nut and remove the nut, and delta ring assembly (we wont be needing these) To mount a LaRue tube, the "keeper" (anti-roll device) plate will interfere with the action block I was using. It required I take a dremel and cut out a notch to accomodate this. I am not sure if it was required.... I cannot tell if this can be slipped in after the fact.... YMMV.  2. Next, place the "keeper" (anti-roll device) on the upper receiver. Slip on the knurled ring and the barrel nut:  3. Add a small amount of moly grease to the receiver threads. The barrel nut is installed just like any other, you snug it up three times, then torque until the next gas tube hole aligns correctly.  4. Here is a picture of the latest model LaRue tube, with the steel insert correctly installed.  5. Slip on the float tube, and tighten the knurled ring. The tube will align itself with locating pins already in the float tube. Use a strap wrench to get the knurled ring tight.  6. Apply blue locktite (supplied with tube) to the allen screws, install, and tighten. This locks down the anti-roll device. Reinstall FSB/gas tube, and muzzle device.  7. DONE! Here is a picture of the sling mounted. Note: I had to modify the KAC full-size panel if I want to use this sling mount. If you choose not to utilize the sling mount, any full size panel will cover the sling hole.  
|
|
|
|
|
[Last Edit: FALARAK]
[#8]
Install your own free-float rail system, step by step:
TROY MRF-C step by step: This section specifically relates to installing a Troy Industries MRF-C float tube. The really cool thing about this system, is that you can install the Troy with almost no tools, and it does NOT require the removal of the barrel nut OR the front sight base. The Troy clamps to the factory barrel nut to float the tube, and is a two piece design that locks together. If the task of pulling your FSB or removing the barrel nut seemed a little challenging to you, or you want to skip the expense of the special tools, or you dont want to have a gunsmith remove your permanently attached muzzle device...... look at the Troy products..... This guide will cover installing a Troy MRF-C lightweight carbine float tube ($~250), from G&R Tactical.  Ok, lets cover the necessary tools. What you need: Seriously.... a few allen wrenches. Thats it. The Troy tube clamps over your existing barrel nut, so no special tools required. You will need a dremel or the like to remove the Delta ring. That’s it for tools! Now here are the step-by-step instructions: 1. Remove the upper from the rifle. Remove the handguards. Here is the upper we will be installing the Troy on: It is a Bushmaster tactical carbine, with a GG&G FSB. We didnt want to have to mess with the muzzle device OR the GG&G, so the Troy was an obvious winner. You need to cut off the factory delta ring. A dremel is the tool for the job. The Delta ring is aluminum so it goes fast. Just be very careful not to slip and mess up your barrel or receiver. Cut it in two places, then snap it off and remove the snap ring and spring.  2. Next, just slap the top half of the MRF-C on the barrel nut. I used a carry handle to align it.... but I think you can get it close by eyeballing it.  3. Now attach the bottom half of the locking ring to the barrel nut. This attaches securely with 4 larger allen screws. Before you lock her down, make sure you have the uppermost rail aligned with the rail on the receiver, then tighten. The bottom locking ring has a nice feature of two legs that stick out just over the receiver, to ensure that the tube cannot accidentally rotate on the upper. 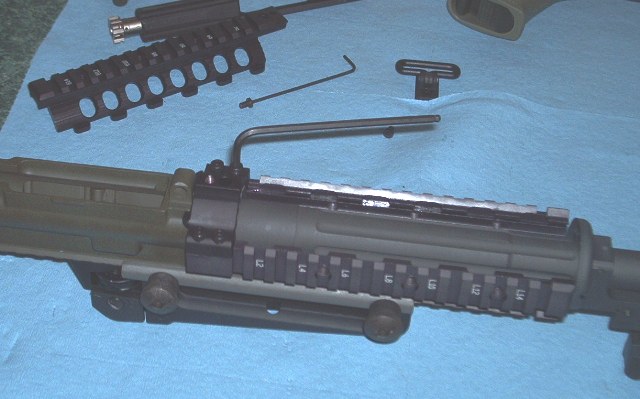 4. Next, attach the bottom half of the float tube. It pops into place, and then you slide it towards the receiver to lock it. Additionally, there is a smaller allen screw that locks it in place.  Finished product:  Start to finish.... half hour job.... at the most. |
|
|
|
|
[Last Edit: FALARAK]
[#9]
Install your own free-float rail system, step by step: (continued)
Common Q&A: Q1. How do you replace the front sight post and make it plumb, so it's not to far left or right? A1. If you are removing and resintalling the same FSB on the same barrel, you cannot screw it up. The taper holes are drilled in the barrel, and in the FSB.... and when taking it off/resintalling it on the same barrel, it will line up perfectly where it was before. There is no room for "play". The taper pins as you drive them in will line it back up exactly where it was drilled. Q2. Do I need the YHM tool for installing the YHM tube, or will my standard armorers wrench do the job? A2. There are two things the YHM tool does better than an Armorers tool: The YHM tool has three pins for positive lockup into the YHM aluminum barrel nut... most Armorers wrenches only have two pins for this. Having seen a YHM barrel nut break once from overtorquing with a standard wrench.... its worth it. Also, the YHM tool has a special end for the locking ring. It is very specific and the only other way to get it tight enough would be a punch, which would mar the surface even more than the YHM tool does. This is another reason I feel blue locktite is necessary on the locking ring for the YHM FFtubes. Q3. Can a second person hold the upper during tightening to save the cost of a bench vice, bench, and $40 action block? A3. NO. The torque involved is too great for that.... you could rig up some type of fixture, but if the upper is not properly supported, risk of damage is high. Q4. What about headspace after removing/installing the barrel? A4. if all you are doing is installing the FF tube on an assembled rifle, using the same bolt/barrel as before, then there is absolutely no reason to concern yourself with headspace, because it is not affected by changing such things. |
|
|
|
|
[Last Edit: FALARAK]
[#10]
Installing a match trigger in your lower, step by step:
(or..... "trigger upgrades for dummies") This web page will demonstrate just how easy it is to install an upgraded match trigger in your AR15 rifle. This whole process, start to finish, takes 15 minutes to an hour.... depending on your skill level. If you can tap a few pins, then you can upgrade your own trigger. The AR15 standard service trigger, however functional, leaves much to be desired in the quality of the trigger. Service triggers are creepy, heavy, rough, and often dont break cleanly. Have no fear, there are several high quality-low cost trigger options for you! Personally, I feel the best bang for the buck in trigger upgrades is the Rock River Arms 2-stage trigger. This trigger, found between $75 and $100, has a light takeup in the first stage, and then a ~4.5lb clean break as the second stage. I highly recommend them. This guide will cover installing a RRA 2-stage trigger in a standard AR15 lower. I got mine from Eagle Firearms.  Ok, lets cover the necessary tools. What you need: 1/8" punch and light tap hammer. You can improvise these tools, using what you have at home... but I really like using a good brass punch set, so I got THIS punch set and really like it.... but you can find what you need at sears or harbor freight, etc... You also need a little trigger lube. Some people like CLP, I like to use a little Moly-grease. That’s it for tools! Now here are the step-by-step instructions: 1. We will be starting with a stock Bushmaster lower, with the stock trigger:  2. First, we tap out the hammer pin. I like to always work from the right side, to the left side when installing/removing pins. Place the lower on something that will lift it above your work surface, to give the pins room to come out. I used a roll of tape. Tap out the hammer pin while holding the hammer, as it is under a little spring pressure.  3. Once the pin falls out, remove the hammer:  4. Now, tap the trigger pin out. 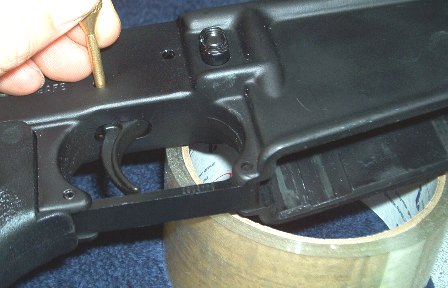 5. Here is the stock trigger, hammer, disconnector, and pins:  6. Now is a good time to clean up and lube your new RRA 2-stage trigger. I like to use a little moly-grease on the sear engagement surfaces on the trigger and hammer, and inside the trigger and hammer pin holes. I place a dab of grease on the new pins, and work them in and out to lube the inside of the new fire control group.  7. Now install the trigger. You do not have to remove the saftey. It is a little tight, and you may have to flip the safety from safe to fire a few times, to work the new trigger into place. Then, tap in the new trigger pin. The Rock River trigger pins are slightly oversized from stock, and will require more tapping force to seat them than to remove the original ones. This is intended, as you do not want the pins rotating in the receiver... you want the trigger and hammer to rotate on the pins. Tap the trigger pin into place, taking care to make sure you line up the holes in the trigger and receiver:  8. Install the hammer. This is a little tricky, but not bad. You have to ensure the legs of the hammer spring lay across the TOP of the trigger pin you just installed. When you have it right, and you line up the hole in the receiver, there is a decent amount of spring pressure on the hammer:   9. I use my punch, from the left side, to hold the hammer in alignment with the receiver holes:  10. Then, tap in the hammer pin, as it knocks out your alignment punch:  11. All done! Perform a trigger function and safety check, and go shooting with your new "match ready" rifle!  Worthy notes:
|
||
|
|
|
[Last Edit: FALARAK]
[#11]
Make your own cut-down low profile gas block, step by step:
First, I started with a FSB that I had to dremel into to get the pins out. It was otherwise ruined, so I figured, why not cut it down???  Get a dremel and a cut-off tool, and start whacking the top off. I didnt even burn up one disc for the whole project!  First step complete:  Now cut off the sling mount and bayo lug, if desired:  Here is what she looks like at this point. Ugly!  The rest will be done with a sanding drum.... or you can use a griding stone. I find the drums, while they burn up quick, go a little faster:  Most of the rough work is done. At this point, just smooth it up a bit to look better:  If you are going to mount your FSB back on the same barrel it came off of.... then re-use your taper pins. If you are going to mount the FSB on a different barrel, you will need to drill and tap for set screws to hold it to the barrel. I then drilled with a #21 drill, and tapped with a 10-32 tap. I also had to taper-grind my set screws.... so they were more "pointy" on the front. Without doing this, they would bottom out against the barrel with hardly any threads, and would strip out. Dont get them too tight or they will trip. Use red-loctite on them so they wont back off.  A quick coat with flat black spray paint:  Finished product: 
|
|
|
|
|
[Last Edit: FALARAK]
[#12]
Remove your permanently attached muzzle device:
Several people hate their mini-Y comp muzzle brake that came on Bushmaster postban barrels, and want to remove it to install a common flash hider. Here is a how-to provided by another member, "BadSVT"
It is VERY IMPORTANT to remember, that most of the Mini-Y's came on 14.5" barrels, and you MUST install a muzzle device that will get the barrel back to 16" or more (Phantom, Vortex) and that MUST be permanently installed, in a fashion acceptable and documented by the ATF. AS SOON AS YOU TAKE THE BRAKE OFF, your barrel will make your AR a SBR, which is illegal, unless you have registered it and payed the ATF stamps, etc. Do not assemble your barrel back on the rifle until you have installed the new device permanently, and dont wait a long time to get the new device installed..... or "plan to" "someday" get it mounted permanently. The reward does not match the risk.  I dont agree with the above legalities, at all... but they warrant mentioning. |
||
|
|
|
[Last Edit: FALARAK]
[#13]
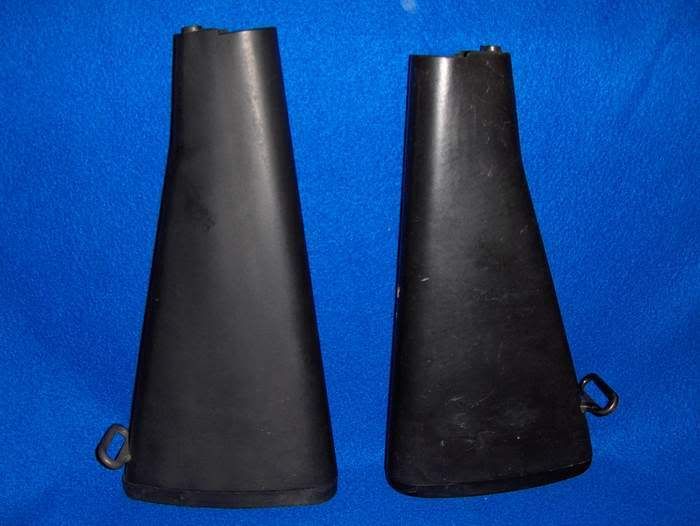
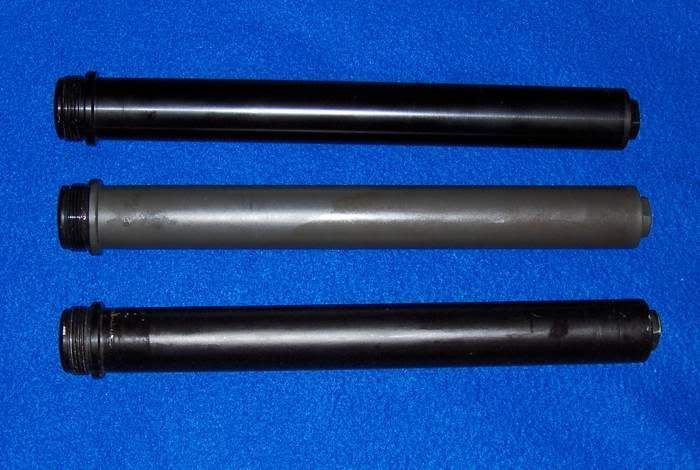
Build your own "SPR" Project:
I have been wanting to build a Special Purpose Rifle type rifle for a long time. I finally got the parts together to do this. This build is not an exact clone of the real deal, just something that fits in the same category of an accurized, scoped rifle. For this build, I chose a laundry list of high end components. I really want a tack driver, so I bought a Kreiger 1:8 twist, SPR profile, 18" stainless barrel. This barrel was turned by CLE and they also provided a fitted matched bolt for this particular barrel. LaRue provided their new enhanced 12.0 free float handguards, and I will be using a low profile gas block. I am using a CMT enhanced bolt carrier. I chose a CMT A3 T-numbered receiver. The stock chosen will be a Magpul PRS stock. The lower receiver is from Rock River Arms, and sports a RRA 2-stage match trigger. A PRI big latch will be added to the charging handle, which really helps in fast and reliable charging, especially on scoped weapons. Tango down rail panels will be used for the primary hand surfaces on the LT FF tube, and Magpul ladder rails will cover the exposed rails to protect them from damage in the field.  Enough talk, let's start building! 1. We will start by placing the upper receiver in an action block, putting moly grease on the receiver threads, and inserting the barrel.  2. Next, we will throw on the LaRue Tactical float tube anti-rotation device, the locking ring, and the barrel nut. The barrel nut will be installed just as described in the FF tube post above.  3. Next, we will install the LaRue Tactical handguard, and tighten the allen screws through the anti-rotation device.  4. Then, we will insert the gas tube into the LaRue gas block, and tap in the gas tube roll pin. Once complete, slide the gas block on the barrel, as you insert the gas tube into the hole in the upper receiver. Once you are happy with the alignment, lock BOTH the provided set screws down WITHOUT any locktite, and ensure you are happy with the alignment. Then, remove ONE set screw, coat it with the provided locktite that came with the block, and reinstall. Repeat for the second setscrew.  5. The last step on the upper is to install the PRI big latch.  6. We will knock out the factory roll pin in the latch using a 1/16" punch. Then install the PRI replacement latch, using the roll pin provided. This step can be tricky, because the latch is under spring pressure while you try to align it and tap the new roll pin in. Sometimes it helps to use a paper clip or the like, to get things lined up just as you start to tap the roll pin in.  7. Now we will install the stock. The Magpul PRS stock is designed to work with a rifle length buffer tube and buffer. If you have a carbine stock you will need to order these parts. If you are removing an A2 stock, you can discard the long stock screw and A2 spacer - they are not needed. The Magpul stock comes with a short vented stock screw that works perfectly with the rifle length buffer tube:  8. Almost there! 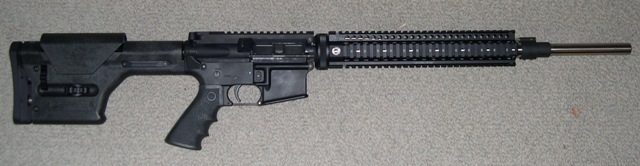 9. Now we will install the rail cover panels, scope, base, and bipod: 
|
|
|
|
|
[Last Edit: FALARAK]
[#14]
How to permanently attach a muzzle device:
If you have a barrel that is 14.5", you must permanently attach a muzzle device that makes the total lenght 16" or more. Best to go 16.1" at least to be safe. For the 14.5" barrel, it is commonly accepted to use the Vortex or Phantom style of flash supressors. The ATF states to be permanently attached, the muzzle device cannot be removed with hand tools easily and must use 1100 degree silver solder, blind pinnned and welded, or welded completely around the barrel. This writeup will demonstrate the most common method, the blind pin and weld. This was originally posted by wildearp, I am just using the basics of his post for this section: Start by predrilling the muzzle device through one side - while removed from the barrel. The drill size should be the same diameter as your pin size. Coat hanger works great.:  Next - attach the muzzle device, time it with a peel or crush washer, and then drill into the barrel, using the hole in the muzzle device as a guide. A drill press works well here, to ensure you do not drill too deep. If you penetrate the bore you will destroy the accuracy of the barrel - go slow here. You only need to drill deep enough to accept the pin.  It should look like this:  Now we are ready to insert the pin.... this is coat hanger, cut to fit.:  Before welding, cover the barrel well to ensure you dont mark it up with welding splatter. Wrap it well. Melted adhesive comes off. Welding splatter doesnt so well. (another great option here is to wrap the barrel surfaces with a few layers of aluminum foil.... no adhesive mess.  A pic after welding. At this point - you can hit it with a dremel, or sander, to blend it in (careful!!!) Then hit it with some cold blue to darken it.  Installed:  |
|
|
|
|
[Last Edit: FALARAK]
[#15]
Interesting Misc stuff:
O-ring for extractor enhancement: The NSWC Crane extractor o-ring is constructed of Viton. OD is 1/4", ID is 1/8". Thickness is 1/16". You can order a bag of 25, Part No. ORV-006, for $2.65 from www.smallparts.com/products/descriptions/orv.cfm
|
||
|
|
|
[Last Edit: FALARAK]
[#16]
And just FYI - there is no need to "tag" this post..... it is, and will be, tacked at the top of the "Build It Yourself" forum.
When you are done - always visit the Examination, Inspection, and Troubleshooting checklist, HERE |
|
|
|
IL, USA
|
[#17]
Okay then. My first ar15 lower buid is done. Took my time sitting in front of the computer. Didn't launch any detent springs. When I installed the safety selector everything got locked up. Pulled it apart and looked everything over. My safety selector had a little silver pin in the notch. Oops. There is the supposedly missing takedown detent. Pulled it out, reassembled everything, mission accomplished. Kind of an elegant little mechanism. Function check was okay. I might brave the cold and go to the range and try it tommorrow. Thank you FALARAK, for the well done instructions.
Scott |
|
|
TX, USA
|
[Last Edit: PointlessSilly]
[#18]
Just to add, for aligning the railed FF tube with the receiver, I used the vertial forgrip instead of my carry handle because the carry handle would not align just right to get a good seating. (The bolts that fit between the rail's groves do not come off the carry handle)
|
|
|
|
[Last Edit: GeneralGenocide]
[#19]
First build accomplished, no tools used other than hammer and screwdriver as stated. Function checks beautifully. Launched the pivot detent and failed to recover, good thing there was a mysterious extra in the LPK.
 Also ended up with an extra bolt catch spring. How many others run into extra parts in LPK's on a regular basis? Also ended up with an extra bolt catch spring. How many others run into extra parts in LPK's on a regular basis?ETA - Big thanks Falarak 
|
|
|
|
FL, USA
|
[#20]
Just completed my first upper build, THANK YOU FOR THE KICK A$$ INSTRUCTION-Really, you should print that stuff up and sell it! Thanks again, also it only did take about 30 min!
|
|
|
|
[#21]
I can not believe how simple it was to change the barrel based on your help.. The right tools are the most important thing to make it easy.
The only problem (not really) was getting the gas tube pin back in.. Super instructions and thanks 
|
|
|
|
IL, USA
|
[#22]
Thanks for the play by play!! Just completed my first build, step by step from right here. The link to the larger parts kit photo was just the ticket for helping me ID my parts and not lose my place! Only had one hiccup, because I didn't notice the "single hole" in the trigger guard instructions. As a result, I have a rather battered roll pin, but everything's where it belongs...NOW!
Thanks again! |
|
|
|
[#23]
A BIG +1!!! The hell with the books and manuals I bought, this post is KICK ASS!! If you do print it up I want a copy for sure!! My first build came out beautiful!
|
||
|
|
GA, USA
|
[#24]
Completed my first lower due in large part to your instructions and coupled with the manual links, thanks for the info
|
|
|
CO, USA
|
[#25]
I'm a long time reader, first time poster.
I'm also a newbie with the Mforgeries and I'm having a bit of a problem with the free float tube. I have an RRA w/ a factory installed YHM free-float tube. Its very heavy so I bought a DD 7.0 rail and I am trying to swap them out. Following these awesome instructions (in reverse) for YHM free-float tube. I have all the proper tools. punch set, bushmaster upper holder, DPMS multi-tool etc... I have the suppressor off. I removed the A2 FSB and gas tube. I loosened the YHM locking ring. now.... the YHM free float tube should just unscrew. Right? I can't budge it!! I have it mounted in the vise and used a towel to give me a better grip and I only accomplished a lot of huffing and puffing.... I want to get a second opinion before I start in with the breaker bars and do some damage I will regret. any advice? thanks in advance. |
|
|
CO, USA
|
[#26]
I will take silence as its a dumb question and I should figure it out myself. |
|
|
|
TX, USA
|
[#27]
I really have nothing to offer for a fix. But if it were me, I would contact the company who made it and ask them first.
|
|
|
|
[#28]
FALARAK,
Thanks for putting together this thread. It helped me a lot in putting together my first build. |
|
|
|
OH, USA
|
[#29]
Anyone else having problems with the pictures not showing up? The domain they are hosted on seems to be unreachable too.
|
|
|
|
[Last Edit: FALARAK]
[#30]
First - we will be starting with an Armalite, 16" chrome lined AR10 .308 carbine upper.
 We will be installing a Noveske/SWS FF rail:  The rail comes with two barrel nuts, marked "A" and "B". Because of the design of the system, the barrel nut is torqued to the desired value, and may not align the tube properly. Therefore, they supply two different ones... one of which will align within the correct torque specs. Since they require a proprietary wrench for the install of their barrel nut, they do supply this with the kit.  Since the tube will cover the gas block - we will be installing the low profile Noveske block. This ships with the gas tube roll pin and set screws. A plus.  Since I dont own an AR10 action block... I improvised. I picked up a $5 poly cutting board at WalMart - and cut two pieces out, into 5.75" x 2" strips. These will work with flat top uppers for the AR15 or AR10:  Clamp it in the vise:  First step - remove the hanguards, muzzle device, gas tube roll pin, gas block, gas tube, and handguard endcap:  Next, remove the factory barrel nut. My DPMS armorers wrench works perfectly:  Next, add a little moly grease to the threads, and install the barrel nut. Just get it snug - we need to torque this nut because of the design:  Torque the nut to the desired setting. The TM for an AR15 is 30-80ft lbs. I just set my wrench to 50lbs - to get an idea of where this nut was going to end up. Since this design does not have a built in anti-rotation device, I would MUCH rather end up on the high side, than the low:  Slip on the rail tube and perform a test fit:  As we can see - this alignment is bad. Time to try out nut "B"  I installed nut "B" and adjusted to 50lbs. It was almost there. A setting of 80 lbs was spot on. You have to go VERY slow and test fit constantly, if you want your tube upper rail to align perfectly with the A3 receiver rail. Now - remove the tube and install the gas tube and gas block. I used blue loctite on the set screws:  Next, install the tube - and lock it to the barrel nut by using the 6 supplied allen screws:  Install your muzzle device and you are done! Before:  After: 
|
|
|
|
|
[#31]
Thanks for your efforts. I'm just starting my first build and would like to see the pics.
I don't know how I could possibly help, but hey, If I can help somehow, let me know. Thanks again. |
|
|
|
[#32]
The bolt catch pin can be driven in with an automatic center punch. Just hold the lower in a padded vise and use needlenosed pliers to hold the pin while driving it with the automatic center punch. I made a small pin punch to remove the pin. It has a small reduced diameter tip to fit inside the roll pin and is just a bit smaller in diameter than the hole. It is only 2" long and used with the automatic center punch. A small finish nail can be used to make it. Just protect the receiver with tape...works easier than punch & hammer.
|
|
|
|
MS, USA
|
[#33]
thanks falarak
|
|
|
VA, USA
|
[#34]
This is my first time really reading this site or posting here, but I am very interested in trying to build my own AR-15. Unfortunately, since I have only really dealt with handguns, I am kind of clueless as far as AR-15 parts, prices, and manufacturers go.
Who are some good manufacturers that I should look for when trying to get the necessary parts? How much approximately, does everyone think that it will cost to build my own medium quality rifle (I know that top quality will be well out of my price range)? Hope that you don't find these questions too elementary and are willing to offer me advice. If you think of anything else that might be important that I left out, please feel free to add whatever you think is useful information. |
|
|
WA, USA
|
[#35]
Is it possible to remove the FSB without removing my YHM Free floate frontend? I want to put on a specter gas block and a flip up front sight on the YHM frontend, it would be much simpler to do without taking off the YHM frontend.
Thanks, JLS7 |
|
|
|
[Last Edit: FALARAK]
[#36]
More build goodness:

Kreiger barrel, CMT upper, RRA lower LaRue 12.0 rail, gas block, and SPR-S LT158 scope mount LaRue QD harris bipod MagPul PRS stock, Hogue grip Tango down and Magpul rail panels Leupold 6.5x20x50mm LR optic RRA 2-stage trigger 
Amarlite AR10T 20" LotharWalther barrel, shortened and threaded by GAP LaRue 13.2 rail, gas block, and SPR-S LT158 scope mount LaRue QD harris bipod MagPul PRS stock, Hogue grip, Magpul rail panels Leupold 6.5x20 MK4 mildot optic SWR Omega supressor Armalite 2-stage trigger 

GlobalTactical 12.5" barrel, CMT upper, Bushmaster Lower LaRue 10.0 rail, gas block, and LT150 aimpoint mount LaRue QD FUG VLTOR clubfoot stock, Hogue grip Troy front and rear BUIS, Magpul rail panels Aimpoint ML2 4MOA optic YHM supressor mount flash hider PRI gas buster charging handle YHM stainless supressor RRA 2-stage trigger 
RRA 16" midlength Elite CAR A4 factory rifle LaRue 9.0 rail, 4XDOS ACOG QD mount PRI FSB/BUIS, ARMS#40L rear BUIS Tango down and Magpul rail panels VLTOR carbine stock, Hogue grip Trijicon ACOG TA31F chevron MSTN brake RRA 2-stage trigger |
|
|
|
WA, USA
|
[Last Edit: IBTLplus1]
[#37]
Thank you for putting this together. Put a lower together last night. Went very smoothly.
|
|
|
|
[#38]
TAG
|
|
|
|
|
[#39]
tag
|
|
|
|
|
[#40]
First, thanks for the thread, excellent work. Second, I`ve got the problem of the pics not showing up also. |
|||
|
|
|
[Last Edit: FALARAK]
[#41]
Reserved for future projects
|
|
|
|
|
[#42]
This is the best info I have ever seen!
|
|
|
|
|
[#43]
Tag
|
|
|
|
|
[#44]
Thanks for all your hard work. This will definitely help me out in the near future.
|
|
|
|
|
[#45]
If you have a barrel that doesn't have anything to index an after market gas block, how do you mount the gas block/sight plumb?
|
|
|
|
|
[#46]
If your gas block is of the set screw/clamp type - You eyeball it to start, then center your rear aperture. Test fire, then slightly adjust the front gas block/sight right and left to zero the weapon. Voila - properly indexed. |
||
|
|
|
[Last Edit: urbankaos04]
[#47]
How can I save this thread to my hard drive along with all the pictures?
It's 63 pages if ya try to print it! But it'd be worth it. |
|
|
|
|
[Last Edit: cmm]
[#48]
Thanks, I was hoping there was an easier way. I guess that's what all my reloads are for  I'm gonna try my first build with a composite barrel from twl. I'm gonna try my first build with a composite barrel from twl.
|
|||
|
|
|
[#49]
I've done this already (great thread to save) You need to click on <FILE><SAVE AS> and pick a name to save. Make sure you save as complete web page to save all the pictures. You'll have to save each page individually. |
||
|
|
|
[#50]
thanks
|
|
|
|
 Win a FREE Membership!
Sign up for the ARFCOM weekly newsletter and be entered to win a free ARFCOM membership. One new winner* is announced every week!
You will receive an email every Friday morning featuring the latest chatter from the hottest topics, breaking news surrounding legislation, as well as exclusive deals only available to ARFCOM email subscribers.

AR15.COM is the world's largest firearm community and is a gathering place for firearm enthusiasts of all types.
From hunters and military members, to competition shooters and general firearm enthusiasts, we welcome anyone who values and respects the way of the firearm.

Subscribe to our monthly Newsletter to receive firearm news, product discounts from your favorite Industry Partners, and more.
Copyright © 1996-2024 AR15.COM LLC. All Rights Reserved.
Any use of this content without express written consent is prohibited.
AR15.Com reserves the right to overwrite or replace any affiliate, commercial, or monetizable links, posted by users, with our own.