|
[#1]
Pics? |
|
|
|
[#2]
Quoted:
I bought a Capco A2 upper on EE not long ago and a friend said that he would help me put it together. He put it in a vice with no supports and bent it. I'm absolutely beside myself. I know that it's beyond repair and I just need to get a new one. Other than EE, is there a place to find used ones with history behind them? That's the part that bothers me the most about losing this beautiful specimen. I hope the hell you find a different friend to help with the next one! Thanks sucks! He offer to chip in $ome? |
|
|
|
[#3]
I have a brand new one without the sight....
Pics of bent upper... |
|
|
|
[#4]
Bent it? Wtf was he doing with it?
A blank upper is pretty cheap. If it were mine i would tell him to not sweat it. If i bent it i would buy my buddy a new one. Eta.oops. just sae it was not a new upper.. That blows. |
|
|
|
[#5]
Obligatory pics:


He offered to foot half the cost of a replacement. I just blew my whole defense budget on the upper assembly from Windham so I don't know when I'll be able to foot the cost of another. Is a Deltonor something in that price range noticeably different than this? I'm mostly torn up about losing the history (USAF conversion upper from what I understand). |
|
|
|
[#6]
Maybe it's just me, but all that looks bent is the pin that holds the cover for the ejection port?
Looks like your idiot "friend" just clamped it into his vice with the port door closed and clamped it too hard. You need a new pin, and a new friend that knows what he's doing. |
|
|
|
[#7]
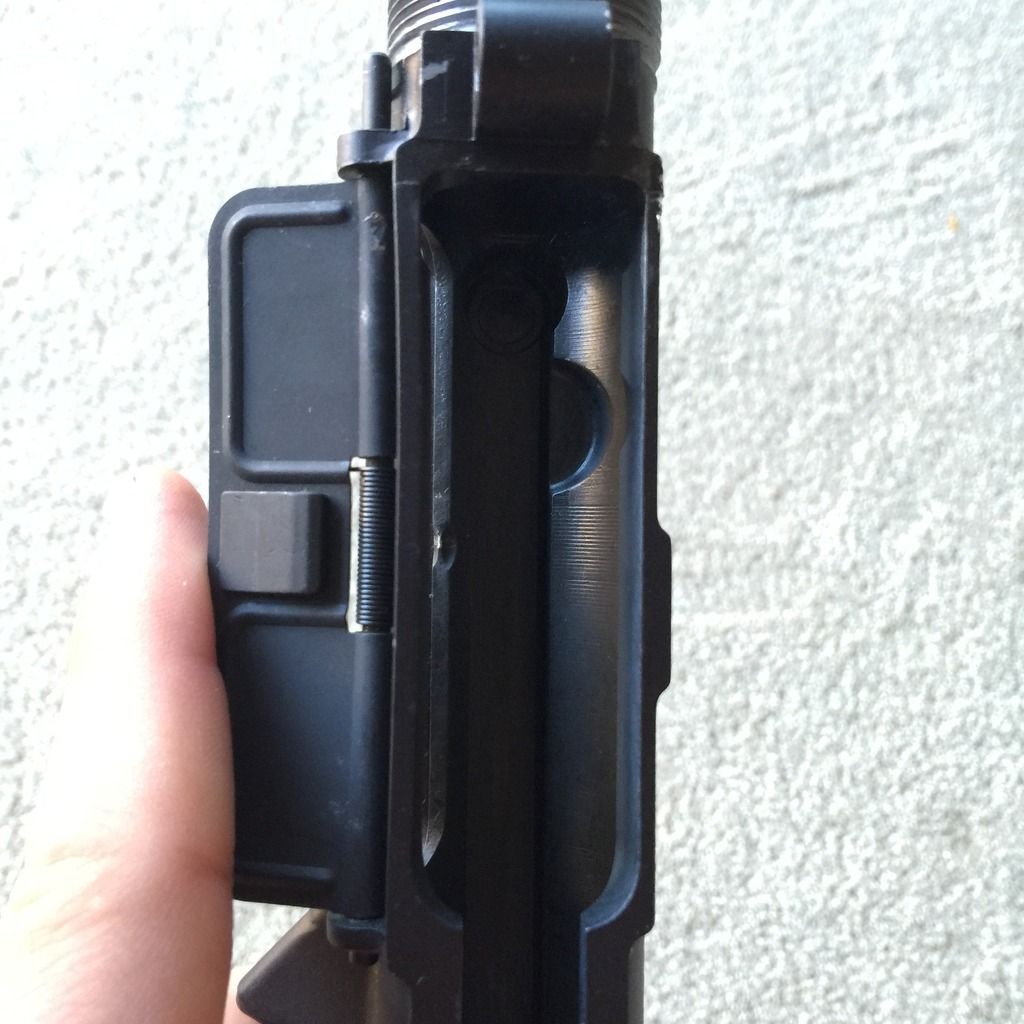
Tried to get a better photo. I cant' find my tape measure right now, but I'll get a picture with it, too. I'm worried that if I bend it back, it'll be an issue of structural integrity at that point. |
|
|
|
[#8]
Quoted:
Maybe it's just me, but all that looks bent is the pin that holds the cover for the ejection port? Looks like your idiot "friend" just clamped it into his vice with the port door closed and clamped it too hard. You need a new pin, and a new friend that knows what he's doing. |
|
|
|
[#9]
Easy fix. Lots of people did that when the clam shells first came out an people didn't use an insert or bolt carrier. Put the upper carrying handle in a padded vise. Get two open ended wrenches, put them in the bolt channel an use opposite pressure to spread the upper back open. Search the archives, somebody posted pictures back in 2009 on the fix. I needed it for a complete upper minus BCG on EE. I didn't try to drop the bolt in till three months after getting it. I was like
 . Seller was long gone. Now, I test everything that goes bang within 24 hours. . Seller was long gone. Now, I test everything that goes bang within 24 hours.
Fix it! Better yet, SELL IT TO ME |
|
|
|
[#10]
Quoted:
Easy fix. Lots of people did that when the clam shells first came out an people didn't use an insert or bolt carrier. Put the upper carrying handle in a padded vise. Get two open ended wrenches, put them in the bolt channel an use opposite pressure to spread the upper back open. Search the archives, somebody posted pictures back in 2009 on the fix. I needed it for a complete upper minus BCG on EE. I didn't try to drop the bolt in till three months after getting it. I was like . Seller was long gone. Now, I test everything that goes bang within 24 hours.
Fix it! Better yet, SELL IT TO ME I'm definitely willing to try it! I don't have to worry about structural integrity, though??? |
|
|
|
[#11]
Quoted:
http://i1048.photobucket.com/albums/s370/Mr310310/97BBCCDD-7871-4728-9E11-F33550FE2537_zps87h4ae98.jpg Tried to get a better photo. I cant' find my tape measure right now, but I'll get a picture with it, too. I'm worried that if I bend it back, it'll be an issue of structural integrity at that point. It's not that bad, I think you'll be ok. The area sees zero stress so even if it were weakened slightly (which I don't think I will be) it wouldn't make a difference. Take the port cover off, clamp it lightly in a vise upside down (clamp the handle), and use a screwdriver through the port from the inside out with the tip resting on the top of the port. It's just aluminum, it will bend easy. |
|
|
|
[#12]
i would spend 5 minutes making up an oak pry bar about a foot long and 2 inches wide that spead the force over a wider area than a metal screw driver or a set of wrenches
|
|
|
|
[#13]
Quoted:
i would spend 5 minutes making up an oak pry bar about a foot long and 2 inches wide that spead the force over a wider area than a metal screw driver or a set of wrenches |
|
|
|
[#14]
I would get a new friend... after making sure the old friend paid for his/her @#%$-up. & you decide how you want to define "paid".
|
|
|
|
[#15]
Do any of you have any recommendations for someone that could fix this? I don't trust myself (and especially my friend) to do it.
|
|
|
|
[#16]
Quoted:
Do any of you have any recommendations for someone that could fix this? I don't trust myself (and especially my friend) to do it. Sell it to me  Shit happens, nobody died or got hurt, lesson learned. Shit happens, nobody died or got hurt, lesson learned.
It's cheaper to buy another upper then to send it out. |
|
|
|
[#17]
Just tried to put a BCG in it. No dice.
|
|
|
|
[#18]
Also, he took a piece out of one of the teeth on the delta ring assembly. Should I replace it or is it probably good to go?

|
|
|
|
[#19]
I would also suggest you bend it back. All the stress is with the bolt and parts forward. That area just needs to not bind the carrier on the way back and forth.
My first thought was the clamp it in a vice around the carry handle. Remove the door and pin. Insert a 1" nylon ratchet strap through the ejection port and around the bottom with it around a fixed object, say an opposing leg of the bend. Ratchet tight to bend it straight. That would leave no marks. The double wrench thing was in the old army manuals IIRC. I know for a fact they advised a pair of crescent wrenches to straighten the top flutes of the carry handle that flank your line of sight. Cutting some hard wood shims to lever against with wrenches would work fine too. hell even some woodworking bar clamps that reverse could work easily. What you have right now is an inoperable upper. What's the worst that can happen? You have an inoperable upper in the end? I'm cheap, I'd also straighten the door and pin with a ball pein hammer and a vise. |
|
|
|
[#20]
I'd reuse it. Grease the threads and draw it tight and back it off and retighten it when installing.
|
|
|
|
[#21]
Barrel nuts are like $9 or less. Now, DON'T let your "Buddy" drive the FSB pins out. If he could crush the upper Lord knows what he would do to the barrel
|
|
|
|
[#22]
Sweet Jesuz - Don't let that knucklehead ever touch any more of your firearm parts!
Looks like a twelve year old tried to put that thing together... Sure hope it really was a "friend" that did this, because if it turns out that it was actually you that screwed this up...well: 


|
|
|
|
[#23]
Send it off to John Thomas, he's a wizard. |
|
|
|
[#24]
I would just get a new one.
And buy the correct tools, for assembly. |
|
|
|
[#25]
PM me and I will send you my address to ship it to and I will fix it for you gratis. I have seen far worse damage done by little brown men throughout the world who didn't know the difference between aluminum and steel. In this particular case, you want to spread the upper back out by use of force applied evenly across the upper rather than in a single area by a screw driver or some other tool.
I started working on the AR platform circa 1970 courtesy of Uncle Sam. I still build and repair about two a month for customers, in fact on Wednesday I have a two gun build party with the local vet to pay for surgery on my wife's poodle. I traded gas block repair for knee surgery for the dog. |
|
|
|
[#26]
Quoted:
PM me and I will send you my address to ship it to and I will fix it for you gratis. I have seen far worse damage done by little brown men throughout the world who didn't know the difference between aluminum and steel. In this particular case, you want to spread the upper back out by use of force applied evenly across the upper rather than in a single area by a screw driver or some other tool. I started working on the AR platform circa 1970 courtesy of Uncle Sam. I still build and repair about two a month for customers, in fact on Wednesday I have a two gun build party with the local vet to pay for surgery on my wife's poodle. I traded gas block repair for knee surgery for the dog. I really appreciate the offer! I messaged you. |
|
|
|
[#27]
Quoted:
I really appreciate the offer! I messaged you. Quoted:
Quoted:
PM me and I will send you my address to ship it to and I will fix it for you gratis. I have seen far worse damage done by little brown men throughout the world who didn't know the difference between aluminum and steel. In this particular case, you want to spread the upper back out by use of force applied evenly across the upper rather than in a single area by a screw driver or some other tool. I started working on the AR platform circa 1970 courtesy of Uncle Sam. I still build and repair about two a month for customers, in fact on Wednesday I have a two gun build party with the local vet to pay for surgery on my wife's poodle. I traded gas block repair for knee surgery for the dog. I really appreciate the offer! I messaged you. Don't you just love the generosity of the members around here? I think the Capco upper is a piece of history worth saving and I'm glad someone can fix it for OP! |
|
|
|
[#28]
I was thinking a wooden dowel thru the upper and wedge off it all across the bend in small increments. But the right guy for the job volunteerd,and will keep a piece of history alive. very nice
|
|
|
|
[#29]
I am taking oldsgm up on his gracious offer and sending him the upper. The wealth of information and generosity I have seen on this site in the very short time I've been herenever ceases to amaze me.
|
|
|
|
[#30]
By chance did you buy the Capco A2 upper that another member sold after he made his rifle an A4?
And definitely don't let your "friend" work on anything else |
|
|
|
[#31]
Quoted:
By chance did you buy the Capco A2 upper that another member sold after he made his rifle an A4? And definitely don't let your "friend" work on anything else Yep, that's the one. 
|
|
|
|
[#32]
UPPER REPAIRED
I thought I would post pictures on how to do this, since a search showed archived threads without photos Here is it next to a A1 Upper I am building for a client 

As you can see there is a slight bend in the upper. Now onto the measurements Starting at the rear of the A1 receiver the measurement is .46 more or less 
The measurement for the damaged upper is the same. 
The measurement at the front of the A1 upper is .90 more or less 
The measurement for the damaged upper is .88 more or less 
In order to remove the bend I will set the upper in a vise. To prevent damaging the upper further I attach a scope mount, and then use wooden blocks on either side of the scope mount. This way the upper is not being touched by the vise. 
I then prepare the tools to bend the upper. I use a crescent wrench and a open end wrench wrapped with tape to prevent scarring the interior of the upper. 
Placing the wider end in the area of the upper I need to bend I use both tools at the same time to avoid rocking the upper in the vise. You use a push/pull motion at the same time to help spread the upper. 

It then becomes a matter of bend, measure, bend until you reach the same measurement as the undamaged lower. Here is the damaged upper with a measurement of .903 at the front the same as the measurement for the undamaged upper 
You then try a BCG to see if there are any binding issues, if not you are good to go 


To double check, you place the upper with a charging handle and BCG on the lower of your choice to see how it all fits 

Work the BCG a few times letting it ride forward slowly to see if there are any more binding problems. It is now ready for barreling. I am waiting on replacement ejection port parts, some things can't be saved 
|
|
|
|
[#33]

Amazing! A piece of history was saved!!! |
|
|
|
[#34]
Told everybody it was a easy fix. Now, please add the pictures to the build sticky. People will need to see how to fix others. Go slow an use the right tools gentlemen.
|
|
|
|
[#35]
Quoted:
UPPER REPAIRED I thought I would post pictures on how to do this, since a search showed archived threads without photos Here is it next to a A1 Upper I am building for a client http://i13.photobucket.com/albums/a292/18_Zulu/Upper%20Repair/1.jpg http://i13.photobucket.com/albums/a292/18_Zulu/Upper%20Repair/2.jpg As you can see there is a slight bend in the lower. Now onto the measurements Starting at the rear of the A1 receiver the measurement is .46 more or less http://i13.photobucket.com/albums/a292/18_Zulu/Upper%20Repair/3.jpg The measurement for the damaged upper is the same. http://i13.photobucket.com/albums/a292/18_Zulu/Upper%20Repair/4.jpg The measurement at the front of the A1 upper is .90 more or less http://i13.photobucket.com/albums/a292/18_Zulu/5_1.jpg The measurement for the damaged upper is .88 more or less http://i13.photobucket.com/albums/a292/18_Zulu/6_1.jpg In order to remove the bend I will set the upper in a vise. To prevent damaging the upper further I attach a scope mount, and then use wooden blocks on either side of the scope mount. This way the upper is not being touched by the vise. http://i13.photobucket.com/albums/a292/18_Zulu/7.jpg I then prepare the tools to bend the upper. I use a crescent wrench and a open end wrench wrapped with tape to prevent scarring the interior of the upper. http://i13.photobucket.com/albums/a292/18_Zulu/8.jpg Placing the wider end in the area of the upper I need to bend I use both tools at the same time to avoid rocking the upper in the vise. You use a push/pull motion at the same time to help spread the upper. http://i13.photobucket.com/albums/a292/18_Zulu/9.jpg http://i13.photobucket.com/albums/a292/18_Zulu/10.jpg It then becomes a matter of bend, measure, bend until you reach the same measurement as the undamaged lower. Here is the damaged upper with a measurement of .903 at the front the same as the measurement for the undamaged upper http://i13.photobucket.com/albums/a292/18_Zulu/14.jpg You then try a BCG to see if there are any binding issues, if not you are good to go http://i13.photobucket.com/albums/a292/18_Zulu/Upper%20Repair/11.jpg http://i13.photobucket.com/albums/a292/18_Zulu/Upper%20Repair/12.jpg http://i13.photobucket.com/albums/a292/18_Zulu/Upper%20Repair/15.jpg To double check, you place the upper with a charging handle and BCG on the lower of your choice to see how it all fits http://i13.photobucket.com/albums/a292/18_Zulu/Upper%20Repair/16.jpg http://i13.photobucket.com/albums/a292/18_Zulu/Upper%20Repair/17.jpg Work the BCG a few times letting it ride forward slowly to see if there are any more binding problems. It is now ready for barreling. I am waiting on replacement ejection port parts, some things can't be saved http://i13.photobucket.com/albums/a292/18_Zulu/Upper%20Repair/HPIM0711.jpg If you're local Mr. GM Oldsmobile guy, I'd buy you a beer 
|
|
|
|
[#36]
Great job, glad to see it saved!
|
|
|
|
[#37]
Quoted:
UPPER REPAIRED I thought I would post pictures on how to do this, since a search showed archived threads without photos Here is it next to a A1 Upper I am building for a client http://i13.photobucket.com/albums/a292/18_Zulu/Upper%20Repair/1.jpg http://i13.photobucket.com/albums/a292/18_Zulu/Upper%20Repair/2.jpg As you can see there is a slight bend in the upper. Now onto the measurements Starting at the rear of the A1 receiver the measurement is .46 more or less http://i13.photobucket.com/albums/a292/18_Zulu/Upper%20Repair/3.jpg The measurement for the damaged upper is the same. http://i13.photobucket.com/albums/a292/18_Zulu/Upper%20Repair/4.jpg The measurement at the front of the A1 upper is .90 more or less http://i13.photobucket.com/albums/a292/18_Zulu/5_1.jpg The measurement for the damaged upper is .88 more or less http://i13.photobucket.com/albums/a292/18_Zulu/6_1.jpg In order to remove the bend I will set the upper in a vise. To prevent damaging the upper further I attach a scope mount, and then use wooden blocks on either side of the scope mount. This way the upper is not being touched by the vise. http://i13.photobucket.com/albums/a292/18_Zulu/7.jpg I then prepare the tools to bend the upper. I use a crescent wrench and a open end wrench wrapped with tape to prevent scarring the interior of the upper. http://i13.photobucket.com/albums/a292/18_Zulu/8.jpg Placing the wider end in the area of the upper I need to bend I use both tools at the same time to avoid rocking the upper in the vise. You use a push/pull motion at the same time to help spread the upper. http://i13.photobucket.com/albums/a292/18_Zulu/9.jpg http://i13.photobucket.com/albums/a292/18_Zulu/10.jpg It then becomes a matter of bend, measure, bend until you reach the same measurement as the undamaged lower. Here is the damaged upper with a measurement of .903 at the front the same as the measurement for the undamaged upper http://i13.photobucket.com/albums/a292/18_Zulu/14.jpg You then try a BCG to see if there are any binding issues, if not you are good to go http://i13.photobucket.com/albums/a292/18_Zulu/Upper%20Repair/11.jpg http://i13.photobucket.com/albums/a292/18_Zulu/Upper%20Repair/12.jpg http://i13.photobucket.com/albums/a292/18_Zulu/Upper%20Repair/15.jpg To double check, you place the upper with a charging handle and BCG on the lower of your choice to see how it all fits http://i13.photobucket.com/albums/a292/18_Zulu/Upper%20Repair/16.jpg http://i13.photobucket.com/albums/a292/18_Zulu/Upper%20Repair/17.jpg Work the BCG a few times letting it ride forward slowly to see if there are any more binding problems. It is now ready for barreling. I am waiting on replacement ejection port parts, some things can't be saved http://i13.photobucket.com/albums/a292/18_Zulu/Upper%20Repair/HPIM0711.jpg Stellar work!! hey OP, you should thank Oldsgms generosity by ponying up for a team membership and supporting this site.This site and the members who call it home just saved you well in excess of what a team membership costs. Just a suggestion. Congrats on getting your upper fixed. |
|
|
|
[#38]
Stellar work!! hey OP, you should thank Oldsgms generosity by ponying up for a team membership and supporting this site.This site and the members who call it home just saved you well in excess of what a team membership costs. Just a suggestion. Congrats on getting your upper fixed. I was thinking a Cabela's gift card, but that's awesome. Just looked at them. Great idea. |
|
|
 Win a FREE Membership!
Sign up for the ARFCOM weekly newsletter and be entered to win a free ARFCOM membership. One new winner* is announced every week!
You will receive an email every Friday morning featuring the latest chatter from the hottest topics, breaking news surrounding legislation, as well as exclusive deals only available to ARFCOM email subscribers.

AR15.COM is the world's largest firearm community and is a gathering place for firearm enthusiasts of all types.
From hunters and military members, to competition shooters and general firearm enthusiasts, we welcome anyone who values and respects the way of the firearm.

Subscribe to our monthly Newsletter to receive firearm news, product discounts from your favorite Industry Partners, and more.
Copyright © 1996-2024 AR15.COM LLC. All Rights Reserved.
Any use of this content without express written consent is prohibited.
AR15.Com reserves the right to overwrite or replace any affiliate, commercial, or monetizable links, posted by users, with our own.


