|
[#1]
Quoted:
Yes, that's me with the harbor freight mini-sledge hammer. Other than tapping off rusted-on brake rotors from my car and tapping out FSB pins I have no use for a 4 lb mini-sledge. Decided to go cheap and buy Harbor freight.  Quoted:
Holy Shit this whole thread is entertaining as hell! From the original hack job to all the following hack job advice. This thread is a MAJOR reminder why I absolutely never buy or trade ARs or related items from experience lacking garage builders. First off, you're using shit tools. Did I really read someone mentioning Harbor Freight tools?  . Even a lot of the tools on Brownells are amateur grade. . Even a lot of the tools on Brownells are amateur grade.
Second, you can soak it for a year in liquid wrench, break-free etc and it absolutely isn't going to do a thing for this situation. Might as well grab some butter off the table and rub it on there. The idea of cooling the metal to contract it is as close to good advice that you're getting on here but even that isn't going to help you much here. I've been a fabricator and machinist in the aerospace industry for over 20 years. Private message me if you want some good advice. There's a couple ways to solve this problem without doing further damage. BigBrakes76 Yes, that's me with the harbor freight mini-sledge hammer. Other than tapping off rusted-on brake rotors from my car and tapping out FSB pins I have no use for a 4 lb mini-sledge. Decided to go cheap and buy Harbor freight. I've used a Stanley Fubar mini sledge with success whacking the mother loving piss out of it. |
|
|
|
[#2]
Quoted:
Holy Shit this whole thread is entertaining as hell! From the original hack job to all the following hack job advice. This thread is a MAJOR reminder why I absolutely never buy or trade ARs or related items from experience lacking garage builders. First off, you're using shit tools. Did I really read someone mentioning Harbor Freight tools? . Even a lot of the tools on Brownells are amateur grade.
Second, you can soak it for a year in liquid wrench, break-free etc and it absolutely isn't going to do a thing for this situation. Might as well grab some butter off the table and rub it on there. The idea of cooling the metal to contract it is as close to good advice that you're getting on here but even that isn't going to help you much here. I've been a fabricator and machinist in the aerospace industry for over 20 years. Private message me if you want some good advice. There's a couple ways to solve this problem without doing further damage. BigBrakes76 Why don't you enlighten us here? 
|
|
|
|
[#3]
Quoted:
Could you extrapolate on this wood method? Quoted:
Quoted:
Quoted:
The poster who said BIG punch and BIG hammer (mini sledge) was correct. Once you break them loose with these you can use the smaller ones to go the rest of the way. One solid hit (like you mean it) is more effective than 100 taps. A solid rest is a must as well. A piece of 2x4 with a hole drilled in it works. BCM posted about this several years ago. Posted Via AR15.Com Mobile I let the pin make its own hole; 2x4 on the garage/basement floor works great. Could you extrapolate on this wood method? Sure, you place a 2x4 on the ground and your barrel assy on the 2x4. Get a large, flat punch and a BFH and whack the pin hard, if it doesnt move, whack it again. Use smaller dia punch when the pin moves, or pull it out if its already loose enough, and repeat on other pin. |
|
|
|
[#4]
Quoted:
Why don't you enlighten us here? Quoted:
Quoted:
Holy Shit this whole thread is entertaining as hell! From the original hack job to all the following hack job advice. This thread is a MAJOR reminder why I absolutely never buy or trade ARs or related items from experience lacking garage builders. First off, you're using shit tools. Did I really read someone mentioning Harbor Freight tools? . Even a lot of the tools on Brownells are amateur grade.
Second, you can soak it for a year in liquid wrench, break-free etc and it absolutely isn't going to do a thing for this situation. Might as well grab some butter off the table and rub it on there. The idea of cooling the metal to contract it is as close to good advice that you're getting on here but even that isn't going to help you much here. I've been a fabricator and machinist in the aerospace industry for over 20 years. Private message me if you want some good advice. There's a couple ways to solve this problem without doing further damage. BigBrakes76 Why don't you enlighten us here? I always like to be enlightened on how to do things the correct way. |
|
|
|
[#5]
Quoted:
Sure, you place a 2x4 on the ground and your barrel assy on the 2x4. Get a large, flat punch and a BFH and whack the pin hard, if it doesnt move, whack it again. Use smaller dia punch when the pin moves, or pull it out if its already loose enough, and repeat on other pin. We have mentioned this method several times now. Works flawlessly. My only addition I mentioned earlier was placing this on the concrete garage floor. Then H I T the bitch. For BigBrakes, the punches I mentioned are Snap-On, as is my hammer. I didn't think it needed to be memtioned, but apparently it does Certainly proper tools need be used, and hardened steel punches are the way to go. I do in fact now also use the Brownell's sight puck, but the first 4 I did (Colt, 2 PSAs, and Bushy) were all done on a 2x4 on my garage floor, with the upper wrapped in a towel.
|
|
|
|
[#6]
How did ye fair boyo?
Are they out? |
|
|
|
[#7]
Where's the Maximus "Are you not entertained" jpeg? This thread is great.
Use a 1/4" steel punch and knock it flush with the sight base. That will get it started. Then a 3/32" steel punch to finish driving it out. Oh, and drive it from left to right. |
|
|
|
[#8]
Quoted:
Holy Shit this whole thread is entertaining as hell! From the original hack job to all the following hack job advice. This thread is a MAJOR reminder why I absolutely never buy or trade ARs or related items from experience lacking garage builders. First off, you're using shit tools. Did I really read someone mentioning Harbor Freight tools? . Even a lot of the tools on Brownells are amateur grade.
Second, you can soak it for a year in liquid wrench, break-free etc and it absolutely isn't going to do a thing for this situation. Might as well grab some butter off the table and rub it on there. The idea of cooling the metal to contract it is as close to good advice that you're getting on here but even that isn't going to help you much here. I've been a fabricator and machinist in the aerospace industry for over 20 years. Private message me if you want some good advice. There's a couple ways to solve this problem without doing further damage. BigBrakes76 Your post is just as foolish and funny as some of the other ones you're making fun of. While I like to use quality tools as much as the next guy, only a fool would think a job like this could only be done with professional grade tools. Do you think a punch is going to work better if its struck with a "professional" hammer as opposed to a harbor freight hammer?
If you're so smart and your advice so sage, why don't you post it here here for all to see, judge and possible learn from or ridicule? 
|
|
|
|
[#9]
Quoted:
Your post is just as foolish and funny as some of the other ones you're making fun of. While I like to use quality tools as much as the next guy, only a fool would think a job like this could only be done with professional grade tools. Do you think a punch is going to work better if its struck with a "professional" hammer as opposed to a harbor freight hammer?
If you're so smart and your advice so sage, why don't you post it here here for all to see, judge and possible learn from or ridicule? Quoted:
Quoted:
Holy Shit this whole thread is entertaining as hell! From the original hack job to all the following hack job advice. This thread is a MAJOR reminder why I absolutely never buy or trade ARs or related items from experience lacking garage builders. First off, you're using shit tools. Did I really read someone mentioning Harbor Freight tools? . Even a lot of the tools on Brownells are amateur grade.
Second, you can soak it for a year in liquid wrench, break-free etc and it absolutely isn't going to do a thing for this situation. Might as well grab some butter off the table and rub it on there. The idea of cooling the metal to contract it is as close to good advice that you're getting on here but even that isn't going to help you much here. I've been a fabricator and machinist in the aerospace industry for over 20 years. Private message me if you want some good advice. There's a couple ways to solve this problem without doing further damage. BigBrakes76 Your post is just as foolish and funny as some of the other ones you're making fun of. While I like to use quality tools as much as the next guy, only a fool would think a job like this could only be done with professional grade tools. Do you think a punch is going to work better if its struck with a "professional" hammer as opposed to a harbor freight hammer?
If you're so smart and your advice so sage, why don't you post it here here for all to see, judge and possible learn from or ridicule? To answer your "why" I don't post my advice on here...its because people read the typed words of a post then comprehend it however they like. Also because offering my phone number so that the OP can call, allow me to hear what tools he does have at his disposal and then help walk him through a couple different methods while on the phone just doesn't seem appropriate to a public post. While I'm glad my participation in this post has continued to entertain you, you have mis-quoted me and missed my point. I didn't mention for the OP to obtain professional tools, but to use the right tool for the job. The comment about amateur tools from Brownells simply means that a lot of the tools offered are not meant or designed to stand up to any significant use or repeated use. The picture of what's left of his punch more than proves my point here. Also, a hammer and punch are not the only and/or necessary tools obviously. The proposed advice of continuing to "beat the shit" out of it or getting a bigger hammer and punch is terrible advice. Again, looking at the pictures from the original post will show what happens when you beat the crap out of something without a well thought out plan. It doesn't matter much to me what hammer the OP uses but it would be wise of him to consider using higher quality punches, correct punches, more support in the correct areas (which has been wisely advised by others), and possibly switch to a method of slow and steady pushing force over the rock/stick caveman approach that has been working so well. BigBrakes76 P.S. ARFCOM = Ridicule. |
|
|
|
[#10]
Quoted:
We have mentioned this method several times now. Works flawlessly. My only addition I mentioned earlier was placing this on the concrete garage floor. Then H I T the bitch. For BigBrakes, the punches I mentioned are Snap-On, as is my hammer. I didn't think it needed to be memtioned, but apparently it does Certainly proper tools need be used, and hardened steel punches are the way to go. I do in fact now also use the Brownell's sight puck, but the first 4 I did (Colt, 2 PSAs, and Bushy) were all done on a 2x4 on my garage floor, with the upper wrapped in a towel.
Quoted:
Quoted:
Sure, you place a 2x4 on the ground and your barrel assy on the 2x4. Get a large, flat punch and a BFH and whack the pin hard, if it doesnt move, whack it again. Use smaller dia punch when the pin moves, or pull it out if its already loose enough, and repeat on other pin. We have mentioned this method several times now. Works flawlessly. My only addition I mentioned earlier was placing this on the concrete garage floor. Then H I T the bitch. For BigBrakes, the punches I mentioned are Snap-On, as is my hammer. I didn't think it needed to be memtioned, but apparently it does Certainly proper tools need be used, and hardened steel punches are the way to go. I do in fact now also use the Brownell's sight puck, but the first 4 I did (Colt, 2 PSAs, and Bushy) were all done on a 2x4 on my garage floor, with the upper wrapped in a towel.
|
|
|
|
[#11]
Quoted: The punches are all steel. . I've been hitting the shit out of this thing. Everywhere I looked told me that for PSA (and most brands) you hit left and the pins come out of the right. Am I wrong on this? Quoted: Quoted: Soak the area generously with break free and let sit, get a punch that isn't soft, tape off around the pins, use some blocks of wood to support things better. They will go eventually. Add some heat if necessary and repeat. The punches are all steel. . I've been hitting the shit out of this thing. Everywhere I looked told me that for PSA (and most brands) you hit left and the pins come out of the right. Am I wrong on this? To know for sure, always measure both sides of the pin with a caliper. The dial is more accurate than your eyeball. I always start with a larger 1/4" punch and make sure a solid surface and object is under the FSB. Give it a whack with a 16oz ball peen hammer and don't be shy. Then remove the pin with the correct size punch. |
|
|
|
[#12]
 |
|
|
|
[#13]
|
|
|
|
[#14]
Quoted:
do you have much experience using hammers to hit hammers? I use this method to pop ball joints and tie rod ends loose all the time. this would also work for these pins. more surface area to hit. Been doing it for years and never had a problem with my Craftsman ball peen hammers. Quoted:
Quoted:
Quoted:
If you haven't already, try setting a ball peen hammer on top of the pin. Tap the other side of the hammer with a large mallet if you've got one. This should get the pins to budge because of the large surface area of the hammer as opposed to a punch. I had the same problem as you, but this is what I did to get them moving and it worked. Hope this helps This is a good idea if you want a chunk of hammer head imbeded in your body. ETA: roll pins are not tapered. Also, it looks to me like you're beating up the wrong side. do you have much experience using hammers to hit hammers? I use this method to pop ball joints and tie rod ends loose all the time. this would also work for these pins. more surface area to hit. Been doing it for years and never had a problem with my Craftsman ball peen hammers. Well, I'm a retired Millwright/Machinist with 38 years of experience and I know people that have had this happen to them. It's probably a rare occurrence, but I've always been taught not to hit a hammer with another hammer. |
|
|
|
[#15]
Firstly I would start with a punch with a much wider surface area, those pins are so damn snug a smaller punch won't have a chance without some kind of Vice block jig with the holes perfectly lined up. I'd also use some blocks of wood for support.
|
|
|
|
[#16]
Recently I was trying to remove the gas block on one of my LWRC rifles and couldn't get the pins to budge.
Upon taking a closer look at the pins (they are taper pins) I noticed that the smaller diameter side was bulged out. So now both end where a larger diameter than the whole in the gas block. I called LWRC and asked about this and they told me that the pins had been pressed in with a hydraulic press, and they use a backer on the pins, which caused the pin to bulge once it when through the gas block. I ended up having get the pins drilled out and install some new ones. Perhaps this is the case with the OPs pins, in which case he would need to drill them out, |
|
|
|
[#17]
Quoted:
Well, I'm a retired Millwright/Machinist with 38 years of experience and I know people that have had this happen to them. It's probably a rare occurrence, but I've always been taught not to hit a hammer with another hammer. Quoted:
Quoted:
Quoted:
Quoted:
If you haven't already, try setting a ball peen hammer on top of the pin. Tap the other side of the hammer with a large mallet if you've got one. This should get the pins to budge because of the large surface area of the hammer as opposed to a punch. I had the same problem as you, but this is what I did to get them moving and it worked. Hope this helps This is a good idea if you want a chunk of hammer head imbeded in your body. ETA: roll pins are not tapered. Also, it looks to me like you're beating up the wrong side. do you have much experience using hammers to hit hammers? I use this method to pop ball joints and tie rod ends loose all the time. this would also work for these pins. more surface area to hit. Been doing it for years and never had a problem with my Craftsman ball peen hammers. Well, I'm a retired Millwright/Machinist with 38 years of experience and I know people that have had this happen to them. It's probably a rare occurrence, but I've always been taught not to hit a hammer with another hammer. As the son of a Blacksmith, and a former millwright myself, I agree with you. You are absolutely right. Hitting one piece of tempered tool steel with another can cause spalling, and the piece that breaks off can seriously injure you. This is why dead blow hammers were invented. Hitting one hammer with another is just asking for it. Don't be 'that guy'. |
|
|
|
[#18]
You up yet OP?
|
|
|
|
[#19]
Quoted:
You up yet OP? I'm up! but the upper is still in the same condition, untouched and in the freezer. I have some work around the house to do but I'm going to take another stab at this later today. If I can't get it to budge I'm going to hold off and wait to head over to my boss's house for some additional help. I appreciate all the help guys, at the very least i'm going to buy a new set of punches, some new A2 pins, and if it gets any worse possibly a new A2 front site post. Since i'm making another PSA order anyways, can anyone tell me if this set looks decent enough. http://palmettostatearmory.com/index.php/black-friday/black-friday-accessories/wheeler-engineering-hammer-and-puch-set-in-wood-box-951887.html |
|
|
|
[#20]
This thread reminds me of the old AAMCO transmission commercial with a bunch of chimps in lab coats in the background beating on a transmission with clubs. Those pins are put in to stay on a quality barrel. You will probably have to make a jig out of a piece of 2x4 that is hollowed out to properly support the barrel and sight base. It doesn't have to be pretty but it has to support the barrel/sight base, or you're going to end up destroying the barrel. Once you have it supported and secured, you can hit it harder and more accurately. A trick is to first hit the big end which sometimes will move the pin a small amount, breaking it free so it can then be driven out from the small end. With a quality penetrant like Kroil, apply it and then heat the sight base to help wick it in. Re-apply after you take the heat off, then wait until the next day to try to drive the pins. Bottom line, you might have to find somebody with a floor press to remove them.
|
|
|
|
[#21]
Quoted:
Holy Shit this whole thread is entertaining as hell! From the original hack job to all the following hack job advice. This thread is a MAJOR reminder why I absolutely never buy or trade ARs or related items from experience lacking garage builders. First off, you're using shit tools. Did I really read someone mentioning Harbor Freight tools? . Even a lot of the tools on Brownells are amateur grade.
Second, you can soak it for a year in liquid wrench, break-free etc and it absolutely isn't going to do a thing for this situation. Might as well grab some butter off the table and rub it on there. The idea of cooling the metal to contract it is as close to good advice that you're getting on here but even that isn't going to help you much here. I've been a fabricator and machinist in the aerospace industry for over 20 years. Private message me if you want some good advice. There's a couple ways to solve this problem without doing further damage. BigBrakes76 I am using shit tools, I thought this was going to be as easy as tapping some pins out (which is something I've routinely done on builds for some time) but my hand to god these were stuck from the begging and I wasn't ready for it. I have to ask though why would this thing be horrible if someone else bought it, or if my story would make you steer clear of buying a used AR? I'm just screwing up the finish and possibly the A2 front sight post. . . . Am I doing damage I don't know about? |
|
|
|
[#22]
Bigger hammer?
 Lol I've had trouble with tapper pins before too Lol I've had trouble with tapper pins before too
|
|
|
|
[#23]
Ya'll are being trolled big time.
|
|
|
|
[#24]
Quoted:
I mentioned the garage floor on the 1st page, he didn't understand what I meant for some reason and asked me to explain. Quoted:
Quoted:
Quoted:
Sure, you place a 2x4 on the ground and your barrel assy on the 2x4. Get a large, flat punch and a BFH and whack the pin hard, if it doesnt move, whack it again. Use smaller dia punch when the pin moves, or pull it out if its already loose enough, and repeat on other pin. We have mentioned this method several times now. Works flawlessly. My only addition I mentioned earlier was placing this on the concrete garage floor. Then H I T the bitch. For BigBrakes, the punches I mentioned are Snap-On, as is my hammer. I didn't think it needed to be memtioned, but apparently it does Certainly proper tools need be used, and hardened steel punches are the way to go. I do in fact now also use the Brownell's sight puck, but the first 4 I did (Colt, 2 PSAs, and Bushy) were all done on a 2x4 on my garage floor, with the upper wrapped in a towel.
Shit, I missed that. OP this method really works the best for the average arfcommer at home. In true arfcom fashion, it should be mentioned that mom's basement concrete floor should suffice if the garage floor is off limits to you. |
|
|
|
[#25]
I would NOT recommend the punches you mentioned. I guess it depends on how much you plan on using them and whether of not you have future plans of more builds etc. If you do, then I would recommend you dont go cheap and buy some quality Starrett or Grace punches. This is one of the sets that I have and use a lot. A little $$$$ but worth it in the long run. I have sets in both brass and steel for multiple purposes.

My comments about not buying built and tinkered with components from someone doing garage DIY is that you never know what you are going to get. People go crazy with hammers, punches, dremels, cutoff wheels, chisels etc. God only knows what some people are willing to try to get the job done. And then they slap some old BBQ grill or header paint on there and call it a day. You never know what things have been subjected to and then covered up. Its easy to get in a hurry or try to save a few $$$ and get something done the sorta half-assed way (we are men after all) but when it comes to things like firearms, its worth the time and $$$ to do it right. Buying quality tools will pay for itself whether its for your own future projects or to help out someone else. The recent and throughout advice about proper support is key. Having the barrel and FSP supported correctly will make a world of difference. Use your dremel to fab up a support vs cutting into the FSP. Also you mentioned getting a new FSP. This will be a problem as I imagine you are not set up to properly drill it to the holes you already have in the barrel. If you mess up the FSP to bad, go with cutting it to a low profile gas block and clean up real good, refinish and then reattach. Or go with an aftermarket lo-profile gas block like the Larue that will cover where the old one was. You could also use the above mentioned advice of a proper press. This was one of the methods I was going to recommend but of course requires you to have a place to go that has one. There are ways to do this safely with a properly mod'd punch, socket or proper washer and a C-clamp. C-clamp method wouldnt be my first choice unless you have the right stuff to fit in there. Another option depending on tool availability, your ability with a steady hand and what the current state of the taper pins are is to very carefully using a pencil grinder grind a slight (I emphasize "slight") concave recess into the correct side of the taper pin head. This will accomplish a couple things. One it will remove any metal that has bulged and is preventing the pin from moving and it will also give you a stable and set place to set your punch and hit. I recommend this as you you dont have the concave tipped punches that would seat against the taper pin tip. Making a slight concave recess will allow you to seat the punch into the recess and then focus all the energy directly into the pin. Again, this will require proper support. Solid backing is crucial. Just please dont get into drilling anything unless you have the proper tools for that. Things can get really messy quick! Last couple pieces of advice that I care to share on here is to definitely use eye protection. Not trying to be a safety Nazi here but its a good idea. And lastly, whatever method you use, I would wrap your barrel and upper receiver in some sort of protection as you are working on the FSP. A towel taped around the receiver and possibly some tape around the barrel. BigBrakes76 |
|
|
|
[#26]
Quoted:
To know for sure, always measure both sides of the pin with a caliper. The dial is more accurate than your eyeball. I always start with a larger 1/4" punch and make sure a solid surface and object is under the FSB. Give it a whack with a 16oz ball peen hammer and don't be shy. Then remove the pin with the correct size punch. Quoted:
Quoted:
Quoted:
Soak the area generously with break free and let sit, get a punch that isn't soft, tape off around the pins, use some blocks of wood to support things better. They will go eventually. Add some heat if necessary and repeat. The punches are all steel. . I've been hitting the shit out of this thing. Everywhere I looked told me that for PSA (and most brands) you hit left and the pins come out of the right. Am I wrong on this? To know for sure, always measure both sides of the pin with a caliper. The dial is more accurate than your eyeball. I always start with a larger 1/4" punch and make sure a solid surface and object is under the FSB. Give it a whack with a 16oz ball peen hammer and don't be shy. Then remove the pin with the correct size punch. 16oz, Hell I use a shortened 3/8 Starrett Punch, and a 32 0z Ball peen hammer. One good hit is all it takes. Was a T & D maker for 35 years. Have the tools and the skills Oh, and Dead blow hammers are useless in an application like this. Yea I have 3 of them
Wear glasses when you smack the punch, with a real hammer. "That is all" |
|
|
|
[#27]
Why are you messing with the FSB? Cut some flutes in the barrel already!
Any luck yet? |
|
|
|
[#28]
Quoted:
I'm up! but the upper is still in the same condition, untouched and in the freezer. Freezer will make it tighter, not looser. You need heat. |
|
|
|
[#29]
I've bought barrels from people who've very obviously given up on pins before.
Then it takes like 20 seconds to get them out.
If I'm not worried about the FSB I use a way oversized punch to start them. If I am worried about it... I mask it off and do the same thing. |
|
|
|
[#30]
Quoted:
Freezer will make it tighter, not looser. You need heat. Quoted:
Quoted:
I'm up! but the upper is still in the same condition, untouched and in the freezer. Freezer will make it tighter, not looser. You need heat. The pin will contract more than the surrounding material. The fact that there is much more of the surrounding material causes it to act as a sink plus adds rigidity, preventing contraction. |
|
|
|
[#31]
Quoted:
Freezer will make it tighter, not looser. You need heat. Quoted:
Quoted:
I'm up! but the upper is still in the same condition, untouched and in the freezer. Freezer will make it tighter, not looser. You need heat. I've had pins that I needed both heat & cold to get the pins out. On one particularly stubborn set, I did several penetrant + heat cycles (mapp gas torch) then into the freezer for a day (had to work) then hit it with heat again...finally got them out after that. Note: I use a 3 pound hammer & the orange brownells block/fixture to knock out pins. |
|
|
|
[#32]
This is as it currently sit;
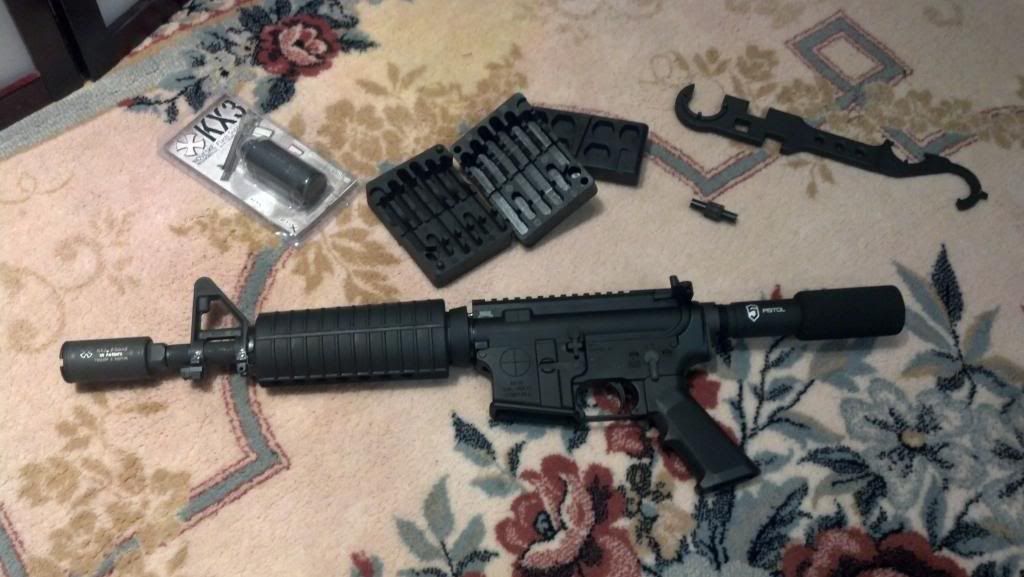
I put the H/G back on, and threw a pig on it. I'm officially throwing in the towel. . . . I'm going to take this to a buddy who knows better and watch him go through the process. Once I'm finished with the build I'll show pics, I appreciate all the help and interest guys. Cheers, |
|
|
|
[#33]
The last PSA barrel I stripped, the FSB pins were tapered. The small side of the pins were on the side you have been beating on.
Go to the hardware store, but a medium nail set. Place on the pin, strike with a 2 pound, short handle sledge. If this does not work, heat with propane torch, evenly for about 30 seconds. Drive PSA pins out from left to right. It's about support and a big ass hammer! You need the weight of a heavy hammer to shock the pins loose. |
|
|
|
[#34]
That's a beauty pistol you've got there, hope everything works out the way you want.
|
|
|
|
[#35]
Quoted:
I'm up! but the upper is still in the same condition, untouched and in the freezer. I have some work around the house to do but I'm going to take another stab at this later today. If I can't get it to budge I'm going to hold off and wait to head over to my boss's house for some additional help. I appreciate all the help guys, at the very least i'm going to buy a new set of punches, some new A2 pins, and if it gets any worse possibly a new A2 front site post. Since i'm making another PSA order anyways, can anyone tell me if this set looks decent enough. http://palmettostatearmory.com/index.php/black-friday/black-friday-accessories/wheeler-engineering-hammer-and-puch-set-in-wood-box-951887.html Quoted:
Quoted:
You up yet OP? I'm up! but the upper is still in the same condition, untouched and in the freezer. I have some work around the house to do but I'm going to take another stab at this later today. If I can't get it to budge I'm going to hold off and wait to head over to my boss's house for some additional help. I appreciate all the help guys, at the very least i'm going to buy a new set of punches, some new A2 pins, and if it gets any worse possibly a new A2 front site post. Since i'm making another PSA order anyways, can anyone tell me if this set looks decent enough. http://palmettostatearmory.com/index.php/black-friday/black-friday-accessories/wheeler-engineering-hammer-and-puch-set-in-wood-box-951887.html I have that same Wheeler set, it is ok for putting lowers together but I would definitely not use it for removing tapered front sight pins. Look elsewhere for a quality set. Good luck! |
|
|
|
[#36]
Forgot to mention in my previous post, I also use this Starrett taper pin punch, also available at Brownells. It is specifically made for taper pins.
ETA: Besides this punch and the Brownells block, I use an old MAC tools 48oz Ball Peen hammer. Nothing fancy about it, just a BMFH, not a dead blow. Make sure to do it on an unyielding surface like a concrete floor. Don't give up, just get the right tools and use the right working surface. 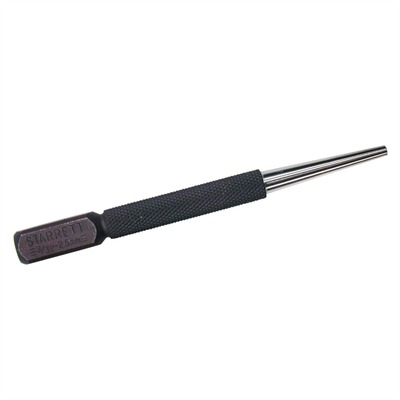 |
|
|
|
[#37]
Quoted:
They are taper pins and you are driving them from the wrong side yep they are |
|
|
|
[#38]
Those punches aren't steel either.
|
|
|
|
[#39]
 |
|
|
|
[#40]
Well on a positive note OP, your project does look kind of cool. Hope you get it the way you want.
|
|
|
|
[#41]
I wouldn't recommend a 2x4, pine is too soft. Use maple or something hard.
|
|
|
|
[#42]
I think the problem the OP has is it not a "build " it is swapping out parts
Thanksgiving or otherwise big difference |
|
|
|
[#43]
Ball peen hammer on pin. Hammer the ball peen. Hammer on hammer action helped mine get loose.
|
|
|
|
[#44]
Just throwing my 2 cents in. (Pretty sure it was a PSA upper I took an A2 sight off of but they had straight pins) But either way, best punch to use starting off is one as short and stubby as you can find and one that's fairly bigger than the pins, that's just to get it started and so you can hit it harder and not have to balance the punch on the pins and also you won't have to worry about the punch flexing or bending. That should get the pins lose then it's easy from there.
|
|
|
|
[#45]
Quoted:
The pin will contract more than the surrounding material. The fact that there is much more of the surrounding material causes it to act as a sink plus adds rigidity, preventing contraction. Quoted:
Quoted:
Quoted:
I'm up! but the upper is still in the same condition, untouched and in the freezer. Freezer will make it tighter, not looser. You need heat. The pin will contract more than the surrounding material. The fact that there is much more of the surrounding material causes it to act as a sink plus adds rigidity, preventing contraction. The pin and the FSB and barrel are the same material and will have essentially identical thermal expansion/contraction characteristics. Making everything smaller will also make the space between the parts smaller so will tighten the fit. Heat makes everything larger, including the space between the parts so loosens the fit. The frequently discussed situation with barrel nuts is completely different as you have a steel nut on an aluminum receiver, steel and aluminum have very different thermal expansion coefficients so that makes the situation different. |
|
|
|
[#46]
this is why i stay out of alot of these discussions. Im a Millwright and machinist. if anyone ever needed help i would help them but not in the open discussions
take a torch and start heating lightly and spray it with some penetrating oil like pb blaster. and have some quick cool spray like CO2 and once you have it hot spray the oil and then heat some more respray and cool it Also use a good set of punches like grace or snap on |
|
|
|
[#47]
Hit it with a brick!
Kidding Next time, make a 2 plate jig with a pin, and press it out with a vise. No problem |
|
|
|
[#48]
Quoted:
this is why i stay out of alot of these discussions. Im a Millwright and machinist. if anyone ever needed help i would help them but not in the open discussions take a torch and start heating lightly and spray it with some penetrating oil like pb blaster. and have some quick cool spray like CO2 and once you have it hot spray the oil and then heat some more respray and cool it Also use a good set of punches like grace or snap on ^^ I'm no machinist but I've owned some rusty assed Jeeps. Heating the FSB around the outside areas away from the pins will cause it to expand in order to punch out the pins. Just like tearing apart taper fitted parts on a Jeep front axle. |
|
|
|
[#49]
Quoted:
this is why i stay out of alot of these discussions. Im a Millwright and machinist. if anyone ever needed help i would help them but not in the open discussions take a torch and start heating lightly and spray it with some penetrating oil like pb blaster. and have some quick cool spray like CO2 and once you have it hot spray the oil and then heat some more respray and cool it Also use a good set of punches like grace or snap on Was an entertaining thread, and I have pretty thick skin. . . Aside from the criticism (which frankly is deserved) there are all sorts of positive and useful pieces of advice in this thread. I'm unfortunately not the most mechanically inclined so I'm going to go to a buddy's house who is (in an effort not to destroy my upper) He can show me step by step and I can emulate the tools he uses. Either way I appreciate all the comments and I promise at a later date (could be a couple of weeks) I'll post pictures of the finished product WITH DD rail, SB-15, AFG2, all the good stuff I can legally use as an AR pistol in WA |
|
|
|
[#50]
Well you gave it a good try!
I have dealt with stubborn ones before and as mentioned in this thread by others there are some key points which help.
When is all said and done use Emory cloth to clean up the surrounding area, cold blue the metal and install new pins. I beat the hell out of one before, thought I ruined the FSB which of course is matched to the barrel but after cleaning up the markings with Emory cloth and a little cold blue it was 95%. Stay safe and have fun! |
|
|
 Win a FREE Membership!
Sign up for the ARFCOM weekly newsletter and be entered to win a free ARFCOM membership. One new winner* is announced every week!
You will receive an email every Friday morning featuring the latest chatter from the hottest topics, breaking news surrounding legislation, as well as exclusive deals only available to ARFCOM email subscribers.

AR15.COM is the world's largest firearm community and is a gathering place for firearm enthusiasts of all types.
From hunters and military members, to competition shooters and general firearm enthusiasts, we welcome anyone who values and respects the way of the firearm.

Subscribe to our monthly Newsletter to receive firearm news, product discounts from your favorite Industry Partners, and more.
Copyright © 1996-2024 AR15.COM LLC. All Rights Reserved.
Any use of this content without express written consent is prohibited.
AR15.Com reserves the right to overwrite or replace any affiliate, commercial, or monetizable links, posted by users, with our own.


