|
Posted: 4/14/2010 6:44:19 PM EDT
So here are some pics of the wear patterns on my rifle. There really isn't any serious problems, it could be cleaned up pretty quickly with a stone which I intend to do, but I was hoping for some technical discussion beyond 'Send it to Bill Springfield". I realize that Bill can do fine work on it, but humor me, please.
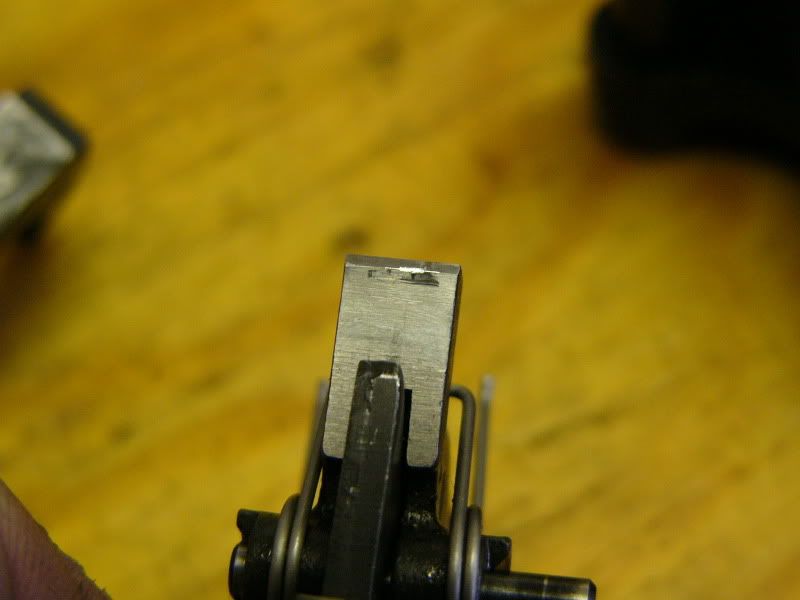
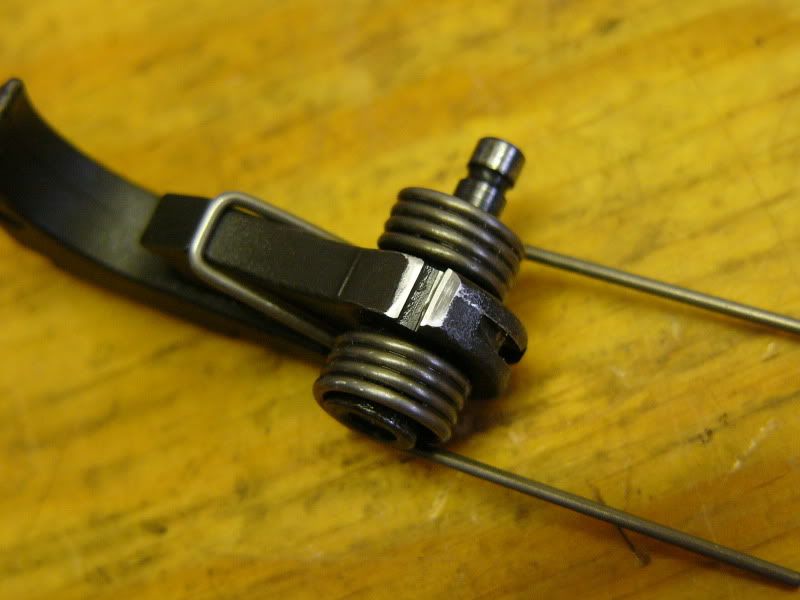
Here is the basic geometry. The BACK side of the hammer hook, where it hits the TOP of the trigger/sear is wearing because of contact. Is this normal/acceptable? I don't see a problem with it, it stops the movement of the hammer as it's going down but is not in contact when the trigger is reset and ready to fire again. 
A pic of the backside hammer wear 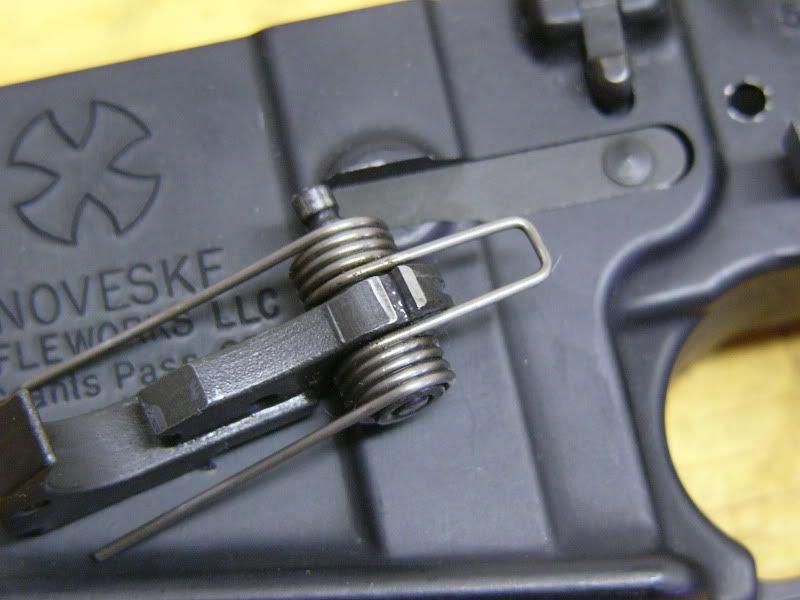
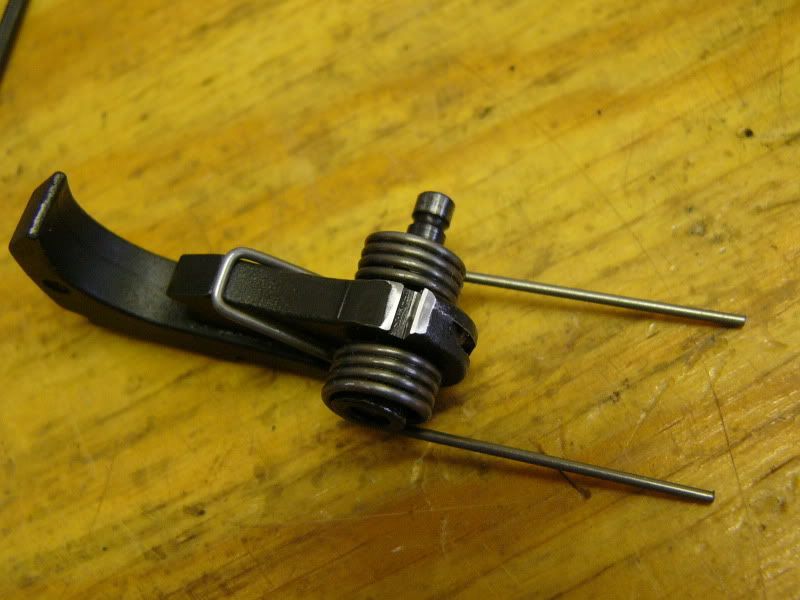
Hammer Hook wear- 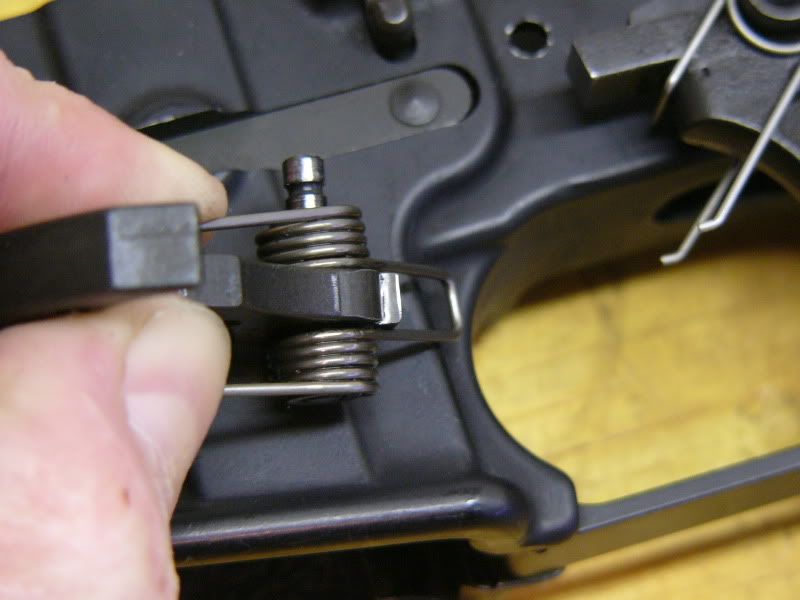
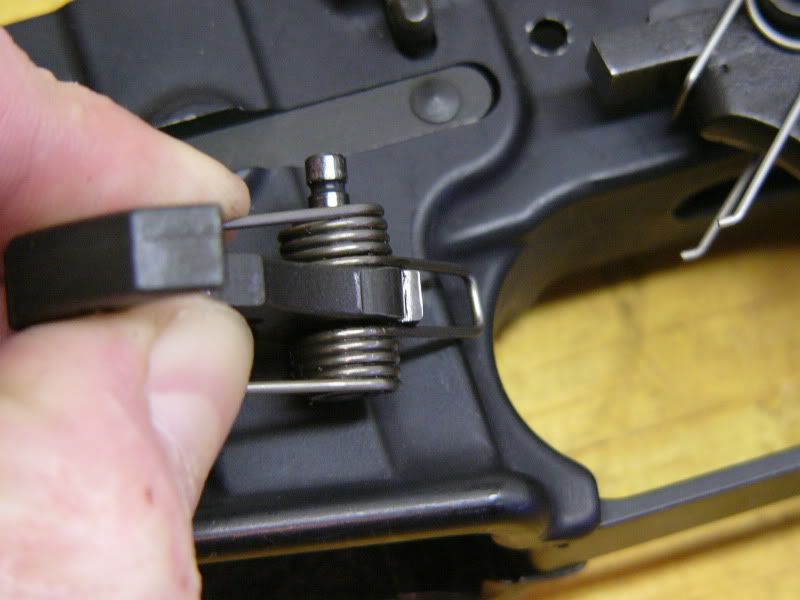
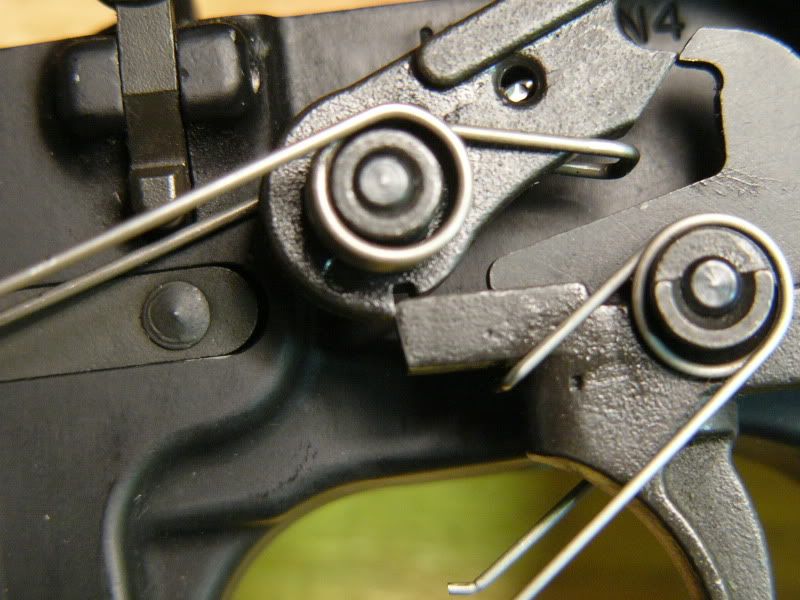
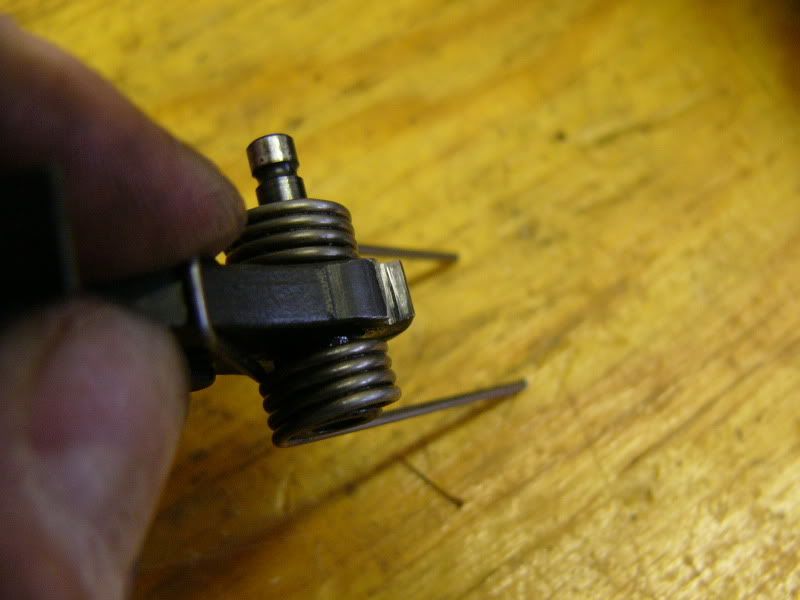
Trigger/Searwear from contact with the backside of the hammer 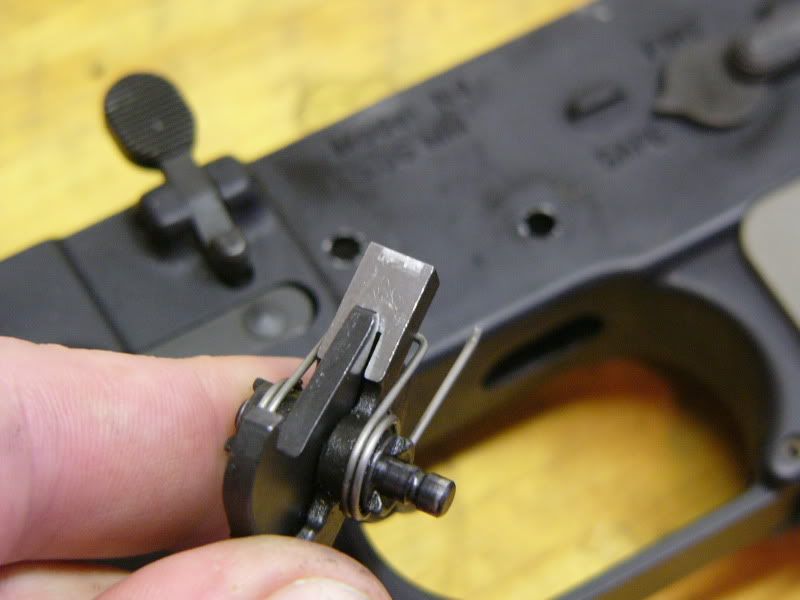
Trigger wear 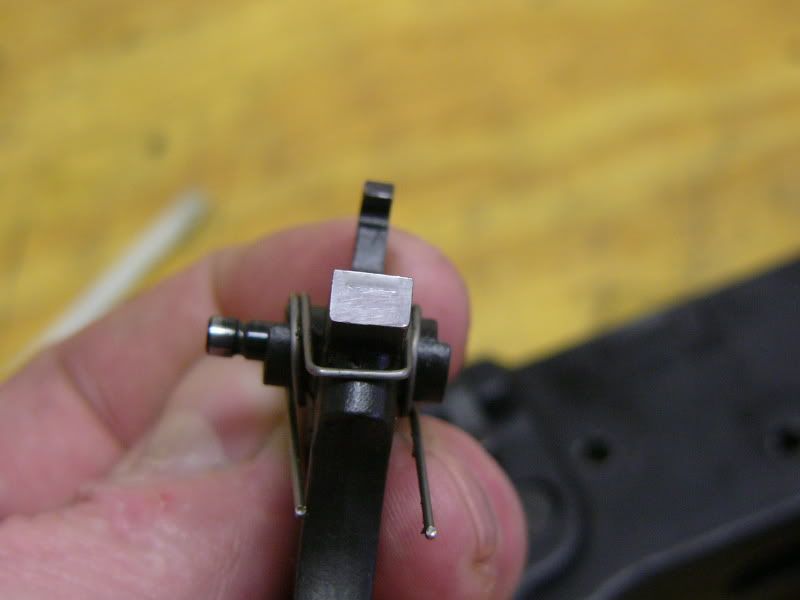
So the questions are this- Is there any benefit from stoning down the backside of the hammer? Like a CZ pistol, the trigger/sear is undercut forcing the hammer to move slightly as the sear drops. Anyone re-cut the sear angle to make it flat What were your results? Thanks- SCW |
|
|
|
[#1]
Bump. Somebody out there has got to work on their own triggers.....
|
|
|
|
[#2]
I don't use a stone unless there is bad burrs on them. Most the time I use a dremel with a felt polishing pad. I polish until it's smooth and shiny. Gives me a nice smooth trigger pull. Not sure if it does anything on the backside like your asking. I just polish everything thats not black
|
|
|
|
[#3]
Don't use a stone. The trigger is surface hardened and you don't want to buff through that or you'll get excessive wear.
Use the felt as said above or what I use. Go to the grocery store and get one of those 4 step nail buffers. They're for shining the tops of finger nails. Skip the first step and use it buff the trigger to a shine. I don't own a dremel, that's why I used the nail thing. I used to polish watches with them. As you use each step, peel off the paper from that step so it doesn't scratch other parts of the trigger. |
|
|
|
[#4]
Thanks gents-
I have a variety of stones that I use on my stuff, including some Hard Arkansas that will only touch steel in the smallest amount, like cleaning up the slight marks you see in the pics. I work over all my own trigger, sometimes recutting angles as I find need for them, so I'm not terribly concerned about using stones on this, I can easily control what gets cut how much. I have already used JB Bore paste on this trigger, which is why it looks as good as it does. I stick some paste on the sear and dry fire a few hundred times, addiing more paste as needed, then cleaning it all up and using some slippery grease. This has improved the trigger quite a bit, but I'm in a tinkering mood and would like to take it a step further. I might have to give a few things a try and see what I can't ruin. It's only a trigger... When I get home I'll take some pics of the results of hitting it with the Arkansas stone. I don't think I'll re-cut the angle of the trigger/sear just yet, not until I have a new one to replace it with. Thanks- |
|
|
|
[#5]
That wear pattern looks perfectly normal. I agree with the others about avoiding the stone. All of my factory triggers are cleaned up and polished with jeweler's rouge when new. If I'm working on an FCG for a defensive/training gun I don't do anything more than cleaning up the engagement surfaces. If I want a glass rod crisp break for a range gun I'll typically install a set screw in the hole for the pistol grip retaining bolt. This set screw is then adjusted to remove the excess creep in the trigger. Once I have it dialed in I use Loc-Tite to keep it from moving. A fine pitch set screw costs about eighty cents, and will do wonders for a sloppy factory trigger. Keep in mind that you lose sear engagement area if you go too far, and for obvious reasons that's dangerous. With the hammer manually cocked, I'll slowly advance the screw until the hammer releases, then I'll back it off a full turn and start fine tuning from there. Double-check to make sure the disco isn't binding on reset, and also make sure that your selector will still engage properly.
Hope this helps-good luck Posted Via AR15.Com Mobile |
|
|
|
[#6]
Smiths don't use Dremels.
 They are only good for maybe a light and quick polish on not flush surfaces which won't properly change angles or polish evenly. They are only good for maybe a light and quick polish on not flush surfaces which won't properly change angles or polish evenly.
I use extra and XX fine ceramic stones for light polishing and fine for changing angles (unless a lot needs to be removed) with all stones you have to keep everything square and understand the design of the trigger. The mil spec AR triggers are pretty crappy surface hardened cast and not ideal for trigger jobs. You don't want to burn through the hardened layer which means you can only do so much and keep it save (over time) The sear/Hammer have to remain "positive", meaning the hammer needs to cam back before firing. If you change the sear angle too much (from \ to / ) you will have a negative unsafe and mushy trigger. Same goes for the hammer . On AR's I usually stone the hammer hook and the sear face with and XX fine and ever so slightly break the edge on each. This usually gives me one creep (instead of 3-4) then a clean break which I can predict every time. The only way to get rid of all creep and take up is to shim the rear of the sear underneath (where your grip screw is and I've "heard" Bill Springfield puts a spot weld under there. some aftermarket triggers have a set screw and you can also buy a "J&L research" grip screw that has an adjustable screw at the tip which shims the sear. The problem with shimming the stock/GI sear is you are ONLY using half (or less if adjusted so) the engagement and again the stock AR triggers are CRAP compared to RC hardened forged triggers you see in other rifles/designs/aftermarket. Just look at the casting of your TG in the pic's.
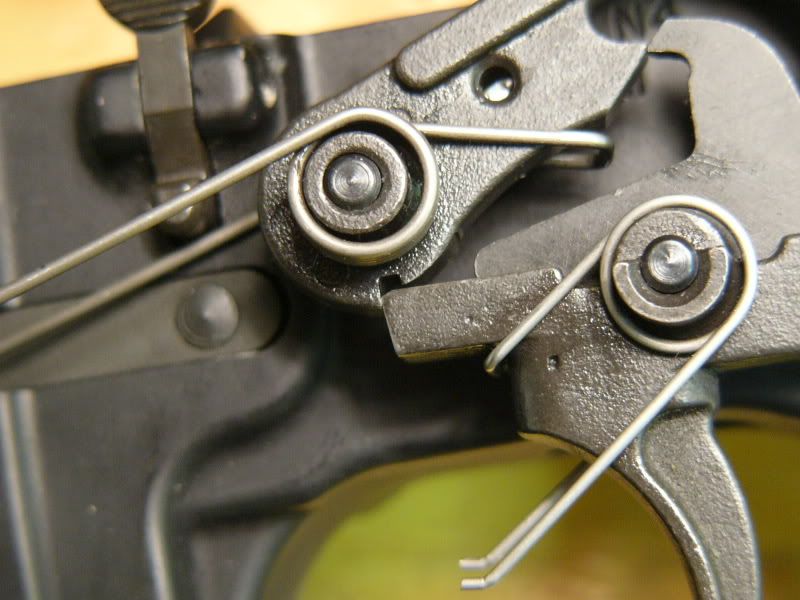
This is why there are two stage triggers which have a nice clean break because the two stage gives you less engagement once you have pulled the first stage and will go back to being safe if you decide not to pull the trigger. All GOOD bench triggers that measure in ounces instead of pounds are two stage. The Single stage trigger needs to cam back so it will go back if you don't pull the trigger so there's a fine line about having a really good single stage trigger and having a unsafe one. You will notice on a CZ pistol (done those too) The hammer cams and when you let off the the trigger the hammer goes back down the sear. If you screw the angle the hammer will sit there and be unsafe and usually real mushy anyway. Anyway, look at your last pic (the sear face) See the gash in it? AR's do that from the hammer hook (even with the heat treat ) and this is why I think they suck and should be forged RC hardened trough out. So again, I go for one creep then crisp when lightly stoning and maybe a light shim, I get the sear smooth , don't try to remove the gash or you will risk getting below heat treat, then lightly stone the hammer testing as you go with a few in and outs. FWIW, after market and two stage triggers are always going to be the way to go when looking for a truly "good" long lasting, and safe trigger. |
|
|
|
[#7]
Back in the early 90's I bought one of these (earlier version, basically the same:)
http://www.brownells.com/.aspx/pid=9875/Product/SERIES_II_STONING_FIXTURE Back then I could go to the local gun show and a guy there had triggers and hammers that I would get 3 for $10, so I would experiment. I found that changing the sear angle on the hammer and polish to the engagement surface of the trigger would result in a no load / no creep trigger (after ruining 3 or 4 before finding the right angle.) Ink the hammer sear surface and watch for square contact with stone. Then assemble and reassemble until you find engagement correct (or throw it out and start again.). You can also re-harden surfaces (case harden,) albeit I never had trouble with excessive wear after stoning (especially with Hard Arkansas.) Before anyone jumps in, the mil-spec would have a hardness rating depth to the surface which I have never seen published so I can not give the measurement or depth of hardness or the amount of material removal before reaching past hardened surface, but if anyone has ever tried to lighten a hammer by grinding the hook off, they are pretty freakin' hard all the way through. Frankly I have a difficult time explaining to anyone why a surface hardened trigger or hammer would have machine marks on it without removing enough of the surface to reach past hardened surface anyways. If they were re-hardened after machining there would most likely be a discoloration to those machined surfaces. I always thought that they were through hardened by heat treatment and then machined, this would make the hardness the same in the center mass as it was on the surface. That would be another thread I guess... Removing any considerable amount of material can and will put the engagement contact points far enough away from each other to cause unintentional fire. For the hobbyist polishing as mentioned above by others improves the feel, but actual material removal and alteration of sear angles should be considered EXTREMELY DANGEROUS! But then again if you wanted to play safe you would have bought an ice cream cone. |
|
|
|
[#8]
Hey DocBob, thanks for your post- just 15 posts in 6 years! I think you understand exactly what I'm looking at, I understand the risks of a bad angle as well as the risks of trashing the trigger group, but I didn't buy an ice cream cone.
I polished the sear face of the trigger with the hard Arkansas stone tonight and was surprised as how deep the gash was from the hammer hook. Far deeper than I anticipated, with the bonus addition of a bit of damage on the critical corner that is likely the cause of my gritty crappy trigger- besides the creep. I'm actually surprised at how much bearing surface is found here, a Hi-Power only runs about .020 of overlap on the hammer and sear, a lousy 1911 trigger is about .020", a good trigger is about .018 and pushing your luck is about .014. This interface is .065". I think that is in part due to the much higher spring pressures put on the pistol hammers, comparably the AR has very weak springs pushing it around and may rely on larger contact to keep it from slipping. Rocker, thanks for your thoughts. I'll start getting the creep taken care of by lifting the backside with the screw CJan_NH was referring to, I think that will solve quite a bit of the problems I have. Here is the damage to the sear corner I found as I started stoning the top of the sear. I'm going to chamfer the top of the sear slightly, betting that the contact surface is slightly greater than in needs to be, and if it doesn't work I'll buy new parts. On a HP/1911/CZ 75/etc cutting a 45-degree angle on the back side of the sear has the effect of shortening the length of the pull before the hammer falls, as long as you keep a safe contact area. I think the same should go for this, so I'll cut a bit off and see how it goes. 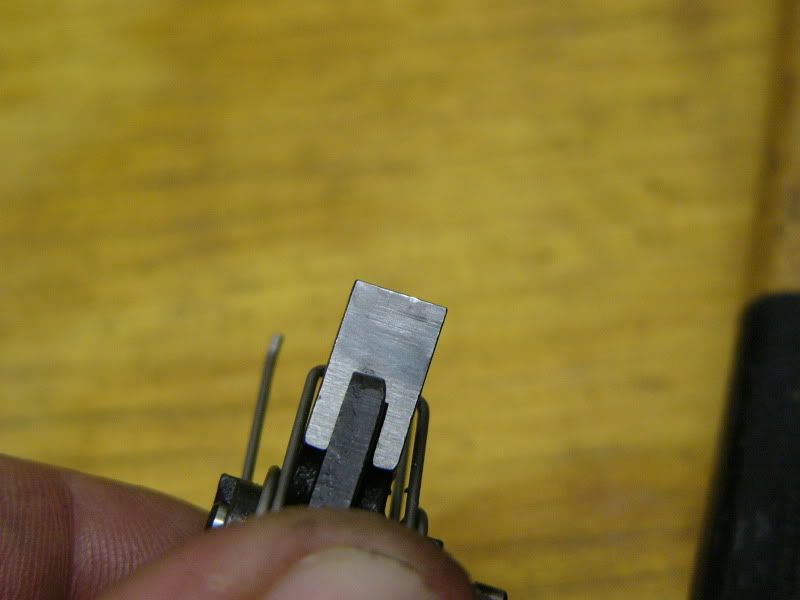
|
|
|
|
[#9]
OK, Here is the update-
This is how I cut the top of the sear removing all the burrs and irregularities. I cut this with a fine crystolon stone (about 400 grit) then polished it with the hard Arkansas (about 1200 grit). 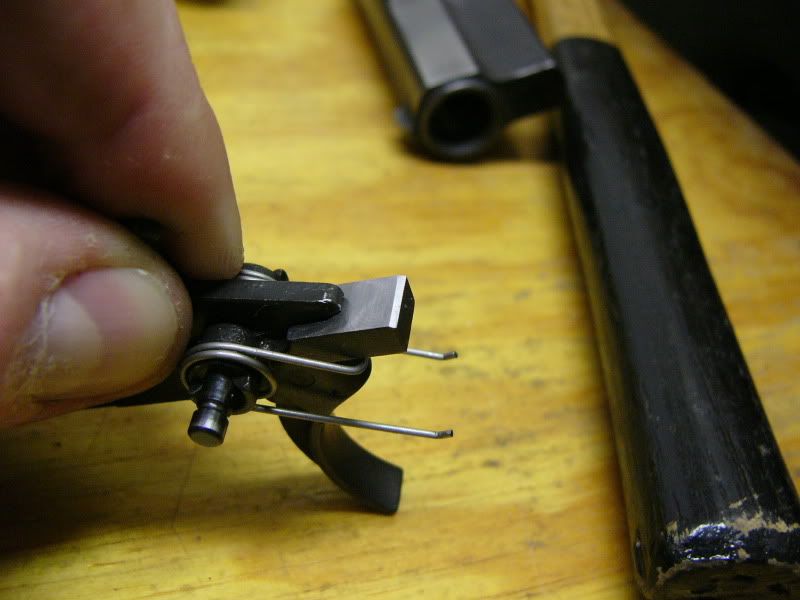
Here is the results of the polishing on the sear face, there is still a slight amount of damage from the hammer, but most of it is now gone. 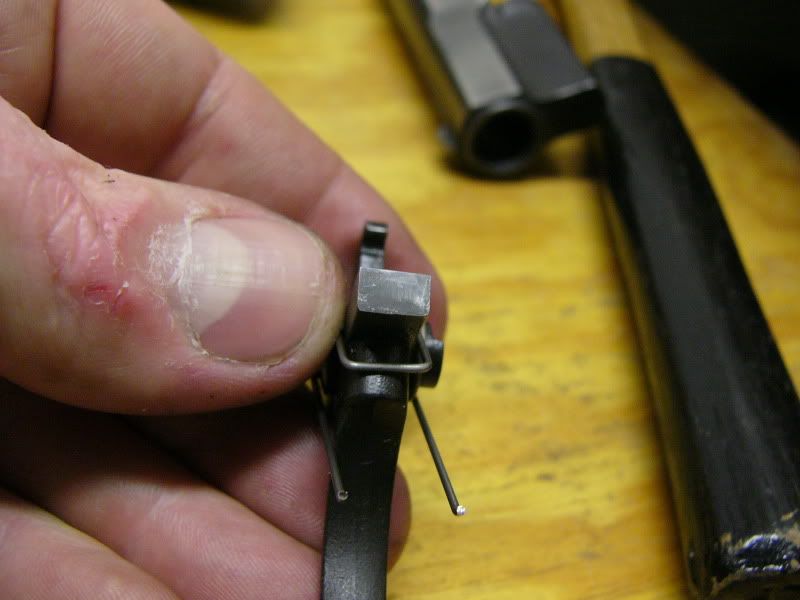
Hopefully these show the remaining contact patch after cutting the sear. I measure the change to be about .020", so from .065 to .042" of contact with the hammer. 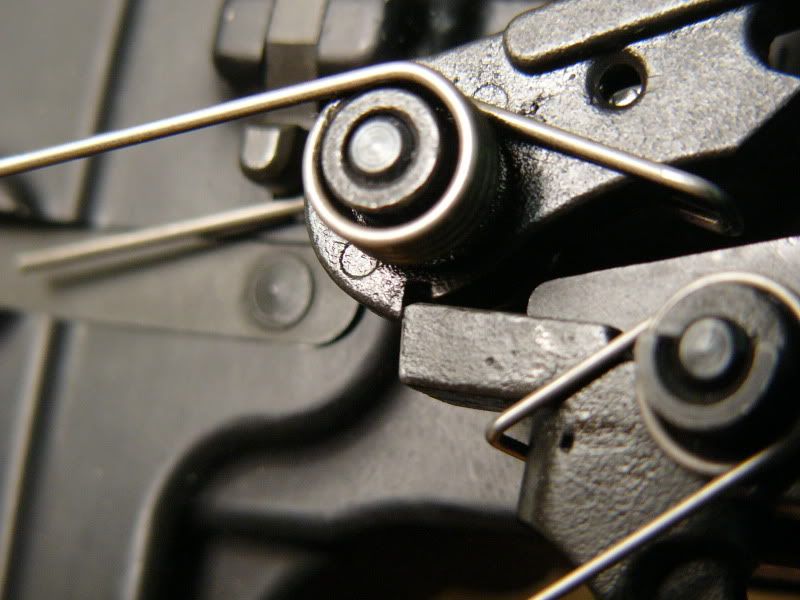
The results were.....Mixed. The trigger pull is decidedly shorter and cleaner. Less creep, WAY less grit and significantly shorter pull before the hammer drops. It also appears to be quite safe as I beat the crud out of it 'mortaring' the rifle to get it to set off the trigger, with no hammer drops. That part is all quite good. The bad part is the pull is still quite hard from a poundage point of view. I think re-cutting the angle of the sear would clean up a bit of that, and I might try that after I get another trigger to put in if/when I screw up this one. I'm still running stock springs, yellow springs might help as well but I'd like to see what I can get from better geometry and finishing first. |
|
|
|
[#10]
tag for interest..
|
|
|
|
[#11]
Quoted:
Back in the early 90's I bought one of these (earlier version, basically the same:) http://www.brownells.com/.aspx/pid=9875/Product/SERIES_II_STONING_FIXTURE Back then I could go to the local gun show and a guy there had triggers and hammers that I would get 3 for $10, so I would experiment. I found that changing the sear angle on the hammer and polish to the engagement surface of the trigger would result in a no load / no creep trigger (after ruining 3 or 4 before finding the right angle.) Ink the hammer sear surface and watch for square contact with stone. Then assemble and reassemble until you find engagement correct (or throw it out and start again.). You can also re-harden surfaces (case harden,) albeit I never had trouble with excessive wear after stoning (especially with Hard Arkansas.) Before anyone jumps in, the mil-spec would have a hardness rating depth to the surface which I have never seen published so I can not give the measurement or depth of hardness or the amount of material removal before reaching past hardened surface, but if anyone has ever tried to lighten a hammer by grinding the hook off, they are pretty freakin' hard all the way through. Frankly I have a difficult time explaining to anyone why a surface hardened trigger or hammer would have machine marks on it without removing enough of the surface to reach past hardened surface anyways. If they were re-hardened after machining there would most likely be a discoloration to those machined surfaces. I always thought that they were through hardened by heat treatment and then machined, this would make the hardness the same in the center mass as it was on the surface. That would be another thread I guess... Removing any considerable amount of material can and will put the engagement contact points far enough away from each other to cause unintentional fire. For the hobbyist polishing as mentioned above by others improves the feel, but actual material removal and alteration of sear angles should be considered EXTREMELY DANGEROUS! But then again if you wanted to play safe you would have bought an ice cream cone. Amen! My situation is very similar except I started about ten years after you. Using the Power Custom trigger fixture and the stones included , plus some extra fine finishing stones makes a big difference. I finish the job off with a felt wheel and some flitz metal polish. Plus some of that red grease on the engagement surfaces that Geisselle includes with their triggers. Before I got started, I bought ,through Brownell's, an AGI VHS tape showing an AR trigger job. It was great because it showed me how to make some major mistakes. Like DocBob, I started experimenting. I finally got just what I wanted, a very clean, single stage break at about 4.5 lbs. I'm basically doing the same thing. I've heard for years all this stuff about how if you stone the grinder marks out of the finished surfaces, it will go through the the surface hardening and reach the " gooey, soft center "of the part and cause problems. I have some guns that I have shot 7-8k rounds using said parts and zero problems. Just normal wear. DocBob's explanation in his third paragraph is the best explanation I have ever read about this subject. |
|
|
|
[#12]
Thanks for this excellent thread, SCW!
|
|
|
|
[#13]
Glad you are not some kid with a file, and those fingers look like they have done some honest work!
It is interesting that you took the material off the trigger surface as I always kept that to the hammer. I would however slightly radius and polish the upper top trigger edge so the hammer would roll off smoother when disengaging, (but as you already know this was the place where removing material would effect the ability for the trigger to keep the hammer engaged,) but I see your case was to remove the gouge and to experiment. You do nice work, which the first rule is be honest to one's self in the evaluation of one's work. Triggers are a very tricky bit o' business. I wonder what Bill Springfield pays for liability insurance... ...and yes I do not post much unless something really interests me. I have been reading this board since ~2000 and building since 1990. |
|
|
|
[#14]
Bob, my pansie hands haven't done any real work in years. I drive Outlook more than anything these days (Civil Engineer with a fat gut).
OK, you guys who have experimented and got good results changing the geometry of your triggers and hammers, where did you cut and to what angles? This is what I've come up with after thinking about it some more. Obviously my trigger and hammer are not meeting at flush angles, or the bottom corner of the hammer would not be cutting into the face of the sear. Decreasing the undercut of the sear would cause this problem to be worse, but would probably lower the trigger pull by not camming the hammer back as the sear drops. Overall I think changing the sear angle will not get me what I want. So that leaves hacking on the hammer hook (Bob you mentioned that you typically work over the hammer, right?) I'm thinking about altering the angle of the hammer hook to cause it to be more flush with the sear. This would allow the hammer hook to bear evenly on the sear face and reduce some of the caming that occurs as the sear drops, but not all of it unless both angles were perfectly straight up and down (like all the good triggers in the world were originally designed...). I don't know if I can get them straight without removing so much material that the hammer starts to sit pretty high when locked back, but maybe that's not a problem either. This is a sketch of what I'm thinking would be the best step at this point. The red area would be stoned off so that the hammer and sear faces are flat against each other. I will also likely stone the sharp edge of the hammer hook similar to the sear to make it a little more robust and resistant to eventual damage- possibly keeping a nice clean trigger for longer. Thoughts? 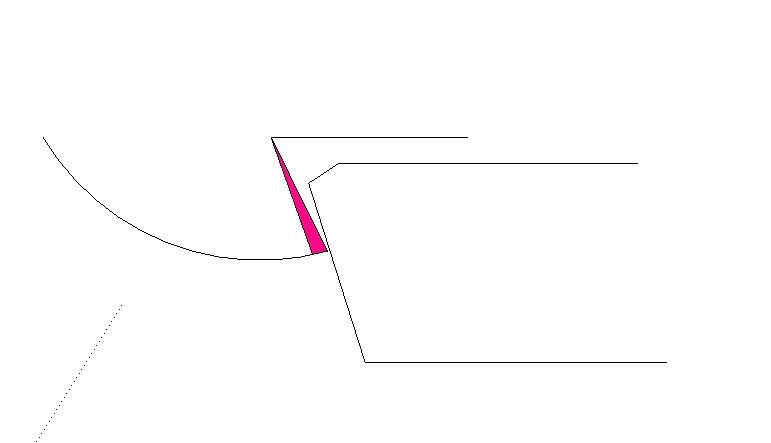
|
|
|
|
[#15]
Stoning off the red area would not improve the trigger feel in my estimation. It would only reduce the angular travel of the trigger following sear break. The sear angle itself needs to be modified to accomplish this.
To work the trigger on my hunter I decreased the sear angle so the trigger's action did not draw the hammer further back. I also bent up one leg of the trigger spring to reduce the tension on the trigger itself. I also removed the tail to lighten the hammer. After polishing all surfaces, including where my finger goes, I have a crisp trigger with reduced travel and good predictability. |
|
|
|
[#16]
Tag for future updates. Good photos and write-up.
|
|
|
|
[#17]
Is there no detailed information printed anywhere regarding this, similar to the detailed info for the cuatro-cinco, that is printed in J. Kuhnhausen's book?
I have no interest in this type work but obviously some folks do. |
|
|
|
[#18]
I think you would like the reduced weight springs, they reduce the contact pressure between the hammer and sear surface, reducing the pull neccesary for movement and the felt grittiness. Yellow JP Springs are the "bench/plinker" lightweights, they offer different levels depending on your reliability needs. The yellows have occasionel problems with hard primers. I also like to polish to a mirror shine. A lot of us have accomplished a similar reduction in sear engagement by using the set screw through the grip screw hole, jacking up the rear of the trigger( the same effect as the Bill Springfield spot weld, or shims, but adjustable) Your bevel may provide a smoother release though. Interesting approach, and great pictures!
|
|
|
|
[#19]
Nice pics. The broken edge on the sear looks quite large (in the pic's anyway) an more than I would attempted And that puppy looks like it's living on the edge now!
The beauty of an adjustment screw is you can change the amount of engagement and correct it a lot easier without permanently removing metal or end to end tolerances and a good place to start before stoning as well because that alone will eliminate some creep , however I would'nt adjust too far. The heat treat is debatable, for one,, if the AR sear was "ideal" it wouldn't have a gash in it with very few rounds fired or dry fired so that tells me right away it's not an ideal hardened part . Also there can be QC issues on heat treat as well and quality of various manufactures HT. I see you like Browning Hi powers,(so do I and have owned many) I've personally seen the stock (surface treated) hammers wear out a few years after having a "professional" trigger jobs done, and when I was a mod at the old (first) defunct HP forum this problem would come up quite a bit on the forum (hammer fall). I have never had a problem with the after market hammer sears (like C&S) and always used those parts when doing triggers under 4 LBS. Also there have been cases where people would drop in a after market hammer and down the road it would eat the stock surface treated sear. Again, I don't trust the stock cast TG of the AR for anything under 3.5lbs and or trust the very end/tip of the hammer hook to hold up for any length of time when adjusted to the extreme. Also again, the hammer must noticeably cam back to be safe. I'm happy with crisp and predictable over light and uncertain any day. After all,, letting loose of a 30 round mag unexpectedly is not a pretty sight in a public setting. Anyway just throwing out a word of caution for those interested in this thread. (go easy) Test, test, test,,, and keep the posts coming (Edit to add about springs) TTT springs are half the price of JP's if you want to "try" a set without spending to much. (they are not a trigger job like the ad says. |
|
|
|
[#20]
Using a reduced weight hammer spring reduces trigger effort because, if nothing else, lateral friction force (i.e., the drag of the trigger sear down the hammer sear notch when the trigger is pulled) is directly proportional to the multiple of coefficient of friction times applied downward force (i.e., hammer spring force).
Not legal advice, MHO, YMMV, etc. |
|
|
|
[#21]
You might consider one of these for future projects. It has been a fantastic trigger to work with.
JP Enterprises Adjustable Trigger. -3# 
|
|
|
|
[#22]
When two pieces of material come into contact with each other wear occurs. It's just like your car, the more you use it the more parts will wear and need to be replaced . But you don't stop driving you car, don't stop using you AR. It is perfectly fine and normal. Once you get to about the 10k round mark then I would start to consider replacing the lower parts.
|
|
|
|
[#23]
Quoted:
You might consider one of these for future projects. It has been a fantastic trigger to work with. JP Enterprises Adjustable Trigger. -3# http://media.midwayusa.com/ProductImages/Medium/167903.jpg You could make the same thing for a few penny's. |
|
|
|
[#24]
SCW, this is exactly what I do as you have illustrated.
To test I would pull on trigger and watch for hammer to move downwards before disengaging and traveling upward to strike. After stoning to your sketched angle you will find hammer does not move in this way with clean disengagement eliminating most of the creep. Obviously the stoning provides less creep and smoother action but this has to be done in tandem with proper (in your opinion and choice,) springs. 15 years ago I worked as an R&D technician for a specialty metal manufacturer (powder metallurgy,) and had access to a Rockwell tester. I didn't bother with testing the hardness back then but wish that I had, albeit I couldn't afford to buy every brand of trigger to do a suitable test procedure anyways. However when I was grinding off the hammer hooks I could have tested surface after grinding. Another missed opportunity to educate myself. Back then we all thought that The Ban would hold forever. I don't think there is enough info out there as to trigger work (I have both 45 Kuhnhausen shop manuals, excellent reference.) Perhaps Mr. Springfield could make more money on a book. 
|
|
|
|
[#25]
Thanks folks, good conversation here, as I had hoped for. I've learned a lot from this experiment and I think I've had good results and should have better results as I experiment more.
Clearly I think we can agree that if the trigger group was hardened, it's not very hard or I wouldn't have the damage to the face of the sear that I do. This rifle only has about 4,000 rounds through it, that seems like excessive damage for such a low round count. Quoted:
Stoning off the red area would not improve the trigger feel in my estimation. It would only reduce the angular travel of the trigger following sear break. The sear angle itself needs to be modified to accomplish this. To work the trigger on my hunter I decreased the sear angle so the trigger's action did not draw the hammer further back. I also bent up one leg of the trigger spring to reduce the tension on the trigger itself. I also removed the tail to lighten the hammer. After polishing all surfaces, including where my finger goes, I have a crisp trigger with reduced travel and good predictability. I (respectfully) think you are wrong about the hammer hook not helping the caming action. Both the sear and the hammer are undercut, so to remove the reverse motion all together both would have to be cut perfectly vertical, but re-cutting the hammer so that it is flat to the sear face will keep future damage to a minimum as well as help (not solve) the reward motion of the hammer. I think I will also bend a spring, but not until I have satisfied myself with stones and geometry (or ruined this trigger  ). ).
Quoted:
Nice pics. The broken edge on the sear looks quite large (in the pic's anyway) an more than I would attempted And that puppy looks like it's living on the edge now! ..... The heat treat is debatable, for one,, if the AR sear was "ideal" it wouldn't have a gash in it with very few rounds fired or dry fired so that tells me right away it's not an ideal hardened part . Also there can be QC issues on heat treat as well and quality of various manufactures HT. I see you like Browning Hi powers,(so do I and have owned many) I've personally seen the stock (surface treated) hammers wear out a few years after having a "professional" trigger jobs done, and when I was a mod at the old (first) defunct HP forum this problem would come up quite a bit on the forum (hammer fall). I have never had a problem with the after market hammer sears (like C&S) and always used those parts when doing triggers under 4 LBS. Also there have been cases where people would drop in a after market hammer and down the road it would eat the stock surface treated sear. (Edit to add about springs) TTT springs are half the price of JP's if you want to "try" a set without spending to much. (they are not a trigger job like the ad says. I don't think the cut on the sear is as big as it looks. It only removed .020" from the height of the sear, but I cut it a fair distance back from the edge to make sure the hammer didn't drag on it after it broke loose from my new sear edge. It was cut back at least .040 from the old edge. I've tested it dry and with 'mortaring' or slamming the butt of the gun down to try to force the sear and hammer to separate, so far so good. Much cleaner break too. Thanks for the heads up regarding the TTT springs. I think you are right regarding the treating of the sear, if it was hard enough I wouldn't have significant damage like I do. I understood the problem with Hi-Power hammers and sear was people putting either a hardened sear or hammer, but not both and ending up trashing other parts. That might be a clue to some of the problem here, the hammer hooks don't show any damage but the sear is pretty soft. Possibly there is a differential in hardness, not that I can do anything about that. Quoted:
When two pieces of material come into contact with each other wear occurs. It's just like your car, the more you use it the more parts will wear and need to be replaced . But you don't stop driving you car, don't stop using you AR. It is perfectly fine and normal. Once you get to about the 10k round mark then I would start to consider replacing the lower parts. I understand that, but there is also the problem that if parts don't fit together well there is undue and accelerated wear, like I'm seeing on the sear surface. This is because the hammer hooks poke the center of the sear and get dragged to the top, rather than bear evenly and evenly slide off. And I'm bored. I should be planting a garden but tinkering is so much more fun. I just parkerized one of my Hi-Powers tonight, and the tomatoes are still not in the ground. Quoted:
SCW, this is exactly what I do as you have illustrated. To test I would pull on trigger and watch for hammer to move downwards before disengaging and traveling upward to strike. After stoning to your sketched angle you will find hammer does not move in this way with clean disengagement eliminating most of the creep. Thanks again Bob. I'm getting closer by the minute to ruining this thing for good, lets see what a little work on the hammer can do. My idea is to hit the hook with some mexican dykem (sharpie) and stone it until it sits flat on the sear face. I'll start stoning in the morning and take some pics along the way just to document how to ruin a previously rotten (but functional) trigger |
|
|
|
[#26]
Quoted: I don't think there is enough info out there as to trigger work (I have both 45 Kuhnhausen shop manuals, excellent reference.) Perhaps Mr. Springfield could make more money on a book. Interesting |
|
|
|
[#27]
SCW, ,020 seems like a lot but I didn't notice if you took more from the top. The hammer should get out of the way on it's own. On a Ruger revolver just a .005 wide break on the sear (also on the trigger) will eliminate all creep, however if you go any more you can get "push off".
Now, if you want to take an experiment to the extreme and get a little crazy,, I also agree that the hammer hook on the AR must be harder than the sear. Do you have a 22lr upper to test the trigger with? That would be the way to go when it comes down to live fire longevity. BTW, post up the BHP when you're done. Do you have a park tank at home? |
|
|
|
[#28]
Quoted:
Quoted:
I don't think there is enough info out there as to trigger work (I have both 45 Kuhnhausen shop manuals, excellent reference.) Perhaps Mr. Springfield could make more money on a book. Interesting Doc is correct, especially free info. There is a DVD and a few books but smiths don't give up trade secrets for free.
|
|
|
|
[#29]
Very good results today. Other than forgetting to parkerize the mag catch screw and losing the trigger axis pin, the Hi-Power is back together and the AR trigger is finished- WITHOUT HAVING TO BUY A NEW ONE!!!!!
 
I re-cut the face of the hammer hook with the Arkansas stone, which is very slow and gives a great polish as it cuts. I changed the angle on the hook and nipped the end of the hook off just the smallest amount to give it a new clean edge that is slightly thicker and hopefully stronger. Also interesting is the damage done to the top of the sear just through a few dozen dry fires, I think my sear re-cut is going to save the actual sear edge from any further damage, but I was surprised at what I found on the sear. RESULTS–––– FANTASTIC!! The trigger pull is just about 5# now, I'd like it to be slightly less but I'll wait to cut any further until I have a back-up FCG in case I screw it up. I'm convinced that cutting the hammer is a huge help, and based on what I saw with the mexican dykem (sharpie) the hammer is now hitting very flat on the sear face, so damage should be minimized as well. Here are a few more pics, cuz I know this is arfcom and 78.3% of the people who click on this thread only look at the pics. 


|
|
|
|
[#30]
I have worked on HP, CZ and AR triggers. I just recut the trigger (slowly and test allot) until it the cam is removed (same with CZs). I made a jig up to keep the stone and trigger angle the same.
A stock trigger is cheap, if there is an issue with surface hardening I will just get a new one...But haven't had any issues yet Working on guns is not rocket science... |
|
|
|
[#31]
I put a bow in the trigger spring legs to give it less tension.
I haven't tried cutting down sear engagement like what you've done, but it's really no different than putting a set screw in the pistol grip hole. I'd be a little concerned about how it's wearing on top of the trigger. Looks like the hammer got ahold of it pretty good. |
|
|
|
[#32]
Thanks SCW, DocBob, Rocker and guys,
This is interesting and just in time Good info... |
|
|
|
[#33]
Quoted:
Quoted:
You might consider one of these for future projects. It has been a fantastic trigger to work with. JP Enterprises Adjustable Trigger. -3# http://media.midwayusa.com/ProductImages/Medium/167903.jpg You could make the same thing for a few penny's. Oh !!!....show me how.... 
|
|
|
|
[#34]
Great info. Thanks to all for the excellent discussion.
I have dabbled in this myself, but not to this extent. You have reinforced my ideas and now I'm convinced that I'm on the right track. Excellent photos, too - I've tried to take some like this, and failed miserably. Thanks again to all. |
|
|
|
[#35]
Nice work! I have reduced the sear engagement with the set scew and added the lighter springs, but this is tagged for the next time I'm in there. I think the change in the hammer hook angle and the bevel to smooth the sear release should improve it further.
|
|
|
|
[#36]
I bought a DPMS lower that had a target trigger of unknown make. It had low power springs and the face of the trigger that contacts the hammer was cut vertically. The center of the safety was drilled through and a set screw was installed. The trigger produced no camming action but the set screw would push the trigger into full engagement when the safety was engaged. This trigger breaks at 3 pounds as measured with my RCBS gauge.
I installed this trigger in another AR and used new full power springs. The pull weight did not change, at least according to my gauge. |
|
|
|
[#37]
Last night I pulled apart a trigger on a low-round count Bushmaster and took some pics, but I'll have to upload them when I get some time (and when I'm on the computer with the pics). In short, the damage on top was still found, but the hammer and sear angles were more similar and well matched. I broke the top edge of the sear with the hard Arkansas stone, but only slightly to clear up the damage on the corner, less than 1/4 of the amount I removed on my first sear.
Then I polished the hammer hooks until they were straight and clean. The results were quite good, the trigger is crisp and the pull weight was decreased significantly, again down to about 5#. I think the pull is still too long and could stand to have the engagement depth shortened by cutting on either the hammer or sear, but it will stay as-is for the time being. Oh, and I got the Hi-Power back together, other than the still-missing trigger pin and forgetting to park the hammer and mag catch screw. Here's a link if you are interested- http://www.ar15.com/forums/topic.html?b=5&f=39&t=94007&page=1 Pics of the Bushmaster trigger to come later, Thanks again. |
|
|
 Win a FREE Membership!
Sign up for the ARFCOM weekly newsletter and be entered to win a free ARFCOM membership. One new winner* is announced every week!
You will receive an email every Friday morning featuring the latest chatter from the hottest topics, breaking news surrounding legislation, as well as exclusive deals only available to ARFCOM email subscribers.

AR15.COM is the world's largest firearm community and is a gathering place for firearm enthusiasts of all types.
From hunters and military members, to competition shooters and general firearm enthusiasts, we welcome anyone who values and respects the way of the firearm.

Subscribe to our monthly Newsletter to receive firearm news, product discounts from your favorite Industry Partners, and more.
Copyright © 1996-2024 AR15.COM LLC. All Rights Reserved.
Any use of this content without express written consent is prohibited.
AR15.Com reserves the right to overwrite or replace any affiliate, commercial, or monetizable links, posted by users, with our own.


.jpg)

