|
[#1]
Parents dryer stopped drying, motor ran fine. Looked in the access panel and belt was broke and very old. $28 and 1 hour later good as new, shop vacuumed the internals as well. This is an early 80's Maytag. Only other 7ssues in the past were 2 bad drum wheels which were a piece of cake. I love old appliances.
|
|
|
|
[#2]
Installed landscape lighting around the front of the house.
I swear that landscape rocks should be listed on the seller's disclosure form, and should be an allowed repair. Especially when they've been allowed to accumulate an inch of dirt on top. I hate landscape rock. |
|
|
|
[#3]
Over the weekend my family and I blew in 90 bales of Green Fiber insulation in the house I bought earlier this year. We gutted it down to the dirt inside and used Mooney walls in the remodel. I took the thermal camera out there today since we had a cold front blow in last night and checked out how we did. We missed a few spots in the walls, so I fashioned a miniature insulation blower from my shop vac and a 5 gallon bucket. I used my drill and a scrap piece of 1/4" metal rod to make a blender for the Green Fiber bales. It worked so well that I hauled it into the attic and shot out a few more bales. It wasn't as fast as the one the store lends you for buying enough bales, but it was much more powerful. It didn't clog once and blows 5 gallons of fluffed insulation in 2 about seconds. It was perfect for patching the spots we missed
|
|
|
|
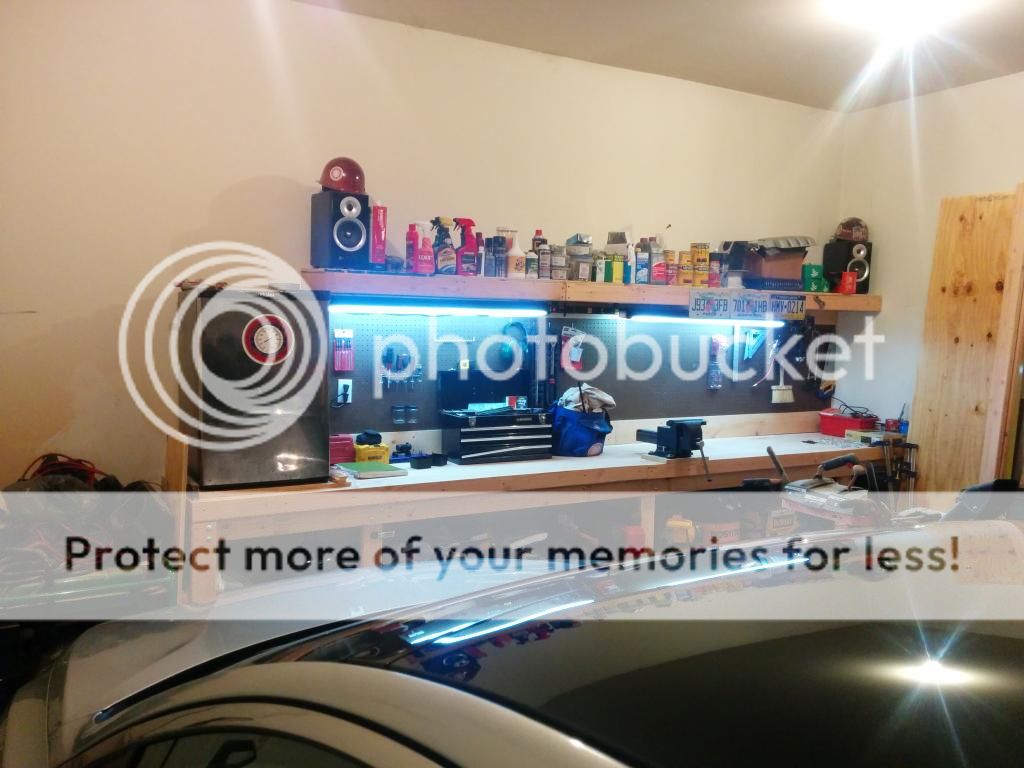
[#4]
Yesterday I began a patch project from a revision to the home speaker project I finished last week (
 ). I'll give it a skim coat today (and by I what I mean is my buddy who is way better at drywall than me!) and sand and paint Friday. Yesterday I also replaced the front shocks on my truck and installed 2 LED sink faucets in the master. They're pretty cool, the water exiting the aerator powers the LED, making the end of the faucet glow. ). I'll give it a skim coat today (and by I what I mean is my buddy who is way better at drywall than me!) and sand and paint Friday. Yesterday I also replaced the front shocks on my truck and installed 2 LED sink faucets in the master. They're pretty cool, the water exiting the aerator powers the LED, making the end of the faucet glow.
|
|
|
|
[#5]
Moved a 300 pound (stripped) range into the kitchen.
Two steps to the porch, on more into the kitchen. Waiting on an exterior blower for the range hood. |
|
|
|
[#6]
I have started to paint the interior of my house, got the living room done, one side of the kitchen, and the hallway done. Put up a ceiling fan in my bedroom. Also worked on getting the drywall around my electric panel ready for paint.
|
|
|
|
[#7]
Just about finished my work bench

|
|
|
|
[#8]
I'm hoping to do a little organization in my garage tomorrow. I'm digging your lighting over the bench, it looks good. |
|
|
|
[#9]
New PIR sensor for a security camera
|
|
|
|
[#10]
Rebuilt a FUBAR'ed STIHL chainsaw of my Uncle's and was rewarded by being given it.
|
|
|
|
[#11]
Pulled an 8/3 line for a new range and ordered a 36 inch gas flex line to hook up the stove top [dual fuel].
|
|
|
|
[#12]
Reorganized the garage, put up some new shelving. One of them is pretty rickety so I'll have to brace it. I need to finish a project so I can get it out of the way and finish organizing.
|
|
|
|
[#13]
Built a big-ass laminate counter top for my kitchen island.
|
|
|
|
[#14]
had a busy weekend under the hood of the maxima.
had an injector go bad. so changed that out a couple weeks ago. then decided an almost 20yo car may be wanting some more new injectors. so installed another 5 injectors. had to pull the upper intake manifold to get to the back 3 and while in there did the valve cover gaskets and spark plug seals., tossed in 6 new coils as well. cleaned out the EGR tube IACV and Throttle body everything went back together with new gaskets pulled all 87billion vacuum lines off and replaced them with new tubing. replaced all the secondary air tubing PCV lines and whatnot. earlier in the year I replaced all coolant lines except the throttle body lines which I did this time. while there was not any 1 issue other than the misfire a couple weeks ago I noticed that age had taken its toll on the vacuum and other rubber items so a refresh was needed. runs like a new car again. no leaks . 4 of the 6 injectors I pulled had busted pintle caps so it was time anyway. all coils where replaced with OE Hitachi so no worries there. less than a grand for all the parts needed and well worth it. have not had a car payment on this one since 99 and at 87K miles it has a ways to go yet. |
|
|
|
[#15]
Tried to change the ball on my hitch to 1&7/8. The 2" inch WOULD NOT budge! Tried soaking overnight in penetrating oil,nope. Tried heating up to cherry red then loosen with breaker bar, nope.
Screw it, got out the Milwaukee band saw and cut the damn thing off
|
|
|
|
[#16]
Sold my high mile truck, bought my dad's lower mile tahoe. Put front rotors on it (they were warped) front pads were cracked, had those warrantied. Balanced tires.
Traded my rebuilt baby chainsaw for a monster saw. Got my dad's saw running. Put front bumper on dad's tacoma. Fixed 2 leaky flappers on toilets in the house. Now I need to go back to work so I can finish my other stihl project. 2 weeks off is too long |
|
|
|
[#17]
Quoted:
Built a big-ass laminate counter top for my kitchen island. Pics! |
|
|
|
[#18]
Ripped up the flooring in the laundry room (cheap vinyl) and put down tile, installed a real drain, still need to grout, seal the grout and install the marble lip to help seal it in in case of a future leak
|
|
|
|
[#19]
Sanded and painted a drywall patch in my wall where I discovered an unanticipated piece of bracing while installing speakers
|
|
|
|
[#20]
Installed a touch screen lock. Pretty easy, but I did have to chisel out and deepen the mortise in the door frame in order to fit the reinforcement plate and longer bolt that keeps it a Grade 1 lock.
I'm going to install the other one tomorrow. $200 each. Century Style Schlage Connect™ Touchscreen Deadbolt |
|
|
|
[#21]
Tackled the hack job electrical wiring in my garage.
Replaced two electrical outlets. They crumbled into pieces as I pulled them from the box. Installed 4 new 4ft LED overhead lights. Opened the junction boxes to wire in the lights. Found out the previous owner had soldered and taped all of the connections. Wow. Cut all of the connections and wire nutted them together. Now the garage is bright enough to do surgery in. |
|
|
|
[#22]
Quoted:
Tackled the hack job electrical wiring in my garage. Replaced two electrical outlets. They crumbled into pieces as I pulled them from the box. Installed 4 new 4ft LED overhead lights. Opened the junction boxes to wire in the lights. Found out the previous owner had soldered and taped all of the connections. Wow. Cut all of the connections and wire nutted them together. Now the garage is bright enough to do surgery in. Info on the worklights? |
|
|
|
[#23]
Worked on my father's old toro snowblower. Cleaned and lubed everything and ordered a new carb for it for $15.00. |
|
|
|
[#24]
Quoted:
Info on the worklights? Quoted:
Quoted:
Tackled the hack job electrical wiring in my garage. Replaced two electrical outlets. They crumbled into pieces as I pulled them from the box. Installed 4 new 4ft LED overhead lights. Opened the junction boxes to wire in the lights. Found out the previous owner had soldered and taped all of the connections. Wow. Cut all of the connections and wire nutted them together. Now the garage is bright enough to do surgery in. Info on the worklights? Cheapo Lowes. We'll see how long they last. I cant run florecents due to temperature extremes. http://m.lowes.com/pd/Utilitech-LED-Strip-Light-Common-4-ft-Actual-4-ft/50277251 |
|
|
|
[#25]
Started installing a generator transfer switch for my shop, got stalled by waiting for paint to dry for the mounting pad for the exterior connection box.
So I shifted and started insulating the shop ceiling so I can get the attic decking secured and the stairs in. |
|
|
|
[#26]
Quoted: Cheapo Lowes. We'll see how long they last. I cant run florecents due to temperature extremes. http://m.lowes.com/pd/Utilitech-LED-Strip-Light-Common-4-ft-Actual-4-ft/50277251 Quoted: Quoted: Quoted: Tackled the hack job electrical wiring in my garage. Replaced two electrical outlets. They crumbled into pieces as I pulled them from the box. Installed 4 new 4ft LED overhead lights. Opened the junction boxes to wire in the lights. Found out the previous owner had soldered and taped all of the connections. Wow. Cut all of the connections and wire nutted them together. Now the garage is bright enough to do surgery in. Info on the worklights? Cheapo Lowes. We'll see how long they last. I cant run florecents due to temperature extremes. http://m.lowes.com/pd/Utilitech-LED-Strip-Light-Common-4-ft-Actual-4-ft/50277251 |
|
|
|
[#27]
had to swap in a new alternator on the jeep

today the VW Bug needs its clutch pedal and cable replaced
and I cleaned out the gutters. |
|
|
|
[#28]
Quoted:
How are they working so far? I really need more lighting in my garage and those look pretty good. Quoted:
Quoted:
Quoted:
Quoted:
Tackled the hack job electrical wiring in my garage. Replaced two electrical outlets. They crumbled into pieces as I pulled them from the box. Installed 4 new 4ft LED overhead lights. Opened the junction boxes to wire in the lights. Found out the previous owner had soldered and taped all of the connections. Wow. Cut all of the connections and wire nutted them together. Now the garage is bright enough to do surgery in. Info on the worklights? Cheapo Lowes. We'll see how long they last. I cant run florecents due to temperature extremes. http://m.lowes.com/pd/Utilitech-LED-Strip-Light-Common-4-ft-Actual-4-ft/50277251 No issues to report. No annoying flickering like the florecent fixtures. No bulbs to shatter or replace. Works in the cold. I would say its much brighter than a florescent fixture of its size. I bet in a couple of years, LEDs will completley push out florescent lighting. Would probably be too bright for anything but shop or garage usage. |
|
|
|
[#29]
Cut though 1 inch of 2-coat plaster and stripped the teeth of a bi-metal blade in about 18 inches.
It is in a kitchen so the base coat is probably Keens plaster with a decent amount of sand. It makes a very hard and moisture resistant plaster. I found a new 8-inch carbide grit blade in the metal Sawzall box and used it for the rest of the cuts. Grit still feels new after about 48 inches of cut. The holes are for a new dual fuel range and a vent hood. I finally stopped when I could not find my shingle ripper. The exterior blower needs a cleared area of about 18 in. x 29 in. on the roof. I moved about one year ago and cannot find my ripper. For $21 I ordered a new one but it will not be delivered till Wednesday. No one had one locally. I want to get the roof work done before it gets any colder. |
|
|
|
[#30]
Quoted:
Cheapo Lowes. We'll see how long they last. I cant run florecents due to temperature extremes. http://m.lowes.com/pd/Utilitech-LED-Strip-Light-Common-4-ft-Actual-4-ft/50277251 Quoted:
Quoted:
Quoted:
Tackled the hack job electrical wiring in my garage. Replaced two electrical outlets. They crumbled into pieces as I pulled them from the box. Installed 4 new 4ft LED overhead lights. Opened the junction boxes to wire in the lights. Found out the previous owner had soldered and taped all of the connections. Wow. Cut all of the connections and wire nutted them together. Now the garage is bright enough to do surgery in. Info on the worklights? Cheapo Lowes. We'll see how long they last. I cant run florecents due to temperature extremes. http://m.lowes.com/pd/Utilitech-LED-Strip-Light-Common-4-ft-Actual-4-ft/50277251 Thanks, I've eyed them in the past. I'll be interested to hear how they hold up. My work bench is under the garage stairs so I end up working in my own shadow too often. |
|
|
|
[#31]
I had to go to buy new rolls of cambric tape and rubber tape for covering split bolts.
And no, you cannot just bury them in vinyl tape, no matter what a drone in Blows or Eveil Orange tries to tell you. No one had any mechanical fasteners for #8. Even a supply house. My cambric and rubber was so dried out it broke when I started to unroll it. I went further into the rolls and then gave up. The cement layer had pretty much dried and set up. It has been a lot of years though. |
|
|
|
[#32]
Insulated the ceiling in my shop.
Ran the wiring for the fire sensors. And added a generator interlock and power port for generator operation. |
|
|
|
[#33]
Quoted:
Insulated the ceiling in my shop. Ran the wiring for the fire sensors. And added a generator interlock and power port for generator operation. I'm currently replacing the floors in two rooms. I don't have any "before" pictures and likely would not post them anyway because the condition disgusted me too much. It wasn't me or my wife that let it get that bad but it is on us to fix it. The home is a manufactured home on pier and beam foundation with particle board flooring. In case you are not familiar with manufactured homes or trailer homes (I wasn't), they have a tarp-like fabric (the moisture barrier) and insulation under the joists that contain the plumbing and ductwork. Seems like a decent idea for getting through the winters without damage to the plumbing or excessive heat loss through the ductwork but critters like mice and rats find it to be an awesome place to live. They can chew through the moisture barrier easily and have a winter home. When I tore out the subfloor, I saw insulation that was absolutely coated with rat crap. Naturally, that meant I had to get rid of the moisture barrier and old insulation and redo it in a less rat-friendly way. Since we live in climate zone 2, which has only a month or so of cold temperatures each year I decided to put 1/8" hardware cloth under the joists and lay R19 insulation on top of it. The hardware cloth serves two purposes--it makes critter access more difficult and provides ventilation to get rid of any moisture that ends up in the insulation. Here is a picture after I put the blocking and screen in. 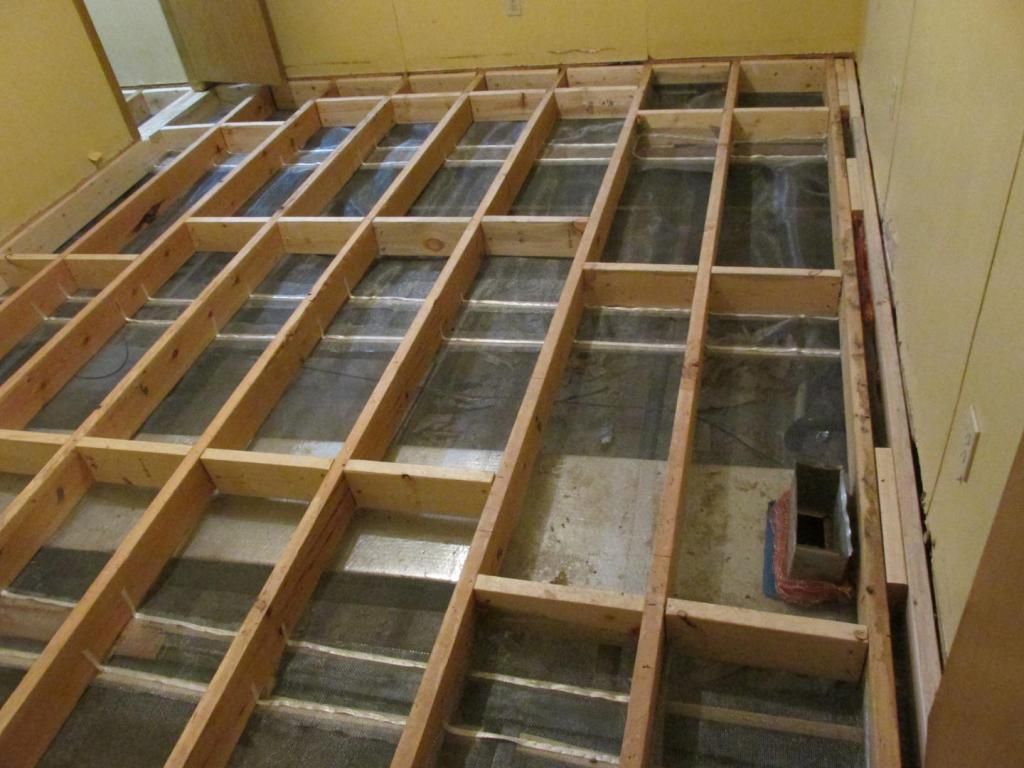
Notice the copper mesh around the base of the floor duct. I cannot verify it but I have read that rats really hate that stuff and will not chew through it because of the taste. Here is a closer shot: 
The widest hardware cloth I could find was 48" so I had to do several rows of it and seal the overlap somehow. I also had some steel I-beams that I had to butt the screen against and somehow seal off. I did the sealing using 1x2 furring strips screwed into the bottom of the joists after the screen was in place. I then stapled the screen to the furring strips from above using a pneumatic stapler. To make extra sure with the I-beam, I overlaid screen across the I-beam from above and stapled to the furring strips. If you look carefully you can see that the staples are applied through some package strapping. That prevents the staple from ripping the screen if it over-penetrates. 
After the screen was in place I put plenty of rat poison on top and then laid insulation on top of it: 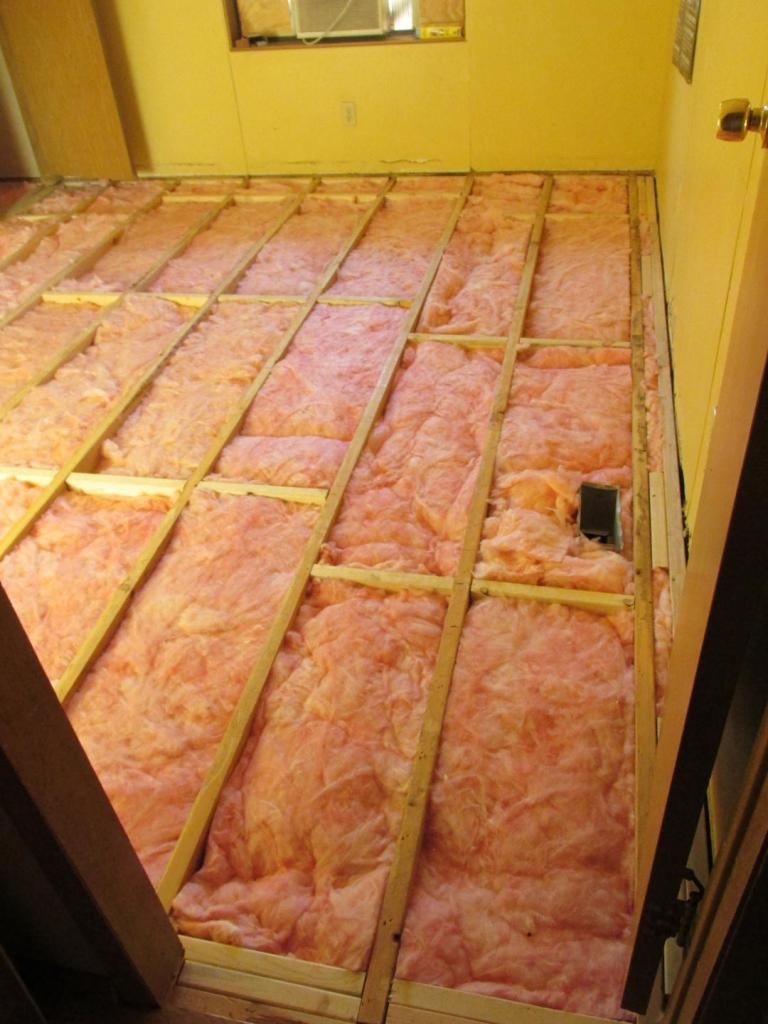
Looks like I forgot to get pictures of the 3/4" plywood subflooring but you can see from the positions of the blocking that I staggered the seams. I also made sure that the required 1/8" expansion gap was maintained between sheets. I attached the subfloor with deck screws, 6" OC along the edges (all edges are supported) and 12" OC along joists under the field of each sheet. I don't have pictures yet but I applied 1/4" sanded plywood underlay over the subfloor and put it in place with a pneumatic stapler--no expansion joints other than 1/8" to 1/4" around the perimeter and staples at 2" OC along sheet edges and 4" OC in the field. I will get pictures and update this post. When I started on the laminate flooring it was dark outside, where I was doing the cutting so I called it a day. Since it would be a couple of weeks before I put the laminate flooring in I covered the underlayment with Ram Board, which is thin cardboard that comes in rolls that is made to protect flooring, so the room is usable before I install the laminate. The work is hard and has involved spending a lot of time in the crawl space, which is a dusty, dirty, rat-crap filled slice of hell. It's worth it, though, because it makes my wife's life better. I know this is not GD, but here's a pic: 
Definitely worth it. BTW, I figured out a far easier way to install the hardware cloth and will post pics when I do the next room. |
|
|
|
[#34]
External ventilator installed on roof.
10 inch 90 degree ell and 60 inch straight 10 inch on order. Vent hood is in sight. |
|
|
|
[#35]
Had 8 yards of topsoil delivered.
Spent the afternoon spreading it out for a new bed. Shoveling 8 yards of soil in 30 degrees sure keeps you warm! |
|
|
|
[#36]
Quoted:
I'm currently replacing the floors in two rooms. I don't have any "before" pictures and likely would not post them anyway because the condition disgusted me too much. It wasn't me or my wife that let it get that bad but it is on us to fix it. The home is a manufactured home on pier and beam foundation with particle board flooring. In case you are not familiar with manufactured homes or trailer homes (I wasn't), they have a tarp-like fabric (the moisture barrier) and insulation under the joists that contain the plumbing and ductwork. Seems like a decent idea for getting through the winters without damage to the plumbing or excessive heat loss through the ductwork but critters like mice and rats find it to be an awesome place to live. They can chew through the moisture barrier easily and have a winter home. When I tore out the subfloor, I saw insulation that was absolutely coated with rat crap. Naturally, that meant I had to get rid of the moisture barrier and old insulation and redo it in a less rat-friendly way. Since we live in climate zone 2, which has only a month or so of cold temperatures each year I decided to put 1/8" hardware cloth under the joists and lay R19 insulation on top of it. The hardware cloth serves two purposes--it makes critter access more difficult and provides ventilation to get rid of any moisture that ends up in the insulation. The work is hard and has involved spending a lot of time in the crawl space, which is a dusty, dirty, rat-crap filled slice of hell. It's worth it, though, because it makes my wife's life better. I know this is not GD, but here's a pic: http://i1292.photobucket.com/albums/b563/Liktur_Titzoff/k_zps96ad6947.jpg Definitely worth it. BTW, I figured out a far easier way to install the hardware cloth and will post pics when I do the next room. Quoted:
Quoted:
Insulated the ceiling in my shop. Ran the wiring for the fire sensors. And added a generator interlock and power port for generator operation. I'm currently replacing the floors in two rooms. I don't have any "before" pictures and likely would not post them anyway because the condition disgusted me too much. It wasn't me or my wife that let it get that bad but it is on us to fix it. The home is a manufactured home on pier and beam foundation with particle board flooring. In case you are not familiar with manufactured homes or trailer homes (I wasn't), they have a tarp-like fabric (the moisture barrier) and insulation under the joists that contain the plumbing and ductwork. Seems like a decent idea for getting through the winters without damage to the plumbing or excessive heat loss through the ductwork but critters like mice and rats find it to be an awesome place to live. They can chew through the moisture barrier easily and have a winter home. When I tore out the subfloor, I saw insulation that was absolutely coated with rat crap. Naturally, that meant I had to get rid of the moisture barrier and old insulation and redo it in a less rat-friendly way. Since we live in climate zone 2, which has only a month or so of cold temperatures each year I decided to put 1/8" hardware cloth under the joists and lay R19 insulation on top of it. The hardware cloth serves two purposes--it makes critter access more difficult and provides ventilation to get rid of any moisture that ends up in the insulation. The work is hard and has involved spending a lot of time in the crawl space, which is a dusty, dirty, rat-crap filled slice of hell. It's worth it, though, because it makes my wife's life better. I know this is not GD, but here's a pic: http://i1292.photobucket.com/albums/b563/Liktur_Titzoff/k_zps96ad6947.jpg Definitely worth it. BTW, I figured out a far easier way to install the hardware cloth and will post pics when I do the next room. Looks nice. Definitely a lot more work than I had. I started closing up the shop walls.insulation, then drywall for a fire barrier topped with plywood. Doing a little bit each day after work or on the weekend, In between the honey-do yard projects.
|
|
|
|
[#37]
finished my welding table and put up some new lights in my garage .
|
|
|
|
[#38]
Built a storage/charging station for all my cordless tools.
Just have not mounted it to the shed wall yet. 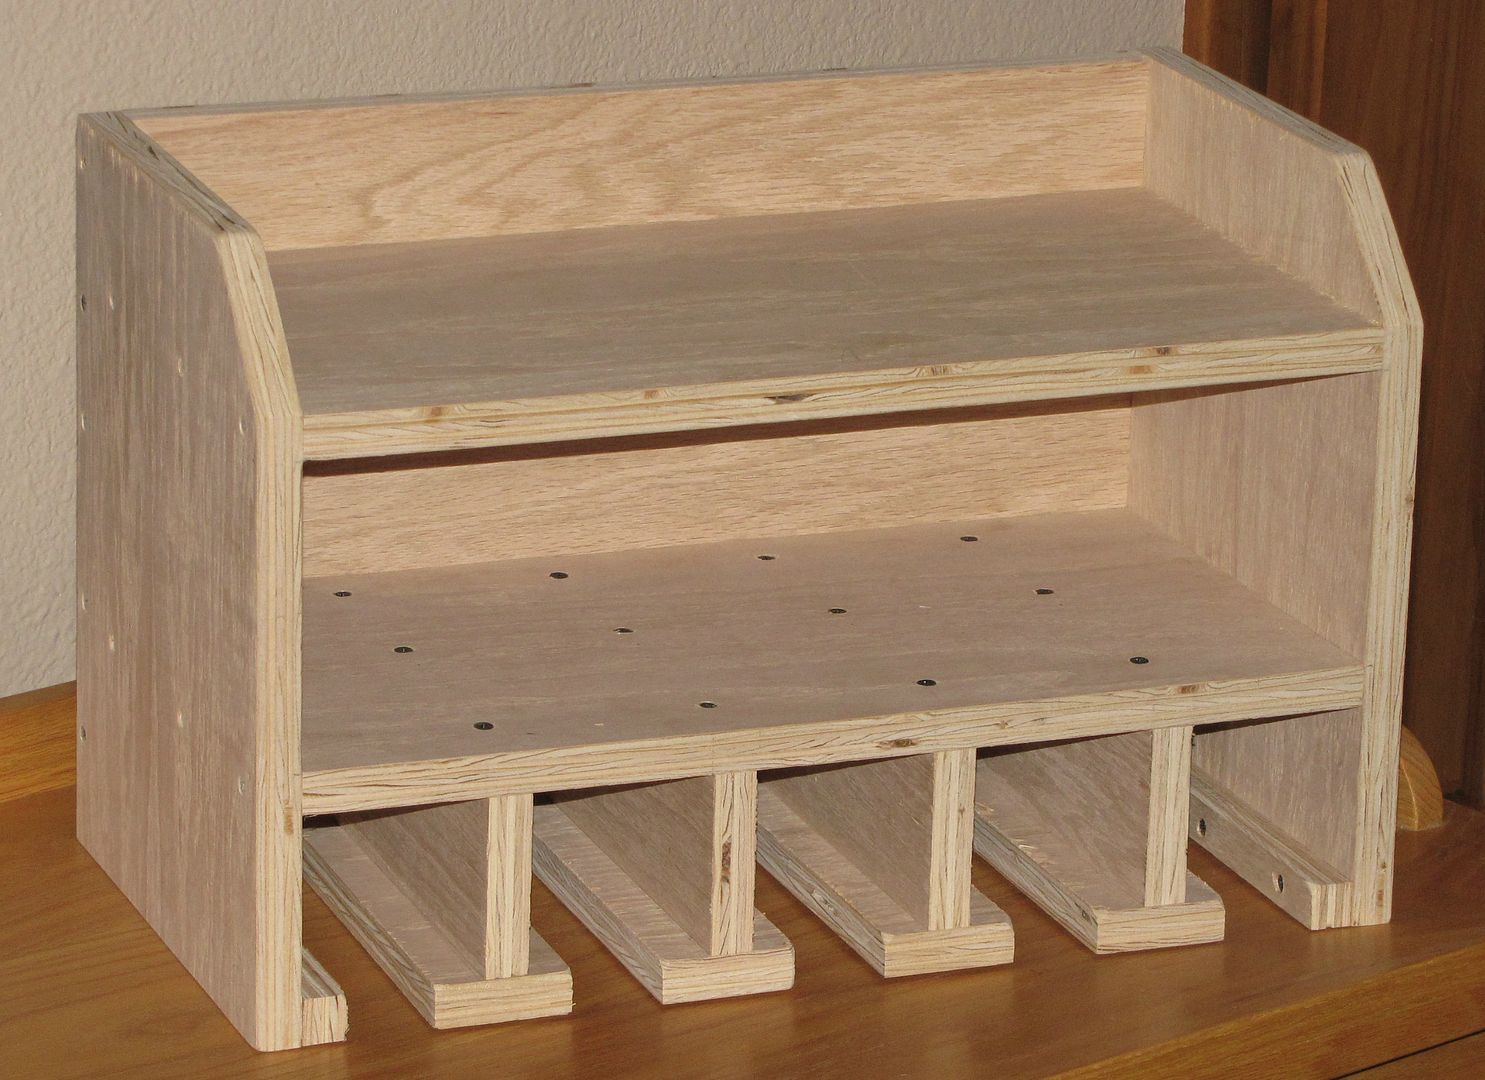
|
|
|
|
[#39]
Quoted:
Built a storage/charging station for all my cordless tools. Just have not mounted it to the shed wall yet. http://i40.photobucket.com/albums/e248/hk45shooter/IMG_0663_zps08319c81.jpg Nice looking! Pics mounted or it didn't happen! |
|
|
|
[#40]
Starting to plumb the shop for air.
|
|
|
|
[#41]
Quoted:
Nice looking! Pics mounted or it didn't happen! Quoted:
Quoted:
Built a storage/charging station for all my cordless tools. Just have not mounted it to the shed wall yet. http://i40.photobucket.com/albums/e248/hk45shooter/IMG_0663_zps08319c81.jpg Nice looking! Pics mounted or it didn't happen! +1! That's a beautiful piece of work. 
|
|
|
|
[#42]
I fixed a clog last night. Not just any clog. A clog caused by a broken DWV joint in a crawlspace. While fixing it, I saw that the downstream joint was weak so I fixed it too.
Pulling out the clog from the end of the upstream pipe was easy but the result was some above average foulness. Would have been a piece of cake if there was more room but in a 2 ft. crawlspace, "piece of cake" tasks are rare. Link instead of embedded pic in weak attempt to keep it classy. |
|
|
|
[#43]
Fixed our "Zone 1" heat pump today (Rheem Classic 10-Seer, circa 2002). It's the systems that cools/heats our "bonus room" that our son uses as his "young man-cave."
Last week, I notice that the fan wasn't kicking on on the outdoor unit like it usually does, so I popped the cover off to take a look. First thing I saw was that the capacitor was rusted very badly. Also, the contactor was in bad shape. I made a quick call to an HVAC contractor friend of mine who gave me some other things to check. After testing what he suggested I test, I found that the defrost control board was shot. Since everything under the hood was in such sorry shape due to age and the elements, I decided to replace all of it. I ordered the parts from an on-line place that's only about 15-miles from here. They don't allow pick-up, but with Priority Mail it would be here in a couple of days. It's been fairly warm for this time of year, so no worries. Capacitor: $19 Contactor: $30 Control Bd: $54 Total: $103 Took a total of approx. 1-1/2 hours to change everything out, including cleaning everything up (leaves, cocoons, dead bugs, etc.), put new weather stripping around the box that the controls live in to seal out the bugs, leaves, and moisture, and neatened up all of the wiring, which looked like a rat's nest. Son has his heat back, I learned a thing or two about HVAC, and I probably saved the family about 7 or 8 hundred bucks. Win-win-win. |
|
|
|
[#44]
Had a leaky faucet in the kitchen. Replaced it. Under hung sinks and granite counters made it a pain in the ass.
|
|
|
|
[#45]
Quoted:
Starting to plumb the shop for air. Whatcha using? |
|
|
|
[#46]
Quoted:
Whatcha using? Quoted:
Quoted:
Starting to plumb the shop for air. Whatcha using? L type 1/2" copper for the drops for the tool dusting guns and the assembly area for nailers. I haven't decided if I should upsize the main header line or not. I don't plan on any high CFM uses, but I may want a larger drop to future proof, so I'll want a larger header to that one. I just need to get the first few drops in so I can finish closing up the walls in that section of the shop. |
|
|
|
[#47]
I cleaned and did laundry

|
|
|
|
[#48]
Quoted:
+1! That's a beautiful piece of work.
Quoted:
Quoted:
Quoted:
Built a storage/charging station for all my cordless tools. Just have not mounted it to the shed wall yet. http://i40.photobucket.com/albums/e248/hk45shooter/IMG_0663_zps08319c81.jpg Nice looking! Pics mounted or it didn't happen! +1! That's a beautiful piece of work.
Thanks guys! It was really pretty easy to do. These are the plans, with some modifications & deletions on my part: http://www.hertoolbelt.com/cordless-drill-storage-charging-station/ (FWIW the site is just the result of my Google search query. Mounting it to the wall will be later. It is too cold to work in the shed this week. I am insulating it & putting up plywood & pegboard. |
|
|
|
[#49]
Made some wooden boxes to store my powder and primers.
|
|
|
|
[#50]
|
|
|
 Win a FREE Membership!
Sign up for the ARFCOM weekly newsletter and be entered to win a free ARFCOM membership. One new winner* is announced every week!
You will receive an email every Friday morning featuring the latest chatter from the hottest topics, breaking news surrounding legislation, as well as exclusive deals only available to ARFCOM email subscribers.

AR15.COM is the world's largest firearm community and is a gathering place for firearm enthusiasts of all types.
From hunters and military members, to competition shooters and general firearm enthusiasts, we welcome anyone who values and respects the way of the firearm.

Subscribe to our monthly Newsletter to receive firearm news, product discounts from your favorite Industry Partners, and more.
Copyright © 1996-2024 AR15.COM LLC. All Rights Reserved.
Any use of this content without express written consent is prohibited.
AR15.Com reserves the right to overwrite or replace any affiliate, commercial, or monetizable links, posted by users, with our own.


