|
[#1]
Need to read this forum more often...
Moved a bunch of firewood from the collapsed pile the former owners left to the metal rack under the screened in porch. Also put vinyl interlocking flooring in 3/4s of what will be the gunroom once I get it finished. That'll also mean 80% of my basement will be "finished". Then comes the cabinets, wiring, paint, etc. |
|
|
|
[#2]
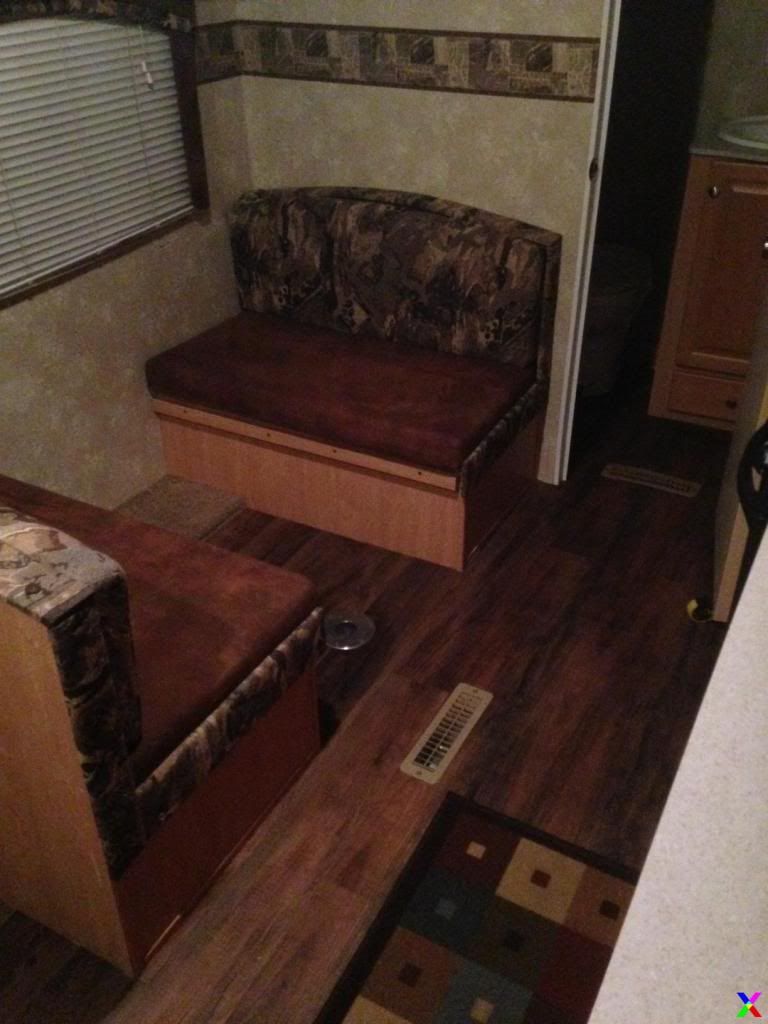
Installed fake wood floors (Vinyl Plank) in the RV.
|
|
|
|
[#3]
I just cleaned the HVAC filter in preperation of the cold weather coming our way tonight.
|
|
|
|
[#4]
I started a new project...I bought a house
|
|
|
|
[#5]
Almost finished installing the railing on the 16'x20' deck I built.
|
|
|
|
[#6]
Quoted:
I started a new project...I bought a house So...where are the pics???? |
|
|
|
[#7]
Turned this

Into this 
|
|
|
|
[#8]
Changed the oil in my small generator that I use to provide electricity for my shop on my property (no grid power connected yet). It ran good but I decided to pull the carb and check it and also spray it out with carb cleaner. Pulled the carb and, except for a tiny amount of grit in the float bowel, it looked perfect. It only runs on ethanol gas and has sat for months on end from time to time. The generator has about 200 hours or so on it with NO maintenance other than oil changes. Replaced the spark plug too while I was at it.
It doesn't really run any better than it did but at least I know it's been serviced! |
|
|
|
[#9]
Quoted:
Changed the oil in my small generator that I use to provide electricity for my shop on my property (no grid power connected yet). It ran good but I decided to pull the carb and check it and also spray it out with carb cleaner. Pulled the carb and, except for a tiny amount of grit in the float bowel, it looked perfect. It only runs on ethanol gas and has sat for months on end from time to time. The generator has about 200 hours or so on it with NO maintenance other than oil changes. Replaced the spark plug too while I was at it. It doesn't really run any better than it did but at least I know it's been serviced! Good to hear its done so well with little maintenance.. (I just bought one about a month ago). what make Honda / Yamaha, other ? |
|
|
|
[#10]
Not today, but this past weekend re-did my bathroom. New paint and fixtures.
|
|
|
|
[#11]
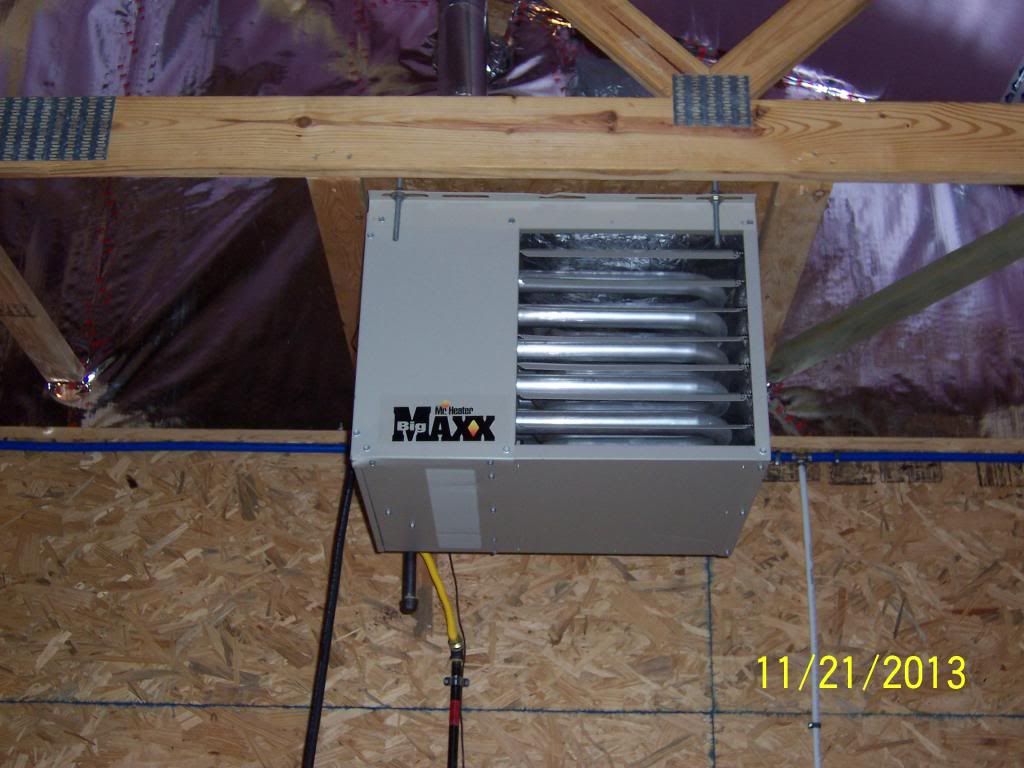
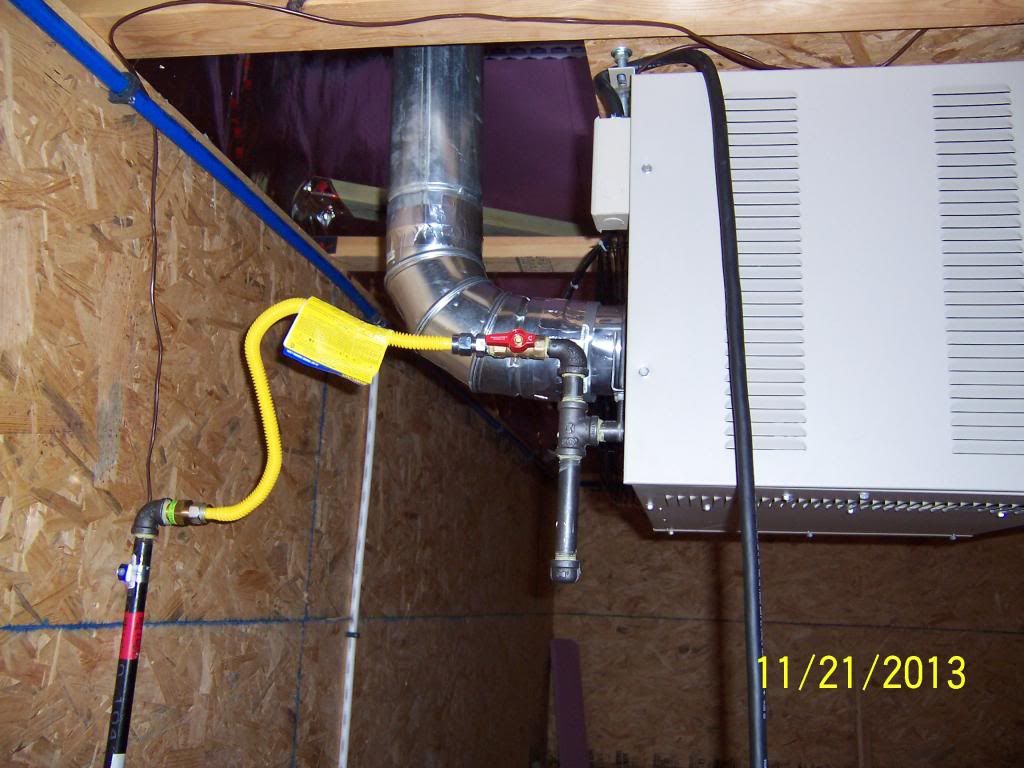
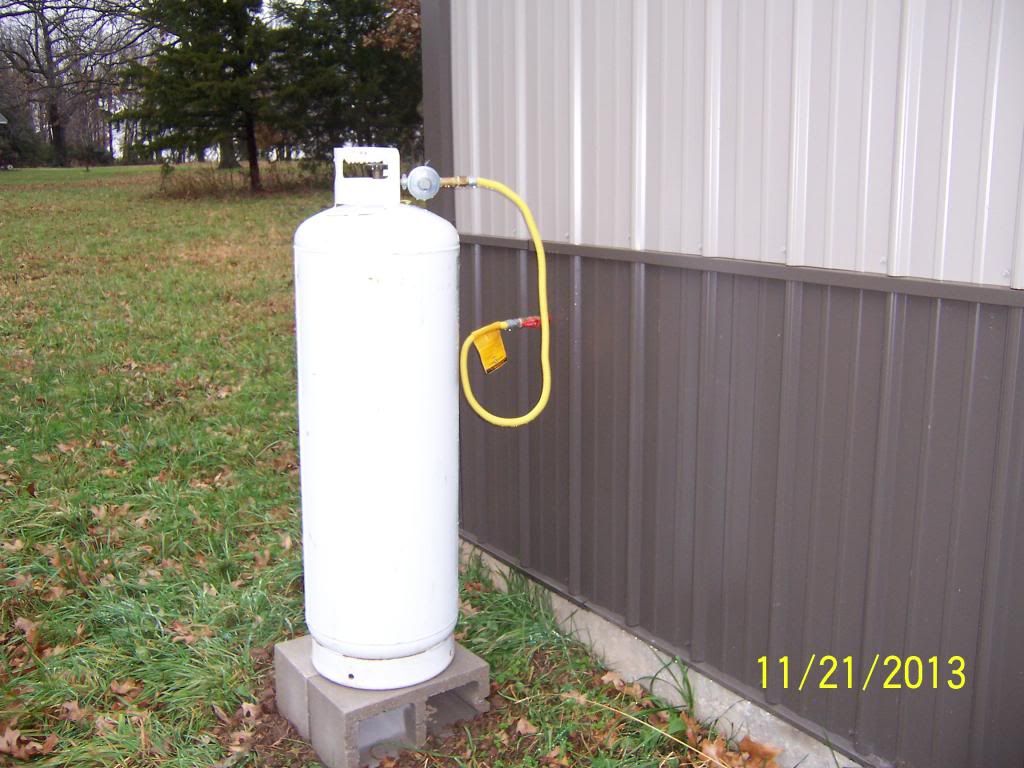
Finished up my shop building Big Maxx heater installation. Works great. Shop building is 30x40. The heater is 80k BTU. Works great. Currently feeding it from a 100 lb tank but plan to one day get a bigger tank.
|
|
|
|
[#12]
Quoted:
Good to hear its done so well with little maintenance.. (I just bought one about a month ago). what make Honda / Yamaha, other ? Quoted:
Quoted:
Changed the oil in my small generator that I use to provide electricity for my shop on my property (no grid power connected yet). It ran good but I decided to pull the carb and check it and also spray it out with carb cleaner. Pulled the carb and, except for a tiny amount of grit in the float bowel, it looked perfect. It only runs on ethanol gas and has sat for months on end from time to time. The generator has about 200 hours or so on it with NO maintenance other than oil changes. Replaced the spark plug too while I was at it. It doesn't really run any better than it did but at least I know it's been serviced! Good to hear its done so well with little maintenance.. (I just bought one about a month ago). what make Honda / Yamaha, other ? It's just a cheap Coleman 1800 watt generator. |
|
|
|
[#13]

|
|
|
|
[#14]
Built a frame for the front porch decorations. Needed it out of the garage so we put it up a tad early.

|
|
|
|
[#15]
My wife and I are trying to get our small, older house ready to sell. One of the tasks on the "To Do List" was to put in new kitchen countertops. She's been wanting new countertops for years, but we always thought it would be fairly expensive and we had planned on having Lowes, etc. do the installation as, frankly, it scared me.
 Well, while browsing Lowes a couple of weeks ago we learned that they have a few styles of laminate in various pre-cut lengths in the back of the store. The girl told us the price and we were thinking We bought a new stainless steel sink as well, got a few various tools to go along with it all and I watched a bunch of YouTube videos on the process. Looked pretty straightforward. We started the first half of the kitchen yesterday. Wanted to do it first since I wouldn't have to mess with the plumbing on the sink. Thought it could be our "trial run," hahaha. We finished it tonight (had to let some mud dry and paint a bit this morning). Went well!! Yes, we know we need a new stove. Before  During  After  |
|
|
|
[#16]
Quoted:
My wife and I are trying to get our small, older house ready to sell. One of the tasks on the "To Do List" was to put in new kitchen countertops. She's been wanting new countertops for years, but we always thought it would be fairly expensive and we had planned on having Lowes, etc. do the installation as, frankly, it scared me.
Well, while browsing Lowes a couple of weeks ago we learned that they have a few styles of laminate in various pre-cut lengths in the back of the store. The girl told us the price and we were thinking We bought a new stainless steel sink as well, got a few various tools to go along with it all and I watched a bunch of YouTube videos on the process. Looked pretty straightforward. We started the first half of the kitchen yesterday. Wanted to do it first since I wouldn't have to mess with the plumbing on the sink. Thought it could be our "trial run," hahaha. We finished it tonight (had to let some mud dry and paint a bit this morning). Went well!! Yes, we know we need a new stove. Before http://i.imgur.com/abakyUj.jpg?1 During http://i.imgur.com/OKFZHaM.jpg?2 After http://i.imgur.com/w51nMsO.jpg?1 Big improvement!!! |
|
|
|
[#17]
I bought some 3 way switches, a 3 gang old construction box, and 960 feet of 12-2. The lady at Lowes working in electrical said "Oh I see your getting my bargain today. Somebody thought it would be a good idea to take 25 feet off a 1k foot spool to sell somebody because we are out of 25 foot rolls."
Next, next pay day, I will buy the new panel box I need and maybe the 4/0 (15-ish feet) wire I need to upgrade my house to 200 amp service. I also need to get a remodel permit 
|
|
|
|
[#18]
Fixed a hole in the fence that the dog squeezed through and I installed a pair of IR floods with photo eye to supplement the IR on my security cameras.
|
|
|
|
[#19]
Quoted:
I bought some 3 way switches, a 3 gang old construction box, and 960 feet of 12-2. The lady at Lowes working in electrical said "Oh I see your getting my bargain today. Somebody thought it would be a good idea to take 25 feet off a 1k foot spool to sell somebody because we are out of 25 foot rolls." Next, next pay day, I will buy the new panel box I need and maybe the 4/0 (15-ish feet) wire I need to upgrade my house to 200 amp service. I also need to get a remodel permit I've been buying things to go in my next house build and storing them. How much was the 12-2 discounted? |
|
|
|
[#20]
Quoted:
I've been buying things to go in my next house build and storing them. How much was the 12-2 discounted? Quoted:
Quoted:
I bought some 3 way switches, a 3 gang old construction box, and 960 feet of 12-2. The lady at Lowes working in electrical said "Oh I see your getting my bargain today. Somebody thought it would be a good idea to take 25 feet off a 1k foot spool to sell somebody because we are out of 25 foot rolls." Next, next pay day, I will buy the new panel box I need and maybe the 4/0 (15-ish feet) wire I need to upgrade my house to 200 amp service. I also need to get a remodel permit I've been buying things to go in my next house build and storing them. How much was the 12-2 discounted? It was $250 instead of $267. A regular 25 foot roll costs $16.47. But the department manager told me they are no longer selling it by the foot and pointed over to the big wire loom they have. I will only use maybe 650-700 feet of this spool. What I will do with it after that I do not know. |
|
|
|
[#21]
Quoted: My wife and I are trying to get our small, older house ready to sell. One of the tasks on the "To Do List" was to put in new kitchen countertops. She's been wanting new countertops for years, but we always thought it would be fairly expensive and we had planned on having Lowes, etc. do the installation as, frankly, it scared me. Well, while browsing Lowes a couple of weeks ago we learned that they have a few styles of laminate in various pre-cut lengths in the back of the store. The girl told us the price and we were thinking We bought a new stainless steel sink as well, got a few various tools to go along with it all and I watched a bunch of YouTube videos on the process. Looked pretty straightforward. We started the first half of the kitchen yesterday. Wanted to do it first since I wouldn't have to mess with the plumbing on the sink. Thought it could be our "trial run," hahaha. We finished it tonight (had to let some mud dry and paint a bit this morning). Went well!! Yes, we know we need a new stove. Before During After We just finished a couple hours ago. Well, we're 98% finished. Still have some trim to put back up, some touch up painting, light switch plates to mount, and some caulking to finish. Ugh...the caulking. The walls, of course, were not perfectly straight, so we had some gaps in areas behind the backsplash and along the sides that we had to work with. Used a metric ton of shims to fill the gaps as best we could, so one more layer of caulk should have it done. Also, this side never had a full-length counter to begin with. When we bought the house the washing machine was in the kitchen. We had that moved to the garage and a dishwasher installed; I rigged up a piece of wood as a "make-shift" counter for the last several years. This side was definitely a pain in the ass because it was so much heavier and awkward, but not really all that difficult. It was painfully obvious once the sink/disposal were installed that none of the drain lines had a hope of lining up. Took a couple of trips to Ace Hardware before I BARELY got it to fit. Anyway, after both sides of the kitchen countertops, a new sink and materials, we probably had about $250-300 invested. Also have to mention that my sammich maker was the best assistant through all of this! Before  During  Test fit pre-sink  After  |
|
|
|
[#22]
Quoted: Following up with the other half of the kitchen! Quoted: Quoted: We just finished a couple hours ago. Well, we're 98% finished. Still have some trim to put back up, some touch up painting, light switch plates to mount, and some caulking to finish. Ugh...the caulking. The walls, of course, were not perfectly straight, so we had some gaps in areas behind the backsplash and along the sides that we had to work with. Used a metric ton of shims to fill the gaps as best we could, so one more layer of caulk should have it done. Also, this side never had a full-length counter to begin with. When we bought the house the washing machine was in the kitchen. We had that moved to the garage and a dishwasher installed; I rigged up a piece of wood as a "make-shift" counter for the last several years. This side was definitely a pain in the ass because it was so much heavier and awkward, but not really all that difficult. It was painfully obvious once the sink/disposal were installed that none of the drain lines had a hope of lining up. Took a couple of trips to Ace Hardware before I BARELY got it to fit. Anyway, after both sides of the kitchen countertops, a new sink and materials, we probably had about $250-300 invested. Also have to mention that my sammich maker was the best assistant through all of this! Before During Test fit pre-sink After It looks good! |
|
|
|
[#23]
We hung 3 more sheets of attic foil yesterday. Eventually we'll get it finished...
|
|
|
|
[#24]
Quoted: We just finished a couple hours ago. Well, we're 98% finished. Still have some trim to put back up, some touch up painting, light switch plates to mount, and some caulking to finish. Ugh...the caulking. The walls, of course, were not perfectly straight, so we had some gaps in areas behind the backsplash and along the sides that we had to work with. Used a metric ton of shims to fill the gaps as best we could, so one more layer of caulk should have it done. Also, this side never had a full-length counter to begin with. When we bought the house the washing machine was in the kitchen. We had that moved to the garage and a dishwasher installed; I rigged up a piece of wood as a "make-shift" counter for the last several years. Quoted: Quoted: Quoted: We just finished a couple hours ago. Well, we're 98% finished. Still have some trim to put back up, some touch up painting, light switch plates to mount, and some caulking to finish. Ugh...the caulking. The walls, of course, were not perfectly straight, so we had some gaps in areas behind the backsplash and along the sides that we had to work with. Used a metric ton of shims to fill the gaps as best we could, so one more layer of caulk should have it done. Also, this side never had a full-length counter to begin with. When we bought the house the washing machine was in the kitchen. We had that moved to the garage and a dishwasher installed; I rigged up a piece of wood as a "make-shift" counter for the last several years. This side was definitely a pain in the ass because it was so much heavier and awkward, but not really all that difficult. It was painfully obvious once the sink/disposal were installed that none of the drain lines had a hope of lining up. Took a couple of trips to Ace Hardware before I BARELY got it to fit. Anyway, after both sides of the kitchen countertops, a new sink and materials, we probably had about $250-300 invested. Also have to mention that my sammich maker was the best assistant through all of this! Before During Test fit pre-sink After It looks good! Question for you guys in the know: I put silicone around the underside of the sink before it was put in place, but should I put another ring around the edge on the surface, too? I did not see any silicone seep out once the sink was snapped into place, which is my reason for asking. |
|
|
|
[#25]
Quoted:
This side was definitely a pain in the ass because it was so much heavier and awkward, but not really all that difficult. It was painfully obvious once the sink/disposal were installed that none of the drain lines had a hope of lining up. Took a couple of trips to Ace Hardware before I BARELY got it to fit. Anyway, after both sides of the kitchen countertops, a new sink and materials, we probably had about $250-300 invested. Also have to mention that my sammich maker was the best assistant through all of this! Before http://i.imgur.com/oNUo0tB.jpg?1 During http://i.imgur.com/57rH9R9.jpg?1 Test fit pre-sink http://i.imgur.com/QmUsLJq.jpg?1 After http://i.imgur.com/LxoIJ0t.jpg?1 It looks good! Thanks! Question for you guys in the know: I put silicone around the underside of the sink before it was put in place, but should I put another ring around the edge on the surface, too? I did not see any silicone seep out once the sink was snapped into place, which is my reason for asking. Quoted:
Quoted:
Quoted:
Quoted:
This side was definitely a pain in the ass because it was so much heavier and awkward, but not really all that difficult. It was painfully obvious once the sink/disposal were installed that none of the drain lines had a hope of lining up. Took a couple of trips to Ace Hardware before I BARELY got it to fit. Anyway, after both sides of the kitchen countertops, a new sink and materials, we probably had about $250-300 invested. Also have to mention that my sammich maker was the best assistant through all of this! Before http://i.imgur.com/oNUo0tB.jpg?1 During http://i.imgur.com/57rH9R9.jpg?1 Test fit pre-sink http://i.imgur.com/QmUsLJq.jpg?1 After http://i.imgur.com/LxoIJ0t.jpg?1 It looks good! Thanks! Question for you guys in the know: I put silicone around the underside of the sink before it was put in place, but should I put another ring around the edge on the surface, too? I did not see any silicone seep out once the sink was snapped into place, which is my reason for asking. I am pretty sure you would run a bead of tub and tile type caulk around the perimeter of the sink. This will keep: dirt / grime and food particales as well as water from seaping into the sink / countertop joint ( which would eventually look like hammered dog shit and be a health hazard I think ) |
|
|
|
[#26]
Quoted: I am pretty sure you would run a bead of tub and tile type caulk around the perimeter of the sink. This will keep: dirt / grime and food particales as well as water from seaping into the sink / countertop joint ( which would eventually look like hammered dog shit and be a health hazard I think ) Quoted: Quoted: Quoted: Quoted: Quoted: This side was definitely a pain in the ass because it was so much heavier and awkward, but not really all that difficult. It was painfully obvious once the sink/disposal were installed that none of the drain lines had a hope of lining up. Took a couple of trips to Ace Hardware before I BARELY got it to fit. Anyway, after both sides of the kitchen countertops, a new sink and materials, we probably had about $250-300 invested. Also have to mention that my sammich maker was the best assistant through all of this! Before http://i.imgur.com/oNUo0tB.jpg?1 During http://i.imgur.com/57rH9R9.jpg?1 Test fit pre-sink http://i.imgur.com/QmUsLJq.jpg?1 After http://i.imgur.com/LxoIJ0t.jpg?1 It looks good! Thanks! Question for you guys in the know: I put silicone around the underside of the sink before it was put in place, but should I put another ring around the edge on the surface, too? I did not see any silicone seep out once the sink was snapped into place, which is my reason for asking. I am pretty sure you would run a bead of tub and tile type caulk around the perimeter of the sink. This will keep: dirt / grime and food particales as well as water from seaping into the sink / countertop joint ( which would eventually look like hammered dog shit and be a health hazard I think ) |
|
|
|
[#27]
I don't run an extra bead of caulk around the sink. I just put it on the sink before installing it. Then, wipe off the excess and it's done.
|
|
|
|
[#28]
Quoted: I don't run an extra bead of caulk around the sink. I just put it on the sink before installing it. Then, wipe off the excess and it's done. |
|
|
|
[#29]
Installed a few ceiling fans in the house. What a pain.
|
|
|
|
[#30]
Hooked up the basement bathroom and kitchen vents
To the roof vent today. Also installed a hand washing Sink for my wife's basement kitchen. |
|
|
|
[#31]
Cut grass for last time, winterized lawn mowers, ran standby generator and tested transfer switch operation, pulled up old beets and radishes from one garden bed and spread straw mulch over the bare soil. Fed chickens and collected eggs. Sat down and had a beer in the shop.
Posted Via AR15.Com Mobile |
|
|
|
[#32]
Quoted:
Installed a few ceiling fans in the house. What a pain. You didn't get the 5 minute fans? |
|
|
|
[#33]
Quoted:
You didn't get the 5 minute fans? Quoted:
Quoted:
Installed a few ceiling fans in the house. What a pain. You didn't get the 5 minute fans? Did yours come with those bs dimmer/fan speed wireless boxes? Last two I installed did, more work than they're worth since mine was already wired for two switches. I spent the day repairing and cleaning a chainsaw then limbed a few trees. I also finally got the last of the 40 gallons of paint the previous owners left hardened enough for the dump to take. Tore out the broken shelving they left as well. Finally getting the garage under control. Also put up some Christmas lights. |
|
|
|
[#34]
Quoted:
You didn't get the 5 minute fans? Quoted:
Quoted:
Installed a few ceiling fans in the house. What a pain. You didn't get the 5 minute fans? Funny! Took 30 minutes just to unpack. Then of course they had a remote, which requires a few extra steps. The instructions were wrong. Spent an hour trying to figure them out until I went to their website, where the manual had been updates with the proper steps. Then the cheap Chinese crap was falling apart in my hands which required a little ingenuity. But its up and running. |
|
|
|
[#35]
Quoted:
Funny! Took 30 minutes just to unpack. Then of course they had a remote, which requires a few extra steps. The instructions were wrong. Spent an hour trying to figure them out until I went to their website, where the manual had been updates with the proper steps. Then the cheap Chinese crap was falling apart in my hands which required a little ingenuity. But its up and running. Quoted:
Quoted:
Quoted:
Installed a few ceiling fans in the house. What a pain. You didn't get the 5 minute fans? Funny! Took 30 minutes just to unpack. Then of course they had a remote, which requires a few extra steps. The instructions were wrong. Spent an hour trying to figure them out until I went to their website, where the manual had been updates with the proper steps. Then the cheap Chinese crap was falling apart in my hands which required a little ingenuity. But its up and running. What brand are they? I only said 5 minutes because I saw a fan box one time that said "5 minute assembly time". I have installed a few fans myself and know how frustrating they can be. I installed 30 in one year and got it down to about 20-25 minutes from the time I opened the box until I flipped the switch for the light and then tested the fan control. What did I do today around the house? Spent another sea note at lowes, and got my permit from the city. Let the wiring fun begin! |
|
|
|
[#36]
Have 5 pallets from the insulation delivery left and wasn't sure what to do with em. Looked around the internet and people turn then into some pretty cool shit.
Made the SIL a wine rack. 
Dark walnut stain. Should pop on her red dining room wall. 

|
|
|
|
[#37]
^-That looks bad ass! Good job.
|
|
|
|
[#38]
Quoted:
^-That looks bad ass! Good job. Thanks. Gonna make some end tables for the basement with these boards. Probably no stain, just clear. 
|
|
|
|
[#39]
Quoted:
Have 5 pallets from the insulation delivery left and wasn't sure what to do with em. Looked around the internet and people turn then into some pretty cool shit. Made the SIL a wine rack. Links to directions/instructions? |
|
|
|
[#40]
Quoted:
Have 5 pallets from the insulation delivery left and wasn't sure what to do with em. Looked around the internet and people turn then into some pretty cool shit. Made the SIL a wine rack. <a href="http://s530.photobucket.com/user/fireshaun/media/image_zps801533c3.jpg.html" target="_blank">http://i530.photobucket.com/albums/dd343/fireshaun/image_zps801533c3.jpg</a> Dark walnut stain. Should pop on her red dining room wall. <a href="http://s530.photobucket.com/user/fireshaun/media/image_zpsc3b4bae6.jpg.html" target="_blank">http://i530.photobucket.com/albums/dd343/fireshaun/image_zpsc3b4bae6.jpg</a> <a href="http://s530.photobucket.com/user/fireshaun/media/image_zps5b55f988.jpg.html" target="_blank">http://i530.photobucket.com/albums/dd343/fireshaun/image_zps5b55f988.jpg</a> I'm going to make this same rack this week! Run into any issues? |
|
|
|
[#41]
Quoted:
Links to directions/instructions? Quoted:
Quoted:
Have 5 pallets from the insulation delivery left and wasn't sure what to do with em. Looked around the internet and people turn then into some pretty cool shit. Made the SIL a wine rack. Links to directions/instructions? Just went off a picture from google images. Pretty straight forward. I whipped you up some instructions though. Total length is 40" Total height is 12.5" INCLUDING the 3/4" gap left on the bottom for the glass base to have room to slide in. You could even make it 20" and hold 4 glasses and a few bottles of wine if space was tight, just cut them at the 2x4. 
|
|
|
|
[#42]
Quoted:
I'm going to make this same rack this week! Run into any issues? Quoted:
Quoted:
Have 5 pallets from the insulation delivery left and wasn't sure what to do with em. Looked around the internet and people turn then into some pretty cool shit. Made the SIL a wine rack. <a href="http://s530.photobucket.com/user/fireshaun/media/image_zps801533c3.jpg.html" target="_blank">http://i530.photobucket.com/albums/dd343/fireshaun/image_zps801533c3.jpg</a> Dark walnut stain. Should pop on her red dining room wall. <a href="http://s530.photobucket.com/user/fireshaun/media/image_zpsc3b4bae6.jpg.html" target="_blank">http://i530.photobucket.com/albums/dd343/fireshaun/image_zpsc3b4bae6.jpg</a> <a href="http://s530.photobucket.com/user/fireshaun/media/image_zps5b55f988.jpg.html" target="_blank">http://i530.photobucket.com/albums/dd343/fireshaun/image_zps5b55f988.jpg</a> I'm going to make this same rack this week! Run into any issues? Take your time removing the boards. Hardest part of the project. The will split. While this is fine and part of the overall look, i didn't want them to split the length of the board. If you have a sawzall, just use that to cut the nail under the board. I reused all the rusty/ugly nails I pulled out from all the boards to nail in the false bottom. Cost me about $0.50 in stain I had laying around. I removed a board from the backside and moved it to the top of the back. All depends on how you want it to look. The glass stem cutouts are 3/4" wide and I cut them 3/4 of the way through the board. I should have only cut them half way in. Didn't have a chisel so used a flat head and a hammer to clean it up the flat end. Nothing You would really need a heads up on though!!! |
|
|
|
[#43]
End table built. Gonna lightly stain it dark walnut.

ETA: Pics of finished table. I think it came out pretty rustic. Basement is almost finished, just need to make some picture frames and mount the TV. Might make a storage chest/coffee table to match and then I should be GTG. 

|
|
|
|
[#44]
Quoted:
End table built. Gonna lightly stain it dark walnut. <a href="http://s530.photobucket.com/user/fireshaun/media/image_zpse2317146.jpg.html" target="_blank">http://i530.photobucket.com/albums/dd343/fireshaun/image_zpse2317146.jpg</a> ETA: Pics of finished table. I think it came out pretty rustic. Basement is almost finished, just need to make some picture frames and mount the TV. Might make a storage chest/coffee table to match and then I should be GTG. <a href="http://s530.photobucket.com/user/fireshaun/media/image_zps8c31bad1.jpg.html" target="_blank">http://i530.photobucket.com/albums/dd343/fireshaun/image_zps8c31bad1.jpg</a> <a href="http://s530.photobucket.com/user/fireshaun/media/image_zpsc207482c.jpg.html" target="_blank">http://i530.photobucket.com/albums/dd343/fireshaun/image_zpsc207482c.jpg</a> Both of those look amazing. I made a wine glass holder like yours, how are u gonna hand it on the wall? What kind of mounts and such? |
|
|
|
[#45]
Last night I ran new wire in the bathroom. Today I will try and get another one of the bedrooms re-done. Having a 12-4 roof is making the job interesting.
|
|
|
|
[#46]
Quoted:
Both of those look amazing. I made a wine glass holder like yours, how are u gonna hand it on the wall? What kind of mounts and such? Quoted:
Quoted:
End table built. Gonna lightly stain it dark walnut. <a href="http://s530.photobucket.com/user/fireshaun/media/image_zpse2317146.jpg.html" target="_blank">http://i530.photobucket.com/albums/dd343/fireshaun/image_zpse2317146.jpg</a> ETA: Pics of finished table. I think it came out pretty rustic. Basement is almost finished, just need to make some picture frames and mount the TV. Might make a storage chest/coffee table to match and then I should be GTG. <a href="http://s530.photobucket.com/user/fireshaun/media/image_zps8c31bad1.jpg.html" target="_blank">http://i530.photobucket.com/albums/dd343/fireshaun/image_zps8c31bad1.jpg</a> <a href="http://s530.photobucket.com/user/fireshaun/media/image_zpsc207482c.jpg.html" target="_blank">http://i530.photobucket.com/albums/dd343/fireshaun/image_zpsc207482c.jpg</a> Both of those look amazing. I made a wine glass holder like yours, how are u gonna hand it on the wall? What kind of mounts and such? Just used some 1 1/2" black drywall screws through the 1x4's and into the studs. You could use drywall anchors if you need to, just a funny angle on the bottom one but a stubby screw driver would get er done. |
|
|
|
[#47]
Finished wiring the plugs on one wall of my kitchen. So far the re-wiring is going well. Have found 3 hidden junction boxes since I have started. Just need to do the living room, 3rd bedroom, and garage. Then I will be ready for the power company to unhook me while I install the new panel box.

|
|
|
|
[#48]
Built this for my 4 year old for Christmas. Worked on it Sat, Sun, and Mon.
Moved her into a bigger room as well. Painted the room on Mon and laid the carpet down yesterday. Still need to put up some baseboard trim as you can see.
She's happy 
|
|
|
|
[#49]
Must be cool climbing into a house mounted to the cieling!
|
|
|
|
[#50]
Quoted:
Must be cool climbing into a house mounted to the cieling! Is it pic showing up upside down for you or something? |
|
|
 Win a FREE Membership!
Sign up for the ARFCOM weekly newsletter and be entered to win a free ARFCOM membership. One new winner* is announced every week!
You will receive an email every Friday morning featuring the latest chatter from the hottest topics, breaking news surrounding legislation, as well as exclusive deals only available to ARFCOM email subscribers.

AR15.COM is the world's largest firearm community and is a gathering place for firearm enthusiasts of all types.
From hunters and military members, to competition shooters and general firearm enthusiasts, we welcome anyone who values and respects the way of the firearm.

Subscribe to our monthly Newsletter to receive firearm news, product discounts from your favorite Industry Partners, and more.
Copyright © 1996-2024 AR15.COM LLC. All Rights Reserved.
Any use of this content without express written consent is prohibited.
AR15.Com reserves the right to overwrite or replace any affiliate, commercial, or monetizable links, posted by users, with our own.


