|
Posted: 11/16/2015 4:54:10 PM EDT
Ok so my Xterra died, and now I'll need to mount my radio and antenna in a soft top Jeep Wrangler.
My biggest concern is getting the antenna high enough, I'd like it to clear the roof line. Any suggestions? Vehicle in question: 
Thanks! |
|
|
|
[#1]
In case you didn't notice, that Jeep doesn't have a roof line. NMO mount and Antenna at the hood seam, and in about 6-8 inches from the side is a sweet spot.
|
|
|
|
[#2]
Oh it has a roof line - just not a metal roof. I'm looking to get the antenna up for best LOS.
|
|
|
|
[#3]
I drilled the top of the windshield frame and installed an NMO mounting bracket. I'll post pics later.
|
|
|
|
[#4]
I put an L NMO bracket on the back of the 3rd brake light. It worked fairly well. Nothing really works all that well on them. I also have a flat NMO bracket that is sandwiched between the hard top and the edge so the antenna is in the corner behind the roll bar. That works fairly well. Everything is going to be a compromise with no decent ground plane.
|
|
|
|
[#5]
NMO 90* angle mount, ....on rear left corner ( that whip on the right corner, is the top half of a hamstick, took that pic before I put it up for sale )
I had a steel TUFFY center console, designed to mount a DIN car stereo, I dremel'd it to fit an IC-706 Also had an AH-4 auto tuner for a while, but the mud-tire and soft-top noise made HF mobile a real challenge to hear. 

It was a lot of fun, ....but it was also the most unreliable vehicle I've every had. My kids were little when I traded it in, they CRIED when it was gone. Thy loved to climb up the rear wheels and snap into there kid seats. |
|
|
|
[#6]
My Jeep was pretty new when I mounted my FT-7900, so I avoided drilling any holes. A simple sheet metal plate from HRO was re-contoured to bolt under the hood and extend out on the driver's side. The dual band antenna has worked very well in this location.

My FT-7900, and later FT-857 mounts high above the rear view mirror on an aluminum bracket I made which utilizes two of the "footman's loop" mounting holes. 

My Little Tarheel screwdriver is mounted to the rear tailgate with a trunk lip type mount. Have fun! Jim... |
|
|
|
[#7]
My original intent was to through bolt the bracket on the windshield frame but I "temporarily" used sheet metal screws. They are still there.


The bracket does dip under the seal a bit, but it doesn't leak. Not that we get a bunch of rain here. The rear HF mount is half of a stainless CB mirror mount with a 3/8x24 stud. 
Rigs are on a custom overhead shelf. 


|
|
|
|
[#8]
Thanks guys, some great ideas here.
|
|
|
|
[#9]
Quoted:
My Jeep was pretty new when I mounted my FT-7900, so I avoided drilling any holes. A simple sheet metal plate from HRO was re-contoured to bolt under the hood and extend out on the driver's side. The dual band antenna has worked very well in this location. <a href="http://s195.photobucket.com/user/JustJimPix/media/rad05_zps33978355.jpg.html" target="_blank">http://i195.photobucket.com/albums/z238/JustJimPix/rad05_zps33978355.jpg</a> My FT-7900, and later FT-857 mounts high above the rear view mirror on an aluminum bracket I made which utilizes two of the "footman's loop" mounting holes. <a href="http://s195.photobucket.com/user/JustJimPix/media/857_zpss9dtnegp.jpg.html" target="_blank">http://i195.photobucket.com/albums/z238/JustJimPix/857_zpss9dtnegp.jpg</a> <a href="http://s195.photobucket.com/user/JustJimPix/media/rad03_zps7caf6dd6.jpg.html" target="_blank">http://i195.photobucket.com/albums/z238/JustJimPix/rad03_zps7caf6dd6.jpg</a> My Little Tarheel screwdriver is mounted to the rear tailgate with a trunk lip type mount. Have fun! Jim... Firestik actually makes a mount for that (though aimed at CB and doesn't work extremely well with the JK). Laird makes a $5 bracket that works just as well. Here is a JK I installed with the Firestik bracket an the other with the Laird bracket. Both run NMO 2/70 antennas. 

|
|
|
|
[#10]
|
|
|
|
[#11]
Hood channel or third brakelight mount and stick a 1/2 wave on it.
|
|
|
|
[#12]
I want to fabricate a wider version of this for a NMO but never seem to make the time.

|
|
|
|
[#13]
I like it. Reasonable price, put the antenna up high, and no drilling into the body. Bonus points because you can order a version for 2 antennas, so I can run a CB as well as my Ham radio. Great solution - thanks! |
|
|
|
[#14]
Quoted:
I like it. Reasonable price, put the antenna up high, and no drilling into the body. Bonus points because you can order a version for 2 antennas, so I can run a CB as well as my Ham radio. Great solution - thanks! Quoted:
I like it. Reasonable price, put the antenna up high, and no drilling into the body. Bonus points because you can order a version for 2 antennas, so I can run a CB as well as my Ham radio. Great solution - thanks! That is the route I ended up going. It came today and my son helped me install it. It's a well made unit, much nicer than I expected (my son was impressed with the smooth welds - I know nothing about welding so I'll take his word for it). I got the dual antenna unit, one side is drilled for a firestick (CB) the other for a 2m dual band antenna (3/4" NMO). The mounting point is situation just over and behind the spare tire. The unit mounts using the two bolts that mount the spare tire carrier to the rear door. To install you have to remove your spare, the third light (if you have one - I do), then the two upper bolts on the spare mount. Put the antenna mount's base plate in front of the bolt holes, then put everything back together. No drilling and you use existing bolts to mount the unit. VERY slick. I liked it so much I ordered Rick's radio mount as well. It's a unit very much like KB7DX's above. However it doesn't require drilling, it mounts up near the windshield resting on the bars that connect the roll cage to the window. It's secured using the existing knob bolts (the ones you can see just in front of KB7DX's mount in the shot with the roof folded back). I'll post info and photos when I get it installed. |
|
|
|
[#15]
Quoted:
That is the route I ended up going. It came today and my son helped me install it. It's a well made unit, much nicer than I expected (my son was impressed with the smooth welds - I know nothing about welding so I'll take his word for it). I got the dual antenna unit, one side is drilled for a firestick (CB) the other for a 2m dual band antenna (3/4" NMO). The mounting point is situation just over and behind the spare tire. The unit mounts using the two bolts that mount the spare tire carrier to the rear door. To install you have to remove your spare, the third light (if you have one - I do), then the two upper bolts on the spare mount. Put the antenna mount's base plate in front of the bolt holes, then put everything back together. No drilling and you use existing bolts to mount the unit. VERY slick. I liked it so much I ordered Rick's radio mount as well. It's a unit very much like KB7DX's above. However it doesn't require drilling, it mounts up near the windshield resting on the bars that connect the roll cage to the window. It's secured using the existing knob bolts (the ones you can see just in front of KB7DX's mount in the shot with the roof folded back). I'll post info and photos when I get it installed. Quoted:
Quoted:
I like it. Reasonable price, put the antenna up high, and no drilling into the body. Bonus points because you can order a version for 2 antennas, so I can run a CB as well as my Ham radio. Great solution - thanks! That is the route I ended up going. It came today and my son helped me install it. It's a well made unit, much nicer than I expected (my son was impressed with the smooth welds - I know nothing about welding so I'll take his word for it). I got the dual antenna unit, one side is drilled for a firestick (CB) the other for a 2m dual band antenna (3/4" NMO). The mounting point is situation just over and behind the spare tire. The unit mounts using the two bolts that mount the spare tire carrier to the rear door. To install you have to remove your spare, the third light (if you have one - I do), then the two upper bolts on the spare mount. Put the antenna mount's base plate in front of the bolt holes, then put everything back together. No drilling and you use existing bolts to mount the unit. VERY slick. I liked it so much I ordered Rick's radio mount as well. It's a unit very much like KB7DX's above. However it doesn't require drilling, it mounts up near the windshield resting on the bars that connect the roll cage to the window. It's secured using the existing knob bolts (the ones you can see just in front of KB7DX's mount in the shot with the roof folded back). I'll post info and photos when I get it installed. Waiting on pics. I'm hoping to get another wrangler in the next month or so and will be mounting a CB and probably a ham as well once I get my license. |
|
|
|
[#16]
Quoted:
Waiting on pics. I'm hoping to get another wrangler in the next month or so and will be mounting a CB and probably a ham as well once I get my license. Quoted:
Quoted:
Quoted:
I like it. Reasonable price, put the antenna up high, and no drilling into the body. Bonus points because you can order a version for 2 antennas, so I can run a CB as well as my Ham radio. Great solution - thanks! That is the route I ended up going. It came today and my son helped me install it. It's a well made unit, much nicer than I expected (my son was impressed with the smooth welds - I know nothing about welding so I'll take his word for it). I got the dual antenna unit, one side is drilled for a firestick (CB) the other for a 2m dual band antenna (3/4" NMO). The mounting point is situation just over and behind the spare tire. The unit mounts using the two bolts that mount the spare tire carrier to the rear door. To install you have to remove your spare, the third light (if you have one - I do), then the two upper bolts on the spare mount. Put the antenna mount's base plate in front of the bolt holes, then put everything back together. No drilling and you use existing bolts to mount the unit. VERY slick. I liked it so much I ordered Rick's radio mount as well. It's a unit very much like KB7DX's above. However it doesn't require drilling, it mounts up near the windshield resting on the bars that connect the roll cage to the window. It's secured using the existing knob bolts (the ones you can see just in front of KB7DX's mount in the shot with the roof folded back). I'll post info and photos when I get it installed. Waiting on pics. I'm hoping to get another wrangler in the next month or so and will be mounting a CB and probably a ham as well once I get my license. I'll take a few of the antenna mount - but the spare blocks the view of most of it. I probably should have waited till the weekend so I could have taken decent shots during installation. |
|
|
|
[#17]
As promised, shot of the antenna mount:
With the back door opened, looking from the back 
From outside, looking at the drivers side mount (CB) 
From the rear (CB on the left, HAM on the right) 
|
|
|
|
[#18]
Shouldn't the antennas be farther apart?
They seem too close in that mount. How's the performance? |
|
|
|
[#19]
Quoted:
Shouldn't the antennas be farther apart? They seem too close in that mount. How's the performance? I don't have the antennas mounted yet. The 2M will be first (sometime over the Christmas break when I mount the radio) then the CB will follow. I will note when I used magnetic mounts on my XJ the antennas were similarly spaced apart (if not closer) and they worked fine. |
|
|
|
[#20]
I don't consider those 'pretty' welds. Good design though. |
|
|
|
[#21]
be sure to check/adjust your SWR
most CB and VHF/UHF need a good flat groundplane ....hard to get in a soft top jeep |
|
|
|
[#22]
Quoted:
be sure to check/adjust your SWR Quoted:
be sure to check/adjust your SWR I plan on it. I have a SWR meter for CB and my buddy has one for the Ham rig. most CB and VHF/UHF need a good flat groundplane ....hard to get in a soft top jeep Yep
|
|
|
|
[#23]
Quoted: I want to fabricate a wider version of this for a NMO but never seem to make the time. http://i228.photobucket.com/albums/ee73/tangotag_bucket/antennamount2.jpg |
|
|
|
[#24]
I tried to mount my cable over the weekend. I turns out the NMO mount (with attached cable) I bought is for sheet steel - this is a bit too thick.
I'm planning on picking up another NMO mount, one meant for a 5/8" hole with a N connector on the bottom; which is meant for thicker material. In my case I'll use two 5/8" Fender Washers so I can mount it securely. My suggestion? If you order this antenna mount for your HAM rig, get it with a 5/8" hole rather than the 3/4", and get one of these NMO mounts instead. |
|
|
|
[#25]
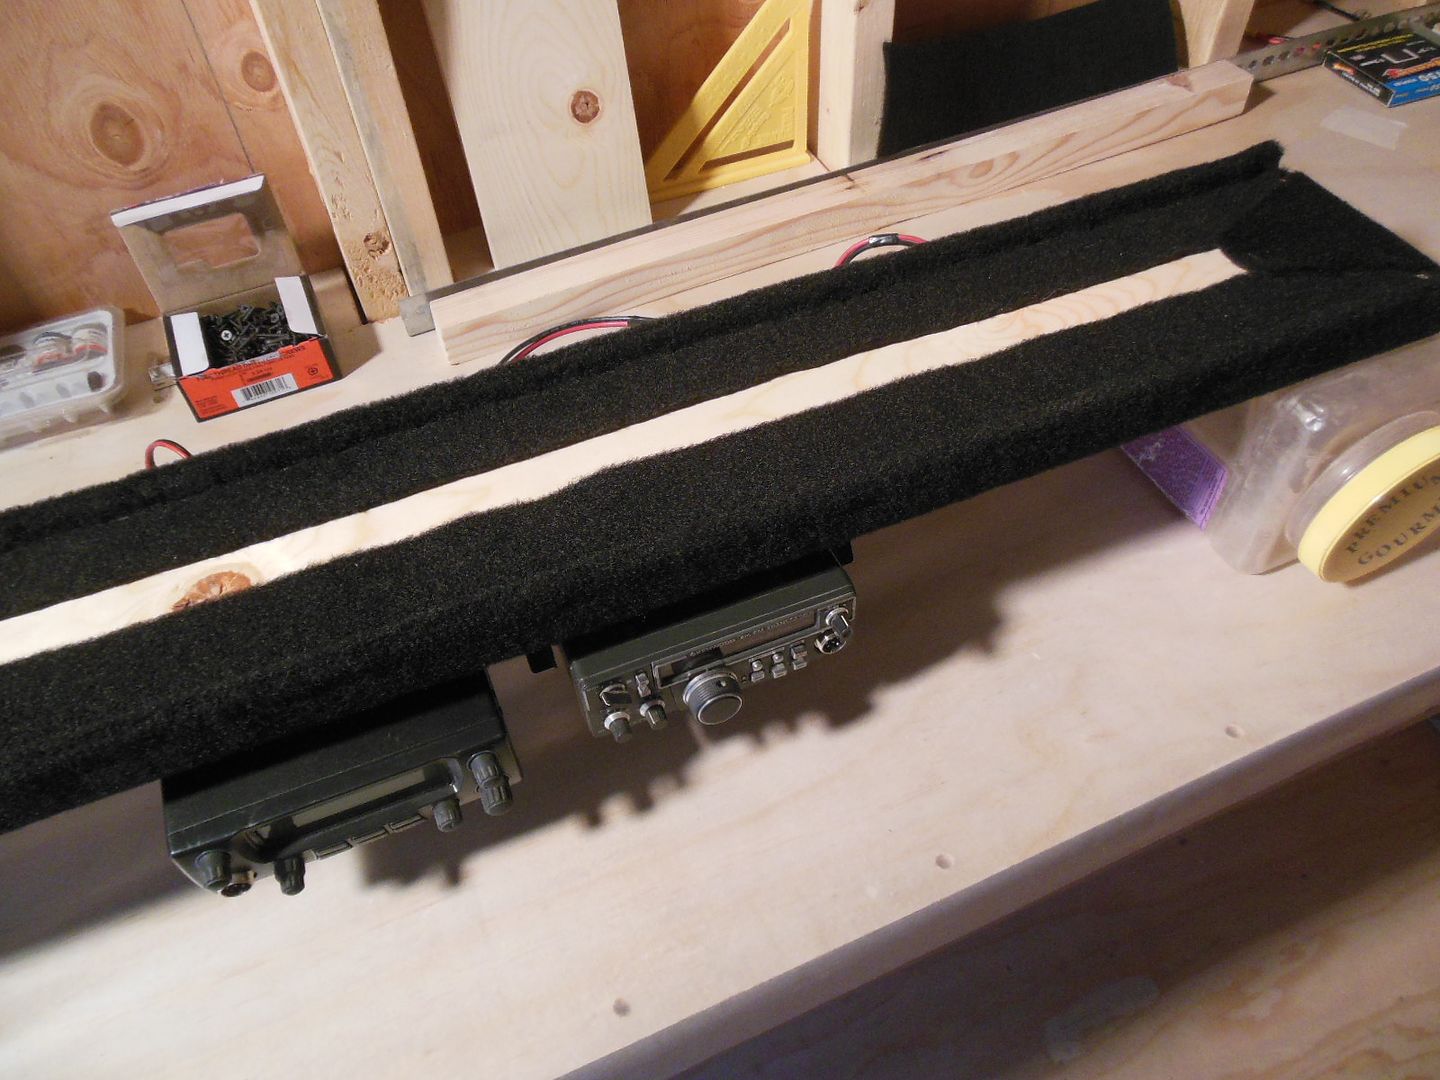
Over the holiday I mounted my radio to the radio mount bar, and added some 'optional extras', as well as mounted the antenna.
Antenna: The Antenna is a Tram 1180 

Radio and Mounting Bar: 


The Mounting Bar was easy to work with, just remember you have to open your soft top to install the unit. The mounting bar came pre drilled with 4 holes to mount the radio bracket and one hole on the front side to route the power wires through (note the mounting bar came with self taping screws for the bracket, several feet of wire, a rubber grommet for the hole, an inline fuse assembly, some crimp connectors and assorted hardware). I was able to use 2 of the pre-drilled holes to mount my bracket. I then drilled a couple other holes to REALLY ensure the radio was going nowhere. My suggestions, if you can run a drill and have bits, order the mount not pre-drilled for the bracket, it will make things a bit cleaner and only add a minute to the install. While the mount thoughtfully came with wire, I already had plenty of my own, plus the connectors and wire that came with my Kenwood. Before running the wire through the rectangular tube I checked the ends of the tube for sharp edges. I found a couple and used a file to quickly removed them (you don't want your power cord cut through by a rough edge). I ran the grommet over the wires up to near the connector. Then I fed the loose ends of the wire into the front hole and down the tube. Once they poked out a quick pull finished the job. The grommet was a PITA to install, I found using a very small flat blade screwdriver a big help in getting the inside grommet edge INTO the hole. Once the wires came out, I cut them off about 6" after the tube, and used shrink tube to hold them together (like a flat ribbon). I then attached Anderson Power Poles to the end of the wires. I also thought it would be helpful to have an extra power socket, so I wired one into the power lines and screwed the socket onto the underside of the bar next to the radio. For the antenna cable I drilled 3 holes (spaced evenly) so I could use cable holders with pan head sheet metal screws to hold the cable in place. One ended up being too close to the radio and wasn't used, the next one (about 14" from the radio) worked well as did the one 6" from it (near the bar over the door). I'll be running a wire from the battery, up the A pillar to a Power Pole, This will allow me to easily disconnect power, and if needed easily remove the radio mount bar for servicing or adding more radios. And a special 'Thank You' to those ARFcom Hams that got me hooked on Power Poles. Now I have all kinds of connectors for feeder batteries, recharging batteriess, 12v extension cords, and the like. Damn things are addicting, Legos for power circuits. ETA: I was hitting the Frostburg MD repeater from my home over the weekend, that's 120 miles line-of-sight. The repeater came in clear as any in my county. |
|
|
|
[#26]
Damn....I miss my Jeep

How's the SWR on VHF & UHF ? I'd be worried you don't have enough ground plane 
|
|
|
|
[#27]
Ground planes on Jeeps? Lol. I plan on being a good SWR reading this weekend (my buddy had a good meter), I don't trust the one built into the radio.
|
|
|
|
[#28]
Quoted:
Ground planes on Jeeps? Lol. I plan on being a good SWR reading this weekend (my buddy had a good meter), I don't trust the one built into the radio. unless I'm mistaken, the TMV71A doesn't have a built in SWR meter |
|
|
|
[#29]
Quoted:
unless I'm mistaken, the TMV71A doesn't have a built in SWR meter Quoted:
Quoted:
Ground planes on Jeeps? Lol. I plan on being a good SWR reading this weekend (my buddy had a good meter), I don't trust the one built into the radio. unless I'm mistaken, the TMV71A doesn't have a built in SWR meter It's got some kind of transmitted power meter, not a swr. |
|
|
|
[#30]
Got my radio programmed last night, kinda
.
Had a glitch, but I'm starting a new thread on that. |
|
|
|
[#31]
Last night I uploaded the new program into the radio. It had a few CTSS issues, which were quickly sorted out.
I also noted all the 2M channels were put on the right side of the radio (display), while the 70cm channels were on the left side. 
That could have been my problem all along, as till last night I was really only using the left side. But I found it strange that the 2M channels were put on the right, as the radio would factory boot with 2M on the left and 70cm on the right. I don't know how/why it did it that way, but no matter I have all the channels and I know how/where to access them. My thanks to you all, your help and information was appreciated! |
|
|
|
[#32]
Quoted:
Damn....I miss my Jeep
How's the SWR on VHF & UHF ? I finally have data! Using a friend's Welz SP-600 I got the following SWR readings. on 2M: at 144.0 MHz I got an SWR of 1.7 at 148.0 MHz I got an SWR of 1.1 on the 2M call frequency an SWR of 1.15 On a local repeater that my friends and I use I got a 1.2 I then switched over to 70cm On the 70cm call frequency an SWR of 1.1 Repeater 1 (rarely used) an SWR of 1.3 Repeater 2 an SWR of 1.0 Repeater 3 an SWR of 1.0 So it looks like I'm not doing too bad, especially on 70cm. My Kenwood is supposed to be a 50W radio. However when I switched to the power meter, the best I could manage was just over 40w on 2M. On 70cm power output was around 35W. I'll note the low (5W) power level was right on the nose, as was the 10W medium power level. |
|
|
|
[#33]
I think your install came out great. You stuck with your original ideas and made it happen, congrats. Really happy to see the performance of the antenna from that location.
On the Kenwood (I use the same one as my primary vhf / uhf base station) all memory locations are available to either the a or b side, it does not constrain you to a band. Therefore you can do vhf / vhf or uhf / uhf if you want to. Mine is normally doing packet email or fsq call on 2 meter simplex on the b side and the a side is whatever repeater I happen to be listening to. These are great radios. Also, do a bit of reading and wrapping your head around the channel grouping that this radio supports. It's a very handy feature to be able to create a much smaller subset of frequencies that you use often for scanning purposes but still have hundreds of other frequencies loaded into the radio. Regarding the power out, I'd assume that there is some interaction between the meter, feed line and antenna that results in a misreading. Mine does the same unless I measure the power into a dummy load with a perfect 50 ohm match. |
|
|
|
[#34]
Quoted:
On the Kenwood (I use the same one as my primary vhf / uhf base station) all memory locations are available to either the a or b side, it does not constrain you to a band. Therefore you can do vhf / vhf or uhf / uhf if you want to. Quoted:
On the Kenwood (I use the same one as my primary vhf / uhf base station) all memory locations are available to either the a or b side, it does not constrain you to a band. Therefore you can do vhf / vhf or uhf / uhf if you want to. This is good to know as sometimes I like to monitor two local VHF repeaters. Is there a setting in the software or some control on the radio that allows this? Mine is normally doing packet email Very cool. I'd like to try that this spring, and possibly the sending of .JPGs via FM using Android devices. Also, do a bit of reading and wrapping your head around the channel grouping that this radio supports. It's a very handy feature to be able to create a much smaller subset of frequencies that you use often for scanning purposes but still have hundreds of other frequencies loaded into the radio. I saw that feature in the programming software, but was not sure how to use it. I'll go back and read the manual. Again thanks for the heads up! |
|
|
|
[#35]
Quoted:...
on 2M: at 144.0 MHz I got an SWR of 1.7 at 148.0 MHz I got an SWR of 1.1 on the 2M call frequency an SWR of 1.15 On a local repeater that my friends and I use I got a 1.2 I then switched over to 70cm On the 70cm call frequency an SWR of 1.1 Repeater 1 (rarely used) an SWR of 1.3 Repeater 2 an SWR of 1.0 Repeater 3 an SWR of 1.0 .... that's pretty damn good ...especially for a Jeep 
I would not worry about the 40watts, it could be the wattmeter,....but even if it's the radio, nobody will hear the difference I wish the TMV71A had a 20-25 watt setting, instead of 10watts |
|
|
|
[#36]
"This is good to know as sometimes I like to monitor two local VHF repeaters. Is there a setting in the software or some control on the radio that allows this?"
There are a couple of ways. If you are in VFO mode, then check out page 17 of the manual, it shows you how to customize your A and B sides for whatever band you want. The way I do it though is I operate both sides in memory mode, at that point it does not care what frequency the memory location has stored, both sides have full access to all memory locations regardless of frequency. Mine is normally doing packet email Very cool. I'd like to try that this spring, and possibly the sending of .JPGs via FM using Android devices. Dig into FSQ Call. It's one of the most interesting new data modes out there right now. It is basically an ad hoc mesh network that can send chat messages, text files and images. There's a group of us here in the Kansas City area running a 24 x 7 mesh of stations on FSQ Call. For packet email I am using RMS express and connecting with a local Winlink Packet gateway. Works great. Recently I whitelisted all of the domains for all of the mobile phone carriers in my Winlink profile so that I can send and receive SMS messages to mobile phones using the Winlink email system. John |
|
|
|
[#37]
"I wish the TMV71A had a 20-25 watt setting, instead of 10watts"
Totally agree! I have a Kenwood TM-271A that I'm setting up as a "data only" radio and it has some secret menus that allow you to modify the high and low settings. Now I'm curious of the TM-V71A also has this. Edit: I looked into it and it's not just a "secret menu" with this radio. Here's the adjustment info http://www.radiomanual.info/schemi/Kenwood_TM-V71_adj.pdf |
|
|

AR15.COM is the world's largest firearm community and is a gathering place for firearm enthusiasts of all types.
From hunters and military members, to competition shooters and general firearm enthusiasts, we welcome anyone who values and respects the way of the firearm.

Subscribe to our monthly Newsletter to receive firearm news, product discounts from your favorite Industry Partners, and more.
Copyright © 1996-2024 AR15.COM LLC. All Rights Reserved.
Any use of this content without express written consent is prohibited.
AR15.Com reserves the right to overwrite or replace any affiliate, commercial, or monetizable links, posted by users, with our own.


