IL, USA
|
[#1]
A couple more projects I am working on:
 (wow, that is blurry!)  |
|
|
MI, USA
|
[#2]
You guys have some awesome talent! seriously.. That matte finish is great.
I love the high quality of your pictures too, it really shows off your craft. Keep em coming, great stuff. |
|
|
|
[#3]
Very interested in this... tag
|
|
|
|
|
[Last Edit: 23pistol23]
[#4]
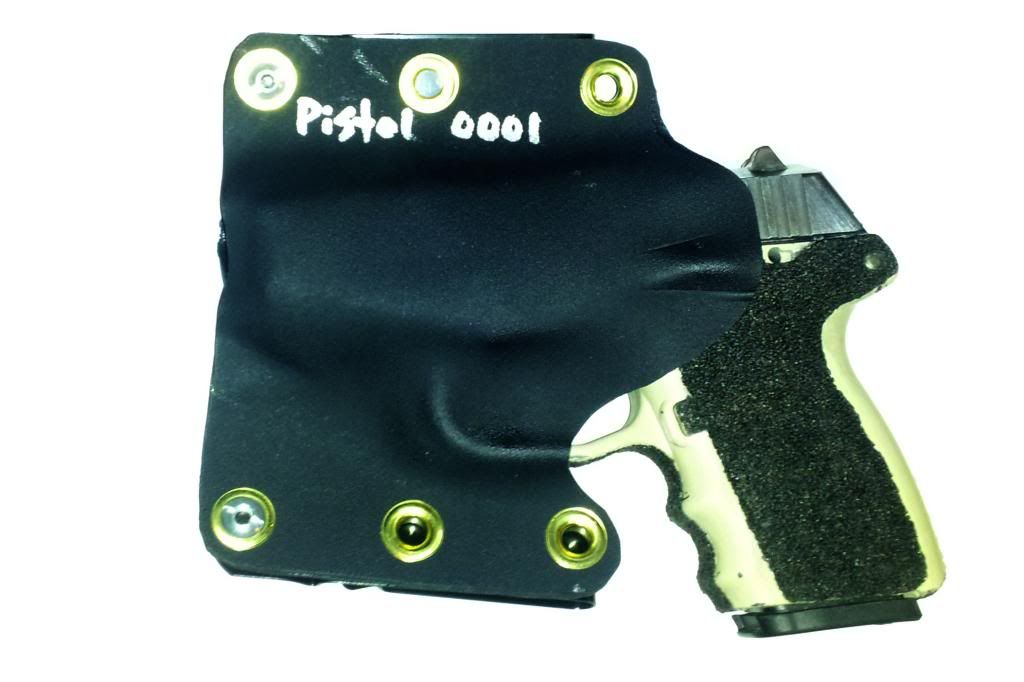
Here is my first go at it. I used a camping mat for foam from walmart to see what it would do. Didn't quite get the definition so I went back with a heat gun and hit the trigger guard, ejection port, and other areas for more retention. The ejection port got a little hot and turned shiny. Oh well, I was pretty impressed with this being the first one. I guess I'll get me some better foam and rivets before I go any further. This thing beats an Uncle Mikes any day though for about the same cost.
|
|
|
|
IL, USA
|
[#5]
Originally Posted By 23pistol23: Here is my first go at it. I used a camping mat for foam from walmart to see what it would do. Didn't quite get the definition so I went back with a heat gun and hit the trigger guard, ejection port, and other areas for more retention. The ejection port got a little hot and turned shiny. Oh well, I was pretty impressed with this being the first one. I guess I'll get me some better foam and rivets before I go any further. This thing beats an Uncle Mikes any day though for about the same cost. http://i187.photobucket.com/albums/x287/23PISTOL23/2013-06-16092931.jpg http://i187.photobucket.com/albums/x287/23PISTOL23/2013-06-16092952.jpg As you found out, the heat gun must be used with care! I made sure to get one that has a dial adjustment so I can fine tune the heat. The camping pad should work OK, though the 1" think Neoprene foam Index Fasteners and/or Knife Kits sells is better. I am wondering what temp you heated the Kydex up to and what you used as a press? The Kydex (0.080") really needs to be 315F (or heated and held for a while at 290-300) to get is pliable enough. Then you must get it in your press, lined up, and get pressure on it as quick as possible. The Kydex sheds heat FAST and waiting and extra 20 seconds can really reduce the pliability. Another tip is to use the heat gun to warm up the foam and the gun. This make the Kydex cool more slowly which allows more time for it to form to your gun. Next, you need to get a decent amount of pressure on your press. I use 2 or 3 clamps with a 1,000 LBS pressure ratting. Standing on the plywood is not going to give you good results. Also, leave the press clamped together for at least 10 minutes. Oh, last thing, only form one side at a time. Trying to do both takes too long, letting the Kydex cool, and can cause a lot more shifting in the press.
|
|
|
|
[#6]
Any one else have issues with the gun metal colored rivets from KK? Used some today on a holster and man did they turn out shitty compared to the regular black ones I use.
|
|
|
|
IN, USA
|
[#7]
Originally Posted By 4DAIVIPAI2K5:
Any one else have issues with the gun metal colored rivets from KK? Used some today on a holster and man did they turn out shitty compared to the regular black ones I use. The few I have rolled over turned out normal. I have not done many though. |
|
|
|
[#8]
Originally Posted By millsusaf:
Originally Posted By 4DAIVIPAI2K5:
Any one else have issues with the gun metal colored rivets from KK? Used some today on a holster and man did they turn out shitty compared to the regular black ones I use. The few I have rolled over turned out normal. I have not done many though. weird. |
|
|
|
|
[#9]
Originally Posted By bobapunk:
Originally Posted By 23pistol23:
Here is my first go at it. I used a camping mat for foam from walmart to see what it would do. Didn't quite get the definition so I went back with a heat gun and hit the trigger guard, ejection port, and other areas for more retention. The ejection port got a little hot and turned shiny. Oh well, I was pretty impressed with this being the first one. I guess I'll get me some better foam and rivets before I go any further. This thing beats an Uncle Mikes any day though for about the same cost. http://i187.photobucket.com/albums/x287/23PISTOL23/2013-06-16092931.jpg http://i187.photobucket.com/albums/x287/23PISTOL23/2013-06-16092952.jpg As you found out, the heat gun must be used with care! I made sure to get one that has a dial adjustment so I can fine tune the heat. The camping pad should work OK, though the 1" think Neoprene foam Index Fasteners and/or Knife Kits sells is better. I am wondering what temp you heated the Kydex up to and what you used as a press? The Kydex (0.080") really needs to be 315F (or heated and held for a while at 290-300) to get is pliable enough. Then you must get it in your press, lined up, and get pressure on it as quick as possible. The Kydex sheds heat FAST and waiting and extra 20 seconds can really reduce the pliability. Another tip is to use the heat gun to warm up the foam and the gun. This make the Kydex cool more slowly which allows more time for it to form to your gun. Next, you need to get a decent amount of pressure on your press. I use 2 or 3 clamps with a 1,000 LBS pressure ratting. Standing on the plywood is not going to give you good results. Also, leave the press clamped together for at least 10 minutes. Oh, last thing, only form one side at a time. Trying to do both takes too long, letting the Kydex cool, and can cause a lot more shifting in the press. Thanks for the pointers. For a press, I was using about a 10" piece of 2x12 on each side, I stood on it and wrapped cord around some screws. I tripled the camping mat for each side but the after closing the press you could feel the gun bottoming out on the boards. Thats why I was thinking I needed better foam. As far as temp, I didn't have an IR thermo so I just went by what I thought. Probably should have left it in a bit longer. Interesting on forming one side at a time. I was actually trying to save some kydex and make a nice clean one piece holster. I put the piece down, put the gun on top, and then pulled the remaining piece over the top. I had to end up cutting it on the bottom though, because it didn't sandwich together very cleanly. Basically left a little loop that ran the length of the holster. I'm learning very quickly from my mistakes. Thanks for the input. |
|
|
|
IL, USA
|
[#10]
How thick is the camping mat foam? You need at least 1" on the top and bottom. Double up the foam you have if it is not think enough. If you don't want to buy an IR thermo, you can use an "in-oven" thermo. Another thing to try is to turn the oven to the lowest setting and let it warm up. Put in your kydex and every 305 minutes turn the oven up 30-50 degrees. Once you get the in-oven thermometer (not the thermostat dial, it could be in accurate)reading 330 or so, the Kydex should be good. The one thing that you should spend a few bucks on is a pair of these: http://www.amazon.com/Jorgensen-3724-HD-24-Inch-Heavy-Duty-Steel/dp/B00005R1HY/ref=pd_sim_hi_2 If you are trying to make a fold-over style holster, you need to tape a round dowel to the top of the slide (between the front the rear sights) to give the Kydex something to mold to and prevent the "puckering" that you experienced. There also are some techniques of how to clamp the press to get the Kydex to form properly around the top of the gun. It is a bit trickier in my experience. You might try a few 2-piece "pancake" style holsters before trying to make the "taco" style. Originally Posted By 23pistol23: Originally Posted By bobapunk: Originally Posted By 23pistol23: Here is my first go at it. I used a camping mat for foam from walmart to see what it would do. Didn't quite get the definition so I went back with a heat gun and hit the trigger guard, ejection port, and other areas for more retention. The ejection port got a little hot and turned shiny. Oh well, I was pretty impressed with this being the first one. I guess I'll get me some better foam and rivets before I go any further. This thing beats an Uncle Mikes any day though for about the same cost. http://i187.photobucket.com/albums/x287/23PISTOL23/2013-06-16092931.jpg http://i187.photobucket.com/albums/x287/23PISTOL23/2013-06-16092952.jpg As you found out, the heat gun must be used with care! I made sure to get one that has a dial adjustment so I can fine tune the heat. The camping pad should work OK, though the 1" think Neoprene foam Index Fasteners and/or Knife Kits sells is better. I am wondering what temp you heated the Kydex up to and what you used as a press? The Kydex (0.080") really needs to be 315F (or heated and held for a while at 290-300) to get is pliable enough. Then you must get it in your press, lined up, and get pressure on it as quick as possible. The Kydex sheds heat FAST and waiting and extra 20 seconds can really reduce the pliability. Another tip is to use the heat gun to warm up the foam and the gun. This make the Kydex cool more slowly which allows more time for it to form to your gun. Next, you need to get a decent amount of pressure on your press. I use 2 or 3 clamps with a 1,000 LBS pressure ratting. Standing on the plywood is not going to give you good results. Also, leave the press clamped together for at least 10 minutes. Oh, last thing, only form one side at a time. Trying to do both takes too long, letting the Kydex cool, and can cause a lot more shifting in the press. Thanks for the pointers. For a press, I was using about a 10" piece of 2x12 on each side, I stood on it and wrapped cord around some screws. I tripled the camping mat for each side but the after closing the press you could feel the gun bottoming out on the boards. Thats why I was thinking I needed better foam. As far as temp, I didn't have an IR thermo so I just went by what I thought. Probably should have left it in a bit longer. Interesting on forming one side at a time. I was actually trying to save some kydex and make a nice clean one piece holster. I put the piece down, put the gun on top, and then pulled the remaining piece over the top. I had to end up cutting it on the bottom though, because it didn't sandwich together very cleanly. Basically left a little loop that ran the length of the holster. I'm learning very quickly from my mistakes. Thanks for the input. |
|
|
|
[#11]
Originally Posted By bobapunk:
[div]
How thick is the camping mat foam? You need at least 1" on the top and bottom. Double up the foam you have if it is not think enough. If you don't want to buy an IR thermo, you can use an "in-oven" thermo. Another thing to try is to turn the oven to the lowest setting and let it warm up. Put in your kydex and every 305 minutes turn the oven up 30-50 degrees. Once you get the in-oven thermometer (not the thermostat dial, it could be in accurate)reading 330 or so, the Kydex should be good. The one thing that you should spend a few bucks on is a pair of these: http://www.amazon.com/Jorgensen-3724-HD-24-Inch-Heavy-Duty-Steel/dp/B00005R1HY/ref=pd_sim_hi_2 [/quote] The foam is about 1/2", but I used three deep on each side and it still bottomed out. So I really think the foam is too soft. It may have worked better if I left it in the oven longer too. I'll get some better foam and clamps and update with my M&P9 with TLR3. |
|
|
|
IL, USA
|
[#12]
The foam I am using is from Knifekits.com Its a high density neoprean foam. It works very well. One tip, I lay the foam on top of my toaster oven as I heat up the Kydex. The warm foam is more pliable, and also slows the heat transfer (cooling down) of the Kydex, allowing it to stay pliable a little longer and producing better results.
Originally Posted By 23pistol23: Originally Posted By bobapunk: [div]How thick is the camping mat foam? You need at least 1" on the top and bottom. Double up the foam you have if it is not think enough. If you don't want to buy an IR thermo, you can use an "in-oven" thermo. Another thing to try is to turn the oven to the lowest setting and let it warm up. Put in your kydex and every 305 minutes turn the oven up 30-50 degrees. Once you get the in-oven thermometer (not the thermostat dial, it could be in accurate)reading 330 or so, the Kydex should be good. The one thing that you should spend a few bucks on is a pair of these: http://www.amazon.com/Jorgensen-3724-HD-24-Inch-Heavy-Duty-Steel/dp/B00005R1HY/ref=pd_sim_hi_2 [/quote] The foam is about 1/2", but I used three deep on each side and it still bottomed out. So I really think the foam is too soft. It may have worked better if I left it in the oven longer too. I'll get some better foam and clamps and update with my M&P9 with TLR3. |
|
|
|
[#13]
G19 with insight M3
|
|
|
|
|
[Last Edit: TheBigAR2003]
[#14]
Originally Posted By bg10:
G19 with insight M3 http://farm6.staticflickr.com/5328/8803774785_0c6167389e.jpg wow i literally just clicked on this thread to ask where to put retention for a kydex holster for a g19 with an m3 is it better to keep the retention behind the light like that or could you put it on the little buttons sticking out that removes the light? and what did you use to make the light channel? and what thickness did you use? |
|
|
|
|
[#15]
Very nice! What belt loops are you using?
Originally Posted By bg10: G19 with insight M3 http://farm6.staticflickr.com/5328/8803774785_0c6167389e.jpg |
|
|
|
|
[Last Edit: bg10]
[#16]
Originally Posted By bobapunk:
Very nice! What belt loops are you using? Originally Posted By bg10:
G19 with insight M3 http://farm6.staticflickr.com/5328/8803774785_0c6167389e.jpg I take .125 kydex and mold the loops. They usually end up being about 3/4" or 7/8" wide. The .125 kydex makes a pretty solid belt loop in my experience. |
|
|
|
|
[#17]
Originally Posted By TheBigAR2003:
Originally Posted By bg10:
G19 with insight M3 http://farm6.staticflickr.com/5328/8803774785_0c6167389e.jpg wow i literally just clicked on this thread to ask where to put retention for a kydex holster for a g19 with an m3 is it better to keep the retention behind the light like that or could you put it on the little buttons sticking out that removes the light? and what did you use to make the light channel? and what thickness did you use? I actually take the heat gun and (carefully) relieve some of the retention in the area circled in green on both the front and back of the holster. My retention comes from circled green area and orange area 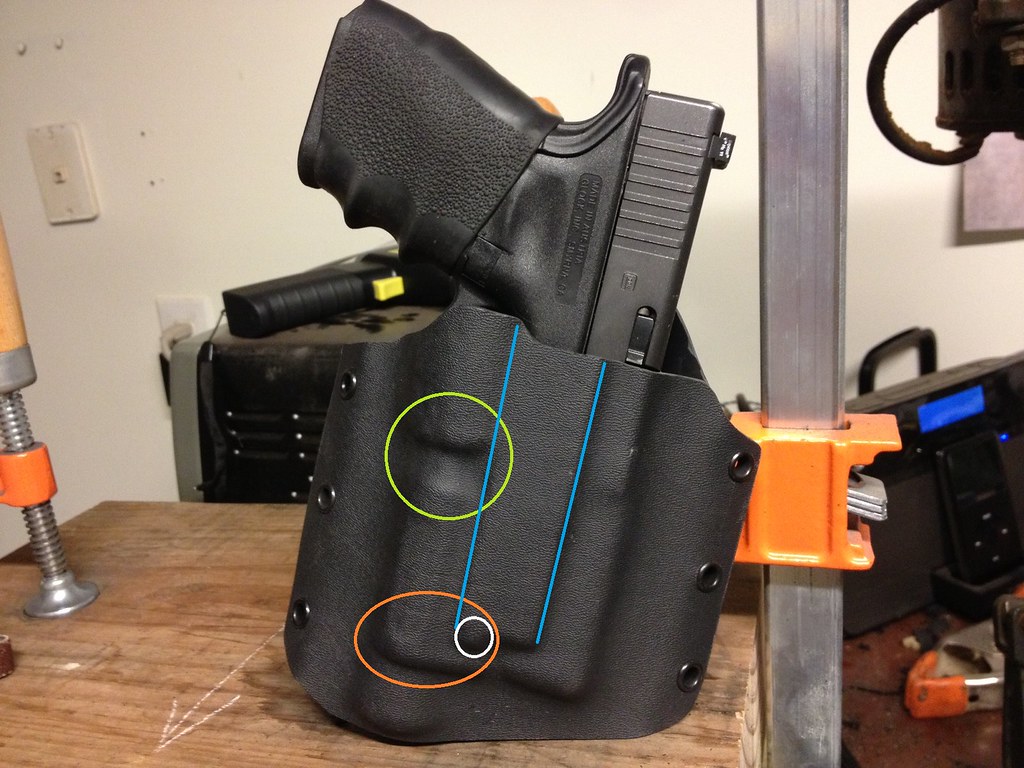
I use a piece of wood to make a channel for the little buttons that removes the light (outlined by blue lines). My concern was that repeated unholstering/reholstering would eventually break those buttons off. I was also concerned that it might be possible to activate those buttons while drawing/reholstering and my light would fall off, or least be unseated. Those buttons also provide too much retention, IMO. You can see that little button circled in white. |
|
|
|
|
[#18]
Same method I use. Your eyelets are a lot farther apart than mine, that is why I thought you were doing something different.
Here is the back of one my my holsters:  Originally Posted By bg10: Originally Posted By bobapunk: Very nice! What belt loops are you using? Originally Posted By bg10: G19 with insight M3 http://farm6.staticflickr.com/5328/8803774785_0c6167389e.jpg I take .125 kydex and mold the loops. They usually end up being about 3/4" or 7/8" wide. The .125 kydex makes a pretty solid belt loop in my experience. |
|
|
|
|
[#19]
Finished that Morakniv sheath:
 |
|
|
|
VA, USA
|
[Last Edit: docbrown30]
[#20]
I have read these forums for quite a while now, and this thread motivated me to start making Kydex holsters. It also seemed like a great place to make my first post on Arfcom after lurking for so long.

This was my first holster for my M&P9. This was a result of several hours of work fine tuning the shape and design. I should have given it more forward cant, but overall the fit of this holster is great. Excellent for open carry- it feels very secure on my hip, yet still draws smooth. I'm sure it could be concealed with a jacket or sweatshirt but it prints too much for summer clothes. http://i51.photobucket.com/albums/f359/drock417/Kydex/mp9-01.jpg http://i51.photobucket.com/albums/f359/drock417/Kydex/mp9-02.jpg This was the second holster I made, also for my M&P9, but this time a more concealable design. I wear this primarily AIWB, but can also rotate it around to 3-4:00 comfortably. The retention on this holster turned out perfect. http://i51.photobucket.com/albums/f359/drock417/Kydex/mp9-1.jpg http://i51.photobucket.com/albums/f359/drock417/Kydex/mp9-2.jpg http://i51.photobucket.com/albums/f359/drock417/Kydex/mp9-3.jpg My third attempt was a S&W 637 j-frame, designed for AIWB carry. I went with a tuckable belt loop on this one. I am very happy with how this holster carries. http://i51.photobucket.com/albums/f359/drock417/Kydex/637-2.jpg http://i51.photobucket.com/albums/f359/drock417/Kydex/637-3.jpg And my most recent holster, also a tuckable design, for a Glock 23. Just the right amount of retention on this one. http://i51.photobucket.com/albums/f359/drock417/Kydex/g23-1.jpg http://i51.photobucket.com/albums/f359/drock417/Kydex/g23-3.jpg If it's not obvious... I'm hooked.
|
|
|
MI, USA
|
[#21]
DocBrown30, Can you post up a picture of what you are using to make those clips... Those look amazing.
I want to make a metal fold over press that will make 4 clips at a time... I was thinking of making is out of steel so you can put it in the oven also... then dunk it in water after you get your strips of kydex in there to snap it back to cold. clearly, you have this down... |
|
|
|
[#22]
Now that is how to make a first ARFcom post!
Fine work, man! Originally Posted By docbrown30: I have read these forums for quite a while now, and this thread motivated me to start making Kydex holsters. It also seemed like a great place to make my first post on Arfcom after lurking for so long. This was my first holster for my M&P9. This was a result of several hours of work fine tuning the shape and design. I should have given it more forward cant, but overall the fit of this holster is great. Excellent for open carry- it feels very secure on my hip, yet still draws smooth. I'm sure it could be concealed with a jacket or sweatshirt but it prints too much for summer clothes. http://i51.photobucket.com/albums/f359/drock417/Kydex/mp9-01.jpg http://i51.photobucket.com/albums/f359/drock417/Kydex/mp9-02.jpg This was the second holster I made, also for my M&P9, but this time a more concealable design. I wear this primarily AIWB, but can also rotate it around to 3-4:00 comfortably. The retention on this holster turned out perfect. http://i51.photobucket.com/albums/f359/drock417/Kydex/mp9-1.jpg http://i51.photobucket.com/albums/f359/drock417/Kydex/mp9-2.jpg http://i51.photobucket.com/albums/f359/drock417/Kydex/mp9-3.jpg My third attempt was a S&W 637 j-frame, designed for AIWB carry. I went with a tuckable belt loop on this one. I am very happy with how this holster carries. http://i51.photobucket.com/albums/f359/drock417/Kydex/637-2.jpg http://i51.photobucket.com/albums/f359/drock417/Kydex/637-3.jpg And my most recent holster, also a tuckable design, for a Glock 23. Just the right amount of retention on this one. http://i51.photobucket.com/albums/f359/drock417/Kydex/g23-1.jpg http://i51.photobucket.com/albums/f359/drock417/Kydex/g23-3.jpg If it's not obvious... I'm hooked. |
|
|
|
|
[#23]
Ok guys I've got my definition issue down. I just let the kydex heat up more and it seems to work fine.
My problem now is I'm trying to figure out the best way to make mag pouches for my PC. I only had those big brass eyelets and didn't want to use those because I was trying to keep the pouch as compact as I could. I have some of the small black ones on order. My idea was to use just Chicago screws to hold the two pieces together and add two kydex strips on the back for molle clips. That way to put the pouch on you could just slide the strip between the molle web and screw the other two pieces to it. I'm having trouble with there being too much retention after I snug them down. I think it also may be because my holes I drilled aren't exactly on the flat part, but again I was trying to keep it as compact as possible. I was hoping to get three pouches, but at least two on my weak side. I also tried putting rubber spacers in between the two pieces and it gave it a better retention but when the mag was fully seated, it rattled. 
|
|
|
|
|
[Last Edit: bobapunk]
[#24]
For the retention, you can go back and use a hair dryer or a heat gun on LOW to gently relieve some of the definition/retention. I do this on the backside of the pouch so that you don't give up the nice look.
As far as pouch design; you could try doing a taco style and put the MOLLE strips on the back instead of the sides. That would allow to to make the pouches a bit more narrow. I wish I had a photo of the back...  Just tape a piece of 1/8" wood to the mag to allow some clearance so that your binding posts do not scrape the mag. |
|
|
|
VA, USA
|
[#25]
Originally Posted By Large_Time:
DocBrown30, Can you post up a picture of what you are using to make those clips... Those look amazing. I want to make a metal fold over press that will make 4 clips at a time... I was thinking of making is out of steel so you can put it in the oven also... then dunk it in water after you get your strips of kydex in there to snap it back to cold. clearly, you have this down... Thanks for the compliments guys. These pics show how I form the belt clips. I use a paint stirrer (perfect width for 1.5" belts) for spacing, and I wrap the heated kydex strip around, barely tucking the inside edge under the spacer. After it cools slightly, I use snips to trim the inside edge to barely roll under, and use the heat gun to tighten the bend. After the clip portion is done, I use the heat gun to spot heat the strip and I press it against the holster where it will mount. http://i51.photobucket.com/albums/f359/drock417/CAM00322.jpg http://i51.photobucket.com/albums/f359/drock417/CAM00323.jpg |
|
|
|
[#26]
Can you fit a 1/4" thick belt through there? I guess stacking 2 paint stir sticks would be better for thick belts. I bought a piece of 1/8" thick plywood at a hobby store and made 1.5", 1.75", and 2.0" pieces, all 1/4" thick to make belt loops. I add a piece of 0.125" kydex if I need a bit more clearance.
Originally Posted By docbrown30: Originally Posted By Large_Time: DocBrown30, Can you post up a picture of what you are using to make those clips... Those look amazing. I want to make a metal fold over press that will make 4 clips at a time... I was thinking of making is out of steel so you can put it in the oven also... then dunk it in water after you get your strips of kydex in there to snap it back to cold. clearly, you have this down... Thanks for the compliments guys. These pics show how I form the belt clips. I use a paint stirrer (perfect width for 1.5" belts) for spacing, and I wrap the heated kydex strip around, barely tucking the inside edge under the spacer. After it cools slightly, I use snips to trim the inside edge to barely roll under, and use the heat gun to tighten the bend. After the clip portion is done, I use the heat gun to spot heat the strip and I press it against the holster where it will mount. http://i51.photobucket.com/albums/f359/drock417/CAM00322.jpg http://i51.photobucket.com/albums/f359/drock417/CAM00323.jpg |
|
|
|
|
[#27]
Originally Posted By docbrown30:
Snip docbrown, that is some quality looking work. Looks really good. |
|
|
|
|
[#28]
Bravo!!!!....they look great!!!!....and welcome!
Originally Posted By docbrown30:
I have read these forums for quite a while now, and this thread motivated me to start making Kydex holsters. It also seemed like a great place to make my first post on Arfcom after lurking for so long.
This was my first holster for my M&P9. This was a result of several hours of work fine tuning the shape and design. I should have given it more forward cant, but overall the fit of this holster is great. Excellent for open carry- it feels very secure on my hip, yet still draws smooth. I'm sure it could be concealed with a jacket or sweatshirt but it prints too much for summer clothes. http://i51.photobucket.com/albums/f359/drock417/Kydex/mp9-01.jpg http://i51.photobucket.com/albums/f359/drock417/Kydex/mp9-02.jpg This was the second holster I made, also for my M&P9, but this time a more concealable design. I wear this primarily AIWB, but can also rotate it around to 3-4:00 comfortably. The retention on this holster turned out perfect. http://i51.photobucket.com/albums/f359/drock417/Kydex/mp9-1.jpg http://i51.photobucket.com/albums/f359/drock417/Kydex/mp9-2.jpg http://i51.photobucket.com/albums/f359/drock417/Kydex/mp9-3.jpg My third attempt was a S&W 637 j-frame, designed for AIWB carry. I went with a tuckable belt loop on this one. I am very happy with how this holster carries. http://i51.photobucket.com/albums/f359/drock417/Kydex/637-2.jpg http://i51.photobucket.com/albums/f359/drock417/Kydex/637-3.jpg And my most recent holster, also a tuckable design, for a Glock 23. Just the right amount of retention on this one. http://i51.photobucket.com/albums/f359/drock417/Kydex/g23-1.jpg http://i51.photobucket.com/albums/f359/drock417/Kydex/g23-3.jpg If it's not obvious... I'm hooked.
|
|
|
|
VA, USA
|
[#29]
Originally Posted By bobapunk:
Can you fit a 1/4" thick belt through there? I guess stacking 2 paint stir sticks would be better for thick belts. I bought a piece of 1/8" thick plywood at a hobby store and made 1.5", 1.75", and 2.0" pieces, all 1/4" thick to make belt loops. I add a piece of 0.125" kydex if I need a bit more clearance. The stir sticks measure 1/4" thick, by 1-7/16" wide. I believe they were labeled as "5 gallon" stir sticks. It is the perfect size spacer for my 1.5" Wilderness 5 stitch Instructor belt, but if you have a thicker belt with an insert, you may want to use a wider spacer. |
|
|
|
[#30]
Originally Posted By docbrown30:
I have read these forums for quite a while now, and this thread motivated me to start making Kydex holsters. It also seemed like a great place to make my first post on Arfcom after lurking for so long.
And my most recent holster, also a tuckable design, for a Glock 23. Just the right amount of retention on this one. http://i51.photobucket.com/albums/f359/drock417/Kydex/g23-1.jpg http://i51.photobucket.com/albums/f359/drock417/Kydex/g23-3.jpg If it's not obvious... I'm hooked. Yay for taco-style holsters! I can't get used to the size of the two-piece ones. |
|
|
|
|
[#31]
Ah, ok. Those are beefier than standard (1 gal) stir sticks! Good find! 1 7/16th" will probably be pretty snug on a 1.5" belt.
Originally Posted By docbrown30: Originally Posted By bobapunk: Can you fit a 1/4" thick belt through there? I guess stacking 2 paint stir sticks would be better for thick belts. I bought a piece of 1/8" thick plywood at a hobby store and made 1.5", 1.75", and 2.0" pieces, all 1/4" thick to make belt loops. I add a piece of 0.125" kydex if I need a bit more clearance. The stir sticks measure 1/4" thick, by 1-7/16" wide. I believe they were labeled as "5 gallon" stir sticks. It is the perfect size spacer for my 1.5" Wilderness 5 stitch Instructor belt, but if you have a thicker belt with an insert, you may want to use a wider spacer. |
|
|
|
MI, USA
|
[#32]
Thanks Doc!
Simple but clearly very effective... |
|
|
|
[#33]
Recent one. You can see how the gun metal rivets flattened instead of rounding like the black ones did for me.

Walther rear by 4DAIVIPAI2K5, on Flickr |
|
|
|
|
[#34]
ignore the tape, I didn't realize it was there until after I took the pics

S&W seperate by 4DAIVIPAI2K5, on Flickr |
|
|
|
|
[#35]
|
|
|
|
|
[#36]
Dang, that "supercam" is supper lame. Not durable at all! I will hopefully have some actual Crye Licensed Multicam Kydex is the near future. Not only will it actually match Multicam, it will be much more resistant to scuffs.
Originally Posted By 4DAIVIPAI2K5: My EDC for the M&P with TLR-1 after a while of use. [email=http://www.flickr.com/photos/40500049@N08/8737292668/]http://farm8.staticflickr.com/7285/8737292668_a53b36cdc2.jpg[/email] Atlas by 4DAIVIPAI2K5, on Flickr |
|
|
|
|
[#37]
yeah it wears super easy I have to tape up the front when I start making them now. If not it has started to wear by the time I finish the holster.
|
|
|
|
|
[#38]
IIRC, somebody in this thread laminated some multicam cordura to a holster. Looked good.
|
|
|
|
|
[Last Edit: 4DAIVIPAI2K5]
[#39]
That was me lol. I'll take some pics of it since it has been worn for a while now. I need to hit the edge with a lighter since I found no way to seal the open edges. It's not horribly frayed but it has a few threads showing.
|
|
|
|
|
[#40]
Originally Posted By 4DAIVIPAI2K5:
That was me lol. I'll take some pics of it since it has been worn for a while now. I need to hit the edge with a lighter since I found no way to seal the open edges. It's not horribly frayed but it has a few threads showing. haha, knew I'd seen it somewhere
|
|
|
|
MI, USA
|
[#41]
Spent some time designing this for a buddy of mine that is required to carry an intermediate force weapon in plain clothes.... he picked pepper spray over a heavy baton.
Pretty much, this gave me a rough draft... The only thing I like about it is the way my logo came out... I did this with a heat gun, no press... so it lacks definition for sure. What It Needs: Shorter rivets Polished edges Longer or offset paddle to reach down over belt Hole in paddle to access center screw Tab to fold under the mag instead of a warped area Tab for spray and maybe a strap for retention... Like I said, its rough but its a start and better than the paper model I hand cut out. http://i1190.photobucket.com/albums/z441/guntruck100/20130622_222536_zps83f3e605.jpg http://i1190.photobucket.com/albums/z441/guntruck100/20130622_222550_zpsd8ab2059.jpg http://i1190.photobucket.com/albums/z441/guntruck100/20130622_222600_zpsb90a654f.jpg |
|
|
|
[#42]
Looks pretty good to me as long as it works and is concealable. I like that the spray has a block off area for the trigger.
I'd a carried a baton with spray in the pocket maybe. I don't do that stuff for a living though... |
|
|
|
|
[#43]
Interested in the logo.
You could try something like I did for this holster. 
Basically cut a a slit and then notch the ends of the kydex as they wrap around the item and put the notch threw the slit and bend it down to lock it in place. Sorry I dont have any pics of the back. But this holster is done using no hardware. |
|
|
|
MI, USA
|
[#44]
I dig it, that is really smart. Gotta love all the designs people come up with.
I really want to design a vacuum table and a heat unit... Im just really concerned with being wasteful with the Kydex. That logo is my business logo, its a brand... mostly for metal and BBQ. If you want to check out some of my other projects im on Facebook at www.facebook.com/LargeTimeFab These are badge holders out of Kydex... they are still in development clearly. Couple ideas I had that I would love some feedback on to improve these. Laser out and color fill Miranda rights on the back side. St. Michael (Saint of Law Enforcement) A clear acrylic in the middle sandwiched between with a tab protruding on the bottom edge to attach another ID (Neck Knife, Paracord) A tab to the side for a small writing pen to attach and be secured. A perfectly cut out copy of a cuff key held in place with a super rare earth magnet epoxied into the clear acrylic... handy for those times you cuff someone and don't have a cuff key....because you left your duty belt in your cruiser.... (Way easier than calling your buddy 60 miles away to come loan you one) One I am on the fence about is the addition of a Retro reflective edge that would reflect when a flashlight hit it.... my logic is, most UC cops that would wear this could easily be identified as a perp with a gun to a passerby during an arrest.... so, I was thinking worst case scenario, at night....Gun out, Derelict on the ground...yelling... Uniformed guys show up, flash lights out.... Maybe by chance they would see this retro and hesitate long enough to not smoke the UC guy who has tunnel vision and didn't have the time to yell out..."Police"... Or it could be a perfect visual target that would end up being a center mass target on any cop that wore it.... and that is why I am thinking it will be a bad idea. Its square because the badge shaped one flips around while your running... the square one wont as easily. Your Thoughts?... this one is a prototype... I need to get some rivets so I can run the chain inside the holes... I think that will look really clean. **Blacked out to protect the integrity and specifics of his badge** http://i1190.photobucket.com/albums/z441/guntruck100/BadgeHolder_zpsc1109fcc.jpg |
|
|
|
[#45]
did you make the brand? I was looking at them before for my stuff.
are you lasing the kydex to cut it? |
|
|
|
CO, USA
|
[Last Edit: RTF_Squared]
[#46]
Alright, after lurking for months I'll play......
Some of my older work, my newer work kinda makes it look like garbage. http://i1281.photobucket.com/albums/a516/LyonDefensiveConcealment/Kydexxx/TypeA_zpsd780bd6e.png http://i1281.photobucket.com/albums/a516/LyonDefensiveConcealment/Kydexxx/Type-B_zpsfc590004.png A little spread of some of my newer work, a new press with legit foam has made definition take a new level. My current EDC configuration, Type-C light mounted design for G17RTF2 and TLR1. http://i1281.photobucket.com/albums/a516/LyonDefensiveConcealment/Kydexxx/TypeC_zps95a9449a.png Glock 19 with Clipdraw attachment Type B concealment design and Type-C light mounted design for same with TLR1, as well as modular mag pouches bolted together for a triple configuration. I kinda feel like a mallninja since I started using that for EDC. Its comfortable enough (for me) to wear 24/7, and is just too freaking cool to take off. http://i1281.photobucket.com/albums/a516/LyonDefensiveConcealment/resized%20kydexxx/Jedwards_zps3c6c43a8.png http://i1281.photobucket.com/albums/a516/LyonDefensiveConcealment/resized%20kydexxx/3b685aaf-6933-4f61-afe3-aaeb4143b29e_zpsa57ae25e.jpg A bunch of jobs from a couple of weeks ago, as well as my EDC. Quick and dirty picture, I really should have taken better, but I had deliveries and shipments to make with the quickness that day. http://i1281.photobucket.com/albums/a516/LyonDefensiveConcealment/Kydexxx/null_zpsd8559d03.jpg Another modular mag pouch setup for a customer. http://i1281.photobucket.com/albums/a516/LyonDefensiveConcealment/resized%20kydexxx/modularcarriers_zps51528d90.jpg Questions/comments/criticism always appreciated! RTF_Squared |
|
|
|
[#47]
Originally Posted By 4DAIVIPAI2K5:
That was me lol. I'll take some pics of it since it has been worn for a while now. I need to hit the edge with a lighter since I found no way to seal the open edges. It's not horribly frayed but it has a few threads showing. Try epoxy. |
|
|
|
IL, USA
|
[#48]
Originally Posted By JoshAston:
Originally Posted By 4DAIVIPAI2K5:
That was me lol. I'll take some pics of it since it has been worn for a while now. I need to hit the edge with a lighter since I found no way to seal the open edges. It's not horribly frayed but it has a few threads showing. Try epoxy. clear Lucite(?) |
|
|
|
[#49]
Originally Posted By 3DD3:
Originally Posted By JoshAston:
Originally Posted By 4DAIVIPAI2K5:
That was me lol. I'll take some pics of it since it has been worn for a while now. I need to hit the edge with a lighter since I found no way to seal the open edges. It's not horribly frayed but it has a few threads showing. Try epoxy. clear Lucite(?) Someone on here was using black devcon I believe. |
|
|
|
IL, USA
|
[#50]
i use these hunters foam seatsThey are on sale till today buy 10 bucks worth your good for a while!
|
|
|
 Win a FREE Membership!
Sign up for the ARFCOM weekly newsletter and be entered to win a free ARFCOM membership. One new winner* is announced every week!
You will receive an email every Friday morning featuring the latest chatter from the hottest topics, breaking news surrounding legislation, as well as exclusive deals only available to ARFCOM email subscribers.

AR15.COM is the world's largest firearm community and is a gathering place for firearm enthusiasts of all types.
From hunters and military members, to competition shooters and general firearm enthusiasts, we welcome anyone who values and respects the way of the firearm.

Subscribe to our monthly Newsletter to receive firearm news, product discounts from your favorite Industry Partners, and more.
Copyright © 1996-2024 AR15.COM LLC. All Rights Reserved.
Any use of this content without express written consent is prohibited.
AR15.Com reserves the right to overwrite or replace any affiliate, commercial, or monetizable links, posted by users, with our own.


