|
[#1]
Do any of you guys have tips/tricks for mounting a holster in a vehicle? I know about the Gcode hanger kit and the Gum creek strap, but I was thinking some of y'all may have come up with something better/cheaper. Thanks.
|
|
|
|
|
[#2]
Originally Posted By Chainsaw1:
Playing around with some of the UltiClips I got in and some Krytek Highlander. http://www.arestactical.net/wp-content/uploads/2015/12/xds-iwb-ulticlip.jpg Do the Ulti-clips work as advertised? |
|
|
|
GA, USA
|
[#3]
Countrygunner, +1 knifekits.com
I also use Jantz Supply Knifemaking.com. just google knife making supplies and a ton of sites should have everything you are looking for. Para_frame, thanks the press works great. The one I purchased was this one from knifekits: http://www.knifekits.com/vcom/product_info.php?cPath=41_524&products_id=636 However, dont waste your money on it. It is a hinged press so it kept misaligning the Kydex. I used the foam from this press to make the one I posted pics of. You can just buy the foam from knifekits and make your own. |
|
|
|
[#5]
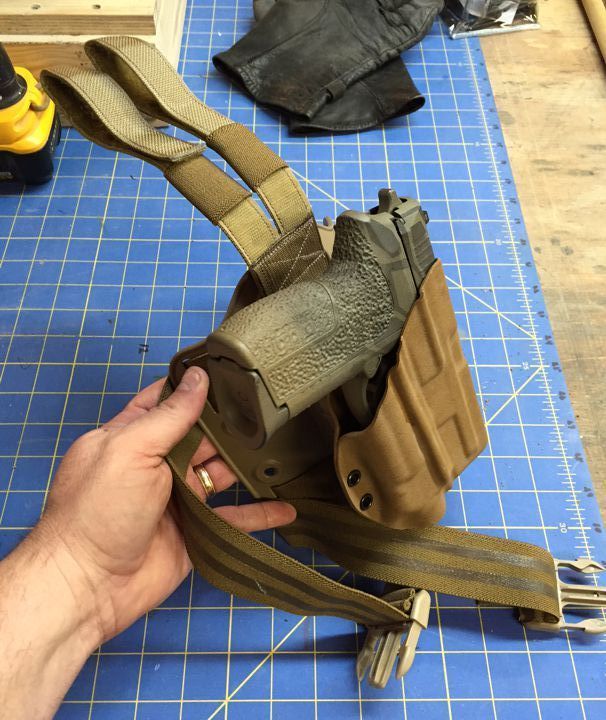
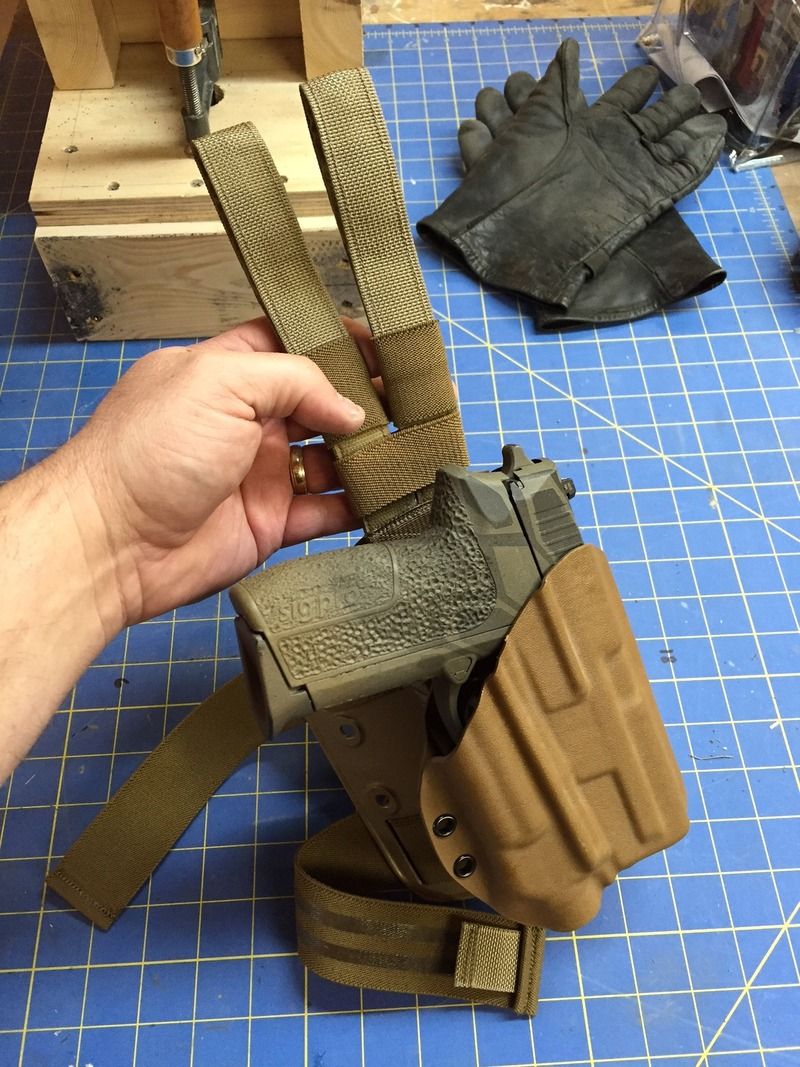
Wanted more tuck so i added more leverage.
 Note the angle of the lever. I recommend this as it follows the contour of the belt. 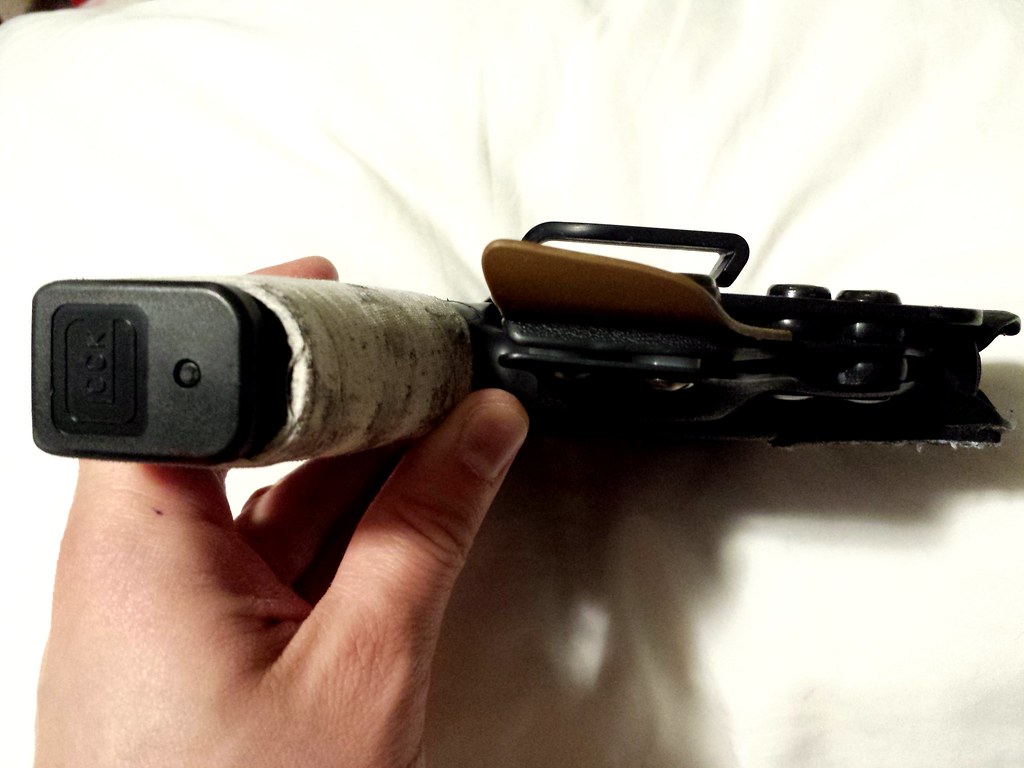 Tucks really well 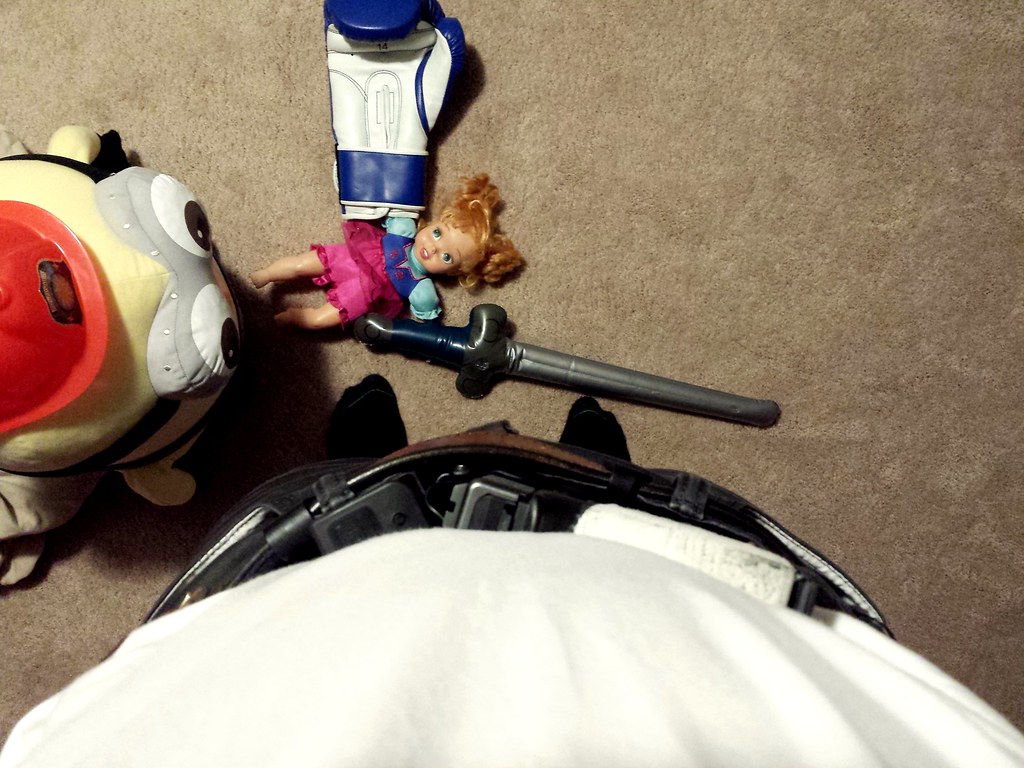 |
|
|
|
|
[#6]
Originally Posted By JonnyVain:
Just made a $130 knife kits order. I'm really pumped about remaking my holster. Its been really good, but the definition sucked. New one I'm planning will actually be similar to the T-rex side car. I mold the tension adjustment area at an angle away from the body and will do a "wing" in this same fashion. Mag carrier and holster will be one piece. https://farm4.staticflickr.com/3790/19120056175_ed24d01726_b.jpg I'm kinda diggin' the hockey tape. |
|
|
|
MO, USA
|
[#7]
The UltiClip is the real deal. Ended up becoming a dealer for them I liked it so much. That said, they are not perfect, but what is? Being a single mounting hole design they can rotate if you don't take some added step to prevent this.
|
|
|
|
[#8]
Originally Posted By Chainsaw1:
The UltiClip is the real deal. Ended up becoming a dealer for them I liked it so much. That said, they are not perfect, but what is? Being a single mounting hole design they can rotate if you don't take some added step to prevent this. Good to know. |
|
|
|
|
[#9]
Anyone have a source for a decently priced G43 drone?
|
|
|
|
|
[#10]
I'm loving your progress 11B. You we imputing me to give one of these a go.
Great job. |
|
|
|
GA, USA
|
[#11]
LonghunterCO, its not rocket science, I say go for it. Remember 350 is the optimal working temp. Check out the videos by PhiliEDC on youtube for more details, they helped me out a lot.
|
|
|
|
[#12]
Originally Posted By JonnyVain:
Wanted more tuck so i added more leverage. https://farm6.staticflickr.com/5820/23650395612_d0859d9dc4_b.jpg Note the angle of the lever. I recommend this as it follows the contour of the belt. https://farm1.staticflickr.com/615/23463206500_944d2fd9d2_b.jpg Tucks really well https://farm6.staticflickr.com/5697/23732772016_31ce00a2c3_b.jpg I don't know how you can sit down with that thing on. Where does the holster go/sit? On a side note, I might try wrapping my glock with hockey tape now. |
|
|
|
TX, USA
|
[#13]
Originally Posted By 2apatriot:
I don't know how you can sit down with that thing on. Where does the holster go/sit? On a side note, I might try wrapping my glock with hockey tape now. Originally Posted By 2apatriot:
Originally Posted By JonnyVain:
Wanted more tuck so i added more leverage. https://farm6.staticflickr.com/5820/23650395612_d0859d9dc4_b.jpg Note the angle of the lever. I recommend this as it follows the contour of the belt. https://farm1.staticflickr.com/615/23463206500_944d2fd9d2_b.jpg Tucks really well https://farm6.staticflickr.com/5697/23732772016_31ce00a2c3_b.jpg I don't know how you can sit down with that thing on. Where does the holster go/sit? On a side note, I might try wrapping my glock with hockey tape now. you gotta wear your pants high enough that it sits above your thigh/junk when you sit down, for me at least. it really is the most optimal spot to carry even though it has its drawbacks |
|
|
AZ, USA
|
[#14]
|
|
|
LA, USA
|
[#15]
Added some legitimate belt loops to my Pistol Tacos:

And made a new sheath for my buddies new knife: 
*I apologize for the grainy photo* |
|
|
|
[#16]
Originally Posted By 2apatriot:
Do any of you guys have tips/tricks for mounting a holster in a vehicle? I know about the Gcode hanger kit and the Gum creek strap, but I was thinking some of y'all may have come up with something better/cheaper. Thanks. here is my setup. simple kydex pancake style. long bolts and nuts brace it up off the plastic in front of the seat. mounted low enough that my leg slips over the top but i can still grab it quick if needed. 
|
|
|
|
|
[#17]
what size eyelets to secure 4 pcs of .08 kydex? and where can i get a 25 or so.
Also im thinking about getting a harbor freight arbor press. from what i understand i will have to drill the base and shaft for the dies. correct? where can i get the dies? |
|
|
|
|
[#18]
first pass at a double thick bicolor.


|
|
|
|
CT, USA
|
[#19]
Try Red Feather for quality drones.
Here is G43: Glock 43 I've purchased a few things from him, and they were all top quality. |
|
|
CO, USA
|
[Last Edit: muddywings]
[#20]
It's been a while since I've done any kydex work so I was going to give a double layer holster a shot. Few questions and check my logic please:
Press as normal the first inner layer-let fully cool (will use 0.060 kydex) Do not remove first inner layer. press second outer layer over the first-let cool (will use 0.080 kyrdex) cut, shape, sand as normal Do i need to glue the inner to the outer or just let the tension screws and mount screws keep everything in place? Anything I'm missing or tips/tricks to make it easier? ETA: further googling I'm seeing mold both pieces at the same time--can anybody confirm? |
|
|
|
[#21]
Originally Posted By evnash: first pass at a double thick bicolor. http://i16.photobucket.com/albums/b28/evnash/Guns/F38A1505-56E3-4606-B2BD-0EFB391464E2.jpg http://i16.photobucket.com/albums/b28/evnash/Guns/9BFB6339-785D-4CE7-A1C1-D5AC2CFD2ABE.jpg I like that a lot. Should be quite rigid. Does it feel a lot thicker than a single layer holster IWB? Love the look of the VZ's on that Champion. |
|
|
|
|
[#22]
Originally Posted By muddywings:
It's been a while since I've done any kydex work so I was going to give a double layer holster a shot. Few questions and check my logic please: Press as normal the first inner layer-let fully cool (will use 0.060 kydex) Do not remove first inner layer. press second outer layer over the first-let cool (will use 0.080 kyrdex) cut, shape, sand as normal Do i need to glue the inner to the outer or just let the tension screws and mount screws keep everything in place? Anything I'm missing or tips/tricks to make it easier? ETA: further googling I'm seeing mold both pieces at the same time--can anybody confirm? i molded both at the same time on the holster above. only separated where i had to reheat to mold for the slide release. |
|
|
|
|
[#23]
Originally Posted By DevilDog0402:
I like that a lot. Should be quite rigid. Does it feel a lot thicker than a single layer holster IWB? Love the look of the VZ's on that Champion. Originally Posted By DevilDog0402:
Originally Posted By evnash:
first pass at a double thick bicolor. http://i16.photobucket.com/albums/b28/evnash/Guns/F38A1505-56E3-4606-B2BD-0EFB391464E2.jpg http://i16.photobucket.com/albums/b28/evnash/Guns/9BFB6339-785D-4CE7-A1C1-D5AC2CFD2ABE.jpg I like that a lot. Should be quite rigid. Does it feel a lot thicker than a single layer holster IWB? Love the look of the VZ's on that Champion. thanks. yes you can tell its thicker |
|
|
|
|
[#24]
I have not made anything for a while.
Picked up a S&W Shield, so decided to make a holster. It is my first taco and first IWB and first with an adjustable tension. 
|
|
|
|
|
[#25]
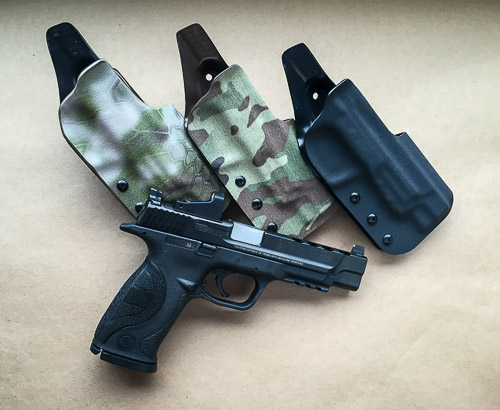
Here's one I made for a buddy of mine. I ordered him the gun and the light. With it being a full railed 1911 and a tlr-4 I knew it would be hard for him to find a holster so I felt obligated to make him one. I'm not a fan of the camo but that's what he wanted.
  |
|
|
|
|
[#26]
getting ready for the next carbine match

|
|
|
|
|
[#27]
Anyone else use the green HolsterMolds from Knifekits? The cheaper of the two green ones. I recommend not to. Dimensions are not correct. For the gen 4 glock 17, the thick slide rail area of the frame doesn't extend as far towards the muzzle as a real glock, and the entire mold is thinner than the actual gun. I've been wondering why my holsters have been dragging on the slide a lot, now I know. Will have to add a shit ton of tape.
|
|
|
|
|
[#28]
Two I made today.


|
|
|
|
|
[#29]
One I bent up for me.

|
|
|
|
|
[#30]
Got a wild hair tonight and made an IWB G43 mag pouch to play around with. Haven't messed with kydex in a few years. Think I forgot how to properly set eyelets.


|
|
|
|
|
[#31]
Originally Posted By AKCory762:
Two I made today. <a href="http://s1302.photobucket.com/user/Cory762/media/326C3727-B0F5-4E4F-A021-1056FA430646_zpsj53wisvl.jpg.html" target="_blank">http://i1302.photobucket.com/albums/ag136/Cory762/326C3727-B0F5-4E4F-A021-1056FA430646_zpsj53wisvl.jpg</a> <a href="http://s1302.photobucket.com/user/Cory762/media/253D12D9-E200-438E-A084-8FEF72BE362F_zpsdll760q8.jpg.html" target="_blank">http://i1302.photobucket.com/albums/ag136/Cory762/253D12D9-E200-438E-A084-8FEF72BE362F_zpsdll760q8.jpg</a> hope you dont snag the front sight on the glock. |
|
|
|
GA, USA
|
[#32]
Good looking stuff guys, I just posted this tutorial over on GON.com and some of it may be redundant but I figured someone here will find it helpful.
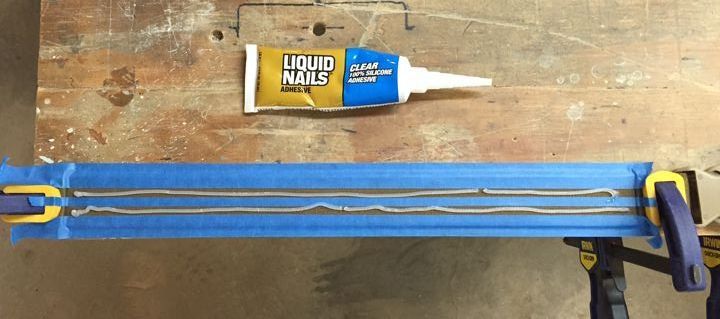
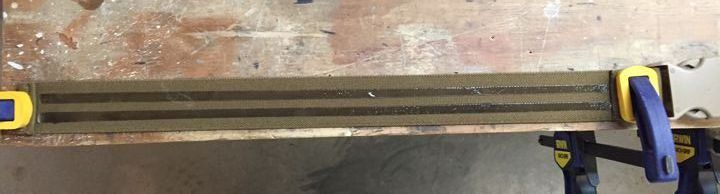
Disclaimer, I am only a hobbyist. I am doing this tutorial to help others in making their own Kydex holsters. So you may have purchased a holster from some company for $50-$100. We have all been there; however if you are like me, you have more guns than holsters. Dropping another $100 every time you get a gun or add a tactical light or whatever can get costly. Worse is if you have some combination of light and gun that no one makes a holster for, or you have to give them your gun for a week for them to make the holster. This is what eventually forced me to learn how to make a quality Kydex holster. So once you get the basics down, you can make a holster, sheath, or whatever with Kydex. I figured that since I have seen several posts about what holster to get I would do this tutorial. Up front you will need some tools and supplies but once this is acquired, you can produce a quality holster for about $10-$15. Most of these tools can be purchased from Harbor Freight, Northern Tool, etc… and are often on sale. The basic tools: Retractable Utility Knife ($5.00) Metal Ruler ($2.00) Non-contact Infrared Thermometer ($30.00) Leather Work Gloves ($20.00) Drill with ¼” Drill Bit ($30.00) Heat Gun ($22.00) Toaster Oven ($20.00) ¼” eyelet hand setter ($12.00) Hammer ($10.00) Kydex Press ($30.00-$40.00) You will need to build this, see below Belt loop jig ($20.00) You will need to build this, see below These are the minimum tools you will need. If you have the following tools it will make everything easier on you: Drill Press Belt Sander Vice Band Saw Dremel Perishables: Medium-Grit Sanding Sponge ($8.00) Blue Painters Tape ($2.00) Wood Dowels Assorted Sizes ($10.00) Michel’s Craft store sells an assortment kit Wood Craft Sticks ($5.00) Tongue Depressors Materials: So Kydex comes in different thicknesses, .60, .80, .93, and .125. I recommend using the .80 thickness and this tutorial is designed for this thickness. .80 is ideal for holsters and will deliver a good balance of definition and durability. For one typical holster you will need two pieces of Kydex at 9”x7” and another piece of 2”x6” for the belt loops. Kydex is sold in 12”x12” sheets but you can also buy it in bulk up to 4’x8’ sheets. I normally get 2’x4’ sheets and that lets me make several holsters. All the Kydex and hardware can be purchased from knifekits.com, diyholsters.com, or Amazon. The hardware is determined by the thickness of the Kydex so for .80 Kydex you will need the following hardware: Kydex .80 ($5.00-$30.00) Eyelets #8-10 ¼” ($10.00) 8-32 Philips head .500 (1/2”) machine screws ($10.00) 8-32 Philips head .375 (3/8”) machine screws ($10.00) ¼” slotted pass through post ($10.00) 7/32” rubber tubing ($5.00) get this from an ACE hardware or similar shop and you will only need a few inches, I just go ahead and buy it in 2’ sections at a time. You will be cutting the tube in 1/8” sections. These slices will be silencers. This is cheaper and more customizable than using rubber washers or O-rings. Kydex Press: So you can buy a Kydex press for about $100.00 but I recommend you build your own. You will need to purchase two pieces of 8”x12”x1” thermoforming foam. Each piece cost about $10.00 from knifekits.com http://www.knifekits.com/vcom/product_info.php?cPath=41_524&products_id=4290 Once you have the foam you can use plywood and some bar clamps to build the press. Here is a picture of the press I built. 
Once I started this tutorial, I decided to upgrade my press. I used some flat 1.5”x14”x1/8” thick steel from home depot. I cut it to fit then I used two ½”x 6” lag bolts with nuts and washers. Once I got it all together, I can now use a cordless drill to squeeze the press. A word of caution, you want it to press tight but you do not want to crush the gun so I use the slowest setting on my drill and since I was already familiar with how much pressure I applied with the clamp press, I had a good idea of how much pressure to apply here. Here is a side view. 
I recommend you build a horizontal press rather than a hinged press. A hinged press will apply force unevenly and I have found them to push objects out of alignment. I am sure you can find plans on the internet for building a press, I just knocked my press out without plans, it works great. Belt Loop Press So you can buy belt loops made of polymer or metal but I just make my own. To do this you will need to make a press. Figure out the size belt loops you will need, keep in mind that the belt loops will need to match mounting holes on the holster. Standardizing this will make thing easier. For my belt loops, they are ¾” wide and they will fit a 1 ¾” wide belt and come out ½”. The mounting holes are 2 ¾” on center. This allows for about ¼” of Kydex material around the holes. To make them, I just heat up the Kydex to about 300 degrees (definition is not an issue with belt loops) and lay the Kydex in the press, then I close the press and apply some clamps to hold it closed for about 10 minutes. Next I open and remove the Kydex. I mark and cut the belt loops slightly larger than ¾” wide, then I sand and drill them. You can buy ¼” eyelets that are shorter and you can put these eyelets in the holes; however, I don’t worry with them. Here are some pictures to the belt loop press. 

Ok, Kydex has an ideal working temperature of 350 degrees, and Kydex gets floppy at about 220 degrees. This means that you can shape it at 220 but to get the desired definition, you really need to get as close to 350 as possible. Also you want to get to the desired temperature slowly. Fast heating of Kydex and/or heating over 350 degrees will cause it to deform and shrink on one or more sides and instead of a square you will have a trapezoid. Another important aspect about Kydex is that it will come with a rough side and a smooth side. It should be self-evident that the rough side is for the outside of the holster and the smooth for the inside. Ok so lets get started I recommend you experiment with a piece of Kydex. Cut a square piece and place it smooth side down in your toaster oven and set the temperature to ~150. Check it every few minutes and in several places to see where the temperature is. My oven has a “Stay On” setting that I use rather than the timed on setting. Once the Kydex is at 150, I rotate the Kydex but I do not flip it (meaning I rotate the Kydex in the oven so that the side that was towards me is now away from me) and turn the temperature up another 50 degrees. Repeat this process till you are at 350. If the Kydex is still a square, then you did it correctly, if its deformed then you got it too hot or heated it too fast. Let the Kydex cool and retry it. Kydex can be reformed several times before it loses its strength. I have even taken old holsters and reformed them for new guns. So once you have the heating down, we move on to making a holster. I will explain this in 4 phases. Each phase will have several steps. Everything should take you about 4 hours if you do everything correctly as I have outlined here. Phase 1 Prepare the gun for forming. Make sure the gun and magazine are unloaded and safe. Once this is accomplished you will need to use the blue painters tape, wooden dowels, and wooden craft sticks to increase the bulk of the gun to allow it to side completely into a holster. For this tutorial I am using a Sig P227 with a Streamlight TLR-3 tactical light attached. I suppose this is a good time to mention that if your gun has a polymer lower or magazines you will be able to make a holster for it but some level of caution should be taken when using the heat gun in the next few phases. You can heat up polymer but I do not recommend heating it past 250 degrees. I know this is a safe temperature because that is the recommended baking temperature for Cerakote on Polymer guns. 

Above is a picture of the Sig P227 masked off. If you are not using a light or laser on you gun then the amount of masking should be minimal. Almost all guns will require some masking. At a minimum, you will need to mask the front sight post, in these pictures you can see that I uses a small (~3/16”) wooden dowel along the top of the slide from the rear sights to the front sight. You should be able to figure out that there needs to be a channel the entire length of the holster for the front sight to slide in, otherwise you may be able to get the gun in the holster but it will be almost impossible to get out of the holster. On Kydex holsters, the retention is primarily centered on the ejection port. So when we later adjust the retention, this is where we will do it; however, if you are working with a gun and no light or laser, then the retention will also be controlled at the trigger guard as well. Another note of caution here, I have seen lots of Kydex holsters that you can see the trigger molded into the Kydex, I am always concerned about the Kydex causing an accidental discharge if the trigger is molded, so for this reason I normally mask off the inside of the trigger guard or a relieve the tension in this area with the heat gun once everything else is done. When masking the gun all the levers and anything that protrudes more than 1/8” of an inch is a good rule to follow. Consider the magazine release, if you do not mask it, the only time there is no tension being applied to it will be once it is in the holster, this means that inserting it and drawing it, the magazine release may have Kydex pushing on it and you may eject the magazine. So to compensate for this, we mask the magazine release all the way to top of the holster. Ok, so we have the gun masked off, we move on to Phase 2. Phase 2 Cut and heat the Kydex. So you can lay the gun on the Kydex and trace around it (leaving plenty of room for eyelets and the Kydex to form up on the contours of the gun). I have done this a few times so I have a good idea of how the holster will look so I have traced this onto the Kydex. If you are unsure about the shape, just cut a large enough square of Kydex (keep in mind it will need to fit inside your oven so that is the largest you can work with) also in this tutorial I intend to have a shirt guard on the inside of the holster so my Kydex must be almost the entire length of the gun. I guess there are several ways to make a holster but I have only worked with two methods. One piece holsters (this wraps around the gun) or a two piece holster. In this tutorial, I am making a two piece holster, this means that we form the inside (side closest to the body) and then the outside. I am also making this holster with leather wings to allow it to conform with the body more. For these wings I cut some cowhide leather about ¼” thick to the size I need that will match with the holster mounting holes and belt loop holes. I dye the leather black and I will add eyelets to the holes once they dry. The leather wings are not necessary but I like them so I added them to this holster. For this tutorial, you can just mount the belt loops directly to the holster if you want. 
Ok, to cut Kydex, you can lay a metal ruler on the line you want to cut and score the Kydex with the utility knife along the ruler several times applying more force each time. Once you have made 4 or 5 scores, then use the edge of a table and bend the Kydex along the scored line. It will snap and make a clean break. Or if you have a band saw, just cut it like you would wood. Once cut, you may want to clean up the edge but I usually do this in a later phase. 

So then we put the body-side piece of Kydex in the oven and slowly bring it to 350 degrees. Between checking the temperature and rotating the Kydex, I use a heat gun and start heating up the forming foam and gun. This is where I said to be careful if you are working with a polymer gun. The idea here is to get the foam and gun warm enough that we do not transfer all the heat from the Kydex to them. We want everything to be warm, this will ensure that we get really good definition in the molding process. The foam and gun do not need to be 350 degrees. They just need to be warm so just wave the heat gun over them for a bit and recheck on the Kydex temperature. Once we have 340-350 degrees on the Kydex we move to Phase 3. Phase 3 Forming the Kydex. Once the Kydex is at 350 and the foam and gun are warm, remove the Kydex from the oven and turn the oven off (we want it to be cool for the next piece of Kydex in a few minutes. Lay the Kydex on the foam and place the gun on it. Remember this is the inside half of the holster so make sure you have everything properly lined up. Next press the top foam on top of the gun and apply pressure with clamps or whatever. Set a timer for 15 minutes and let everything sit. 
Once the 15 minutes are up, release the clamps and remove the top foam. Leave the inside Kydex and gun on the lower foam. Do not separate them or move them at all. Now we start heating the outside half of Kydex in the oven and slowly bring it to 350 degrees. This time we will only heat up the top foam with the heat gun. If we use the heat gun on the bottom foam or the gun we will mess up the inside half of Kydex. Once the outside half of Kydex is at 350 and the top foam is warm, remove the Kydex from the oven and lay it on top of the gun. Apply the top foam and apply pressure and clamp it for another 15 minutes. Once the time is up, remove the clamps, top foam, both halves of Kydex, and the gun. The Kydex may stick to the top foam, no big deal, just pull it off. 
In the 15 minutes between these phases, I finish the belt loops, leather, and I cut the silencers from the 7/32” rubber tubing. 

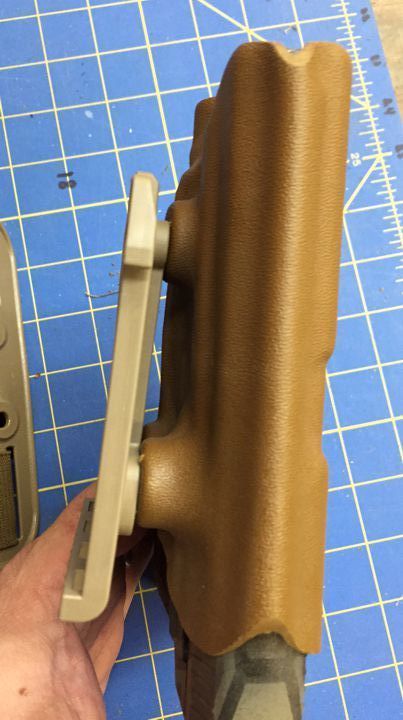
Once all this is done we move on to Phase 4. Phase 4 Cutting and finishing the holster. So at this point you should have two halves of the holster and the gun with the masking still on it. I normally keep the gun in the holster and tape the two halves of the holster together. I do not want the holster to shift for these next few steps. This is the time to finish all the outer edges. I do a rough cut and sand with the band saw, belt sander, and Dremel. Once this is done I remove the gun and separate the holster halves then I finish all the edges with the sanding sponge. I put is all back together and re tape the halves together. If you want to angle the sides of the holster, you can heat up the area you want to angle and place it in a vice then bend the holster to the desired angle. Be careful doing this so that you do not heat up any area that was molded, if you do, you will loos all the detail you worked so hard to achieve. On this holster I heat up the Kydex on both halves of the holster above the slide. On this right hand holster that means that I am shaping the side of the holster that faces forward. Then I do the other side. On the finished pictures you will see the angle I am talking about. 
Next I drill out the holes on the holster halves. This is best done with both halves taped together so that they line up. I also keep the gun in the holster to help in keeping both halves aligned. Once the holes are drilled. Now is the time to remove the masking from the gun and put it back in the holster. Now I add the eyelets. If the gun is hard to pull out of the holster once the eyelets are mounted, do not panic, we want it tight. This is where you will adjust the tension with a heat gun on the ejection port and/or trigger guard. For this holster I heated up the Kydex at the ejection port a little too much, you will notice that it’s a bit shinny there. If you use a lower heat setting to work slower you can avoid this shinny effect. I also heated up the mouth of the holster where the light would slide in and with a gloved hand I bent the Kydex out a bit to assist in holstering. When you are adjusting the tension at the ejection port, heat up the Kydex till its slightly bendable, then work the gun in and out of the holster till the Kydex cures. You should still have some resistance but the gun should be able to draw out of the holster. Over time this will ease a slight bit, I also apply a light coat of 3in1 oil to the inside of the holster and this makes a big difference. So once you have the retention where you want it, I apply the leather and belt loops with the 8-32 Philips head machine screws, ¼” slotted pass through post, the 1/8” cut 7/32” rubber tubing. I place the rubber tubing (silencers) next to the Kydex. I use the 1/2” screws for attaching the leather to the holster and the 3/8” screws for attaching the belt loops. Clean everything up and you are done. I hope this helps and 


I look forward to any questions or comments. |
|
|
OH, USA
|
[#33]
Not trying to be an asshole, but your holsters need a lot of work before teaching others how to build them.
|
|
|
|
[Last Edit: BlackCloud762]
[#34]

|
|
|
|
GA, USA
|
[#35]
Originally Posted By 4DAIVIPAI2K5:
Not trying to be an asshole, but your holsters need a lot of work before teaching others how to build them. I am pretty sure I stated that I was a "hobbyist" and the three tutorials I posted here are to help other who are new to Kydex. I seem to recall several positive replies to my previous posts. But what the heck you are welcome to your opinion. Unless there is some kind of outpouring of how "crappy" my unskilled and apparently amateurish holsters are then I will continue to blissfully contribute here. Rest assured that your legendary status is not threatened by half assed attempts to mold plastic around a gun. |
|
|
MO, USA
|
[#36]
Back it off from 350. Learn to work fast and efficient from heating source to the press. If I wasn't so busy I'd be pissed that there is someone new everyday trying to take my business. But, Phlster videos started me down the path so I feel I owe it to the next guy.
|
|
|
OH, USA
|
[#37]
Originally Posted By 11B30B4:
I am pretty sure I stated that I was a "hobbyist" and the three tutorials I posted here are to help other who are new to Kydex. I seem to recall several positive replies to my previous posts. But what the heck you are welcome to your opinion. Unless there is some kind of outpouring of how "crappy" my unskilled and apparently amateurish holsters are then I will continue to blissfully contribute here. Rest assured that your legendary status is not threatened by half assed attempts to mold plastic around a gun. Originally Posted By 11B30B4:
Originally Posted By 4DAIVIPAI2K5:
Not trying to be an asshole, but your holsters need a lot of work before teaching others how to build them. I am pretty sure I stated that I was a "hobbyist" and the three tutorials I posted here are to help other who are new to Kydex. I seem to recall several positive replies to my previous posts. But what the heck you are welcome to your opinion. Unless there is some kind of outpouring of how "crappy" my unskilled and apparently amateurish holsters are then I will continue to blissfully contribute here. Rest assured that your legendary status is not threatened by half assed attempts to mold plastic around a gun. 
As I stated I wasn't trying to be an asshole, maybe your previous postings had a better holster done in it. The one that the context of the this discussion needs improvement. Sorry, but that is a fact. |
|
|
LA, USA
|
[#38]
Originally Posted By 11B30B4:
I look forward to any questions or comments. 1. Block out the ejection port. 2. Don't overheat your holster. 3. Injection Molded > Kydex Belt Loops Your holsters need a lot of work, but we appreciate your attempt at helping new kydex holster makers. However, there are plenty of tutorials already out there from folks who do this every day and have mastered their craft. |
|
|
|
[#39]
Speaking of injection molded belt loops, who has the best price and for decent quality ones? I have been making holsters for about 3 years, an never had one of my kydex ones break, but the molded ones do have a better look to them
|
|
|
|
|
[#40]
Originally Posted By aperdue:
Speaking of injection molded belt loops, who has the best price and for decent quality ones? I have been making holsters for about 3 years, an never had one of my kydex ones break, but the molded ones do have a better look to them i usually buy from holsterloops.com but DIY holsters and Knifekits have them as well. |
|
|
|
GA, USA
|
[#41]
Chainsaw1, thanks for the suggestion. I will experiment with temps in the 320-340 range. I just know that in the past I did not even get close to 350 and I never got good definition. I spent some time watching several Youtube videos and most of them recommend 350 as the target. Since then I get (what I consider) good definition. Anyway, I understand your feelings about your business; however, as you said, you learned from someone else. All I was attempting to do here was contribute some of what I have learned to help others.
4DAIVIPAI2K5, the way I received your comments was exactly opposite from what you stated your were attempting to avoid. In any case, a statement like “needs a lot of work” does not help me. I would have asked exactly what needed improvement, but I figured it would have opened me up to another (not so helpful) comment like “everything”. If noting in my post was useful to you then no big deal. While I did ask for comments, I was hoping for more constructive ones. Anyway, I got no issues with you and if my response was brash, I apologize. Dave_M, thank you for your suggestions, I do block out the ejection port some but I will experiment more with that. As for the overheat at the ejection port, It was intentional to show what happens when using a heat gun. As I only make holsters for myself and a few close fiends, I was not overly concerned, but I did open myself to comments about it. I also am aware of injection molded belt loops and I would agree that they are most likely more resilient than Kydex ones but again I was attempting to show what a person could with minimal investment. Thank you for your suggestions. |
|
|
|
[Last Edit: Dangus]
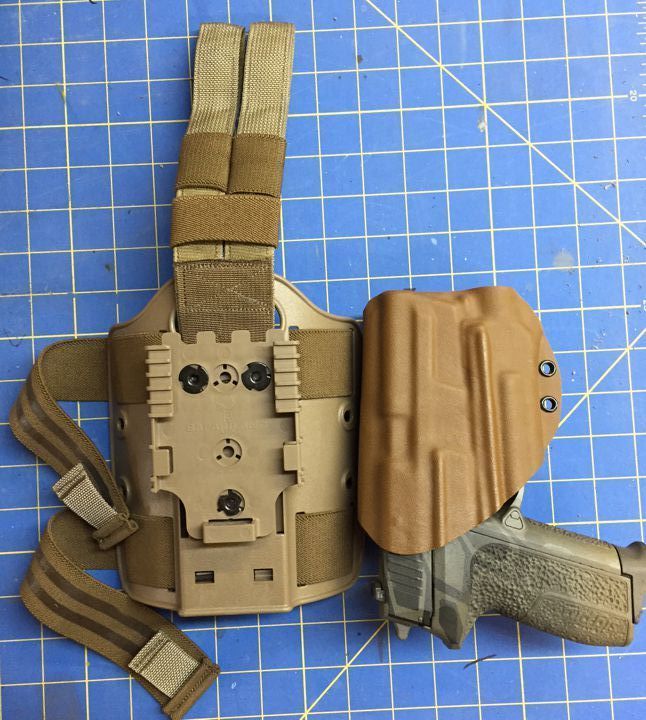
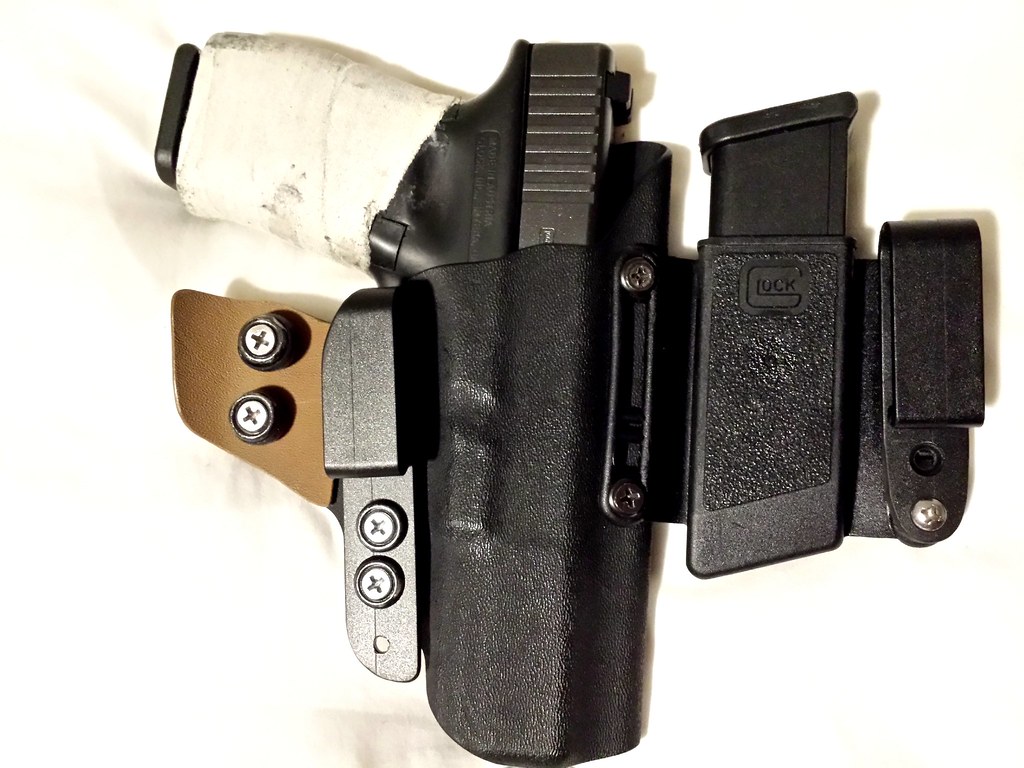
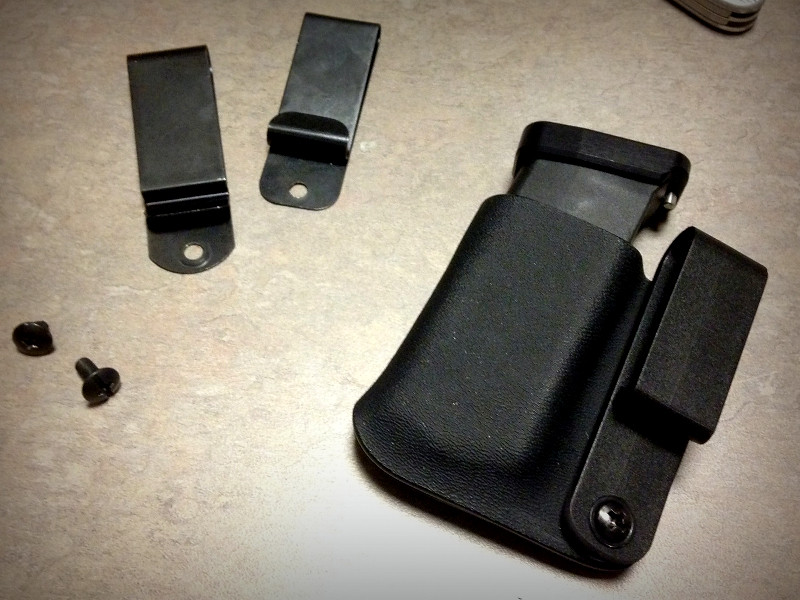
[#42]
Used this setup the past couple of days. Pouch is the same I posted above a few days ago with the addition of the metal j-hook and some adhesive-backed felt sheeting from Ebay. Seems to work great. I was really surprised how comfortable the pouch was. Found the sweet spot on my weak side, and barely noticed it was there 13+ hours each day. Drawing the mag is business as usual - Index finger along the front inside the waist band, thumb and middle/ring fingers grasping the mag itself. Time will tell how long the felt holds up, but I'm pleased with it so far. (Holster is from Ebay and is okay until I can find one I like... I haven't quite ventured into making kydex holsters.)


|
|
|
|
|
[Last Edit: evnash]
[#43]
Need some help here. I finally got my 1/2 ton arbor press set up. Used dies from diy holsters. Set rivets look totally crappy compared to the hammer set journeyman set I've been using from knife kits. With this arbor u tried less pressure, more pressure , even squired some lube on the dies. Same result.
Any suggestions. Arbor set on the right, hammer set in right 
Set up 
|
|
|
|
MO, USA
|
[#44]
I'd take a real close look at the dies and make sure they are polished and make sure your arbor/dies are squared up. But I think trying eyelets from someplace else may work better. I know I have least amount of problems using KK eyelets with the KK master dies.
|
|
|
WY, USA
|
[#45]
Originally Posted By 4DAIVIPAI2K5:
Not trying to be an asshole, but your holsters need a lot of work before teaching others how to build them. im pretty new to making kydex stuff, and really enjoy and appreciate seeing as many different ideas as possible on how to shape kydex. totally unlike 4daivipai2k5 who obviously knows everything that there is to know about kydex and there is nothing new to learned since the best has already been done and there is no need for others to put forth any new ideas or effort in coming up with different techniques. I on the other hand, believe in innovation, and encourage everyone to keep putting forth any new ideas or different techniques they can come up. |
|
|
OH, USA
|
[#46]
Originally Posted By LowRez:
im pretty new to making kydex stuff, and really enjoy and appreciate seeing as many different ideas as possible on how to shape kydex. totally unlike 4daivipai2k5 who obviously knows everything that there is to know about kydex and there is nothing new to learned since the best has already been done and there is no need for others to put forth any new ideas or effort in coming up with different techniques. I on the other hand, believe in innovation, and encourage everyone to keep putting forth any new ideas or different techniques they can come up. Originally Posted By LowRez:
Originally Posted By 4DAIVIPAI2K5:
Not trying to be an asshole, but your holsters need a lot of work before teaching others how to build them. im pretty new to making kydex stuff, and really enjoy and appreciate seeing as many different ideas as possible on how to shape kydex. totally unlike 4daivipai2k5 who obviously knows everything that there is to know about kydex and there is nothing new to learned since the best has already been done and there is no need for others to put forth any new ideas or effort in coming up with different techniques. I on the other hand, believe in innovation, and encourage everyone to keep putting forth any new ideas or different techniques they can come up. There is right way to do it and a wrong way to do it. Damn near melting the kydex in multiple areas, incorrect blocking, un even bends, random rivet placement, extra un needed holes in the leather, use of loops that have been proven to break. These are not new ideas or different techniques. These are errors. Learning from your errors is one thing, but presenting them to try to teach others on how to make a PROPER holster is another. |
|
|
OH, USA
|
[#47]
Originally Posted By evnash:
Need some help here. I finally got my 1/2 ton arbor press set up. Used dies from diy holsters. Set rivets look totally crappy compared to the hammer set journeyman set I've been using from knife kits. With this arbor u tried less pressure, more pressure , even squired some lube on the dies. Same result. Any suggestions. Arbor set on the right, hammer set in right <a href="http://s16.photobucket.com/user/evnash/media/kydex/4BF6C597-21D8-41A0-BF2C-4E48665F91DE.jpg.html" target="_blank">http://i16.photobucket.com/albums/b28/evnash/kydex/4BF6C597-21D8-41A0-BF2C-4E48665F91DE.jpg</a> Set up <a href="http://s16.photobucket.com/user/evnash/media/kydex/E0DD0F23-488B-4458-98A0-6F9B0931FAD3.jpg.html" target="_blank">http://i16.photobucket.com/albums/b28/evnash/kydex/E0DD0F23-488B-4458-98A0-6F9B0931FAD3.jpg</a> Are the eyelets long enough, hard to tell in the pictures. I dont use a arbor press, I use the hammer set, that i modified and made into one of my vices so I can get the eyes set on both sides of a adj. retention taco holster. |
|
|
|
[#48]
Here's my first with the square blocking from DIY Holsters. Worked out pretty well with the Insight light. Think I might get another set of these and modify them to work with the Surefire XC1.

|
|
|
|
|
[#49]
Originally Posted By evnash:
Need some help here. I finally got my 1/2 ton arbor press set up. Used dies from diy holsters. Set rivets look totally crappy compared to the hammer set journeyman set I've been using from knife kits. With this arbor u tried less pressure, more pressure , even squired some lube on the dies. Same result. Any suggestions. I wonder if you have excessive runout in your dies in relationship to the press? I have the same press, but different dies. I had a machinist drill the holes in mine and have had ZERO issues with it on hundred's of holsters. |
|
|
|
OH, USA
|
[#50]
Originally Posted By terrance250:
Here's my first with the square blocking from DIY Holsters. Worked out pretty well with the Insight light. Think I might get another set of these and modify them to work with the Surefire XC1. http://i63.tinypic.com/2qu4ppy.jpg Assuming you are running the real light when you mold? If so screw the head out a little bit when you mold it and it will give you a little bit more length when you cut the holster down. Then when you back the head back down it will sit flush with the holster. |
|
|
 Win a FREE Membership!
Sign up for the ARFCOM weekly newsletter and be entered to win a free ARFCOM membership. One new winner* is announced every week!
You will receive an email every Friday morning featuring the latest chatter from the hottest topics, breaking news surrounding legislation, as well as exclusive deals only available to ARFCOM email subscribers.

AR15.COM is the world's largest firearm community and is a gathering place for firearm enthusiasts of all types.
From hunters and military members, to competition shooters and general firearm enthusiasts, we welcome anyone who values and respects the way of the firearm.

Subscribe to our monthly Newsletter to receive firearm news, product discounts from your favorite Industry Partners, and more.
Copyright © 1996-2024 AR15.COM LLC. All Rights Reserved.
Any use of this content without express written consent is prohibited.
AR15.Com reserves the right to overwrite or replace any affiliate, commercial, or monetizable links, posted by users, with our own.