|
[#1]
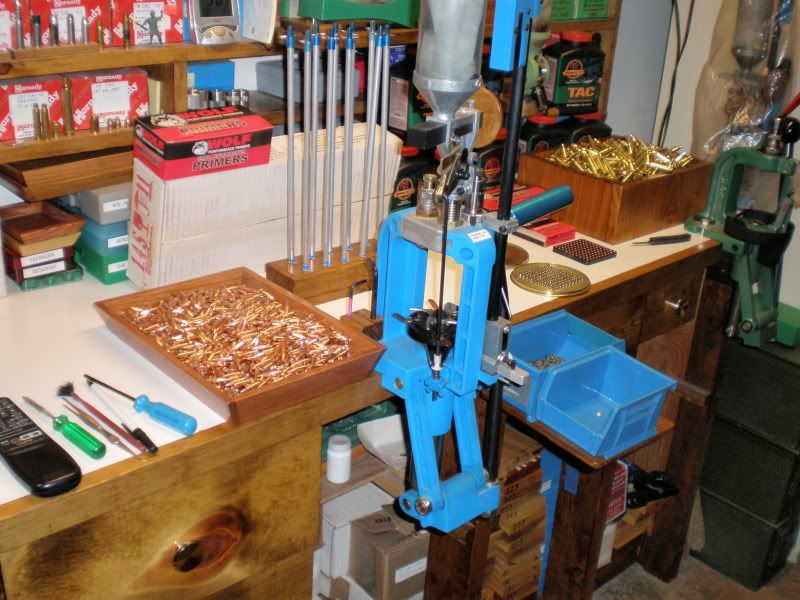
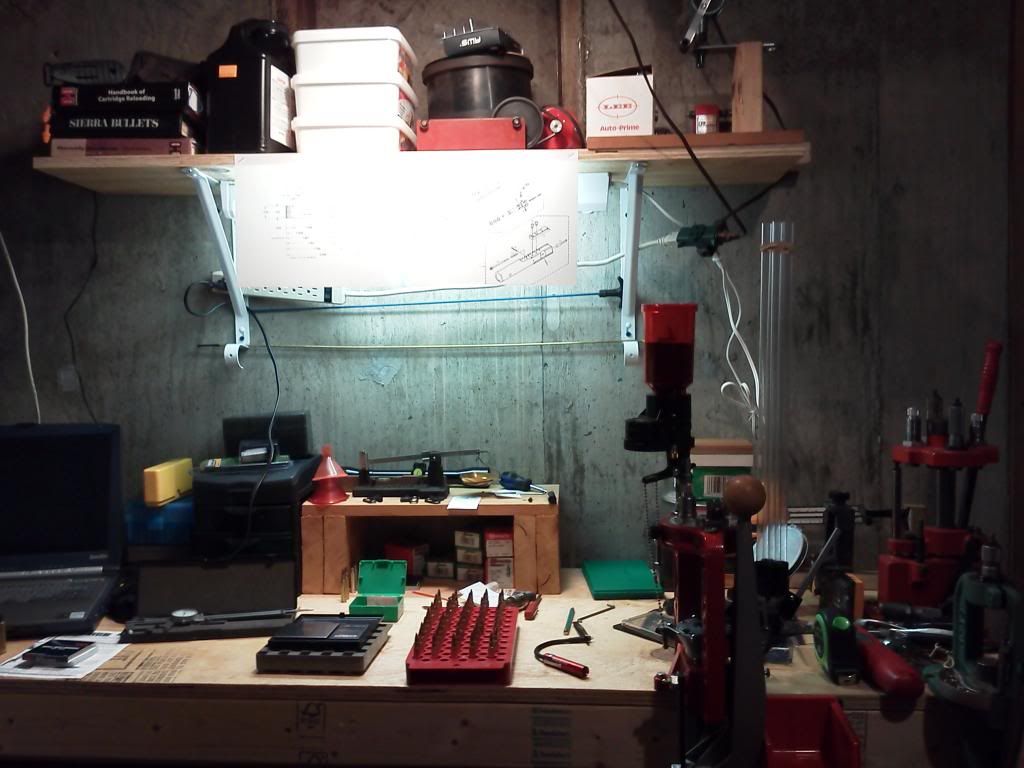
The top ring is glued. The bottom cap is just twisted on really tight. To remove the tubes to clean or what not, all I have to do is slide them up a little to get a good grip and give the bottom cap a good twist. definitely NOT coming off by just using them!
Originally Posted By Panther1911:
I like it! I like the solution to the primer tubes and powder holder |
|
|
|
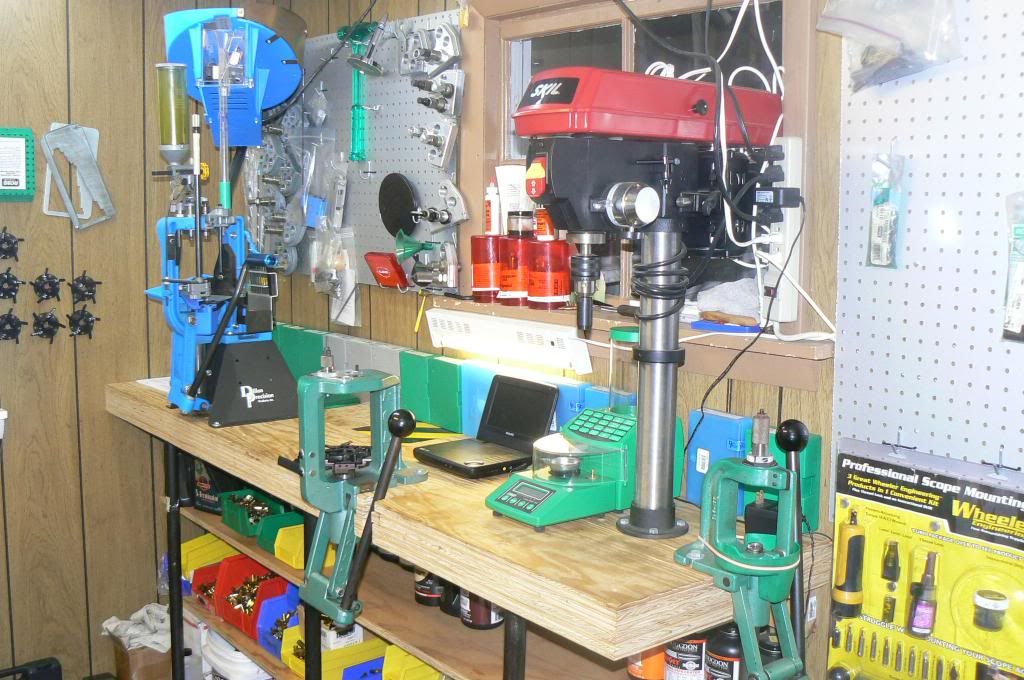
ME, USA
|
[Last Edit: farmcat]
[#2]
This was a fun project, and I enjoyed building it for my son(straight six). He takes care of all my reloading, so it was the least I could do.
|
|
|
UT, USA
|
[#3]
IKEA work bench works perfectly! I put some small trim peices along the sides to stop rouge primers and bullets that I drop. Works great!

|
|
|
|
[Last Edit: RLR350]
[#4]
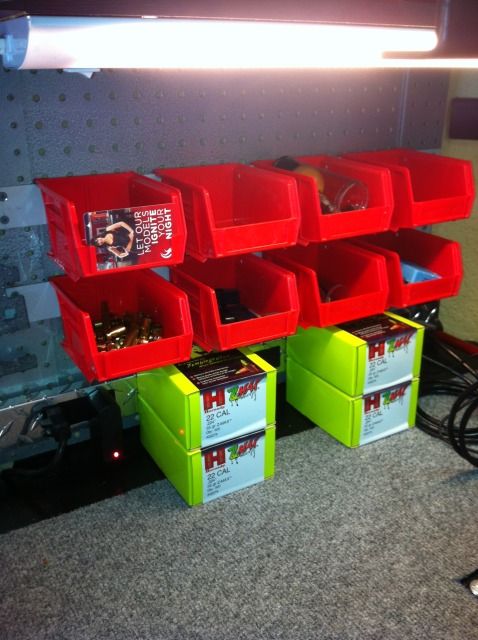
Thanks to an idea from "ekimnaheem" I added his primer tube holders to an unused area right of my press.
Three holes, three tube holders. I put one under the primer tube to catch used primers, too. I need to make the back one longer to hold the spring tubes for the LNL AP bullet feeder though. 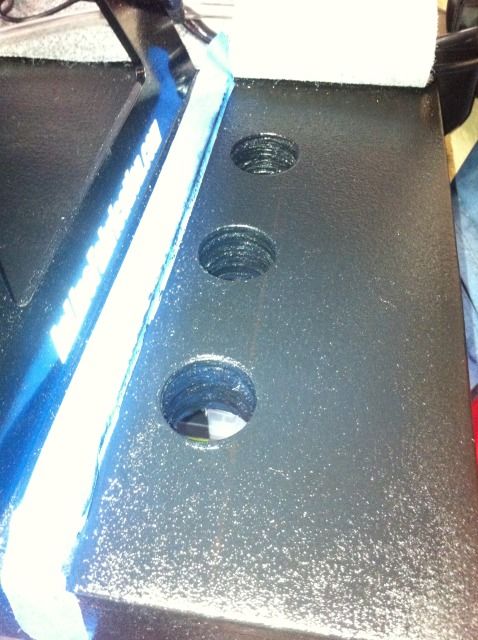 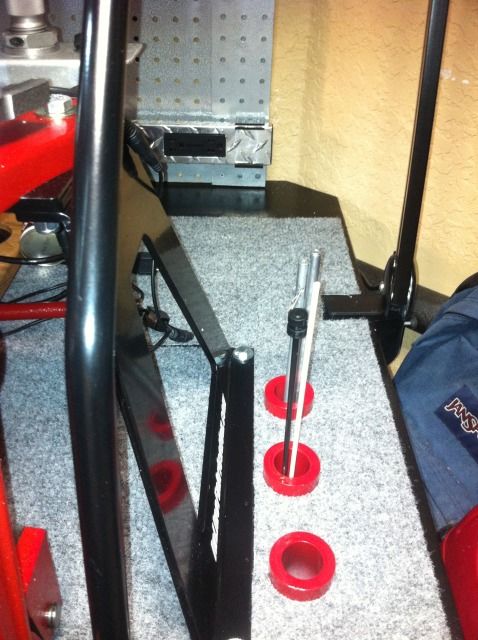
|
|
|
|
|
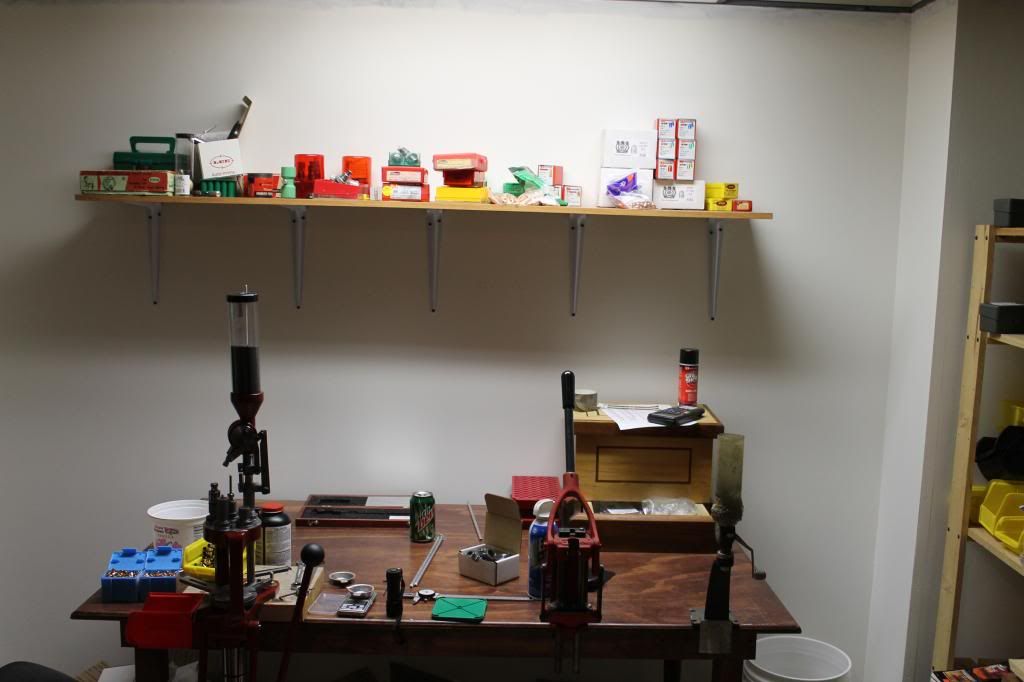
[#5]
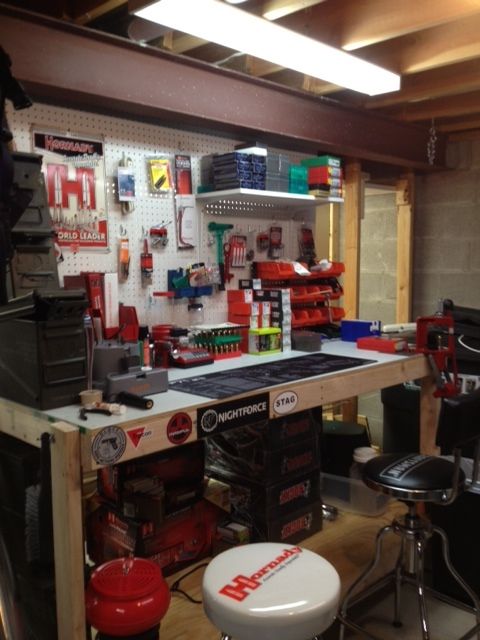
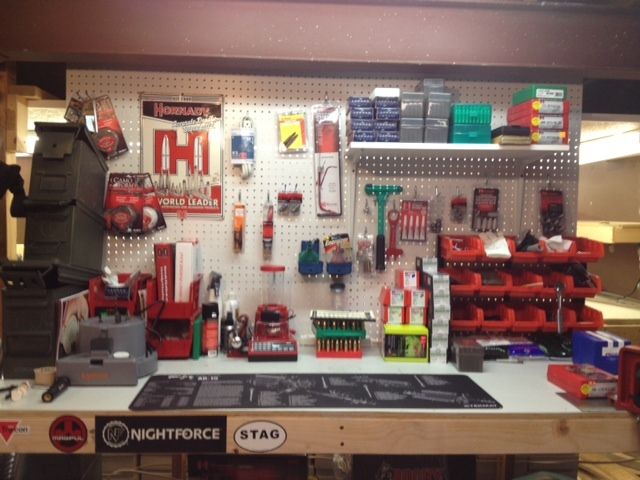
I'm somewhat new to reloading. This is my set-up.
|
|
|
|
|
[#6]
Originally Posted By Ogive:
I'm somewhat new to reloading. This is my set-up. http://i1296.photobucket.com/albums/ag4/OgiveARFCOM/ARFCOM%20Photos/D112BD54-E8D5-46AB-BBC2-64CDD13EDC23-1215-00000233B3F92C73_zpsb1afc641.jpg http://i1296.photobucket.com/albums/ag4/OgiveARFCOM/ARFCOM%20Photos/0C406E09-6683-4BA2-81C3-204768D61DB6-1215-0000023320B31050_zps6bb276de.jpg Nice set up. I like those long mats and the stool is cool. Where did you find the hangers for the Arko bins? |
|
|
|
|
[#7]
Originally Posted By Ogive:
I'm somewhat new to reloading. This is my set-up. http://i1296.photobucket.com/albums/ag4/OgiveARFCOM/ARFCOM%20Photos/D112BD54-E8D5-46AB-BBC2-64CDD13EDC23-1215-00000233B3F92C73_zpsb1afc641.jpg http://i1296.photobucket.com/albums/ag4/OgiveARFCOM/ARFCOM%20Photos/0C406E09-6683-4BA2-81C3-204768D61DB6-1215-0000023320B31050_zps6bb276de.jpg Where did you pick up the Hornady stool? I need a stool for my new bench. . . |
|
|
|
|
[#8]
Originally Posted By Ogive:
I'm somewhat new to reloading. This is my set-up. http://i1296.photobucket.com/albums/ag4/OgiveARFCOM/ARFCOM%20Photos/D112BD54-E8D5-46AB-BBC2-64CDD13EDC23-1215-00000233B3F92C73_zpsb1afc641.jpg http://i1296.photobucket.com/albums/ag4/OgiveARFCOM/ARFCOM%20Photos/0C406E09-6683-4BA2-81C3-204768D61DB6-1215-0000023320B31050_zps6bb276de.jpg How do you like the craftsman stool and where did you get the hornady one? Been needing a couple good stools for the man room... Thanks!! |
|
|
|
|
[#9]
Originally Posted By ekimnaheem:
I love rainy Saturdays. Got to stay in and work on my bench a little. Came up with a nifty way to keep all the odds & ends in reach and secure. Also, The shelving unit is "countersunk" into the bench top using a forester bit. I made the cut just deep enough and wide enough to get the adjustable feet to "almost" fit then i pounded them in from the top with a rubber mallet. A little epoxy resin in the hole before the feet went in makes a VERY stable base. The shelf unit is NOT moving! For the holders, i took a piece of 1.5 inch pvc pipe and got a cap on one end and then the other end is an extension. I used a hole saw to cut out the exact diameter of the pvc pipe through the table. I am going to put 2 more on the other side. Hope this may give you some ideas for your own benches! http://i1149.photobucket.com/albums/o586/ekimnaheem/CA257A9D-7BAA-456C-9608-C172450B6692-2372-00000161CCB8705C_zps3f1244f1.jpg http://i1149.photobucket.com/albums/o586/ekimnaheem/9381A42A-07D1-44C0-A0E5-70BCF819F93C-2372-000001619923E2A4_zps43181072.jpg http://i1149.photobucket.com/albums/o586/ekimnaheem/73EF43CA-68A1-4B4C-8097-BD78D4AC907A-2372-00000161941A1C25_zpse03ebd82.jpg http://i1149.photobucket.com/albums/o586/ekimnaheem/EB5ACB8C-094A-4AAE-BE66-E0BC6F71CA5A-2372-000001618EAC77F5_zps075d6245.jpg Very cool idea! I will be adding that mod to my bench. |
|
|
|
|
[#10]
Originally Posted By Ogive:
I'm somewhat new to reloading. This is my set-up. http://i1296.photobucket.com/albums/ag4/OgiveARFCOM/ARFCOM%20Photos/D112BD54-E8D5-46AB-BBC2-64CDD13EDC23-1215-00000233B3F92C73_zpsb1afc641.jpg http://i1296.photobucket.com/albums/ag4/OgiveARFCOM/ARFCOM%20Photos/0C406E09-6683-4BA2-81C3-204768D61DB6-1215-0000023320B31050_zps6bb276de.jpg Heh... So I've seen/can pick up the Craftsman stool at my local Sears, but like others have stated, the Hornady stool stands out like a ketchup popsicle in a white gloved Eskimo's hand. Source details, plz?? |
|
|
|
NC, USA
|
[#11]
Just started my endevor into the reloading world


Ordered a lee Loadmaster last night. I will post some new pics when it gets here! |
|
|
|
[#12]
Originally Posted By RLR350:
Thanks to an idea from "ekimnaheem" I added his primer tube holders to an unused area right of my press. Three holes, three tube holders. I put one under the primer tube to catch used primers, too. I need to make the back one longer to hold the spring tubes for the LNL AP bullet feeder though. Nice! Is the red spray paint or did you use something other than PVC pipe? |
|
|
|
|
[#13]
Originally Posted By ekimnaheem:
Originally Posted By RLR350:
Thanks to an idea from "ekimnaheem" I added his primer tube holders to an unused area right of my press. Three holes, three tube holders. I put one under the primer tube to catch used primers, too. I need to make the back one longer to hold the spring tubes for the LNL AP bullet feeder though. Nice! Is the red spray paint or did you use something other than PVC pipe? Red paint. After I took the time to paint them I decided I needed three different lengths for various items. So, I made new ones and didn't repaint them. I have a long one for the feeder tubers, medium for primer tubes and short for picks, etc - like a cup holder of sorts. This way everything is about the same height off the top of the bench and the length is contained underneath. I found the easiest way was to glue the connector to the length of PVC. After that use a power miter saw to cut the majority of the connector off - I used 1/2" from the bottom so it has a 1/2" rim above the bench. Then the PVC can be cut to the desired length, inserted in the bench and capped. For the spent primer catcher I cut the PVC tube immediately below the bench and used a connector to attach the remainder and cap. This way it can be removed fro the bottom to empty it rather then trying to get it around the press from the top. The clear plastic tube from the press is cut to a length just long enough it doesn't come out of the PVC on the upstroke - it moves up and down inside the PVC. Thanks again for the tip! |
|
|
|
|
[#14]
Originally Posted By ARGB:
Here is mine. Just finished it. http://i1153.photobucket.com/albums/p507/Leedsseat/Guns/IMG_3306_zpsfaae54e1.jpg Show off |
|
|
|
|
[#15]
Originally Posted By Weber:
http://i296.photobucket.com/albums/mm198/WeberSteve/A0F649C1-10FF-4FFB-9810-C2FFDD522452-28614-00001B136B92B75F_zps79409578.jpg What size Husky cabinet is that? I'm trying to decide between the 36" and 48" for my gun area in the garage. Would be for ammo and component storage primarily. I'm leaning towards the 36" to give me space for gun cases beside it. |
|
|
|
|
[#16]
Originally Posted By ekimnaheem:
I love rainy Saturdays. Got to stay in and work on my bench a little. Came up with a nifty way to keep all the odds & ends in reach and secure. Also, The shelving unit is "countersunk" into the bench top using a forester bit. I made the cut just deep enough and wide enough to get the adjustable feet to "almost" fit then i pounded them in from the top with a rubber mallet. A little epoxy resin in the hole before the feet went in makes a VERY stable base. The shelf unit is NOT moving! For the holders, i took a piece of 1.5 inch pvc pipe and got a cap on one end and then the other end is an extension. I used a hole saw to cut out the exact diameter of the pvc pipe through the table. I am going to put 2 more on the other side. Hope this may give you some ideas for your own benches! http://i1149.photobucket.com/albums/o586/ekimnaheem/CA257A9D-7BAA-456C-9608-C172450B6692-2372-00000161CCB8705C_zps3f1244f1.jpg http://i1149.photobucket.com/albums/o586/ekimnaheem/9381A42A-07D1-44C0-A0E5-70BCF819F93C-2372-000001619923E2A4_zps43181072.jpg http://i1149.photobucket.com/albums/o586/ekimnaheem/73EF43CA-68A1-4B4C-8097-BD78D4AC907A-2372-00000161941A1C25_zpse03ebd82.jpg http://i1149.photobucket.com/albums/o586/ekimnaheem/EB5ACB8C-094A-4AAE-BE66-E0BC6F71CA5A-2372-000001618EAC77F5_zps075d6245.jpg Clever. Well done. |
|
|
|
|
[#17]
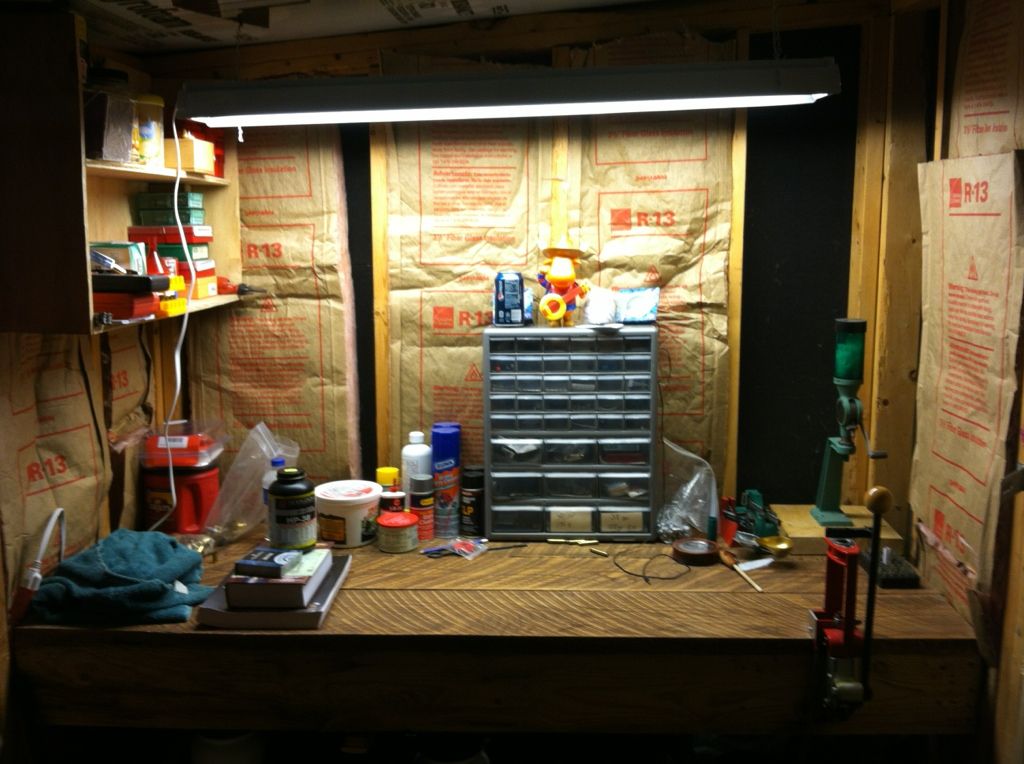
 Another way to store primer tubes is a wood block. No hole in bench.
|
|
|
|
|
[#18]
Originally Posted By RLR350: FYI, Saw some Arko bins on woot. http://www.woot.com/plus/organize-your-garage-1Originally Posted By Ogive: I'm somewhat new to reloading. This is my set-up. http://i1296.photobucket.com/albums/ag4/OgiveARFCOM/ARFCOM%20Photos/D112BD54-E8D5-46AB-BBC2-64CDD13EDC23-1215-00000233B3F92C73_zpsb1afc641.jpg http://i1296.photobucket.com/albums/ag4/OgiveARFCOM/ARFCOM%20Photos/0C406E09-6683-4BA2-81C3-204768D61DB6-1215-0000023320B31050_zps6bb276de.jpg Nice set up. I like those long mats and the stool is cool. Where did you find the hangers for the Arko bins? |
|
|
|
USA
|
[#19]
Originally Posted By Corporal_Chaos:
Originally Posted By Ogive:
I'm somewhat new to reloading. This is my set-up. http://i1296.photobucket.com/albums/ag4/OgiveARFCOM/ARFCOM%20Photos/D112BD54-E8D5-46AB-BBC2-64CDD13EDC23-1215-00000233B3F92C73_zpsb1afc641.jpg http://i1296.photobucket.com/albums/ag4/OgiveARFCOM/ARFCOM%20Photos/0C406E09-6683-4BA2-81C3-204768D61DB6-1215-0000023320B31050_zps6bb276de.jpg Where did you pick up the Hornady stool? I need a stool for my new bench. . . called Hornady today to ask if they still made them. They dont and wont make any more |
|
|
IN, USA
|
[#20]
Here is mine. Always tinkering with it. The top is 3/4" oak. Sturdy as you could ask for and tapped into the poured basement walls. This room is right off the living room in the basement.
 |
|
|
IL, USA
|
[#21]
|
|
|
FL, USA
|
[#22]
First timer, I tinkered with my dads press, and when I moved out he gave me a Lee Load Master. Wow that thing was too intimidating to get it right, so I traded down for a single stage. Awaiting my mini chop saw and trimmer for my Blackout rounds. My bench doubles as the office.
|
|
|
TN, USA
|
[#23]
Finally finished the bench last week.
 " /> " />
|
|
|
|
[#24]
 |
|
|
|
|
[#26]
Tag
|
|
|
|
|
[#27]
Lots of nice additions to this thread lately.
|
|
|
|
KS, USA
|
[Last Edit: rgerh]
[#28]
 " /> " />
|
|
|
|
[#29]
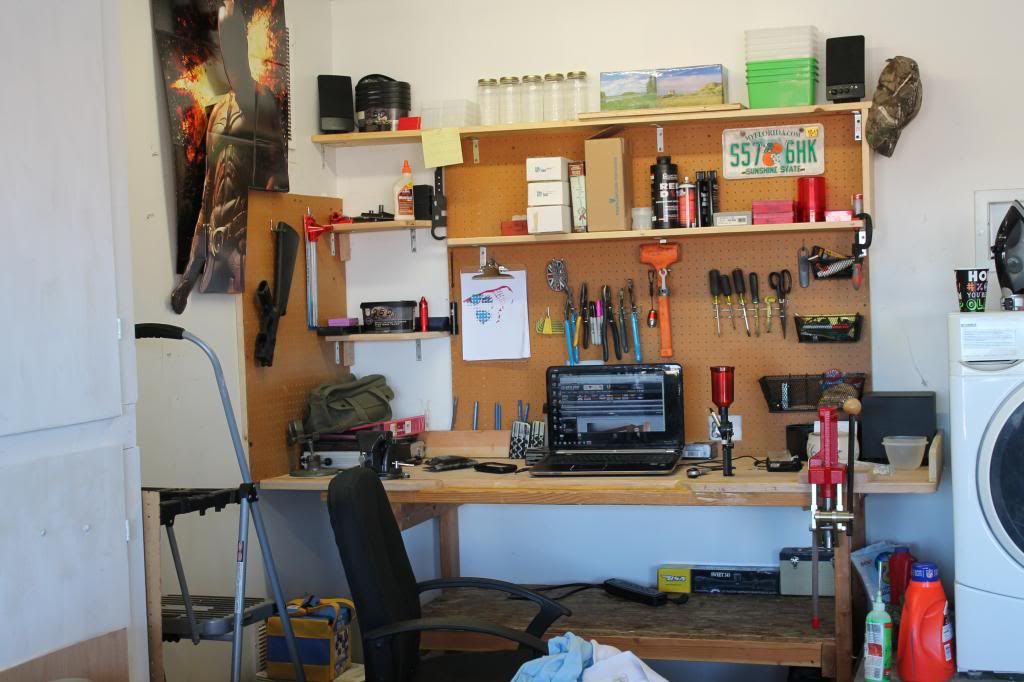
Originally Posted By ArchInfidel:
http://i790.photobucket.com/albums/yy181/mckeam22/IMG_0382_zps64db8b4a.jpg Details on the tv/camera setup please. My humble st up. 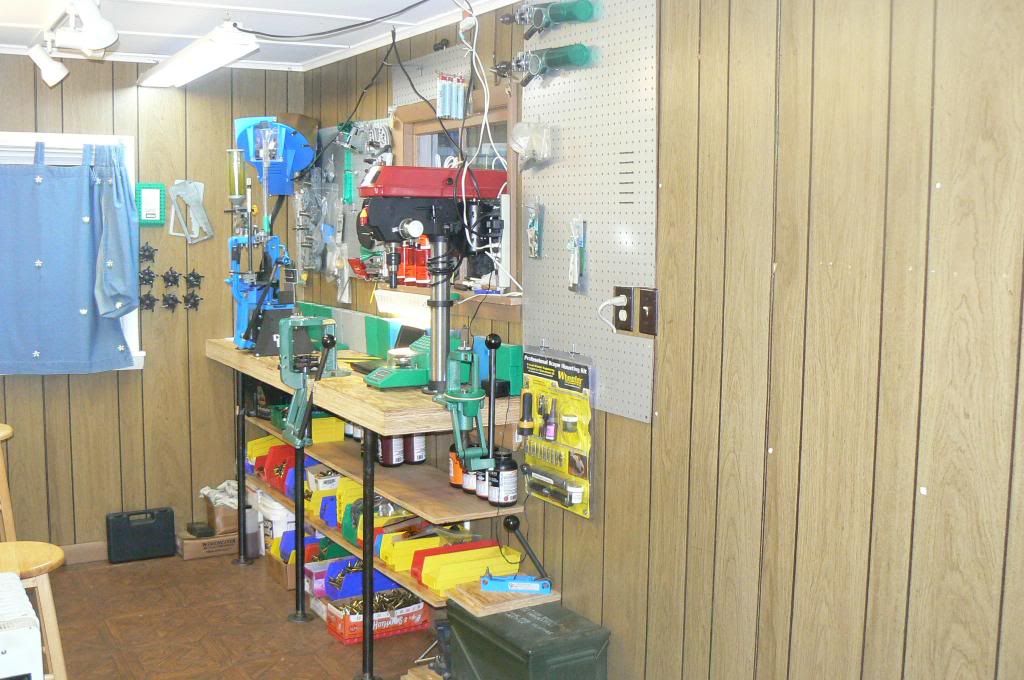
|
|
|
|
|
[#30]
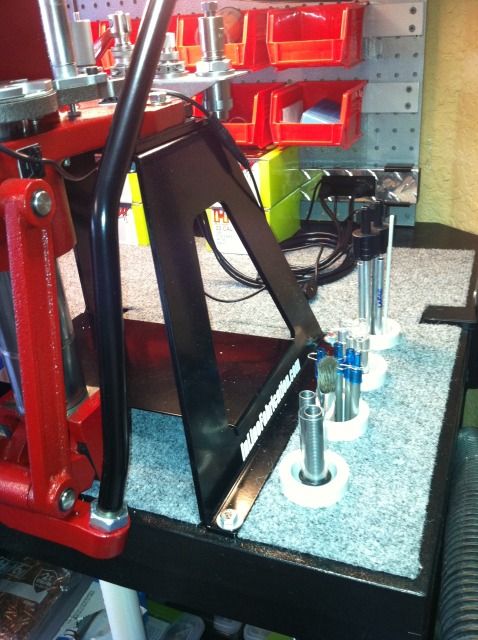
Added a few bin hangers to the back of my bench. Used cheap aluminum rulers from Harbor Freight held off the peg board at each end about 1/8"; the width of peg board. Also added a primer tube/feeder spring and tube holder next to the press. I had three smaller ones, but added the fourth and made them a larger diameter.
Finished up the die head holders for all four calibers I load; 45 ACP, 9mm, 40 SW and 223 Rem. I color code all my load note cards, load data tabs in excel and other things specific to each caliber. For example red is always 45 ACP, green is 223. So I figured out a way to color code dies and other things, too. 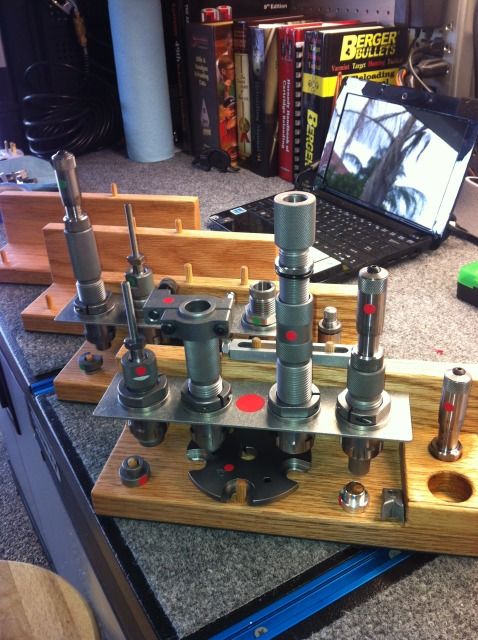 
|
|
|
|
|
[#31]
Originally Posted By j1r11: Just experimenting for now, set up a cheap 4x optical zoom canon digital camera on a tripod over the press with audio/video patch out to the tv. It really helps confirming powder charge. The plan is to eventually put a flat screen on the wall and a better camera mounted to the ceiling. Originally Posted By ArchInfidel: http://i790.photobucket.com/albums/yy181/mckeam22/IMG_0382_zps64db8b4a.jpg Details on the tv/camera setup please. My humble st up. http://i90.photobucket.com/albums/k269/prucha1/Reloadingbench001_zps5f02690f.jpg http://i90.photobucket.com/albums/k269/prucha1/Reloadingbench002_zpsd776d47a.jpg |
|
|
|
NY, USA
|
[#32]
You guys are far to organized:
|
|
|
|
[#33]
Originally Posted By j1r11: Originally Posted By ArchInfidel: http://i790.photobucket.com/albums/yy181/mckeam22/IMG_0382_zps64db8b4a.jpg Details on the tv/camera setup please. My humble st up. http://i90.photobucket.com/albums/k269/prucha1/Reloadingbench001_zps5f02690f.jpg http://i90.photobucket.com/albums/k269/prucha1/Reloadingbench002_zpsd776d47a.jpg Now that's a bench top. Nice looking bench. |
|
|
|
|
[Last Edit: j1r11]
[#34]
Originally Posted By dryflash3:
Originally Posted By j1r11:
Originally Posted By ArchInfidel:
http://i790.photobucket.com/albums/yy181/mckeam22/IMG_0382_zps64db8b4a.jpg Details on the tv/camera setup please. My humble st up. http://i90.photobucket.com/albums/k269/prucha1/Reloadingbench001_zps5f02690f.jpg http://i90.photobucket.com/albums/k269/prucha1/Reloadingbench002_zpsd776d47a.jpg Now that's a bench top. Nice looking bench. Thanks, means a lot coming from you. I can only hope one day to have brass as shiny as you get it. Only been in the game 8 years, but i wanted to have good equipment right off the start. Funny thing is i only touch the 650 if i have to do 1k or more. All my big rifles get the single stage rock chucker as IMR 4350 is a bitch to go through a powder measure. I made it so i can slide the Pro 2000 out and slide in a vise and the superswage 600 that you see in the bottom right of the pic. I have been pondering staining or getting that vinyl glue down sheeting or something. What do you think? |
|
|
|
|
[#35]
Originally Posted By j1r11:
Originally Posted By dryflash3:
Originally Posted By j1r11:
Originally Posted By ArchInfidel:
http://i790.photobucket.com/albums/yy181/mckeam22/IMG_0382_zps64db8b4a.jpg Details on the tv/camera setup please. My humble st up. http://i90.photobucket.com/albums/k269/prucha1/Reloadingbench001_zps5f02690f.jpg http://i90.photobucket.com/albums/k269/prucha1/Reloadingbench002_zpsd776d47a.jpg Now that's a bench top. Nice looking bench. Thanks, means a lot coming from you. I can only hope one day to have brass as shiny as you get it. Only been in the game 8 years, but i wanted to have good equipment right off the start. Funny thing is i only touch the 650 if i have to do 1k or more. All my big rifles get the single stage rock chucker as IMR 4350 is a bitch to go through a powder measure. I made it so i can slide the Pro 2000 out and slide in a vise and the superswage 600 that you see in the bottom right of the pic. I have been pondering staining or getting that vinyl glue down sheeting or something. What do you think? Poly.... all day long :-) 3 or 4 coats of polyurethane. Never have to worry again! But, I just like the look of natural wood. |
|
|
|
USA
|
[#36]
|
|
|
NC, USA
|
[#37]
Finished up the die head holders for all four calibers I load; 45 ACP, 9mm, 40 SW and 223 Rem. I color code all my load note cards, load data tabs in excel and other things specific to each caliber. For example red is always 45 ACP, green is 223. So I figured out a way to color code dies and other things, too. http://i369.photobucket.com/albums/oo134/rlr350/holders_zps7f37aba6.jpg http://i369.photobucket.com/albums/oo134/rlr350/holders2_zpse5e8a6c7.jpg Those stands are pretty badass. I might have to copy them. |
|
|
LA, USA
|
[#38]
Reloading and general purpose workbench
%100 made from scratch 
|
|
|
FL, USA
|
[#39]
First time poster here. I wanted to thank everyone for posting their photos. I just started reloading and am hooked. Unfortunately, most of the equipment I've ordered is still on backorder so I'm using a RCBS partner press (all I could find).
I just finished my bench and am very happy with how it turned out. Here it is... This is what I was using until I figured out how I wanted things laid out... 
Here is the new bench coming together... 
Formica getting glued down and finished. Here you can see how the modules fit into the bench. 30 degree angled back and T-Nuts on the modules to hold them in place. 
More Formica getting added to cover up all the wood. The modules are also covered now... 
Here it is with the top shelf, bottom shelf and peg board added. (Note my little helper on the right... she wasn't happy with the saw dust in the garage... nor was the wife because it was getting tracked into the house) 
Here is a cool feature that I call "Mag Pod". There are magnets in some of the modules and these pods stick right on them and hold them in place but they can be easily removed without having to take up a whole module. 
Here is a show with everything in place. Pull out keyboard tray, lamp that extends wherever and almost ready to go. 
Knobs that screw into modules to keep them in place. (If i had to do it again, I would have just cut slots where the modules would slide into the bench verses doing it this way. That would have been a little easier IMO). 
Here it is in it's home... I just purchased some under counter pucks to go under the shelf to improve lighting. 
Let me know what you guys think or if you have any questions. Chris |
|
|
|
[#40]
Originally Posted By 67cobra: Reloading and general purpose workbench %100 made from scratch http://i1178.photobucket.com/albums/x369/68WASR/IMG_4657.jpg Need better shots of the battleship(s). |
|
|
|
|
[#41]
Originally Posted By xxxxtremistxxx:
First time poster here. I wanted to thank everyone for posting their photos. I just started reloading and am hooked. Unfortunately, most of the equipment I've ordered is still on backorder so I'm using a RCBS partner press (all I could find). I just finished my bench and am very happy with how it turned out. Here it is... This is what I was using until I figured out how I wanted things laid out... http://i45.tinypic.com/r1gaoz.jpg Here is the new bench coming together... http://i48.tinypic.com/ibf9tj.jpg Formica getting glued down and finished. Here you can see how the modules fit into the bench. 30 degree angled back and T-Nuts on the modules to hold them in place. http://i48.tinypic.com/2rgp5r9.jpg More Formica getting added to cover up all the wood. The modules are also covered now... http://i47.tinypic.com/34ypwt1.jpg Here it is with the top shelf, bottom shelf and peg board added. (Note my little helper on the right... she wasn't happy with the saw dust in the garage... nor was the wife because it was getting tracked into the house) http://i46.tinypic.com/nvyzie.jpg Here is a cool feature that I call "Mag Pod". There are magnets in some of the modules and these pods stick right on them and hold them in place but they can be easily removed without having to take up a whole module. http://i45.tinypic.com/akh3dd.jpg Here is a show with everything in place. Pull out keyboard tray, lamp that extends wherever and almost ready to go. http://i48.tinypic.com/og9j89.jpg Knobs that screw into modules to keep them in place. (If i had to do it again, I would have just cut slots where the modules would slide into the bench verses doing it this way. That would have been a little easier IMO). http://i45.tinypic.com/257q740.jpg Here it is in it's home... I just purchased some under counter pucks to go under the shelf to improve lighting. http://i49.tinypic.com/35ksrhw.jpg Let me know what you guys think or if you have any questions. Chris excellent first post |
|
|
|
|
[#42]
That's a fact, first post win.
Welcome to the Reloading Forum.
|
|
|
|
|
[#43]
Originally Posted By j1r11: Originally Posted By dryflash3: Originally Posted By j1r11: Originally Posted By ArchInfidel: http://i790.photobucket.com/albums/yy181/mckeam22/IMG_0382_zps64db8b4a.jpg Details on the tv/camera setup please. My humble st up. http://i90.photobucket.com/albums/k269/prucha1/Reloadingbench001_zps5f02690f.jpg http://i90.photobucket.com/albums/k269/prucha1/Reloadingbench002_zpsd776d47a.jpg Now that's a bench top. Nice looking bench. Thanks, means a lot coming from you. I can only hope one day to have brass as shiny as you get it. Only been in the game 8 years, but i wanted to have good equipment right off the start. Funny thing is i only touch the 650 if i have to do 1k or more. All my big rifles get the single stage rock chucker as IMR 4350 is a bitch to go through a powder measure. I made it so i can slide the Pro 2000 out and slide in a vise and the superswage 600 that you see in the bottom right of the pic. I have been pondering staining or getting that vinyl glue down sheeting or something. What do you think? Make the top as smooth and as level as you can. Glue down vinyl. Makes sliding around things on the bench top very easy.
|
|
|
|
|
[Last Edit: ekimnaheem]
[#44]
Originally Posted By xxxxtremistxxx:
First time poster here. I wanted to thank everyone for posting their photos. I just started reloading and am hooked. Unfortunately, most of the equipment I've ordered is still on backorder so I'm using a RCBS partner press (all I could find). I just finished my bench and am very happy with how it turned out. Here it is... This is what I was using until I figured out how I wanted things laid out... http://i45.tinypic.com/r1gaoz.jpg Here is the new bench coming together... http://i48.tinypic.com/ibf9tj.jpg Formica getting glued down and finished. Here you can see how the modules fit into the bench. 30 degree angled back and T-Nuts on the modules to hold them in place. http://i48.tinypic.com/2rgp5r9.jpg More Formica getting added to cover up all the wood. The modules are also covered now... http://i47.tinypic.com/34ypwt1.jpg Here it is with the top shelf, bottom shelf and peg board added. (Note my little helper on the right... she wasn't happy with the saw dust in the garage... nor was the wife because it was getting tracked into the house) http://i46.tinypic.com/nvyzie.jpg Here is a cool feature that I call "Mag Pod". There are magnets in some of the modules and these pods stick right on them and hold them in place but they can be easily removed without having to take up a whole module. http://i45.tinypic.com/akh3dd.jpg Here is a show with everything in place. Pull out keyboard tray, lamp that extends wherever and almost ready to go. http://i48.tinypic.com/og9j89.jpg Knobs that screw into modules to keep them in place. (If i had to do it again, I would have just cut slots where the modules would slide into the bench verses doing it this way. That would have been a little easier IMO). http://i45.tinypic.com/257q740.jpg Here it is in it's home... I just purchased some under counter pucks to go under the shelf to improve lighting. http://i49.tinypic.com/35ksrhw.jpg Let me know what you guys think or if you have any questions. Chris I like! Very nice job, My next project to my bench is to install a set of those "tracks" so i can slide my trimmer, scale, or whatever I am using and have it secure although your modular idea has me thinking!!!!!! My bench top is not 100% flat and smooth, so not sure if its going to work. There is a batcher/deli going out of business by me and I am going to go bid on his "butcher block" table. Its about 3" thick hardwood and weighs over 300 pounds. SOLID as a rock! 5' wide and 3' deep |
|
|
|
|
[#45]
Originally Posted By xxxxtremistxxx: First time poster here. I wanted to thank everyone for posting their photos. I just started reloading and am hooked. Unfortunately, most of the equipment I've ordered is still on backorder so I'm using a RCBS partner press (all I could find). I just finished my bench and am very happy with how it turned out. Here it is... This is what I was using until I figured out how I wanted things laid out... http://i45.tinypic.com/r1gaoz.jpg Here is the new bench coming together... http://i48.tinypic.com/ibf9tj.jpg Formica getting glued down and finished. Here you can see how the modules fit into the bench. 30 degree angled back and T-Nuts on the modules to hold them in place. http://i48.tinypic.com/2rgp5r9.jpg More Formica getting added to cover up all the wood. The modules are also covered now... http://i47.tinypic.com/34ypwt1.jpg Here it is with the top shelf, bottom shelf and peg board added. (Note my little helper on the right... she wasn't happy with the saw dust in the garage... nor was the wife because it was getting tracked into the house) http://i46.tinypic.com/nvyzie.jpg Here is a cool feature that I call "Mag Pod". There are magnets in some of the modules and these pods stick right on them and hold them in place but they can be easily removed without having to take up a whole module. http://i45.tinypic.com/akh3dd.jpg Here is a show with everything in place. Pull out keyboard tray, lamp that extends wherever and almost ready to go. http://i48.tinypic.com/og9j89.jpg Knobs that screw into modules to keep them in place. (If i had to do it again, I would have just cut slots where the modules would slide into the bench verses doing it this way. That would have been a little easier IMO). http://i45.tinypic.com/257q740.jpg Here it is in it's home... I just purchased some under counter pucks to go under the shelf to improve lighting. http://i49.tinypic.com/35ksrhw.jpg Let me know what you guys think or if you have any questions. Chris What a fantastic improvement! |
|
|
|
OH, USA
|
[#46]
Here's my bench a buddy and I built last week, this is before it was stained, and any bins and such are installed.

|
|
|
|
[#47]
Originally Posted By YoMoFo:
Here's my bench a buddy and I built last week, this is before it was stained, and any bins and such are installed. http://i1325.photobucket.com/albums/u636/SixPack_Saturday/20130306_184325_zps26a40349.jpg Very nice. I wish I had thought of recessing the bottom shelf. |
|
|
|
OH, USA
|
[Last Edit: YoMoFo]
[#48]
Originally Posted By bags533:
Very nice. I wish I had thought of recessing the bottom shelf. Actually, that was my buddy's idea, I designed the top to be 30" deep, and was going to do a full size shelf at the bottom, and he suggested using the extra 18" of the plywood instead. Footrest, plus being able to slide in the chair when not in use. |
|
|
|
[#49]
It's still a work in progress but I'm liking it
|
|
|
|
OH, USA
|
[#50]
Here it is with some stain/poly all in one stff applied, and a few pieces parts here and there... my press is on backorder until june, so it's a matter of stocking up on components until then

|
|
|
 Win a FREE Membership!
Sign up for the ARFCOM weekly newsletter and be entered to win a free ARFCOM membership. One new winner* is announced every week!
You will receive an email every Friday morning featuring the latest chatter from the hottest topics, breaking news surrounding legislation, as well as exclusive deals only available to ARFCOM email subscribers.

AR15.COM is the world's largest firearm community and is a gathering place for firearm enthusiasts of all types.
From hunters and military members, to competition shooters and general firearm enthusiasts, we welcome anyone who values and respects the way of the firearm.

Subscribe to our monthly Newsletter to receive firearm news, product discounts from your favorite Industry Partners, and more.
Copyright © 1996-2024 AR15.COM LLC. All Rights Reserved.
Any use of this content without express written consent is prohibited.
AR15.Com reserves the right to overwrite or replace any affiliate, commercial, or monetizable links, posted by users, with our own.


