USA
|
[#1]
Originally Posted By EastWind:
Originally Posted By Falar:
How many FF rails besides the URX have a removable bottom rail? I think this is a key feature because I've noticed that when doing a lot of rapid fire in humid environments the barrel likes to oxidize near the barrel nut. Try cleaning that off with a rail like a LaRue. Troy MRF Also DD Omega DD RIS II Vltor CASV ARMS SIR Not implying they are any better or worse than a KAC. Hell I'd love to have a URX if I could install it myself. |
|
|
TX, USA
|
[#2]
Originally Posted By 80sgyrene:
Originally Posted By EastWind:
Originally Posted By Falar:
How many FF rails besides the URX have a removable bottom rail? I think this is a key feature because I've noticed that when doing a lot of rapid fire in humid environments the barrel likes to oxidize near the barrel nut. Try cleaning that off with a rail like a LaRue. Troy MRF Also DD Omega DD RIS II Vltor CASV ARMS SIR Not implying they are any better or worse than a KAC. Hell I'd love to have a URX if I could install it myself. thanks for the heads up on the RIS II, DDs site makes no mention of that feature. The Vltor unit doesn't look like a regular 4 sided rail though, and I've never even seen a Troy, I wonder who sells them. ARMS though? Come one who the hell would use that crap? |
|
|
USA
|
[#3]
Originally Posted By kcr121:
This thread is full of badass. I commend you, sir. Ditto. Keep up the good work OP, I'm an ME and miss the days of college when access to lathes and mills were just down the hall... the paycheck of being an adult is nice though My only comment is about the loctite... even if it's the "red" loctite the first thing that someone suggests when you can't get a nut or screw out that has loctite on it is to apply heat. I'm guessing that putting loctite on these nuts isn't really doing much but if it makes you sleep better at night by all means go for it. Looking forward to pictures of the prototypes. |
|
|
|
[#4]
Originally Posted By jarvxd: Originally Posted By kcr121: This thread is full of badass. I commend you, sir. Ditto. Keep up the good work OP, I'm an ME and miss the days of college when access to lathes and mills were just down the hall... the paycheck of being an adult is nice though My only comment is about the loctite... even if it's the "red" loctite the first thing that someone suggests when you can't get a nut or screw out that has loctite on it is to apply heat. I'm guessing that putting loctite on these nuts isn't really doing much but if it makes you sleep better at night by all means go for it. Looking forward to pictures of the prototypes. That's why I'll be using Rocksett. It's like loctite on steroids and it's resistant to heat. |
|
|
|
|
[Last Edit: unclemoak]
[#5]
Last night I was a little bored, so I decided to go over to the shop and waterjet some steel.
The first that that I had to do was to pull my CAD file over into a drawing within Solidworks. Then the drawing needed to be saved as a .DXF files so that it's in a compatible format for the waterjet. 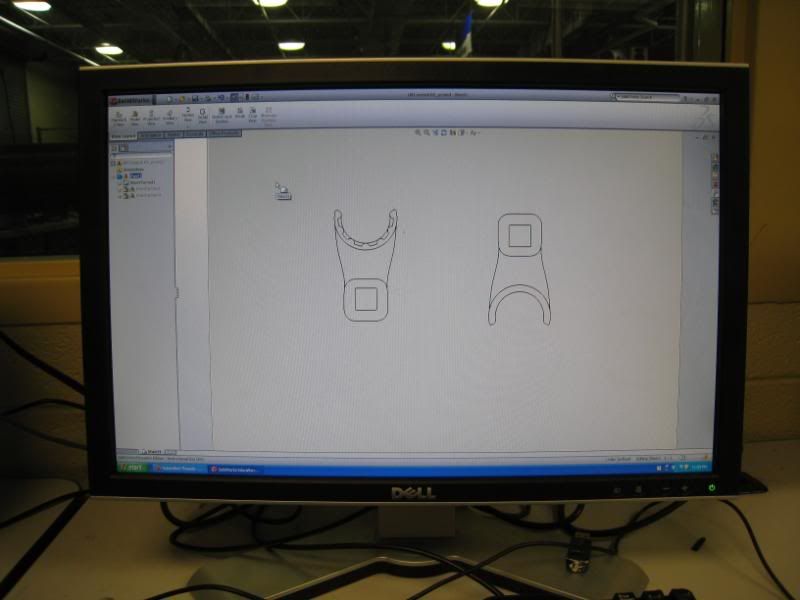 Next I had to sort through the scrap bins to find some suitable material. I dug up a suitable piece of 1/4" mild steel plate. 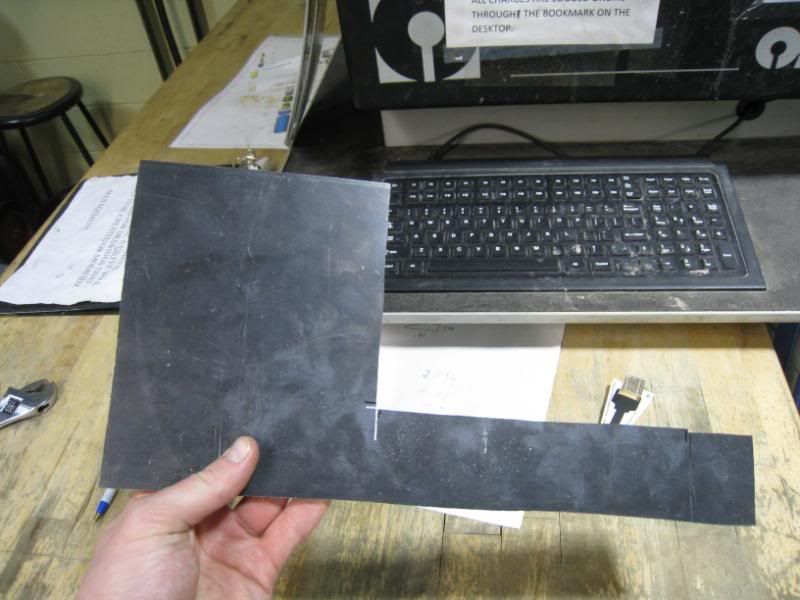 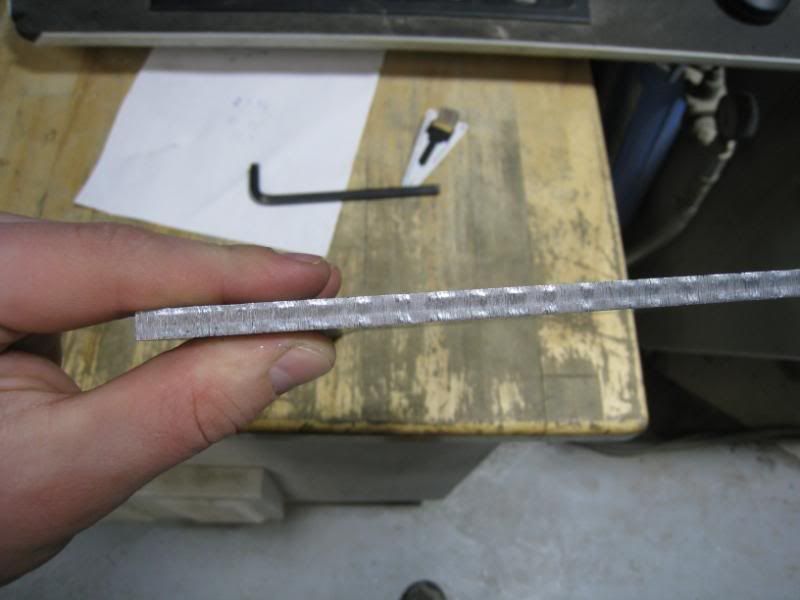 The next step was to open up the file on the waterjet. 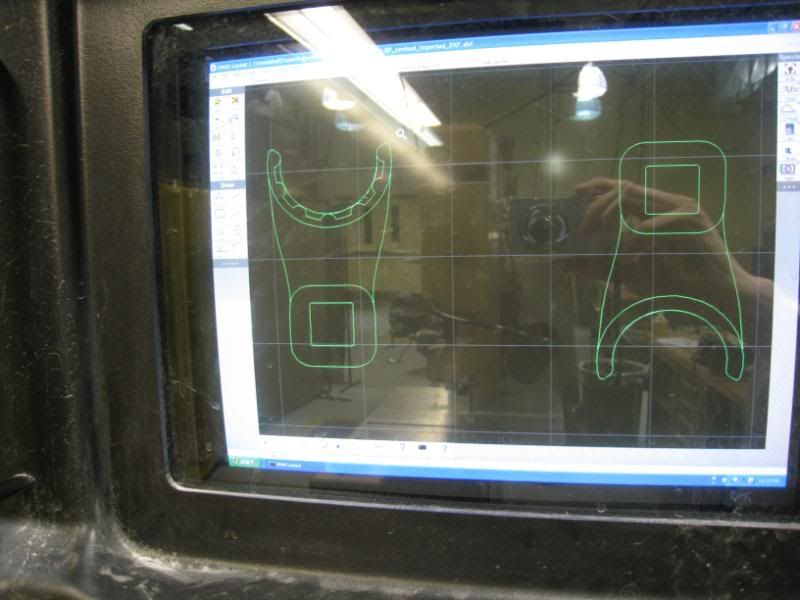 Since the computer is somewhat dumb, it can't differentiate between a line where it needs to cut and a contour line, so I have to go through and delete all the extra lines so it didn't make a whole bunch of extra cuts. 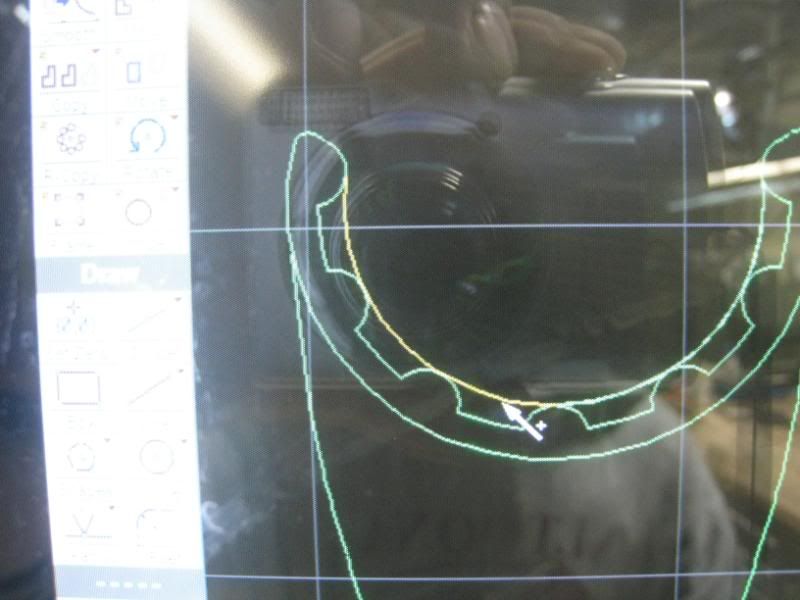 I missed getting a picture of programing the tool paths and the quality adjustments. But basically since I wanted to eliminate as much curf as possible I put the quality of the cut on the highest setting. Then I set how thick and what type of material I was using, so the machine would know how fast of feed rate it could use. Obviously the softer and thinner the material the faster it'll go. 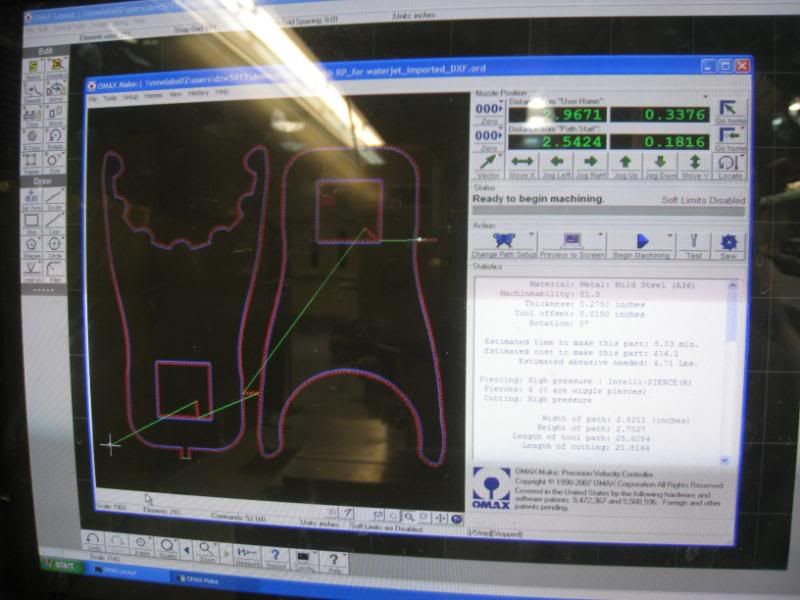 Setting the material on the table. I put some heavy ass steel bricks on it so it wouldn't move around while it's being cut. 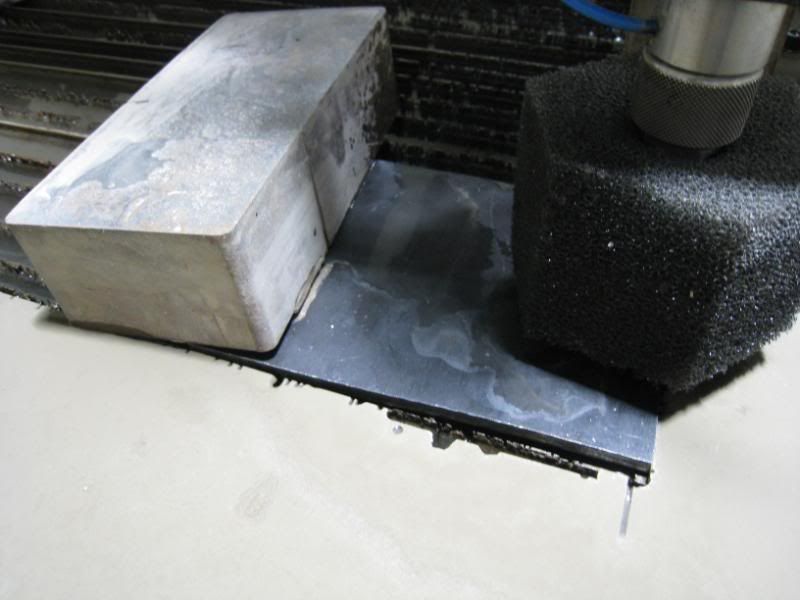 Set the height of the nozzle. We generally set it to be about a credit card thickness off the workpiece. 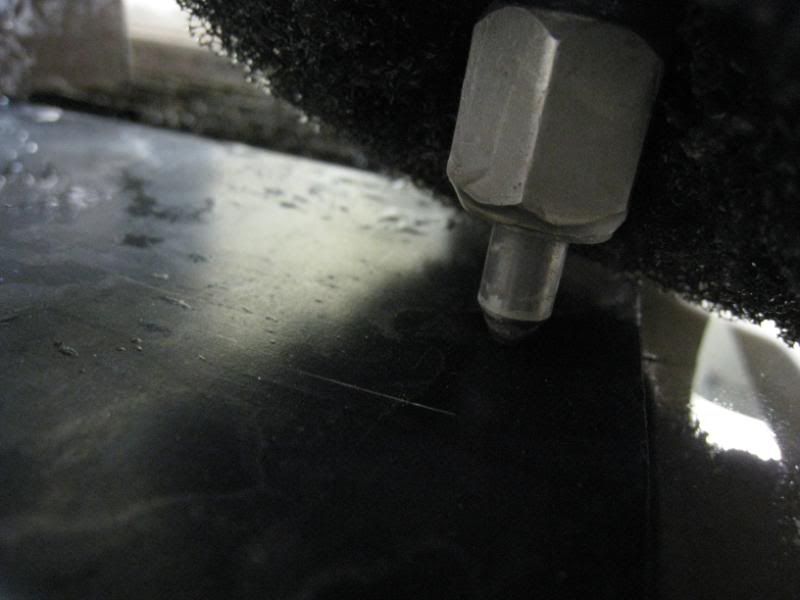 Submerge the part on the table.  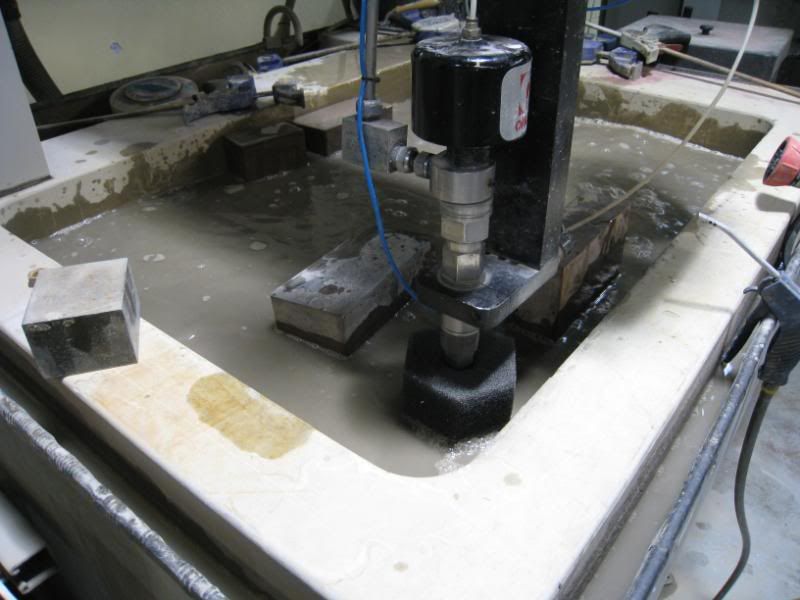 Press go to unleash 480 volts and 44.4 KPSI (yes, that's 44,400 thousand PSI) of Omax waterjet goodness on that steel's ass. 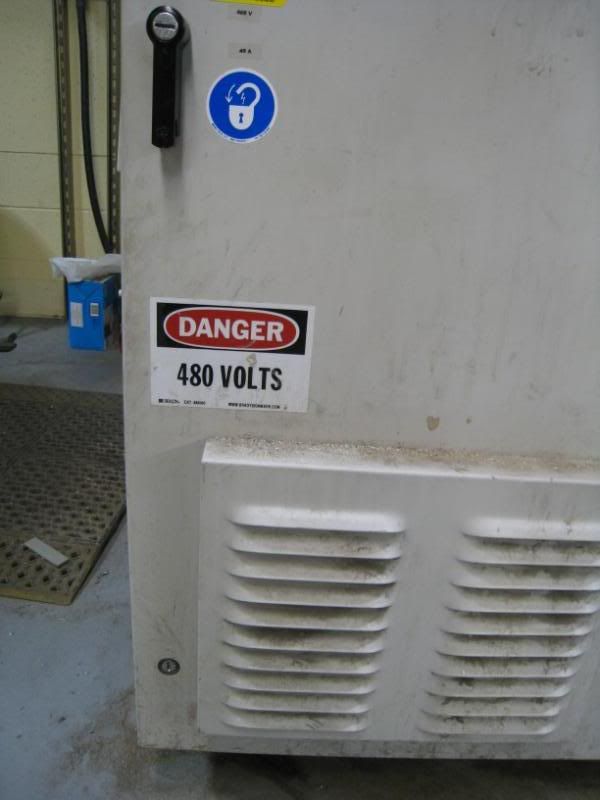 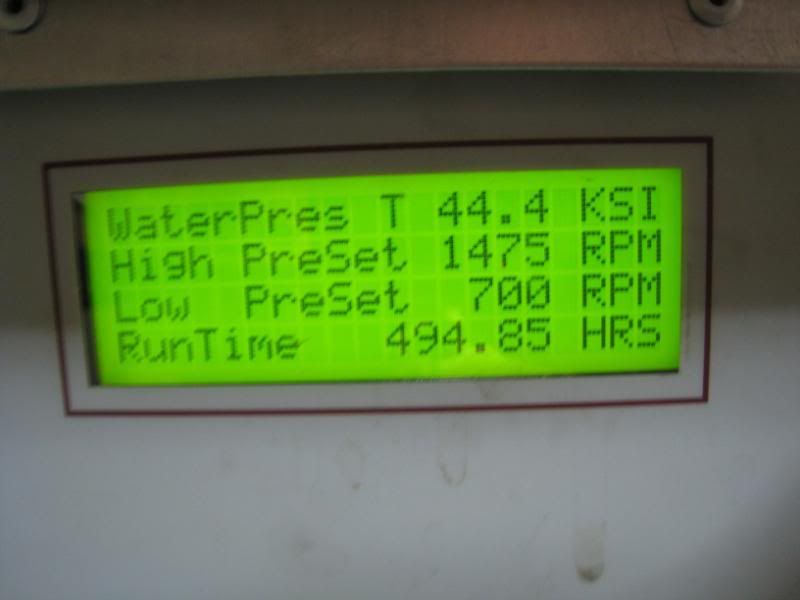 And about five minutes later, you have a finished part. 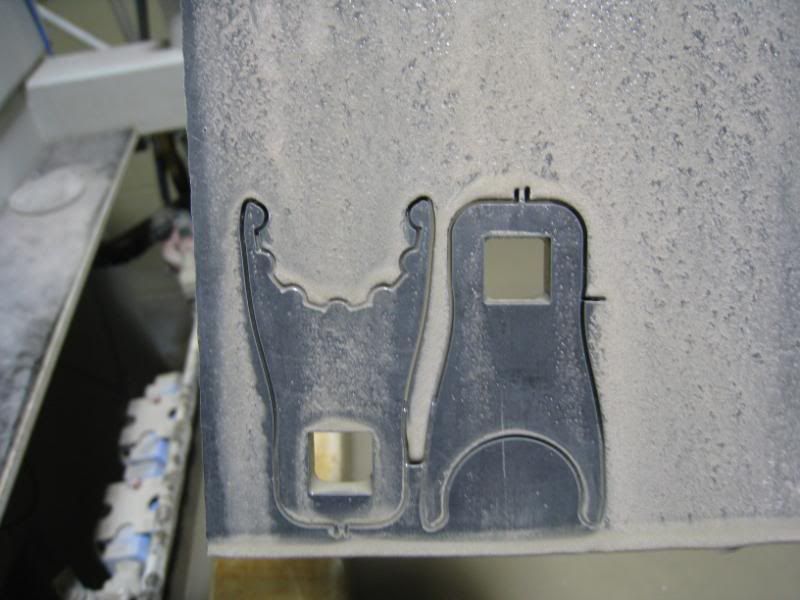 The small tabs on the ends are there to prevent the part from falling down in the water. It's not fun at all going on a expedition to fish your parts out of the bottom of the tank.  It fits like it should on the top side of the cut. I was going to adjust the dimensions because the RP model was a little loose, but I was happy I didn't because it fit nice and snug. 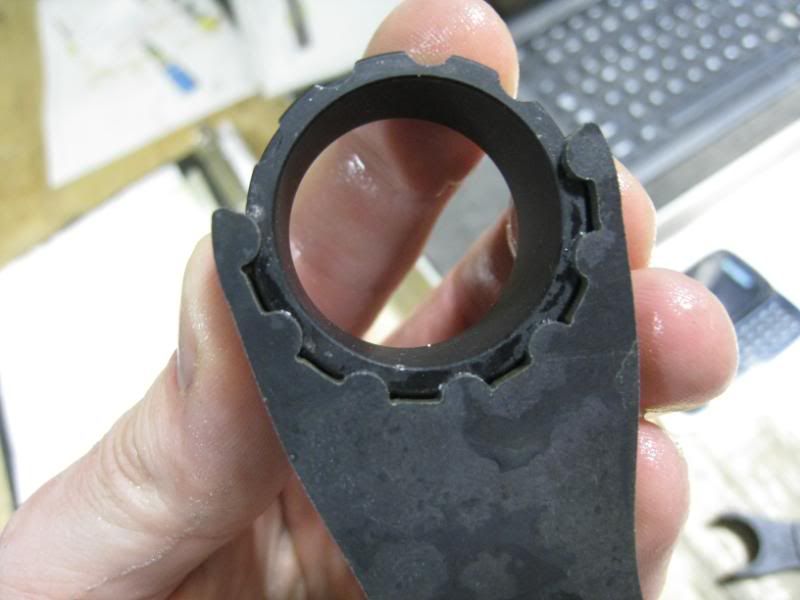 But because of the curf, it doesn't quite fit on the bottom side. But once I cleaned all the abrasive out of it and hit it with the bead blaster it fit fine. 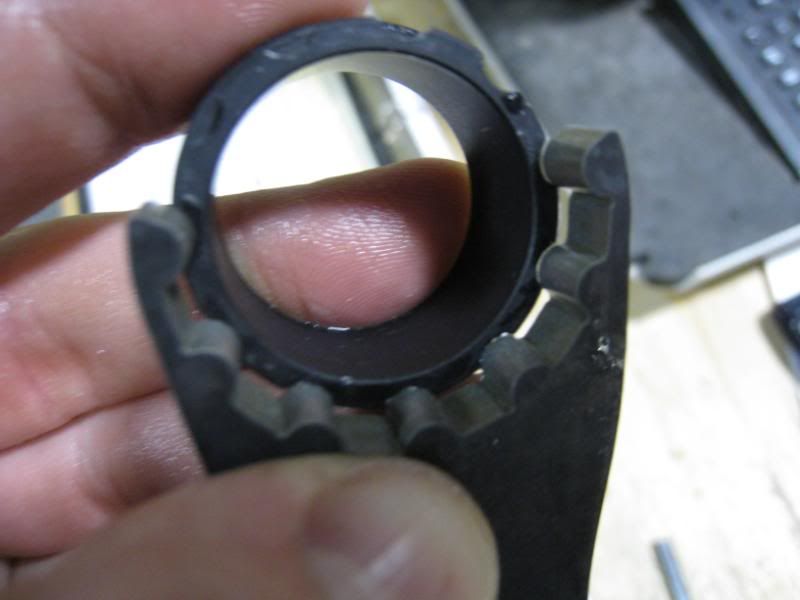 What is curf crap that I've mentioned a few times now? Well due to the top side of the cut be completed before the bottom side, there is extra abrasive that flows through the top side enlarging it in the extra duration that is needed to completely cut through the whole piece. Here's a quick MS paint drawing of the result, obviously this is really exaggerating the results.  Clamping the two halves together to get welded. 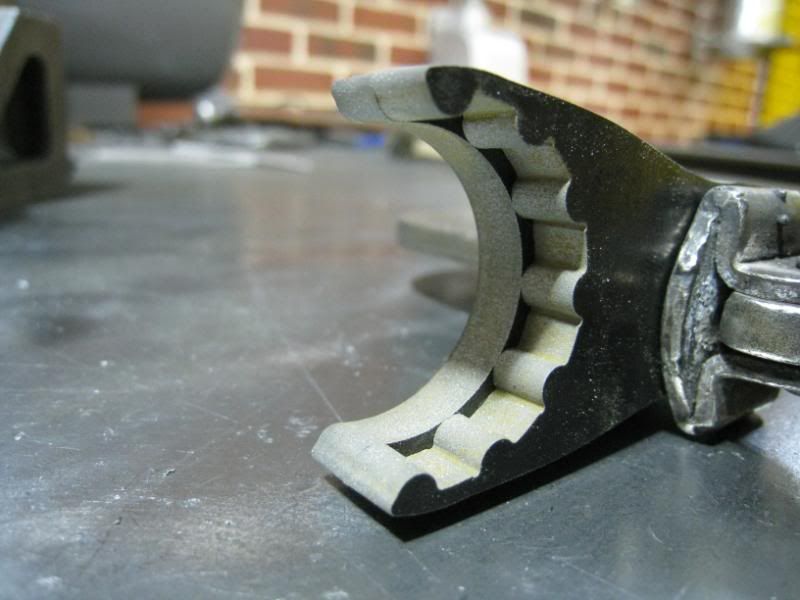 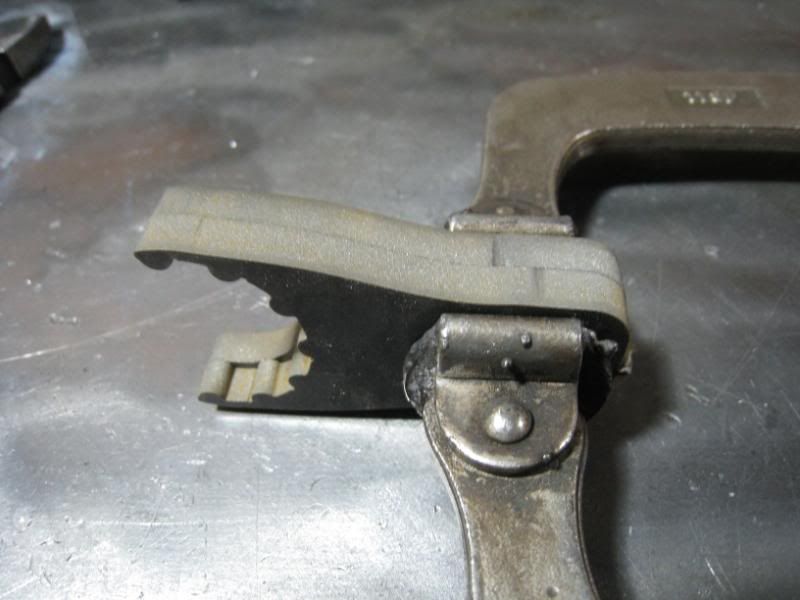 Hitting it with the TIG 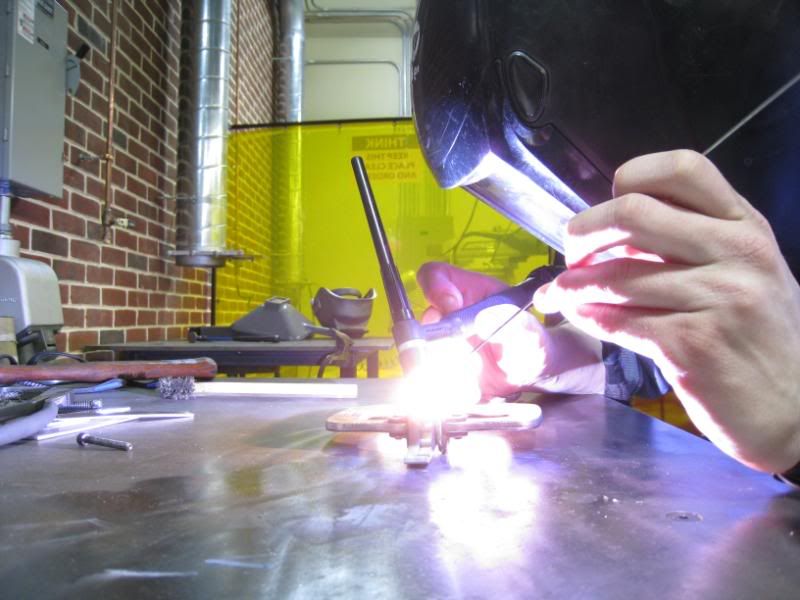 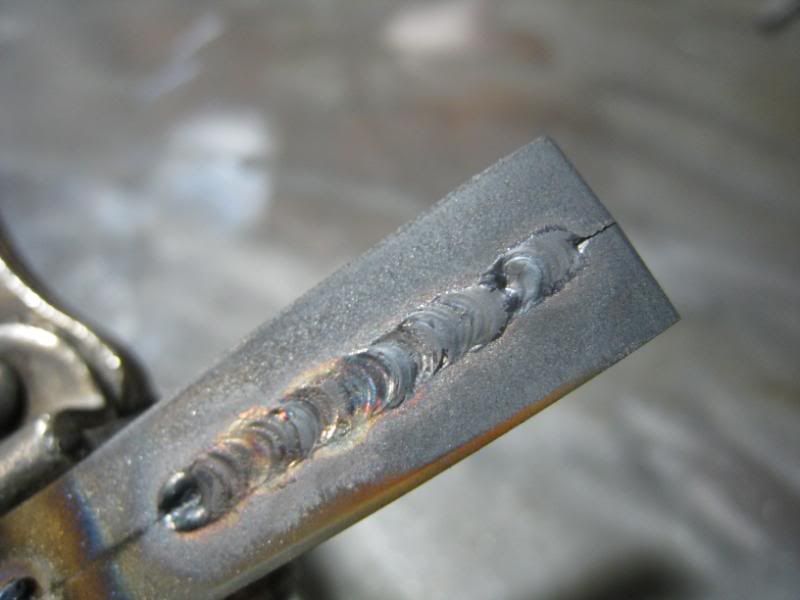 Ground down and bead blasted 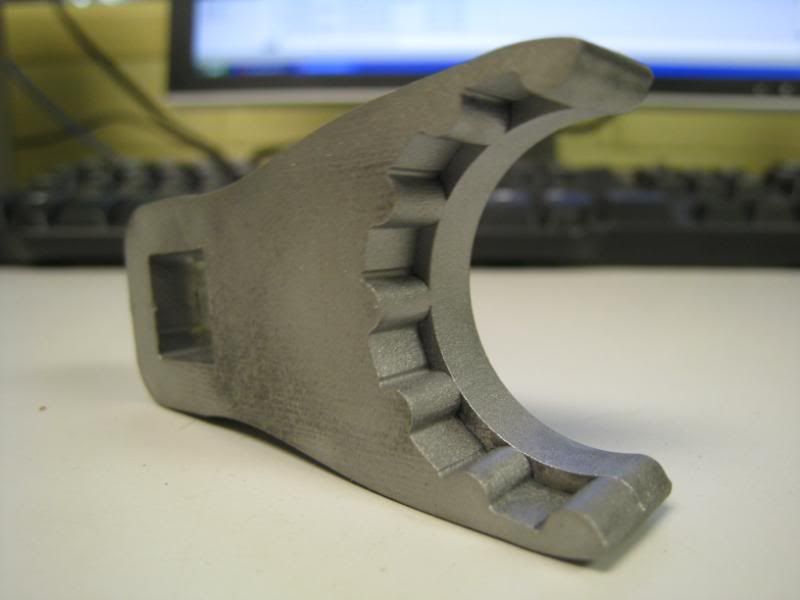 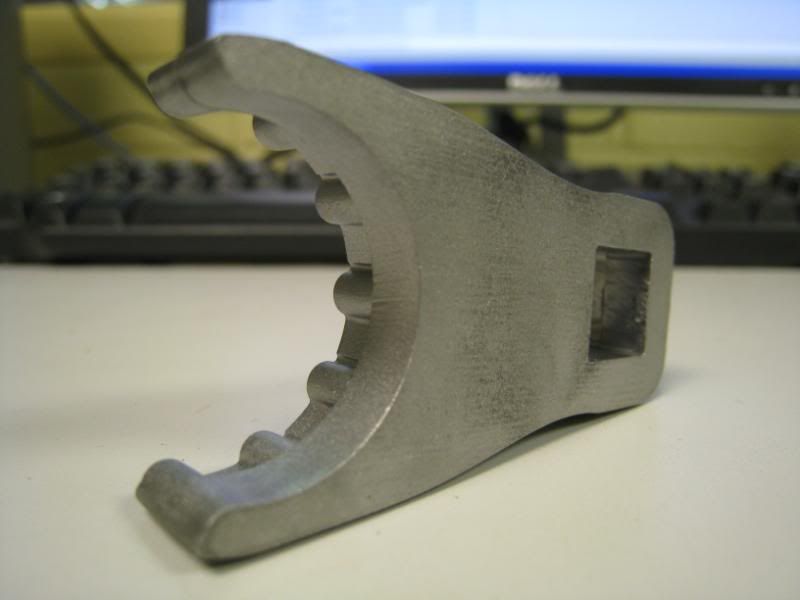   Fits like it's supposed to inside the rail. 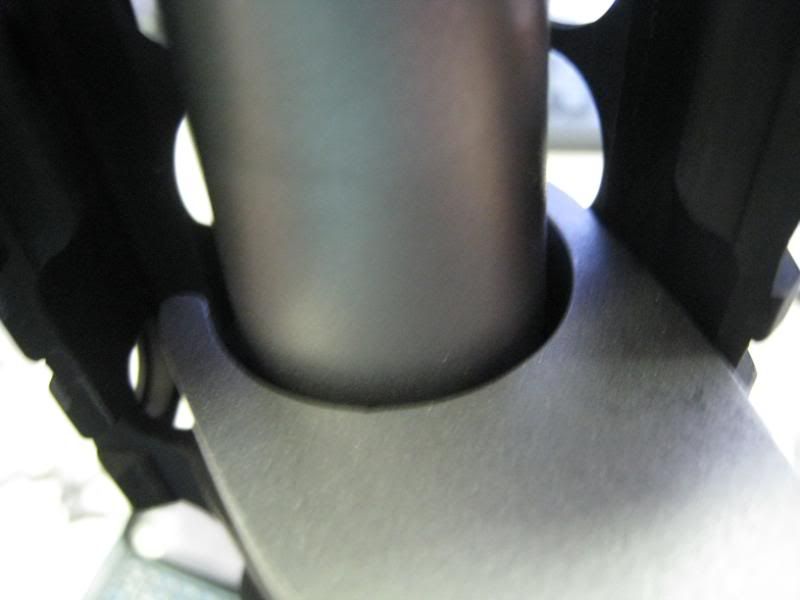 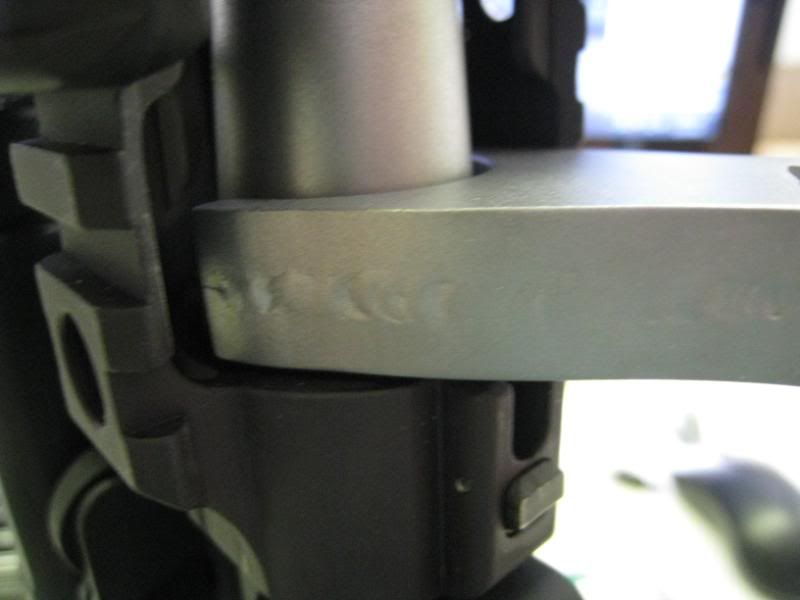 A quit trip to the park tank and it's done. I was either going to paint it or parkerize it to protect the aluminum nut at least a little bit from the steel wrench. Since I already had some stuff I needed to parkerize anyway this morning, parkerize it was. 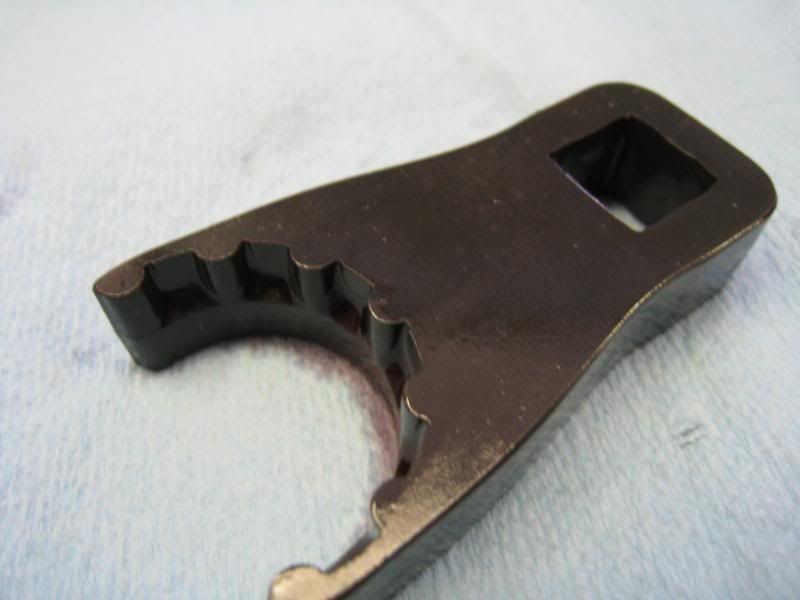 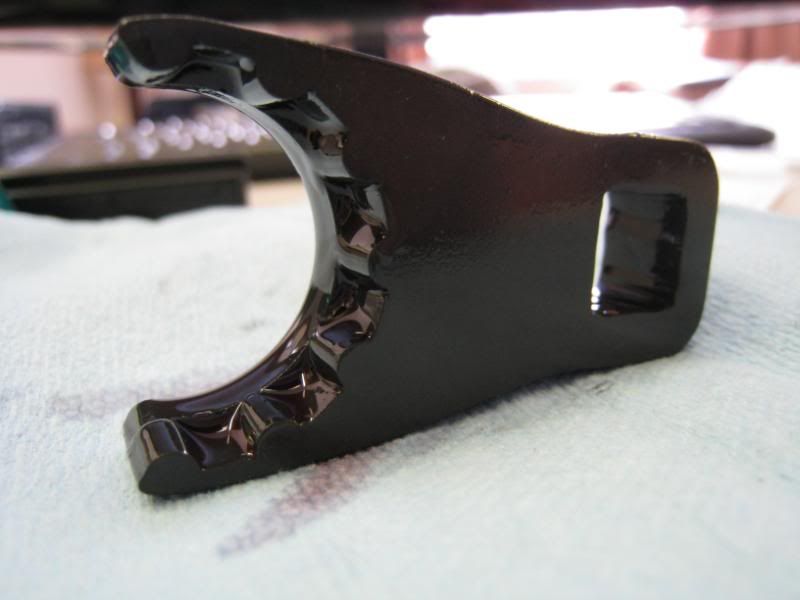 |
|
|
|
|
[#6]
Very impressive!
|
|
|
|
|
[#7]

|
|
|
|
USA
|
[#8]
I hate you.
Very impressive. Both your work and that piece of machinery. |
|
|
|
[#9]
What will it go for in the EE?

|
|
|
|
GA, USA
|
[#10]
SWEET!
|
|
|
|
[#11]
Originally Posted By 80sgyrene: I hate you. Very impressive. Both your work and that piece of machinery. Don't get me wrong, the waterjet is a great machine, but you have to know it's limitations. Some of the more advanced ones these days have a cutting head that automatically tilts itself to eliminate the curf. This is an older machine, so it's not the greatest, but it'll do the job. Here's a new 5-axis waterjet cutting all sorts of craziness. http://www.youtube.com/watch?v=2jm4_HikMqk Curf typically only becomes an issue when you are trying to make precision parts like this. If you're making regular sheet metal stuff it's awesome. Sometimes we use it to rough out parts then we'll finish machine them using a mill or lathe. You should have seen us cutting 3" thick titanium to make some bearing carriers |
|
|
|
|
[#12]
Originally Posted By mathecb:
What will it go for in the EE? I was just thinking... considering the material expense/machine usage... and the man-hours from start to finish... It would be probably cheaper if you bought one from KAC! The man-hours spent would be a substantial "labor rate" in the production "cost" of this one of a kind! |
|
|
|
|
[Last Edit: Lancelot]
[#13]
MOD DELETE OF STUPID TROLLING POST
|
|
|
|
|
[#14]
One of the most impressive DIY threads ever... my hat off to you....
cause I would have just got a different rail and been happy... |
|
|
|
|
[#15]
I want your job......
|
|
|
|
|
[#16]
Very nice thread.
I love the step-by-steps with plenty of pics and useful, descriptive captions. Good job, and thanks for the infotainment. (I mean that in a good way.)
|
|
|
|
FL, USA
|
[#17]
I wish I lived in PA, I would be your shop bitch just to have the chance to learn... Awesome project!
|
|
|
|
[#18]
Now if you can build a wrench for the 6940, I'm pretty sure you could make some serious money right now.
|
|
|
|
MD, USA
|
[Last Edit: jay2984]
[#19]
Great job on designing and building the wrench for the URX, you did a great job. I didn't know a lot about the handguard until I read this thread. I think I'm going to stick with my DD Lite rails though. Way less complicated.
|
|
|
WI, USA
|
[#20]
Nice Job!!
Any thoughts in just selling the waterjet cut plates? |
|
|
|
[#21]
I work a plant that makes adult diapers and underpads.We used to cut the leggings for the diapers with Flow waterjets,40,000 to 50,000psi.One time a jet passed over my thumb for maybe a nanosecond.It cut through my nail,maybe to the bone.Hurt like heck and bled forever.
|
|
|
|
VA, USA
|
[#22]
what can you say but WOW
thanks for taking the time to explain the steps you took , and all the great pics to go with it . now i look forward to the thread with pics of the upper |
|
|
|
[#23]
unclemoak: you need to change your screenname to UnclePIMP!
|
|
|
|
HI, USA
|
[#24]
VERY nice work! A true DIY thread
|
|
|
|
[#25]
Originally Posted By unclemoak:
Originally Posted By cowboy7242001:
Originally Posted By EzGoingKev:
Originally Posted By unclemoak:
This is how the rail works. The rail (red) threads on to the reciever threads (black). Then you slide the barrel (gray) in and it is held in place by the barrel nut (yellow), which also threads into the rail http://lh5.ggpht.com/_Kybyq3n1q3w/S3MQvkoffDI/AAAAAAAACEg/PCY7xhh7NJQ/s800/rail.png So if I got this right, the URX rail threads directly onto the upper receiver in place of the original barrel nut. What keeps the URX rail from unscrewing if you were using a VFG? Loctite and torque, just like every other rail out there. And the gas tube to some degree. Granted it isn't the strongest thing in the world, but it would prevent rotation. We (KAC) use medium strength “Blue” Loctite for the URX because (1) it is the torque of how the three main components come into and maintain union (UR, URX upper and barrel nut); (2) Blue allows for successful disassembly later with a reasonable amount of heating with a 14 amp heat gun. And for all concerned, the URX design was never intended for home-brewing. It was designed for factory or 3rd Echelon Maintenance. That is why it is what it is. You might note that our designs are typically very simple and involve very few parts that can come loose, be removed by a Soldier and lost, etc., whereas most others are packed with a bag of bolts, nuts and clamps. I don’t consider such “externally” mounted rails as near integral enough to qualify as “monolithic” that we tried and successfully achieved with the original URX and now have made better. Rocksett, I would not use in the URX application because later disassembly will be near impossible. We use Rocksett for application of muzzle compensators to minimize the torque requirement at the muzzle. When such a muzzle device needs to be removed, a lot of heat is required to loosen. Sometime way too much heat, especially if the Rocksett had been applied properly to clean, de-greased parts. I have tried soaking such muzzles in water overnight, but this did not help loosen the Rocksett. Aggravating this is the usual absence of a solid place to hold a barrel securely in a vise, as a huge bunch of torque (sometimes with a 4-foot long breaker bar) is required after about 10 minutes of 14 amp heat gun application. I have sent you my instructions, which you may post here if you wish. |
|
|
|
AR, USA
|
[#26]
Originally Posted By unclemoak:
Originally Posted By jarvxd:
Originally Posted By kcr121:
This thread is full of badass. I commend you, sir. Ditto. Keep up the good work OP, I'm an ME and miss the days of college when access to lathes and mills were just down the hall... the paycheck of being an adult is nice though My only comment is about the loctite... even if it's the "red" loctite the first thing that someone suggests when you can't get a nut or screw out that has loctite on it is to apply heat. I'm guessing that putting loctite on these nuts isn't really doing much but if it makes you sleep better at night by all means go for it. Looking forward to pictures of the prototypes. That's why I'll be using Rocksett. It's like loctite on steroids and it's resistant to heat. I would advise against it. blue loctite is recommended because it is semi permanent |
|
|
|
[#27]
Originally Posted By coldblue:
I have sent you my instructions, which you may post here if you wish. Wow. Very awesome to contribute this and your blessing. Such a great thread, in every respect. |
|
|
|
|
[#28]
Thanks Coldblue! I guess it's a good thing that the Rocksett I ordered didn't arrive yet
If anyone is interested, here are the installation instructions for the current production URX II's. I have instructions for the older models as well, if anyone is interested, let me know and I'll post those as well.  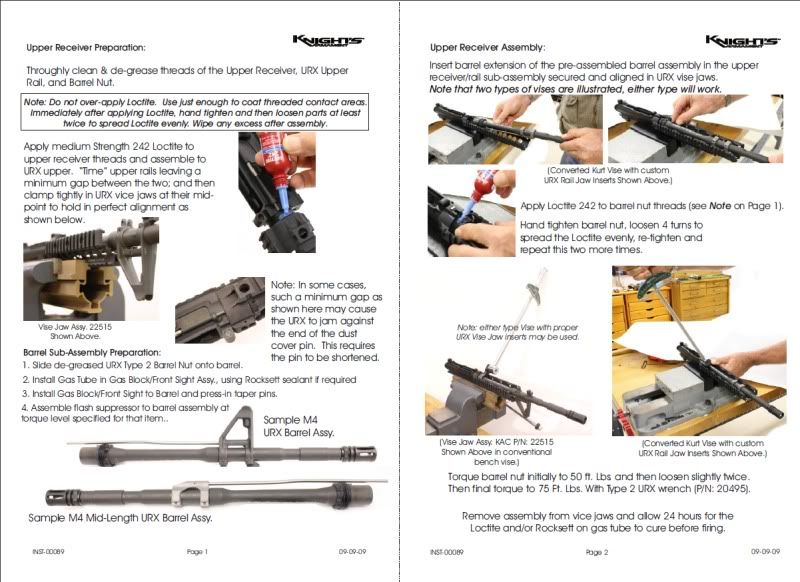 |
|
|
|
TX, USA
|
[#29]
That was one of the most impressive, educational & well thought out write ups I have ever seen.
Fantastic job man! And, what a super cool DYI project. It has got to be great to have access to toys like that. MLG |
|
|
MA, USA
|
[#30]
Originally Posted By sr-47:
One of the best advantages of the URX is that after the barrel nut is installed and the barrel is reassembled the barrel can be installed as a complete unit the wrench and barrel nut will clear the gas tube I can swap barrels in about 5 minutes So I assume they sell nuts separately so you can have barrels w/ gas blocks installed so they just drop in? |
|
|
CA, USA
|
[#31]
BTT
|
|
|
|
[#32]
Originally Posted By EzGoingKev:
Originally Posted By sr-47:
One of the best advantages of the URX is that after the barrel nut is installed and the barrel is reassembled the barrel can be installed as a complete unit the wrench and barrel nut will clear the gas tube I can swap barrels in about 5 minutes So I assume they sell nuts separately so you can have barrels w/ gas blocks installed so they just drop in? Nut are available seperately, however keep in mind the nut is a ONE TIME USE NUT. This was never designed as a quick swap system, it was designed so a Military Armorer could easily swap the system. |
|
|
|
|
[#33]
I finally had some time on Friday to get my upper put together. The wait for this thing to finally be finished has been killing me.
All the parts that are going into it 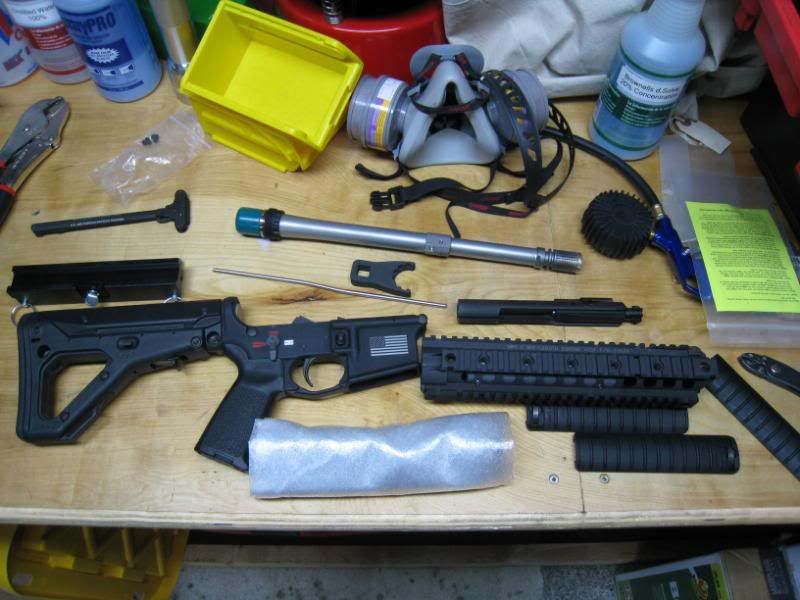 I put some Loctite on the receiver threads and threaded on the rail 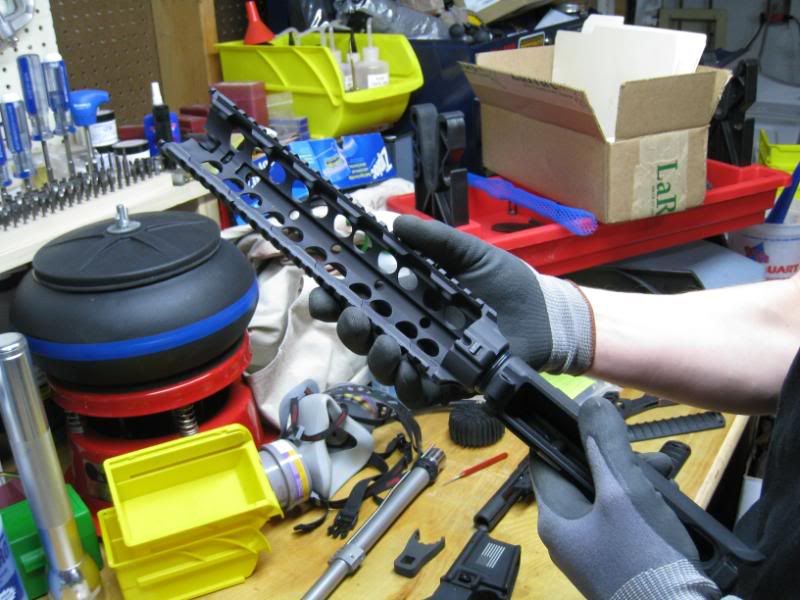 Used my PRI action block to hold the receiver and rail in proper orientation 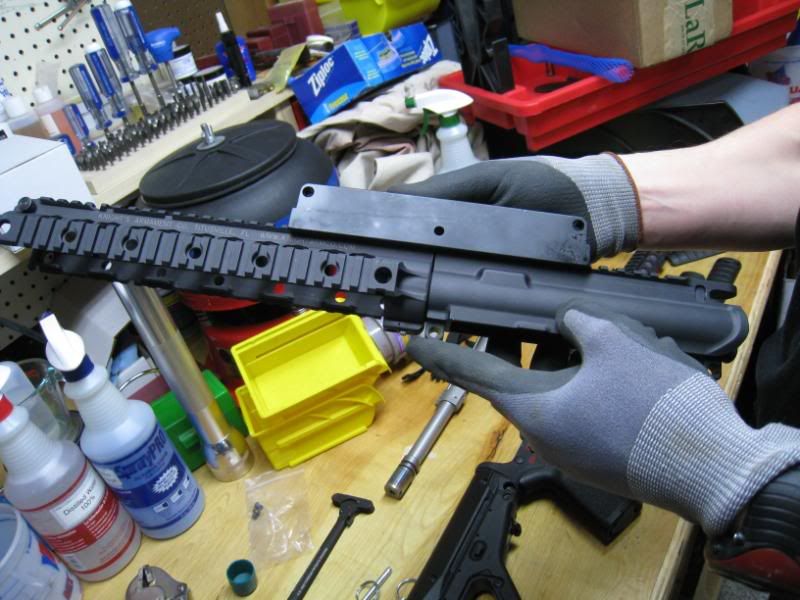 Put some Loctite on the barrel nut 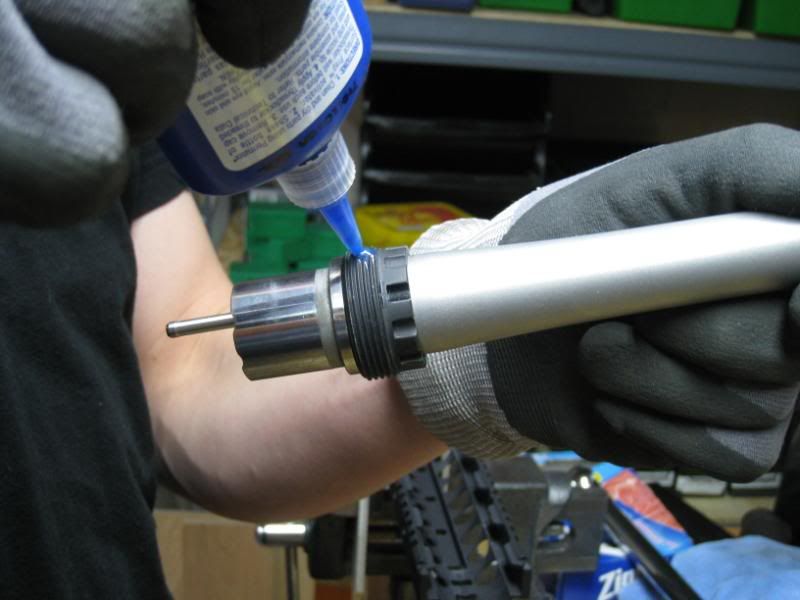 Slide the barrel assembly in the rail 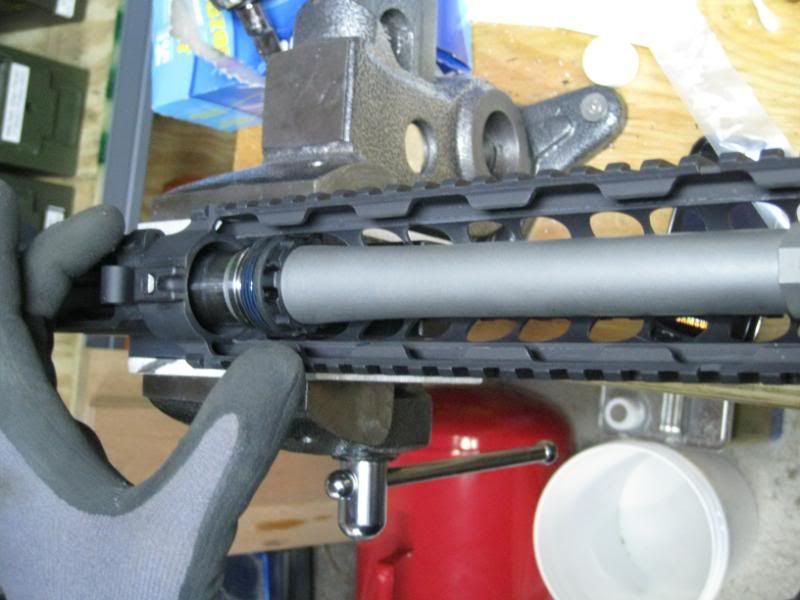 Spin the nut in by hand  The wrench 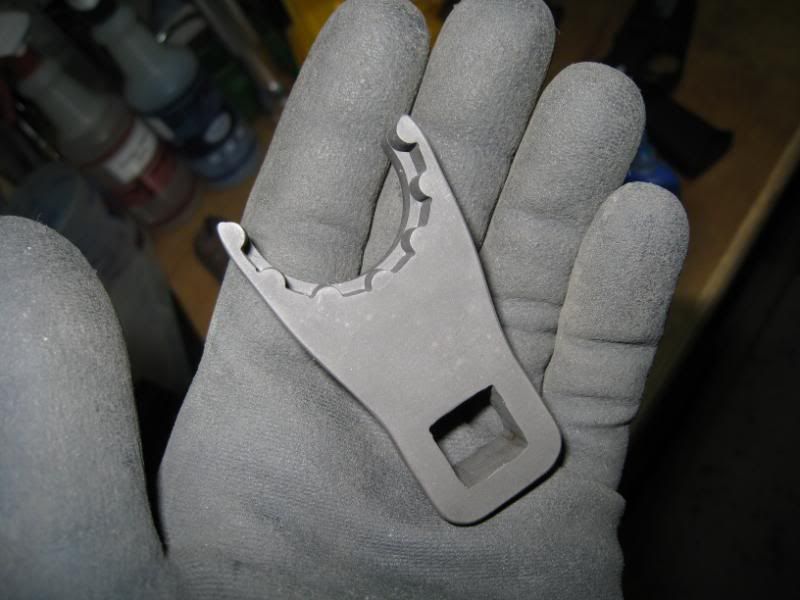 Torquing it down in to the proper spec. 50 ft lbs then backed off twice, then final torque to 75 ft lbs.  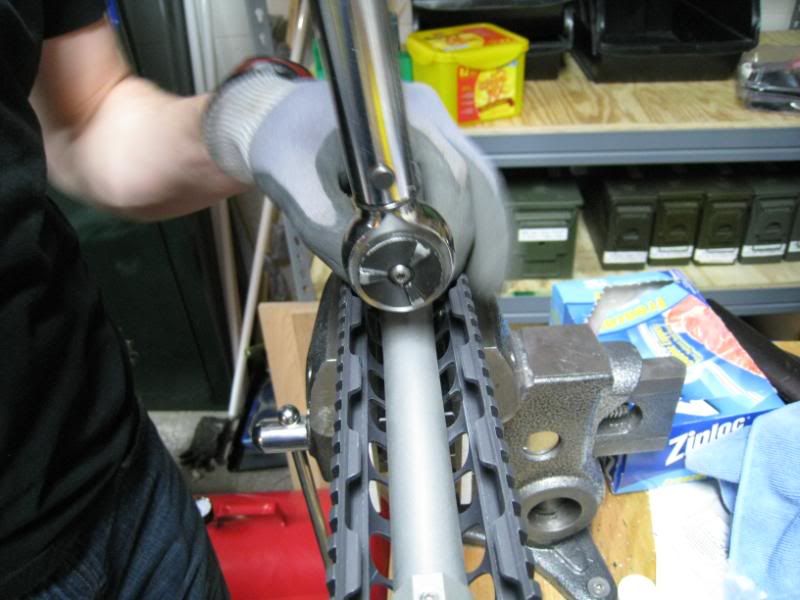 Install the bottom portion of the rail and tighten down the screws that hold it in place  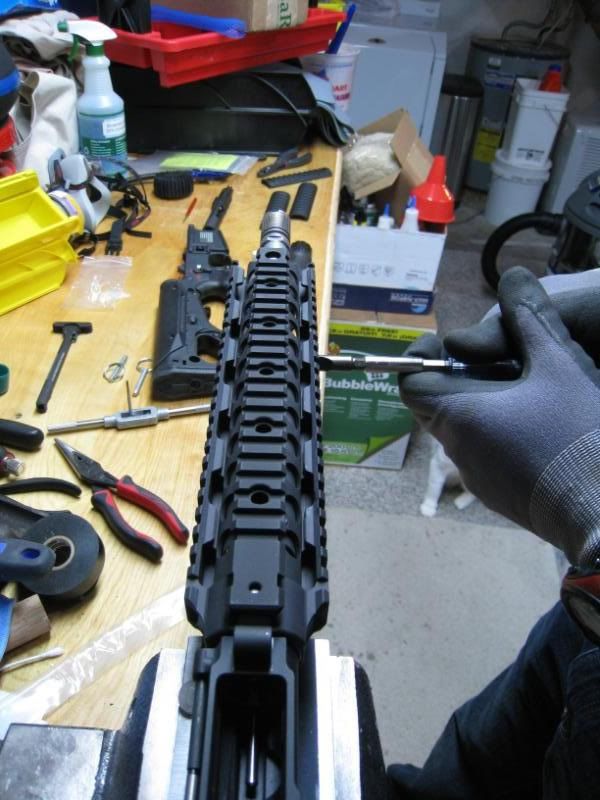 All done. 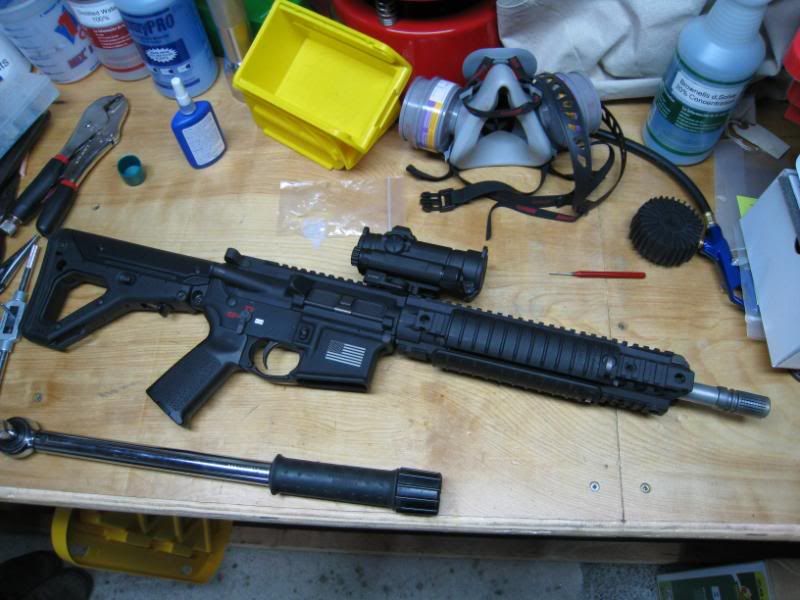 Range pics. I'll see if I can get some action pics from Zans113 who went with me. 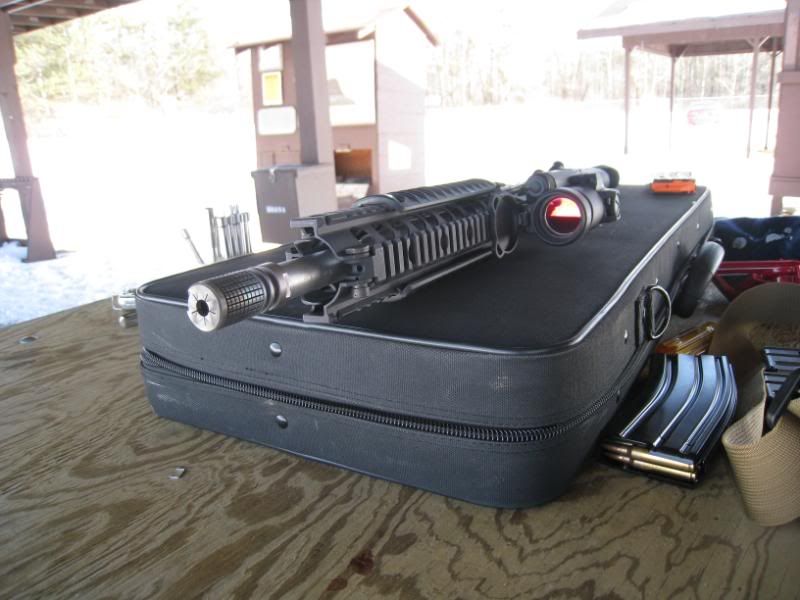 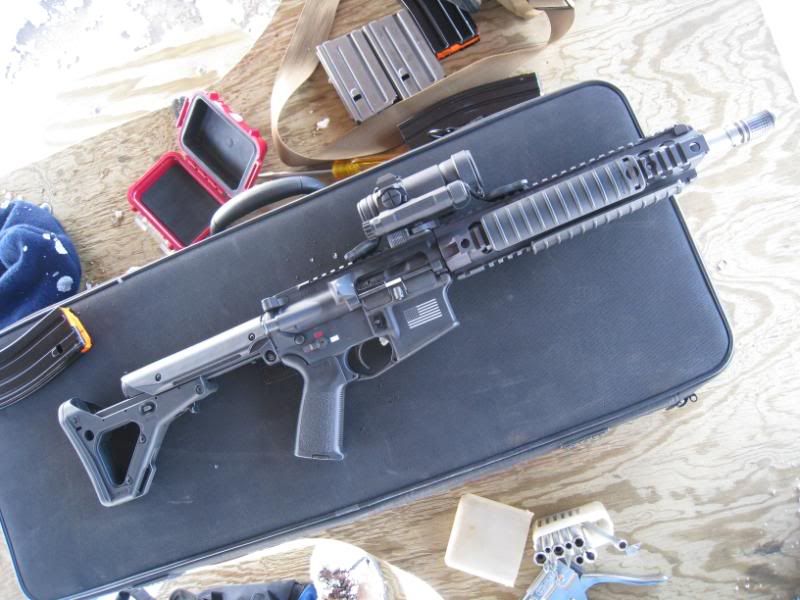 |
|
|
|
USA
|
[#34]
That's a sweet little rig, you must have printed some nice little cloverleafs with that....congrats.
|
|
|
|
[#35]
Originally Posted By LWT: That's a sweet little rig, you must have printed some nice little cloverleafs with that....congrats. haha it didn't fair to well on Saturday. I was in such a hurry to get it together I forgot to tighten the screws that bolt the Aimpoint to the mount I still put some rounds down range with it though. When I got back, I was sure to tighten up the screws and all was well when I went back out on Saturday. All told, I put about 600rds through it this weekend without a hiccup. |
|
|
|
TX, USA
|
[#36]
What gas block did you use? Is it a modified one? No gas blocks will fit under the URX II rail without modifications, correct?
|
|
|
|
[#37]
Originally Posted By Falar: What gas block did you use? Is it a modified one? No gas blocks will fit under the URX II rail without modifications, correct? I left the factory Noveske one that came on the barrel on it. I will say that it did rub a bit when sliding on the bottom section of rail, but once it was fully seated, it didn't seem to interfere. I would have probably not know it rubbed slightly unless I took off the bottom section and noticed two small marks on the heat shield. |
|
|
|
SC, USA
|
[#38]
Use a wire EDM to cut out your plates and you can get a much closer fit with no kerf. I've done some very close tolerance work in tool & die with a wire EDM.
This allows you to use pre-hardened 4140 or a hardened and ground tool steel. A better quality steel will allow you to make the jaws of the tool thinner where needed. Since the EDM will cut anything that conducts electricity, you do all the hardening and grinding before hand. I also think this was a great thread. My hat is off to you as well. The rifle looks great. If it shoots as well, you have a true winner. I've got 13 years in CNC, Tool& Die, Wire EDM, Laser, Auto CAD and Esprit CAD/CAM. I started an AS degree in ME a few years ago. My intention was to be where you are heading, an engineer with machining and programming experience. The company went through a big down turn and I had to put those plans on hold. Keep us posted. |
|
|
|
[#39]
How did that PRI block do for keeping the handguard perfectly aligned?
I've always been curious to know if they worked 100%, did you get a chance to put a level on the receiver and URX yet? |
|
|
|
|
[#40]
sweet thread! this would make a hell of a resume once you graduate. keep it up. you have a bright future.
|
|
|
|
|
[#41]
Originally Posted By JV3:
sweet thread! this would make a hell of a resume once you graduate. keep it up. you have a bright future. DITTO |
|
|
|
|
[#42]
Originally Posted By KevinB: Originally Posted By JV3: sweet thread! this would make a hell of a resume once you graduate. keep it up. you have a bright future. DITTO Some employers give you the  when you start talking about your gun-related projects. when you start talking about your gun-related projects. |
|
|
|
TX, USA
|
[#43]
Originally Posted By unclemoak:
Originally Posted By KevinB:
Originally Posted By JV3:
sweet thread! this would make a hell of a resume once you graduate. keep it up. you have a bright future. DITTO Some employers give you the when you start talking about your gun-related projects.
Fuck those employers. I'm sure you can get a job in the industry. You already had an offer from KAC in this thread, I'll bet that would be a dream job for many. |
|
|
|
[Last Edit: unclemoak]
[#44]
Originally Posted By Falar: Originally Posted By unclemoak: Originally Posted By KevinB: Originally Posted By JV3: sweet thread! this would make a hell of a resume once you graduate. keep it up. you have a bright future. DITTO Some employers give you the when you start talking about your gun-related projects. Fuck those employers. I'm sure you can get a job in the industry. You already had an offer from KAC in this thread, I'll bet that would be a dream job for many. Well I guess it's all how you go about it in the interview. I do actually own a small company that makes stuff on occasion just for shits and giggles, so naturally it's on my resume. Interviewers always ask about it, so I have to go through a whole diatribe about how I've always been interested in competitive/target shooting and as I got more and more interested in firearms, I sought a need for some niche market parts for my own use, which evolved into me making them for others. If I explain it all that way they usually don't give me the and they are more understanding of the whole creative process. |
|
|
|
VA, USA
|
[#45]
that upper turned out as nice as the wrench
great job again |
|
|
ID, USA
|
[#46]
Originally Posted By Falar:
What gas block did you use? Is it a modified one? No gas blocks will fit under the URX II rail without modifications, correct? If I am not mistaken, a KAC, VLTOR, or PRI gas bloack will fit w/o modification. But I have been wrong before.... |
|
|
|
[#47]
Since you worked so hard on this, I think it gets a tack. For now anyway.
|
|
|
|
|
[Last Edit: unclemoak]
[#48]
Originally Posted By Lancelot: Since you worked so hard on this, I think it gets a tack. For now anyway. Thanks Some pictures from zanz113 and I's range trip over the weekend. 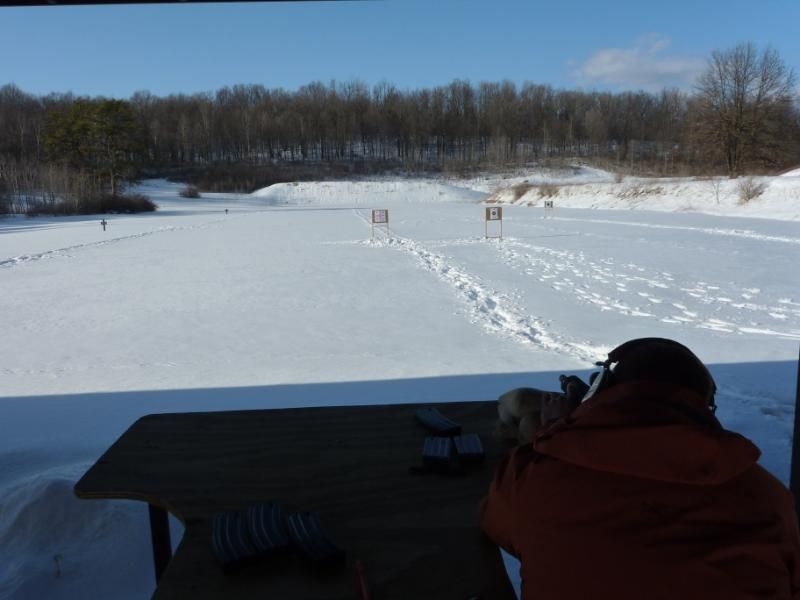 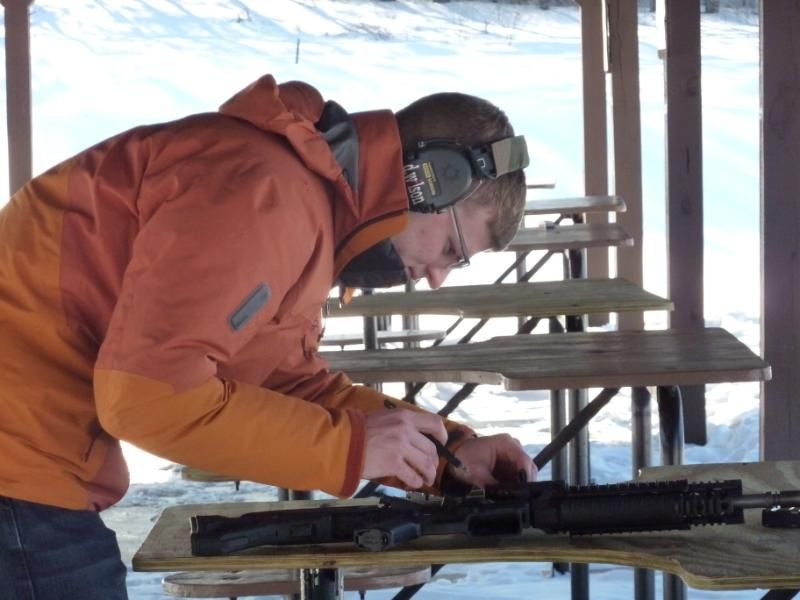 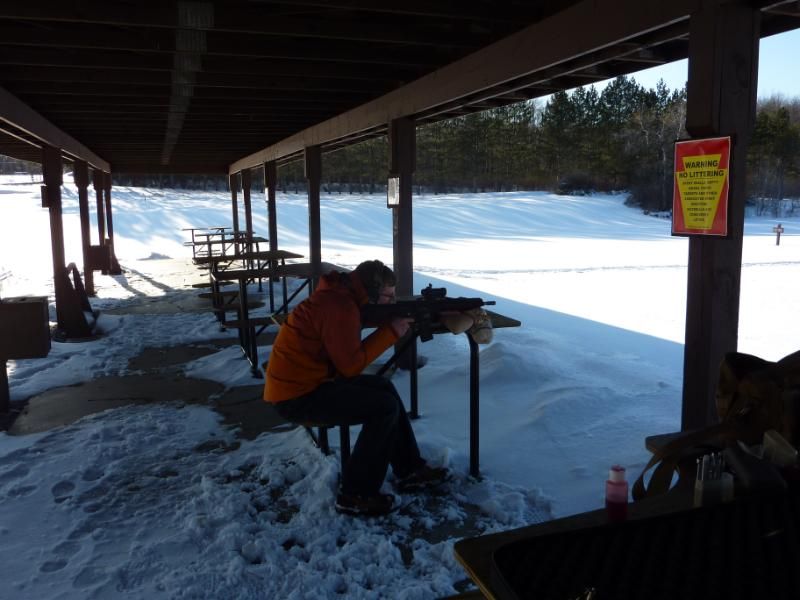 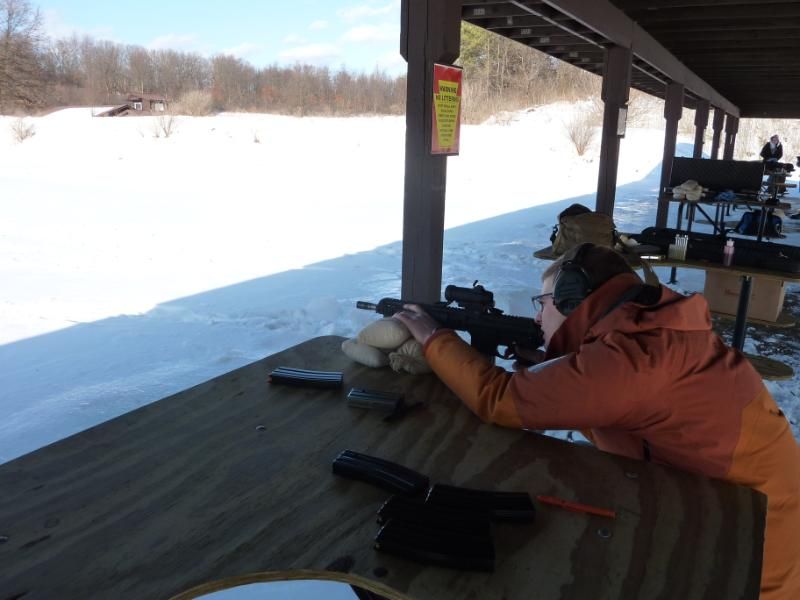 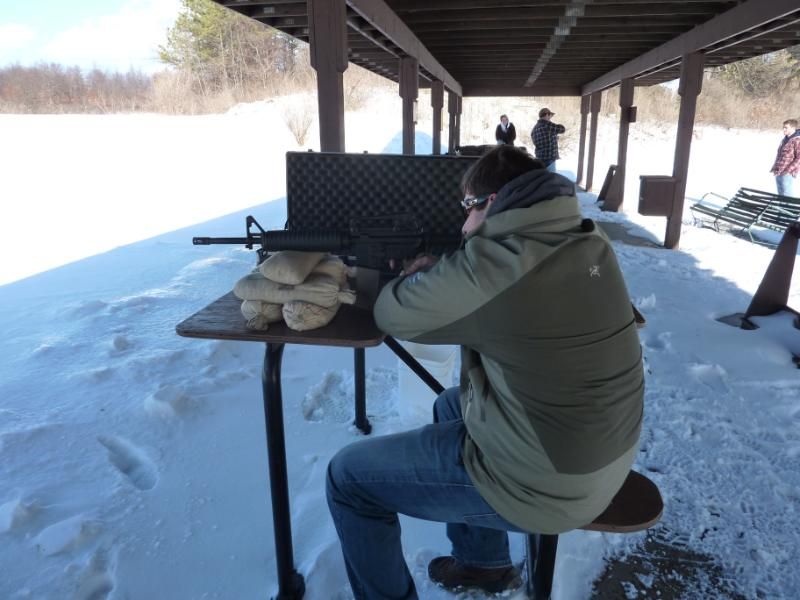 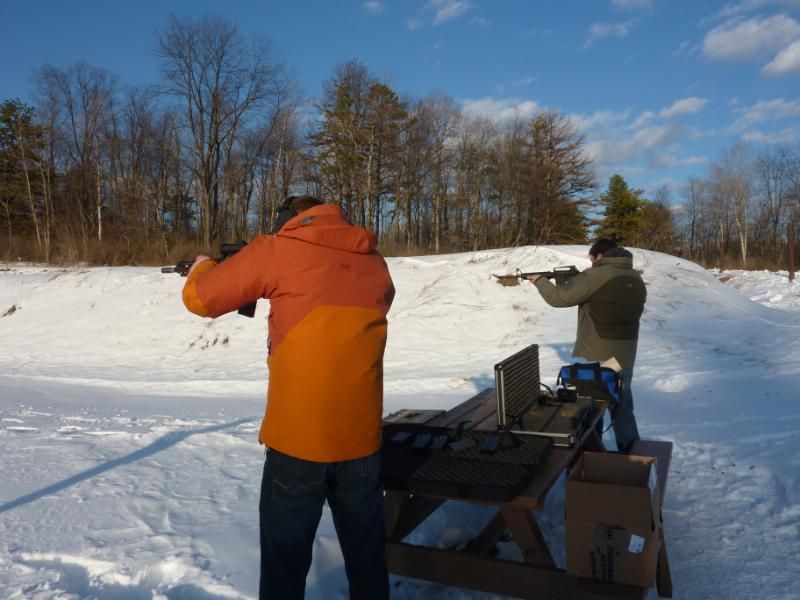 |
|
|
|
PA, USA
|
[#49]
we are looking pretty damn good if I do say so myself
|
|
|
|
[#50]
|
|
|
|
 Win a FREE Membership!
Sign up for the ARFCOM weekly newsletter and be entered to win a free ARFCOM membership. One new winner* is announced every week!
You will receive an email every Friday morning featuring the latest chatter from the hottest topics, breaking news surrounding legislation, as well as exclusive deals only available to ARFCOM email subscribers.

AR15.COM is the world's largest firearm community and is a gathering place for firearm enthusiasts of all types.
From hunters and military members, to competition shooters and general firearm enthusiasts, we welcome anyone who values and respects the way of the firearm.

Subscribe to our monthly Newsletter to receive firearm news, product discounts from your favorite Industry Partners, and more.
Copyright © 1996-2024 AR15.COM LLC. All Rights Reserved.
Any use of this content without express written consent is prohibited.
AR15.Com reserves the right to overwrite or replace any affiliate, commercial, or monetizable links, posted by users, with our own.


