|
[#1]
Right as rain. Why didn't I think of that.
|
|
|
|
[#2]
Great work John. To maintain the look of the original gas tube setup, you could simply use a very short plug on the front face of the fsb.
Posted Via AR15.Com Mobile |
|
|
|
[#3]
You guy's are just AWESOME!!!!!!! and AWE inspiring to me. I love coming in here and learning new things every day from you all.
Thank yo very much for helping to educate me. Btw, JT those are great pics to help explain your thinking. |
|
|
|
[#4]
I think it is obvious that fixing the mold form would be the best solution.
If that is not feasable I would suggest using a different type of detent. Instead of using one that captures the spring like the current style I would use one that sets on top of the spring. A selector detent would work nicely for this. It's diameter is .120 and the diameter of the sight detent spring is .115. A 1/8 hole would be sufficient and the selector detent could (but doesn't necessarily need to be) turned down from the point to a boss like the current sight detent. ETA - the hole size for the current captured detent is about .175. That would save about .025 on the width needed for everything to fit. Maybe .030 or .035 if you cheat the detent hole closer to the threaded sight hole. If you chose to cheat on the hole spacing, you would also have to turn the boss down a little smaller on the detent to account for the reduced clearance. I'm sure we could get an enterprising retro member to turn a bunch of these down for a nominal fee if that was the way everyone wanted to go. The only downside I can see to what I have suggested is assembly. The detent sitting on top of the spring may be a challenge. It may take a few hands to put it together but it wouldn't be something that ever had to be taken apart again. OR a short section of the detent could be turned down to fit inside the spring to keep things aligned like on the bolt stop detent. That may be the best option if this method is used. |
|
|
|
[#5]
JT as usual, your work is outstanding. It looks to me like the originals had the same problem and that the designers came to pretty much the same conclusion. You managed to work within the constraints of the part, make it look right, and function. You sir, are a true craftsman.
|
|
|
|
[#6]
Quoted:
I think it is obvious that fixing the mold form would be the best solution. ....... Shirkefan, If you look near the bottom of page 2 of this topic, you'll see we may have this figured out. Thanks for the comments, though. John Thomas |
|
|
|
[#7]
Very Good!! ( Insert the sound of two hands clapping!!)
|
|
|
|
[#8]
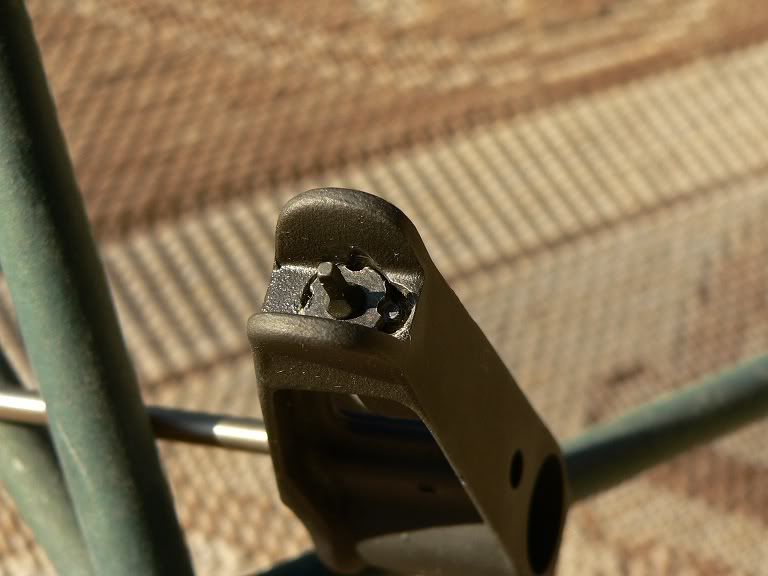
Guys, we're almost there! Here are are two updated photos I took this morning outdoors in the natural sunlight:
John Thomas 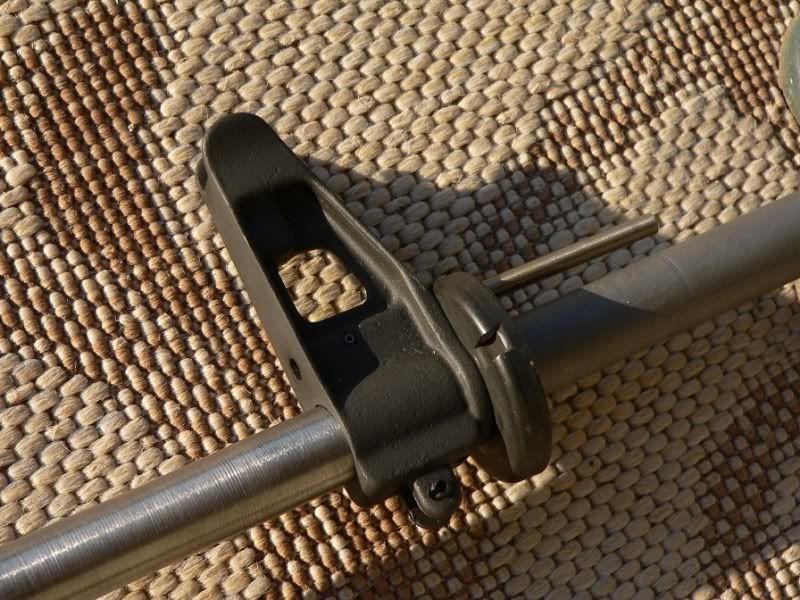
|
|
|
|
[#9]
Holy Smoke! John you are simply amazing when it comes to stuff like this. You sir are my hero!
|
|
|
|
[#10]
Thanks very much, but the credit for this one goes to you... you hung in there when most would have given up (to be honest, at one point, I had almost lost hope on this ever happening).
John Thomas Quoted:
Holy Smoke! John you are simply amazing when it comes to stuff like this. You sir are my hero! |
|
|
|
[#11]
We still gonna try to get the mold modified, or just go with John's fix?
|
|
|
|
[#12]
Oops, double tap.
|
|
|
|
[#13]
Quoted:
We still gonna try to get the mold modified, or just go with John's fix? This is the million dollar question. I've always been a firm believer in "If it isn't broke, don't fix it." I really like the look we have right now, and I fear someone at the foundry won't care as much about the look as those of us here with OCD! You guys tell me what you want me to do on Monday. |
|
|
|
[#14]
Quoted:
We still gonna try to get the mold modified, or just go with John's fix? My two cents... I am confident I can consistently machine these the way they are cast now. My opinion is to go with them as is, with the caveat to folks that if they want to use the current "detent system", the front sight post will require minor modifications (deepening the slots around the circumference where the detent rests). This can be done with a small hand file or Dremel tool. John Thomas |
|
|
|
[#15]
I was always taught to modify the least expensive part. If you don't have to modify the mold, I wouldn't. I don't have the tools or time to do the necessary machining however. How close to turn key are these going to be? I've always wanted to build a 'prototype carbine' similiar to Postino's - looks like it may actually happen this year.
|
|
|
|
[#16]
Quoted:
I was always taught to modify the least expensive part. If you don't have to modify the mold, I wouldn't. I don't have the tools or time to do the necessary machining however. How close to turn key are these going to be? I've always wanted to build a 'prototype carbine' similiar to Postino's - looks like it may actually happen this year. I will say that the parts that I will be receiving from the foundry will be a raw casting without any finish machining. It will be up to each individual to take care of any finish work. I can only speak for myself, but I will be sending my personal stuff to John Thomas for the finish machining and mounting to my in the white barrel. I know that there are many very talented individuals here on this forum that will do their own finish work. For those of us that don't have that skill set, then we each should consider contacting one of those talented individuals here on this forum about doing the finish work. Please remember to not mention anything about selling of parts or exchange of money on this thread. I'm sure that some people from this forum will be offering services such as these in another location or post in the appropriate location, but not in this thread. If you guys haven't noticed, I'm trying to cover my tail and prevent getting banned again for such behavior. |
|
|
|
[#17]
Roger that. I think we all know who those 'talented individuals' are.
|
|
|
|
[#18]
I can live with any solution, or none...I was considering a fixed blade front sight anyway (a la the old AR10). But if I change the plan and use an adustable front sight, I rather like JT's solution. The fact that it is noticeably different than the standard front sight makes it more "realistic" as a "prototype".
You know 10 years from now, there will be arguments on the interweb about whether Armalite produced these in '58 or in '59. |
|
|
|
[#19]
I would go with JT's solution its the easiest fix to the problem. Anyone can get a round swiss file to modify the front sight post. Modifying the mold at this point can be counter productive, Murphy's Law can easily creep into the project and cause further problems. Rex and John I can't wait to get my prototype done. Great job by all making this happen. Now if we can some one to do a small run of prototype lower receivers without the magazine boss on the left side that would be great!! I am in for two!! Anyone else!! Sorry for the hi jack ––fjruple |
|
|
|
[#20]
This is going to be sweet.

|
|
|
|
[#21]
If we are voting, I vote to leave the mold alone and go with John's solution of modifying the front sight detent notchs.
|
|
|
|
[#22]
Quoted:
Now if we can some one to do a small run of prototype lower receivers without the magazine boss on the left side that would be great!! I am in for two!! Anyone else!! Sorry for the hi jack ––fjruple fjruple, I was thinking the same thing about a lower receiver. I've even considered getting one of braceman's 80% lowers that has the Armalite Logo, then have John Thomas do the anodizing, then do the finish machining myself. |
|
|
|
[#23]
Quoted:
Quoted:
Now if we can some one to do a small run of prototype lower receivers without the magazine boss on the left side that would be great!! I am in for two!! Anyone else!! Sorry for the hi jack ––fjruple fjruple, I was thinking the same thing about a lower receiver... Guys, One thing to remember if you remove the magazine boss from the left side of the lower... it's there for a reason. If you remove it, you have to fill the vertical slot inside the receiver (the aluminim is about as thick as a piece of foil if you don't fill it. Then, once it's filled, a regualar magazine won't work due to the tab that protrudes on the magazine. I ran into this on my "AR14" project, but I decided to go with it anyway. I made one magazine that works with that rifle, and that's probably all I'll ever have. John Thomas |
|
|
|
[#24]
Didn't Postino make a 25rd prototype magazine out of rectangular steel tube? We could do something like that for the magazine. John you make a good point about the vertical slot on the left side of the magazine well. I wonder if Braceman would consider taking an un-machined forging and do enough machining to make it 80% like we need for a Armalite Prototype Lower?
|
|
|
|
[#25]
I congratulate myself for sitting back and keeping my mouth shut while the others solved the problem.

Excellent job, Rex, JT, Pezboy and all! (rubbing hands maniacally) Mwaahaahaa.... Soon, it will be soon.... |
|
|
|
[#26]
Quoted:
Quoted:
We still gonna try to get the mold modified, or just go with John's fix? My two cents... I am confident I can consistently machine these the way they are cast now. My opinion is to go with them as is, with the caveat to folks that if they want to use the current "detent system", the front sight post will require minor modifications (deepening the slots around the circumference where the detent rests). This can be done with a small hand file or Dremel tool. John Thomas The question is whether I can do it. My mill has a DRO, so it is good, but I suck so bad... 
|
|
|
|
[#27]
What is DRO for us ignorant people on this equipment?
|
|
|
|
[#28]
I also agree "Leave it alone", dont change the mold. "Good enough for govt work" If we start altering things now, some other problem will likely arise. There are enough options for us machinist hack wannabes. GREAT job, Rex, Jt, and all that have contributed.
|
|
|
|
[#29]
Quoted:
What is DRO for us ignorant people on this equipment? A digital position readout (also known as a DRO, short for digital read out) provides a numerical display showing the position of your machine elements. |
|
|
|
[#30]
As an engineer and a prepaid purchaser of the FSB my "vote" would be go with John's fix and not mess around with a change in a mold.
John has figured out a great way to do it with the existing mold. If we go messing around with the mold no telling what will go wrong. I have complete confidence in John's work. |
|
|
|
[#31]
Quoted:...I have complete confidence in John's work.
Now you're making me nervous! Thanks, though, John Thomas |
|
|
|
[#32]
Quoted:
As an engineer and a prepaid purchaser of the FSB my "vote" would be go with John's fix and not mess around with a change in a mold. John has figured out a great way to do it with the existing mold. If we go messing around with the mold no telling what will go wrong. I have complete confidence in John's work. +1 - John's solution seems the optimal. |
|
|
|
[#33]
John, regarding the gas tube hole - Just a thought, but you could always snip the end off of one gas tube & JB weld it onto the end of another to take up the excess "void" left in the front of the front sight block. Then it would not only operate fine, but still look like the originals as well...
Mike(FlDiveCop71 |
|
|
|
[#34]
I had a thought regarding the gas tube. For those of us who are willing to have barrel work done to put the "correct" gas system on the rifle, how would things line up if you were to move the gas port in the FSB to the inside of the swivel? Looking at the pictures, it seems like it would bring the gas tube flush with the front of the sight?
|
|
|
|
[#35]
Quoted:
I had a thought regarding the gas tube. For those of us who are willing to have barrel work done to put the "correct" gas system on the rifle, how would things line up if you were to move the gas port in the FSB to the inside of the swivel? Looking at the pictures, it seems like it would bring the gas tube flush with the front of the sight? On the original the gas port hole is in the center of the sling swivel hole and the front of the gas tube is flush with the front of the FSB. If you put the front of the gas tube flush with the front of the FSB on the repro it won't quite line up with the center of the sling swivel but I think you could do it if you enlarged the hole in the gas tube. Also, on the original the gas tube was closer to the barrel because a thinner handguard was used. You can drill the hole for the gas tube on the repro FSB closer to the barrel, but then you can't use a standard handguard cap. Also, there will be some excess material in the center web part of the FSB. Dustin |
|
|
|
[#36]
I think that I'm going to just go with John's first setup. I think it will work good for me. Man, I finally will have a setup to match my NDS-32 Upper.
Oh, by the way I didn't call the foundry since John's solution looks like the best and we don't want to upset Mr. Murphy and his law of probability by messing with the mold. |
|
|
|
[#37]
Quoted:
I think that I'm going to just go with John's first setup. I think it will work good for me. Man, I finally will have a setup to match my NDS-32 Upper. Oh, by the way I didn't call the foundry since John's solution looks like the best and we don't want to upset Mr. Murphy and his law of probability by messing with the mold. Smart move. |
|
|
|
[#38]
Quoted:
I think that I'm going to just go with John's first setup. I think it will work good for me. Man, I finally will have a setup to match my NDS-32 Upper. Oh, by the way I didn't call the foundry since John's solution looks like the best and we don't want to upset Mr. Murphy and his law of probability by messing with the mold. Excellent! What is your best estimate for when the batch will be finished? |
|
|
|
[#39]
The foundry owner told me expect at least 10 weeks, so that would put us around Mid-March.
|
|
|
|
[#40]
Quoted:
Guys, I think I have this figured out!!! I squeezed the threaded post and detent as close together as I thought I could, then cut the notches in the sight where the detent rests a little deeper. It works great, and looks correct. There is one thing that I may do differently... it's the gas tube hole. On the photos I saw of the original prototype FSB, the hole went all the way through, but the gas tube extended nearly to the front face of the FSB, so the hole in the front was very shallow. With the length of today's gas tubes, the face of the gas tube is recessed pretty deeply in the FSB and the hole in the front is deep rather than shallow. I'm going to recommend not drilling completely through as I did on this test piece. I think it will look more accurate if we just go to the required depth. Thanks to everyone involved in this project to getting it where it is now. Especially 04ZREX. It appears we are getting close!!! Pictures are below (forgive my use of an A2 sight post... I didn't want to ruin a A1 post in case this didn't work)––also, at the very bottom is a photo of the original showing what I mean about the face of the gas tube: John, If you drill the gas port through the bottom of the sling mount does it move the pin position far enough forward to mimic the original using a standard gas tube? (file photo) 
|
|
|
|
[#41]
Quoted:
Quoted:
Guys, I think I have this figured out!!! I squeezed the threaded post and detent as close together as I thought I could, then cut the notches in the sight where the detent rests a little deeper. It works great, and looks correct. There is one thing that I may do differently... it's the gas tube hole. On the photos I saw of the original prototype FSB, the hole went all the way through, but the gas tube extended nearly to the front face of the FSB, so the hole in the front was very shallow. With the length of today's gas tubes, the face of the gas tube is recessed pretty deeply in the FSB and the hole in the front is deep rather than shallow. I'm going to recommend not drilling completely through as I did on this test piece. I think it will look more accurate if we just go to the required depth. Thanks to everyone involved in this project to getting it where it is now. Especially 04ZREX. It appears we are getting close!!! Pictures are below (forgive my use of an A2 sight post... I didn't want to ruin a A1 post in case this didn't work)––also, at the very bottom is a photo of the original showing what I mean about the face of the gas tube: John, If you drill the gas port through the bottom of the sling mount does it move the pin position far enough forward to mimic the original using a standard gas tube? (file photo) http://bellsouthpwp.net/d/m/dmshannon/2-fsb-back.jpg See my post a few up. It is only about 1/16 off. Dustin |
|
|
|
[#42]
Quoted:
See my post a few up. It is only about 1/16 off. Dustin Dooh, so it is. I wonder if there's enough material for an original Sudanese style adjustable gas tube? (Hopin I didn't miss that one either) I can't wait to get mine!! |
|
|
|
[#43]
Gotta be careful about moving the gas tube around.The gas tube goes into the gas key on the bolt carrier,and I'm sure there is a minimum and maximum amount of tube that is needed to properly control the recycling action of the BCG.
|
|
|
|
[#44]
Quoted:
Quoted:
See my post a few up. It is only about 1/16 off. Dustin Dooh, so it is. I wonder if there's enough material for an original Sudanese style adjustable gas tube? (Hopin I didn't miss that one either) I can't wait to get mine!! Explain please. I'm ready to drill and tap mine. |
|
|
|
[#45]
You guys simply amaze me! I watched this thread with stunned amazement!
Been out of time and touch but I HAD to dig this thread up and say..... The talent on this board is incomparable! 
Such dedication and attention to detail! You guys are the greatest collection of anal retentive master craftsmen I've ever seen! (I mean that in the most complimentary terms and with great jealousy because I will never attain on tenth of the abilities that you guys have!) |
|
|
|
[#46]
Hmmm I'm late to this thread as I haven't been around arfcom much lately.
Jntmjt1's solution is fine, maybe optimal from an aesthetic standpoint. But in any event, if the measurements are accurate, +/- .032" is plenty of room. Like, miles. The walls can be thin; they aren't subject to a lot of stress. I'll have to check it out in detail when I receive my casting, but I bet it can be done without even modifying the sight post. |
|
|
|
[#47]
Quoted:
Hmmm I'm late to this thread as I haven't been around arfcom much lately. Jntmjt1's solution is fine, maybe optimal from an aesthetic standpoint. But in any event, if the measurements are accurate, +/- .032" is plenty of room. Like, miles. The walls can be thin; they aren't subject to a lot of stress. I'll have to check it out in detail when I receive my casting, but I bet it can be done without even modifying the sight post. I'll go ahead and speak for John Thomas on that one and say that he tried doing it without modifying the sight post and guess what? He punctured through the front of FSB. Dooooh!!!!! I believe he has decided to stick with modifying the sight post base to prevent the problem. I for one will be going with John T. for my finish work and mounting and would recommend anyone else like myself to go with him for your service as well. I know that there are a few out there skilled enough to do their own stuff, but most of us are not that talented. |
|
|
|
[#48]
I've never measured a $5 bill, but lined notebook paper is .003" - .004" - I use notebook paper when setting my cutters down to the workpiece...So that's 10 sheets of notebook paper (if you don't have a vernier or mic) on the FSB...
But centering the sight post and doing away with the detent is prolly what I'll do...But I don't use LocTite for anything; if you don't want it to move, put a dab of Contact Cement on it...It's flexible/rubbery when dry, and the threaded part can still be easily removed... |
|
|
|
[#49]
I think that it is going to be very interesting to see how some of machinist types do their own parts. I think that we are going to great ideas.
|
|
|
|
[#50]
Quoted:
Dustin, please don't blame yourself for this. We are lucky you donated your time and skill for this project. I think this is one of those small oversights that many of us involved did not catch, so pointing blame won't help. Oh, shrinkage on the part didn't help us either. I only hope you understand how much all of us appreciate your help with this project. If there is one thing that I've learned in this whole process it is that we should all appreciate what a company goes through trying to bring a product to market. How many times in history has such a problem occurred. Who's to say that the original FSB even had a detent, maybe it had something more like the AK. Yeah, this. I was going to have a substantive post, but all my bright ideas were put forward by other guys first and better, and a bunch more bright ideas. But I've been reading a lot about the early days of the ARs lately. I think of my M4 or 416 as about the same gun as the A1 I had for so many years, about the same thing as the first prototype. Nothing could be more off the mark. Between the first COLT prototype (which already had dozens of changes from the Armalite prototypes) and the first batch of GI M16s and XM16E1s, there were about 250 changes. Having done my time in manufacturing, you're lucky any of the drawings go to metal right first shot. |
|
|
 Win a FREE Membership!
Sign up for the ARFCOM weekly newsletter and be entered to win a free ARFCOM membership. One new winner* is announced every week!
You will receive an email every Friday morning featuring the latest chatter from the hottest topics, breaking news surrounding legislation, as well as exclusive deals only available to ARFCOM email subscribers.

AR15.COM is the world's largest firearm community and is a gathering place for firearm enthusiasts of all types.
From hunters and military members, to competition shooters and general firearm enthusiasts, we welcome anyone who values and respects the way of the firearm.

Subscribe to our monthly Newsletter to receive firearm news, product discounts from your favorite Industry Partners, and more.
Copyright © 1996-2024 AR15.COM LLC. All Rights Reserved.
Any use of this content without express written consent is prohibited.
AR15.Com reserves the right to overwrite or replace any affiliate, commercial, or monetizable links, posted by users, with our own.


