|
[#1]
Originally Posted By Iram: I've found that the initial shaping is best done using the oven to heat up the kydex, then tweaking with the heat gun.Originally Posted By Backstop: Just curious about something. The one Kydex sheath I made, I heated it up in the oven. Would this work also and or better? Puts out either 570F or 1000F - bought it for my hockey stick. http://www.acetoolonline.com/v/vspfiles/photos/MIL-8975-6-2T.jpg That would have worked much better. Being able to heat up and adjust just a small area (instead of heating the whole thing) makes a night and day difference. |
|
|
|
|
[#2]
Originally Posted By Afterwork_Ninja: What do I need to mount my belt loops to my holster? I bought the #6-6 rivets for the .060 Kydex, and I need to order some .080 for loops, but I don't see any chicago screws that fit through the #6-6 rivets. You can use the #8 rivetrs on the 0.060" kydex, and the chicago screws will fit. I've got no need for the #6 rivets. |
|
|
|
|
[#3]
Originally Posted By AR4U:
Originally Posted By Iram:
I've found that the initial shaping is best done using the oven to heat up the kydex, then tweaking with the heat gun. Originally Posted By Backstop:
Just curious about something. The one Kydex sheath I made, I heated it up in the oven. Would this work also and or better? Puts out either 570F or 1000F - bought it for my hockey stick. http://www.acetoolonline.com/v/vspfiles/photos/MIL-8975-6-2T.jpg That would have worked much better. Being able to heat up and adjust just a small area (instead of heating the whole thing) makes a night and day difference. Thanks. |
|
|
|
|
[#4]
Originally Posted By AR4U:
Originally Posted By Afterwork_Ninja:
What do I need to mount my belt loops to my holster? I bought the #6-6 rivets for the .060 Kydex, and I need to order some .080 for loops, but I don't see any chicago screws that fit through the #6-6 rivets. You can use the #8 rivetrs on the 0.060" kydex, and the chicago screws will fit. I've got no need for the #6 rivets. Can you tell me which ones? http://www.knifekits.com/vcom/index.php?cPath=41_56&sort=3a&page=2 |
|
|
|
USA
|
[#5]
I think this thread is causing problems at knifekits.com, they are out of the .08 black kydex. Last week they were out of the rivet setters. Stop it people!
|
|
|
|
[#6]
Originally Posted By Afterwork_Ninja:
Originally Posted By AR4U:
Originally Posted By Afterwork_Ninja:
What do I need to mount my belt loops to my holster? I bought the #6-6 rivets for the .060 Kydex, and I need to order some .080 for loops, but I don't see any chicago screws that fit through the #6-6 rivets. You can use the #8 rivetrs on the 0.060" kydex, and the chicago screws will fit. I've got no need for the #6 rivets. Can you tell me which ones? http://www.knifekits.com/vcom/index.php?cPath=41_56&sort=3a&page=2 I'm not aware of any #6 Chicago screws. Maybe I'm reading this conversation wrong but I think you bought #6 rivets (the small ones) and are looking for a way to attach belt loops though them. If so I'm sorry but I think you are out of luck. The only thing i've seen #6 rivets used on is knifes. Hopefully I'm reading it wrong though. |
|
|
|
|
[#7]
Originally Posted By WILSON: Originally Posted By Forgetfull: What in the heck did you do to that poor rifle? Treated it like a combat weapon! I like pretty and shiny Sauers, Mausers, Krieghoffs, Blasers, Kricos, Heyms, and Sakos as much as anybody. But I LOVE an AR (or AK) with "character". A beat-up rifle with hours, and hours, and hours of fun on it is beautiful thing! I wish I had the ammo to do that. |
|
|
|
|
[#8]
Originally Posted By Forgetfull:
Originally Posted By WILSON:
Originally Posted By Forgetfull:
What in the heck did you do to that poor rifle? Treated it like a combat weapon! I like pretty and shiny Sauers, Mausers, Krieghoffs, Blasers, Kricos, Heyms, and Sakos as much as anybody. But I LOVE an AR (or AK) with "character". A beat-up rifle with hours, and hours, and hours of fun on it is beautiful thing! I wish I had the ammo to do that. Me too. |
|
|
|
|
[Last Edit: MOS2111]
[#9]
Dont give me that line. I drive a beat up car, and I am a teacher. Prioritize what you want and budget your money. I reload about 5k .223 each year. To me shooting and training are about my top priority next to keeping my life going.... I choose to have ammo and cool guns and shoot alot. That is about all I do hobby wise.
You didnt even comment on my old faded sweat stained armor... |
|
|
|
|
[Last Edit: Afterwork_Ninja]
[#10]
Originally Posted By millsusaf:
Originally Posted By Afterwork_Ninja:
Originally Posted By AR4U:
Originally Posted By Afterwork_Ninja:
What do I need to mount my belt loops to my holster? I bought the #6-6 rivets for the .060 Kydex, and I need to order some .080 for loops, but I don't see any chicago screws that fit through the #6-6 rivets. You can use the #8 rivetrs on the 0.060" kydex, and the chicago screws will fit. I've got no need for the #6 rivets. Can you tell me which ones? http://www.knifekits.com/vcom/index.php?cPath=41_56&sort=3a&page=2 I'm not aware of any #6 Chicago screws. Maybe I'm reading this conversation wrong but I think you bought #6 rivets (the small ones) and are looking for a way to attach belt loops though them. If so I'm sorry but I think you are out of luck. The only thing i've seen #6 rivets used on is knifes. Hopefully I'm reading it wrong though. No, that's about right. I guess I'll try again. I just have to call them and figure out what size of #8 rivet I need for .060. |
|
|
|
|
[Last Edit: AR4U]
[#11]
Originally Posted By Afterwork_Ninja: Originally Posted By AR4U: Originally Posted By Afterwork_Ninja: What do I need to mount my belt loops to my holster? I bought the #6-6 rivets for the .060 Kydex, and I need to order some .080 for loops, but I don't see any chicago screws that fit through the #6-6 rivets. You can use the #8 rivetrs on the 0.060" kydex, and the chicago screws will fit. I've got no need for the #6 rivets. Can you tell me which ones? http://www.knifekits.com/vcom/index.php?cPath=41_56&sort=3a&page=2 I've been using the #8-8 rivets with the 0.060" kydex: http://www.knifekits.com/vcom/product_info.php?cPath=41_56&products_id=658&osCsid=f71c427c85fcc7a851cb42dfceb4fba7 The chicago screws fit through the rivets nicely. I should mention that I'm using the rivet flaring dies and not the hand setter. The extra length of the rivet is rolled into a ring very neatly with the dies, but I don't know if this will work with the hand setting tool; it may crack the rivets. I don't have one so I can't try it. ETA: One thing you might try is going down the the hardware store and getting some machine screws that just barely fit through your #6 rivets. Order some T Nuts for the backside. My Crossbreed supertuck has it's loops attached that way, IIRC. |
|
|
|
|
[#12]
Originally Posted By AR4U:
Originally Posted By Afterwork_Ninja:
Originally Posted By AR4U:
Originally Posted By Afterwork_Ninja:
What do I need to mount my belt loops to my holster? I bought the #6-6 rivets for the .060 Kydex, and I need to order some .080 for loops, but I don't see any chicago screws that fit through the #6-6 rivets. You can use the #8 rivetrs on the 0.060" kydex, and the chicago screws will fit. I've got no need for the #6 rivets. Can you tell me which ones? http://www.knifekits.com/vcom/index.php?cPath=41_56&sort=3a&page=2 I've been using the #8-8 rivets with the 0.060" kydex: http://www.knifekits.com/vcom/product_info.php?cPath=41_56&products_id=658&osCsid=f71c427c85fcc7a851cb42dfceb4fba7 The chicago screws fit through the rivets nicely. I should mention that I'm using the rivet flaring dies and not the hand setter. The extra length of the rivet is rolled into a ring very neatly with the dies, but I don't know if this will work with the hand setting tool; it may crack the rivets. I don't have one so I can't try it. ETA: One thing you might try is going down the the hardware store and getting some machine screws that just barely fit through your #6 rivets. Order some T Nuts for the backside. My Crossbreed supertuck has it's loops attached that way, IIRC. Thanks for the help. |
|
|
|
USA
|
[#13]
my 3rd and 4th holster.
IWB Glock 21sf ( with a grip reduction i did) 
OWB Glock 17w/TRL-1 ( it was the ability to go IWB with "wings" removed and belt attached.) 

|
|
|
|
[#14]
Looks good.
Any nuggets of wisdom to pass along when it comes to making a holster for a gun with a light attached? |
|
|
|
|
[#15]
Originally Posted By Afterwork_Ninja: Looks good. Any nuggets of wisdom to pass along when it comes to making a holster for a gun with a light attached? THIS! Will be ordering goodies to make a holster for a G19 with weaponlight. Got tired of various holster makers ignoring the market on this. |
|
|
|
|
[#16]
Should be about the same for making regular ones. You are going to have to shape and fit where the light enters. I will be testing using a ID 1in/1.5 in pvc pipe in the opening of the holster where the light first goes in...
|
|
|
|
USA
|
[#17]
OK here is what I did and it is not the same as pressing a holster with a non-light bearing weapon.I spent some time looking at various designs and they all have something in common. An open channel in the diameter of the largest part of the light. Typically it's not the body of the light. So i made a "mold" so to speak for the body


I secured with the tape so that i could form it in the press. It turned out well. One minor issue was the mold also formed a bit to the gun and the holster was corrected with a heat gun. Now since there is a channel where the trigger guard is there can be be retention around the trigger guard. These holsters will not provide ANY retention without the light attached to the pistol. The retention is provided by the light itself. With the TRL-1 it's the thumb screw as you can see on the body side of the holster. 
I hope that helps. |
|
|
|
[#18]
Couldn't you make the ejection port the point of retention?
|
|
|
|
USA
|
[Last Edit: Rosco79]
[#19]
Originally Posted By Afterwork_Ninja:
Couldn't you make the ejection port the point of retention? I typically do not b/c i found it scuffs the hell out of the holster inside and after repeated draws i had lots of material coming up with the pistol. I usually fit the port with a block when molding them. Also once the light is removed it does leave a bit of free room inside which leads to some play. YMMV. |
|
|
|
[#20]
Originally Posted By Rosco79: Originally Posted By Afterwork_Ninja: Couldn't you make the ejection port the point of retention? I typically do not b/c i found it scuffs the hell out of the holster inside and after repeated draws i had lots of material coming up with the pistol. I usually fit the port with a block when molding them. Also once the light is removed it does leave a bit of free room inside which leads to some play. YMMV. what did you use as a block for the port? |
|
|
|
USA
|
[#21]
Originally Posted By EPOCH96:
Originally Posted By Rosco79:
Originally Posted By Afterwork_Ninja:
Couldn't you make the ejection port the point of retention? I typically do not b/c i found it scuffs the hell out of the holster inside and after repeated draws i had lots of material coming up with the pistol. I usually fit the port with a block when molding them. Also once the light is removed it does leave a bit of free room inside which leads to some play. YMMV. what did you use as a block for the port? Nothing too high speed. Just a piece of thick cardboard held in with the painters tape. |
|
|
|
[#22]
Originally Posted By KaosX2133:
So now onto the leather part. Just a forewarning, you're going to be buying enough leather to make about 6 holsters...because that's how they sell them. I bought what's called a "shoulder" of veg tanned leather in the 6-7 oz variety which I think it about right for this. It's up to you to pick what type (bull, horse etc) of leather you want. Here's the cost on the shoulder I bought: It might be hard to see, but it was 39.99. That's fine for me because I can do multiple projects with this leather and I usually get a few offers on something I already made...this will let me recoup it, but I'll generally make them for people I know off the net as well. http://img.photobucket.com/albums/v328/KaosX/Kydex/g19_stipple024.jpg Forgive me for pictures being missing, I have them - will upload once I get them off my wife's computer. So you need to decide on a shape, I recommend tracing to cardboard first: {insert pic of my tracing} Then you need to put your template on your leather and go over the edge a few times (5-6) with a regular pencil. The line will be there, just very lightly. I used an exacto-ish razor knife to carefully trace around the edge and then you can pretty much cut right into it and for me it carved right in my razor line. http://img.photobucket.com/albums/v328/KaosX/Kydex/g19_stipple023.jpg Now you can lay your kydex over the leather piece and decide on placement. http://img.photobucket.com/albums/v328/KaosX/Kydex/g19_stipple022.jpg You can then use a pencil to mark where you want the rivets to be on the leather. I just use a 7/64 drill bit and drill through the kydex and through the leather: http://img.photobucket.com/albums/v328/KaosX/Kydex/g19_stipple025.jpg http://img.photobucket.com/albums/v328/KaosX/Kydex/g19_stipple028.jpg I like to set the rivets one at a time then mark the next one. You can adjust the leather to add in a bit of more retention too, just keep in mind it will be pressing against your side - which will retain it even more. Too much can be bad. Setting a rivet is really easy. You just push the post up through the backside of the leather, then through the hole in the kydex. Set the anvil from the setter under the post, then use the setter on the cap. If you have a rounded cap use the rounded part of the setter: Rivet post, cap setter and anvil: http://img.photobucket.com/albums/v328/KaosX/Kydex/g19_stipple026.jpg Putting post through the leather backer form the rear: http://img.photobucket.com/albums/v328/KaosX/Kydex/g19_stipple029.jpg Post set through the leather and the kydex, it will be a tight fit, this is good. http://img.photobucket.com/albums/v328/KaosX/Kydex/g19_stipple030.jpg Cap on the post: http://img.photobucket.com/albums/v328/KaosX/Kydex/g19_stipple032.jpg Showing the anvil underneath: http://img.photobucket.com/albums/v328/KaosX/Kydex/g19_stipple031.jpg Setting the cap with the setter: http://img.photobucket.com/albums/v328/KaosX/Kydex/g19_stipple033.jpg Then the holster part is basically done. Mine will hold my glock 19 upside down very securely: http://img.photobucket.com/albums/v328/KaosX/Kydex/g19_stipple034.jpg then you need to decide where you want your belt clips. I didn't want to use kydex clips so I just bought some belt clips from tandy...they were a couple bucks a piece: http://img.photobucket.com/albums/v328/KaosX/Kydex/g19_stipple021.jpg Then I used a leather hole punch to punch the hole where I wanted them. I don't want adjustable cant but you can just make a series of holes so you do have adjustable cant....your call. http://img.photobucket.com/albums/v328/KaosX/Kydex/g19_stipple037.jpg http://img.photobucket.com/albums/v328/KaosX/Kydex/g19_stipple039.jpg http://img.photobucket.com/albums/v328/KaosX/Kydex/g19_stipple040.jpg Then you can just use "chicago screws" to affix the clips to the leather backer. You might need some kind of rubber grommet or washer for a snug fit: http://img.photobucket.com/albums/v328/KaosX/Kydex/g19_stipple041.jpg Then I light to hit the edges with a worn belt on the sander. You could always use some kind of edge coating here too, or just take a lighter to the edges to burn the fibers short: http://img.photobucket.com/albums/v328/KaosX/Kydex/g19_stipple035.jpg And just like your baseball glove after a while it will get softer. But mine works great so far: http://img.photobucket.com/albums/v328/KaosX/Kydex/g19_stipple042.jpg Fire away with questions :) –– I'd be willing to cut some leather off the shoulder I bought for a reasonable price if anyone wants some for a project as well. Mine looked like that. I trimmed a lot of extra leather off of it. Then I made the "combat cut". I couldnt get a full firing grip on the pistol. Now, this is my daily carry setup. 

I carry my Kimber Pro Raptor II in this as well. |
|
|
|
|
[#23]
I made my second holster this weekend... Not only did it go faster because I was already familiar with how the material works, but the thinner Kydex is decidedly easier to mould around the gun.
|
|
|
|
|
[#24]
I did another holster today. I was inspired by the Tucker "Silent Thunder". This isn't leather lined, just a bit of moleskin covering the hardware inside the holster to help with the gun's finish. If anyone knows of a good, thin, substance that can be used to line part of a kydex holster, I'd love to hear details.
If I was going to do this again, I'd use the thickest kydex I could get. The holster just feels weak when empty. Made using a deremel, leatherman, and a cheap heat gun. Total cost of parts, not counting the stuff I didn't use and shipping, was under $15. 


|
|
|
|
MO, USA
|
[Last Edit: Romad816]
[#25]
Here is a hybrid I made a couple months ago before finding this thread. I have since cut down the leather in front and back, moved the belt loops in toward the kydex a bit and she fits a lot better now.
I have been thinking of way to mold the kydex in such a way to pull the butt of the pistol in toward the body more. 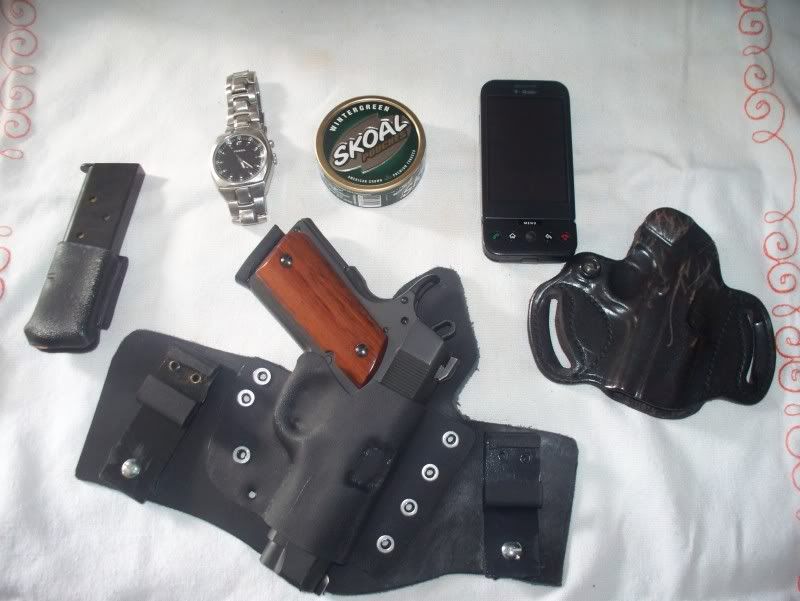
|
|
|
|
[#26]
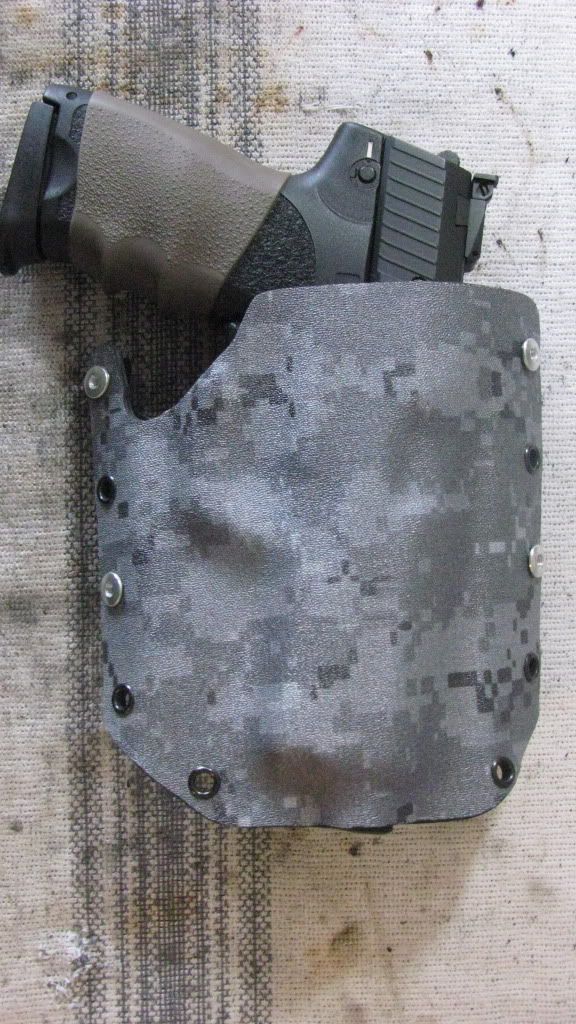
after my failed search for a holster for my G29 with TLR-3 attached, i decided to try and make my own tuckable.
my advice for making one is to get a heat gun. a blow dryer won't cut it imo. i ended up using a candle to do my final forming so the light has a large enough channel to holster and draw the pistol. and wear some type of glove, the kydex gets hot. i also used it to get some more angle on my sides so it will 'curve' more to wrap where i would be wearing it. i would recommend if your making one to have a light attached to use something that goes from the back of the light to the end of the holster towards your grip because the kydex will mold around the light making it impossible to holster/unholster the pistol. i used two pieces of kydex (a top and bottom). i think if i make another for an attached light i will make it so the backside doesn't mold by either using some yoga mat foam or no foam at all. but as of right now I'm pretty satisfied with the results. the retention is based on the light, though i haven't tried the holster with the gun and no light i'm pretty sure it would just be sitting in there. this holster still is not finished, i have to get some kind of rivet or grommet. the screws in there are from another holster i had laying around and from the kydex sheath that came with my Rat RC-4 knife. i just used them to get an idea for final shaping. i also may take off some more material from the bottom of the holster where the front of the light is. I'll see once i get my rivets in and my clips drilled/mounted. Material and Tools used so far: .60 Kydex for the holster (knifekits) .125 kydex for the clips(knifekits) foam for press (knifekits) 2 pieces of 3/4" plywood 2 4" double headed C-Clamps Dremel tool with cut off wheel Dremel 125 grit flap wheel to get my corners and smooth/even the edges. a yard stick to help form the belt clips candle needle nose pliers oven heated to 275, heated the kydex for around 5-8 minutes bottom side of a Teflon coated cookie sheet utility knife square i didn't take any pictures during the molding process but here are pictures at about 75% complete. just need to get the small parts and mount the belt clips. 


the shiny spots are from using a candle, which is why i say use a heat gun. get all the parts you need if you order from knifekits at one time. i thought i would cheap out and just use the hardware/small parts i could find local. what i found will not work as i want it too. i'm taking a trip to a big craft store tomorrow to see if what rivets/grommets will work for me. also, make the 'wings' where you hardware would go wider, so you have more play in forming the final shape the trim afterwards. i think if your just making a standard holster without a light you will have a much easier time getting one put together. |
|
|
|
|
[#27]
You guys have done a great job with all of the info in this thread. I will be trying some in the near future....Thanks!!!!
|
|
|
|
|
[#28]
Here are a few pics of a kydex forming press that I made up that doesn't require any clamps and gives consistent results. I used 1" foam from knifekits.com, but the camping foam from walmart probably would work just as well. I just put a little bit of glue on the corners to secure the foam, so it wont be an issue to replace if/when the foam gets messed up (the velcro mentioned earlier probably isn't a bad idea either). All I had was some plywood, so I put in a few re-enforcing screws around the eye bolts to make sure they didn't come out. If I had some solid wood, I would not have worried about doing this.
Prior to heating the kydex, I put the pistol in the press and tighten the wingnuts to the amount of tension I want, that way I dont have any adjustments to make once the kydex is heated. 


For rivet forming, I use the rivet dies from knifekits.com, and tighten them in a vise. The rivet die is easily aligned with one hand, and I just tighten the vise with the other. It flares the rivets nicely without having to do a bunch of hammering. 

|
|
|
|
VA, USA
|
[#29]
I can't see where you guys got the free sample of kydex from, any help?
|
|
|
|
[#30]
Originally Posted By ckichinko: I can't see where you guys got the free sample of kydex from, any help? They don't do it any more for the larger sizes. You only get little 4in tiles now. |
|
|
|
|
[#31]
Originally Posted By dusten: Here are a few pics of a kydex forming press that I made up that doesn't require any clamps and gives consistent results. I used 1" foam from knifekits.com, but the camping foam from walmart probably would work just as well. I just put a little bit of glue on the corners to secure the foam, so it wont be an issue to replace if/when the foam gets messed up (the velcro mentioned earlier probably isn't a bad idea either). All I had was some plywood, so I put in a few re-enforcing screws around the eye bolts to make sure they didn't come out. If I had some solid wood, I would not have worried about doing this. Prior to heating the kydex, I put the pistol in the press and tighten the wingnuts to the amount of tension I want, that way I dont have any adjustments to make once the kydex is heated. http://www.hunt101.com/data/500/SAM_0285.JPG http://www.hunt101.com/data/500/SAM_0286.JPG http://www.hunt101.com/data/500/SAM_0287.JPG For rivet forming, I use the rivet dies from knifekits.com, and tighten them in a vise. The rivet die is easily aligned with one hand, and I just tighten the vise with the other. It flares the rivets nicely without having to do a bunch of hammering. http://www.hunt101.com/data/500/SAM_0288.JPG http://www.hunt101.com/data/500/SAM_0289.JPG That's an excellent idea; I'll have to add that to my press. The vise trick gives me the best results with the rivets as well. I place a small amount of grease on the dies, and I get perfectly rolled rivets every time. |
|
|
|
VA, USA
|
[#32]
Originally Posted By Forgetfull:
Originally Posted By ckichinko:
I can't see where you guys got the free sample of kydex from, any help? They don't do it any more for the larger sizes. You only get little 4in tiles now. This is what I meant, I'd still kind of like to see what the colors and thicknesses look and feel like in person before going elbow deep into an order. I just don't see on the site where to order the sample swatches |
|
|
|
[#33]
Originally Posted By ckichinko:
Originally Posted By Forgetfull:
Originally Posted By ckichinko:
I can't see where you guys got the free sample of kydex from, any help? They don't do it any more for the larger sizes. You only get little 4in tiles now. This is what I meant, I'd still kind of like to see what the colors and thicknesses look and feel like in person before going elbow deep into an order. I just don't see on the site where to order the sample swatches I'm pretty sure this is it. http://www.kydex.com/samples.aspx |
|
|
|
|
[#34]
well, i basically finished my holster.
i went to a local Michaels craft store an picked up some 3/16" eyelets which are just barely big enough to work with two layers of .60 Kydex. I also bought some black Tandy leather and some adhesive to glue it to the back of the holster. i also stole the screws, clips, and nuts from a comp-tac holster i have for a 1911 that i don't carry to get it to work. i'll probably just go to Lowes and get the nuts and screws i need then use the clips i made once i get time to make them the right size, and return the comp-tac hardware to it's holster once i do that, all i did for the mounting holes was drill the appropriate size hole and screw them on since the nuts wold not fit through the smaller 3/16" eyelets. i must say that my creation is way more comfortable than the leather Gould & Goodrich holster i bought from a local store. 


Since this was my first try i was basically going for function over looks, hence the glue remnants and extra holes that serve no purpose. I've also molded a mag holder earlier today but still need to cut it to the proper size and mold the belt clip. for the mag holster i decided to go with one integral piece and use a folded side with screws and rubber washers for tension and the extra on the backside for a belt clip. after this, I'll probably be ordering the proper size eyelets,screws, and tools along with modifying my mold process to allow for belt clips or something. I didn't really realize that there was a lot more that went into holster making than one would think....but i know for next time. also, making a holster for a gun with a light attached is a pain in the ass. |
|
|
|
|
[#35]
Lots of great info here guys............thank you all
|
|
|
|
|
[#36]
Wow nice thread!
|
|
|
|
|
[#37]
Originally Posted By Wils91:
well, i basically finished my holster. i went to a local Michaels craft store an picked up some 3/16" eyelets which are just barely big enough to work with two layers of .60 Kydex. I also bought some black Tandy leather and some adhesive to glue it to the back of the holster. i also stole the screws, clips, and nuts from a comp-tac holster i have for a 1911 that i don't carry to get it to work. i'll probably just go to Lowes and get the nuts and screws i need then use the clips i made once i get time to make them the right size, and return the comp-tac hardware to it's holster once i do that, all i did for the mounting holes was drill the appropriate size hole and screw them on since the nuts wold not fit through the smaller 3/16" eyelets. i must say that my creation is way more comfortable than the leather Gould & Goodrich holster i bought from a local store. <a href="http://img80.imageshack.us/i/img0715t.jpg/" target="_blank">http://img80.imageshack.us/img80/279/img0715t.jpg</a> <a href="http://img245.imageshack.us/i/img0716uc.jpg/" target="_blank">http://img245.imageshack.us/img245/3231/img0716uc.jpg</a> <a href="http://img13.imageshack.us/i/img0719pr.jpg/" target="_blank">http://img13.imageshack.us/img13/2382/img0719pr.jpg</a> Since this was my first try i was basically going for function over looks, hence the glue remnants and extra holes that serve no purpose. I've also molded a mag holder earlier today but still need to cut it to the proper size and mold the belt clip. for the mag holster i decided to go with one integral piece and use a folded side with screws and rubber washers for tension and the extra on the backside for a belt clip. after this, I'll probably be ordering the proper size eyelets,screws, and tools along with modifying my mold process to allow for belt clips or something. I didn't really realize that there was a lot more that went into holster making than one would think....but i know for next time. also, making a holster for a gun with a light attached is a pain in the ass. What kind of glue did you use to attach the leather? |
|
|
|
|
[#38]
This is one of the best threads ever. Exhibit A as to why I'll always be a Team Member.
After a long wait for a Raven Concealment Phantom for my XDM, I decided to take a crack at rolling my own for my PPS. I was fortunate to have a shooting buddy with a garage full of metal and word working tools. Took us the better part of an evening to get everything configured properly, but I can probably roll new ones out in under an hour now. Mine on the left, RCS on the right. I didn't get quite the 'press' that the RCS has... I had plenty of heat, however I was concerned about the 1" foam being too thin so I stacked some carpet padding behind it, which unfortunately resulted in not enough squeeze. Still has great retention, just lacks that satisfying *snick* of the RCS. 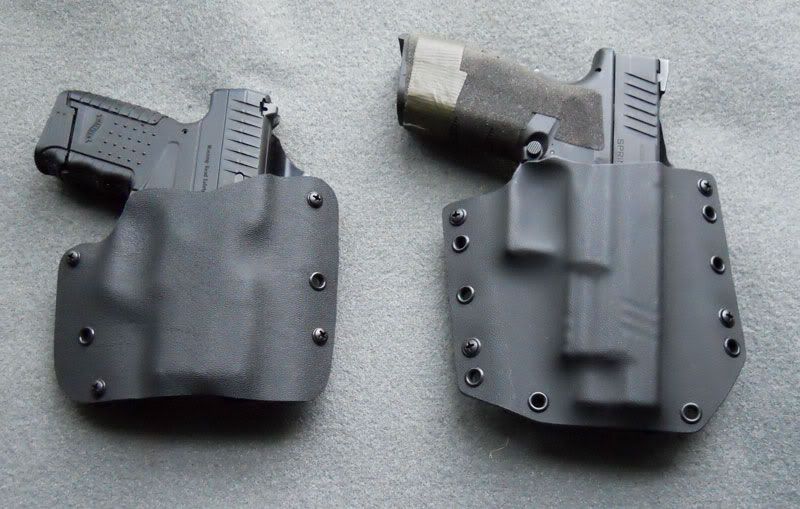
As others have said, use more material than you think you'll need. I was hoping to get 2 full holsters out of a 12x12 sheet and I should have planned on one and given myself a little more room for error. That being said, my first try is completely serviceable. |
|
|
|
|
[#39]
Originally Posted By Iram:
Originally Posted By Wils91:
well, i basically finished my holster. i went to a local Michaels craft store an picked up some 3/16" eyelets which are just barely big enough to work with two layers of .60 Kydex. I also bought some black Tandy leather and some adhesive to glue it to the back of the holster. i also stole the screws, clips, and nuts from a comp-tac holster i have for a 1911 that i don't carry to get it to work. i'll probably just go to Lowes and get the nuts and screws i need then use the clips i made once i get time to make them the right size, and return the comp-tac hardware to it's holster once i do that, all i did for the mounting holes was drill the appropriate size hole and screw them on since the nuts wold not fit through the smaller 3/16" eyelets. i must say that my creation is way more comfortable than the leather Gould & Goodrich holster i bought from a local store. <a href="http://img80.imageshack.us/i/img0715t.jpg/" target="_blank">http://img80.imageshack.us/img80/279/img0715t.jpg</a> <a href="http://img245.imageshack.us/i/img0716uc.jpg/" target="_blank">http://img245.imageshack.us/img245/3231/img0716uc.jpg</a> <a href="http://img13.imageshack.us/i/img0719pr.jpg/" target="_blank">http://img13.imageshack.us/img13/2382/img0719pr.jpg</a> Since this was my first try i was basically going for function over looks, hence the glue remnants and extra holes that serve no purpose. I've also molded a mag holder earlier today but still need to cut it to the proper size and mold the belt clip. for the mag holster i decided to go with one integral piece and use a folded side with screws and rubber washers for tension and the extra on the backside for a belt clip. after this, I'll probably be ordering the proper size eyelets,screws, and tools along with modifying my mold process to allow for belt clips or something. I didn't really realize that there was a lot more that went into holster making than one would think....but i know for next time. also, making a holster for a gun with a light attached is a pain in the ass. What kind of glue did you use to attach the leather? some type of Elmers, it didn't really work though. it's peeling off of the sweat guard part |
|
|
|
|
[#40]
Questions for those of you who have made more than a couple of these:
What kinds of jigs or tools are you using to fashion your belt loops / clips, etc? How are you setting up to do holsters for handguns with rail mounted lights? If I mold to the gun with the light attached I won't be able to draw, if I extend the channel for the light to get through I feel like I could stick my finger in there and reach the trigger? Any tips? |
|
|
|
TX, USA
|
[#41]
This thread is awesome!
|
|
|
|
[#42]
Originally Posted By fyeguy: Questions for those of you who have made more than a couple of these: What kinds of jigs or tools are you using to fashion your belt loops / clips, etc? How are you setting up to do holsters for handguns with rail mounted lights? If I mold to the gun with the light attached I won't be able to draw, if I extend the channel for the light to get through I feel like I could stick my finger in there and reach the trigger? Any tips? For belt loops I'm using a small square bottle that is 1.5" wide. Wood stock would be perfectly fine two; that was just the closest thing at hand. If you look one or two pages back somebody posted a nice tutorial on how to make holsters for lights. |
|
|
|
|
[#43]
Originally Posted By AR4U:
If you look one or two pages back somebody posted a nice tutorial on how to make holsters for lights. Thanks! RIF, I've read this thread 7 times and somehow missed that. |
|
|
|
|
[#44]
Originally Posted By fyeguy:
Originally Posted By AR4U:
If you look one or two pages back somebody posted a nice tutorial on how to make holsters for lights. Thanks! RIF, I've read this thread 7 times and somehow missed that. I find something new every time I go back a few pages. |
|
|
|
|
[#45]
Originally Posted By fyeguy:
Questions for those of you who have made more than a couple of these: What kinds of jigs or tools are you using to fashion your belt loops / clips, etc? How are you setting up to do holsters for handguns with rail mounted lights? If I mold to the gun with the light attached I won't be able to draw, if I extend the channel for the light to get through I feel like I could stick my finger in there and reach the trigger? Any tips? i used a piece of a yard stick. heated the Kydex, and rolled it around the yard stick. for mine with light attached i used two pieces of kydex. then just used a candle to heat the areas i wanted less retention and molded it out with my fingers (wearing gloves of course) it was mainly behind the light, but a little in the ejection port area. the holster has really good retention and i can't stick my finger into the trigger guard area |
|
|
|
|
[#46]
To make loops I cut strips of .08 and use pre existing hard loops off of my RCS. I heat the strips and lay them over the rcs and fan. I have not had an issue other than perfecting where my rivits go or my attachment methods...
|
|
|
|
|
[#47]
Originally Posted By 1IV:
This thread is awesome! It'd get my nomination for one of the Top 10 Most Informative Threads Ever Posted On ARFCOM. |
|
|
|
|
[#48]
Great thread, love this stuff. Here are a couple of mine I just made this week.
HK USP .45 Tactical 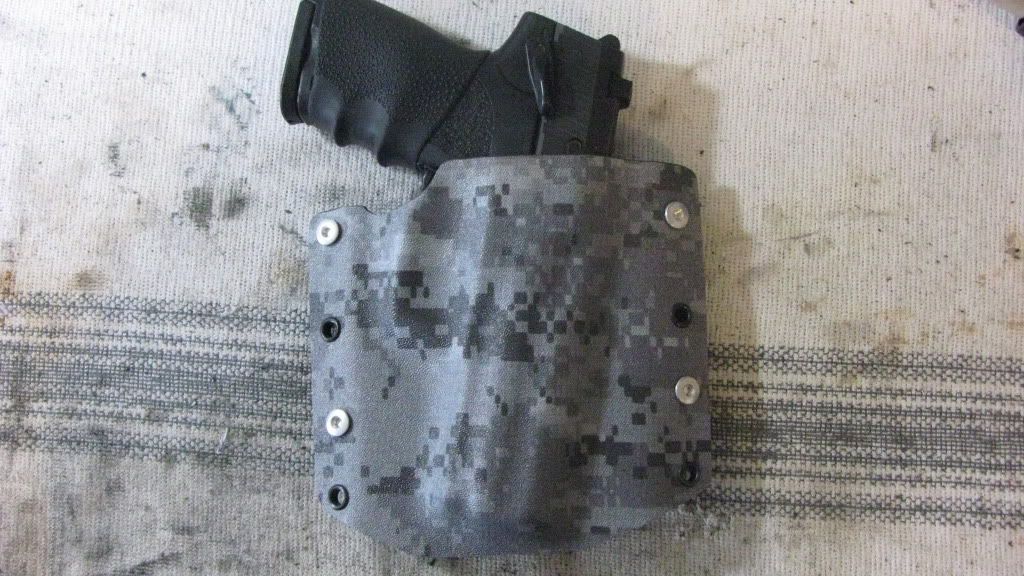
USP 9 I use 1/4" rivets and I'm having a hard time finding chicago screws and rubber washers any of you guys find a good online source? I've found most of the stuff I need on knifekits but there has to be a cheaper place. |
|
|
|
|
[#49]
I've had pretty good success with cutting "washers" from windshield wiper tube. I picked some up from my local NAPA auto parts store.
|
|
|
|
|
[Last Edit: millsusaf]
[#50]
I've been pretty busy....

OWB Glock 19 
OWB XD 
|
|
|
|
 Win a FREE Membership!
Sign up for the ARFCOM weekly newsletter and be entered to win a free ARFCOM membership. One new winner* is announced every week!
You will receive an email every Friday morning featuring the latest chatter from the hottest topics, breaking news surrounding legislation, as well as exclusive deals only available to ARFCOM email subscribers.

AR15.COM is the world's largest firearm community and is a gathering place for firearm enthusiasts of all types.
From hunters and military members, to competition shooters and general firearm enthusiasts, we welcome anyone who values and respects the way of the firearm.

Subscribe to our monthly Newsletter to receive firearm news, product discounts from your favorite Industry Partners, and more.
Copyright © 1996-2024 AR15.COM LLC. All Rights Reserved.
Any use of this content without express written consent is prohibited.
AR15.Com reserves the right to overwrite or replace any affiliate, commercial, or monetizable links, posted by users, with our own.


