|
Posted: 8/14/2006 2:23:00 PM EDT
[Last Edit: Hawkeye]
I used to have a file with different quals, drills, and times but I lost it when I lost my hard drive. Hopefully someone else will be able to give input (a tacked resource would be nice) that would consist soley of drills and quals.
I'll see what I can dig up, but if someone else has a listing handy, that would be great. Edited to bold title - Hawkeye |
|
|
|
|
[#1]
I'm ALL for that; it would be an extremely handy resource!
|
|
|
|
|
[#2]
www.personaldefensetraining.com/images/meu_soc.pdf
Only have a minute - couldn't cut and paste it here - maybe someone else with time can. |
|
|
|
|
[Last Edit: Opey]
[#3]
|
|
|
|
|
[#4]
It would indeed. Give us some time to get this new section organized and hawkeye, jarhead and myself will try to get some momentum going on this matter. |
||
|
|
|
[#5]
Looking forward to seeing more drills...
|
|
|
|
|
[#6]
"found" an HK MP5 Qualification course at HKPRO, but I can't seem to be able to post here. If anyone wants to help me out, I can email it to them (its a word doc)
TIA |
|
|
|
MI, USA
|
[#7]
Just rememebr that meusoc course is a copyrighted material.
|
|
|
|
[Last Edit: Opey]
[#8]
|
|
|
|
|
[Last Edit: TonyF]
[#9]
By whom? I thought the Marine Corps (MEUSOC) developed that CoF? IIRC, anything a federal gov't entity publishes is in the public domain or am I mistaken? ETA: Nevermind. I just noticed that Pat Rogers has a copyright attributed to it. |
||
|
|
|
[#10]
US Army Rifle Marksmanship
http://www.globalsecurity.org/military/library/policy/army/fm/3-22-9/index.html US Army Combat Pistol Qualification Course http://www.globalsecurity.org/military/library/policy/army/fm/3-23-35/appa.htm US Army Alternate Pistol Qualification Course http://www.globalsecurity.org/military/library/policy/army/fm/3-23-35/appb.htm Sorry, but I don't know how to make a link hot |
|
|
|
|
[#11]
|
||
|
|
WA, USA
|
[#12]
Opey they made it easier then b4 but you can Still use the old way
1. Copy link 2. Open one of the Dark Gray boxes b3low this text part that is 1 left from the end (has a globe with a figure 8) 3. Enter text or dont 4. paste URL |
|
|
OH, USA
|
[#13]
I would also love to have a space for drills to refer to. If anyone has any to email to me directly that would be great! I could use them for pistol, MP5, and M4/ AR15's.
thanks, Mike 
|
|
|
MI, USA
|
[#14]
no sweat |
||
|
|
|
[Last Edit: Opey]
[#15]
Thought I would bring this back up, with two new links, and a drill I came across
Links Handgun Drills, DOT Torture Marksmanship Drill And this was written by SimplyDynamic heres my basic drills to keep me up with the training is down. I try to do 15-20minutes of dry practice a day or at least 3 times a week if im busy. People always ask what the secret or tricks of the trade to speed and accuracy are... well I think most of us know by now that there are no tricks, its all mastering and hoaning the basic fundamentals. Shooters and instructors also get carried away with all the high speed shooting out there which is great but even the best masterclass shooters out there can never forget about the basics. there will always be high speed tactical shooting couses, compititions, combat, ect... but the real deal is what you do on your own, and if you dont, when the shit hits the fan one day you will hesitate at the molment of truth. So I start with breaking down all the fundamentals... Pistol 1: set up stnace, Modern Isolesles. Nice and tight I shoot on the range as if I were in an actual firefight to keep my combat mindset in the game and to mimic a stressful enviornment. I am tensed and flexed up the whole time to simulate what is going to happen to me in a real fight...adrenaline, hormones, loss of all dexterity ect... Stay in this stance through out the whole dryfire, it sucks but its worth it, and its a good workout. you should be smoked even after 20mins of dry fire like this. anyways... -weight on the balls of the feet. -slight comfortable bend in the knees -bent forward at the waist -shoulders rolled forward (pistol) -set tension in the wrists and elbows ..not locked out but tight (pistol) elbows tucked in (rifle) 2: I break down the Draw. startingin the ready position I transistion to the pistol and break the bail (Safariland 6004, per your holster SOP) and aquire master grip and STOP. ***then I repeat this around 25-50 times. consentrating on minimizing the little movements and perfecting just this step. 3: Starting at the "3rd eye postion weapon in front of the chest (strong hand only) with my weak hand only about 10in away fro the gun. I bring the hands together to aquire the master grip on the gun and then STOP. (I use the Leatham/Enos grip with a modified CRUSH grip to simulate high stress shooting.) I do this little drill about 50 times since its the base of the following fundamentals. Consentrate on minimizing the little movements and perfecting just this step. 4: From there I continue to do the drill above but now put the next step in: punch out on target aquiring slight alingment/sight picture and STOP I do this drill about 50 times on an actual target/ with T-shirt on for realistic purposes. Then I do it on a target with small Paisties to concentrate more on the sights and trigger pull which comes next. Consentrating on minimizing the little movements and perfecting just this step. 5: From the 3rd eye position do the drill above and then concentrate on isolating the trigger and squeezing, (utilizing the trigger on target theory) since the only thing that is moving at this point is your trigger, think about using the pull to line up the sights (micro movemnets at this point). this is used in mostly bullseye and 25 yd pistol shooting but this really makes me think about trigger control. Dry fire this until you get sick of it. 6: Once you feel comfortable with these 5 steps, now put it all together, and keep it clean and concentrate on each fundamental but keeping it smooth and minimise all the little unessisary movments. 7: Strong hand only (all fundamentals) 8: Weak hand only (all fundamentals) 7: Once I'm through my basic funds practice I move into multiple target sight aquisition drill and moving drills responding left/right/back. Then shooting around corners under couches beds ect... 8: Then I go into speed reloads and tac-reloads while dry-firing on the targets. 9: Now I go into Malfunctions, type 1- type 4, I leave imeadiate and remedial action for the rifle. I do these malfunction drills master grip, strong only and weak only...this is something shooters and intructors neglect to do or teach. RIFLE -Same thing as the pistol really... minus the draw... -I consentrate on sight aquisition speed and utilizing multiple targets. -Transitions -strong and weak -malfunctions,...simulate firing then immeadiate action, then remeadial action. ***this drill is for targets over 50yrds only otherwise transition. Here is some cheese for you I pulled out of a PP, but the pics display the Form and stance mentioned above: When I hit the range I do all the above to warm up and then move into all the high speed practical shooting. here is a Qual course I use to stay proficient on: QUAL PISTOL QUALIFICATION YARD LINE/ DRILL/ REPS/ .45 Cal/ TIME 25- Pair Standing / Pair Kneeling 1/ 4/ 6 15- Pair Standing / Pair Kneeling 1/ 4/ 5.5 10- Pair /Speed Reload / Pair 1/ 4/ 5 10 to 3- Pair /Speed Reload / Pair 1/ 4/ 5 10 to 3- Failure Drill 1/ 3/ 4.5 7- Pair Strong Hand Only 1/ 2/ 2 7- Pair Weak Hand, weak hand draw 1/ 2/ 5 7- Pair/ Speed Reload / Minimum Target Exposure Shot 1/ 3/ 4 SCORE 24 TORSO, 2 BRAIN (52 Points Total), Re-Face Targets. 15- Pair on 1st Target / Speed Reload / Pair on 2nd Target 1/ 4/ 5 10 to 3- Pair on 1st Target / Speed Reload / Pair on 2nd Target 1/ 4/ 5.5 10 to 3- Pair on Both Targets /Speed Reload / Minimum Target Exposure Shot on Each 1/ 6/ 6.5 7 to 3- Pair on Both Targets / Speed Reload / Pair on Both Targets 1/ 8/ 6.5 7- Minimum Target Exposure Shot on each target 1/ 2/ 4 SCORE 20 TORSO, 4 BRAIN (48 Points Total). TOTAL 50 NOTES (1) All drills start from the low ready with the M-4. (2) Tactical/Speed reload as necessary. (3) Clear any type 1,2 or 3 malfunction on the move. (4) If you have a Type 3 malfunction, continue to move until you reach your point of domination. Clear the malfunction from a knee but do not engage. (5) Always know the condition of your weapon. (6) If you run dry, you loose those points. (7) Highest score possible is 100 points. (8) Complete CQB / Assault gear will be worn at all times. (9) Totals are per man. |
|
|
|
|
[Last Edit: Harv24]
[#16]
|
|
|
|
|
[#17]
BTT - Is there any chance of this being tacked?
|
|
|
|
|
[#18]
Tag ola!
|
|
|
|
VA, USA
|
[#19]
No, the MEU(SOC) course is not (C) protected. That page was part of a booklet for a specific group, and the (C) was added to the entire booklet (mistakenly to those two pages) .
This course was developed by the Special Missions Brance at llMEF SOTG circa 2000. I only use it. |
|
|
|
[#20]
Anybody ever seen a Department of Defense test published? I THINK that's what we did at the end of a carbine course at Blackwater.
|
|
|
|
MI, USA
|
[#21]
My Fault, thank you for clearing that up Pat....
|
|
|
|
[Last Edit: Hawkeye]
[#22]
Just a reminder to everyone to feel free to post any drills or such that you like or have here.
A couple of things though. * This thread is tacked, so there should be no trouble finding it. Please do not "tag" the thread. Use the board tag feature instead. * Please post drills only. If you have questions about a specific drill thats posted, etc., please start a new thread. Lets keep this one as clean and to the point as possible so it doesnt get cluttered up with lots of discussion. Thanks for your help. |
|
|
|
|
[#23]
|
|
|
|
|
[#24]
Please read Hawkeye's post above, I will be deleting posts that do not comply with his requests.
|
|
|
|
|
[Last Edit: FMD]
[#25]
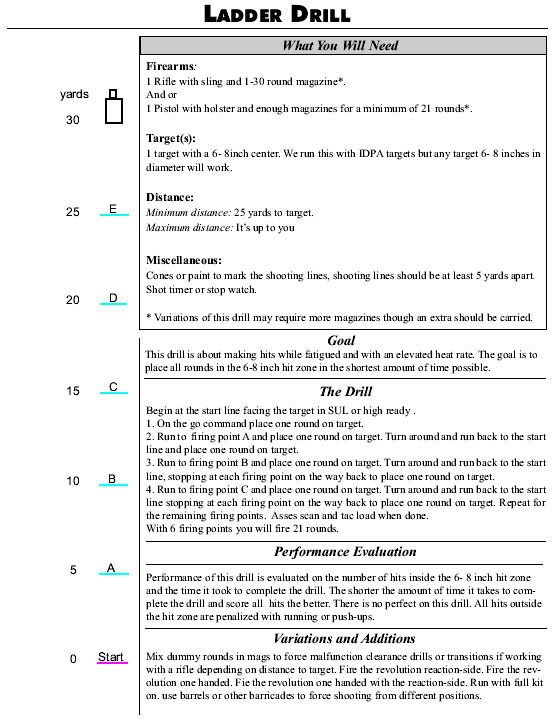
Equipment: 1 Rifle (with sling) and one magazine. 1 Pistol (with holster) and enough magazines to feed the gun for 30 rounds. 30 rounds of rifle ammo. 30 rounds of pistol ammo. Distance: Anything shorter than 25 yards (5-15 Feet is typical). Target: 2 Targets required; They may be as small as target pasters, or you can use two "zones" in a silhouette. Goal: Rifle to pistol transition muscle memory/reinforcement. The Drill: Begin by facing the target in "Sul". 1) Bring your rifle up, acquire a sight picture (remember your sights are ~2" higher than your bore), disengage your safety and fire ONE round. 2) Reengage your safety and let your rifle hang on its sling. 3) Draw your pistol, acquire a sight picture, disengage your safety (if applicable) and fire ONE round. Note: For DA/SA pistols, this shot is DA. 4) Reengage your safety (decocking if that's how your gun came out) and reholster. Re secure any holster retention device(s) disengaged on the drawstroke. Continue these four steps (changing pistol magazines when appropriate) until your rifle is empty. Performance Evaluation: If you performed the drill perfectly, you will have one rifle-caliber hole in one target, and one pistol-caliber hole in the other. If this is the case, call Ripley's, buy a lotto ticket, and await the lightning strike. Variations & Additions: Add an additional magazine of rifle ammo and magazines of pistol ammo for a total of 120 rounds, 60 revolutions. Add a sidestep to the drawstroke. Add rotation (begin at 90/180/270 from the target) to each revolution. Add an "asses, scan, tacload" to each revolution. Fire the revolution reaction-side. Fire the revolution one handed. Fie the revolution one handed with the reaction-side. "Contractor Pushups" (Tactical Response); Begin from the prone position for the rifle, stand to fire your pistol, and return to prone for the rifle. Combine any or all variations above for a truly hellish experience. |
|
|
|
VA, USA
|
[#26]
|
|
|
|
|
[Last Edit: FMD]
[#27]
a.ka The Devil's Drill a.k.a The Eighteen Drill As taught by Greg "Sully" Sullivan of The Defensive Edge Equipment: 1 Rifle. Three magazines each with six rounds. 1 shot timer. Distance: 18 Yards. Target: A humanoid silhouette. 8" COM "Kill Zone". Goal: To increase performance under pressure, with a focus on speed, accuracy, position transitioning, and emergency reloads. The Drill: Begin by facing the target in the low-ready position with one magazine in the rifle. From the buzzer/command to fire: Aquire the target and fire six rounds standing. Perform an emergency reload during your transition to a kneeling position. Aquire the target and fire six rounds kneeling. Perform an emergency reload during your transition to a prone position. Aquire the target and fire six rounds prone. Performance Evaluation: If you performed the drill satisfactorily, you will have 18 holes within the "Kill Zone". An acceptable time to complete the firing rotation is 18 seconds. If you take longer than 18 seconds or drop rounds outside the specified target area, you have failed. Variations & Additions: Begin at "Sul" or high-ready. Have a "friend" add a dummy round or blank to each magazine to simulate type one malfunctions*. Reduce the size of the Kill Zone. Fire the revolution reaction-side. Fire the revolution one handed. *Note: Do not allow Tommytrauma to do this. He will load each of your mags with at least four dummies/blanks. He is not your friend. |
|
|
|
|
[#28]
This is one BulletcatcheR came up with I've shot it twice and not only is it a good drill it's one hell of a work out!!
|
||
|
|
|
[Last Edit: BookHound]
[#29]
The Box Drill
Round count: 24 Weapon: rifle or pistol Drill type: moving while engaging multiple targets Three silhouette (IDPA/IPSC) targets are setup in a row about five feet apart (shoulder to shoulder of the targets). Setup four corner markers (we use small orange cones you can purchase at WalMart) in a box just in front of the targets. Closest corner markers to the targets should be about 15-feet. In the following example, the dashes are the targets and each letter (a-d) represents a corner marker. _......._........_ b................c a................d Shooter starts the drill in the low-ready position at rear corner marker “a”. On command, shooter starts moving towards marker “b” and begins engaging the targets. Each target should be shot twice per leg of the box. In other words, the shooter hits all three targets two times each when moving from “a” to “b”. The shooter continues to the next marker and again will put two hits on each target. The drill ends when the shooter is back at the starting position. The completion of the trip around the box results in 24 shots fired (four legs times six shots per leg). All hits must be center-mass (“A” zone) to score. This is a pass/fail drill. Practice with a timer to improve speed while maintaining good hits. Variations: >Toss in a mandatory mag change for the guys running this with rifles. >Load the mags for your buddies so they don’t know when they’ll have a mag change needed or even replace live rounds for spent cases (makes for a nice jam!) or use training rounds. >Mix up the starting points or even run the drill by crossing corners (move from “a” to “c”, to “b”, to “d” and back home to “a”). >Make head shots the second round on each target. >Feel like slinging more lead? Throw in head shots as a third round on each target. Things to watch for: >Keep your knees together when moving forward/backward and do a good duck-walk to limit the wobble. >Don’t cross your feet when moving sideways! This has always been one of my favorite drills because it puts so much together for me. I first did this drill in a Dave Harrington class and later did some variations in a Ken Hackathorn class. Mike Benedict, a local instructor and member of this board, also uses this drill a lot in his classes. Mark edit to fix the formatting on my example |
|
|
|
IL, USA
|
[#30]
Phase 1 of the MEU pistol drill requires a weak hand draw. Do you reach behind yourself with the left hand? If so, it is difficult with equipment & drop leg holster.
also concerned about safety as well. |
|
|
|
[#31]
|
|
|
|
|
[#32]
With a dropleg I look like a dog chasing his tail if I try to reach behind to draw. |
||
|
|
|
[Last Edit: photoman]
[#33]
This is one we run from time to time at our practice sessions. Just a note the set up graphic shows the target at 30 yards because thats what we have been running it at the last few times. It may seem rather easy, but it will kick your ass.
 Here are some of the toher drills posted in this thread. I hope this makes it a bit easier for folks to keep the drills handy for taking to the range. These are JPEG images. If you save them they should show up better. I laso have these in PDF if you want copies just email me and put drills in the subject. I'm going to put all of these into one PDF document along with any others I can get done up. All info as to where a drill came from or where it was learned is taken out of the original post that contained the drill. Hope these are helpful. 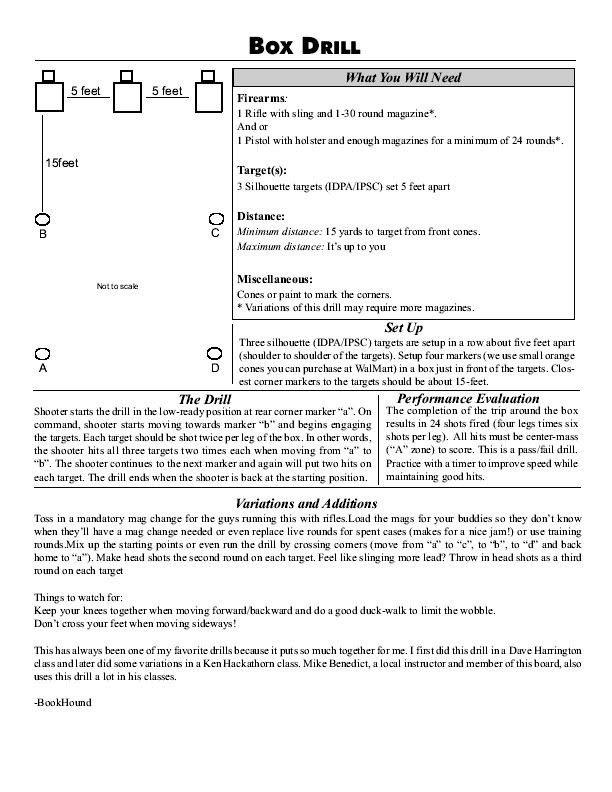 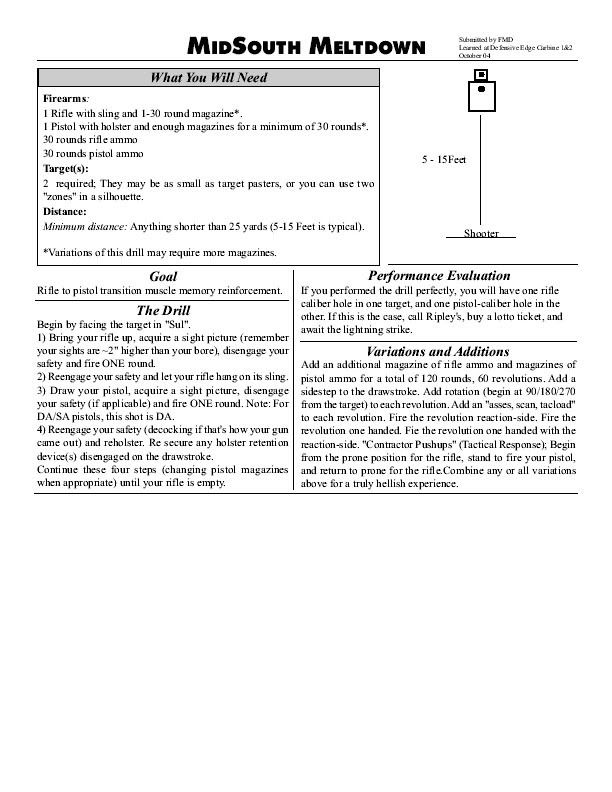 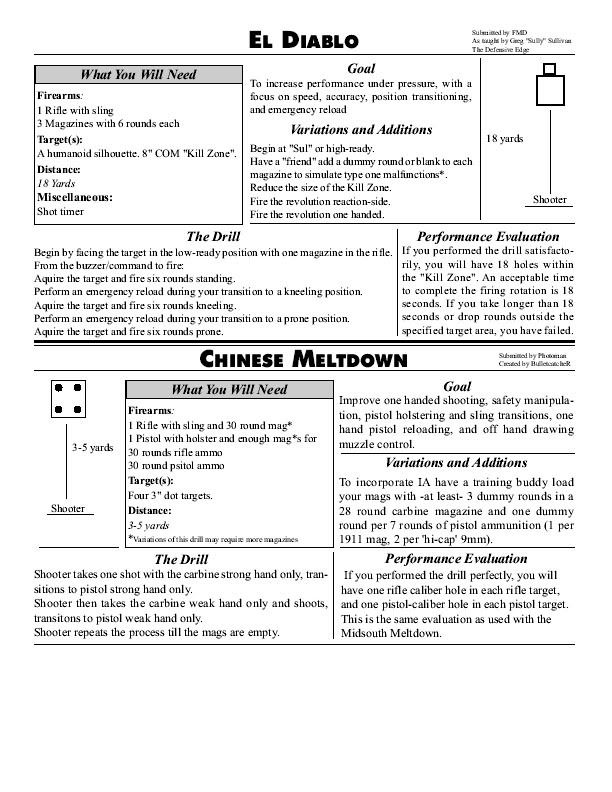
|
|
|
|
|
[#34]
Excellent format Photoman......

|
|
|
|
|
[Last Edit: photoman]
[#35]
Thanks but I just followed FMDs format, and added graphics |
||
|
|
|
[#36]
Good job photoman!!!
When doing the 'diablo' be sure to work in some practice starting from the ground up. Use all the positions you know, roll over, supine, feet first, sitting one knee, both knees, get the picture. The same positonal shooting can be done during a meltdown,,,break down the contractor pushups onto smaller movements for us FOGs. I practice these from behind barricades after warming up on the line. Be careful of your six when transitioning in off positions, work with a buddy/spotter to make sure you're not flagging or find out where you flag if you have to when starting out. CY6 bulletcatchR |
|
|
|
|
[#37]
Bump for more!
|
|
|
|
FL, USA
|
[Last Edit: Opey]
[#38]
The table can be found over at HKPRO, under, "The Submachine Guns"
"The best there is: MP5" section HK INTERNATIONAL TRAINING DIVISION MP5 QUALIFICATION COURSE Range Rounds Position Fire Reps Total Time: Mode Rounds 50m 2 Kneeling Semiauto 3 6 3.0 sec 50m 2 Prone Semiauto 2 4 3.0 sec 25m 2 Standing Semiauto 3 6 2.0 sec 25m 2 Kneeling Semiauto 2 4 2.0 sec 25m 4 Standing Semi/ Reload Drill 1 4 8.0 sec 15m 2 Standing Semiauto 3 6 1.5 sec 10m 3 Standing Fullauto 2 6 1.5 sec 7m 4 Standing Fullauto 2 8 2.0 sec 5m 3 Standing Fullauto 2 6 1.5 sec Total Rounds: 50 START "LOW READY" POSITION/ PASSING SCORE = 80 2 PTS PER HIT. |
|
|
IN, USA
|
[#39]
|
|
|
|
[#40]
bump to keep this alive
|
|
|
|
|
[#41]
Ummm its tacked. |
||
|
|
|
[#42]
Yea, but it was a low tack. Now its a high tack. For tall people like me it makes a difference, okay? |
|||
|
|
|
[#43]
OST
|
|
|
|
|
[Last Edit: 13gunbunny]
[#44]
We ran a variation Diablo/Harv24 drill yesterday @ 7,10,15,20 yds with pistols....We had 3 targets and had 3 mags of 6. Emergency mag change on each target.
First mag was "prone over a bench, 2nd was standing and 3rd was kneeling. The initial drill started from the holster. I think it is a good thing to throw in some different distances to help break the cadence you get into when shooting at one specific distance....Helps you learn how "fast" you can shoot at a given distance and still make good COM hits. You could throw in some dummy rounds to make you assess and deal with given malfuncions. 7 yds was averaging 12 secs or so 20 was running 23 secs or so |
|
|
|
|
[#45]
BTPA
|
|
|
|
MO, USA
|
[Last Edit: ColtRifle]
[#46]
Place two targets (or more) about 7 yards away.
Get some variety of colored stickon circles (Walmart has them) You should have about 3 colors. Take the colored circles and write numbers in them. Don't number all the colors the same. For example, you have blue, green, and red. You might use 1,5,7 for blue, 2,4,6 for green, and 3, 7,8 for red. Paste the colored circles on the target at different locations around the target. Make it random. Take two people and face them uprange. Prior to each drill, give each shooter a color and number combo. Don't give the same one to each shooter. Upon your command, they turn toward the targets, draw their weapons, and give verbal commands to the targets. At the same time, they are scanning the target looking for their number and color combo. Sometimes both shooters will shoot. Sometimes neither shooter will shoot. Sometimes one will shoot while the other doesn't. The goal is to counteract the tendency to have sympathetic shoot response. Also, the goal is to force the shooter to focus on the threat and scan the entire target looking for the shoot cues. It's a good drill but takes at least three people to do it as above. It can be done with two people if one is on the line and the other is not shooting but is calling out the combinations. Could be done with rifles but more geared to handguns. |
|
|
|
[#47]
Sounds all good and I'll have to download all of it to see what I can use.
Let me add a thing or two. First of all, from time to time, I practice with my heavy, fur lined winter gloves on. Why? Well, if you are doing a sweep in freezing temps, after 20 minutes without the gloves on, your hands will be useless for shooting. That's for pistol; applying that to rifle has only been done in the simplest stages, without much success (I know, drop the lower portion of the trigger guard). I pistol shoot well one handed or two handed, right, or left. But with the gloved on, I find I do need the two handed grip to get past the decock on the weak hand ........ or have to pull back the hammer one handed. Curiously enough, btw, in non gloved shooting, it is my weak hand that shoots better. I'm unsure of the reason but I believe it is that since I only started shooting on the weak side in the last decade, it doesn't have all the stresses that the strong side has built up over 40 years. Second item to add: as I said above, I do shoot, drill, one handed as well. Why? Well, as someone pointed out to me once, "What are you going to do when you are sliding down a gully and holding on to a bush?" _______________________________________________________________ ("(do the field strip drill) blindfolded?"--young Marine "You're in the middle of a fire fight at night and your weapon jams. What are you going to do, light a match?"--Captain Anders, (w,stte), "Ice Station Zebra") |
|
|
|
WI, USA
|
[#48]
Shot this one recently at a course.
Modified Navy Qual 50yds-5rds per mag-3mags Time-25 seconds 5 Standing RELOAD 5 Kneeling RELOAD 5 Prone Target is an 8-inch circle. Very very good drill as it combines 3 important shooting skills. Many people scoff at this drill and think its easy and not a challenge. Then they get their mindset f'd when they don't seperate the different skills and try and do them all at once. |
|
|
PA, USA
|
[#49]
DoJ Reactive Shooting
Transitional Target III, B27 or IDPA work ok. Basic Rifle - Open Sights 50 yd. Standing, Strong Shoulder, 5 Roounds Emergency Reload 50 yd. Kneeling, Strong Shoulder, 5 Rounds 30 Seconds 50 yd. Standing, Strong Side Barricade, 5 Rounds, ER 50 yd. Kneeling, Strong Side Barricade, 5 Rounds 30 Seconds 50 yd. Prone, 5 Rounds, ER 50 yd. Prone, 5 Rounds 30 Seconds Start Position - Magazine in weapon - High underarm position - Weapon charged upon facing target - Safety off Advanced Rifle - Optical Sights 100-200 yd. Prone, Bipod 5 Rds. 20 Seconds 100-200 yd. Prone, Bipod 5 Rds. 20 Seconds 100-200 yd. Kneeling-Front Support-No Bipod 5 Rds 20 Seconds 100-200 yd. Kneeling-Front Support-No Bipod 5 Rds 20 Seconds (Sandbags, hood/trunk of car, mailbox, etc) 100-200 yd. Prone, Bipod Behind Cover 5 Rds. 20 Seconds 100-200 yd. Prone, Bipod Behind Cover 5 Rds. 20 Seconds |
|
|
FL, USA
|
[Last Edit: Opey]
[#50]
FBI Pistol Qualification Course
This standard, revised April 1997, is used to qualify both agents and instructors. Target: FBI "Q" Ammunition: 50 rounds service ammunition Scoring: Hits in or touching "bottle" count 2 points; misses and hits outside bottle count zero points Qualification: 85% to qualify; 90% for instructors STAGE I 18 ROUNDS Starting Point: 25 yard line Time Allotted: 75 seconds Start with a fully loaded weapon. On command shooter draws and fires 6 rounds prone position, decocks, fires 3 rounds strong side kneeling barricade position, 6 rounds strong side standing barricade position, and 3 rounds weak side kneeling barricade position. Upon completing stage I, the shooter will conduct a magazine exchange and holster a loaded weapon. STAGE II 10 ROUNDS Starting Point: 25 yard line Time Allotted: 2 rounds in 6 seconds 4 strings of 2 rounds in 3 seconds each Start at the 25 yard line. On command the shooter moves to the 15 yard line, draws and fires 2 rounds in 6 seconds, decocks, and returns to low ready. The shooter will fire 4 strings of 2 rounds in 3 seconds, decock and return to low ready after each string. Upon completing Stage II, the shooter holsters a loaded weapon [without reloading unless gun capacity is only 10 rds ––ed]. STAGE III 12 ROUNDS Starting Point: 15 yard line Time Allotted: 15 seconds Start at the 15 yard line. On command the shooter moves to the 7 yard line, draws and fires 12 rounds in 15 seconds, to include a reload. Upon completing stage III, the shooter holsters a loaded weapon. Shooter then arranges remaining 10 rounds to have 5 rounds in the weapon and 5 rounds in a spare magazine. STAGE IV 10 ROUNDS Starting Point: 7 yard line Time Allotted: 15 seconds Start at the 7 yard line. On command the shooter moves to the 5 yard line, draws and fires 5 rounds with strong hand only, reloads, tranfers the weapon to weak hand and fires 5 rounds weak hand only. Upon completing stage IV, the shooter will unload and holster an empty weapon. Agents are required to requalify four times a year. 1,338 agents have shot a perfect score during qualification (the FBI's "possible club"). The FBI presently employs 11,271 agents required to shoot this course. [Information current as of December 1997] Courtesy of Steve Silverman. borrowed from Handgun Drills, Standards, and Training Page |
|
|
 Win a FREE Membership!
Sign up for the ARFCOM weekly newsletter and be entered to win a free ARFCOM membership. One new winner* is announced every week!
You will receive an email every Friday morning featuring the latest chatter from the hottest topics, breaking news surrounding legislation, as well as exclusive deals only available to ARFCOM email subscribers.

AR15.COM is the world's largest firearm community and is a gathering place for firearm enthusiasts of all types.
From hunters and military members, to competition shooters and general firearm enthusiasts, we welcome anyone who values and respects the way of the firearm.

Subscribe to our monthly Newsletter to receive firearm news, product discounts from your favorite Industry Partners, and more.
Copyright © 1996-2024 AR15.COM LLC. All Rights Reserved.
Any use of this content without express written consent is prohibited.
AR15.Com reserves the right to overwrite or replace any affiliate, commercial, or monetizable links, posted by users, with our own.


