|
Posted: 11/25/2005 10:09:35 AM EDT
Making Your Own Pistol display / Range stand
I cut and sanded this in about two hours (stain and finish over several days). This places the pistol in a fixed position, allows for placement of 6 single stack mags side by side and provides a space for miscellaneous items (extra rounds, mag loader, etc). The overall size allows it to fit in my particular range box with everything else. At my range there are these little tables (pedestals really) that use carriage bolts to secure the wood to the post. The boltheads, of course, come in contact with firearms (unless you use a rug since it’s a bit small for the typical OEM case) So being the picky person that I am I decided to build this (50 rounds total in pic).  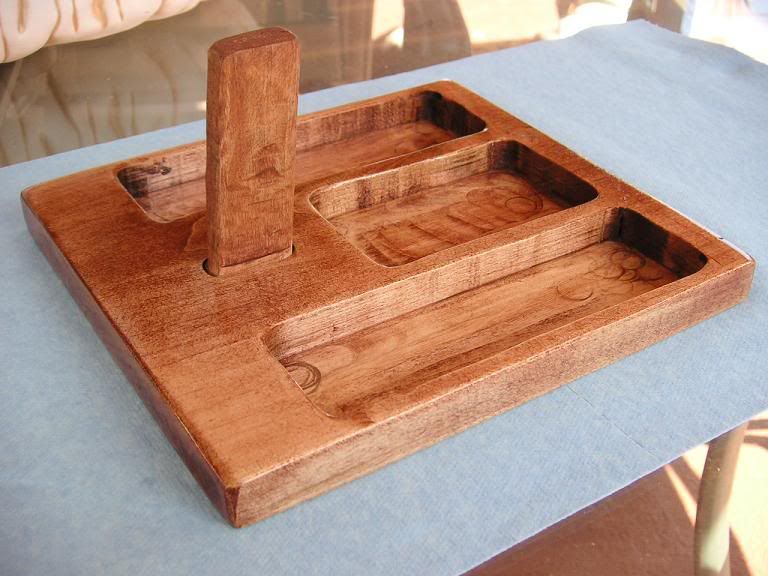 For all those who are interested, there are a number of ways to do this, I’ll talk about two: My Way and the Really Easy Way. Why did you even bother ‘My Way’? Because it was raining and the range was getting soaked (Wilma had taken away the roof Since this is my post Materials I used ‘My Way’: Maple wood, 3/4in thick (found it in Home Depot!, the only time ever!) Handheld Router, 1/4in shaft, 1/2in round bit. Orbital sander, 5in Jigsaw Ruler, 12in Pencil Min-Wax Wood Conditioner (actually does help stain wood nice and even) Min-Wax Gel Stain in Mahogany (could only find it in gel) Tung Oil for ‘varnish’ (Tung oil is very easy to touch up) Mineral spirits, odorless Various paint brushes and foam pads that I was willing to throw away Tack cloth Steel wool, Final Finish, Quad 0 Blue Shop Towels (minimal lint) 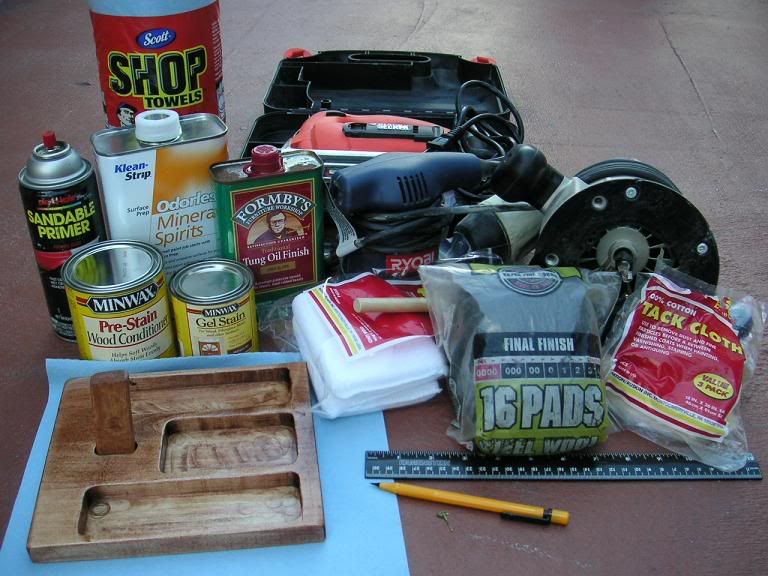 The Schematic:  Start the router at 1/8in depth and work deeper in 1/8in increments to minimize burn marks in reaching desired depth. Sand it out good, I started with the sander at 150 grit, then used 320 grit by hand. Wipe off using tack cloth then use blue towel and a light application of mineral spirits, let evaporate about 20 minutes. Apply Wood Conditioner freely and let dry about 30-45 minutes. Apply stain, pass over 2-3 times, let sit overnight (or hang as I did) Realize it doesn’t cure too fast in humid environment; hang inside all day  Tack cloth again (lightly to minimize wax transfer, otherwise use a light touch of mineral spirits to remove waxy residue) Apply Tung oil nice and even, foam brushes work pretty well for me. Let SIT overnight, otherwise it may run down to the corner. Extra coats optional but I put three altogether. Lightly use 0000 fine wool between coats and MAKE SURE to tack off the steel wool that settles on there. After all that I then put one coat on the bottom just to seal it. Materials for ‘Really Easy Way’: Wood, 1/2in thick pieces by two Handsaw Ruler, 12in Pencil Wood glue Cut the various pieces so that they conform to the schematic and glue them onto the other piece like a puzzle. Close enough! Go shooting! Lets see yours (especially if you have access to a machine shop  ) when you’re done or if you have something different! ) when you’re done or if you have something different!The End. edit: For spelling and some grammar (even though I previewed several times |
|
|
|
[#1]
Tagged. I like that thing a lot!
|
|
|
|
[#2]
Just one? Improvements? Changes? |
|
|
|
|
[#3]
mabe sand out the router burns b4 you stain & seal it?, other than that it looks good.
theres a bad ass clear coat ive used called "mirror coat", and its thick enough to embed things within it. it would be awsome with bullet casings drilled and glued in flush. |
|
|
|
[#4]
Thanks for the input. I get a lot of comments on it at the range, in combo with the stainless 1911. "You got some serious hardware there" Being maple and the areas somewhat inaccessible, it was taking too long to sand out the burn marks (yes I am impatient and dont have a dremel or even a sanding bit for the cordless drill) so I just went ahead and sealed it |
|
|
|
|
[#5]
I can't wait till I have a house with a garage and all the tools I need to make stuff like that. Very nice design. Want to sell me one?
|
|
|
|
[#6]
I like the design for your range - i dont know how i feel about the gun being held that way... but your range dictated that so im not complaining. i think for the problems you had at the range you came up with the perfect solution.
i am trying to think of other things i keep at the line - the only other thing is more pistols. heres my only idea. Those pedistals at your range, are they uniform in size? because if they are then i would make a carrier about twice the size of the top they give you and put for little studs on the bottom of your carrier to secure it from movement. that way you could run multiple pistols, maybe a ammo bag, ears and eyes when you arnt usin em. that kinda stuff. i think yours is about as good as it gets though. i wouldnt change anything. my .02 p.s. i have access to machining tool and i gaurantee you nothing i machine goes near my pistols - my wood shop is where all the pistol boxes and such are made. |
|
|
|
[#7]
on a different subject - that is a commmander 1911 is it not? 4" barrel? im fairly certain it is. i was wondering how reliable it is. I am about to purchase a commander 1911 as my CCW but do not know how well they perform. the praise or gripes would be appreciated!
very nice gun by the way |
|
|
|
[#8]
Yes, 4in barrel. CCW's pretty nice (I do appendix carry and it is just short enough where I can sit, drive, etc, with it). Uber reliable with FMJ and 99% with GoldDots. Here is my review www.ar15.com/forums/topic.html?b=5&f=49&t=22703 |
|
|
|
|
[#9]
For those of us too lazy to build one ourselves, would you be willing to sell one?
|
|
|
|
[#10]
I just found this thread. But my Dad, the retired cop and current carpenter (officially school larned in carpentry) and I are going to discuss this when he gets out of bed. |
|
|
|
|
[#11]
And this is easier/better than just using a holster at the range why again?
Real purty would look nice in some display but range tool, I think not. |
|
|
|
[#12]
would love to get some tips |
||
|
|
|
[#13]
The range I go to does not allow drawing from a holster (also only one round every five seconds, etc...) If you got any range recommendations in Miami, I am all ears. |
|
|
|
 Win a FREE Membership!
Sign up for the ARFCOM weekly newsletter and be entered to win a free ARFCOM membership. One new winner* is announced every week!
You will receive an email every Friday morning featuring the latest chatter from the hottest topics, breaking news surrounding legislation, as well as exclusive deals only available to ARFCOM email subscribers.

AR15.COM is the world's largest firearm community and is a gathering place for firearm enthusiasts of all types.
From hunters and military members, to competition shooters and general firearm enthusiasts, we welcome anyone who values and respects the way of the firearm.

Subscribe to our monthly Newsletter to receive firearm news, product discounts from your favorite Industry Partners, and more.
Copyright © 1996-2024 AR15.COM LLC. All Rights Reserved.
Any use of this content without express written consent is prohibited.
AR15.Com reserves the right to overwrite or replace any affiliate, commercial, or monetizable links, posted by users, with our own.


