|
Posted: 11/30/2011 4:11:39 PM EDT
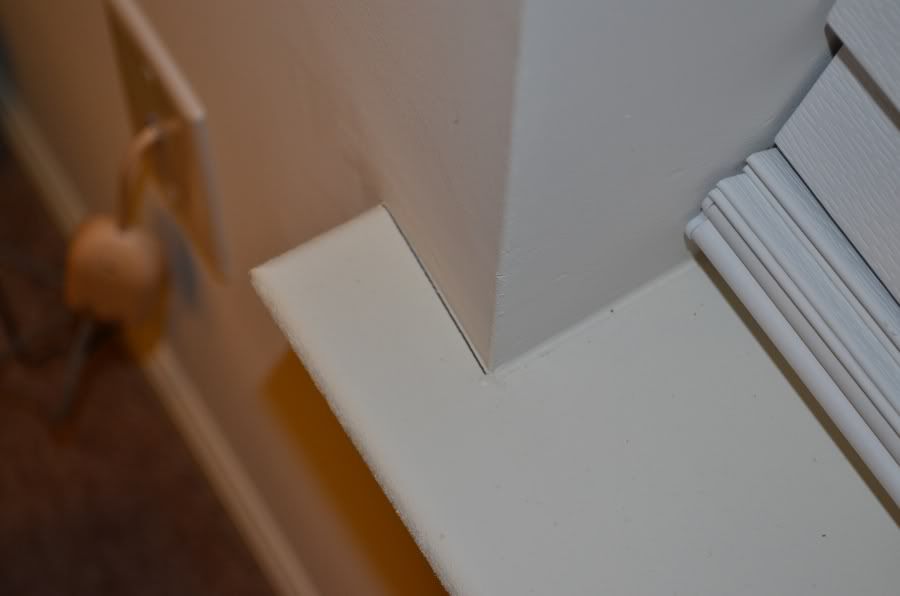
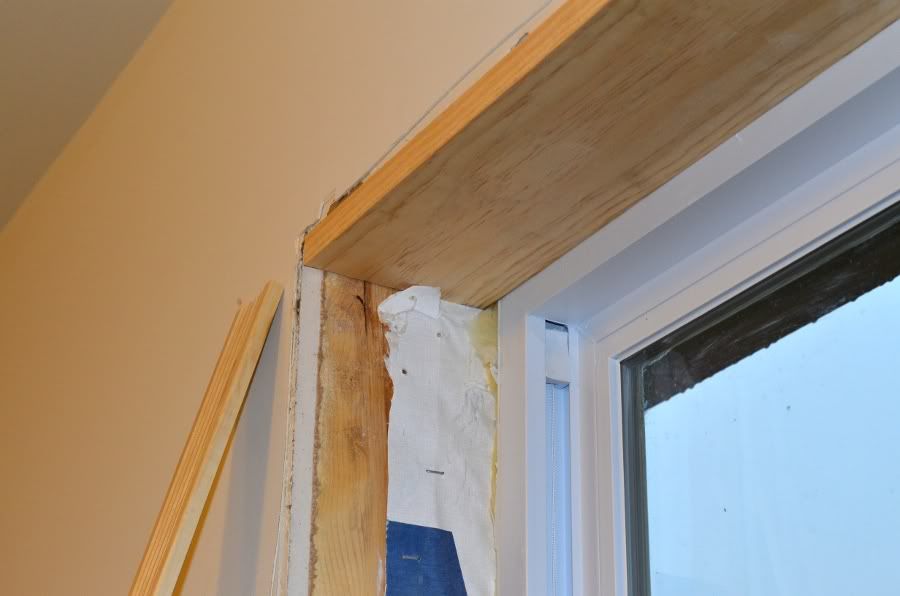
The pics will speak for themselves. I don't want to simply shim the trim I plan to put up since it'd take a quick glance at the apron to tell something is horribly crooked. Also, something that may be worth mentioning; on the left of the window I have an 1-1/8" of vinyl exposed between drywall and glass, while on the right it's probably closer to 3/4" or 5/8".
How do I fix this properly and the least obtrusive way possible? Once the drywall makes it to the header, it gets a lot better. The other side of the window is pretty much square. This pic does not do it justice, it looks a lot more of a dramatic sharp bow in person. The shadow tells it all. 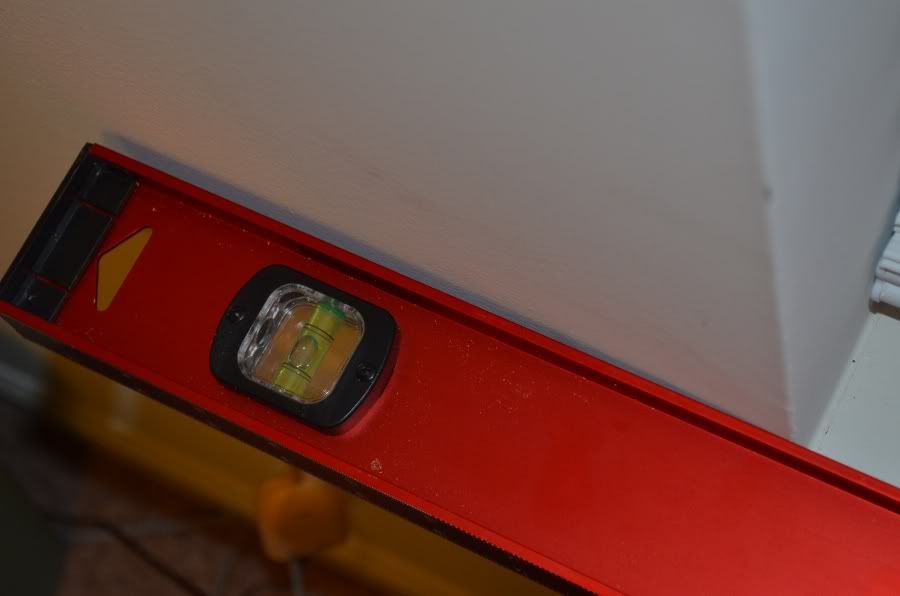
|
|
|
|
[#1]
Honestly, that's about as square as most houses are. You just work with it and do what you have to for a good result. If you put a square and a level most anywhere in most houses you can make yourself crazy in short order.

|
|
|
|
[#2]
Corners in houses aren't square. There is a corner bead applied to the drywall and then it is floated with mud. This creates the illusion of things being flat and square.
What exactly are you trying to do here? Just add casing over the drywall? |
|
|
|
[#3]
These are things I know guys

This picture does it justice. All I want to do is put trim around the window, and probably get rid of the drywall inside the casing and go with wood. ETA: The wall is straight up to the edge of the level. 
|
|
|
|
[#4]
What a lot of people don't see during the process of trimming out a house is the drywall smashing.
If you plan on adding extension jambs then you don't have to worry about those corner beads. Score them with a razor and smash them right out. Then smash and claw the drywall until it is square or at least out of the way of what you want to do. Add the jambs and then case. |
|
|
|
[#5]
Quoted:
What a lot of people don't see during the process of trimming out a house is the drywall smashing. If you plan on adding extension jambs then you don't have to worry about those corner beads. Score them with a razor and smash them right out. Then smash and claw the drywall until it is square or at least out of the way of what you want to do. Add the jambs and then case. Thanks for the help. I'm new to carpentry (I'm a metal guy ), but after years of watching my grandpa I find I'm pretty damn good at it. I'm just always unsure of what's right to do. No offense to you guys, I just have to remember a lot of butchering is involved haha.
|
|
|
|
[#6]
Ok, there is a trick to accomplishing what you want. When I did a lot of these (former general contractor) I could do a window in about 15 min. This is not rocket science, and don't try to over think it......
Cut your header piece (top of window) first and make it a bit snug. If you have to, scribe the piece to fit perfectly into the space, but put the cut side to the window, a little caulk will fill small gaps and paint well. You want to have to gently tap it into place, but not have to bang it! use a square and shims to get it square to the window casing as possible then finish nail into place, leave the shims! Do the same with the side pieces (vertical sides). Once all is fitted and you are happy, scribe and snap off shims and case the outside leaving 0-1/4 inch reveal, this is a personal call. From the pictures you posted, you have a wooden stool (many call this the sill, but the finished piece is called a stool). This may require a creative bit of thinking to blend the trim, or you may wish to replace it and leave the "wings" a bit longer to accommodate the new case frame. Feel free to PM me if you need any more help. |
|
|
|
[#7]
Quoted:
Ok, there is a trick to accomplishing what you want. When I did a lot of these (former general contractor) I could do a window in about 15 min. This is not rocket science, and don't try to over think it...... Cut your header piece (top of window) first and make it a bit snug. If you have to, scribe the piece to fit perfectly into the space, but put the cut side to the window, a little caulk will fill small gaps and paint well. You want to have to gently tap it into place, but not have to bang it! use a square and shims to get it square to the window casing as possible then finish nail into place, leave the shims! Do the same with the side pieces (vertical sides). Once all is fitted and you are happy, scribe and snap off shims and case the outside leaving 0-1/4 inch reveal, this is a personal call. From the pictures you posted, you have a wooden stool (many call this the sill, but the finished piece is called a stool). This may require a creative bit of thinking to blend the trim, or you may wish to replace it and leave the "wings" a bit longer to accommodate the new case frame. Feel free to PM me if you need any more help. His issue is that the casing would be angled back on each side of the window. The only way to fix that without using shims is to smash out the corner bead. Otherwise he would have to rip strips and apply them to the back of the casing to square everything up. |
|
|
|
[#8]
If he wants to case the inside of the window with wood and have a trim on the wall face, my instructions are right on. Bringing the wood out to be flush with the corner bead (metal corner over the dry wall) will allow the face trim to lie flush with the existing wall finish (or at least very caulkable). The other thing to consider is the width of the casing trim on the wall, too wide and the uneven surface will show too much, too thin looks silly and will show the angle. It is a balancing act of the right size and shape of the trim mixed with a little skill. Trust me, I have done hundreds of these in remodel situations.
|
|
|
|
[#9]
Quoted:
If he wants to case the inside of the window with wood and have a trim on the wall face, my instructions are right on. Bringing the wood out to be flush with the corner bead (metal corner over the dry wall) will allow the face trim to lie flush with the existing wall finish (or at least very caulkable). The other thing to consider is the width of the casing trim on the wall, too wide and the uneven surface will show too much, too thin looks silly and will show the angle. It is a balancing act of the right size and shape of the trim mixed with a little skill. Trust me, I have done hundreds of these in remodel situations. He only has 5/8" - 3/4" between the drywall return and the window on one of the sides. This will only be enough to fit an extension jamb flash to that wall. If he makes the edge of that flash with the corner, it still leaves and almost 1/4" gap between the wall and the casing (on the opposite side of the casing from the jamb) if he wants everything to fit square. That is far beyond an acceptable gap for caulking. Caulking should be used for blending seams not for covering mistakes. I am a builder/ GC as well with a heavy concentration in specialty carpentry. So I have a pretty good idea what I am doing to say the least. If he installs the casing against the wall the way it sits now, the casing will be angled back on all 3 sides causing the miters be to opened up. The other option is to run a level across the opening, measure the distance to the wall and rip strips to backband the outside part of the casing with. This will keep everything square and fill the gap. Bringing extension jambs flush with the corner bead does nothing to address the fact that the wall ramps back starting at the bead. |
|
|
|
[#10]
I plan to cut a line vertically in the drywall, slightly inset of the edge of the stool, and remove all drywall from that point over. My bad corner bead will be gone, jamb extensions will replace drywall, and the trim casing will cover the butchered out corner.
My only concern is that the window is offset in the opening and I don't know why. I'm only concerned because I'd rather not have to cut a new stool, I don't have a router.
You guys are great help |
|
|
|
[#11]
Quoted:
I plan to cut a line vertically in the drywall, slightly inset of the edge of the stool, and remove all drywall from that point over. My bad corner bead will be gone, jamb extensions will replace drywall, and the trim casing will cover the butchered out corner. My only concern is that the window is offset in the opening and I don't know why. I'm only concerned because I'd rather not have to cut a new stool, I don't have a router.
You guys are great help Window stool comes with the routered edge Take a picture of the full window Sounds like the right way is to smash out the drywall as necessary, install new jambs centering the window with a new stool barring that, smashing the drywall is the only way to get the result the op wants as I see it |
|
|
|
[#12]
Finally did this last night and today. Still have to putty and paint.
Cut out all the drywall 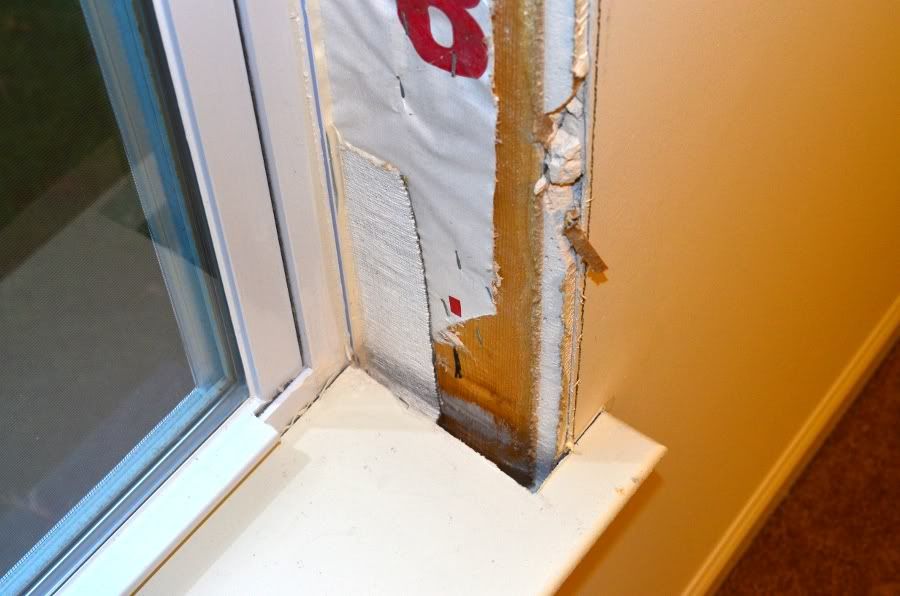
Top jamb fitment 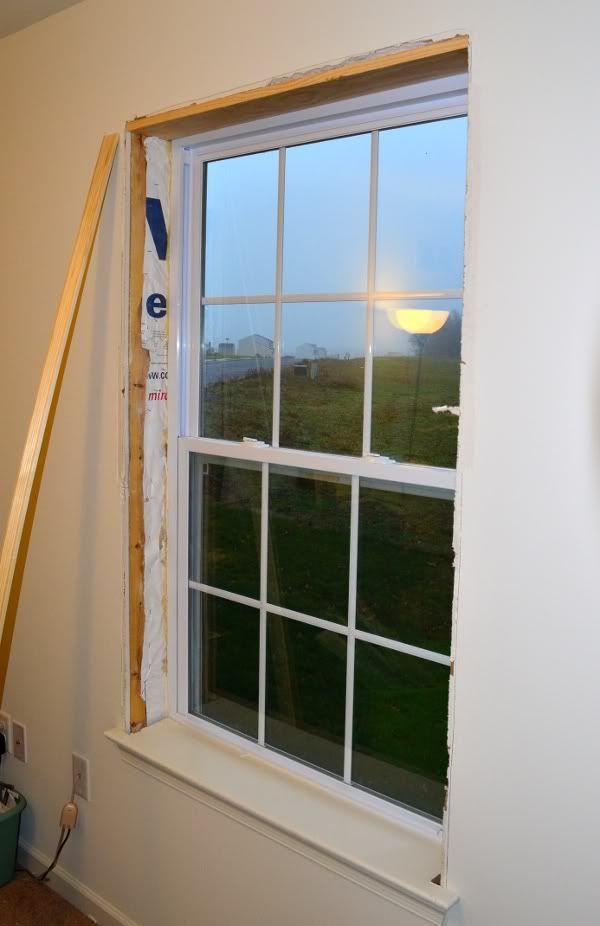
Window sill shaped and cut, side jambs in 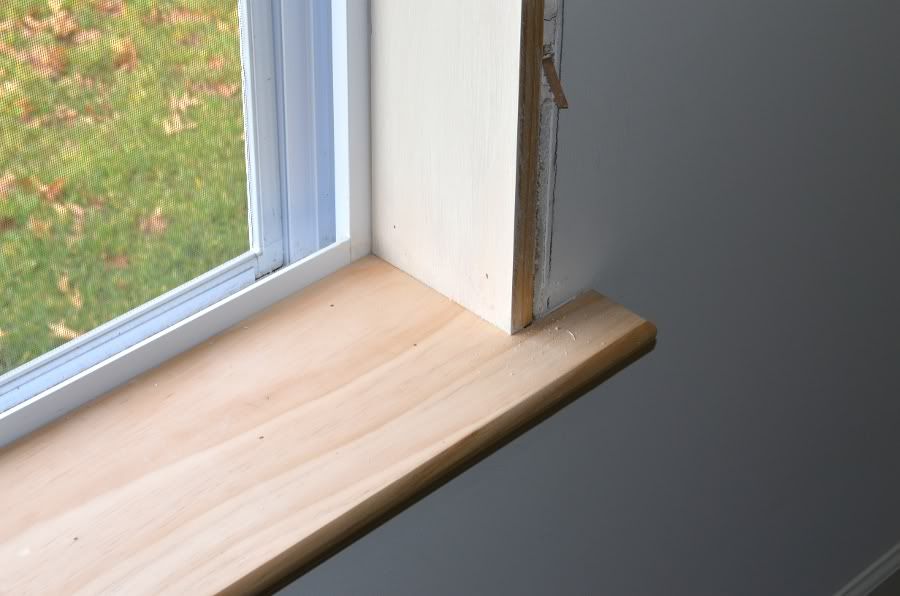
Everything up. The room is for my soon to be born daughter, it will be painted a lavender color. The trim should really pop. 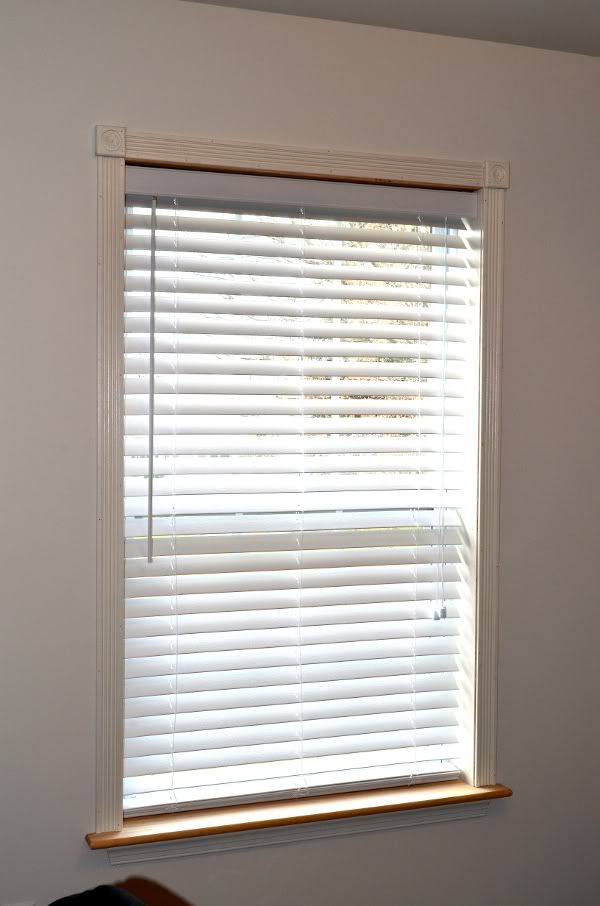
|
|
|
|
[#13]
wow - turned out great! looks professional to me!
|
|
|
 Win a FREE Membership!
Sign up for the ARFCOM weekly newsletter and be entered to win a free ARFCOM membership. One new winner* is announced every week!
You will receive an email every Friday morning featuring the latest chatter from the hottest topics, breaking news surrounding legislation, as well as exclusive deals only available to ARFCOM email subscribers.

AR15.COM is the world's largest firearm community and is a gathering place for firearm enthusiasts of all types.
From hunters and military members, to competition shooters and general firearm enthusiasts, we welcome anyone who values and respects the way of the firearm.

Subscribe to our monthly Newsletter to receive firearm news, product discounts from your favorite Industry Partners, and more.
Copyright © 1996-2024 AR15.COM LLC. All Rights Reserved.
Any use of this content without express written consent is prohibited.
AR15.Com reserves the right to overwrite or replace any affiliate, commercial, or monetizable links, posted by users, with our own.


