USA
|
[#1]
Originally Posted By corruptor:
Flashbang, are both of your cuts in the pan perpendicular to the bottom, or do you have the lead-in cut angled slightly to allow the base to drop in at the same time / slightly before the neck to avoid nose-dives? They are both cut 90 degrees to the pan bottom. First pan cut did employ a leading cut angle, however that turned out unnecessary and I squared it up. The key for clean drops: A pan cut window at least 1.25 inches wide. Bottom of the cut must be file/sanded flush with the bottom of the pan. Trailing edge of cut should have a smooth tapper, almost like a one sided knife edge. Pan set 1/8 inch behind feed ramp riser board. If this does not stop nose dives 100 percent, feed ramp angle needs adjustment and/or the feed ramp is set to high above bottom of pan. I have no issues at all with my machine annealing 30-06, 22-250, 300AAC, and .223Rem. |
|
|
CO, USA
|
[#2]
got the back door and feet on, my son says it's good enough and quit playing with it, but it's been fun tinkering with it.
http://vid1084.photobucket.com/albums/j412/rlporter507/M4H01516.mp4 |
|
|
VA, USA
|
[#3]
nice built, rlporter. I've got all the parts for mine and I've got the wiring all figured out I just need time to get in the shop and actually build the body for this thing. Seeing all the awesome completed builds out there is killing me! haha
|
|
|
VA, USA
|
[#4]
Great work to everybody developing this into a really well thought out home project.
I'd seen this thread before and was intrigued, read the whole thing front to back again a few days ago, saw the proximity sensor addition, and ordered all the parts Friday, I expect to be building by the middle of next week. A buddy of mine has a home machine shop, so I'm really focused on doing it up right, possibly over doing it. 
Thanks for all the info and the "I can do it myself cheaper" mentality that I identify with so much in this thread. |
|
|
|
[#5]
Thanks for everyone posting in this thread, hopefully I can get mine done this long weekend.
|
|
|
|
MO, USA
|
[#6]
I was thrilled to have found the link to all this great info. on the Cast Boolits forum. I have a rough version running to prove out the dimensions I used and in preparation for converting to the proximity sensor setup whenever my sensors show up. My main use will be annealing 8Kurz cases, both factory FNM and PPU as well as cases made from .308 doners. It's taken some doing to get mine working well since the Kurz cases are so short causing my drum to need to be quite shallow. I fabbed my own drum using a .050 aluminum strip and a 5" dia..050 back tigged together. My main board is tilted about 12 degrees which has given me the best feeding at about 90% so far. I think if I reduce the offset between the drum and the feed to much less than what I see on the various videos it'll get me closer to 100% function. That done I'll redo it all with the proximity sensor using some cabinet grade plywood that's still to be gotten instead of the crap construction grade stuff I used so far.
Wondering if anyone has used one of these machines for bottleneck cases as short as my 8X33 Kurz. Pete in St. Louis Sturmgewehr addicted! |
|
|
AL, USA
|
[#7]
Originally Posted By shortfal:...... snip...........
Wondering if anyone has used one of these machines for bottleneck cases as short as my 8X33 Kurz. Pete in St. Louis Sturmgewehr addicted! Almost. I anneal 6mm BR Norma which are only a tad longer than your cases. I set up my machine for .223 and .308, both much longer than the 6mm BR. But a simple shim cures the problem. If I'm set up for .223, it takes less than 10 seconds to fit my shim and be all set to anneal 6mm. Note that I have a case stop rod bent to be tucked into the annealing pan where it is not exposed to the torch. That is the key to fitting the shim so quickly. The shim is nothing more than a short piece of brass tubing with a piece of brass shim stock soldered on the end. Works great. Here's what it looks like: 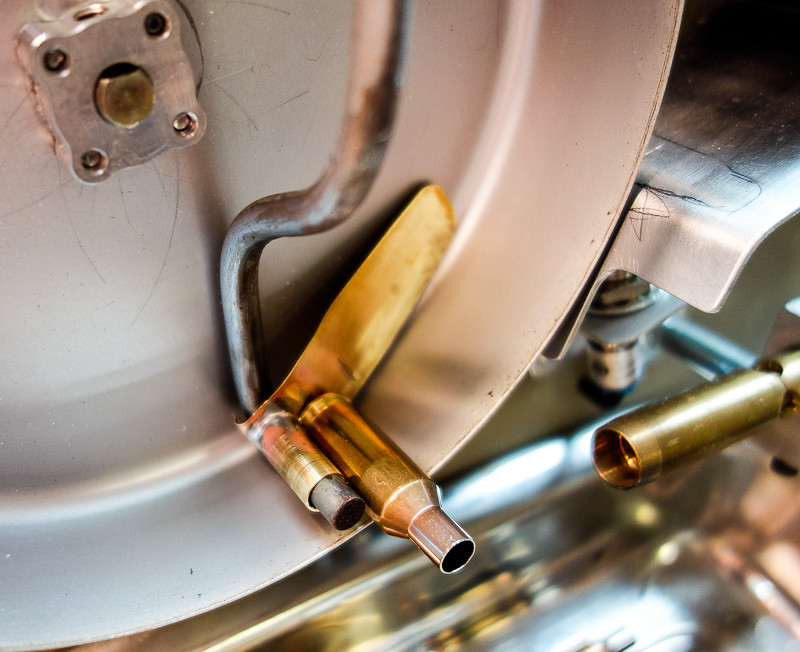 _DSC3380 _DSC3380
|
|
|
MO, USA
|
[#8]
Nice rig you built there! Had mine running today with good results. It's running off a little 300MA charger that is putting out about 16V that I had from some device. Running for a least 1.5 hrs. nothing got even warm. I'll need to cut more off the drum as I think I need to expose more of the case body below the shoulder. No torch mounted yet, just proving the feeding. Timing of the drum vs the feed is trickey as the feed slot can grab a case from right, left, or center of the stack of cases thereby making the case drop timing less than precise. I'm looking forward to the proximity setup eliminating that variable. Still need to get my torch setup and Tempilac.
Got some nice 6 ply plywood located at a local cabinet shop. Even as is is I think the guys at the gunclub meeting this week will be awestruck as I know some are annealing the old hard way. Pete |
|
|
AL, USA
|
[Last Edit: Mozella]
[#9]
Originally Posted By shortfal:
.... snip.... Timing of the drum vs the feed is trickey as the feed slot can grab a case from right, left, or center of the stack of cases thereby making the case drop timing less than precise. ....... snip............. Pete If you use the basic two-motor set up you have to adjust the feed motor speed correctly, but it's not really tricky. All you have to do is make sure the feed drum picks up a case and delivers it to the feed ramp AFTER the previous case has fallen into the annealing pan but BEFORE the annealing pan slot comes around the next time. In the first instance, you get a double-feed; BAD. In the second case where the next case arrives too late, you just waste some time as the annealing pan makes a rotation while it's empty; not so bad. Remember, the feed drum need not deliver a case to the feed ramp so that it continues directly into the annealing pan in one motion. That timing would indeed be tricky. Remember, the next case to go into the annealing pan should sit on the end of the feed ramp and it will be held there in the "waiting position" by the rotating annealing pan until the aperture comes around at which time it will fall into the annealing pan. Any time after that, the subsequent case can be delivered by the feed drum where it will wait at the end of the feed ramp for the next arrival of the aperture. As the machine processes cases, the timing may not remain perfectly in sync, but all you have to do is tweak the feed drum speed either a bit faster or slower to keep things running smoothly which is defined by one case for each rotation of the annealing pan; not two cases or not zero cases. Or, as others have pointed out, mount the proximity switch mod to solve the sync problem. |
|
|
MO, USA
|
[#10]
Good info. thanks. Got my proximity switches today though. Put one in and it's a pleasure to watch it do its thing. I got 2 just in case. Tried one on the bench first with just the motor and power supply. A case or other metal put against it would almost stop the motor but not quite. Shaft still turned VERY slow. Like it was "leaking" current. Put the other one in my machine and it shuts off totally just as it should.
Do not know what to think about that. Defective maybe? Likely to cost more to send back than it cost. Probably get another one or two for spares. Pete |
|
|
VA, USA
|
[#11]
Originally Posted By shortfal:
Good info. thanks. Got my proximity switches today though. Put one in and it's a pleasure to watch it do its thing. I got 2 just in case. Tried one on the bench first with just the motor and power supply. A case or other metal put against it would almost stop the motor but not quite. Shaft still turned VERY slow. Like it was "leaking" current. Put the other one in my machine and it shuts off totally just as it should. Do not know what to think about that. Defective maybe? Likely to cost more to send back than it cost. Probably get another one or two for spares. Pete If you use a relay between the motor and the switch, it would still work. Yes it is probably defective. |
|
|
MO, USA
|
[#12]
Got a few real small relays from a brain box of some sort out of some automotive electronics. Should have a real low draw coil.
Might put the speed controller back in too. Feed drum does not need to run full RPM as it does now. Fun stuff! Pete |
|
|
AL, USA
|
[#13]
I've annealed many thousands of cases with mine but usually a maximum of 150 cases per session. Recently I annealed 500 cases at once for a friend and a few days later I did a group of more than 600 cases for another friend. My pan drive motor stopped and it was indeed pretty hot. It ran OK after allowing it to cool, but I wanted a fix which would cure the problem.
I added a heat shield fabricated out of aluminum flashing material and added a computer cooling fan inside the box so that it blows on the annealing pan drive motor. I've tested these for functionality, but not for long term effectiveness; however, I expect they will do the job. Note that my case stop rod is bent so that it is mostly inside the annealing pan and out of the direct flame. That helps too. Note that my heat shield now sits low enough so that I can't get my normal catch pan under the annealing pan. Now I just position the whole unit on top of a large, deep, metal baking pan. That works OK, but if I were starting over, I would make the enclosure two inches higher with plenty of room along the bottom edge so that a catch pan would fit under the heat shield and also have enough room so that the cases will drop through and not jam up. New builders might give this some consideration. 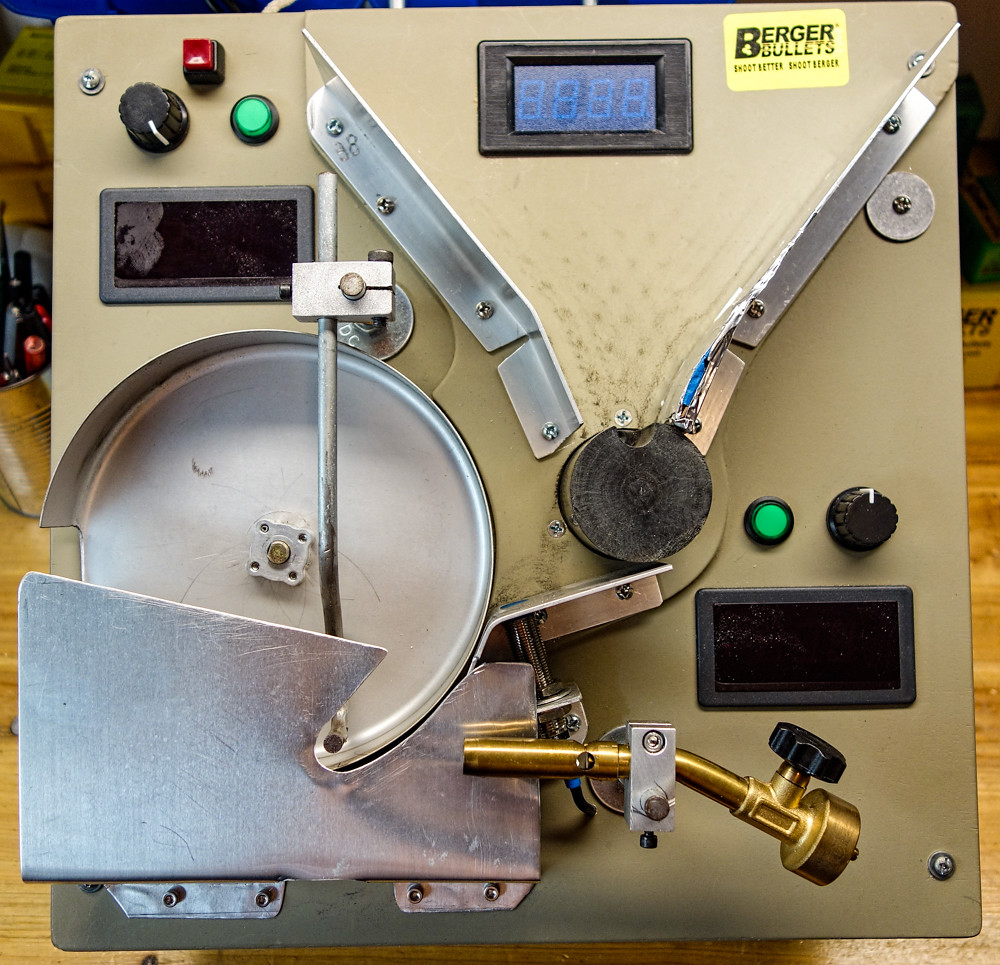 Shield (1 of 1) Shield (1 of 1)
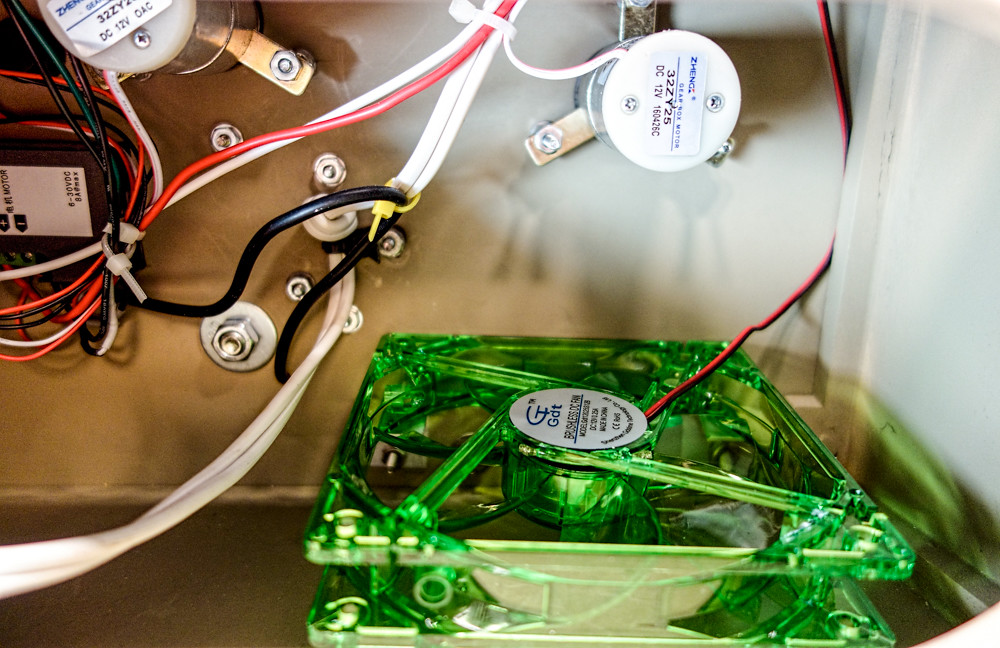 Fan (1 of 1) Fan (1 of 1)
|
|
|
AL, USA
|
[#14]
HEAT SHIELD PROGRESS REPORT: I did a few hundred cases the other day after installing the sheet aluminum heat shield, cooling fan, and new pan drive motor.
Before this mod, the motor eventually got pretty hot. No problems for 100 rounds, but when I did several hundred without stopping the motor got almost too hot to hold. Eventually it began to fail. I'm happy to report that the addition of the heat shield and internal cooling fan works well. The motor doesn't seem to heat up at all. I haven't tried to measure the temperature, but it feels close to room temperature when I touch it after a long run. So, if you will never do more than 100 cases in a batch, this mod isn't necessary. But if your red-neck friends come over with a bag of 600 or 700 cases which need annealing (and they don't even bring their own beer ), then consider the heat shield and fan mod.
|
|
|
MO, USA
|
[#15]
Originally Posted By Mozella:
HEAT SHIELD PROGRESS REPORT: I did a few hundred cases the other day after installing the sheet aluminum heat shield, cooling fan, and new pan drive motor. Before this mod, the motor eventually got pretty hot. No problems for 100 rounds, but when I did several hundred without stopping the motor got almost too hot to hold. Eventually it began to fail. I'm happy to report that the addition of the heat shield and internal cooling fan works well. The motor doesn't seem to heat up at all. I haven't tried to measure the temperature, but it feels close to room temperature when I touch it after a long run. So, if you will never do more than 100 cases in a batch, this mod isn't necessary. But if your red-neck friends come over with a bag of 600 or 700 cases which need annealing (and they don't even bring their own beer ), then consider the heat shield and fan mod.Interesting re the motor getting hot. Mine was too. Doing the short 8X33 Kurz cases probably made it worse to the point the motor got to where it was dragging/changing RPM. I bored out the center of the drum about 2.5 " dia. and riveted a I/8 inch thick piece of phenolic sheet over the hole with my 1/2 " drive shaft hole centered. That insulated the drum from the shaft to where the motor no longer gets hot. I did not have a fan handy but did have the phenolic sheet! Pete in St. Louis |
|
|
MO, USA
|
[#16]
Originally Posted By shortfal:
I should add that the heating problem showed up after I cut the drum wall 1/4" shorter than it had been to let more of the cases hang over the edge so the flame could hit the case more towards the shoulder/ body area. Pete Interesting re the motor getting hot. Mine was too. Doing the short 8X33 Kurz cases probably made it worse to the point the motor got to where it was dragging/changing RPM. I bored out the center of the drum about 2.5 " dia. and riveted a I/8 inch thick piece of phenolic sheet over the hole with my 1/2 " drive shaft hole centered. That insulated the drum from the shaft to where the motor no longer gets hot. I did not have a fan handy but did have the phenolic sheet! Pete in St. Louis Originally Posted By shortfal:
Originally Posted By Mozella:
HEAT SHIELD PROGRESS REPORT: I did a few hundred cases the other day after installing the sheet aluminum heat shield, cooling fan, and new pan drive motor. Before this mod, the motor eventually got pretty hot. No problems for 100 rounds, but when I did several hundred without stopping the motor got almost too hot to hold. Eventually it began to fail. I'm happy to report that the addition of the heat shield and internal cooling fan works well. The motor doesn't seem to heat up at all. I haven't tried to measure the temperature, but it feels close to room temperature when I touch it after a long run. So, if you will never do more than 100 cases in a batch, this mod isn't necessary. But if your red-neck friends come over with a bag of 600 or 700 cases which need annealing (and they don't even bring their own beer ), then consider the heat shield and fan mod.I should add that the heating problem showed up after I cut the drum wall 1/4" shorter than it had been to let more of the cases hang over the edge so the flame could hit the case more towards the shoulder/ body area. Pete Interesting re the motor getting hot. Mine was too. Doing the short 8X33 Kurz cases probably made it worse to the point the motor got to where it was dragging/changing RPM. I bored out the center of the drum about 2.5 " dia. and riveted a I/8 inch thick piece of phenolic sheet over the hole with my 1/2 " drive shaft hole centered. That insulated the drum from the shaft to where the motor no longer gets hot. I did not have a fan handy but did have the phenolic sheet! Pete in St. Louis |
|
|
TX, USA
|
[#17]
Question about the proximity switch - For the switch to work, does the case have to have a spent primer in it?
I thought I read somewhere in a product description about the switch sensing steel, so I didn't know if that was necessary or just simply a metallic object. |
|
|
|
[#18]
No, it doesn't need a primer. The empty brass works fine to trip it.
|
|
|
|
VA, USA
|
[#19]
Originally Posted By OlKev:
Question about the proximity switch - For the switch to work, does the case have to have a spent primer in it? I thought I read somewhere in a product description about the switch sensing steel, so I didn't know if that was necessary or just simply a metallic object. Nope, just metal. I tested mine with empty brass and the sensor worked fine |
|
|
MA, USA
|
[Last Edit: Smokewaggin]
[#20]
Been having a friend anneal for me, but he's about an hour away and I only see him once a month at best. Gathering the parts to give this a go myself now that my wife has gotten into shooting rifles more. I don't want to hand off a 5 gallon bucket of brass to my buddy and ask him to anneal so I figure I best get to it myself.
Anyone used UHMW Polyethylene rod stock for the case feed roller instead of Acetal(Delrin)? I have access to quite a bit of this type of Polyethylene in various diameters I can get HDPE Polyethylene and Acetal but only in 2.5 inch. It is at no cost to me, so I can have a bit of whichever I like. I'm only thinking of using the UHMW Poly as I can get it at 2 inches and under. |
|
|
VA, USA
|
[#21]
Originally Posted By Smokewaggin:
Been having a friend anneal for me, but he's about an hour away and I only see him once a month at best. Gathering the parts to give this a go myself now that my wife has gotten into shooting rifles more. I don't want to hand off a 5 gallon bucket of brass to my buddy and ask him to anneal so I figure I best get to it myself. Anyone used UHMW Polyethylene rod stock for the case feed roller instead of Acetal(Delrin)? I have access to quite a bit of this type of Polyethylene in various diameters I can get HDPE Polyethylene and Acetal but only in 2.5 inch. It is at no cost to me, so I can have a bit of whichever I like. I'm only thinking of using the UHMW Poly as I can get it at 2 inches and under. That would work. It doesn't get hot. Mine is made out of wood. |
|
|
MA, USA
|
[#22]
Originally Posted By snowshooter:
That would work. It doesn't get hot. Mine is made out of wood. Originally Posted By snowshooter:
Originally Posted By Smokewaggin:
Been having a friend anneal for me, but he's about an hour away and I only see him once a month at best. Gathering the parts to give this a go myself now that my wife has gotten into shooting rifles more. I don't want to hand off a 5 gallon bucket of brass to my buddy and ask him to anneal so I figure I best get to it myself. Anyone used UHMW Polyethylene rod stock for the case feed roller instead of Acetal(Delrin)? I have access to quite a bit of this type of Polyethylene in various diameters I can get HDPE Polyethylene and Acetal but only in 2.5 inch. It is at no cost to me, so I can have a bit of whichever I like. I'm only thinking of using the UHMW Poly as I can get it at 2 inches and under. That would work. It doesn't get hot. Mine is made out of wood. Thank you, I figured it would, but I know very little about plastics. |
|
|
|
[#23]
Originally Posted By Smokewaggin:
Thank you, I figured it would, but I know very little about plastics. Originally Posted By Smokewaggin:
Originally Posted By snowshooter:
Originally Posted By Smokewaggin:
Been having a friend anneal for me, but he's about an hour away and I only see him once a month at best. Gathering the parts to give this a go myself now that my wife has gotten into shooting rifles more. I don't want to hand off a 5 gallon bucket of brass to my buddy and ask him to anneal so I figure I best get to it myself. Anyone used UHMW Polyethylene rod stock for the case feed roller instead of Acetal(Delrin)? I have access to quite a bit of this type of Polyethylene in various diameters I can get HDPE Polyethylene and Acetal but only in 2.5 inch. It is at no cost to me, so I can have a bit of whichever I like. I'm only thinking of using the UHMW Poly as I can get it at 2 inches and under. That would work. It doesn't get hot. Mine is made out of wood. Thank you, I figured it would, but I know very little about plastics. Polyethylene is self-lubricating, it is typically easy to work (using woodworking tools, for the most part) and it tends to remain very dimensionally stable. Don't use too high a drill speed or feed the saw too fast, because you can generate heat and cause tools to bind. I would think the process to make the feed roller would be identical to the way folks have made their Delrin parts. (I'm not to the point that I need a machine to anneal my brass. I'm still using the cheap and easy method dryflash3 recommended. But I'm keeping my eyes open for this becoming "a thing" for me. )
|
|
|
|
VA, USA
|
[#24]
Originally Posted By GHPorter:
-snip- (I'm not to the point that I need a machine to anneal my brass. I'm still using the cheap and easy method dryflash3 recommended. But I'm keeping my eyes open for this becoming "a thing" for me. )You say that now, but the moment you load the machine with 100 pieces and it finishes before you would have finished applying the Tempilaq, that is a thing of beauty. |
|
|
MA, USA
|
[#25]
Originally Posted By GHPorter:
Polyethylene is self-lubricating, it is typically easy to work (using woodworking tools, for the most part) and it tends to remain very dimensionally stable. Don't use too high a drill speed or feed the saw too fast, because you can generate heat and cause tools to bind. I would think the process to make the feed roller would be identical to the way folks have made their Delrin parts. (I'm not to the point that I need a machine to anneal my brass. I'm still using the cheap and easy method dryflash3 recommended. But I'm keeping my eyes open for this becoming "a thing" for me. )Originally Posted By GHPorter:
Originally Posted By Smokewaggin:
Originally Posted By snowshooter:
Originally Posted By Smokewaggin:
Been having a friend anneal for me, but he's about an hour away and I only see him once a month at best. Gathering the parts to give this a go myself now that my wife has gotten into shooting rifles more. I don't want to hand off a 5 gallon bucket of brass to my buddy and ask him to anneal so I figure I best get to it myself. Anyone used UHMW Polyethylene rod stock for the case feed roller instead of Acetal(Delrin)? I have access to quite a bit of this type of Polyethylene in various diameters I can get HDPE Polyethylene and Acetal but only in 2.5 inch. It is at no cost to me, so I can have a bit of whichever I like. I'm only thinking of using the UHMW Poly as I can get it at 2 inches and under. That would work. It doesn't get hot. Mine is made out of wood. Thank you, I figured it would, but I know very little about plastics. Polyethylene is self-lubricating, it is typically easy to work (using woodworking tools, for the most part) and it tends to remain very dimensionally stable. Don't use too high a drill speed or feed the saw too fast, because you can generate heat and cause tools to bind. I would think the process to make the feed roller would be identical to the way folks have made their Delrin parts. (I'm not to the point that I need a machine to anneal my brass. I'm still using the cheap and easy method dryflash3 recommended. But I'm keeping my eyes open for this becoming "a thing" for me. )I was going to use a router bit on my variable speed dremil-ish tool for the feed roller. It was either that or a fine tooth hand saw of some kind. This thread is one of the most interesting threads I've found regarding reloading. I started reading it from start to finish and it is interesting to see the solutions/improvements people come up with. One of the first things I thought of before I was a couple pages is was a proximity sensor for the case feeder to eliminate the second controller and saving a few $. I made a mental note and kept reading. I was also considering the need for a way to cool the motors if I decided to complete enclose the case/internals, computer case fans popped in my head as I have a few laying around. While trying to figure out how to make the cake pan adjustable to accept the larger caibers (30-06 & 300WM in my case). I thought about just cutting off the lip of the cake pan and adding a round tupperware container top(or two) to go from 30-06 to 223 to 300blk All of these issues were already considered and solved before I got to the end. Pretty awesome. |
|
|
ME, USA
|
[#26]
Hello everyone. I'm looking for some help with the NPN Proximity switch I got off ebay.
I have flowed the instruction on this forum but i can't get it to switch the motor on and off. Maybe broken or wrong switch or I'm a idiot. Just looking for some input before i order a new one thanks. |
|
|
|
[#27]
Originally Posted By lundstrom9374: Hello everyone. I'm looking for some help with the NPN Proximity switch I got off ebay. I have flowed the instruction on this forum but i can't get it to switch the motor on and off. Maybe broken or wrong switch or I'm a idiot. Just looking for some input before i order a new one thanks. That's been addressed in this thread somewhere. So read the whole thread unless you get a quick answer. |
|
|
|
|
[#28]
I haven't see much info regarding the round counter? Does anyone have more info?
|
|
|
|
USA
|
[#29]
Originally Posted By lundstrom9374:
Hello everyone. I'm looking for some help with the NPN Proximity switch I got off ebay. I have flowed the instruction on this forum but i can't get it to switch the motor on and off. Maybe broken or wrong switch or I'm a idiot. Just looking for some input before i order a new one thanks. Go to page 21 and read my post. I also have a wiring diagram posted. |
|
|
VA, USA
|
[#30]
Shouldn't be too hard to wire in. I rigged a round counter to my xl650 press. I'd just get a cheap punch counter off ebay and install another proximity sensor on the ramp.
|
|
|
MA, USA
|
[Last Edit: Smokewaggin]
[#31]
Originally Posted By lundstrom9374:
Hello everyone. I'm looking for some help with the NPN Proximity switch I got off ebay. I have flowed the instruction on this forum but i can't get it to switch the motor on and off. Maybe broken or wrong switch or I'm a idiot. Just looking for some input before i order a new one thanks. It is quite possible the switch is bad. I just started putting mine together this AM and I'm running into a problem as well. The light on both of the proximity switches works, and will turn off when I put a case near it but I can't get it to turn on the motors at all. As a test I hooked up a 16 inch strip of LED roll lights, they are bright when hooked directly to the power supply. When run through the switches, one won't even turn on the LED's, the other switch lights them up but they are extremely dim. The switches are letting little to no power through them. I did ensure I had the voltage nob on the power supply turned all the way up. update: Found my Multimeter, one switch only allows 4 volts through, the other 8. Power supply with the voltage turned all the way up puts out 13.6 |
|
|
|
[#32]
Originally Posted By Smokewaggin:
update: Found my Multimeter, one switch only allows 4 volts through, the other 8. Power supply with the voltage turned all the way up puts out 13.6 Yep, those switches are bad. Send 'em back for replacements. The way these gadgets work, you should get only a very small loss (if any you can measure with a quick multimeter test) when the switch is "closed" (conducting). |
|
|
|
OH, USA
|
[Last Edit: MrBottleneck]
[#33]
Hi, new member first post. Joined for help on my annealing machine I am building. If not to much trouble I have a few questions.
1. Where is everyone getting the Acetal bar stock at a cheap price. I checked Grainger as that was mentioned somewhere in this thread but, they only seem to sell 8' pieces at a ridiculous price. Is Skip or anyone else making these pieces still like earlier in the thread? 2. Since the OP recommended the motors with 8mm motor shafts how are you attaching the plastic (acetal) drum shell feeder to it? Most motor shafts have a flat for a set screw or wedge. So, are you tapping the plastic and installing a set screw for solid mounting to motor shaft? 3. Watched Skips recent version 2.0 and I loved the idea of the shell stopping rotation of the shell drum feeder until it moves. I looked throught the thread but, could find out how this is done and how its wired up. What parts are needed etc? Thanks for the help in advance. Mike |
|
|
MA, USA
|
[Last Edit: Smokewaggin]
[#34]
Originally Posted By MrBottleneck:
Hi, new member first post. Joined for help on my annealing machine I am building. If not to much trouble I have a few questions. 1. Where is everyone getting the Acetal bar stock at a cheap price. I checked Grainger as that was mentioned somewhere in this thread but, they only seem to sell 8' pieces at a ridiculous price. Is Skip or anyone else making these pieces still like earlier in the thread? 2. Since the OP recommended the motors with 8mm motor shafts how are you attaching the plastic (acetal) drum shell feeder to it? Most motor shafts have a flat for a set screw or wedge. So, are you tapping the plastic and installing a set screw for solid mounting to motor shaft? 3. Watched Skips recent version 2.0 and I loved the idea of the shell stopping rotation of the shell drum feeder until it moves. I looked throught the thread but, could find out how this is done and how its wired up. What parts are needed etc? Thanks for the help in advance. Mike Try MSC Industrial supply, They have decent prices most stuff. I ordered my angled aluminum and a few other bits and bobs from them. I was going to order Acetal stock from them but I had a buddy set me up with some Poly. They had a good price on the 750 Tempilaq so I ordered it from them as well. They also had a 20% off coupon l found. You can also get a 20% coupon for creating an account or signing up for e-mail alerts I forget which. The shipping wasn't silly, even with the aluminum angle. For the shell feeder that starts/stop that is a Proximity Sensor Switch (LJ12A3-4-Z/AX DC 6-36V NPN NC 4mm Inductive Proximity Sensor Switch to be exact). I think it starts about page 16 and the conversation is off/on again through page 21 or so. Couple people post how to wire them up and whatnot. |
|
|
OH, USA
|
[#35]
Awesome thanks for the link on the tidbits and part number to the sensor.
How did you go about mounting the poly drum shell feeder to the motor shaft? Did you simply just drill an 8mm hole then either epoxy it on or use a set screw tapped into the poly? |
|
|
|
[#36]
Originally Posted By MrBottleneck: Awesome thanks for the link on the tidbits and part number to the sensor. How did you go about mounting the poly drum shell feeder to the motor shaft? Did you simply just drill an 8mm hole then either epoxy it on or use a set screw tapped into the poly? |
|
|
|
|
[#37]
Originally Posted By MrBottleneck:
Hi, new member first post. Joined for help on my annealing machine I am building. If not to much trouble I have a few questions. 1. Where is everyone getting the Acetal bar stock at a cheap price. I checked Grainger as that was mentioned somewhere in this thread but, they only seem to sell 8' pieces at a ridiculous price. Is Skip or anyone else making these pieces still like earlier in the thread? I ordered a 12" piece through McMaster-Carr or Grainger, it's out there. 2. Since the OP recommended the motors with 8mm motor shafts how are you attaching the plastic (acetal) drum shell feeder to it? Most motor shafts have a flat for a set screw or wedge. So, are you tapping the plastic and installing a set screw for solid mounting to motor shaft? Thats how I did mine, friction fit with a set screw back up. 3. Watched Skips recent version 2.0 and I loved the idea of the shell stopping rotation of the shell drum feeder until it moves. I looked throught the thread but, could find out how this is done and how its wired up. What parts are needed etc? It's just a couple pages back. Thanks for the help in advance. Mike |
|
|
|
|
[Last Edit: RLR350]
[#38]
Originally Posted By MrBottleneck:
Awesome thanks for the link on the tidbits and part number to the sensor. How did you go about mounting the poly drum shell feeder to the motor shaft? Did you simply just drill an 8mm hole then either epoxy it on or use a set screw tapped into the poly? For the round plastic rod search "2xmh9." That is the Grainger part number for the 12"x2" acetal rod. I don't remember what the diameter used in the project is, but Grainger has it. The rod connects to the motor shaft with pressure and I backed it up with a set screw tap though the plastic. Good luck. |
|
|
|
OH, USA
|
[#39]
Thanks everyone.
I followed your red and black build RLR350 you did a really nice job. |
|
|
|
[Last Edit: ws-6]
[#40]
a couple of questions for you Mozella:
do you have something that shows the shape and dimensions of what you used to cut the 2nd front piece (the one on the outside)? also have you tried to do 308 or -06 cases yet? if so, is the original channel you cut in the feed drum fine or would it need to be enlarged? also how may 5.56 cases can you get in your hopper at once? ETA: so if you go to amazon and order that cake pan that everyone referenced, the most popular item that was bought with it (and they are even including a bundle with it) is a 12v motor controller.....I wonder where most of these pans have wound up |
|
|
|
|
[Last Edit: RLR350]
[#41]
Originally Posted By ws-6:
a couple of questions for you Mozella: do you have something that shows the shape and dimensions of what you used to cut the 2nd front piece (the one on the outside)? also have you tried to do 308 or -06 cases yet? if so, is the original channel you cut in the feed drum fine or would it need to be enlarged? also how may 5.56 cases can you get in your hopper at once? ETA: so if you go to amazon and order that cake pan that everyone referenced, the most popular item that was bought with it (and they are even including a bundle with it) is a 12v motor controller.....I wonder where most of these pans have wound up I'll answer a couple. If you cut the slot on the feeder drum just right it will be slightly wider than 223, but not so big it allows two of them in and big enough for a 308. If done at the right width it will handle 223, 300, 308 and 30-06. I measured mine at 29/64, but I think I did it with a 7/16 router bit and widened it with a file to fit, eventually getting to 29/64. I put over 250 223 cases in my feeder. The size of the hopper won't be the limiting factor. The tilt of the cases from being angled will eventually be too great so the cases will fall out if stacked too high. I didn't have any problems with the weight of the cases resting on the feed drum. |
|
|
|
|
[#42]
Thx rlr. I asked about the drum slot because he used a drill bit in a press to do his. I don't have a router but do have a press. He also didn't cut the slot all the way through which I was planning on also doing.
On the feeder though, I didn't even think about the taper of the case bodies. Thx for that |
|
|
|
|
[#43]
Originally Posted By RLR350:
For the round plastic rod search "2xmh9." That is the Grainger part number for the 12"x2" acetal rod. I don't remember what the diameter used in the project is, but Grainger has it. The rod connects to the motor shaft with pressure and I backed it up with a set screw tap though the plastic. Good luck. Originally Posted By RLR350:
Originally Posted By MrBottleneck:
Awesome thanks for the link on the tidbits and part number to the sensor. How did you go about mounting the poly drum shell feeder to the motor shaft? Did you simply just drill an 8mm hole then either epoxy it on or use a set screw tapped into the poly? For the round plastic rod search "2xmh9." That is the Grainger part number for the 12"x2" acetal rod. I don't remember what the diameter used in the project is, but Grainger has it. The rod connects to the motor shaft with pressure and I backed it up with a set screw tap though the plastic. Good luck. Any time you need something from Grainger - search online for the item through Zoro Tools. Zoro is the web outlet store for Grainger and can often save you 20-30% |
|
|
|
|
[#44]
Originally Posted By ProfGAB101:
Any time you need something from Grainger - search online for the item through Zoro Tools. Zoro is the web outlet store for Grainger and can often save you 20-30% That's great to know. Zoro has really great prices, especially compared to Grainger's online prices. |
|
|
|
OH, USA
|
[#45]
Where can I get these parts in USA? I can't make them
|
|
|
|
[#46]
Originally Posted By ppcblaster:
Where can I get these parts in USA? I can't make them Which parts? Al most all the parts require some kind of altercation to them to be used. Ie the cake pan needs cut down, the feed drum needs to be cut, bored, tapped, and slotted, etc. Most of it can be done with hand tools but you will need a drill press for some parts Posted Via AR15.Com Mobile |
|
|
|
|
[#47]
Originally Posted By ws-6:
Which parts? Al most all the parts require some kind of altercation to them to be used. Ie the cake pan needs cut down, the feed drum needs to be cut, bored, tapped, and slotted, etc. Most of it can be done with hand tools but you will need a drill press for some parts Posted Via AR15.Com Mobile Originally Posted By ws-6:
Originally Posted By ppcblaster:
Where can I get these parts in USA? I can't make them Which parts? Al most all the parts require some kind of altercation to them to be used. Ie the cake pan needs cut down, the feed drum needs to be cut, bored, tapped, and slotted, etc. Most of it can be done with hand tools but you will need a drill press for some parts Posted Via AR15.Com Mobile Yeah PPCShooter, if you don't have all of the tools, do have friends with tools? Maybe a group build? Or harbor freight tools? |
|
|
|
AL, USA
|
[#48]
Originally Posted By ws-6:
a couple of questions for you Mozella: do you have something that shows the shape and dimensions of what you used to cut the 2nd front piece (the one on the outside)? also have you tried to do 308 or -06 cases yet? if so, is the original channel you cut in the feed drum fine or would it need to be enlarged? also how may 5.56 cases can you get in your hopper at once? ETA: so if you go to amazon and order that cake pan that everyone referenced, the most popular item that was bought with it (and they are even including a bundle with it) is a 12v motor controller.....I wonder where most of these pans have wound up By "2nd front piece" do you mean the sheet aluminum heat shield? No pattern because each Skip Design machine is different. After my annealing pan motor cooked itself to death, I added that shield plus a computer fan inside the case. Now the motor stays nice and cool. Each person will have to custom fit their own shield if they think they need one. Start with a piece of 8.5x11" paper, some masking tape, and a pair of scissors. I used a 1/2" Forstner bit to cut my feed drum slot. It works for .223, .308, and 6mm BR. I haven't tested other cases. I haven't counted exactly how many cases fit into my hopper, but I think for .223 brass it's around 150 or so. The brass has more of a tendency to "bridge" just above the feed drum because of the weight of the brass in the hopper when it's absolutely full. So I generally load 30 rounds or so, start the machine, and then feed in cases as necessary to keep the hopper roughly somewhere between 20 rounds and 100 rounds. |
|
|
|
[#49]
Flashbang1 or Mozella,
how tall and how wide is the front of your aneallers? did you use the 13x13 dimension or make it slightly bigger? |
|
|
|
USA
|
[#50]
Originally Posted By ws-6:
Flashbang1 or Mozella, how tall and how wide is the front of your aneallers? did you use the 13x13 dimension or make it slightly bigger? Rough face is 12 x12 inches. Sides are 4.5 inches wide on top, 7.5 inches on bottom which gives a optimum tilt angle of 14 degrees. Floor is flush in front, no need to extend like some builds. Holds about 210 5.56mm/.223 cases. Little blue Nasty on the job working some 30-06 cases. 
|
|
|
 Win a FREE Membership!
Sign up for the ARFCOM weekly newsletter and be entered to win a free ARFCOM membership. One new winner* is announced every week!
You will receive an email every Friday morning featuring the latest chatter from the hottest topics, breaking news surrounding legislation, as well as exclusive deals only available to ARFCOM email subscribers.

AR15.COM is the world's largest firearm community and is a gathering place for firearm enthusiasts of all types.
From hunters and military members, to competition shooters and general firearm enthusiasts, we welcome anyone who values and respects the way of the firearm.

Subscribe to our monthly Newsletter to receive firearm news, product discounts from your favorite Industry Partners, and more.
Copyright © 1996-2024 AR15.COM LLC. All Rights Reserved.
Any use of this content without express written consent is prohibited.
AR15.Com reserves the right to overwrite or replace any affiliate, commercial, or monetizable links, posted by users, with our own.


